Workshop Mastery with Jimmy DiResta: A Guide to Working with Metal, Wood, Plastic, and Leather - Jimmy DiResta, John Baichtal (2016)
Chapter 2. Woodshop Mastery
My first and greatest love as a maker has always been working with wood. As long as I can remember I’ve stood in front of band saws and drill presses. I’ve created a lot of very fun projects, but also numerous practical and useful projects.
You can see both kinds of projects in this chapter. I’ll share four cool items I built in my woodshop, beginning with a large set of oak and mahogany tool drawers, then moving on to a dovetailed bench I created out of a massive piece of hardwood. From this practical and large-scale beginning I move on to two more whimsical projects. I describe transforming an ordinary shipping pallet into a toolbox, carefully extracting the boards from the pallet so as not to damage them, then trimming and planing them into usable material. The final project of the chapter, the Gattar (Figure 2-1) merges an electric guitar into an AK-47 to create a unique musical instrument.
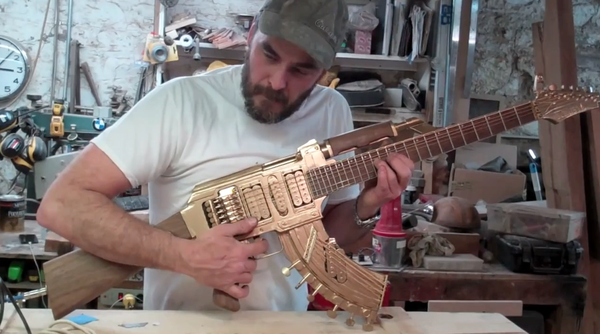
Figure 2-1. I’ll show you how I built my Gattar, an electric guitar shaped like a rifle
Before the projects, however, I’ll cover some of my favorite tools, including much of the equipment I used to build these four projects.
Tools
I use these tools on a daily basis in my shop, and maybe they could be useful to you.
Chisel
I keep my chisels sharp and polished. I have a straight set as well as a set of sexy carving chisels. My dad bought the carving set when I was 11 years old, but I was too intimidated to use them until I was a teenager. Those are my good chisels. No one’s allowed to touch them.
I use a piece of wood as the hammer. It’s the cutout from a guitar I made in 1985. I kept it, and it’s always been my tap hammer when I do carving. It’s just a scrap of wood I picked up, and I’ve used it for 30 years.
Compound Miter Saw
Sometimes called a chop saw, a sliding compound miter saw is a circular saw that can be chopped down at materials, but can also be pulled back more than a foot to cut wider lengths of wood like a radial arm saw. You can cut bevels, angles, and compound bevels. I use a DeWalt 12” saw, seen in Figure 2-2, and it runs about $600.
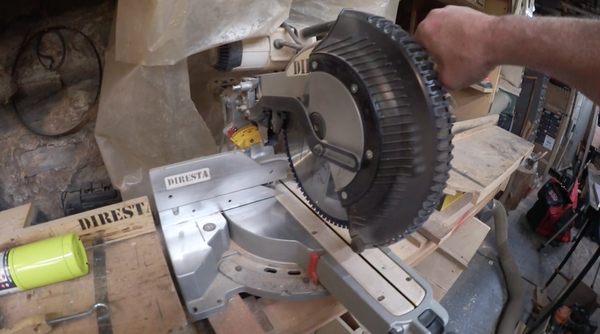
Figure 2-2. The compound miter saw makes precise cuts in smaller pieces of wood
Cordless Drill
I keep a bunch of cordless drills around. I organize them in sets of two: one regular drill with high and low speeds, as well as a hammering action for drilling into masonry. For driving screws I use a 20 V cordless impact driver, and it accepts standard-sized hex bits.
I feel like the technology is such that pretty much any cordless drill is just as good as any other. People ask me which drill to buy, and I tell them to choose the one that’s their favorite color.
Drill bits
I use a variety of bits in my work:
Standard
I have tons of partial sets of standard bits lying around. It’s just cheaper to buy a new set than purchase individual bits. Sets are divided into good and bad sets. A good set is one that has all the bits, and I can bring it to a job site with the expectation that there will be none missing.
Countersinks
These bore a wider hole around the main one, so the screws can be set flush against the surface of the material. I always have a jar of countersinks handy.
Step bits
Used for drilling wider holes in sheet metal. I bring a package of these to every job site.
Forstner bits
My clean set of Forstner bits is labeled DO NOT USE, and that applies to everyone in the shop but me. Of all the methods I’ve tried, these bits are the best for cutting big holes in wood.
Spade bits
Another way of making a big hole is a spade bit, which I keep around but almost never use. The holes they make are just too rough, and I mostly use them for sheetrock.
Festool Domino Joiner
This system makes the process of connecting two pieces of wood together with pegs very quick, very sure, and totally repeatable. You simply press the machine into the material and it carves out mortises that precisely match the tenons you buy with the machine. I generally don’t buy Festool because it’s expensive; this tool is around $950. However, it was a gift from my girlfriend, and it really has improved my workflow.
Dust Collection System
I use a couple of different methods to keep dust in my shop at a minimum. My Harbor Freight system (seen in Figure 2-3) is primarily connected to the back of my table saw, which is the main thing in the shop that generates a lot of dust.
I also use a couple of smaller, portable dust systems, which essentially consist of shop vacs that you can hook up to your tool. For instance, my palm sander has a dedicated hose that plugs into the back of the tool. I use these around the shop when it would be too inconvenient to use the main collector.
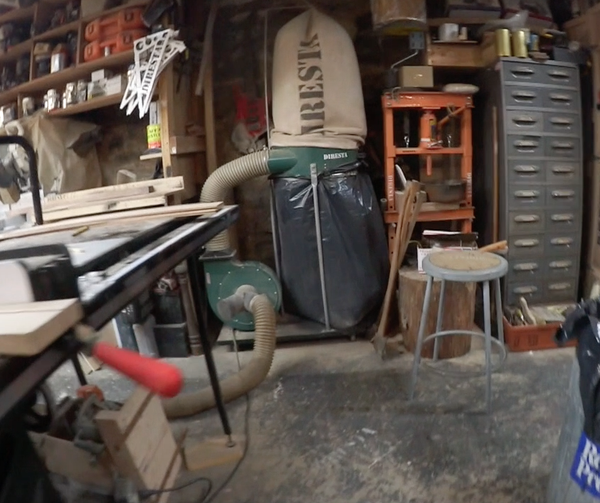
Figure 2-3. My Harbor Freight dust collection system mostly cleans up after my table saw
Hammers
I keep a variety of hammers on hand, depending on what I’m trying to hammer. I have regular and small-sized steel hammers, ones with brass and lead heads for working with softer materials that might be damaged by steel, as well as even softer ones like rubber, leather, and wood mallets.
Planer
I bought the Delta planer in Figure 2-4 brand new, maybe in 1990. I’ve changed the blades a bunch of times over the years, and along the way learned not to put timbers I found on the street through this tool without inspecting them first. I’ve passed 3×10 beams through this thing, and they’re all full of concrete dust and basically ruin the blade immediately.
In storage I have a Rigid planer and a DeWalt planer, and they all work pretty much the same and have the same amount of snipe. This is where the beginning or end of the board gets pinched as it runs through the planer. I solve this by pushing the main board through with a sacrificial board of the same thickness.
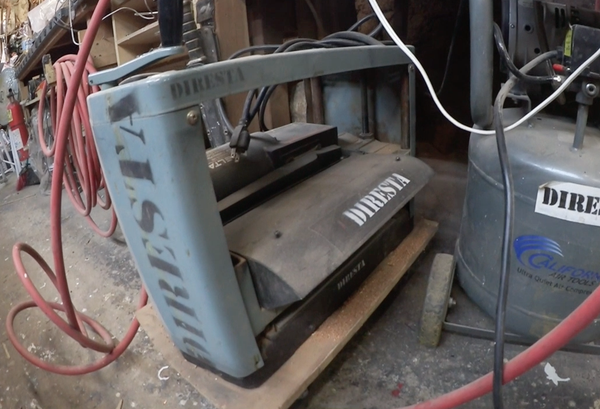
Figure 2-4. The Delta planer smooths down pieces of wood
Router
These rotary tools carve away material using bits that look a lot like drill bits. I keep a compact DeWalt router in the shop. It’s a 1.25 HP, which is strong enough for most uses. When that’s not the case, I have a heavier DeWalt that packs 2.25 HP and includes a built-in dust collector that sucks up most of the sawdust generated by this tool.
Router bits
Popular types of bits include straight, dado, rabetting, flush trim, and dovetail, and I try to keep a wide variety around. I have a huge drawer of router bits that I got from around three shop buyouts. People ask me how I organize my router bits and I send them a picture of my drawer. It’s not a rock tumbler—the bits don’t move around much in the drawer. I keep a second drawer with the router’s wrenches and other attachments, plus I include a handful of bits that are currently my sharpest and best of each type. After so many systems and boards with holes in them, this is the system for me.
Pneumatic Brad Nailer
I use these nailers all the time for keeping things in place when I’m gluing up. I use both small 23-gauge nailers as well as larger-sized 18-gauge ones. They’re so easy to pop a nail in at a moment’s notice. People ask what are the best brands, and Porter Cable and Bostich seem to be the ones that don’t break.
Hand Saws
My go-to is a little crosscut saw I got from Lee Valley. I keep the blade free of rust and the blade-guard on, so it has stayed the sharpest the longest of all my saws, and I use it for fine cutting. I keep a larger DeWalt saw around for rough stuff. I also keep one in the truck in case I spot a piece of lumber and don’t want the whole thing.
I have an antique Disston hand saw from the 1950s. I liked the saw because of the history of it, and I bought it from an antique shop in Alabama. It turned out to be quite sharp, and I use it for fine cuts.
People always ask me, why do I hand saw stuff so much? One reason might be simply to stay in practice. Sometimes it’s easier just grabbing a saw and making a few swipes than running an electrical cord.
I also use small dovetailing saws and get them from the Home Depot for 13 bucks. Whenever one of them gets dinged up, I just throw it in my junk drawer.
Sawzall
I have five of these reciprocating saws. It’s the sort of thing people buy and never use and then ask me, “Hey, can you use this tool?” So I inherit a bunch of them. They’re perfect for cutting apart pallets and rough work like cutting into a wall. However, I’ve found them to be useful for fine work in certain circumstances. For instance, I like to use a sawzall to finish a cut on a thing too thick for a table saw. I cut it on the top and bottom with the table saw, finish the cut with the sawzall, then clean up the cut so no one can tell.
SawStop Table Saw
I’ve used many different table saws over the years, but I really like my SawStop, the 3HP Professional unit seen in Figure 2-5. It’s pretty heavy-duty and I can’t stall it, no matter how hard I push wood through it.
It’s got a 36” fence, which is great because I can cut pretty much anything. The most notable feature of the SawStop involves a safety mechanism that shuts down instantly if the blade is touched while spinning. Because of the physical needs of this brake, the arbor and bearings are much stronger and more durable that most table saws I’ve used.
Another clever feature consists of a two-part guard that flips over the blade, protecting you from flying wood chips while also marking the blade’s height. It also has an attachment to my dust collection system, so sawdust is hoovered away as I cut.
SawStop gave me this saw for free, and I thank them because I really like it.

Figure 2-5. The SawStop table saw includes a touch-sensitive safety brake
Hand Planes
These tools help smooth down areas of wood, prior to sanding. I use my Veritas shoulder plane for cheeks and tenons. However, my latest acquisition is a Lie-Nielsen Np. 610 low-angle jack rabbet plane. The blade goes to the very edge of the plane, allowing me to get down into corners with it. My go-to hand plane is the low-angle block plane from Veritas.
Glues
Wood Glue
I mostly use yellow carpenter’s glue repackaged into small squeeze bottles I get from the restaurant supply store down the block. The bottles I get from the glue company usually aren’t very usable. Brandwise I prefer Titebond, but I’ve often used cheaper brands with great success.
3M Spray Glue
I use this spray glue all the time. I like the #77 because it has a lower tack than #90. This has some unexpected uses. For instance, I’ll spray-glue a stack of MDF together and run it through the band saw, and then break it apart. With the #90 it wouldn’t come apart afterwards!
2p10 Glue
This is a cyanoacrylate glue, also known as CA glue, and it comes with an activator spray.
PVA Glue
This stuff is used for bookbinding; I use it for gluing leather to wood. Elmer’s glue will get hard and chippy, but PVA stays rubbery and flexible.
West System Epoxy
I found out about this stuff from friends who build boats. It leaves a nice hard-shell finish and also fills up cracks. West System also sells sawdust-like fillers that allow you to change the color, texture, and finish of the epoxy.
Veritas Mk. II Power Sharpening System
You can get your plane blades nice and sharp using the Mk. II sharpening system. It consists of a 650-RPM turntable and a blade holder that can be set to 5-degree increments, allowing you to perfectly hone an edge in a matter of minutes.
Summary
I hope you found my selection of tools helpful in stocking your own workbench. Next, I’ll share this chapter’s projects.
Organizing with Oak and Mahogany Tool Drawers
It amazes me sometimes how many really tiny tools I collect. I’m always picking up bits and blades of various types, whether at garage sales or flea markets. I acquire still more tools when I buy a machine, as it usually comes with all sorts of attachments. A case in point is my Bridgeport milling machine, a giant tool I keep in my workshop in upstate New York. It comes with about a million bits, so I need a set of tool drawers to organize them. I came up with the simple-seeming set of drawers seen in Figure 2-6.
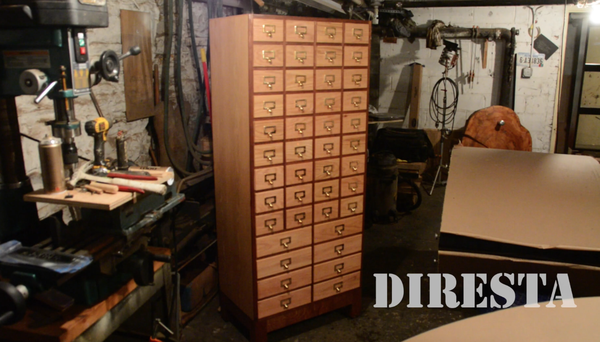
Figure 2-6. I built a set of drawers to store drill bits and other small tools
Tools and Parts to Build the Drawers
I used the following when building my drawers:
§ Table saw
§ Dado bit
§ Chop saw
§ Router
§ Cordless drill
§ Brad nailer
§ Planer
§ Lead hammer
§ Sandpaper
§ Wood glue
Building Steps
Here are the steps I followed to build my drawers:
1. Cut the horizontal dividers
I began by cutting up a bunch of plywood on my table saw. I’m not even sure how much plywood this particular project used, but it was a lot! I then took the first set of boards to my chop saw and cut them down. These sections will serve as horizontal dividers between the sets of drawers.
Next, I took these dividers and cut dados into them. Dados are trenches that hold other pieces of wood. I cut dados not just for the sides of the cabinet, but also interior grooves for the vertical dividers that will hold the drawers. The top and bottom dividers were one-sided, and the rest were two-sided.
I used hold-down clamps (seen in Figure 2-7) to secure the boards to my sled, which keep the wood in place for accurate cuts. I cut the grooves with the help of a stacked dado set, essentially several saw blades stacked up to make a very wide cut. I’d make one cut, then move over the board six inches at a time. I used a stopper strip to create even six-inch spacing between dados. I kind of made up my own procedure. I had never seen anyone make a set of drawers like this before and wasn’t sure how to begin, so I sat down and figured out how it would be done. As a final step on the horizontal dividers, I used the chop saw to cut the boards down to the perfect size.
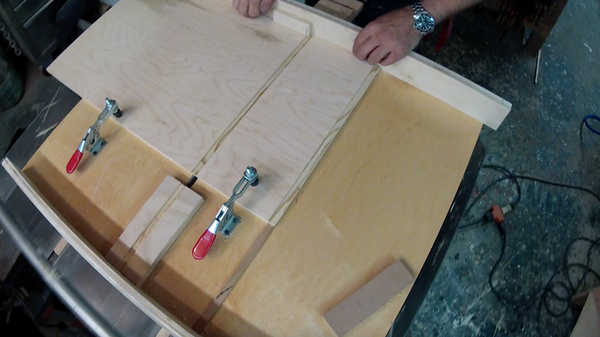
Figure 2-7. Cutting the dados with the help of the saw’s sled
2. Cut the vertical dividers
I began cutting 6” × 16” strips of plywood for the vertical dividers. I cut off strips of scrap wood, then cut them down to size on the chop saw. They’re all the same size, so I just made a bunch of them!
3. Build stages
After I cut the horizontal and vertical dividers, it was time to build each stage. By that I mean a horizontal divider with all five vertical dividers glued in place. I grabbed the first board and put wood glue in the dados, added the dividers, then secured them with a brad nailer.
Once I had a section done, I set it aside and built another to give the first one time to tack up. The glue is doing most of the holding; the nails just keep it in place. I was careful to wipe up the glue, not because I didn’t need the staying power, but so the globs didn’t take up space and prevent the drawers from sliding in and out.
When I had two, I glued them together with dividers, then clamped them together and let them dry. The most important thing is to make sure everything stays straight. I wouldn’t want all these little channels to become crooked.
4. Assemble the cabinet
As each set of stages was completed, I glued it to the next with more dividers. I assembled the basic cabinet out of the stacks of sections. The most important consideration at this point is to keep everything straight and level. I checked and rechecked everything, then clamped it down to dry overnight.
Note that the lower levels have only two drawers (as seen in Figure 2-8), each twice as big as the others. I didn’t bother doing the dados any different for these stages, as you won’t be able to see the extra cuts when the drawers are in.
Once the cabinet was dry I put the back on; it’s just a sheet of plywood. I’d already cut it to fit so it was pretty close. First I glued the backs of all of the boards and then nailed the sheet of plywood nailed in my brad nailer. I let it sit overnight.
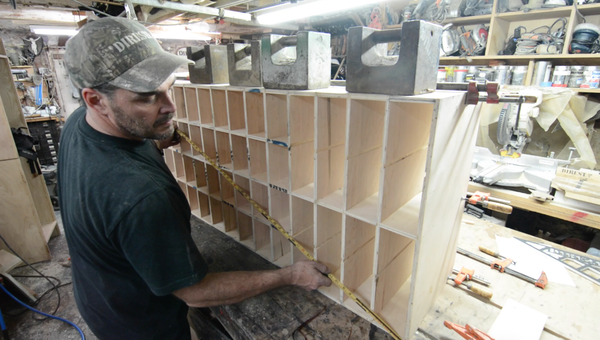
Figure 2-8. Measuring diagonally to ensure the cabinet isn’t crooked
5. Add the veneer
The next day I began adding the veneer. Because the sides clearly show the edges of all the horizontal dividers, I added a cosmetic veneer of quarter-inch oak plywood over it.
I glued the sides with wood glue and added the plywood, shown in Figure 2-9. I tacked it down with my brad nailer, using some pin nails to keep it in place until the glue dried. I trimmed off the excess with a flush cutter.
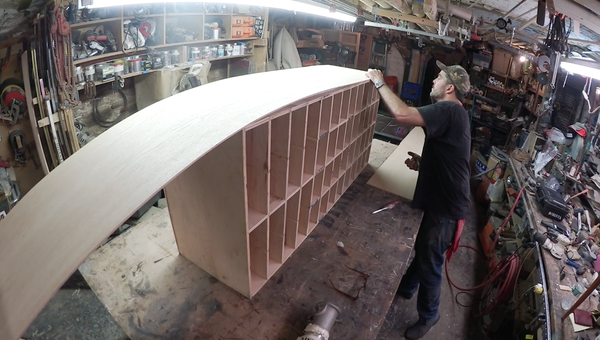
Figure 2-9. Gluing on a veneer of plywood
I added the top piece of veneering, gluing the plywood and then applying the veneering, the same way I did with the sides. I also glued a small piece of hardwood on the corners (Figure 2-10), concealing the edges of the veneering. I taped it into place with blue painter’s tape.
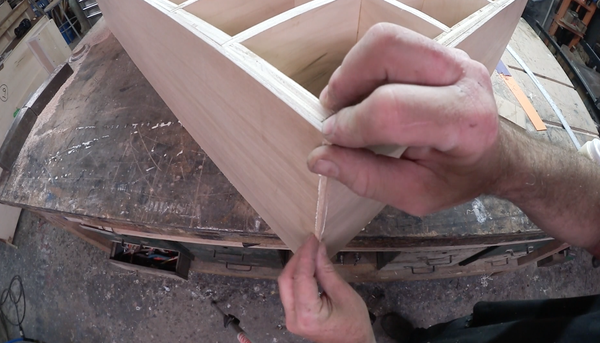
Figure 2-10. Gluing in a cosmetic strip of hardwood
6. Cut the edge banding
I cut small strips of mahogany on my table saw. These will make the plywood edges of the front of the cabinet look prettier. I glued the strips onto the front of the cabinet, on the spaces between the drawers. Those plywood edges were pretty functional, so the mahogany dressed it up considerably.
The vertical stripes I affixed first, then cut off the excess. The spaces between them needed a little more care, so I cut them precisely to size on the chop saw, then glued them in place and taped them with painter’s tape.
Once the glue was dry, I sanded them with a long board covered in sandpaper. I used the board because there are so many openings and having a longer sanding implement helped to bridge those gaps. I also tried using a 12” sanding disk on a stick, with a big steel weight to give it more authority.
7. Cut the drawer parts
I cut strips of oak on the table saw and then used my chop saw to cut them down. These pieces will be the faces of the drawers. I used a block of wood to make sure they were all the same width.
Next, I made the drawer sides using a piece of ash I had. Someone had given me some thin strips of ash. They were a little cupped, but I knew that for the small pieces of wood I’d need, it wouldn’t matter. I cut the boards down, trimming both sides to keep them smooth.
Next, I cut a big sheet of half-inch oak plywood down using my table saw, making long strips that will serve as the bottoms of the drawers. Once again, I used the chop saw to cut the boards to size.
8. Assemble the drawers
The next step involved assembling the drawers out of the boards I just cut. I used a router to round the edge of the faces, just to give them a little bevel.
Then I cut a rabbet (Figure 2-11) around the edges with a dado blade on my table saw. These will help the face inset into the front of the cabinet. I cut a quarter-inch around the edge, but double-cut the bottom to half an inch, because the drawers’ bottom is thicker than the sides.
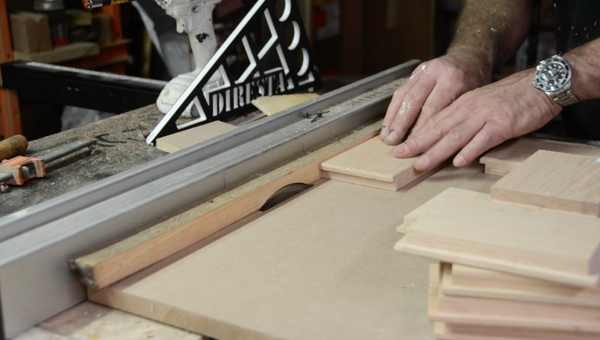
Figure 2-11. Cutting rabbets in the drawer faces
Finally, I assembled the drawers with the usual wood glue and brad nailer. Figure 2-12 shows a completed drawer getting a quick planing.

Figure 2-12. Planing and sanding a completed drawer
While I worked, I basically used the cabinet as my file (Figure 2-13) to keep each one of the drawer parts in its place. When I was ready to build a drawer, I’d get the parts out of the cubby and put the finished drawer back in.
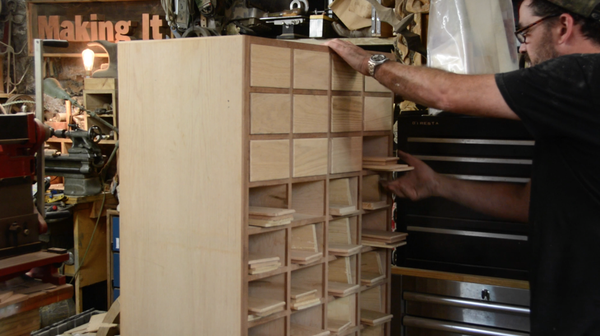
Figure 2-13. Keeping the drawer parts organized
9. Make the base
The cabinet needs a base, because even without the tools in the drawers, it weighs a couple hundred pounds. I cut and planed some mahogany boards, and these will make up the base’s construction. The base’s legs consist of pairs of mahogany boards glued together.
Next, I used a domino jig (seen in Figure 2-14) to cut peg holes in the mahogany pieces. This kind of joinery is called mortise and tenon, and it’s very strong. When had mortised all of the holes, I used tenons and a lead hammer to bang it all together with glue.
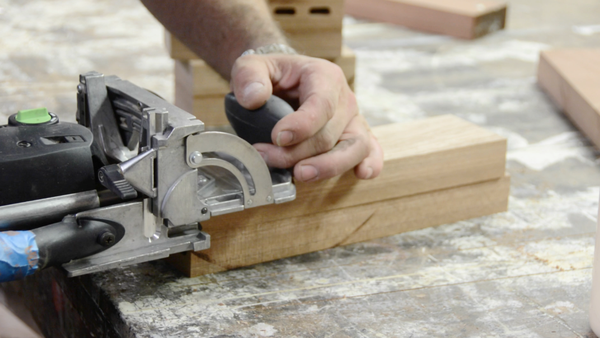
Figure 2-14. Using a domino jig to drill mortises into the mahogany
I clamped the base, using shims and extra tenons as pads so the clamps didn’t dent the mahogany. Before I left the base to dry overnight, I added poplar strips to the inside with the air nailer. The strips will attach the base to the cabinet.
I screwed the base to the cabinet (Figure 2-15) using poplar strips to attach the two together. Knowing that the cabinet would get pushed around a bit, I added big glides to the bottom of the legs. I’d recycled them from a piece of furniture I’d found on the street.
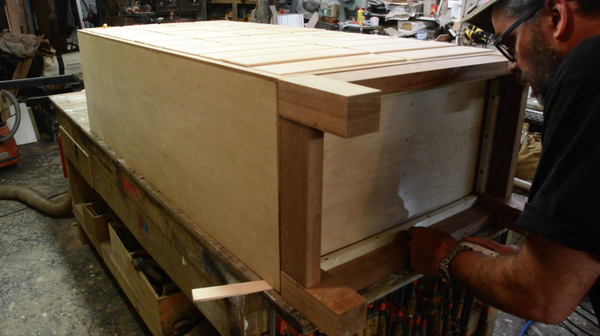
Figure 2-15. Attaching the base to the cabinet
10. Finish the cabinet
With the drawers and cabinet done, it was time to add the finishing touches. I painted the drawer fronts and mahagony trim with paint, and hit the veneered sides and top as well. However, I didn’t bother painting the back, because no one will see it.
I put a drawer pull on each face, using a little jig to ensure they’re straight and centered. They’re vintage-looking plates (seen in Figure 2-16) and also contain a slot for a small label, which will be helpful when I start putting parts in the drawers.
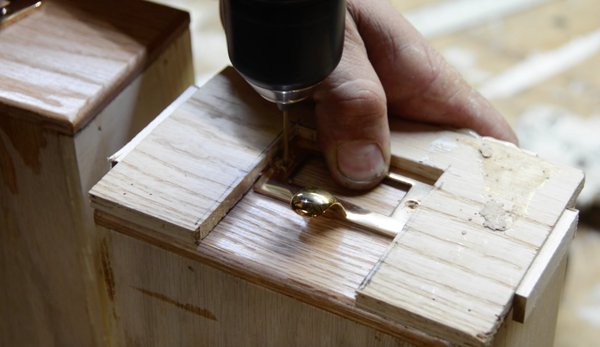
Figure 2-16. I made a jig to ensure the drawer pulls were centered
Finally, I used Briwax to lubricate the sides of the drawers and to keep them free of dirty fingerprints. Next up, I just have to label it and fill it with junk!
Summary
I had mixed feelings about this project. On one hand it filled a need I had: a storage cabinet able to accommodate my huge collection of drill bits and Bridgeport parts I’d acquired over the years. On the other hand, it was kind of repetitive, with tons of identical cuts and countless pieces of wood to keep track of. Now that it’s done, however, I can safely say that I’m proud of my work!
Dovetailing a Massive Oak Bench
I really don’t cut dovetails that often. It’s odd because it’s not an unusual way of connecting two pieces of wood. In fact, it’s been around since before writing was invented. It simply wasn’t a type of joinery I practiced very often.
When I decided on this project—which was right after I saw the board that would be used in it—I knew I’d want something without a lot of excess detail. I was visualizing a bench that was monolithic and strong, but also simple and elegant.
I decided on using dovetail joints because it was a very strong and durable method to combine two pieces of wood, but also didn’t involve a lot of extra hardware. You can see what I came up with in Figure 2-17.
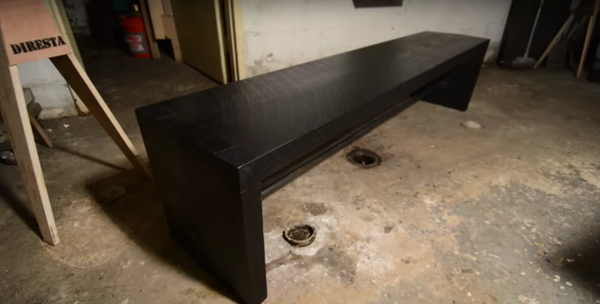
Figure 2-17. Pitch-black oak melded with steel make for a truly massive bench
Tools and Materials Used
Mostly I used a variety of saws to make this bench. Dovetailing is a technique that predates the pyramids, and as such it doesn’t need a lot of tools. This is what I used:
§ Table saw
§ Hand saw
§ Dovetailing saw
§ Dremel cutout tool
§ Hammer and chisel
§ Rigid milling machine
§ Chopping band saw
§ Huge piece of oak!
§ Steel stock
§ Presto black gel
§ WD Lockwood dye
§ Ebony Briwax
Building the Bench
I got a huge oak plank from a sawmill down the road from my house in upstate New York. It’s 9′ long by 16” wide and 2.5” thick, and weighs around 200 pounds. It was $50. From the moment I saw the board I knew I was going to do this very project. Here are the steps I took to build it:
1. Cut down the wood
I cut off the ends of the board, trimming off the S-hooks. These pieces of metal (seen in Figure 2-18) keep the wood from splitting and warping, but won’t be needed anymore.
In addition, I needed to fit the board into the truck for the ride home, so I cut 18” lengths off to serve as legs.
I decided not to plane it flat, because I wanted to keep the rough saw marks from when it was first milled.
Figure 2-18. Cutting off the S-hooks
2. Cut dovetails in the first leg
I drew 60-degree dovetails on one of the legs using an angle finder. Once I’d identified the waste wood, I marked it boldly in Sharpie (Figure 2-19) so I wouldn’t accidentally cut out the wrong part—it happens!
Then I cut into the wood with the hand saw. I was careful to keep the angle perfect or the dovetails wouldn’t work.
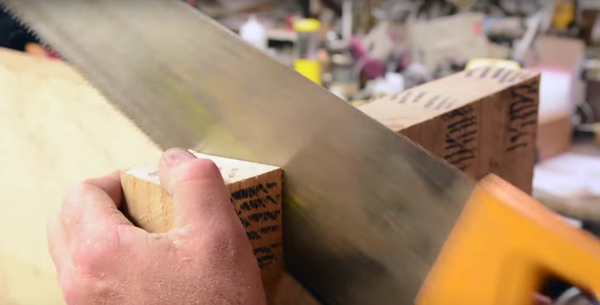
Figure 2-19. Cutting the first dovetail
Once the side cuts had been made, I dug into the waste wood with a Dremel cutout tool. It only cut partway through, so I cleared the last bits with a chisel and dovetailing saw.
3. Cut dovetails in the top
Having one set of dovetails, I was ready to make the matching set in the top of the bench. I put the leg next to the top, approximately how they would be when nested. I marked the edge of the bench’s top.
Then I marked the top of the bench corresponding with the dovetails I cut into the leg. I made a rubbing of the cross sections (Figure 2-20) and spray-glued it to the top.
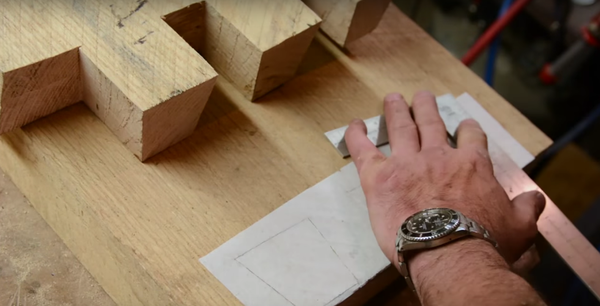
Figure 2-20. A traced template tells me where to saw
I used a chisel to cut into the traced lines in order to give my hand saw a clearer cutting path for me to follow.
When I had a nice big groove, I went to work with my hand saw. The wood had a tendency to grab the blade, so I waxed it periodically with Minwax, and that really helped.
After I got the dovetails cleaned up, I did a test fit. The two pieces (seen in Figure 2-21) came together perfectly, which is great because this was the first set of dovetails I’d done in many years, and only the third set I’ve done in my life.
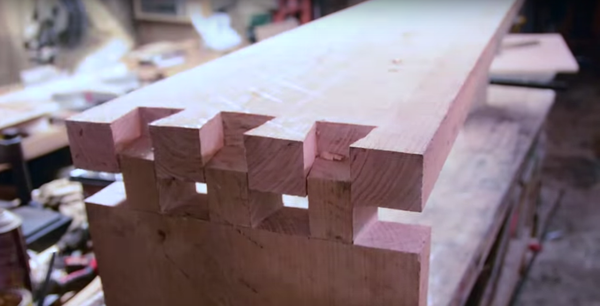
Figure 2-21. A test fit confirmed the dovetails were cut right
4. Cut the other set of dovetails
With that success under my belt, I replicated the dovetails on the other side, using my hand saw, Dremel cutout tool, and chisel to basically do the same thing. For some reason this set was tighter than the first. I wasn’t able to figure out why, but they came together without cracking, which is the important part.
5. Saw off excess material
With the legs seated, I went to work with a dovetailing saw to cut off the excess. Because of the aforementioned bowing of the wood, some of the dovetails were longer than others, so I trimmed them off with my saw (Figure 2-22) and then gave it a light sanding with my palm sander.
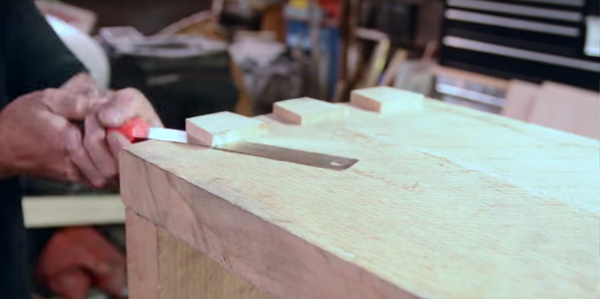
Figure 2-22. Sawing off extra material
6. Build the truss rod assembly
Next I began working on the truss rod that would help reinforce the bench. First, I cut off two 4” disks of steel stock using my Craftsman chopping band saw. These parts will serve as flanges on the bench.
After that I cut off about 6’ of truss rod that will be supported by those flanges I just cut. Figure 2-23 shows the rod in the chopping band saw.
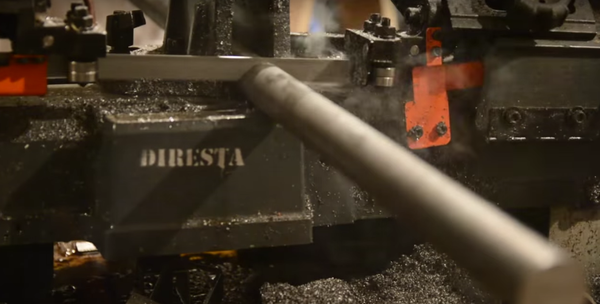
Figure 2-23. Cutting off some steel rod
I drilled holes in the center of the disks corresponding to the diameter of the truss rod. I used my Rigid milling machine, which doesn’t get a lot of use. It’s good for long, slow drills. After cutting the center holes I gave each truss a quick polish on the belt sander.
Then I drilled the mounting holes with the drill press, with countersink bits to help the brass screws fit flush.
Finally, I welded the flanges onto the truss rod, positioning them so there was about 3” of rod sticking out of either end. Figure 2-24 shows one of the trusses.
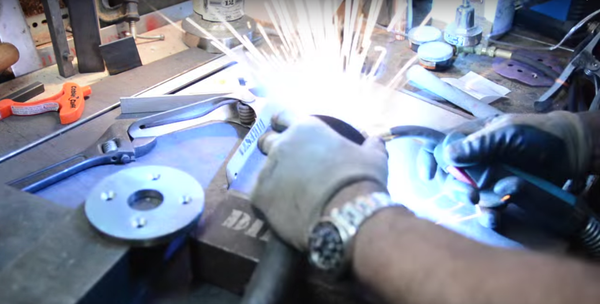
Figure 2-24. Welding the flanges to the rod
7. Install the truss rod
It was time to install the truss rod by trapping it between the bench’s legs. I removed the legs with the help of a couple of small prybars.
I marked both legs where the truss rod would go, then drilled holes with the drill press.
Then I reassembled the bench with the truss rod in place, as seen in Figure 2-25. It’s trapped between the legs, and once bolted into place, help keep the legs upright.

Figure 2-25. Installing the truss rod that reinforces the bench
Before I tapped the legs into place for the final time, I glued the dovetails. I used a pipe clamp to get them as tight as I possibly could.
Finally, I drilled pilot holes and screwed brass screws in to secure the flanges. Be careful with brass screws because you can easily strip them.
8. Finish the bench
The bench was done—all I needed to do was add a coat of dye and polish it up. I began with a few coats of WD Lockwood Dye, a wood dye that sinks right in without filling up the fibers. It’s the best way to get pitch black oak.
The next day I gave it a light sanding and polished it with ebony Briwax, which colors as well as polishes. You can see the nearly completed bench in Figure 2-26. As a final step, I colored the steel with Presto black gel, making the entire bench a really great glossy black. It weighs around 150 pounds including the metal, making it extremely sturdy and stable.
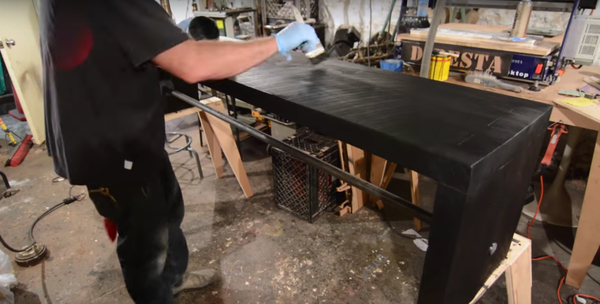
Figure 2-26. Applying ebony Briwax to bring out the shine
Summary
I visualized this exact project the moment I laid eyes on the piece of lumber at the sawmill. Being able to execute my idea exactly as intended was very satisfying, and I’m proud of how the bench turned out.
Turn a Pallet into a Toolbox
I had been thinking of making a toolbox out of wood repurposed from an old pallet, and when I spotted just the perfect pallet right in front of the workshop, I said to myself, “You know, that’s a pretty good-looking pallet” and picked it up.
Most pallets have skinny little strips of hard oak, and they’re very brittle, but this one had thicker planks of pine, and I knew it would be useful. Follow along to learn how I built my toolbox—you can see the finished project in Figure 2-27.
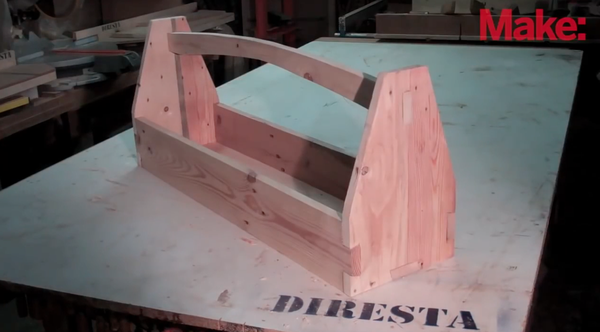
Figure 2-27. Learn how to build this handy toolbox out of waste wood
Tools and Materials
The toolbox project used the following tools:
§ Sawzall
§ Delta planer
§ Table saw
§ Brad nailer
§ Rubber mallet
§ Disk sander
Building Steps
I performed the following steps to build my toolbox:
1. Break apart the pallet
The easiest way to take apart a pallet is literally to saw the nails in half—if you try to pry it apart, the boards will break. I ran a sawzall between the top planks and the side supports, slicing the nails with a hacksaw blade. After cutting as much as I could with the sawzall, I used a claw hammer and rubber hammer to pry apart the big pieces.
I removed the remaining nail heads by poking them through on one side, then using a hammer (Figure 2-28) to pull them out.
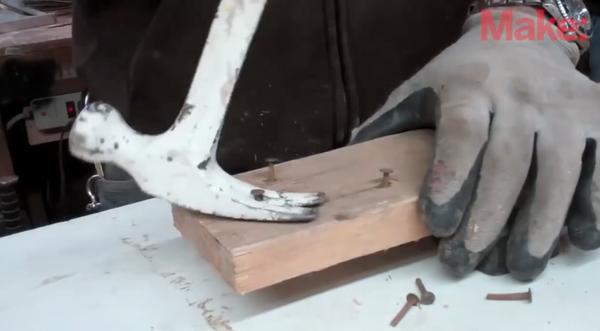
Figure 2-28. Removing nail ends with a hammer
2. Dress the boards
I ran the planks through the planer, smoothing down both sides while maintaining a uniform thickness. This is called “dressing” and will help make the toolbox a little more finished-looking.
Then I used a table saw to trim the widths, cutting out cracks and other damage whenever possible while trying to get the most yield out of each board.
When I had all the boards planed and trimmed, I repaired as many cracks as I could (Figure 2-29) by gluing and clamping them.
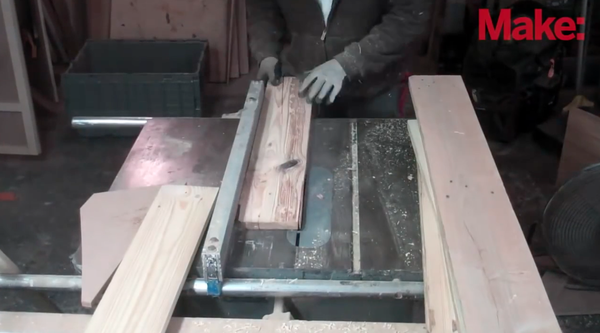
Figure 2-29. Trimming the widths
3. Cut the toolbox ends
I glued some of the boards together to form double-width planks, and they will form the broader sides and bottom of the toolbox. Figure 2-30 shows me gluing two boards together.

Figure 2-30. Gluing narrow boards together to make a wide one
Then I used the chop saw to cut shorter lengths of double-width board for the toolbox’s ends. Then I adjusted the miter on my chop saw and cut the tapers. I stacked the boards so I cut both sides simultaneously, keeping them even. Figure 2-31 shows me making the cuts.
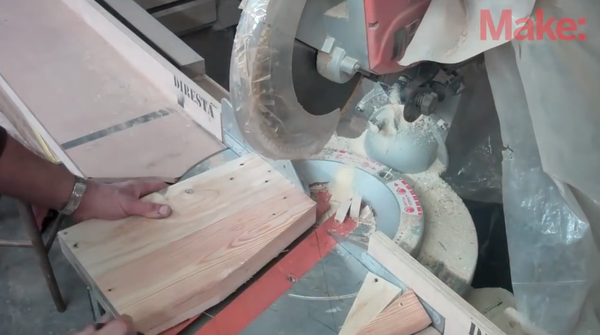
Figure 2-31. Cutting angles on the end pieces
4. Cut the sides and bottom
Readjusting back to 90 degrees, I cut single-width boards for use as two of the box’s sides. Then I cut another length of double-width board to form the bottom. You can see these parts in Figure 2-32.

Figure 2-32. All the pieces of the toolbox arranged together
5. Cut dovetails in the boards
I used a wooden wedge (seen in Figure 2-33) to angle the boards precisely for cutting dovetails on the table saw. I cut the angles using the table saw, then used the band saw to trim away the waste material.
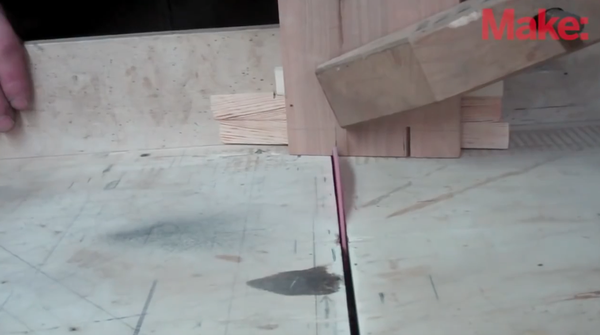
Figure 2-33. Cutting dovetails at an angle with the help of a wedge
When I had one dovetail finished, I traced it to cut its mate. This allows me to ensure they fit together precisely.
I cut out the traced dovetails on the band saw. You can see the side panel in Figure 2-34.

Figure 2-34. Cutting dovetails on the ends
6. Cut the handle
I cut the toolbox’s handle out of one of the single boards. I cut a curve that I had free-drawn on the board. I went only halfway along the board, however. I used the waste pieces from the first part to trace the curve on the remaining part of the board with a marker, giving me a quick, easy, and symmetrical curve.
Then I drilled the handle holes on the sides, beginning with a series of holes (seen in Figure 2-35) bored with a Forstner bit.
I used a chisel to clean up the holes. I’m making a mortise that will hold the handle.
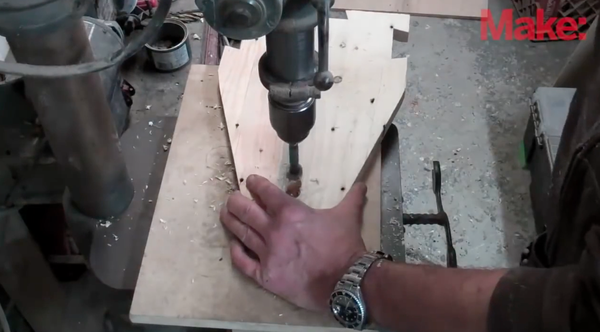
Figure 2-35. Cutting holes for the handle
7. Finish
I put the parts of the toolbox together without glue. I clamped the dovetails to ensure they were flush, then secured them in place with a couple of nails. Finally, I gave the toolbox a good sanding to smooth down any rough edges. The project is done!
Summary
This project definitely challenged me to make the most out of a notoriously unreliable medium: pallet wood. I’m really happy with how it turned out. Next, I’ll describe the final project of the chapter, creating an electric guitar that looks like an AK-47.
Turning a Guitar into a Gattar
In the spring of 2013 my friend and former accountant was working with Wyclef Jean. Wyclef mentioned he wanted a signature guitar in the shape of a gun, because he wanted to illustrate the concept of turning guns into guitars. This was in response to the street violence in Chicago. My friend introduced us and we came up with an idea for a fully playable guitar shaped like an AK-47, gold just like Saddam Hussein’s gold AK-47. Only a few hours from coming up with the concept, I was in the workshop putting it together. It’s a very interesting project that came together in just a couple of days, and it’s been my most successful video, getting me tons of recognition on YouTube. Figure 2-36 shows how the Gattar turned out.
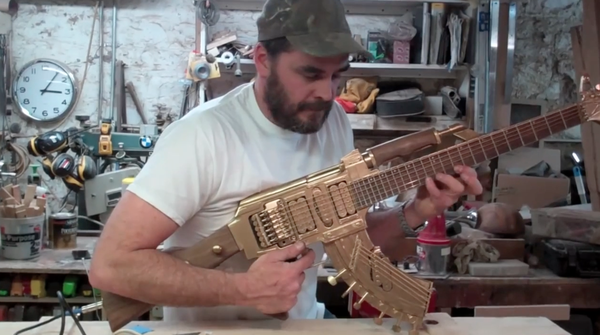
Figure 2-36. The Gattar is a fully playable electric guitar
Tools and Materials
Beyond the big two, the guitar and the toy gun serving as a visual guide (visible in Figure 2-37), you’ll need several tools and parts:
§ Ibanez electric guitar
§ Replica AK-47 (all plastic)
§ Second electric guitar
§ Band saw
§ Dovetailing saw
§ Router

Figure 2-37. I needed to make the guitar look like the gun
Building the Gattar
I took the following steps to build the Gattar:
1. Draw the design on the guitar
Using the replica gun as a guide, I free-handed the shape of the Gattar’s body. I didn’t know exactly how this project would come together, but I just dove right in, trusting my ability to overcome any problems that arose. However, I was pretty sure I knew I had to start with the main section of the guitar, including the neck. Figure 2-38 shows the design coming together.
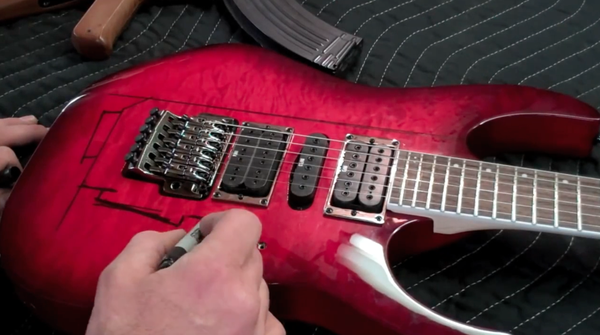
Figure 2-38. Drawing the gun shape on the guitar
2. Remove the guitar’s hardware
In order to reformulate the Ibanez as an AK-47 I needed to remove all of the guitar’s electronics, because they’ll interfere with cutting the new shape. That included stuff like knobs, wires, and the amp jack. I removed the metal plate from the back of the Ibanez, exposing the electronics.
3. Cut out the design
Having drawn the shape, I cut off the excess wood on my Delta band saw, seen in Figure 2-39.
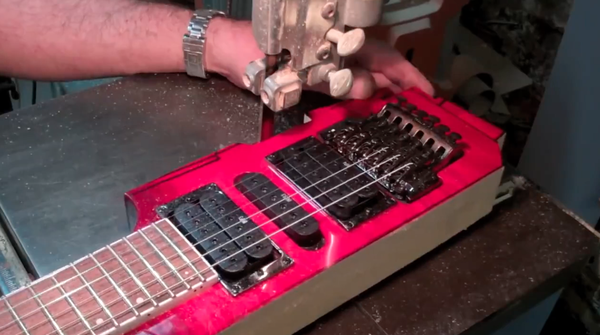
Figure 2-39. Cutting the guitar down to a gun shape. Just add the pistol grip!
4. Shape the pistol grip’s attachment point
I’ll be adding both functional and cosmetic parts that will make the Gattar look like a gun. One of these is the pistol grip, and I carved away at the body with a dovetailing saw to create a small nub to which I’ll eventually add a grip.
5. Cut out the stock and grip
I cut the stock out of a big chunk of walnut, as seen in Figure 2-40. I could have used a real gun’s stock, but I didn’t have one, and the dimensions I needed were different than the replica’s stock. In any case, the replica is made out of flimsy plastic and would never hold up on tour.

Figure 2-40. Cutting the stock and grip out of walnut
After I had it cut out I ran it through the band saw some more, carving it into more of a natural, curved shape. I am most comfortable carving and sculpting on the band saw. I’ve been doing it so long, it’s an easy way to quickly remove material. Holding the walnut in my hands and running it through the saw, I can slow down and see exactly where I’m at.
Next, I cut the pistol grip out of the walnut. Just as I did with the stock, I worked on the grip in the band saw (Figure 2-41) to round it a little more.
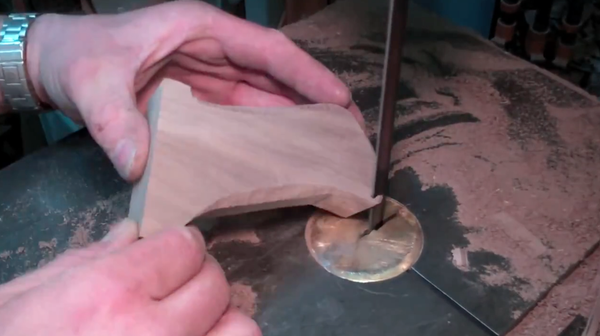
Figure 2-41. Shaping the pistol grip
6. Build the gas tube
Next I focused on a cosmetic part of the Gattar matching the AK-47’s gas tube, which is found above the barrel with a wooden shroud covering it. Because this is a distinctive feature of the AK, I wanted to include it in the Gattar. I added some plastic I had lying around the shop, screwing it into the top of the guitar as shown in Figure 2-42.
After I had installed the plastic pole, I cut the wooden housing that covers the gas tube. This is so you don’t burn your hand when the gun is firing. Of course, the Gattar doesn’t need this, but it’s nevertheless part of the AK-47’s distinctive look.
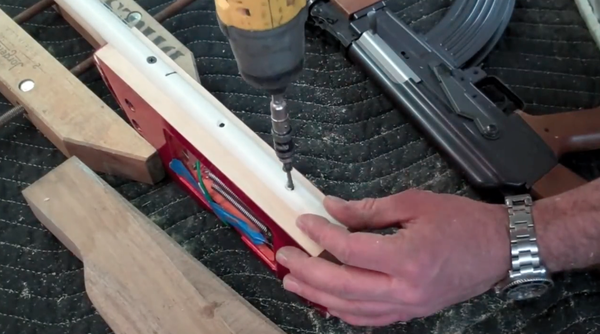
Figure 2-42. Attaching a piece of plastic on the top
7. Make the banana clip mini guitar
The Gattar’s magazine was a fun surprise to the project. It was Wyclef’s idea. He really wanted the magazine to have its own little guitar pickups and strings! It was a little bizarre at first, but I said, “OK, let me see if I can figure it out.” It ended up working out really well.
The first step was to cut out the banana shape. I made it out of an old cutting board I had lying around. Figure 2-43 shows me cutting the shape. Then I used a router to bevel the edges to look like the real magazine.
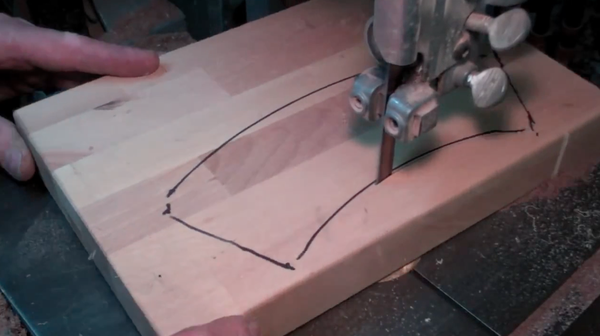
Figure 2-43. Cutting the magazine shape out of a cutting board
Then I used a Forstner bit on my drill press to cut out indents for the pickups and tuners.
Next, I installed the clip’s bridges, pickups, and tuners, as seen in Figure 2-44. I ended up going out and buying another cheap guitar, and harvested the electronics out of it.
Then I strung the mini guitar. I’ll take the strings off when I paint the instrument, but I’m putting them on early to test it out.
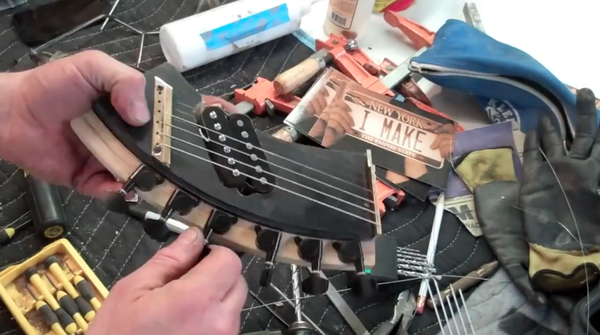
Figure 2-44. Stringing the mini guitar
As a final step for the mini guitar, I glued the banana clip onto the main body of the Gattar with five-minute epoxy, making sure to thread the pickups’ wires through a hole for future access. I eventually added a couple of screws as well.
8. Finish attaching the gas tube
Having completed the delicate work on the banana clip, I finished up the cosmetic gas tube on the top of the Gattar. Using some miscellaneous plastic parts, I mounted the wooden housing (visible in Figure 2-45) to the instrument.
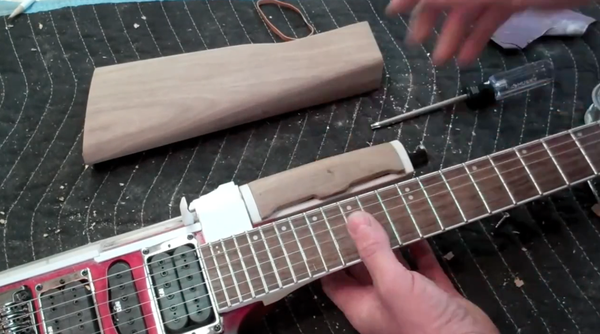
Figure 2-45. Finishing the gas tube
9. Modify the stock
I needed a place to install the electronics, so I decided to cut into the stock. The first step was to run the stock through the band saw, cutting it in half. I’ll hollow out a space in the stock for electronics, then secure the halves with screws so Wyclef can repair the guitar as needed when it’s on tour.
I hollowed out a space for the electronics using Forstner bits to dig out material. Figure 2-46 shows me drilling the first hole. The guitar’s power switch also needs a place to be mounted, so I cut out a hole with my dovetail saw.
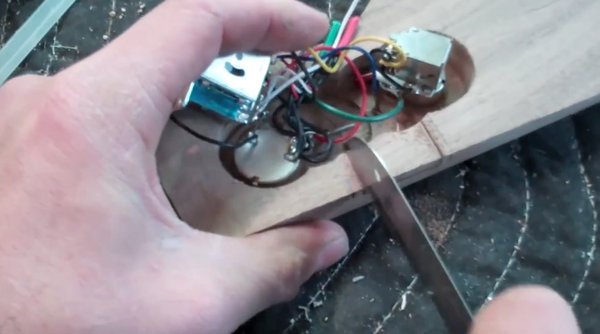
Figure 2-46. Cutting a wire hole in the electronics enclosure
I secured the stock to the Gattar using a special attachment plate I milled. It has two sets of holes that permit Wyclef to remove a single half of the stock to make quick repairs.
Once the enclosure was ready, I soldered in the electronics. Figure 2-47 shows the inside of the stock. Putting electronics together isn’t an easy task for me, but with a little trial and error, I made it work. Once the electronics were completed, I closed up the stock with screws.
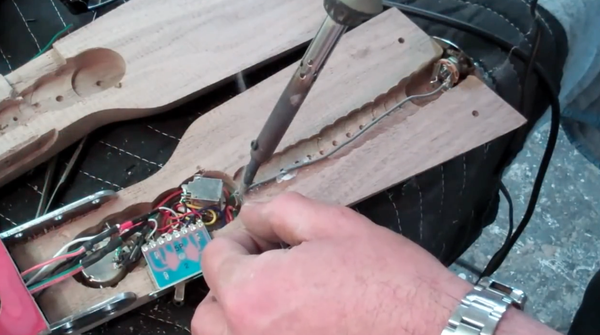
Figure 2-47. Soldering up the electronics
10. Build the whammy trigger
One of the last-minute additions to the project is a metal trigger that will move the bridge to change the tension on the strings, therefore changing the sound. Called the vibrato or whammy, this normally takes the form of a small lever (the “whammy bar”), but in my design I decided to use the trigger to create that effect. This idea came to me when I was already working on the guitar.
I welded a couple of pieces of metal together, then used my portable band saw to cut a trigger shape.
11. Create the back panel
I created a plastic plate to cover the bridge-tensioning springs. I eventually covered it in paint to make it look like metal.
12. Paint
It was the moment of truth! I showed Wyclef the guitar and he wanted it immediately, so I spray-painted the Gattar with gold paint, unstringing it first and covering the pickups with tape. When the paint was dry, I re-strung the Gattar and it was ready to go.
Summary
The Gattar project is done, and so is this chapter. I hope you learned a bunch and found inspiration in the pages of this chapter. If you liked wood, you’ll love metal! First, though, Chapter 3 explores the relatively new field of computer-controlled tools.