Backyard Farming: Homesteading: The Complete Guide to Self-Sufficiency - Kim Pezza (2015)
Chapter 6. DECIDING WHAT TO RAISE
You have some idea of what you want to do, as far as growing and raising your food is concerned. You’ve selected a property (or have decided to use the land that you’re on); now is the time to start making the big decisions. This doesn’t need to be a source of stress; rather, it can become a fun family project. Just keep in mind that your plans will not only change during this time, they may also change throughout the development stages and during the life of your farm or gardens.
Farms and/or gardens are always evolving and changing as you find elements that don’t work, elements that work better than expected (and which you want to expand on), and elements that did work, but are no longer efficient or important. Things will change as you continue adding new things to the farm or garden, things that you perhaps thought you couldn’t do during the initial planning stages. Even in the smallest spaces, such as containers on an apartment balcony, things will change.
Whittling Down the Wish List
When first trying to decide what you want to raise and/or grow on your homestead or backyard farm, start with a wish list of everything that you would like to do (within reason, of course; you might really want to add a milk cow to the family farm for fresh milk and cheese, but if you are in an urban area with a tiny backyard, common sense dictates you reconsider). So, make your wish list, and have fun making it, but keep it sensible and realistic, bearing in mind the space that you actually have.
Throughout this chapter, we will be discussing the most popular and common things raised and/or grown on a typical homestead or backyard farm. Keep in mind that, just because these are often seen on backyard farms and homesteads does not mean that it needs to be grown or raised on yours; neither does it guarantee that it will even work with your needs and situation. These are just examples of what you could try on your site. If you are considering livestock, but aren’t quite sure whether to take that first step, talk to others who have experience with the animals you’re considering. Ask if you can handle them a bit, to get to know the animal. If you have appropriate housing and fencing, the owner (especially if they are a friend of yours) might even let you keep them at your home for a weekend or even a week, just so you can see what some of the daily care is like. If that setup isn’t practical, see if you can help out at their farm for a while. This won’t give you a total picture of what goes into the care of all livestock, of course; nor will it grant insight into medical emergencies, or other unexpected things that go along with owning and caring for animals. What it will do is give you an idea of the daily care, a sense for how simple or tricky it can be to milk a goat, for example. While this all might sound like a bit of a pain in the neck, it is much better than bringing an animal onto your farm, and then realizing soon after that it just isn’t for you.
One final thought: don’t be afraid to make your gardens, or your farm as a whole, outside of the norm. Don’t be afraid to try unusual things in the garden, even in a market garden—especially if the market you will be selling to has an appreciation for ethnic or unusual items. If you want to try something in your garden, but aren’t confident about it, try one or two. If you like it, you can add to it in full next time. If you don’t, then you can keep what you have or else give it away to someone who does like it.
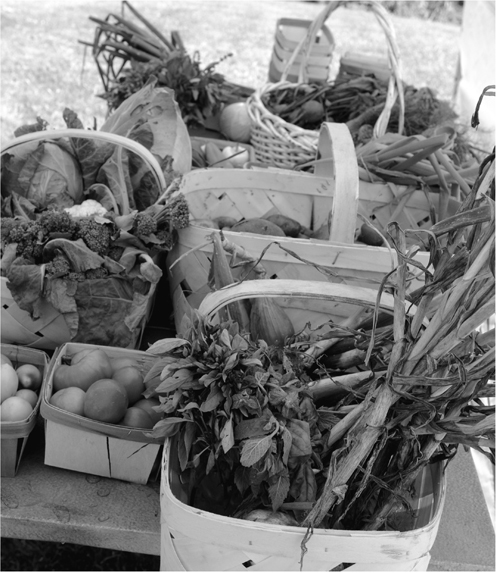
Selling produce that you can’t use or store is an option, provided the quality of your produce is high enough. Otherwise, it makes a great gift to a neighbor or family member. Photo by Catarina Astrom under the Creative Commons Attribution License 2.0.
Types of Gardening Layouts
You have your land, and have been considering the layout you want to use. Now you’re trying to make the final decision as to what garden type or method you want to use. You may use one, or a combination of several. A garden, whether you are using it for flowers or food, can be as complex or as simple as you want. But what are these garden methods? Let’s take a quick look.
The Traditional Garden
A method in which plants or seeds are planted into flat, tilled or un-tilled ground, the traditional garden is the most inexpensive garden form, and what most people picture when they think of a garden. The garden is ground-level, with the seeds or plants put directly into the ground.
This method is more susceptible to health problems in the plants, uses more water, and needs more weeding time; in general, it is a bit more time consuming than the other methods. However, given that this is the least expensive method, and still the most widely used, it’s not uncommon for a homesteader’s first garden to be a traditional setup.
There are a few things that you can do to try to help counteract some of the problems of a traditional garden. For example, after turning the soil (if you are doing so), a garden cloth may be laid on rows that are to be planted. This will allow the water to get through, while helping to keep weeds at bay. It won’t eliminate the problem entirely, but it will make weeding easier. Some people will also use black plastic, but it is important to use caution when doing so, as black plastic holds heat (tomatoes work well with this), and water can only soak through the spots where the plants are coming through the plastic. Depending on the garden, however, using garden cloth or plastic can be expensive. A less expensive (and more environmentally friendly) alternative is to use newspapers. The single drawback to using papers is that replacement will need to be done on a yearly basis. However, for the gardener who is on a low budget or is looking to recycle, this is a great resource.
Once the garden area has been selected and sod, any rocks and stones have been removed and the soil has been turned, lay out any soil covering(s) that you’ve decided to use and lightly cover with soil. This will prevent them from blowing away in a wind. Before planting, you will need to cut holes into the cloth or plastic where the seeds or plants will go. If using newspaper, you can either lay it out beforehand, like with cloth or plastic; otherwise, as long as you are putting in plants and not seeds, pieces of newspapers may be put around the plants after they’ve been planted.
Some drawbacks to the traditional garden include the time investment, particularly in terms of their care; they can also be difficult for the handicapped or elderly who have physical difficulties—especially those with problems bending and kneeling. Finally, traditional gardens do not hold moisture as well as raised beds do. However, it is still a good choice for the novice gardener.
The Raised Bed
Exactly as it sounds, raised bed gardens are raised off the ground in beds usually created from wooden frames, which can sit at least 11 inches in height. Raised beds may also be in a table or manger style frame that is up on legs, two or more feet off the ground (these are great for wheelchair-bound gardeners.) In a sense, they are a traditional garden within a frame, allowing for plantings to not be done at ground level.
Materials for the frames may vary; pavers, concrete blocks, wood, brick and stone are all viable materials for building raised beds. In fact, anything that would be safe for use in the garden will work. It should be noted, however, that if a wooden frame is being used, the wood should be either untreated; or, if treated, make sure that a non-toxic method is used. This is so that the toxins from the wood do not contaminate the soil, the plant’s root systems or your food. If you can find wood that has been given a non-toxic treatment, this is preferable over non-treated wood. Otherwise, you may find it necessary to replace at least the sunken foot of the frame, due to rot. This does not mean that treated boards will not rot; however, they will decompose much slower than those that are not. Prefab kits can also be purchased at garden stores, nurseries, online retailers and even department stores and catalogs.
Some gardeners will build the frames right on top of the ground, which works fine, and is typically an easier build. However, if you have problems with burrowing animals, raised beds that sit on the ground should have the first foot or so of the frame sunk down into the soil. This will help to prevent animals from burrowing into your garden bed. Keep in mind that, if you want the walls of your raised bed to be 3 feet in height, you will need to build a 4 foot high frame, keeping in mind that the first foot will be underground.
Once the frame (or frames) of choice have been constructed, the proper soil mix is added to the frame, whether the raised bed is on or off of the ground. The soil mix will depend on what you want to grow in the beds; your local nursery or extension can direct you in creating the proper mix for your particular garden needs. Otherwise, you can purchase pre-mixed soil at nurseries and garden centers.
A common mix is:
✵ Half organic matter (such as compost)
✵ Half soil
✵ Some sand for drainage
Raised beds do represent an initial investment, which includes not only the purchase of the materials for the raised beds, but the soil to go in it as well. They are also a bit more time consuming in the beginning, due to the fact that they need to be built. (Raised beds that are raised up on legs can now be purchased as a kit, although some assembly may still be required.) Finally, the soil will need to be rejuvenated every few years (as the nutrients are removed from the soil by the plants), whether through the addition of fertilizer (common to any garden type) or replacement of the soil. However, because the soil is added to the frame after it is built, a raised bed will allow you to grow in areas that have bad soil (except for leach fields).
Raised beds may also be any height, size or shape that the gardener wants them to be. They can hold water somewhat better than a traditional garden, and weeding is much easier, as the weeds can be better kept under control than in a traditional garden.
The Container Garden
Simply put, a container garden is one in which the plants are all kept in pots and other containers, including flower pots, wooden boxes, bags, old decorative cans and any other type of container that your creativity can suggest. Although some plants may have a few special needs when grown in a container, such as needing a bit more watering or a transplant, it is a great way to go if you have very limited space (such as a deck or balcony), or have plants that will need to be brought indoors before the first frost. In fact, container gardening has become quite popular for those who have little to no space for an actual garden bed.
Creating a container garden for food plants is just like creating a container for flowers; you need good soil and good drainage within the pot so that the excess water from rain or maintenance watering can drain out. Otherwise, you run the risk of your plants rotting or drowning. The containers may be anything that would be safe to use with food plants; just make sure that you have some type of drainage in the vessel, such as holes on the bottom or on the bottom edge. If the container has no drainage holes built in, and you do not for whatever reason want to drill holes (it can be tricky to do so in pottery), fill the container about a quarter of the way with stone, pottery shard or packing peanuts before adding the soil. Keep in mind, however, that container gardens can dry out quickly in summer heat, and also quickly become over-watered as well, so it is very important to find the “happy medium” for successful growth.
You’ll need to bear in mind the size of your container, as well. If you are using a large container that will need to be moved at some point, keep it light enough for easy movement (unless it is on wheels). Don’t fill it with rocks and heavy soil; rather, use the packing peanuts or a combination of a few stones or pottery shards on the bottom, with the rest covered with packing peanuts, and a lighter weight soil or soil blend.
If you choose to go with the container growing method, don’t think that your choices are limited, as far as vegetables and fruits are concerned. That couldn’t be further from the truth. With the popularity of container gardening surging, plants are even being bred especially for container use. Many of those plants (and seeds) that are not specifically created for containers will work just as well.
Fruits and vegetables conducive to being grown in containers include tomatoes, peppers, berries, herbs, dwarf fruit trees, lettuce, and edible flowers, to name just a few. Any plants that are climbers, or which need some sort of support as they grow, can make use of cages, small trellises and stakes placed in the pots, just like you would with traditional and raised bed gardens.
In a container garden, there may be one or more plants per container, depending on the container’s size and what you are planting. Plants such as strawberries, herbs and edible flowers may be planted together, if the container is large enough, and multiple vegetables may be kept in a single container, as well.
When choosing what container will hold what plant, it is important to make sure that the depth of the pot will be adequate for the plant’s root system. For example, a pepper plant should be in a container with a depth of 8-12 inches, carrots 9-18 inches, and beans 16-18 inches in depth.
Container gardening can be fun, and is definitely functional, especially if your space is limited. However, it is highly unlikely that you will be able to completely supply for your family from what you grow. In reality, this method can only present you with a nice addition to your meal or dish. But don’t let that prevent you from container gardening, as the addition of anything that you have grown yourself is worthwhile.
Espalier Gardening
Although container gardening is most popular among those with little garden space, if you do have a little patch of ground against a wall or fence, or want something a little more out of the ordinary in your container garden and have the time to learn, you may want to try espalier.
An ancient practice of controlling the growth of a tree for fruit production, the word espalier is French, coming from the Italian spalliera, which basically means “something to rest the shoulder against.” In basic terms, espalier is pruning and tying branches up to a frame or wires set flat up against a wall, fence or trellis. A common example is the grapevines in a vineyard. Beginning with the Romans and refined to an art during the Middle Ages by the Europeans, espalier is making itself known once again, as part of the resurgence of the backyard urban farmer or city dweller with limited space.
Although there are many sites online and books available to help you learn about espalier, the pruning techniques required and how to maintain the trees, you may also want to check with any local garden clubs, nurseries and extension offices in your area about any classes that may be offered, to give you a firsthand look at this useful and decorative art.
—From Backyard Farming: Growing Vegetables and Herbs
The Vertical Garden
Vertical gardens may be part of a raised bed, traditional or container garden, or they may be their own structure. In the vertical garden, everything grows trained and braced in an upward position. Of course, supports will be needed to allow vine plants to grow upwards instead of following their natural tendency to grow across the ground. These supports can be, in short, anything that works, including lattice and fencing. Some vertical gardens are also built self-contained into old pallets, which are then leaned against walls. Much lighter box versions are made to hang on the sides of buildings.
This method not only works with plants that naturally grow upwards, such as tomatoes and eggplant, but can also be used for vine plants that usually grow along the ground, such as cucumbers and squash. Using the vertical gardening method will not only give you more room in a garden, but it can prevent you from stepping on vegetables that would normally be lying on the ground. It can also increase the yield of the plants. Vertical gardening is a good method to use for those who may have a difficult time harvesting from a traditional garden.
The main thing to remember is that, whatever you use for your plant brace, you make sure it is firmly secured, whether to the ground or the side of a building. You do not want the weight of your plants to bring your bracing system down, as damaged or broken plants can result, which in turn may lead to a loss of fruits or vegetables.
Growing Organic
You will find each of these garden styles in backyards, city lots, rooftops, rural farms and homesteads throughout the world. Of course, your selection of garden style will automatically be narrowed down by what space is available to you for your garden. But no matter what space you have available, even if it is only indoors, at least one of these methods will work for you.
Along with deciding your garden’s style, you will want to decide whether or not you want to grow purely organic, partially organic or as natural as possible. If you plan to have a certified organic garden, this will need to be decided beforehand, as certification demands that soil be pesticide-free for a certain period of time before it can be certified organic (usually a period of years; check your local certification for the time period).
An organic garden can be any type of garden—traditional, vertical, raised bed or container. But for a true organic garden, seeds, soil and pest control choices do matter. When you choose to go organic, it means that you are committing to keeping your garden chemical-free, using organic seeds and organic gardening practices. And, although organic doesn’t mean that no fertilizers or pesticides have been used, should you choose to use them, they must be approved for organic use. This is particularly important if you plan to become certified organic.
Organic certification is not that important if you are raising plants only for yourself; certification is expensive, and you must strictly adhere to the rules to retain that certification. There is also a lot of record keeping involved. However, if you want to sell your product with an organic label, you must be certified. (There may be exceptions, depending on if sales are below a certain amount.)
For further information on going organic, check the United States Department of Agriculture website at www.usda.gov. Most states also have their own organic certification office where you can get information more applicable to your area.
Growing totally organic is a matter of personal choice, with many gardeners deciding to grow as organically as possible, without certification; that is, using non-organic pesticides and fertilizers only when absolutely necessary. Whether you decide to go organic or not, know that with proper care your garden will grow enough vegetables or fruit to make the time and effort worthwhile.
What to Grow
Now that you have decided which method (or methods) you will be using for your garden, and have made the decision of going organic (or not), it is time to determine what will be in your garden. Of course, you probably already have your wish list, but this is the time for realistic decisions. Keep in mind how much space you really have, and how much time you have to dedicate to your garden at this time. If you are a new gardener, you may be more comfortable starting with some easier vegetables and herbs. Tomatoes, cucumbers, leaf lettuce and most basic herbs are examples of plants that are great for the first time gardener, as are strawberries, blueberries and the ever prolific zucchini. Although it is just as easy to begin from seed with most of these plants, the beginning gardener may be more comfortable starting with seedlings or young plants.
When selecting your plants, remember that there are four types:
Annuals: Plants that come up for one year or season only, and must be replaced the following year (although, if allowed to go to seed, you could get new plants the following year). Most annuals will die off completely at the first hard or killing frost. Most vegetables fall under this category, especially for those who live in areas with four seasons.
Biannuals: Plants that will go to seed the second year. Onions, carrots and beets, left in their natural state, fall under this category.
Perennials: Plants that will come back year to year. Many edible flowers and herbs fall under this category, as well as vegetables such as asparagus. Many berries and all fruit trees are perennials.
Tender Perennials: Plants that are grown as perennials in mild climates but as annuals in colder climates, due to the fact that they cannot survive the extreme cold and snow. Some good examples include rosemary and French tarragon.
Seeds, Plugs or Plants?
After you have decided what you will be growing, the next step is to decide whether to start with seeds, plugs, or plants. And it really isn’t as complicated or intimidating as it sounds. First, what do each of these terms mean?
Seed is pretty much self-explanatory. Most people, gardeners or not, are familiar with seeds. They are the base on which all plants start. Seeds are an inexpensive way to start, and you can have quite a variety of produce in your garden starting this way.
Plugs are very young plants, also called seedlings, due to the fact that they have just sprouted from the seed. Plugs will be small and more expensive than seeds but cheaper than plants. Plugs may need a bit more babying than plants in the garden to start, but will usually fare quite well and will give you a slight head start over starting with seeds. Plugs are sometimes sold as singles, but may also be found in four- and six-pack containers. Flower plugs may already be in some bloom at this stage.
Plants are larger than plugs, and usually sold singularly in small pots. Some may even be large enough to already have a number of blossoms growing, and may even have little vegetables or fruits developing. Plants are the most expensive way to go as the grower has had to take more care and time with them, not moving them to market as quickly as plugs.
If you’re looking for as much variety as possible, seeds are definitely the way to go. Seed catalogs have an enormous selection of all different types of vegetable and herb seed. For the experienced gardener or the new gardener who isn’t afraid to jump right in, using seeds is the best way to get the most variety in your garden for the least money. Seeds may be started indoors early in the season in seed trays (in fact, depending on climate, this is a must for some) or may be planted directly in the ground. Either way, the package will indicate the best time and method for starting the seeds, usually having some type of growth chart on the back.
—From Backyard Farming: Growing Vegetables and Herbs
Hybrid and Heirloom Plants
If you want to go a bit further, there are a few other selections to make as well, regarding heirloom and hybrid classifications.
An heirloom fruit or vegetable plant is basically a pure plant, meaning that there has been no crossbreeding with other plants. It is open pollinated (pollination by the wind, bees, butterflies, etc.). Heirloom types can be traced back decades and even centuries, and may have unusual names, colors and markings, with interesting origins. They can be heartier in various weather conditions and tastier than their hybrid counterparts, but can also be a little longer in growing time, with the fruits and vegetables tending to be a bit smaller. However, heirloom seeds can be saved from year to year, with the assurance that you will end up the following year with offspring that will be just like the parent plant.
Hybrids, on the other hand, are crossbreeds between two types of the same species. They usually go back decades in development, with some newer, some older. Many hybrids have been bred to withstand weather extremes, a positive trait; however, many who have raised heirlooms say that the flavors can’t compare, with the hybrids tasting not as good. Finally, although you can save the seeds of a hybrid, there is no guarantee what you will get when you plant the following year. And, if you do get something, those results will be unpredictable. In fact, chances are good that if you do get results, they will be nothing like the parent plant.
If you have the extra space, it can be fun to try a few of the hybrid seeds that you have saved. This year, I experimented with cabbage seeds that I had saved from a previous harvest. Planting five seeds, four actually produced a plant, and one did nothing. Out of the four plants, two produced heads of cabbage. While they were not big, they were still edible and quite good. But with less than half the seeds bearing results—minimal results, at that—it doesn’t seem prudent to save hybrid cabbage seeds!
As a result, whether hybrids or heirlooms are used comes down to being a personal preference. Some growers will opt for either one or the other, while others will grow a combination.
This is only a brief introduction to starting a garden on the homestead. Further hints, tips and more in-depth information can be found in Backyard Farming: Growing Vegetables and Herbs.
Adding Chickens to Your Farm
Perhaps the most popular animal on the farm, the chicken is one of the first animals that you think of when picturing a barnyard, and one of the first animals that a homesteader decides to add to their growing farm. Chickens come in all shapes, sizes and colors, as do their eggs; as a result, there is a chicken for every farm situation, and it is up to you to pick the right one.
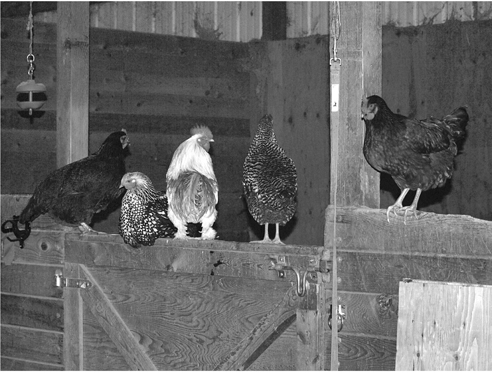
Chickens come in a variety of breeds. From left to right: Partridge Rock hen, Wyandotte hen, Cochin Cross rooster, Dominique hen, Rhode Island Red. Photo courtesy of Amy Kolzow.
Chickens are usually kept for meat, eggs or both. In the case of the urban farm, the few hens kept for eggs will usually become family pets as well, referred to as “the girls” or “the ladies.” If you end up on this path, don’t be surprised if you end up turning into the chicken version of the “crazy cat lady.” Certain breeds of chicken are preferred for meat, while others are preferred for their eggs. However, any breed can be used for their eggs and meat. It is up to you which you prefer and which will work the best for you and your family.
Chickens raised for meat are usually larger, meatier birds, ready for slaughter at 10-16 weeks old. Considered fryers at this age, they are ideal for frying and barbecue, while older birds (such as retired layers), while larger, will also be a tougher bird, best for roasting, soups and stews. Some popular examples of meat birds are Delaware, Plymouth Rock, Orpington, Dorking and Sussex.
Chickens that are favored for egg production include the non-industrial type Rhode Island Reds and Leghorns, and the Ameraucana (also known as the Easter Egg Chicken, due to their naturally colored eggs).
Depending on the breed selected, it can take anywhere from 17-26 weeks after hatching for the hen to be mature enough to begin her egg laying cycle. Keep in mind that if you want fertile eggs for any reason, including replenishing your own stock, you will need a rooster. However, if you live in an urban area that does not allow roosters due to noise restrictions, never fear: your hen will still lay her eggs without the rooster; you just won’t get fertile eggs from her.
Some backyard farmers may want both egg and meat birds, but only have room for one or the other. Thankfully, there are some breeds that are specifically dual-purpose. These birds are excellent layers that can later become excellent meat birds as well. Some of these dual breeds include Jersey Giant, Barred Rock, Dominique and Silver Laced Wyandotte.
Another popular chicken is the Bantam. Due to their small size, you can keep more in a smaller space. They are great for kids to handle, and they’re good layers; an excellent bird for those in an urban setting with a very tiny backyard.
Finally, when deciding on chickens, consider a heritage bird. Also known as heirloom or antique breeds, heritage birds are defined as meeting the following qualifications, set by The American Livestock Breeds Conservancy:
✵ They must be from stock recognized by the American Poultry Associations Standard Breed, prior to the mid-twentieth century.
✵ They must be able to reproduce naturally, being genetically maintained only through natural mating.
✵ They must have the genetic ability to live and thrive outdoors and pasture.
✵ Hens must have at least 5-7 years of productivity and roosters 3-5years.
✵ They must have a slow or moderate rate of growth, not reaching the market weight for that particular breed until at least 16 weeks of age.
Sadly, many heritage breeds are also endangered, although both small homesteaders and backyard farmers are working to bring many breeds back from the brink of extinction, with some success. The American Livestock Breeds Conservancy provides a list of endangered poultry and livestock, along with their status.
Housing Your Birds
Once you’ve decided on your birds, you will need to build or purchase a chicken coop to house them. The size of coop you will need depends on how many birds you will be keeping; however, the rule of thumb is 4 square feet per bird of indoor space, and 10 square feet per bird for outdoor space. This is the minimal space that is recommended. If you have the room to build something larger, your birds will love the extra space to run around and spread their wings.
So exactly what options do you have when it comes to housing your flock? There are basically three options available to the new chicken owner. They are:
✵ Containment
✵ Free-choice
✵ Free-range/Pasturing
The first (and probably least favorable) way to keep chickens is using the containment method. Used primarily by commercial growers, containment housing is just as it sounds: the birds are kept contained indoors throughout their entire life. Layers are usually kept in small cages, with multiple birds per cage (many times in cages too small to house them), while meat breeds are allowed to run around only within the house. The outdoors and oftentimes natural daylight are off-limits to these birds.
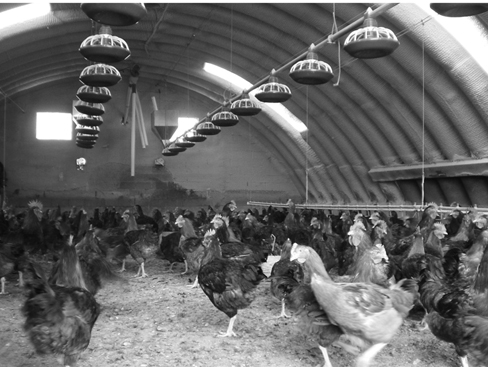
Chickens are productive, well-behaved and (in general) easy to care for. Containment housing, as shown here, is not really necessary except in cases of large numbers of birds. Photo by Amy Kolzow under the Creative Commons Attribution License 2.0.
An electric fence running along the outside of your regular fencing may help in keeping predators out, but there are things to consider when using one. First, you must remember that an electric fence has live current running through it. Absentmindedly leaning against it or touching it, although not deadly, will be a memorable experience. Next, the fences must stay clean and clear. Things such as high grasses and deep snow can short out the fence, rendering it useless against a predator. Finally, you must continually check for broken connections. Again, this can render the fence useless against predators.
The next option you have for your birds is what I call free-choice. Free-choice is basically keeping your birds in the typical chicken coop configuration: a chicken coop/house of whatever size needed, either inside a large fenced area or attached to a large outdoor pen. In either scenario, the coop will have a small door that can open and close, allowing the birds to go in and out at will, and which can be securely closed at night. It can also be raised off the ground with ramps used to enter and exit.
Most small backyard and urban farms will use a combination of containment and free choice, meaning that at times the birds will be inside the coop (or a fenced area attached to the coop), and at other times will be given the opportunity to stay inside, or venture out into the yard.
Those on a homestead may opt to allow their birds to free range or pasture, containing them only at night or in very bad weather. The birds will love foraging around the yard or pasture for insects and grubs (just don’t let them get into the road or a neighbor’s yard). This is healthy for them, so long as the grasses are not treated with pesticides. If you’re handy with a hammer and nails, you can build your own chicken coop using any number of plans available in books, magazines and online. If you are carpentry-challenged, there are many places which now sell pre-built chicken coops and chicken coop kits.
If you live in the city, it won’t be as easy for you to let your birds run freely in the yard. This is where a chicken tractor comes in handy. A chicken tractor is a movable coop and covered pen, or a freestanding movable covered pen that the birds go into during the day, and which allows the birds to be moved from spot to spot, letting them pick at the grass and weeds (essentially pasturing without running loose). An excellent choice for the urban chicken who wants to get out and run around, but risks getting into trouble in the neighborhood, chicken tractors are also great for the homestead chicken living in an area with predator problems during the day, as it allows them to get out and forage in a relatively safe manner.
Feeding Your Chickens
Chickens love to pasture, catching insects and digging up grubs to eat; but what about when you have little or no area for them to pasture in? Or, what if you have pasture space, but still need to supplement their diet, as the majority of backyard farmers do? The answer is deceptively simple: the purchase of commercial, supplemental feed.
Commercial feed can be pre-mixed or, if you are lucky enough to have a granary nearby or a feed store that bags its own feed, you can have a custom mix put together for you. Feed can be purchased either medicated or non-medicated, in blends made for specific stages of life.
Chick Starter: More finely ground than adult feed (although you can also get finely ground adult food as well), chick starter can be medicated or non-medicated, with medicated feed used for coccidiosis (a commonly found protozoan parasite found in most chicken pens/yards). Some hatcheries now vaccinate for coccidiosis as well, so you may want to check to see whether the medicated feed is in fact necessary.
Chicks should receive starter feed for the first six weeks of life; at 18-20 percent protein, it gives chicks the extra boost they need.
Grower: A 14-17 percent protein feed, grower feed is given to chickens from seven weeks on. Higher percentage protein is usually given up to 14 weeks of age, before changing over to the lower percentage from 14 weeks on. This food may also be labeled as grower/finisher, due to the fact that meat birds will stay on this food until slaughter.
Layer: Layer feed is for hens that are approaching laying age, or are already laying eggs. A 16-17 percent protein food, hens should be given additional calcium (for stronger egg shells) along with this feed. Calcium, which is usually nothing more than crushed oyster shells, may be purchased at feed stores. Eggshells may also be crushed and given to the hens; however, make sure that the shells are crushed very fine. Calcium should be given freely, and may be put in bowls, scattered on the ground (to give them something to do) and even mixed with food.
Grit: Grit needs to be given to all birds, as it aids in the digestion process of the gizzard. Like calcium for hens, grit should be given freely. If your birds are free range, they will get a lot of the grit they need naturally. Your birds should also always have access to clean water.
Keeping chickens can be a fun and educational activity for the entire family. Whether you are raising them for eggs, meat or both, the chicken is probably one of the easiest homestead animals to keep. You’ll find that, given the chance, chickens are not the brainless birds most believe them to be—in fact, chickens are very attentive parents when allowed to raise their own chicks. When chickens get to express their individual personalities, they can be quite the clowns, and will become your best buddies at feeding time.
For more in-depth information on keeping chickens, including hatching and raising chicks, refer to Backyard Farming: Raising Chickens.
Raising Cattle
While rare to see on a smaller backyard farm, many rural farms and homesteads will opt to have at least one or two head of cattle. Because our focus is primarily on smaller scale backyard farms and homesteads in this book, we’ll only briefly discuss raising cattle. For more information, see Backyard Farming: Raising Cattle in this series.
When selecting a cattle breed that’s right for your wants and needs, bear in mind that there are a wide variety to choose from, which can be dual or triple purpose—meaning animals suited for dairy, draft work, or beef.
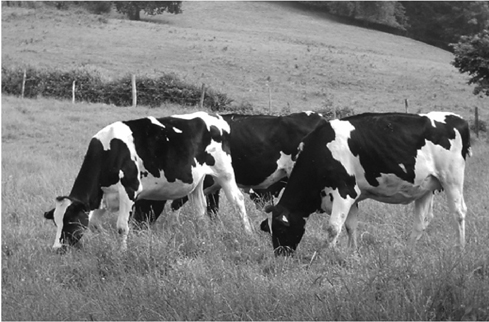
The archetypical “cow,” the Holstein’s black and white coloring makes it one of the most well-known cattle breeds. Photo by Ganaderia Goizalde under the Creative Commons Attribution License 2.0.
The term dairy cattle refers to those types and breeds of bovine that are bred specifically for milk production. Although it is only the cow that is the milk producer, both sexes of this type are considered to be dairy; males are used for meat, breeding or work. In truth, any cow, whether dairy or beef, will produce milk after giving birth. Historically, many cattle breeds were dual or triple purpose, depending on need and available resources. Many cows remain dual/triple purpose today. However, cows that are bred specifically for milking are built for the task, and excel at providing milk. They tend to be thinner, with a much larger udder than those found on beef cattle. And, while a beef cow will usually produce only enough milk for her calf, a dairy cow produces more than what the calf needs, allowing her to provide much of the milk for human use as well. For this reason, dairy cows are also known as the “foster mothers of the human race.” Examples of dairy cattle breeds include the Ayshire, Jersey, and Holstein-Friesian varieties.
Although often classified as dual or triple purpose, beef cattle have been primarily bred and raised for meat production. Beef actually refers to the meat of the adult animal. As with dairy breeds, selective breeding has been used in the production of beef cattle to develop specific traits for the various breed types. Examples of cattle grown primarily for their meat include the Black Angus, Herefordshire and Piedmontese breeds.
Concerns When Raising Cattle
When determining whether cows are right for you and your farm, other concerns to keep in mind include:
Time: Do you have the time to spend with cattle? Although beef cattle don’t require the same amount of time that dairy cattle do, they still do need some time and attention. Although they may graze in good weather, if you’re in an area that sees snow, you will need to go out and feed the animals. If you have dairy cows, you will need to set aside milking time, usually twice per day, at the same time each day.
Barns: Barns, or whatever structure you choose to house your animals, will need cleaning. Even if you have only one dairy cow, odds are you will most likely keep her in the barn at night or in inclement weather. And although beef cattle can stay out in harsher conditions, if you only have a few animals you may want to bring them in at night and/or during very inclement weather or hunting seasons.
Costs: Will you be able to afford a cow? Unless you are looking at a mini breed (which itself carries a steeper up-front cost) cattle—whether for dairy or beef—will need much more than a dairy or meat goat. If you are breeding, you will need to purchase and support a bull, or else pay for artificial insemination (AI). And if you are breeding, do you have the means and space for the calves? If not, do you have a ready market for them?
Fencing: Fencing is a necessity in order to contain your cows, be they dairy or beef, but it can be expensive—especially if you are fencing in areas and acres. In addition, your fencing will need maintenance and occasional repair, which again costs time and money.
Veterinary needs: Along the way, you will eventually have veterinary needs, which can be expensive. Although you will likely begin to pick up many of the basics of healthcare for your animal, there will still be times when a vet will need to be called. And, as you will soon find out, it will usually end up needing a weekend visit, or during a holiday/after hours, which may add on to the vet’s fee.
Purchase costs: Can you afford the initial purchase price of the animals? The initial purchase price of your cattle will depend on the breed, age, gender, whether or not the animal is a proven milker (in the case of dairy animals) and even whether the individual animals are pedigreed. If you decide to purchase calves, you will need to either raise the animal until it reaches slaughtering age and weight (in the case of beef), or it becomes old enough to breed (in the case of dairy). When purchasing a young dairy calf, it could be up to two years before you will see her first milking. Of course, if you’re lucky you may find someone looking for a good home for a milk cow, in which case you may end up getting a milker for a nominal fee, but this is the exception, not the rule.
Handling: Finally, who will handle the cattle? If you are a first timer or you plan on having kids handling the animals, you will probably want to look at the more docile breeds. And if this is the case, make certain not to purchase your cattle sight unseen, as you will want to make sure of their temperament beforehand, and confirm that you can handle them.
Raising Goats
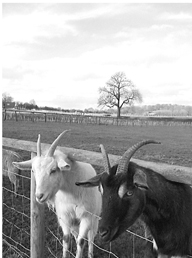
Of course, there is another animal that is very popular for the homesteader and backyard farmer—the clown of the barnyard, the goat.
It’s easy to see how goats got their “barnyard clown” nickname; the time that you spend with your goats will be some of the most fun you will have on your backyard farm. Goats are available in many colors, sizes, varieties and personalities, and are used for everything from milk to meat; pets and companions; lawn mowing; even as pack animals for short day hikes. They are great for those who want to raise dairy or meat animals, but don’t have the space for cattle. Goats are animals that the entire family can handle, and many urban city areas are now becoming more accepting of goats, giving urban farmers the go-ahead to raise them in the backyard.
Although there are technically two types of goat—meat and dairy—any breed of goat may be used for its meat. Depending on the type and breed of goat, they may stand anywhere from 16-35 inches tall, and weigh between 22-300 pounds for does (females) and 27-350 pounds for bucks (males), with a life expectancy of between 8-12 years, on average.
Does and bucks can have horns, beards (hair growth under the chin that looks just like a beard) and wattles (growths of hair covered skin, hanging to either side of the goat’s neck, usually behind the beard). Their horns are actually live bone, and it is common practice for many owners to have the horns removed, a process known as polling the animal. Does will have udders just like a dairy cow; however, unlike the dairy cow (who has four teats on the udder) the goat will only have two teats. And (although these traits will be true for all does, dairy or meat), the udder on meat-type breeds will be a bit different, as these animals are bred for their meat and not their milk production. Let’s take a brief look at both types of goat, starting with dairy goats.
Dairy Goats
Dairy goats are built and bred for milk production. Any dairy breed will provide you with enough milk for your dairy needs; therefore, when selecting your animal, select not only for what you need, but also what you like. As you will be interacting with these goats daily, it is important that you enjoy them. You also need to keep in mind that you will need to breed your goat(s) in order for them to produce milk. This is usually done on a yearly basis; however, some have had success keeping their goats milking at a rate sufficient for their needs for a longer time. Along with breeding comes kids (baby goats), so you will need a plan for what to do with them as well, when they are old enough to leave.
Some farmers will select by breed, some will select by the butterfat content of the milk. Butterfat, also known as milk fat, is the fatty part of the milk that gives goat’s milk its sweet flavor. Butterfat also affects the texture of the milk, and is the chief component in goat’s milk butter. Goats may also be selected by the number of pounds or weight of milk she gives (approximately 8.2-8.5 pounds of milk is equal to one gallon of milk.)
Some of the most common dairy breeds in the United States include Toggenburg, Nubian, LaMancha, Saanen, Sable, Oberhasli (a heritage breed), Alpine and Nigerian Dwarf (a heritage breed).
Meat Goats
Meat breeds will most likely be kept in more of a homestead or rural-type situation, as opposed to an urban farm where dairy breeds are more likely to be kept. Breeds that are meat specific will be larger built, and bred for muscle and carcass development. Some of the most popular meat type breeds are Boer (South African), Spanish Meat Goat, Tennessee Meat Goat and African Pigmy.
Unlike the other meat breeds, the African Pigmy can be milked (although they will not produce as much as dairy breeds) and are popular as pets. They also enjoy companionship, although their companion doesn’t have to be another goat. However, due to their size, the African Pigmy is a prey animal, so they should be locked up at night (although even the larger breeds are vulnerable to predator attack).
When determining which goat is right for you, read as much as you can about the various breeds. Talk with other goat owners; if you can, visit some farms. If it is fair time, visit the fair and hit the goat barn. Ask questions, and remember to choose the goat that you like and will enjoy.
Housing for Goats
Before you bring your goats home, you need to have their housing ready for them. Any type of building that will stay clean, dry and draft-free will work for your animals. An old shed could work well, but the minimum space per goat should be 15-25 square feet per animal. Make sure that it is easy for you to keep clean, with a dirt floor being the best choice; once packed with straw bedding, dirt will stay warmer than concrete, will not rot out like a wood floor, and any urine will be absorbed by the dirt.
If you are only going to have one or two goats, stalls in the shed are not overly necessary, but will be helpful to have during kidding time or if a goat needs to be isolated. If you plan on having more than two goats, however, you should have some type of stall available, so that the goats can have their own space during kidding, and it is easier to isolate for illness or injury when necessary.
The shed needs to give your goat access to the outdoors as well, and should have a fenced-in area either connected to it, or should itself be inside of a fenced area. Goat yards should have a minimum of 200 square feet per goat. However, you will find that keeping your goats inside the fence may be a challenge all its own. If the fence is too low, they will go right over the top; if the openings are too big, they will stick their heads through, usually getting stuck if they still have their horns, or else pulling themselves out and breaking the fence in the process. If the spaces are too large, the goats will also be able to climb the fence. The best fencing is a heavy-gauge wire weave with small openings at the bottom of the fence, making it difficult for the goats to climb. Usually called goat fencing, it is more expensive, but it will save you many headaches along the way.
Goats love to get into mischief when they can, so a strong, dependable fence will save you a lot of headaches going forward.
Feeding Your Goats
When it comes to feeding your goats, it is of the utmost importance that you keep feed stored out of their reach. If allowed, goats will gorge themselves on grains to the point of eating themselves to death. Never store feed where your animals can get to it. In terms of hay, always check for mold and discard any and all moldy hay, as this can also sicken and even kill your goat. Now, with that important bit said, let’s take a closer look at feeding goats.
Unlike what you might have seen in cartoons, goats won’t eat tin cans (although they will eat paper). They do like grains, hay and alfalfa (use alfalfa in moderation, as it can cause bloat). Unlike other animals, goats prefer shrubs, brush, leaves, and suckers to a lush green pasture. They also like pine trees, tree bark and saplings, so caution needs to be used when fencing goats in areas with trees that you want to keep. It would actually be a good idea to put individual fencing around the trees and saplings inside of the goat yard, if you don’t want the goats nibbling at it.
As for the subject of hay (and alfalfa), you will quickly find that your goats seem to waste more hay than they eat. Although they will go back and eat what they dropped on the ground, during that time it will have been walked on, urinated on and even wetted (if the ground is wet). There are a few ways to try to counteract this. Inside, you can use hay bags (bags that hang on the wall and hold the hay off the ground for the goats to eat) and wall hanging hay racks. Although you will still see some waste even with these, it will greatly help in reducing the amount of hay the goat will pull out at once. Outside, you can use mangers (which are basically food troughs, except they hold hay instead of grain), hay rings (rings of various sizes that the hay is contained in) and covered feeders, which will help to keep the rain and snow off of the hay and/or alfalfa.
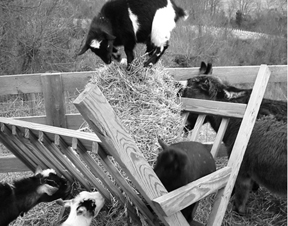
Providing a hay rack or hay manger for your goats will help you to prevent your goats from wasting more than they eat.
Your goats also need their grains. These can be in either a mash or pellet form, and will fill in any nutrient deficiencies the animals could have. It is important that this balance be kept; if it isn’t, your goat will be affected by the lack of important nutrients, just like a human.
Sweet feed is a treat that your goats will absolutely love. A simple pellet/green mix with molasses added, to goats it is like candy. Because of that, you have to be extra careful that they don’t get into a bag and gorge themselves.
Last but not least, you need to make sure that your goats get their salt and minerals. This can be through salt/mineral blocks, or in loose form; which you use is up to you. Some goat owners feel that their animals get more of what they need through loose forms, while others feel the block works just as well. From experience, I have had good luck with the block form; there was less wasted and the goats seemed to like them better.
As you get to know your goats, you will see that they are a very useful and versatile animal, despite their occasional mischief. Goats can contribute a lot to the farm—milk, meat, fiber, fertilizer, cheese, cream, hair and more. You can even use them to clear shrubbery in areas where you don’t want to use pesticides or other methods that could be destructive to the surroundings. As ten goats can be kept in the same area that would otherwise hold two steers, they make sense for smaller space homesteads or backyard farms.
Once you’ve made the final decision to purchase your goats, there are thousands of resources out there to help answer questions, including other goat owners, most of whom will gladly answer questions to the best of their ability. For further information on keeping you goats, as well as their kids, refer to Backyard Farming: Raising Goats.
Backyard Beekeeping
Many urban and backyard farmers are beginning to consider bees as a part of their homestead’s livestock. One of the first things you may need to think about when considering beekeeping is, how easy are bees to keep? Do they need constant care? What are the disease risks for the bees? Will I have predator problems? What about weather and seasonal changes? Housing is another issue the potential beekeeper will have to consider.
The truth is that honeybees are really no more complicated to keep than most other livestock. Feeding, disease and disease prevention, protection from predators, and general upkeep through the seasons and all types of weather are all concerns that apply to honeybees as much as cattle or fowl.
Honeybees eat nectar and pollen, and, of course, they drink water. In the wintertime, in regions where hives are unable to forage for themselves, they will survive on their stored honey and pollen. In addition to their own natural stockpiling, keepers may also provide supplemental nourishment both inside and outside of the hive. Depending on the climate you live in and are keeping your bees in, they may hunt seasonally, remaining bundled up in the hive in the winter, or they may hunt for most of the year.
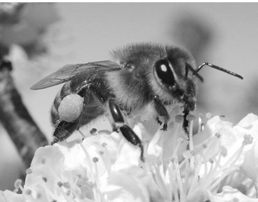
Bees are one of the primary pollinators of trees and flowers, and as such can be an enormous benefit to your garden or orchard. Photo courtesy of Wikimedia Commons.
However, there are only a few situations in which supplemental feeding would be necessary. As stated, the colony’s own honey is what is best for the survival of the hive, including during the winter. A single hive/colony should have 1,680 pounds of honey available to them and their hives in the fall to carry them through the winter.
Furthermore, if and when it becomes necessary to provide your hive (or hives) with supplemental food, there are three options available that will provide the necessary nutrients that your bees will need: dry mix, moist cake, and sugar syrup.
Dry mix compositions include brewer’s yeast or soy flour. The dry mix can be fed inside the hive into the brood nest (where the larvae are) or outside of the hive in an open container such as a tub or tray. However, if placed outside of the hive in an open container, the dry mix must be sheltered from becoming damp due to rain and dew. This can be accomplished simply by the addition of some sort of little roof structure set up over the container. One drawback with feeding dry mix outside is that other bees besides your own may find and feed on it, so keep in mind the environment that your hives exist in.
Another feeding option is moist cake. Moist cake is made up of pollen pellets, sugar, and soy flour. Moist cake may be fed to the bees inside the hive. The cakes should be placed close to the larvae so the nurse bees (worker bees that care for the larvae) can feed their charges. If more moist cakes are made or obtained than can be used at any one time, they can be frozen for several weeks without losing any nutritional value.
Sugar syrup is made from cane sugar, beet sugar, or isomerized corn syrup mixed with water. A carbohydrate substitute, sugar syrup may be fed outside the hive in any open container. However, there must be something for the bee to stand on in the container if using a tray or dish for the syrup. Some keepers will install their own jar feeders as well.
Setting Up a Hive
At its most basic level, the hive is a home and workplace for the honeybees, where they will live and raise their young. There are two types of hives: natural and artificial (or manmade).
Natural hives are those that occur naturally in structures where wild honeybees may live. Natural hives may be found in rock cavities and hollow trees. They may also be found in the walls of buildings, usually abandoned buildings. You might also find combs in abandoned cars or even on branches. However, those that are exposed to the elements will not survive in areas of harsh winters and cold temperatures.
Artificial hives are man-made structures, usually wooden-box type, which are designed and built to house honeybees, their young, and their stores of food and honey. At one time, man-made hives were simply round, tall structures made out of coils of straw called “skepts.” Today, the artificial or man-made hive will most likely be made of wood and have several parts to it.
These parts include:
✵ Stand
✵ Bottom boards
✵ Hive bodies or supers
✵ Frame/comb
✵ Queen excluder
✵ Inner cover
✵ Outer cover
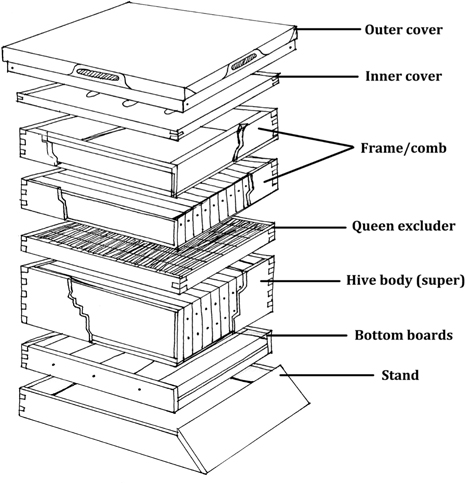
While the hive is composed of many parts, modern-design hives are easy to use, and provide efficient space for your bees. Illustration by Ariel Delacroix Dax.
Besides the standard hive type, which as its name suggests is the most common type of hive that you will probably see both in use and for sale, there are a few other styles/types of beehives. They are not overly common (at least in the United States), so I am just touching on them so you are aware of other hive options. Some beekeepers believe that these are a more natural and bee friendly way to keep their bees.
There are a few alternative hive styles that backyard farmers can consider, including Warré, Delon and Top Bar hives, but we will not discuss these here. For more information, check out Backyard Farming: Keeping Honey Bees.
Finally, when the hive is done, you need to find the right spot for it. It should be away from roads or pathways when possible. This will help to prevent your bees from being bothered by too much human and pet foot traffic, which would result in them becoming grumpy and on the defensive.
The ideal placement should also feature limited exposure to wind, have a water source nearby for the bees, and be in an area of good drainage. It should be level, have some sort of wind block (especially if you are in an area of cold and snowy winters), and have a good balance of sun and shade. More sun is preferable than more shade if you cannot find the “perfect” spot, as your bees will slow down if it is too cool and shady.
Do not worry if you cannot account for all of these conditions when placing your hive. Yet do remember one thing: be sure to allow easy access for yourself. For the other steps, do what you can, but things like sun and a dry area are important to your hive, as is the water source (which you may have to create yourself if there are no natural sources nearby).
There is more to keeping bees than what has been shown here, of course, but this is a basic introduction to help you get a feel for whether you’d want to consider keeping bees on your farm. For more information, see Backyard Farming: Keeping Honey Bees.
In this chapter, we have discussed the basics of deciding what to raise, focusing on the most popular elements the new homesteader has available—the garden, chickens, bees, cattle and goats. Regardless of what you choose to raise, make sure it’s something that you’ll be happy with. It’s your backyard farm—fill it with all the things that excite you!