Growing Beautiful Food: A Gardener's Guide to Cultivating Extraordinary Vegetables and Fruit (2015)
PLANT
SEED STARTING
One of the most compelling and magical things about growing, whether gardening or farming, is the adventure of turning a tiny dusting of seeds—with all their stored genetic promise—into fully formed plants. Buying plants that someone else has started and grown will never have the same transformative power. So much potential lies in a small and improbable seed packet: to feed yourself and others, to create beauty, to take an active part in cycles outside your own. We are bonded as a species, like the rest of the natural world, by regeneration, by the process of creating new life; beyond all the bustle and distractions of being human, it’s really why we’re here.
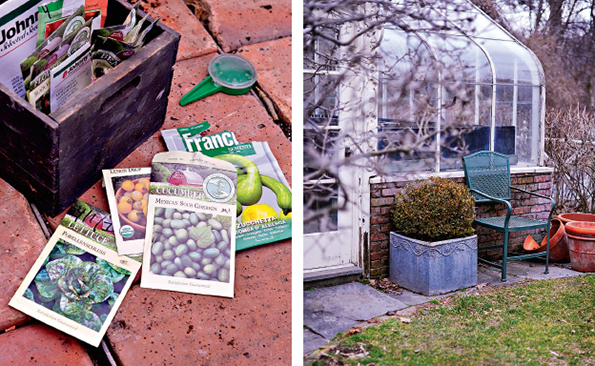
There are many arguments for starting your own plants from seed, but the most persuasive reasons are access to thousands of varieties that you’ll never see at the nursery and being able to grow many more plants at a fraction of the cost. There are nurseries that sell only heirloom seeds, those that specialize in rare and exotic varieties, and those that focus on annual flowers. There are those that concentrate on organics, or just tomatoes, or herbs, and some that sell it all. Whatever the farm or garden of your imagination can conjure, there are seed catalogs out there to tempt you.
One of your first considerations before you order seeds will be determining your USDA Zone. These are growing areas defined essentially by your first and last frost dates, and zone maps are ubiquitous online. Knowing your zone will tell you what plants you can safely grow: Any number higher than yours will be iffy for you. (For example, growing a Zone 8 kumquat in Zone 6 is asking for trouble.) All perennial seed packets will indicate what zone that plant is suited for. Your zone for annuals tells you how soon you can plant out in spring without risk of injury from frost and how late you can plant short-season annuals into fall. Because the climate has been so unstable lately, zones are also shifting, and you may find yourself being bumped up a zone or two at some point. (So, kumquats? Maybe.)
For organic growing, you’ll want to find seeds from companies that carry organic, non-GMO seeds. Many mail-order catalogs have both organic and conventional seeds, while some specialize in organic only. Heirloom seeds are something to consider as well; they’re open-pollinated, meaning they are true to type and you’ll be able to save some seeds from your vegetables at the end of the season and plant them the following year. (If you order only heirlooms, you could theoretically never have to buy seeds again!) Ordering organic seeds means you’re supporting organic growers who—unlike conventional producers that use earth-damaging chemical fertilizers, pesticides, and GMOs—are invested in restoring the balance of natural ecosystems.
Make a list of what you want to grow and what you love to eat, then compare it to the amount of space you have. Be ruthless about paring down the list, based on the space each crop requires and how much care it will need. It’s better to start small and get more ambitious next season. Many enthusiastic growers get discouraged their first time out when they overplant without realizing the amount of work and maintenance involved. Once your skills, needs, and desires are more defined, you can go all out.
Soil Blocking
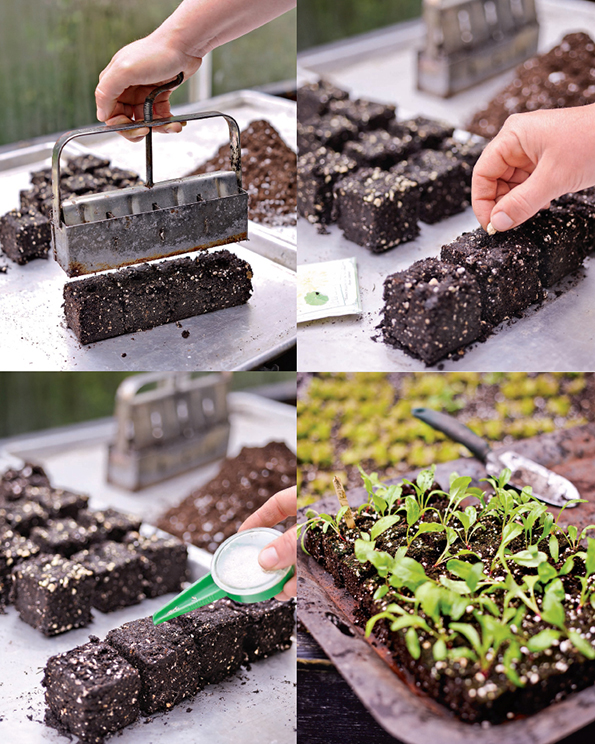
Soil blocking is my preferred method of starting seed, not only because no pots or seed trays are involved but because the blocks can be transferred directly into the soil once the seedlings are ready. A soil blocker is a one-, four-, or eight-celled metal soil mold that is used to make firm squares of potting mix that are then seeded. (We primarily use a blocker with four 2-inch-square cells.) The mold is pressed firmly into moist potting soil and compressed into a square with a small dimple in the top of the square for the seed. Seeds grown in soil blocks will not suffer from root binding as can often happen with pots; their roots will go only to the edge of the block and stop (they’re smart that way). The outer soil in the block will form a harder crust as it dries, which will keep the block intact.
We start our soil-blocked seedlings in the greenhouse and lay out the blocks in tight rows on repurposed metal restaurant trays (the 18 × 26-inch galvanized baking sheets you see in racks in professional kitchens). We may have ample light for seed starting in our greenhouse in March, but with late winter still lingering outside, our unheated greenhouse barely gets to 50°F, and the soil blocks are even cooler, so the soil must be warmed from below to trick seeds into thinking it’s time. There are commercial seed heating mats available, some with thermostats, but they’re prohibitively expensive for the square footage of heat you get. Needing more bottom heat on a budget to aid germination, I’ve improvised a DIY system that works quite well: The trays are put over runs of gutter heating cable, which brings the soil temperature of the blocks up to around 70°F—ideal for starting most seeds.
If the soil-blocked seedlings begin to get too large for their 2 × 2-inch block, they can be potted up into a larger soil block (made with a bigger blocker), transplanted into a larger 4-inch pot until planting out, or (ideally) planted out directly into the garden after your last frost.
Seed Starting Indoors
Starting seeds indoors is where most home growers begin. Before you invest in the expense of a greenhouse or hoop house, it’s important to see if any of this really is for you. Indoor seed starting can happen in all types of containers on a bright windowsill or in an area of the house where you can create favorable growing conditions. To get seeds off to a healthy start, use a soilless seed-starting mix that will retain moisture but drain quickly. You can buy a commercial mix or make your own by combining equal parts of vermiculite, milled sphagnum moss (or good-quality, screened compost), and perlite. Avoid products that contain fertilizers—seeds come prepackaged by nature with their own startup food supply.
Any container that has drainage holes may be used for starting seeds, but professional growers have good reasons for using the familiar 10 × 20-inch plastic flats that fill garden center shelves each spring. The shallow depth of a standard-size flat holds enough growing medium for seedlings to spread their roots while allowing for watering from the bottom. A flat may be filled with seed-starting medium or used to hold cell packs or other individual containers. Seedlings such as squash or melons that may suffer if their roots are disturbed during transplanting may be started in biodegradable pots of peat, coir, or newspaper supported in a flat until it’s time for planting out. If you’re recycling flats or cell-packs that held previous plant purchases, wash them with warm, soapy water and rinse thoroughly before adding seed-starting mix.
Sow seeds in the moistened mix according to their size and the instructions on the seed packet. Fine-textured seeds may be sprinkled over the surface of a container, while larger ones should be spaced evenly in rows and planted at the recommended depth. Pay attention to light needs: Some seeds require light to germinate and should not be covered, while others germinate only in darkness. Cover small seeds with a sprinkling of dry seed-starting mix (moisten afterward with a spray bottle mister) or with fine sand.
Once seedlings are up, light is essential. A windowsill may seem bright but often is not light enough in the short days of late winter. Fluorescent shop lights are inexpensive and can ensure seedlings get enough light. Hang (or support) lights just a couple inches above seedlings and set a timer to turn them on and off so young plants get a reliable 8 to 10 hours of light per day and a rest at night that ties them in to nature’s circadian rhythms of light and dark.
Potential Problems
Seed starting most often fails when the conditions are not right. If flats of newly sown seeds fail to germinate or germinate poorly after a reasonable amount of time, chances are that the seeds’ germination requirements were not satisfied or you possibly have some old, expired seed. If you started with fresh seeds from a reliable source, consider if the growing mix was too warm or too cold, if the seeds were covered too deeply, or if the medium dried out. Check the normal germination rate of the crops you’re starting—some seeds are naturally finicky (perennials in particular) about sprouting and may come up sparsely even if you do everything just right. Adjust the conditions and try again.
If young seedlings become pale and yellowish or develop any other abnormal color, a lack of nutrients is probably to blame. Add organic liquid fertilizer, diluted to half the recommended strength, to the watering routine no more than once every 1 to 2 weeks. Seedlings will also benefit from a foliar (sprayed) application of half-strength liquid seaweed or fish emulsion, but be aware that they’ll smell of low tide, so consider whether the location of your seedling flats is a place where this is tolerable or not.
Seedlings that suddenly collapse have fallen prey to damping-off disease, a fungus that occurs in soil and fells apparently healthy seedlings, typically causing them to bend over right at the soil line. Damping-off is soilborne, which is why starting in clean containers with soilless mix is so important. The disease also thrives in damp, cool conditions where there’s little air movement; increasing ventilation with a small fan can help prevent problems, too, as can filling seed-starting containers to the rim so their sides don’t block airflow around young stems and leaves.
Seeds want to grow—that’s why they’re here. They all have the hope of viability in their DNA, wanting that delicious, life-giving cocktail of dirt, water, and light to set them loose upon the world. Your job is only to steward them—they’ll take care of the rest.
Coldframes
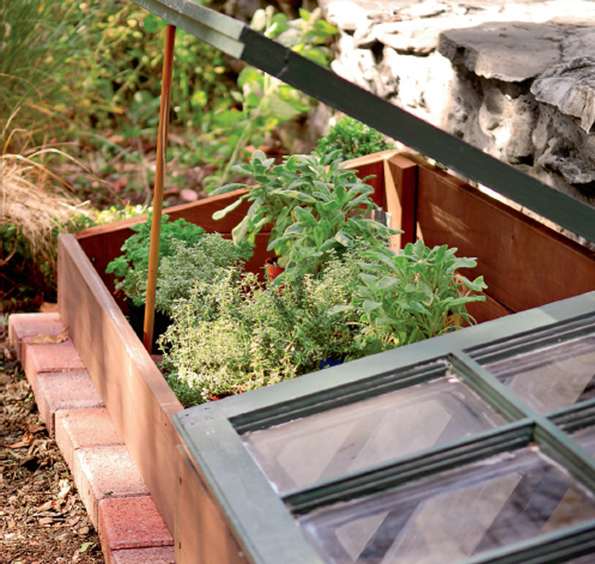
Coldframes are great season extenders, allowing you to harden off your seedlings earlier in the season and grow plants later in the season as frosts come and go. Hardening off is the process of slowly acclimating seedlings to outdoor conditions. A coldframe is basically a mini greenhouse, often made from rot-resistant lumber, topped with a repurposed window to let light in and with a means of propping the window open during warm days. It’s a pretty simple DIY project.
Plants want light, good soil, moisture, and protection from frost, and coldframes will give you all of that, with the added benefit of creating a transitional space for your seedlings when the greenhouse becomes too crowded (and it always does) in late spring.
A coldframe, as its name implies, should be cooler than the greenhouse and allow plants to start acclimating to the outdoors. They are usually built with the front, south-facing edge lower than the back, to minimize shade from the frame itself and to allow water to shed. The glass should be propped up and vented during the warmest days in spring, as direct spring light—unobstructed by a canopy of leaves—can warm up the coldframe interior quickly. Adding hinges to the window frame will allow you to vent the frame during the day and close it at night to reduce convection.
Greenhouses and Hoop Houses
Every gardener dreams of having a greenhouse to grow in. There’s nothing like creating your own biosphere of warmth and light that pulses with life during the off-season, when the rest of the growing world lies dormant.
Not only does it extend your season by a few months on either end, giving you a place to start seeds in early spring and continue growing cold-hardy crops into fall and winter, but it also protects higher maintenance plants (like fussy, heat-loving tomatoes) during the season and allows you to more carefully control and monitor the growing environment. A greenhouse creates a perfect microclimate for you and your seedlings, and while a coldframe is a small step, a greenhouse or hoop house is a giant leap toward becoming a serious grower.
Hoop houses, which come in many sizes and are made from galvanized pipe and translucent polyethylene sheeting, are an economical answer to the expense of a traditional greenhouse. They’re relatively easy to construct and take down, require no permanent foundation to be built (usually meaning no permits necessary), and provide most of the benefits of a traditional greenhouse, except for the higher solar heat transfer of glass. Hoop houses are usually constructed using a double layer of UV-resistant, 0.6-millimeter poly film, while commercial greenhouses use a double-walled rigid polycarbonate or double-glazed glass, but they all have a relatively high thermal performance that keeps the warmed air inside the structure from cooling due to convection.
The most economical option, after a hoop house, is a high tunnel, which is a single-walled hooped structure. High tunnels will do a reasonable job of season extension, as will low tunnels, which are a scaled-down version usually made with ¾-inch EMT pipe. There are pipe benders on the market for forming your own hoops, making it simple to create protective row covers for your crops.
The only downsides of hoop houses are that they are vulnerable in high winds or heavy snow loads (they don’t have the structural integrity of more permanent structures) and that the polyethylene film degrades over time. They also aren’t the most beautiful things, looking a bit like oversize and half-buried plastic barrels, but they have plenty of utility and economy.
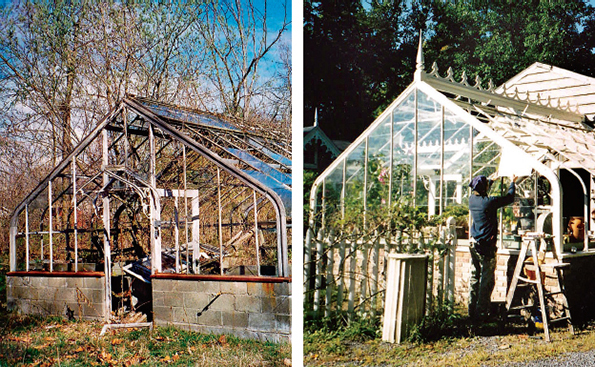
If you are resourceful and want a more permanent, eye-pleasing structure for your property (but still don’t want to blow your kid’s college fund), you can look for a used glass greenhouse on the Internet. These structures are often in disrepair, missing glass, and overrun by neglect, but with enough time and energy, they can be taken apart, salvaged, and restored.
Shortly after I moved in at Stonegate, I uncovered an abandoned greenhouse foundation in the woods that used to be part of the old estate before trees and time ate it up. Its ornate lion’s face fountainhead was the only sign of its former grandeur, poking out indignantly beneath a scrap heap of twisted metal and glass. The most salvageable piece was the fountainhead, which I moved (somehow) to a spot on the eastern side of the potting shed, where it sat glaring at me for a few years until someone told me about an old commercial greenhouse nearby that was about to be torn down. I got in touch with the property owner and came to check it out, and there was this forsaken 52-foot Gothic structure from the 1920s, with most of its glass gone and trees and vines growing through the open rafters, but with all the beautiful, original bones intact: scrolled ironwork brackets above the doors, terra-cotta staging tiles, functioning worm gears and venting wheels. I was ecstatic. It took about 3 weeks to salvage enough material for the 18 × 18-foot greenhouse I wanted to build, and another few weeks to rebuild it on-site, but because the old galvanized materials had such integrity and had somehow shrugged off the effects of time, the greenhouse went up like a kit from another time. It’s now where the farm gets started—and finishes up—each year.
Before you go through the expense and effort of putting in a greenhouse or hoop house, be sure that your site is appropriate: Water and drainage are essential, as is access to electricity. A greenhouse also wants as much early- and late-season light as possible, so siting it with its gable ends to the east and west means its longest side will be south facing and have the most solar exposure. The only downside here is getting too much heat gain in summer, making venting and shading necessary. We solved that problem at Stonegate by planting two vigorous seedless Concord grape vines outside the foundation wall and then training them under the wall and up into the greenhouse rafters where they shade in summer and—with their roots outdoors—drop their leaves in winter, letting in all the wanted light. Oh, and there’s the small delight of those glinting clusters of grapes hanging from the rafters in August: Practical and beautiful meet again.