K-Food: Korean Home Cooking and Street Food - Da-Hae West, Gareth West (2016)
Chapter 3. Banchan & Sides
Food is so ingrained in Korean culture that the word for family, shikgu, translates literally as ‘mouths to feed’. Every family gathering always involves a big feast and, whenever we meet with friends, the first thing we talk about is where we should eat.
While Korea’s probably best known for its barbecued meats, these are usually reserved for eating out in big groups. At home, people tend to eat an assortment of small dishes known as banchan - meat, fish or vegetable dishes which are shared in the middle of the table, with each person also having an individual bowl of rice and often a simple soup, or guk, as well.
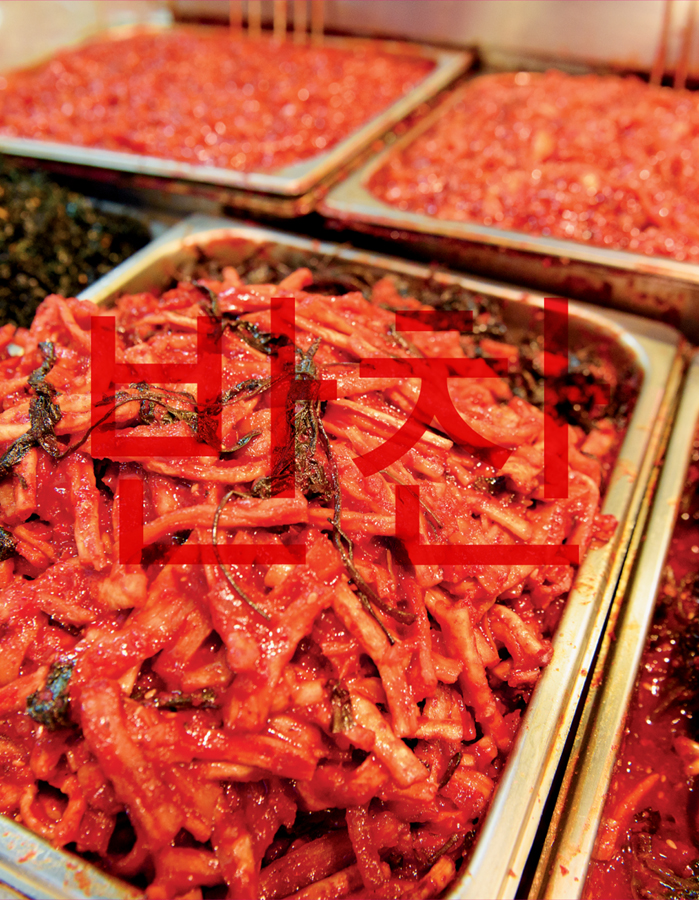
Banchan usually fall into the broad categories of kimchi (fermented vegetables), namul (lightly seasoned vegetable dishes), bokkeum (stir-fried dishes), jorim (braised dishes, usually in soy sauce) and jeon, which includes savoury pancakes (or pajeon) but also includes pan-fried meat or vegetables which are coated in a flour and egg batter. Because Koreans believe that balance is important in order to maintain a healthy diet, there will often be a real mix of different dishes served at any one time.
Nowadays, a lot of (particularly younger) Koreans don’t have the time to make a variety of different banchan each day, but fortunately they’re always easy to buy from the ajummas in the markets. Anyone who lives in Korea knows that it is run by the ajummas - the middle-aged women of Korea often seen wearing baggy floral trousers or shell suits and visors. They’re the ladies with attitude - the ones who will push past you in a street or jump a queue without a second thought. But they’re also the powerhouses. It’s the ajummas who usually run the restaurants, cooking up a storm in the kitchen. They’re also the ones with the big trays of food balanced on their heads as they run takeaways, and the ones that sit for hours at the markets, selling their veg and prepared banchans.
At work, I used to eat lunch with a group of girls, and we’d always each bring in at least one banchan, sometimes homemade, sometimes bought, for everyone to share. These would vary from the traditional such as homemade kimchi or seasoned vegetables to mac ’n’ cheese, fried Spam or hot-dogs tossed in ketchup. It just goes to show that nowadays with banchan almost anything goes. It’s what I love about Korean food in general - the fact that you’re able to pick and choose the dishes you like to suit your own taste.
The dishes that we’ve included in this section are mostly traditional Korean banchan, but they can also be enjoyed as side dishes or starters. We’ve also included some of our favourite sides that we’ve served at our pop-ups and events, all of which would make equally great banchan too.
Jeon
FAMILY FRITTERS
Though traditionally part of Korea’s royal cusine, nowadays jeon can be found everywhere, even as street food. These lightly coated fritters still have a place, however, as part of special occasions, such as Je-Sah - when families get together to commemorate the lives of relatives who have passed away. In my family we hold a big Je-Sah gathering each year to commemorate my grandparents, and these jeon always form an important part of the meal we share.

1 tablespoon vegetable oil, plus extra if needed
jeon pieces of your choice
Cho Ganjang, to serve
COATING
4 eggs
160g (6oz) plain flour
1 teaspoon salt
1_ Heat the vegetable oil in a large heavy-based frying pan over a medium-low heat.
2_ To make the coating, whisk the eggs together in a bowl and set aside. In a separate bowl, mix together the flour and salt.
3_ Toss your chosen jeon pieces in the flour until well coated, then dip them in the beaten egg mixture.
4_ Shake off any excess beaten egg, then add the jeon pieces to the pan, being careful not to overcrowd it (you may need to cook these in batches, if so add an extra tablespoon of oil to the pan for each batch).
5_ Fry for 2-3 minutes on each side until golden brown, reducing the temperature if it looks like the jeon pieces are starting to colour too quickly. Remove from the pan and drain on kitchen paper. Serve with cho ganjang for dipping.
Cod (sengsun) Jeon
Cut 350g (12oz) cod fillet into 5-cm (2-inch) x 2.5-cm (1-inch) pieces. Coat and cook according to the instructions opposite.
Courgette (hobak) Jeon
Slice 1 courgette into 1-cm (½-inch) rounds. Coat and cook according to the instructions opposite.
Pork Meatball (wanja) Jeon
Crumble 200g (7oz) firm tofu into a large mixing bowl. Add 1 sliced spring onion, 4 finely chopped garlic cloves, 2 tablespoons diced carrot and 300g (10½oz) minced pork, season with salt and pepper and mix together well. Shape into golf-ball-sized pieces and flatten each until they are about 1cm (½ inch) thick. Coat and cook according to the instructions opposite.
Spring Onion and Spam Jeon Skewers (spam sanjeok)
Soak 8 bamboo skewers in water. Cut 8 spring onions into thirds, then slice 300g (10½oz) Spam into pieces of the same size as the onions. Alternately thread 3 spring onion and 3 Spam pieces onto each skewer, trim the skewer ends neatly, then coat and cook according to the instructions opposite.


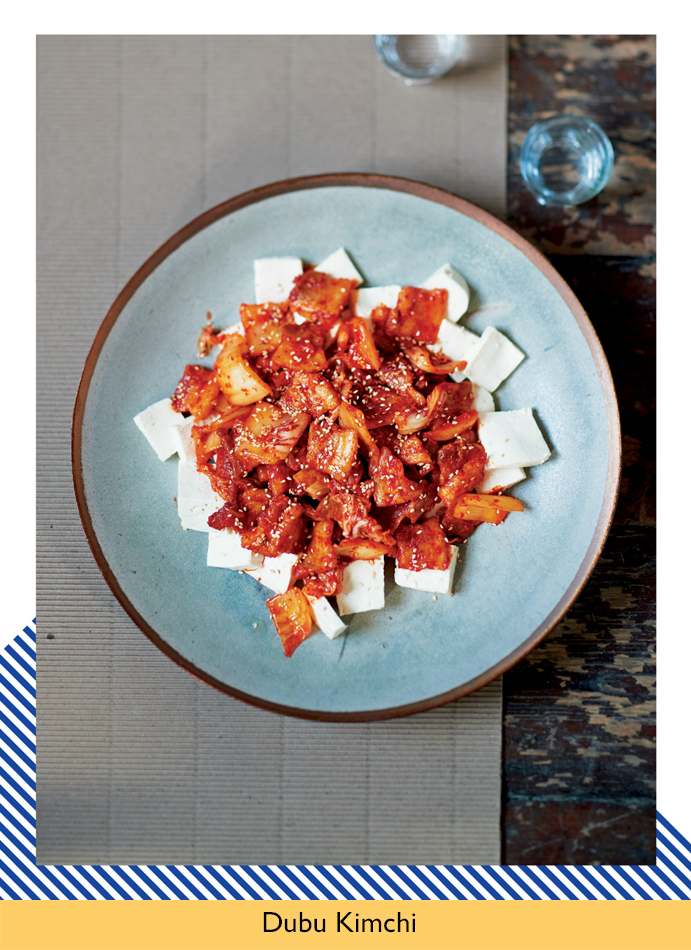
Dubu Kimchi
STIR-FRIED PORK AND KIMCHI WITH TOFU
Don’t knock this until you’ve tried it! While kimchi and tofu might not sound like the most exciting of flavour combinations, it really works - the spicy tanginess of the kimchi contrasting with the soft, silky texture of the tofu. A great side dish, this is also often served as an anju as it makes a perfect accompaniment to a few shots of soju.

1 tablespoon vegetable oil
300g (10½oz) pork belly, cut into bite-sized chunks
300g (10½oz) Baechu Kimchi, drained and roughly chopped
1 tablespoon gochugaru (Korean red chilli powder)
1 tablespoon caster sugar
½ tablespoon roasted sesame seeds
½ tablespoon sesame oil
400g (14oz) firm tofu
1_ Heat the vegetable oil in a heavy-based frying pan over a medium heat. Add the pork and fry for 2-3 minutes, stirring, until the meat is coloured on all sides and cooked through.
2_ Add the kimchi, gochugaru and sugar to the pan and fry for another 3 minutes, until the kimchi softens and becomes glossy from the fat that has rendered down from the pork pieces. Add the sesame seeds and sesame oil and cook, stirring, for a further minute, then remove from the heat and set aside.
3_ Bring a saucepan of salted water to the boil. Carefully lower the tofu into the water, reduce to a simmer and cook for 3 minutes. Remove the tofu from the pan with a slotted spoon and drain on kitchen paper, then cut into 5-cm (2-inch) squares.
4_ Arrange the tofu squares on a serving plate or board and spoon over the pork and kimchi mixture to serve.
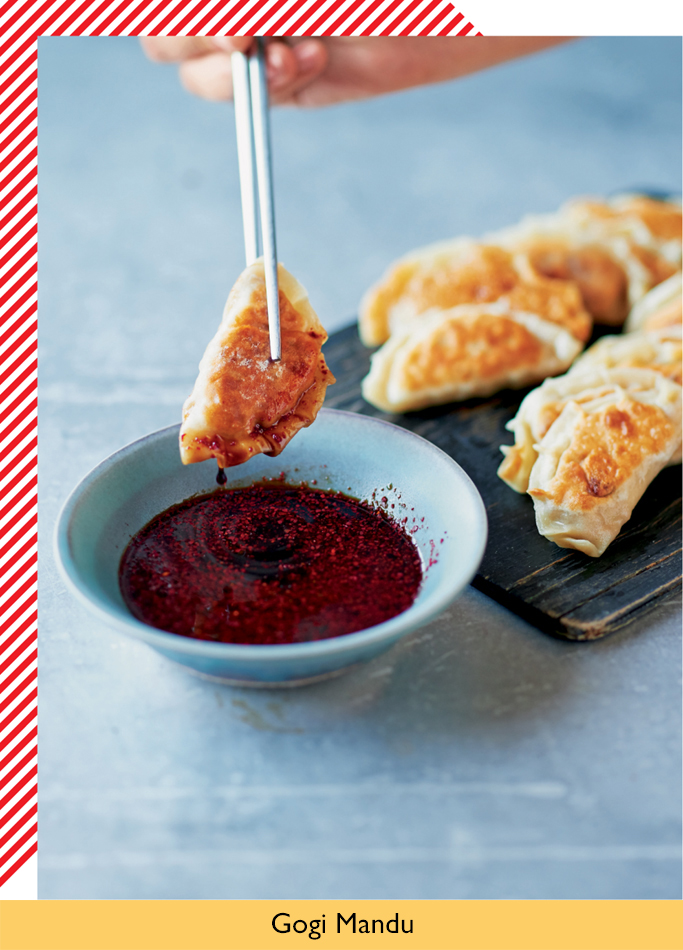
Gogi Mandu
PORK DUMPLINGS
These plump little dumplings are always a real crowd pleaser. This recipe shows how to make the pan-fried versions with their crispy, golden brown skins, but they’re also great simply steamed or added to soups, and can be deep-fried for added crunch too. I love adding them to instant noodles when I’m feeling really hungry.

vegetable oil, for frying
20 mandu skins, either shop-bought or homemade
2 tablespoons water, plus extra if needed
Cho Ganjang, to serve
FILLING
3 dried shiitake mushrooms
50g (1¾oz) dangmyeon sweet potato noodles
200g (7oz) firm tofu
2 spring onions, trimmed and finely sliced
¼ Chinese cabbage, trimmed and finely sliced
3 garlic cloves, minced
pinch of pepper
2 tablespoons regular soy sauce
2 teaspoons sesame oil
1 tablespoon vegetable oil
300g (10½oz) minced pork
1_ For the filling, place the shiitake mushrooms in a bowl, cover with boiling water and leave to soak for 15 minutes. Drain and finely chop.
2_ Meanwhile, soak the noodles in boiling water in a separate bowl for 10 minutes. Drain and rinse under cold running water, then cut into 5-mm (¼-inch) lengths.
3_ Crumble the tofu into a large bowl (the finer you can crumble it, the better). Add the noodles and mushrooms to the tofu along with all the remaining filling ingredients except the minced pork and mix together well.
4_ Heat 1 tablespoon of vegetable oil in a frying pan over a medium heat. Add the minced pork, stirring, and break it into pieces with a wooden spoon until browned all over. Add the filling mixture into the pan and cook for a further 3 minutes, stirring, until the cabbage has softened. Tip the filling into a large bowl and leave to cool.
5_ Fill the mandu skins following the step-by-step instructions opposite.
6_ Heat 2 tablespoons of oil in a large frying pan with a lid over a medium heat. Add the mandu, being careful not to overcrowd the pan (you may need to do this in batches) and fry for 2 minutes until browned on one side.
7_ Turn the mandu over, add the water and cover with the lid. Cook for a further 2 minutes, then remove the lid. The mandu should be half-crispy and half-steamed at this point - if there’s still a little water in the pan, then leave them to cook uncovered for another minute until it has evaporated.
8_ Drain on kitchen paper and serve with cho ganjang for dipping.
MANDU-FILLING STEP-BY-STEP
1_ Lay a mandu skin flat in the palm of your hand.
2_ Spoon 2 teaspoons of the filling into the centre of the mandu skin.
3_ Dab a finger in a little water and run it over the edge of half of the mandu skin.
4_ Fold the mandu skin over and seal the edges together with your fingertips.
5_ Dab your finger in a little more water and run it over the front flat edge of the mandu.
6_ Ensuring the mandu skin remains flat, pinch the semicircular edge with your fingertips every 1-cm (½-inch) gap to create a rippled, crimped effect. Repeat with the remaining mandu skins and filling.
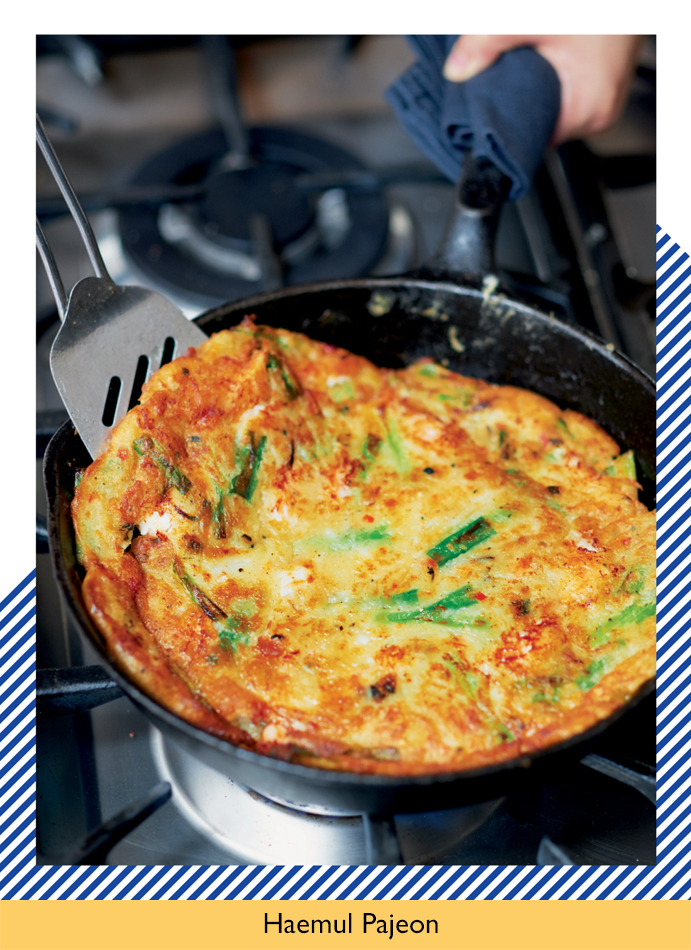
Haemul Pajeon
CRISPY SEAFOOD PANCAKE
Apparently, Koreans traditionally eat these deliciously crispy savoury pancakes on rainy days because the sizzling noises from the frying pan sound like the pitter-patter of raindrops. While this seems like a bit of a stretch to me, I’m happy for any excuse! The baking powder is the secret ingredient in this recipe - it gives the pancake extra crunch, so everyone will be fighting over all those crispy edges. It’s served traditionally with makgeolli, a fermented alcoholic rice drink, but it is also great with a soju or beer.

250g (9oz) plain flour
1 teaspoon salt
1 teaspoon baking powder
375ml (13fl oz) ice-cold sparkling water
200g (7oz) mixed seafood (such as prawns, mussels and squid rings), roughly chopped
2 bird’s eye chillies, finely chopped (optional)
10 spring onions, trimmed and cut into 5-cm (2-inch) lengths
6 tablespoons vegetable oil, plus extra if needed
Cho Ganjang, to serve
1_ In a large bowl, mix the flour, salt and baking powder together with the water to form a smooth batter. Add the seafood, chillies and spring onions and stir together well to ensure everything is evenly coated in the batter mixture.
2_ Heat 3 tablespoons of vegetable oil in a large, nonstick frying pan over a high heat. Spoon a generous ladleful of the pancake mixture into the centre of the pan then, using the base of the ladle, carefully smooth the mixture out into a circle shape until the pancake is about 1cm (½ inch) thick.
3_ Cook the pancake for 2-3 minutes, until browned and crispy on one side, then flip it over and cook for a further 2-3 minutes. The pancake will soak up some of the oil, so you may need to add a little extra to stop it sticking (this will also help to make the edges extra crispy!). Drain on kitchen paper and cover to keep warm.
4_ Heat the remaining 3 tablespoons of oil in the pan and repeat for the second pancake. Serve with cho ganjang for dipping.
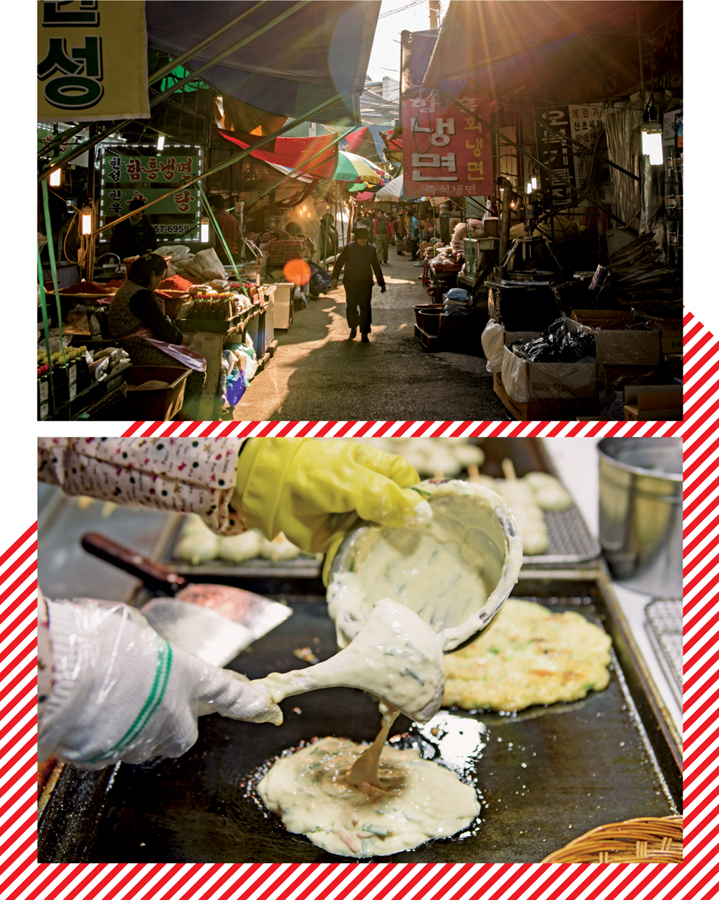
Coconut Bindaetteok
CRISPY MUNG BEAN PANCAKES
These mung bean pancakes are particularly famous in Gwangjang Market in Seoul. There you can watch as the ajummas grind up the mung beans by hand, using stone mills to create the paste for the pancake batter. The batter is then fried in batches on large sizzling griddles and the pancakes are piled high in front of their market stalls, to catch the eye of passing customers. The smell of these bindaetteok crisping up in the hot oil fills the market, making them impossible to resist.
We wanted to create our own take on these mung bean pancakes and decided to give them a South-Asian twist for a Korean/Indian pop-up that we held with some friends. The coconut adds a subtle sweetness, which provides a nice contrast to the tangy, sweet-and-spicy dipping sauce that we serve these with.

230g (8¼oz) yellow mung beans
350g (12oz) coconut milk
100g (3½oz) creamed coconut, grated
1 teaspoon salt
1½ teaspoons garam masala
1 onion, finely sliced
2 bird’s eye chillies, finely sliced
vegetable oil, for frying
DIPPING SAUCE
2 bird’s eye chillies, finely sliced
3 tablespoons apple vinegar
2 tablespoons caster sugar
½ tablespoon gochugaru (Korean red chilli powder)
1_ Put the mung beans in a bowl, cover with water and leave to soak for 4 hours.
2_ Meanwhile, for the dipping sauce, mix all the ingredients together in a bowl. Set aside.
3_ Once soaked, rinse and drain the mung beans, then tip them into a food processor with the coconut milk, creamed coconut, salt and garam masala and blend together to form a smooth batter. Stir the onion and chillies into the batter with a wooden spoon.
4_ Heat 2 tablespoons of vegetable oil in a large frying pan over a medium heat. Pour a ladleful (about 120ml/4fl oz) of batter into the pan and spread out to a 1-cm (½-inch) thickness. Fry for 2 minutes on each side until crispy and golden.
5_ Slide the pancake out of the pan and drain on kitchen paper while you continue to make the rest, adding an extra 2 tablespoons of oil to the pan for each pancake. Serve immediately with the dipping sauce.
Pa-Jeori
SPRING ONION SALAD
My mum is from Busan, so I’ve always thought that this dish was called Pa-Jeo-Leg-Gi. That is, until I was teased about it recently. Korea has different accents and dialects, and this is just one example of the many words from Busan creeping into my Korean without me realising. The official name that you’ll see on restaurant menus is Pa-Jeori. Whichever way you say it, these spicy spring onions make a great accompaniment to a Korean BBQ - the slightly vinegary dressing contrasting perfectly with the fatty meats and sweet marinades.

200g (7oz) spring onions, trimmed
2 tablespoons regular soy sauce
2 garlic cloves, minced
2 tablespoons gochugaru (Korean red chilli powder)
2 teaspoons sesame oil
2 tablespoons caster sugar
2 tablespoons apple vinegar
1 teaspoon salt
1_ Cut the spring onions into 10-cm (4-inch) lengths, then cut each piece in half lengthways. Slice the spring onion halves lengthways as thin as you possibly can so that you have lots of fine spring onion strands.
2_ Place the spring onion strands in a large bowl with all the remaining ingredients. Using your fingertips, mix the ingredients together well for 2-3 minutes, until the spring onions are softened and completely coated and serve.
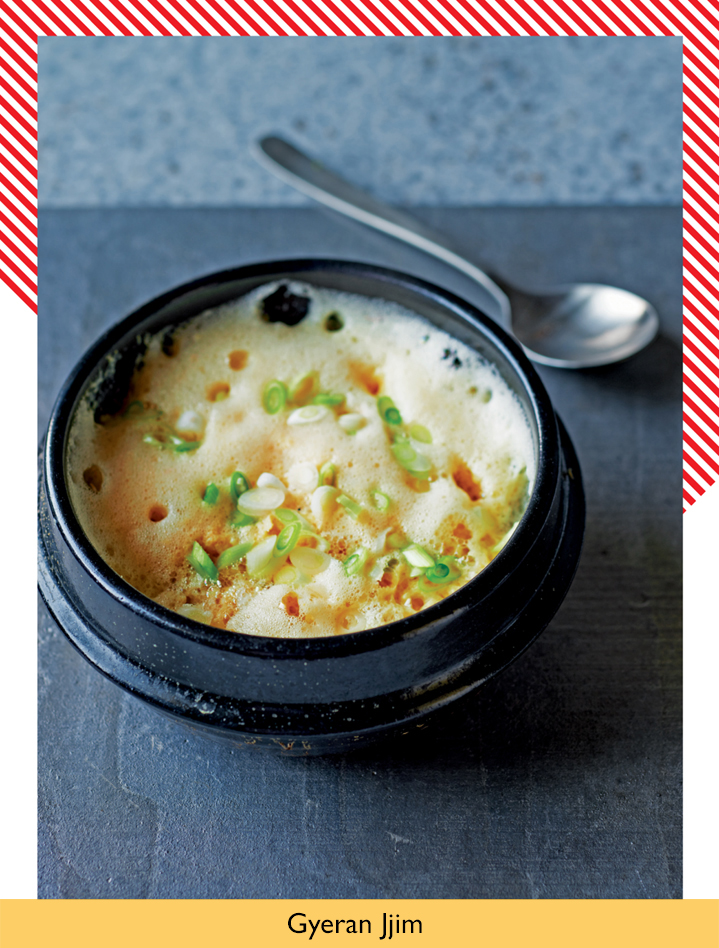
Gyeran Jjim
FLUFFY STEAMED EGG
This dish is so simple but so delicious, and is one of my favourite banchan. The egg becomes really light and fluffy like a soufflé, lightly seasoned by the fermented shrimp. If the idea of seeing the whole little shrimp puts you off, either chop them up before you add them to the egg or use a good pinch of salt instead.

3 eggs
approx. 200ml (7fl oz) water
1½ spring onions, trimmed and chopped
½ teaspoon vegetable oil
2 teaspoons saeujeot (salted fermented shrimp)
1_ Crack the eggs into a measuring jug, making a note of the volume of egg (this should be about 200ml/7fl oz but will vary depending on the eggs you use). Top up with the same quantity of water as egg, add half the spring onions and whisk together well.
2_ Brush the bottom of a heatproof earthenware dish or Korean dolsot stone bowl with the vegetable oil and place over a high heat.
3_ Add the egg mixture to the dish and cook for 3-4 minutes, whisking continuously, until the egg thickens to a custard-like consistency. Whisk the fermented shrimp into the mixture and cook for a further 1 minute, until the egg is just beginning to set and is starting to come away from the sides of the dish.
4_ Remove from the heat, spoon into a serving bowl and garnish with the remaining spring onions. Serve immediately.
A generic term for anything that has been mixed in seasoning, muchim are commonplace on a Korean dinner table as banchan. These dishes can always be found in our refrigerator at home - my mum will often grab a small handful of each and mix them together with rice and sesame oil to make a very quick bibimbap (mixed rice) but they can also be served as individual dishes.
In Korea, there’s a phrase, ‘son mat’, which means ‘taste of the hand.’ It refers to a person’s natural ability to balance flavours to create a dish. The muchim recipes that feature here are my versions, but everyone makes them slightly differently, so feel free to tweak them to your own taste. Funnily enough, it’s actually easiest to mix all the ingredients together by hand rather than a spoon, as it means you really rub the flavours into the vegetables and encourage their natural juices to form the marinade.
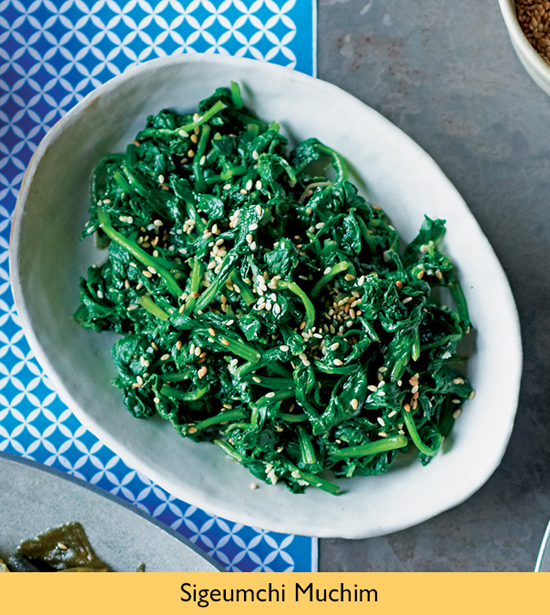
Sigeumchi Muchim
SEASONED SPINACH
Lightly seasoned, the sesame flavourings give the earthy spinach a subtle, nutty fragrance.

400g (14oz) spinach leaves
½ teaspoon salt
1 small garlic clove, minced
1 teaspoon sesame oil
pinch of pepper
1 tablespoon roasted sesame seeds
1_ Bring a large saucepan of water to the boil.
2_ Add the spinach to the water and cook for 1 minute until wilted. Drain and rinse under cold running water, then squeeze out any excess water with your hands.
3_ Put the spinach in a bowl, add the remaining ingredients, and mix together with your hands, ensuring the spinach is thoroughly coated in the seasoning mixture. This will keep in the refrigerator for 3-4 days.
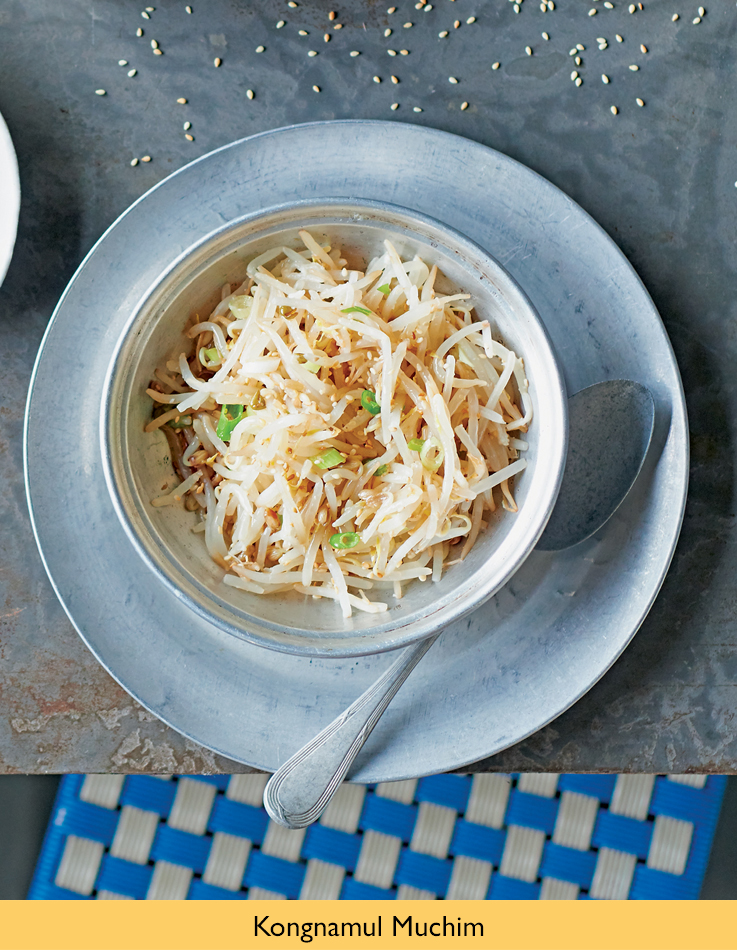
Kongnamul Muchim
SEASONED BEAN SPROUTS
An essential for Dolsot Bibimbap, these beansprouts have a nice crunchy texture and are a staple banchan at most Korean tables.
600g (1lb 5oz) bean sprouts
2 tablespoons salt
4 spring onions, trimmed and finely sliced
2 garlic cloves, minced
1 tablespoon roasted sesame seeds
1 tablespoon sesame oil
1_ Remove any brown heads and skins from the bean sprouts and cut off all the stringy roots.
2_ Fill a large saucepan with water and bring to the boil. Reduce the heat to a simmer, add the bean sprouts and cook for 5 minutes until tender. Drain and rinse under cold running water.
3_ Tip the bean sprouts into a large bowl and add all the remaining ingredients. Mix everything together with your hands, ensuring the bean sprouts are thoroughly coated in the seasoning mixture. This will keep in the refrigerator for 3-4 days.
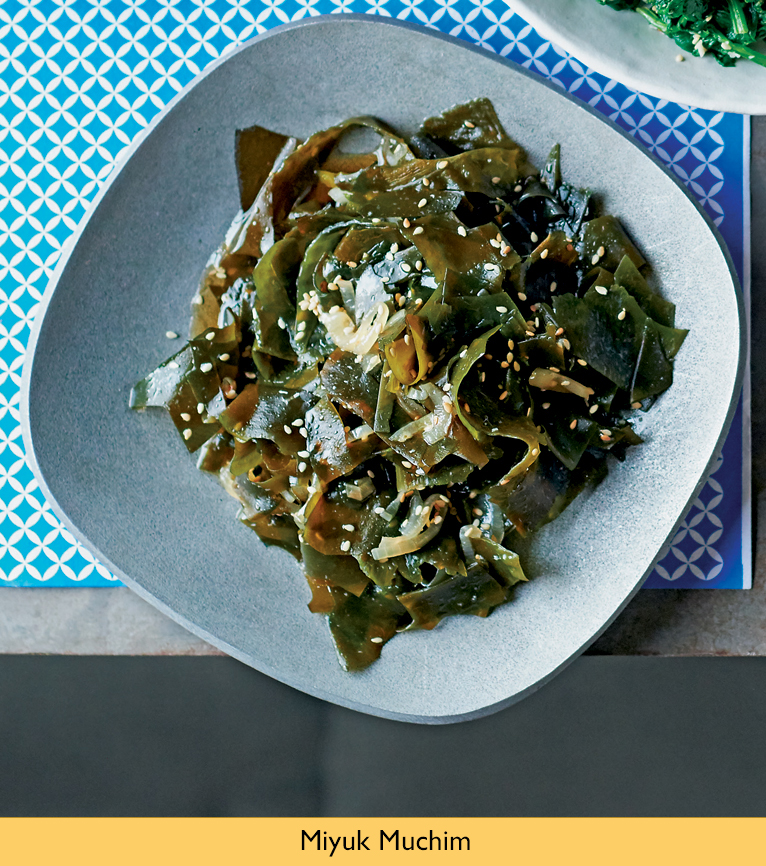
Miyuk Muchim
SEASONED SEAWEED
Probably my mum’s favourite muchim, this seaweed banchan still retains the taste of the sea with a very savoury edge from the onions.
25g (1oz) dried miyuk (wakame) seaweed
1 tablespoon vegetable oil
½ onion, finely sliced
pinch of salt
2 teaspoons sesame oil
2 tablespoons sesame seeds
1 teaspoon light soy sauce
1 small garlic clove, minced
1_ Put the seaweed in a small bowl, cover with cold water and leave for 10-15 minutes until soft and slippery. Drain, squeezing out any excess water with your hands, then roughly chop.
2_ Heat the oil in a heavy-based frying pan over a medium heat. Add the onion and salt and fry for 2-3 minutes, until the onion has softened but not coloured.
3_ Tip the onion into a large bowl and add the chopped seaweed, sesame oil, sesame seeds, soy sauce and garlic. Using your fingertips, mix the ingredients together well, ensuring the seaweed is thoroughly coated in the seasoning mixture. This will keep in the refrigerator for 3-4 days.
TIP: If you fancy something spicier, leave out the onions and soy sauce and mix in a couple of tablespoons of Cho Gochujang when combining the rest of the ingredients. This will make a spicy, sweet and sour sea weed muchim called miyuk cho muchim.
Corn on the Cob with Kimchi Butter
Oozing with melted butter, corn on the cob has to be one of the ultimate side dishes and the perfect accompaniment to a BBQ. Our Kimchi Butter, slathered on top, packs the corn full of salty, spicy flavours. Be generous with it, you’ll want loads.

4 sweetcorn, husks removed and halved
2 tablespoons vegetable oil
½ teaspoon salt
KIMCHI BUTTER
200g (7oz) Baechu Kimchi, drained
250g (9oz) salted butter, softened
2 teaspoons fish sauce
4 garlic cloves, minced
1 tablespoon gochujang (Korean red chilli paste)
1_ To make the kimchi butter, put all the ingredients in a bowl. Mix everything together well with a wooden spoon (or use your hands if you prefer) until the ingredients are incorporated evenly through the butter.
2_ Tip the butter onto a chopping board covered in a sheet of clingfilm and form into a long sausage shape about 5cm (2 inches) in diameter. Wrap the clingfilm tightly around the butter, twisting the edges to seal, and refrigerate until needed.
3_ When you are ready to cook the sweetcorn, mix the vegetable oil together with the salt in a small bowl.
4_ Heat a cast-iron griddle pan over a medium heat. Brush the sweetcorn with the oil mixture, then add to the pan and cook for 10-12 minutes, turning with a pair of tongs and brushing with more oil every few minutes to ensure they cook evenly, until the kernels become swollen and start to make a popping noise.
5_ Flip the sweetcorn up on their ends and cook for 30 seconds on each end to sear and ensure all the corn kernels are cooked. Transfer to a large serving dish.
6_ Cut the kimchi butter into discs and slather all over the corn to serve.
TIP: Although you’ll want to use loads of butter here, any left over will keep in the freezer for up to a month.

Ga-ji Bokkeum
STIR-FRIED CHILLI AUBERGINE
I love the way aubergines act like sponges and soak up other flavours, and I particularly enjoy them when they’re stir-fried. In this dish it’s really important to salt and squeeze the aubergines first, so make sure not to skip this step - it will transform the aubergine from the sludgy stuff-of-nightmares to the beautifully caramelized, slightly sticky pieces you’re after here.

1 aubergine, trimmed
½ tablespoon salt
1 tablespoon vegetable oil
SAUCE
6 garlic cloves, minced
2 tablespoons doenjang (Korean soybean paste)
½ tablespoon clear runny honey
½ teaspoon sesame oil
½ tablespoon sesame seeds
pinch of pepper
1 tablespoon regular soy sauce
½ tablespoon mirin
1½ long chillies, trimmed and finely chopped
1 spring onion, trimmed and finely chopped
1_ For the sauce, put all the ingredients in a small bowl and mix together well. Set aside.
2_ Slice the aubergine in half lengthways, then slice each half into quarters so that you end up with eight long strips. Cut each strip into 7-cm (2¾-inch) long pieces.
3_ Put the aubergine pieces in a large bowl and cover with the salt. Leave for 15 minutes to draw out any excess water, then squeeze the pieces by hand to dry further (it’s easiest to do this a few pieces at a time).
4_ Heat the vegetable oil in a frying pan over a high heat. Add the aubergines pieces and fry, stirring occasionally, for 4-5 minutes, until the flesh is softened and caramelized. Reduce the heat to medium, stir in the sauce to coat the aubergine pieces and fry for a further 3 minutes. This will keep in the refrigerator for 3 days.
Gamja (Potato) Salad
Surprisingly, potato salad is one of those dishes that you often find at Korean restaurants, served alongside the kimchi as banchan. To be honest, it’s never been one of my favourite choices as it’s usually very heavy on mayonnaise and doesn’t tend to have much flavour. This moreish version however, with its additions of smoky bacon, sharp mustard and tangy soured cream, will have everyone fighting over the last potato.

1kg (2lb 4oz) new potatoes
1 tablespoon salt
3 smoked streaky bacon rashers, finely sliced
2 spring onions, trimmed and finely sliced
200ml (7fl oz) soured cream
½ teaspoon English mustard
pinch of pepper
1 small garlic clove, minced
1_ Cut any large potatoes in half so that they are all roughly the same size.
2_ Bring a large saucepan of water to the boil. Add the salt and potatoes, reduce the heat to a simmer and cook for 10-15 minutes, or until the potatoes are tender when pierced with a knife. Drain, rinse under cold running water to cool, then tip into a bowl. Set aside.
3_ Heat a frying pan over a medium heat. Add the bacon slices and cook, stirring, for 2-3 minutes, until lightly browned and crispy. Remove from the heat.
4_ Add the bacon to the potatoes, making sure to include all the crispy bits from the pan along with any rendered fat. Add the remaining ingredients and toss together well until the potatoes are completely coated in the dressing. Leave to cool and eat at room temperature.
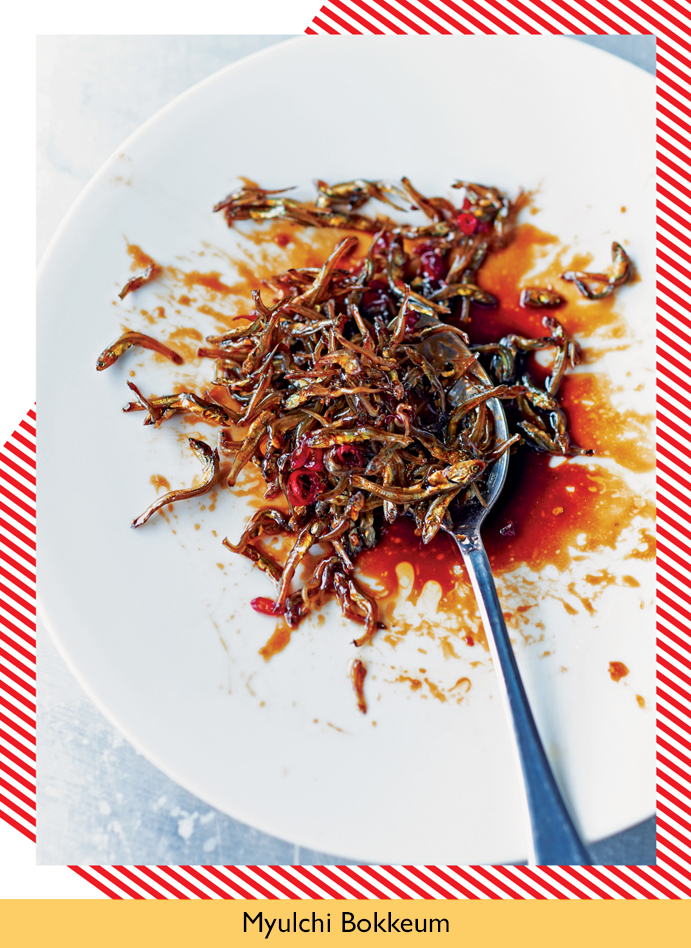
Myulchi Bokkeum
CANDIED ANCHOVIES
You know that saying, ‘Mother knows best’? Well, in this case, my mum really does. I first tried making a version of this (actually very easy) side dish at home, and the result was slightly burnt, quite bitter and very salty. So, I called my mum for her recipe and here it is - her way produces sticky, crispy anchovies with a great chilli kick. Traditionally, these anchovies would be served in the middle of the table alongside some kimchi and lots of other banchan, but Gareth insists that they also make a great beer snack.

1 tablespoon vegetable oil
50g (1¾oz) small dried anchovies, about 2-cm (¾-inch) long
2 bird’s eye chillies, trimmed and finely sliced
3 tablespoons regular soy sauce
3 tablespoons corn syrup
1 tablespoon water
1_ Heat the vegetable oil in a heavy-based frying pan over a medium heat. Add the dried anchovies and chillies to the pan and fry for 1 minute, stirring to ensure the fish are evenly coated in the oil. Tip the anchovies and chillies out onto a plate and set aside.
2_ Return the frying pan to the heat and add the soy sauce, corn syrup and water. Simmer for 1-2 minutes, stirring to prevent the liquid catching on the bottom of the pan, until it has reduced to a thick, sticky syrup.
3_ Add the anchovies and chillies back to the pan and mix together with a wooden spoon to ensure they are evenly coated, then remove from the heat and spoon into a suitable container. Leave to cool, then cover and store in the refrigerator for up to a week until needed.
TIP: For a very quick, hassle-free dinner simply mix these anchovies through a little cooked rice.
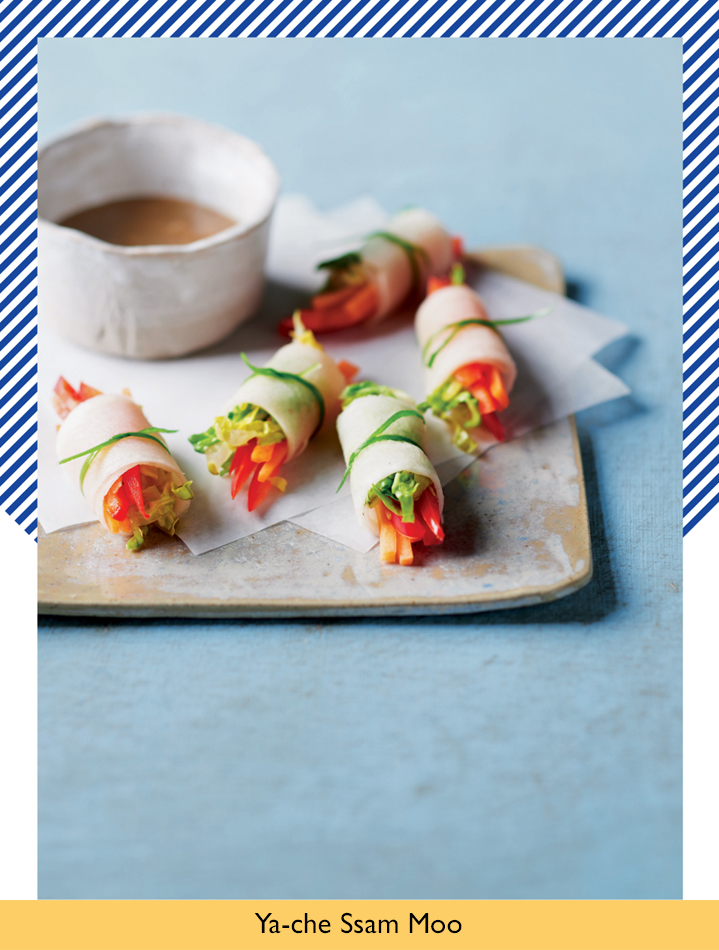
Ya-che Ssam Moo
PICKLED MOOLI PARCELS
I had these tangy little mooli parcels at my cousin’s house in Seoul. It was the first time we’d visited her place since she’d got married and she served them as a starter - very unusual for Korean food! While they might not pack the big punchy flavours of some other Korean dishes (though the mustard dipping sauce gives them a lovely kick) they are beautifully crisp and fresh and make the perfect canapé if you’re having a party, or a lovely light starter before a heavy meal.

4 spring onions
20 pickled mooli slices (see Tip)
1 carrot, halved and cut into thin strips
1 red pepper, cut into thin strips
1 baby gem lettuce heart, finely chopped
DIPPING SAUCE
1 teaspoon caster sugar
1½ teaspoons English mustard or wasabi
1 tablespoon apple vinegar
1 teaspoon regular soy sauce
1_ Slice the green parts of the spring onions lengthways to create long thin strips. Discard the white parts.
2_ Mix all the dipping sauce ingredients together in a small bowl. Set aside.
3_ Arrange a few carrot and pepper strips in the centre of one mooli slice and top with a small pinch of chopped lettuce.
4_ Roll the mooli into a cigar-shaped parcel, tucking in the vegetables (don’t worry if the some poke out the end). Tie a spring onion strip around the middle of your parcel to hold everything in place, then repeat with the rest of your mooli slices and filling ingredients.
5_ Arrange the mooli parcels on a large plate and serve with the dipping sauce.
TIP: Pickled mooli slices can be bought at most Korean stores and come in round packs, but if you can’t get hold of these, you can make your own: shave a mooli with a vegetable peeler into long, wide ribbons, then cut these into 10-cm (4-inch) lengths and pickle using our Simple Pickle Brine recipe. Don’t feel bound by the choice of veg for the filling here either - use whatever crunchy veg you have to hand.
Mooli Slaw
We usually serve this as a topping for our Jeyuk Bokkeum pork belly buns. The pork belly is quite spicy, so the fresh and crunchy slaw gives it a cooling, refreshing contrast. If you leave this slaw to sit, the vegetables will release too much liquid, making it watery, so for best results be sure to eat it straight after making.

350g (12oz) mooli, coarsely grated
1 carrot, grated
5 tablespoons apple vinegar
5 tablespoons natural yogurt
pinch of salt
1_ Put the grated mooli in a salad spinner and spin to get rid of any excess liquid. Drain and repeat until the mooli is quite dry.
2_ Put the mooli in a bowl, add the remaining ingredients and mix together thoroughly. Serve immediately.