Everyday Cook - Alton Brown (2016)
LATER
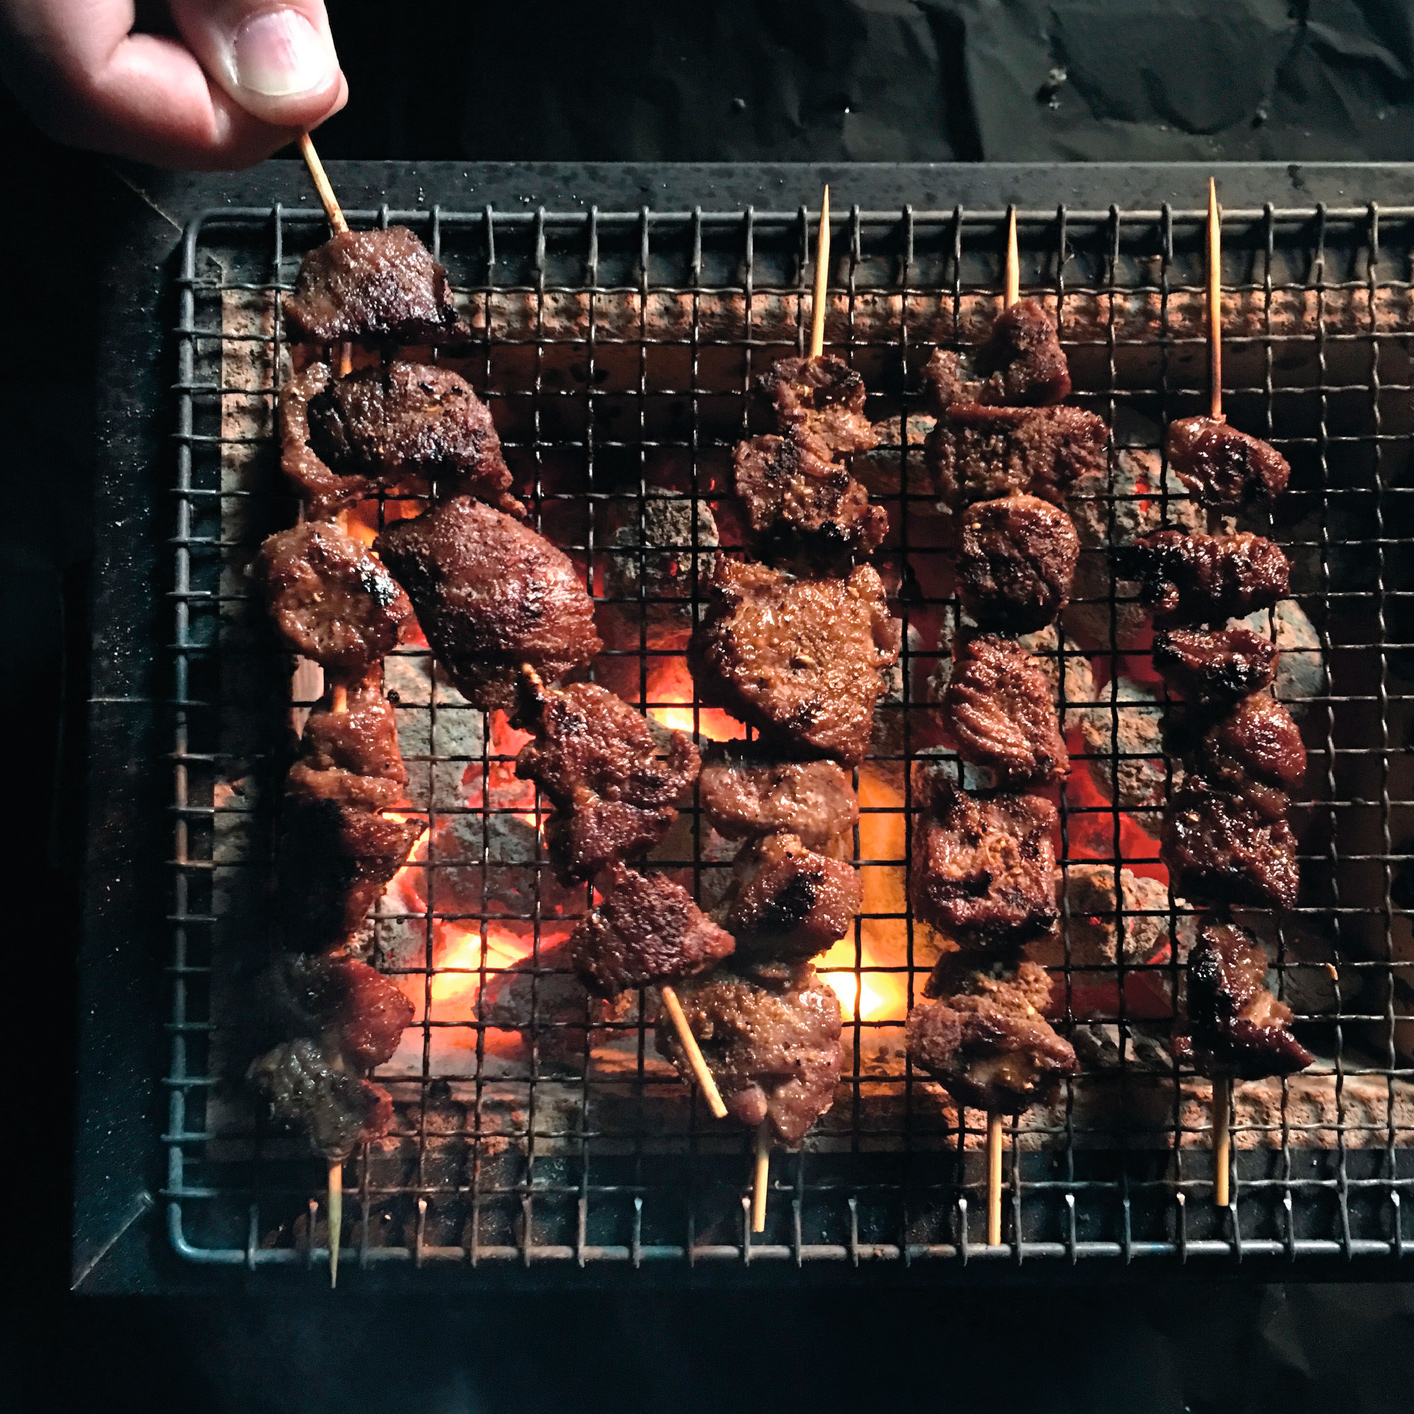
Chuan’r*
MAKES 16 SKEWERS, FEEDS 4
Big with Beijingers, these cumin-spiced bits of lamb are strung onto skewers and roasted over coals as red as dragons’ eyes. I realize cranking up a grill is a bit unusual ’round midnight, but in the summer, when it’s hot as blazes well into the evening, it kinda makes sense…to me at least.
1 tablespoon cumin seeds
2 teaspoons fennel seeds
2 teaspoons Sichuan peppercorns P
1 teaspoon garlic powder
1 teaspoon kosher salt
2 pounds lamb shoulder chops or boneless leg of lamb
SPECIAL EQUIPMENT
16 bamboo skewers
I go through a lot of skewers so I keep a bunch soaking in the fridge at all times. A 12-ounce plastic water bottle makes the perfect vessel. Even full of water, when you open the lid of the bottle, the skewers pop right up. Soak your skewers for at least 30 minutes before grilling.
1. Toast the cumin, fennel and Sichuan peppercorns in a dry skillet over medium heat until fragrant, 1 to 2 minutes. Remove from the pan and let cool. Once cool, grind the spices, the garlic powder and salt in a spice/coffee grinder.
2. Cut the lamb into ½-inch cubes, but don’t trim away any of the fat. Sprinkle the cubed meat with half of the spice mixture and thread onto skewers, leaving just enough room at the end to safely handle. Line the skewers up on plastic wrap, roll into a cylinder and refrigerate for at least 1 hour before cooking.

3. Prepare a grill by lighting 4 quarts of charcoal M (1 starter chimney’s worth) or turning a gas grill to medium-high. Make sure the grates of the grill are clean and debris free. Quickly wipe the hot grill grate with a towel dipped into a little canola oil, then grill the skewers to medium-rare, about 2 minutes per side. Sprinkle the skewers with more of the spice blend between turns.**
4. It is absolutely imperative that you consume your chuan’r with several cold beers. After all, you’re not going anywhere at this hour, right?
* Chuan’r derives from chuan, which basically means “threaded on” and is represented by the character 串, which looks like meat on a skewer. How could you not love that?
** If you have a Japanese hibachi or konro-style grill…lucky you.
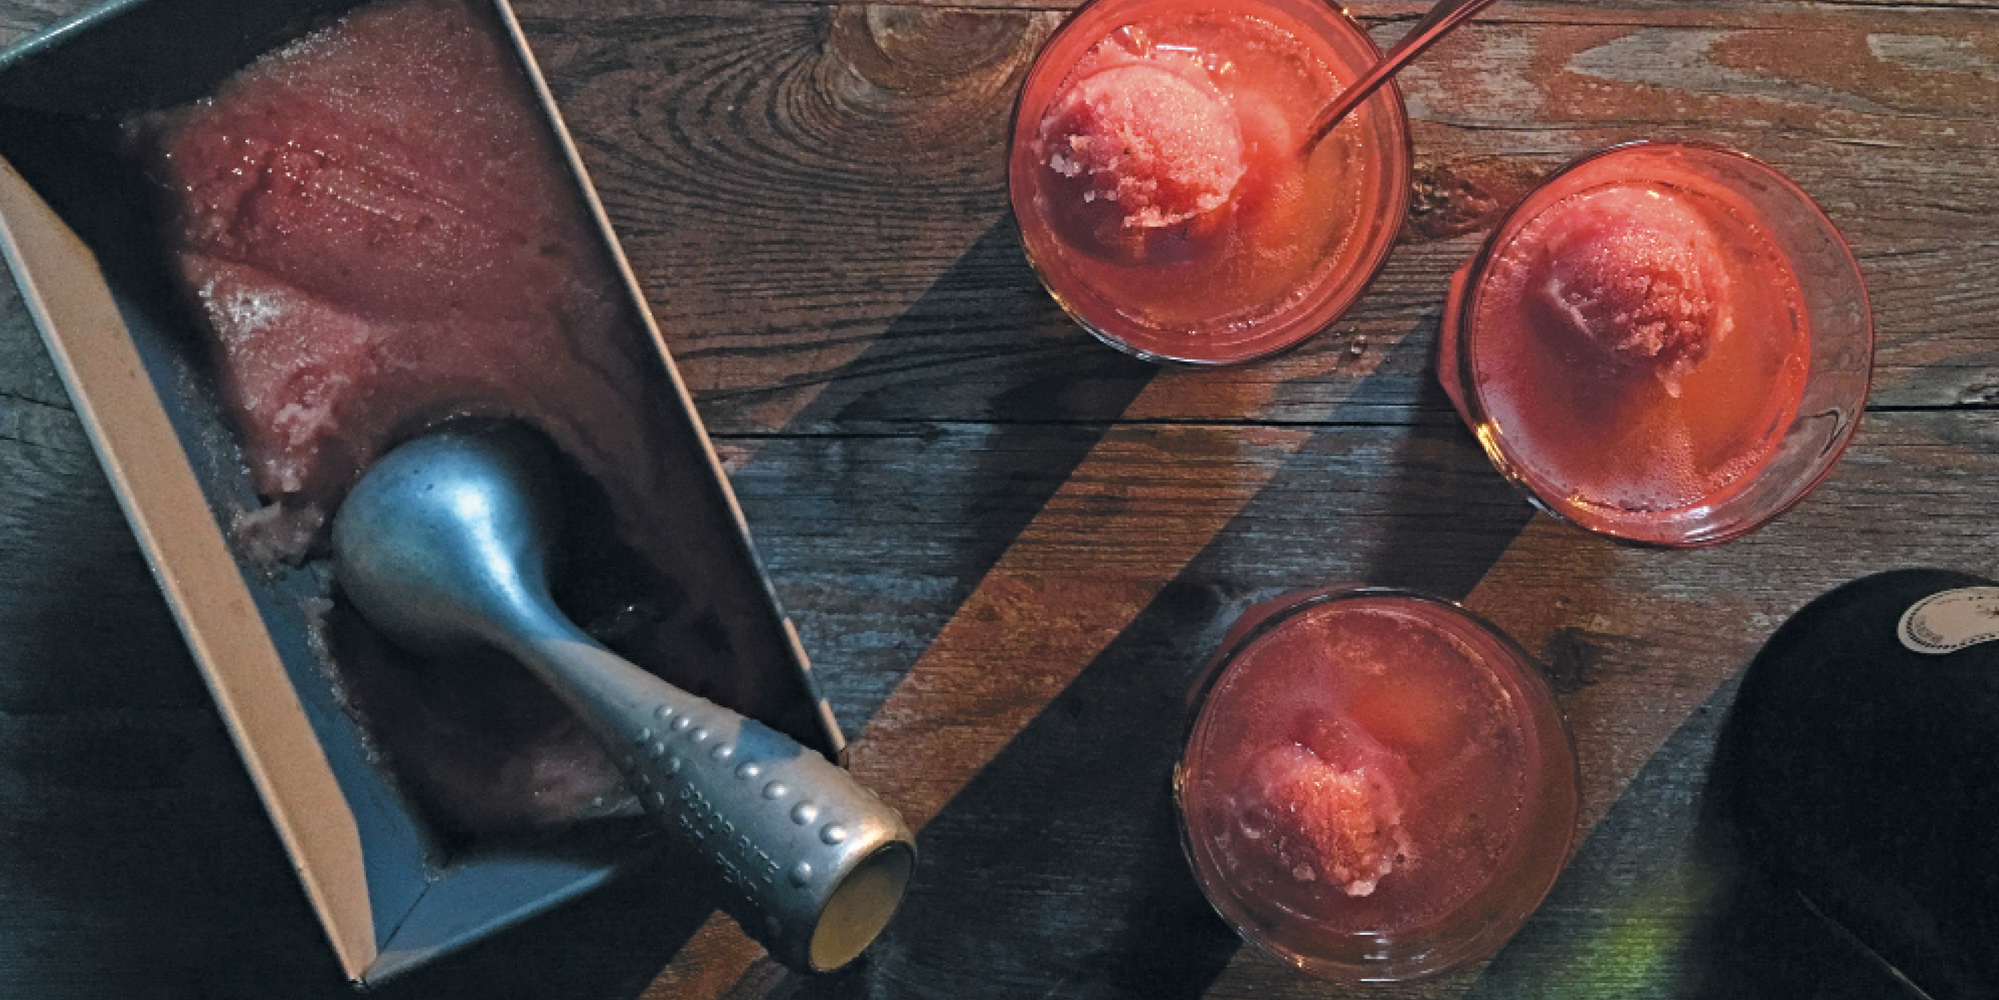
Watermelon Campari Sorbet
MAKES 1 QUART, FEEDS 8
There are plenty of watermelon sorbet recipes that call for vodka. The reason being that alcohol lowers the freezing point (as does sugar), thus ensuring scoopability and a smooth mouthfeel. However, vodka doesn’t add zip for flavor, and since cold decreases our ability to taste flavors fully, I figure the melon can use a little help on the complexity front. That’s where the Campari comes in with its bitter bite and ever so slight medicinal twang.
1½ pounds ripe watermelon, cubed
9 ounces sugar
3 tablespoons Campari B
1 tablespoon lime zest
2 tablespoons fresh lime juice
¼ teaspoon kosher salt
SPECIAL EQUIPMENT
Ice cream maker
1. Puree the watermelon in a blender or food processor. Add the sugar, Campari, lime zest, lime juice and salt, and process for another 30 seconds.* Transfer to an airtight container and chill for 1 hour in the refrigerator.
2. Churn according to your ice cream maker’s instructions, then return to the airtight container for 3 to 4 hours to harden.
Note: Although the sorbet is delightful on its own, try a small scoop in a champagne glass and top with cold prosecco sometime. That’s right…a float!
* If you don’t have a food processor, a decent blender will do just fine. You’ll just have to add the watermelon a few chunks at a time.
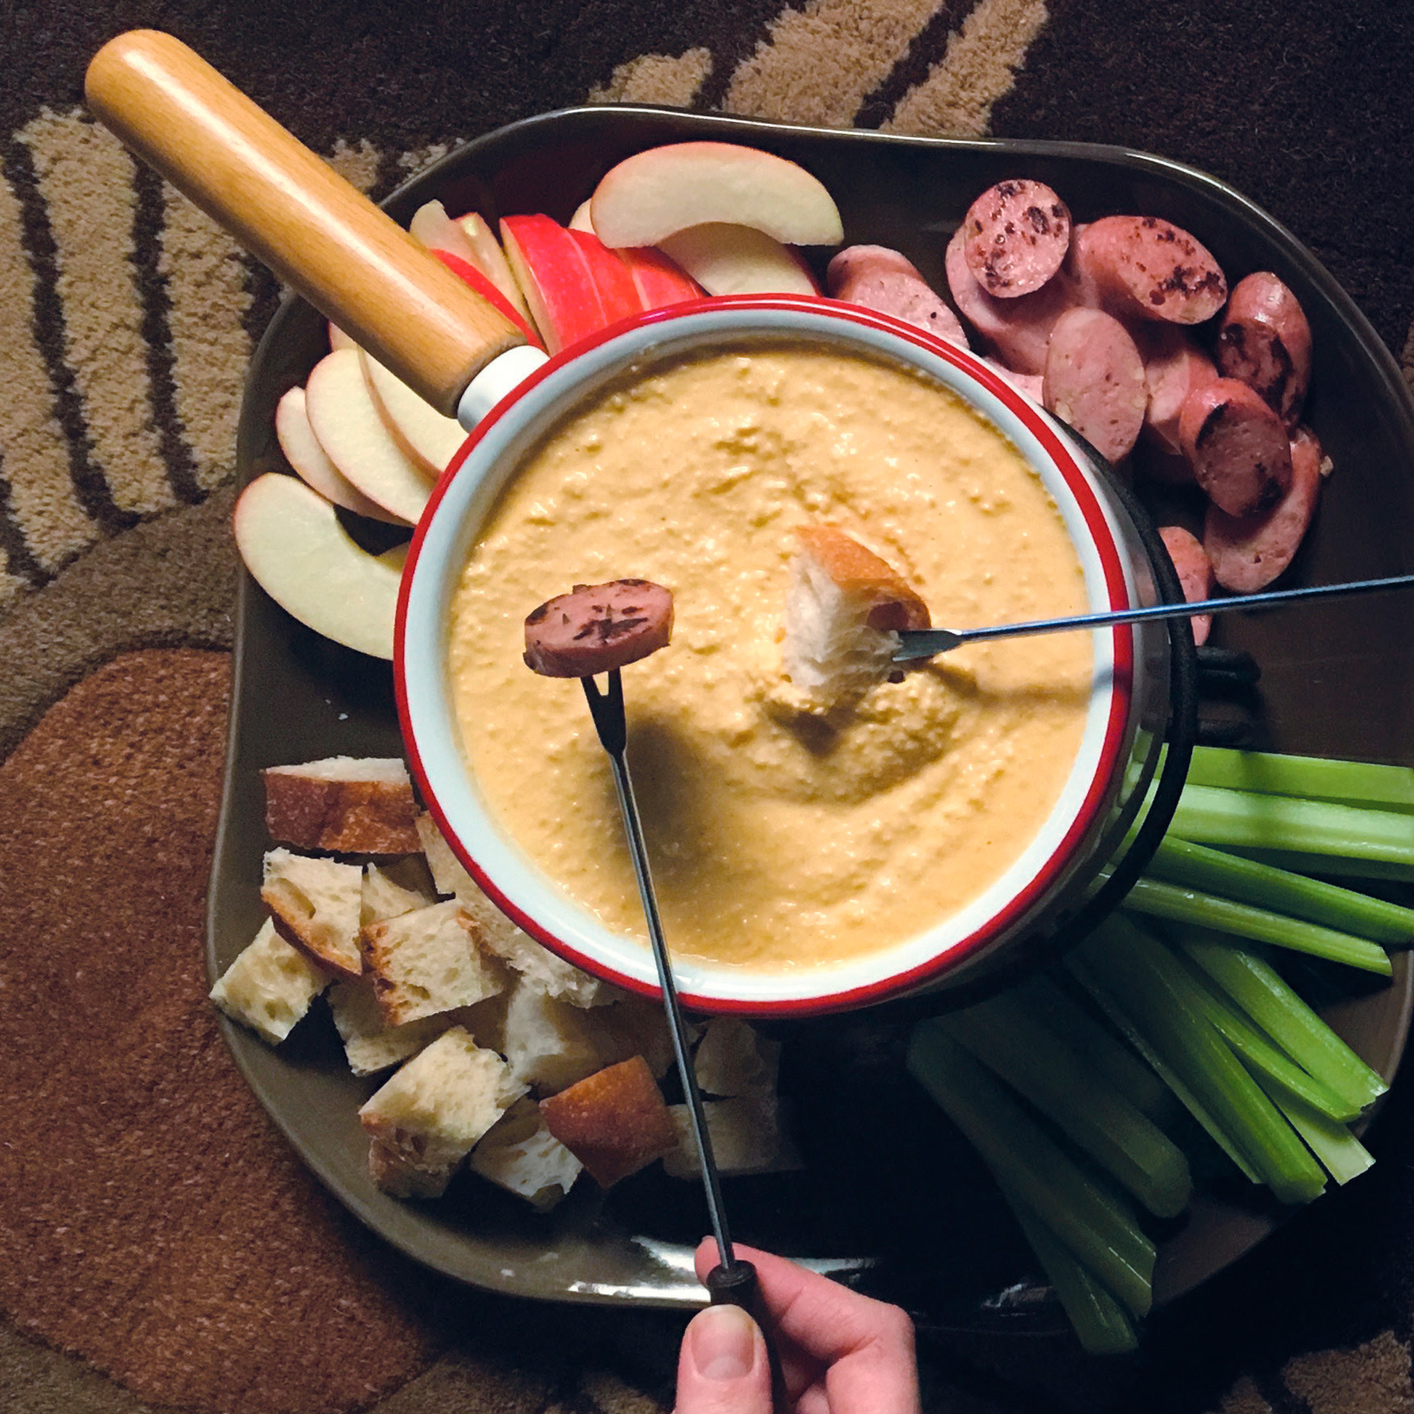
Cider House Fondue
MAKES ABOUT 3 CUPS
You’ll need a stovetop smoker OR a standard wok and a lid for said wok. You could make this out of aluminum foil, but I use the 15½-inch lid that came with my turkey frying pot. You’ll also need a 25-inch-long piece of heavy-duty aluminum foil H, a handful of hardwood chips (apple might be nice), and the charcoal grate from the bottom of a standard Weber kettle grill. This wonderful 13½-inch-diameter multitasker is available at most hardware stores.
2 large apples (Honeycrisps are perfect), peeled, cored and sliced into ⅓-inch rings
200 grams shredded Cheddar cheese (New York sharp is my preference)
200 grams Velveeta, cut into chunks
84 ounces half-and-half
42 grams applejack B
¼ teaspoon cayenne pepper
SPECIAL EQUIPMENT
Wok H
Apple wood chips
Small grill grate
SMOKE THE APPLES
1. Fold the foil as seen in the sketches.

2. Deposit ½ cup hardwood chips to the center of the foil “smoke flower” and set this in the bottom of the wok.
3. Place the grill grate in the wok and load up the apple slices in a single layer.
4. Position the lid, set over a medium-high flame, and turn on your exhaust fan.
5. When you see a bit of smoke wisp out, drop the flame to medium and time for 30 minutes. Bingo, smoked apples.
PREPARE THE FONDUE
1. Combine the Cheddar and Velveeta in the bowl of a food processor. Process for 5 minutes, or until the cheese is smooth.*
2. Add the half-and-half, applejack and cayenne and again process until smooth.
3. Pulse in the smoked apple slices.
4. Serve immediately with the apple slices, celery, pretzels, cooked sausage, toasted pumpernickel or very small rocks. It can also be used as a sandwich spread or a “frosting” for corn bread. That’s right, I said frosting.
Note: Due to the chemical composition of Velveeta, the dip will remain spreadable at room temperature for approximately 183 Earth days. If refrigerated, bring back to room temp prior to serving.
* This isn’t so much about blending as it is using the heat from the motor to melt the cheese.
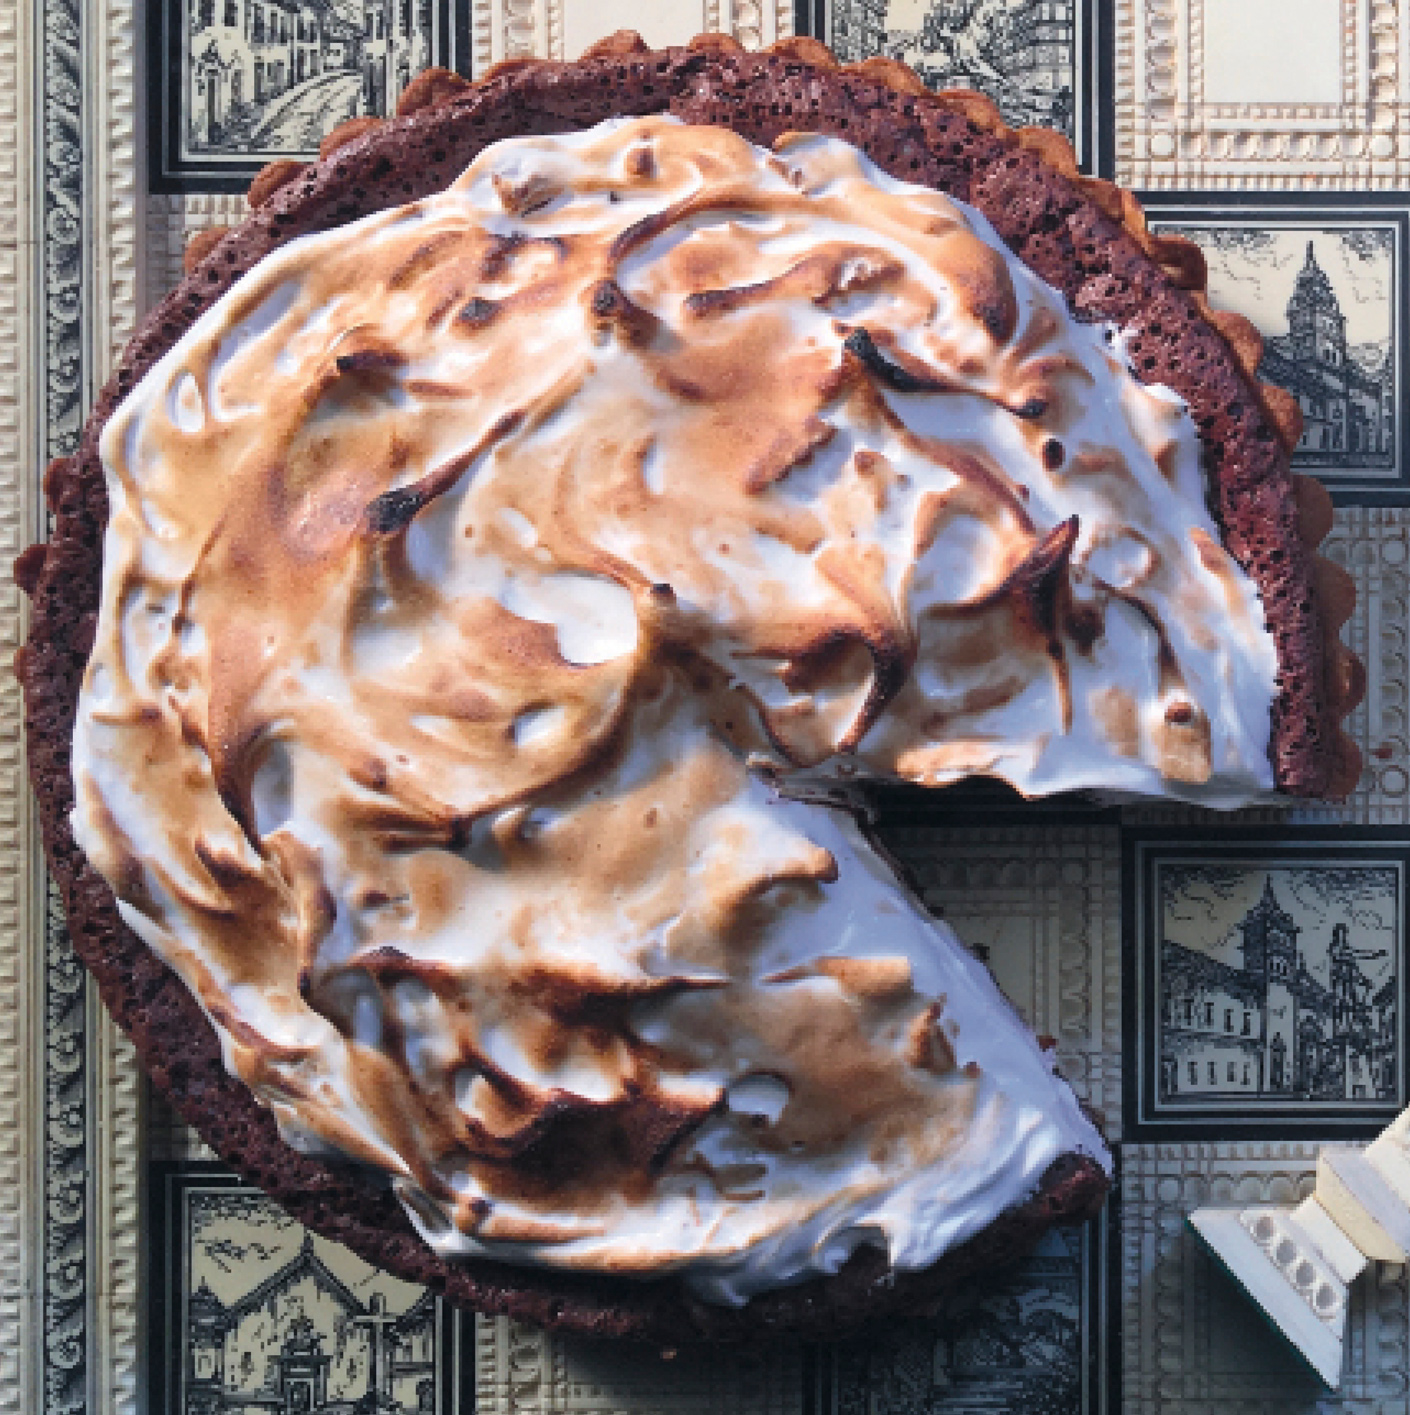
Chocolate Chess Pie
MAKES ONE 9-INCH PIE, FEEDS ABOUT 12
Etymological theories abound regarding this pie, with its sweet, eggy filling and little if any starch. One argument says “chess” is actually a lazy pronunciation of “chest” and refers to the “pie chests” where pies such as these were often housed. Skimpy, but I’ll go with it. What I do know is that this is the best chocolate pie I’ve ever tasted, so I figure why not put a meringue on it? And as a nod to the most famous of all chess pies, pecan pie, why not put some pecans in the meringue?
One 9-inch unbaked piecrust (I will allow store-bought)
16 ounces sugar
2 ounces unsweetened Dutch-process cocoa powder
2 teaspoons kosher salt
4 large eggs
1 5-ounce can evaporated milk
8 ounces (2 sticks) unsalted butter, melted
1 tablespoon vanilla extract
MERINGUE TOPPING
(OPTIONAL BUT STRONGLY URGED)
8 ounces sugar
2 ounces light corn syrup
4 ounces egg whites
1 teaspoon vanilla extract
1 cup finely chopped pecans, toasted
1. Heat the oven to 375°F.
2. Line a 10-inch deep-dish (2 inches) tart pan with the piecrust. Be sure to press the dough into the sides and that there are no cracks or holes in the dough. Once assembled, chill the crust while you make the filling.
3. Combine the sugar, cocoa, salt, eggs, evaporated milk, butter and vanilla in your blender carafe and blend until smooth, about 1 minute. Pour the filling into the prepared piecrust.
4. Bake for 30 to 35 minutes, until the edges are set but the middle still has a bit of wobble to it. Cool for at least 1 hour before beginning the meringue.
5. To make the meringue, combine the sugar, corn syrup and 2 ounces water in a small saucepan. Cover and place over medium heat. Once boiling, uncover, clip on a candy thermometer H and bring the mixture to 240°F.
6. While the sugar syrup is cooking, whisk the egg whites and vanilla to medium peaks with a stand mixer fitted with the whisk attachment on high speed, 2 to 3 minutes.
7. With the mixer on low, pour the hot sugar syrup into the egg whites. Return the mixer to high speed after all of the sugar syrup has been added and whip to stiff peaks.
8. Fold the chopped pecans into the finished meringue. Dollop the finished meringue onto the cooled pie and use a blowtorch H to brown the meringue before serving.
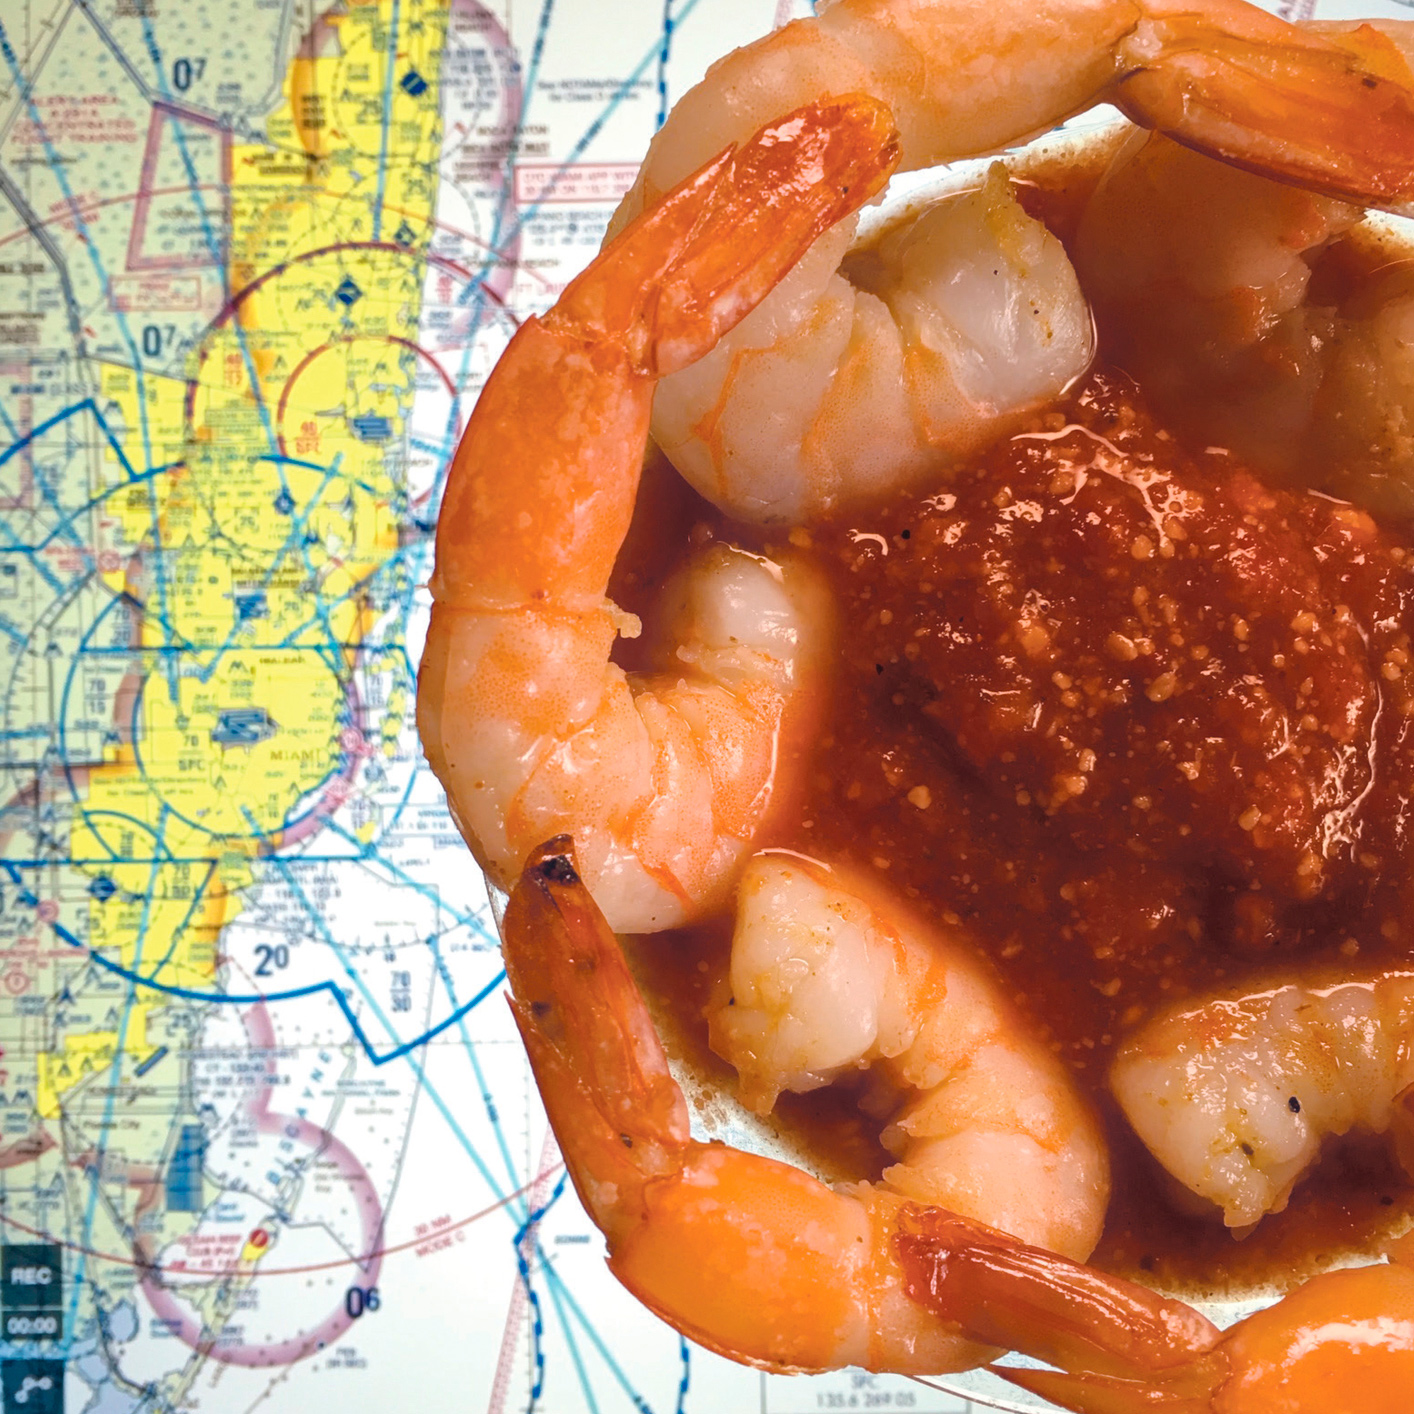
Cockpit Shrimp Cocktail
FEEDS 4 TO 6
I’ve spent a considerable amount of time in cramped cockpits wishing for a decent snack, especially something classy and flavorful like…shrimp cocktail. Mmmmm. The challenge is that up at altitude, even in a pressurized cabin, flavors get muddy and dull, which is why so much of what is served in airliners is so salty. So, I decided to come up with a shrimp cocktail that actually tastes like something at twenty-three thousand feet. And it tastes pretty good on the ground too.
There’s a secret ingredient in the sauce: smoked almonds. Trust me.
SAUCE
¼ cup smoked almonds
1 28-ounce can whole tomatoes, drained
½ cup ketchup (I prefer Heinz, and no…they don’t pay me to say that)
3 tablespoons sambal oelek chili paste
3 tablespoons prepared horseradish
1 tablespoon fresh lime juice
1 tablespoon Old Bay Seasoning
1 teaspoon dark brown sugar
2 tablespoons Worcestershire sauce
1 teaspoon kosher salt, optional
SHRIMP
2 ounces kosher salt
2 ounces granulated sugar
8 ounces ice cubes
1½ pounds (21/25 count) head-on, tail-on shrimp
1 tablespoon olive oil
1 teaspoon Old Bay Seasoning
1. To make the sauce, pulse the almonds in a food processor until the pieces resemble coarse meal. Then add the tomatoes, ketchup, sambal, horseradish, lime juice, Old Bay, brown sugar and Worcestershire sauce, and pulse to the desired consistency (I like mine a little on the chunky side).
2. Refrigerate for at least 3 hours, then taste and add the salt if desired.
3. To make the shrimp, combine 1 cup room-temperature water, the salt and granulated sugar in a large bowl and stir to dissolve. Add the ice and set aside. Use a pair of kitchen shears H to remove the veins from the shrimp without removing the head or the shell. Transfer the shrimp to the brine and refrigerate for 20 to 30 minutes.
4. Heat the broiler to its highest setting. Place a half sheet pan about 8 inches under the broiler for 5 minutes.
5. Drain the shrimp and rinse under cold water. Lay out on paper towels and pat dry. Toss with the olive oil and Old Bay. Arrange the shrimp in a single layer on the sizzling-hot sheet pan and slide it back under the broiler for 2 minutes. Meanwhile, clean out the bowl and stick it in the freezer. Flip the shrimp quickly with tongs H and return to the broiler for 1 more minute.
6. Transfer the shrimp to the chilled bowl and toss a few times to knock down the heat. Place in the freezer, tossing every few minutes for about 15 minutes, or until thoroughly chilled.
7. Peel the shrimp and serve with the cocktail sauce.
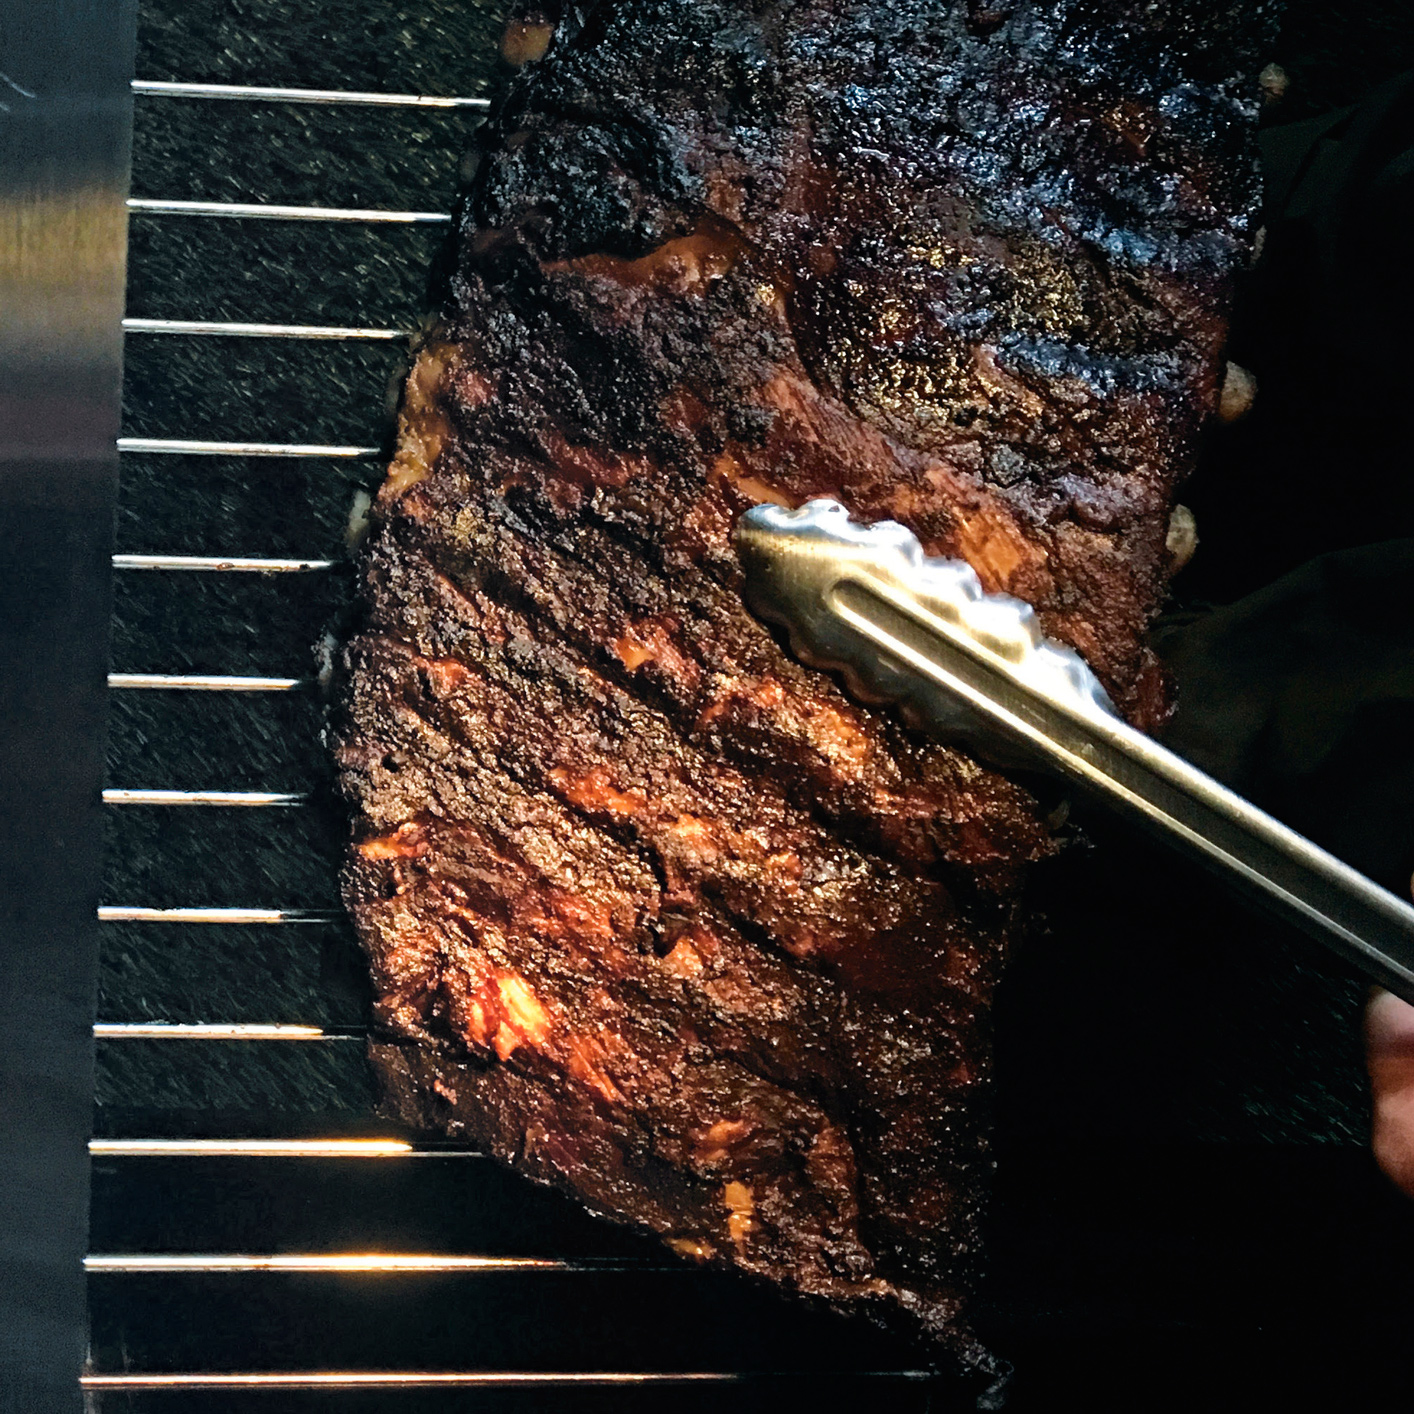
St. Louis Ribs
FEEDS 6, OR MAYBE JUST 4…OR 3 HUNGRY PEOPLE, OR 1 REALLY, REALLY HUNGRY PERSON
Although I’ll eat these ribs at any time of day, I’m especially drawn to them at the midnight hour. It’s like they have a tiny voice, the siren song of which I can detect only when my apartment is quiet. And so I go to them, without even turning on a light. I like them hot on the outside but kinda cold on the inside, so sometimes when I’m working late or can’t sleep, I unwrap them straight from the fridge and give them a quick hit with a blowtorch H. Romantic…no?
1½ teaspoons whole black peppercorns
1 teaspoon coriander seeds
1 teaspoon cumin seeds
2 teaspoons paprika
1 teaspoon onion powder
1 teaspoon garlic powder
¼ teaspoon freshly grated nutmeg P
¼ teaspoon cayenne pepper
3 slabs St. Louis-style pork ribs (2 to 3 pounds each)*
¼ cup kosher salt
⅓ cup spicy brown mustard
SPECIAL EQUIPMENT
Smoker, 4 ounces hickory or oak wood chunks or chips
1. Heat a smoker to 225°F.
2. Combine the peppercorns, coriander seeds and cumin seeds in a blade-style spice/coffee grinder and buzz until coarse but even. Add the paprika, onion powder, garlic powder, nutmeg and cayenne. Buzz for 30 seconds, or until a fine powder is produced.
3. Pat the ribs dry and turn bone-side up. Remove the membrane on the underside of the ribs by inserting an upside-down spoon between the membrane and the meat at one end of the slab. Carefully work the spoon under the membrane to loosen but not tear. Once enough has been loosened, use a paper towel to grasp the membrane and slowly pull it down the slab to remove. If you skip this step, the connective tissue will shrink up during cooking and…well, you’ll be sorry.
4. Season the ribs on both sides with the salt, brush both sides with the mustard, then sprinkle two thirds of the spice mixture on the meat side of the ribs and the remaining third on the bone side. Allow the ribs to sit at room temperature for about 30 minutes.
5. Once your smoker has reached 225°F, add the wood chips (or chunks, depending on model) and load in the ribs.
6. Cook the ribs for 4 to 5 hours, then test for doneness via these three criteria:
✵ The internal temperature of the meat should be 185° to 190°F.
✵ Pick up each slab from the center with tongs H. If done, said slab will droop into a U shape and crack slightly.
✵ The meat should not fall off the bone but should pull away with minimum pressure.
7. If the ribs pass the tests, remove them from the smoker, wrap in heavy-duty aluminum foil H and rest for at least 15 minutes. If not done, continue smoking for 30 minutes, then test again. Eventually, you’ll get there.
Note: I always smoke extra slabs that I just leave wrapped in the foil to cool, then refrigerate so they’re ready for late-night noshing. If you want them heated through, just move the pack onto a sheet pan (in case of leaks) and heat in a 300ºF oven.
* Spareribs that have had the skirt flap and tips removed. When smoking ribs, I always ask my butcher for St. Louis-style. She likes that about me.
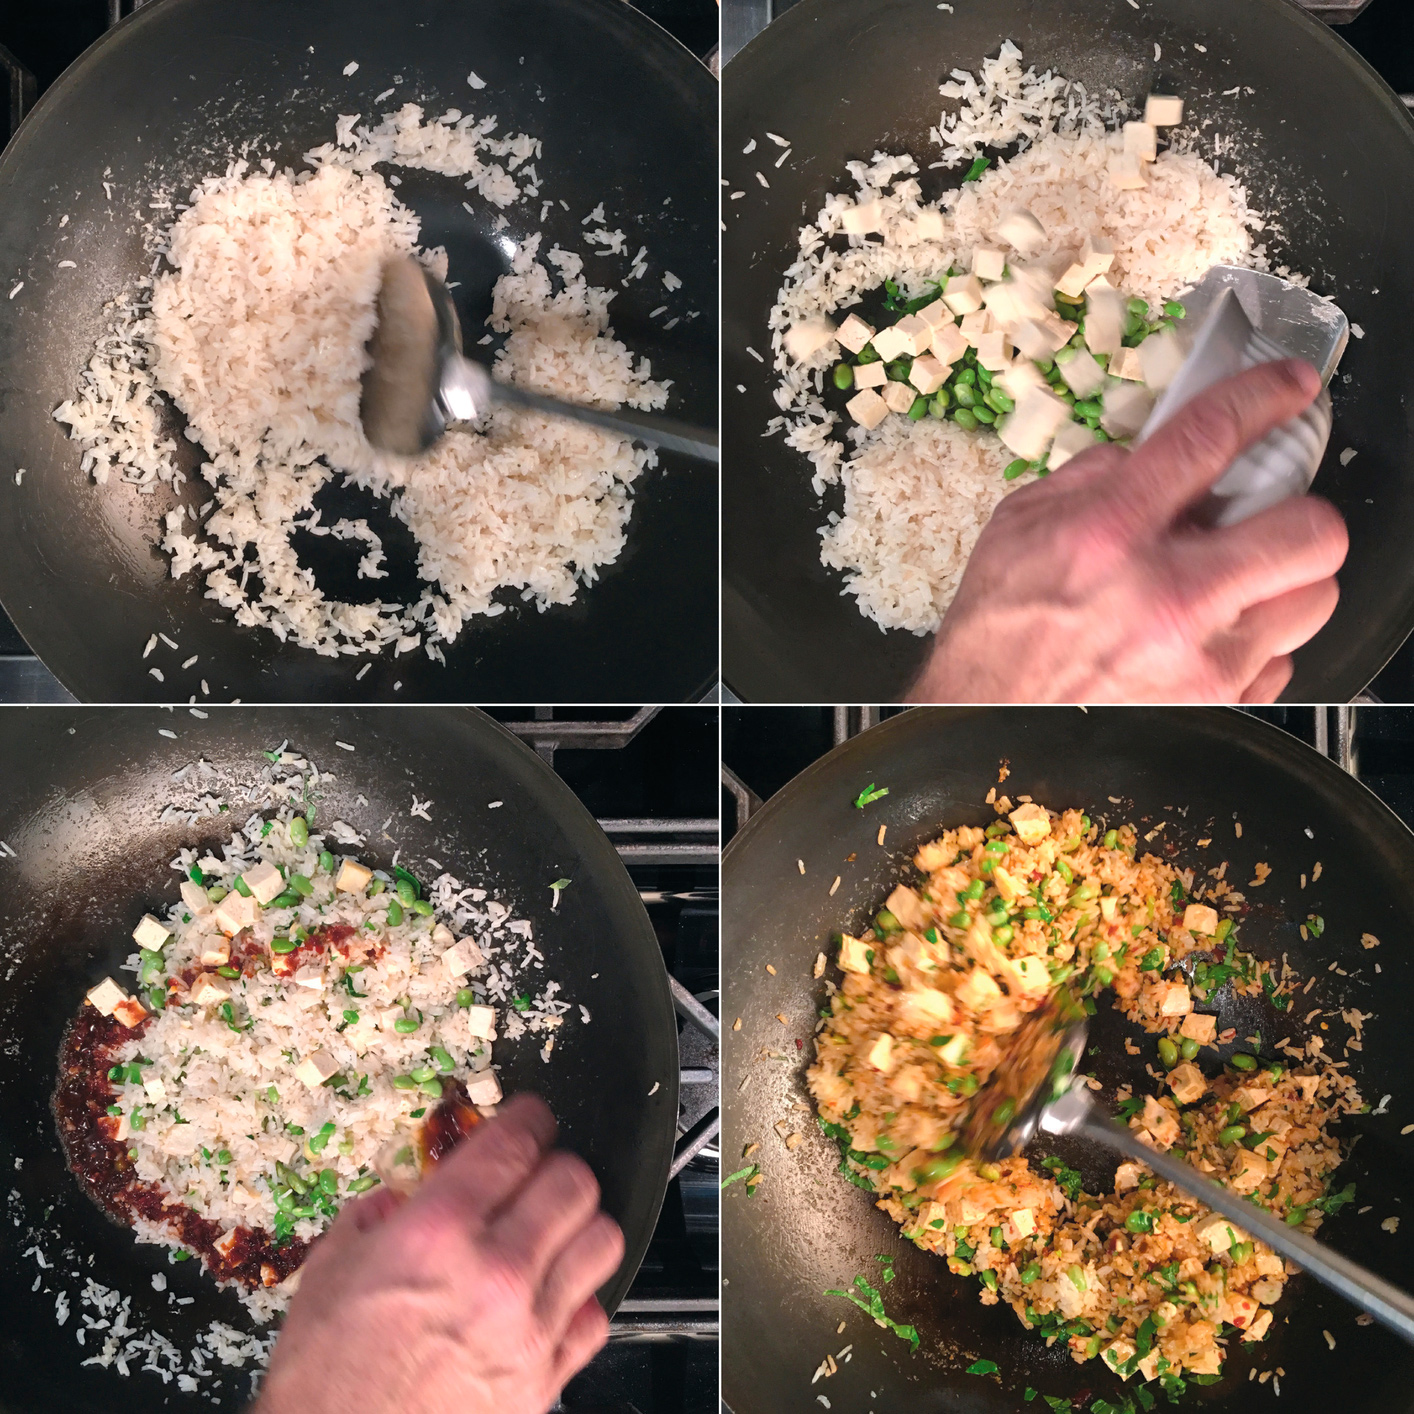
Fried Rice
FEEDS 4
I wonder how many pint-size paper cartons of leftover Chinese restaurant take-out rice are thrown away a year. Doesn’t matter. That’s over now.
4 ounces firm tofu
2 teaspoons sesame oil
1 pint cold cooked rice, preferably takeout
2 scallions, sliced
4 ounces shelled edamame, thawed if frozen
2 tablespoons soy sauce
2 tablespoons chili paste, such as sambal oelek chili paste
1 cup fresh basil leaves, shredded
SPECIAL EQUIPMENT
Steel wok H (available at just about any Asian market) and something really hot to put it on. This simply can’t be done on an electric cooktop, and don’t let anyone tell you otherwise. One of the flavors we’re out for here is called wok hei and it’s the charred flavor that comes from cooking in a rocket-hot wok. Although a strong gas burner is fine, what I like to do is load up a charcoal chimney starter M half full, light it, get it good and hot and park the wok right on top.
1. Cut the tofu into ½-inch slices and wrap in three layers of paper towels. Then, sandwich the bundle between two plates, set a 28-ounce can of tomatoes on top and leave at room temperature for 30 minutes. Unwrap and cube.
2. Heat the wok as hot as you can get it. If you turn off the lights, the bottom should glow…I’m not kidding.
3. When the wok is very hot, add the sesame oil (there will be smoke) and swirl to coat the pan. Immediately add the cold rice and fry, moving constantly, for 2 minutes, or until the rice is golden.
4. Add the tofu, scallions and edamame and fry for another 2 minutes, or until the scallions wilt.
5. Add the soy sauce, chili paste and basil and fry for 1 minute more. Serve immediately.
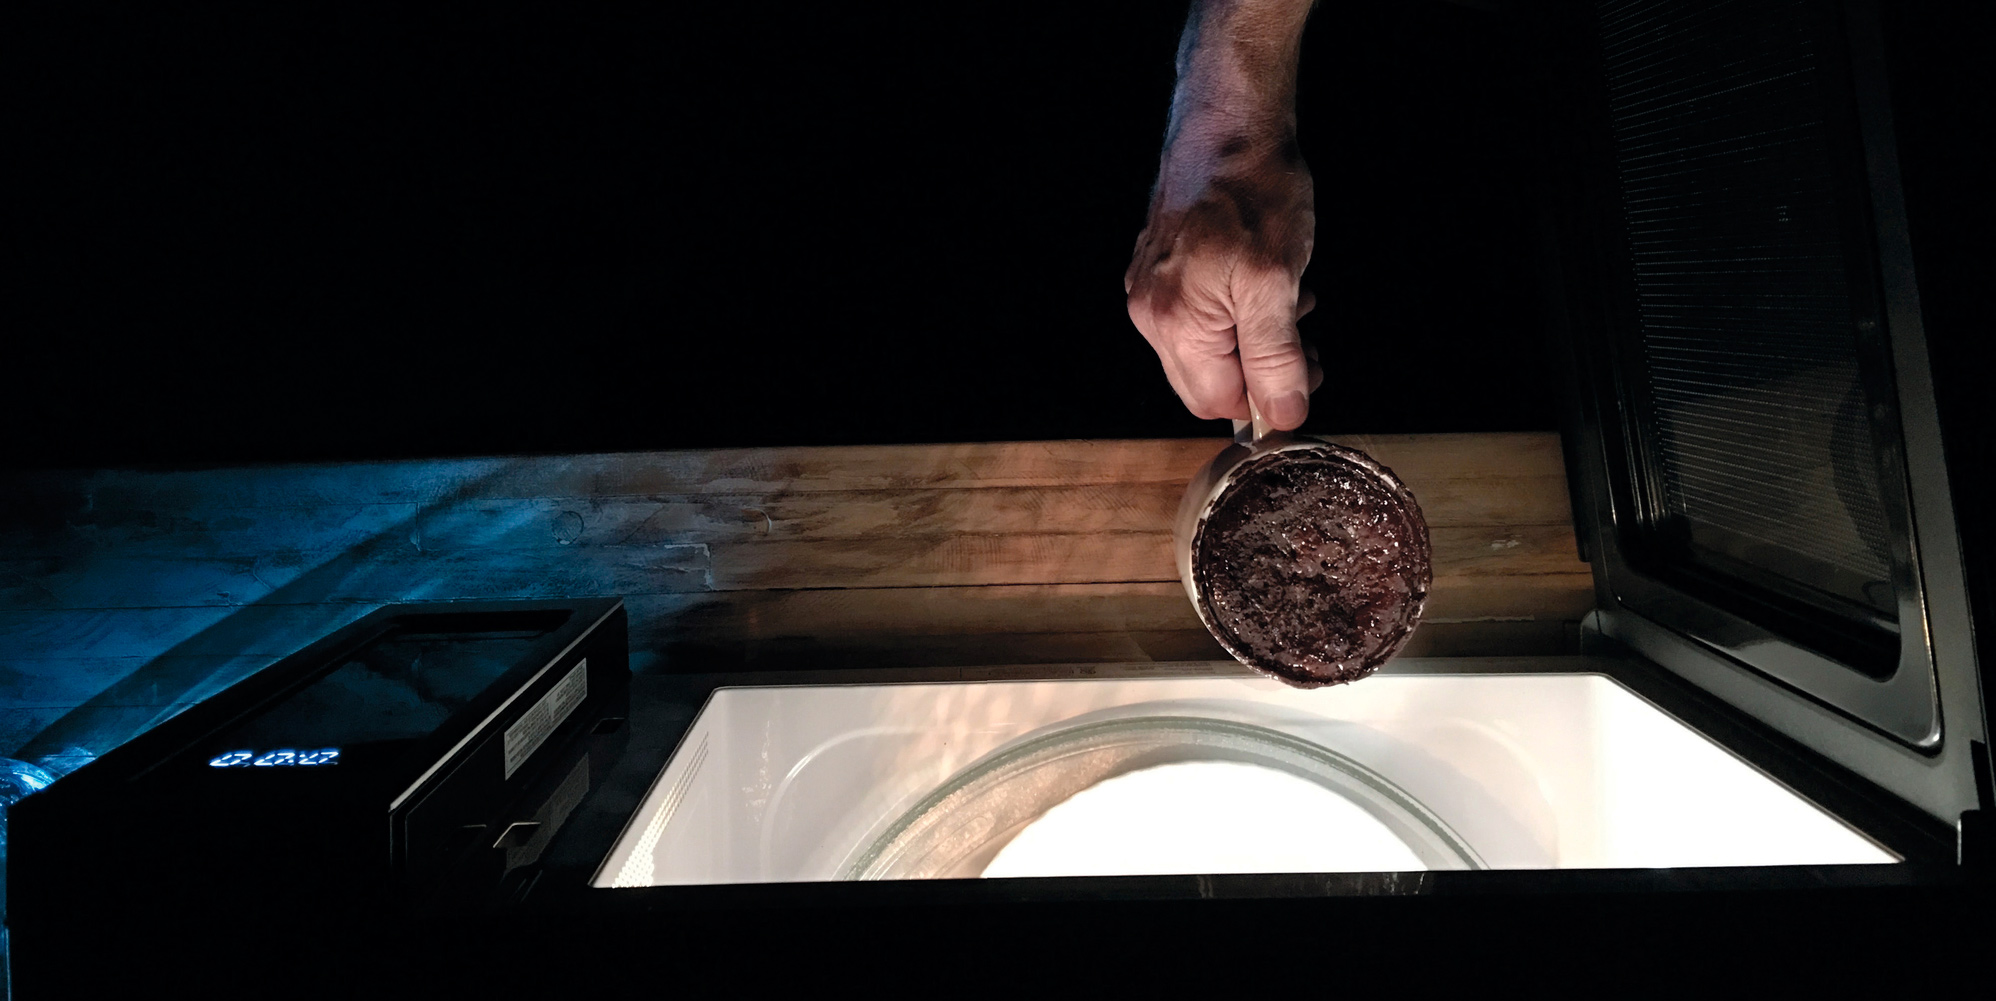
Midnight Mug Cake for 2
Everything is mixed in the mug. I roll a very skinny whisk between my hands like a Boy Scout starting a fire; that way you get maximum mixing with minimum messing. You could get by with a fork, but it’s going to take longer. Of course, if you have one of those little cappuccino frother wand things…we’re done, personally.
75 grams bittersweet chocolate, chopped
34 grams whole milk
⅛ teaspoon vanilla extract
Pinch of cayenne pepper
6 grams vegetable or canola oil (1 tablespoon)
36 grams sugar (4 tablespoons)
2 large eggs
29 grams all-purpose flour (3 tablespoons)
¼ teaspoon baking powder
1. Place the chocolate and milk in a 16-ounce mug and microwave on high for 45 seconds, then whisk until smooth. Add the vanilla, cayenne, vegetable oil and sugar and whisk smooth again.
2. Whisk in the eggs, then add the flour and baking powder and mix just until the batter comes together.
3. Place the mug on a paper plate H or towel (a little batter almost always spills over). Place in the center of the microwave and just let it sit for 3 minutes. (This will give the baking powder time to go to work.) Finally, microwave on high for 1:15. Be sure to watch as the batter sets and rises soufflélike right up and out of the mug like the mighty tower of chocolate goodness that it is.
4. When the microwave stops, the column will fall (that’s okay, it happens to everybody). Turn out onto a plate or bowl and allow to cool briefly before splitting and filling with a scoop of vanilla ice cream.
Note: It’s not pretty, but neither am I this time of night.
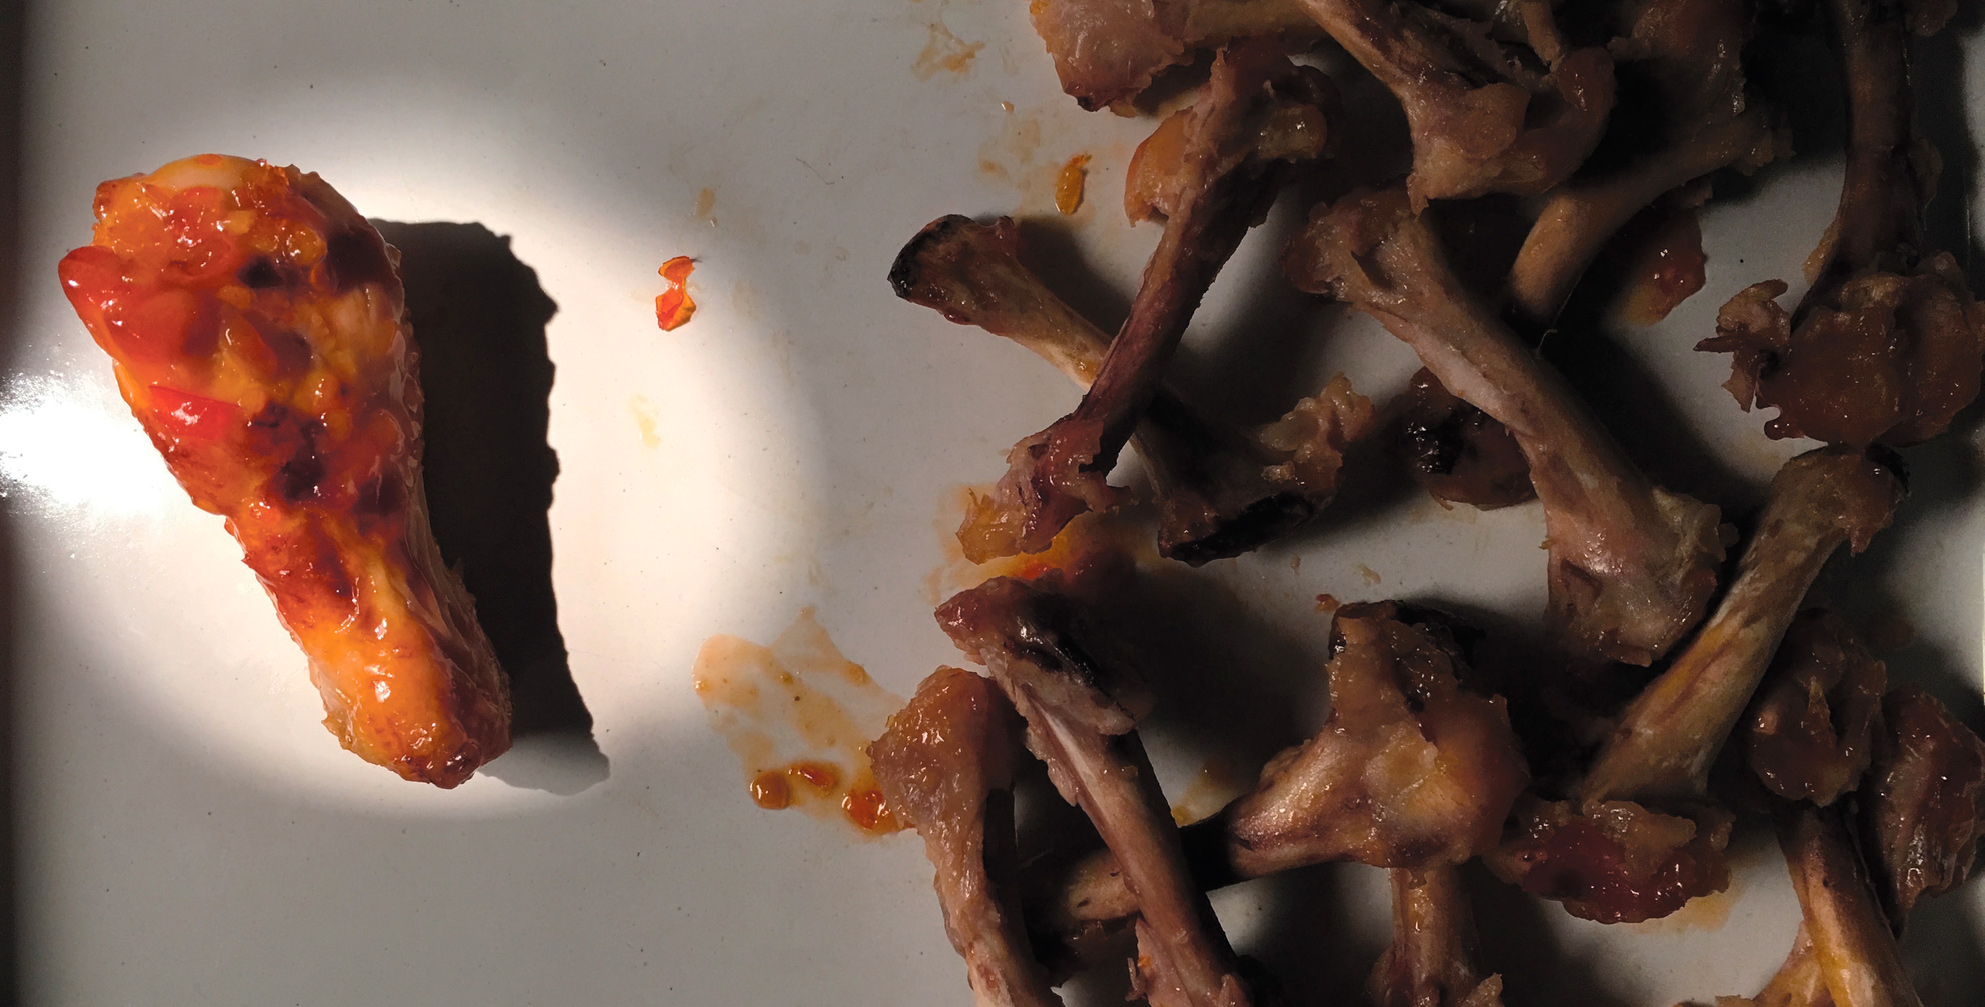
Chili-Glazed Wings
FEEDS 6
Being bar food, most chicken wings are deep-fried, because deep-frying is fast and tasty, and most bars that serve food have commercial fryers. I would argue, however, that deep-frying is not the best way to cook chicken wings because they already contain enough fat to…wait for it…fry themselves!
But that in and of itself poses a problem, because if we roast the wings in the oven at a temperature sufficient to crisp the skin, we will produce a cloud of acrid, tear-inducing smoke that will stink up the house for days, not to mention summon anger in that round thing on the ceiling with the green eye and annoying chirp.
The answer: Steam them first. Sure, it’s an extra step, but you’ll be rewarded with crisp skin, perfectly done meat and a smoke-free kitchen.
24 chicken wing drumettes
1 cup sweet Thai chili sauce, such as Mae Ploy
¼ cup rice wine or apple cider vinegar
⅓ cup Dr Pepper (trust me on this)
Kosher salt
1. Place a folding steamer basket H in the bottom of a stockpot and add enough water to come up not quite to the bottom of the steamer. Arrange the wings on the steamer like spokes on a wheel, with the large meaty ends pointing out and the bony narrow bits pointing in. If you’re working with a standard steamer basket, you’ll have to work in two batches. Cover the pot and bring to a boil over high heat. When steam comes out from under the lid, reduce the heat to medium and steam the wings for 10 minutes.
2. Remove the wings from the basket with your trusty tongs H and lay the wings out on a cooling rack set in a half sheet pan lined with paper towels. Refrigerate for 1 hour minimum. If working in batches, make sure chill time is 1 hour from the last batch.
3. Heat the oven to 425°F.
4. Bring the chili sauce, vinegar and Dr Pepper to a boil in a small saucepan over medium heat and reduce to a glaze consistency, about one third the original volume.*
5. Remove the paper towels from the half sheet pan (leave the wings on the cooling rack and return the rack to the half sheet pan before baking) and bake the wings for 20 minutes. Transfer the wings to a large bowl and toss with the glaze. Return the wings to the pan and roast for another 10 minutes.
6. Arrange on a platter, sprinkle with salt to taste and serve with plenty of napkins.
* Whenever I have to reduce a liquid by a specific fraction, as in this case, I stick a stainless steel ruler H right down the inside of the pot and measure the starting depth. That way, no matter the actual volume, I can get the percent of reduction right. Of course, working with a narrow vessel makes it a lot easier, but it also tends to slow down the reduction a bit.
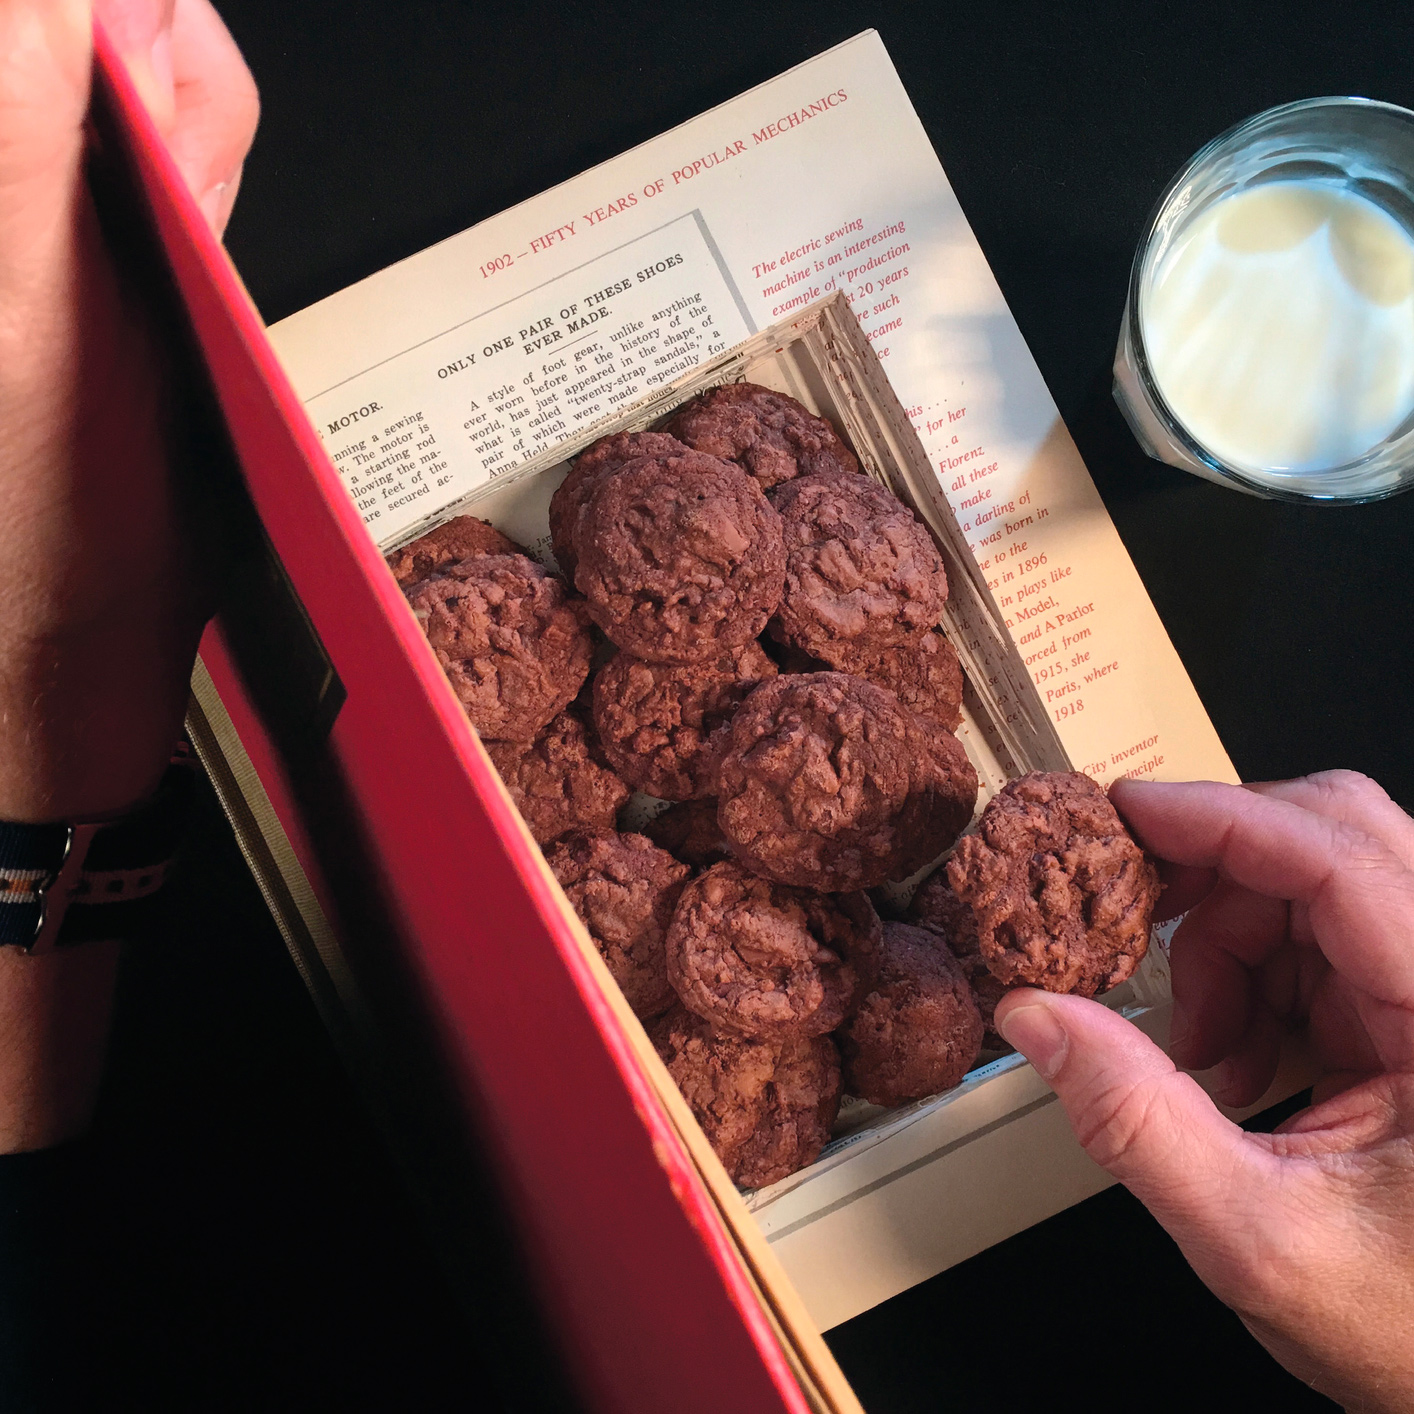
Chocapocalypse Cookie
MAKES 36 COOKIES
The goal was simple: Pack more chocolate into a cookie than had ever been packed before. Each of these obsidian disks contains five forms of chocolate, which pretty much kicks the choco-crap out of any other cookie out there.
As always, where measuring matters most, I’ve gone to grams.
172 grams 54 percent bittersweet chocolate (6 ounces), coarsely chopped
56 grams unsweetened chocolate (2 ounces), coarsely chopped
52 grams all-purpose flour (1¾ ounces)
½ teaspoon baking powder
½ teaspoon kosher salt
2 large eggs, at room temperature
1 teaspoon vanilla extract
56 grams unsalted butter (4 tablespoons/ ½ stick), at room temperature
172 grams light brown sugar (6 ounces)
86 grams 70 percent bittersweet chocolate (3 ounces), coarsely chopped
2 large eggs, at room temperature
86 grams 40 percent milk chocolate (3 ounces), coarsely chopped
56 grams cocoa nibs (2 ounces)
1. Place the 54 percent bittersweet chocolate and unsweetened chocolate in a heatproof bowl and microwave on high for two 30-second intervals, stirring after each interval. If it is still not smooth, heat for 10 additional seconds at a time and stir until it is. Set aside for about 15 minutes, until cooled to 90ºF.
2. Whisk the flour, baking powder and salt together in a small bowl, then transfer to a paper plate H. In the same bowl, whisk the eggs and vanilla together and set aside.
3. Mount the paddle attachment on a stand mixer and cream the butter and brown sugar on medium for about 2 minutes, until the mixture looks like wet sand.
4. Reduce the speed to low and slowly add the egg mixture until fully incorporated. Pour in the melted chocolate and mix to combine, stopping to scrape down the sides of the bowl as needed. Then, with the mixer still on low, work in the flour mixture. When the batter seems homogenized, mix in the 70 percent bittersweet chocolate, milk chocolate and cocoa nibs.
5. Cover the bowl with plastic wrap and refrigerate for 45 minutes.
6. Heat the oven to 350ºF. Line two half sheet pans with parchment paper.
7. Scoop the dough onto the prepared pans using a 1¼-inch-diameter disher or ice cream scoop, placing the mounds 2 inches apart for 12 cookies per pan. Bake for 8 to 9 minutes, rotating the pans after 5 minutes. The cookies may still look a bit wet when they come out, but that’s okay.
8. Cool the cookies on the pan for 2 minutes, then slide the parchment paper to a rack to let the cookies cool completely. Repeat steps 7 and 8 with remaining dough.
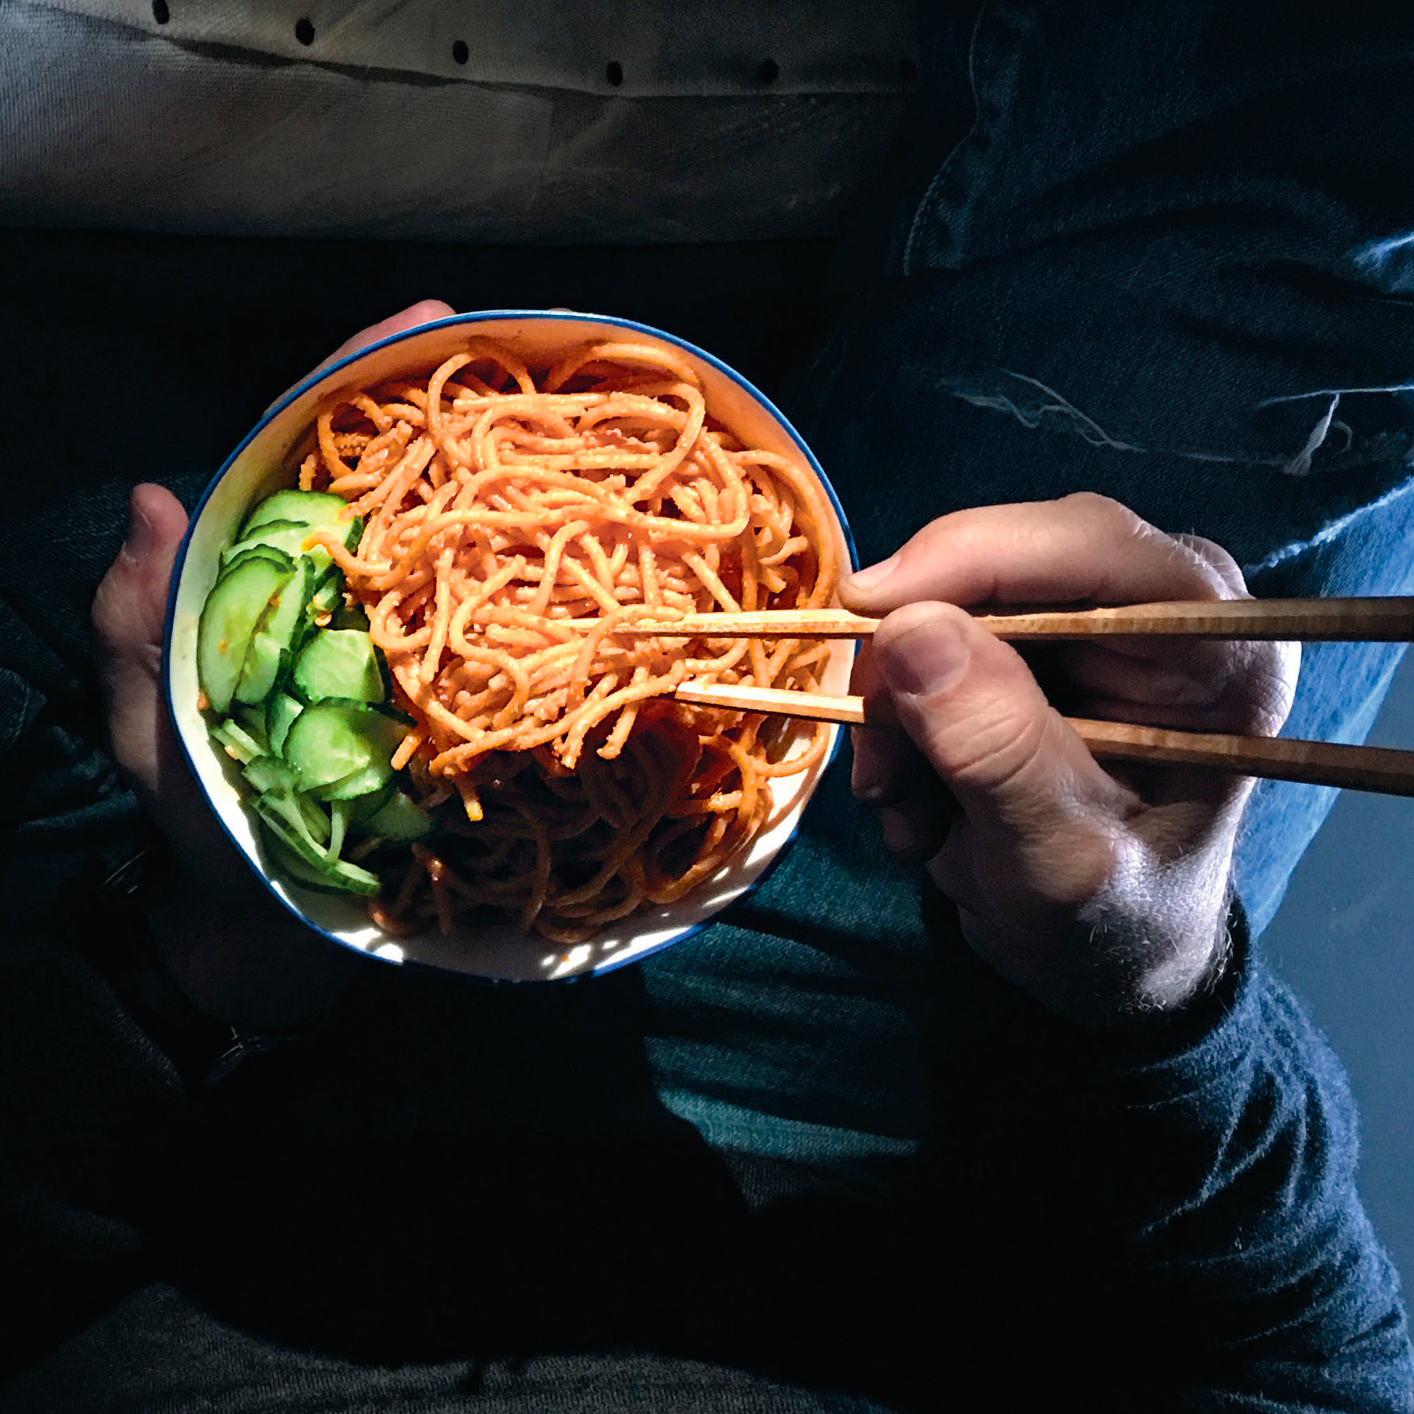
Open Sesame Noodles
FEEDS 2
(As in open the refrigerator door in the middle of the night and eat them right out of the container, standing there pretty much naked.)
Note: Although this recipe makes plenty of sauce for two, you may want to go as much as triple here so that you can keep some refrigerated in a jar for next time.
1 cup rice wine vinegar
½ cup sugar
1 teaspoon kosher salt
½ teaspoon red pepper flakes P
1 hothouse English cucumber
284 grams smooth peanut butter
40 grams soy sauce
15 grams plus 2 tablespoons toasted sesame oil
25 grams sambal chili paste (sambal oelek is what I keep on hand)
20 grams freshly grated ginger (about a finger’s worth)
30 grams rice wine vinegar*
20 grams sugar (about 1 tablespoon)
10 ounces dry pasta, cooked al dente (see Cold Water Pasta Method M) or 1 pound fresh Chinese egg noodles, cooked according to package directions**
1. Combine the rice wine vinegar, sugar, salt and red pepper flakes in a mixing bowl. Mix well then add the sliced cucumber. Cover with plastic wrap and set aside in the fridge while you prepare the sauce.
2. Install the standard blade in the work bowl of your food processor, then put the work bowl on your scale H. Weigh in the peanut butter, soy sauce, 15 grams toasted sesame oil, chili paste, ginger, rice wine vinegar and sugar. Remember to zero out the weight of each ingredient as you go. This is one of those cases where the scaling is more about convenience than precision, so if you are a gram or two on either side of target, it’s okay. The sauce won’t explode or anything.
3. Run the food processor steady for about 2 minutes. Scrape down the sides, if needed, and go for another minute, or until the sauce is smooth.
4. Toss the cooked noodles with the remaining 2 tablespoons of sesame oil in a large bowl. Add ¾ of the peanut sauce and toss in the noodles until thoroughly coated (you can add more sauce as desired or save the rest for another day). This is a lot easier if the sauce is warm, so if you’re getting it out of the fridge, you may want to nuke it briefly.
5. Garnish with the pickled cucumber and devour.
6. Wash your face, you disgusting animal!
* Rice vinegar and rice wine vinegar are the same thing. The real differences come when color is involved. Although Japanese styles are generally white, Chinese styles include white, black and red, depending on the color of the rice from which they’re made. I typically use red for this dish, but if all you have is a light Japanese version, use that. But do not use a “seasoned” vinegar made for sushi; it’s got a lot of salt and sugar added to it.
** Classically, this dish is made with fresh or even frozen Chinese egg noodles, which are pretty easy to find in Chinese markets. But, for me at least, this is an impulse dish. I keep the sauce in a jar in the fridge so that I can throw this together with any kind of noodles from spaghetti to instant ramen. Last time I made it I used number 15 perciatelli. The key is to cook the noodle al dente, then immediately rinse with cold water, drain, then lube with toasted sesame oil. Skip that and the noodles will be gummy no matter what.
Jungle Bird
SERVES 1
Although its inventor, who was working in a bar in Kuala Lumpur in the early seventies, chose to create this tiki classic with Campari B, I prefer Cocchi* Rosa Americano, an apéritif composed of a blend of wines punched up with various fruits, herbs and spices, including cinchona bark, whose quinine provides Cocchi’s bark, so to speak. The nutmeg and a pinch of salt round out the flavors and keep the bitter and sweet from killing each other.
1 cup ice cubes
1½ ounces rum B
1½ ounces pineapple juice
¾ ounce Cocchi Rosa Americano B
½ ounce fresh lime juice
½ ounce simple syrup
2-inch cube of ice
Pineapple wedge or skewer
Freshly grated nutmeg P
Pinch of kosher salt
1. Combine the ice cubes, rum, pineapple juice, Cocchi, lime juice and simple syrup in the bottom of a Boston-style shaker. Cover and shake for 15 to 30 seconds, until chilled and frothy.
2. Strain the rum mixture into an old-fashioned glass over the 2-inch cube of ice. Garnish with pineapple, nutmeg and salt. Serve immediately.
* Pronounced “cokey.”

Tomorrow, French Fries
FEEDS 4
These are not baked french fries but rather baked potatoes turned into french fries. The miracle here (if I may call it that) is that this process allows you to skip the double frying called for by most french fry recipes. And, since the spuds are already cooked when they go into the oil, there’s very little of the foaming and boiling over that can be experienced with raw potatoes. The only downside is you have to bake the potatoes today for frying tomorrow, hence the name.
4 russet potatoes (about 8 ounces each), scrubbed and rinsed
2 teaspoons plus 2 quarts peanut oil
Kosher salt
1. Bake the potatoes at least 12 hours in advance: Position a rack in the top half of the oven with a half sheet pan on the rack below. Heat the oven to 350ºF.
2. Poke a few deep holes in the potatoes with a fork or paring knife. Coat each potato lightly with the 2 teaspoons of the peanut oil and sprinkle generously with salt.
3. Bake directly on the oven rack for 45 minutes to 1 hour, until tender.
4. Cool to room temperature and then refrigerate overnight.
TO FRY!
1. Heat the remaining 2 quarts peanut oil to 375°F in a large Dutch oven fitted with a deep-fry thermometer H.
2. Slice the cold potatoes into ½-inch-thick batons, leaving the skin attached. Turn the heat up slightly and fry 8 to 10 fries at a time until golden brown and delicious. You may need to adjust the heat to maintain the oil temperature. Use a spider H to remove the fries from the hot oil to a cooling rack set over paper towels. Sprinkle with additional salt and devour.