Mastering Basic Cheesemaking: The Fun and Fundamentals of Making Cheese at Home - Gianaclis Caldwell (2015)
Part 1. THE FUNDAMENTALS OF MAKING CHEESE
Chapter 3. THE CHEESEMAKER’S TOOLS
IF YOU ARE AN AVID COOK, then you likely have most of the equipment you need to get started making cheese. There are two things to remember about all cheesemaking equipment: First, it should be non-reactive, or made from a material that will not react with the acids produced during cheesemaking. (The metals in an aluminum pot, for example, react to acid and will partially dissolve.) High-quality stainless steel is the best choice for most pots and utensils, and food-grade plastic or stainless steel for forms. Second, the equipment should be easily cleaned — no nooks, scratches, or chips that might harbor bacteria and cause safety or quality issues in the cheese.
POTS, VATS, AND CONTAINERS
For heating milk and warming curd, a high-quality, heavy-bottomed, stainless steel pot is ideal. Large pots up to five gallons (20 L) can be purchased from restaurant supply companies. If you are ripening milk at low temperatures, as for a soft, fresh cheese, you can use a food-grade plastic container instead of stainless steel, but in general, stainless is always a better choice as it is easier to clean thoroughly without scratching. Glass jars, such as Mason-type canning jars, with lids are great for ripening and storing cultured milks, which we’ll be making in chapter 5.
A water bath can be very helpful when warming milk and holding milk at a certain temperature. The water bath consists of the cheesemaking pot being placed in another container that holds water. As the water is heated, either by the stove or by changing it out from a hot water faucet, the milk warms without any danger of scorching. A water-bath canning pot, designed to heat jars of fruits and preserves that are being canned, with a rack at the bottom works great. Because of their large diameter, these enameled pots, designed for canning high-acid fruits, pickles and sweet preserves, will usually accommodate a five-gallon pot. The rack at the bottom keeps the interior pot from sitting directly on the bottom of the larger pot and allows water to flow around it. A stainless steel tabletop warming tray, such as used by caterers, can also make a useful vat for making a water bath. You can also simply place the cheesemaking pot in a sink and run hot water to warm the milk.
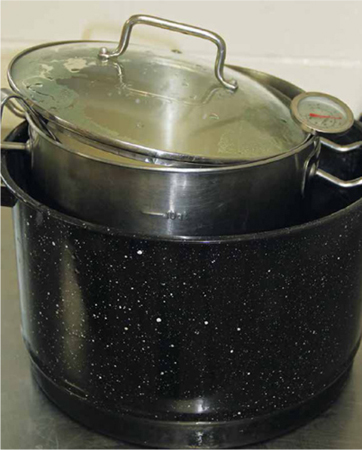
A simple water bath setup for warming milk.
THERMOMETERS
Most food thermometers can be used to the monitor temperature during cheesemaking. The instrument should not be breakable (no glass), should be easy to read single-degree temperature changes, and range of temperatures from freezing to boiling. Inexpensive dial types, available at most grocery stores, work quite well. I am not a fan of digital thermometers, as they seem to be more difficult to keep reliable. Be sure to periodically verify that your thermometer is working properly. This can be done by filling a glass with ice and a little water. Immerse the stem of the thermometer into the ice bath and observe the temperature. It should be just above freezing (32oF [0oC]). Most units will have a small nut located behind the dial and around the stem. This nut can be adjusted to correct the reading.
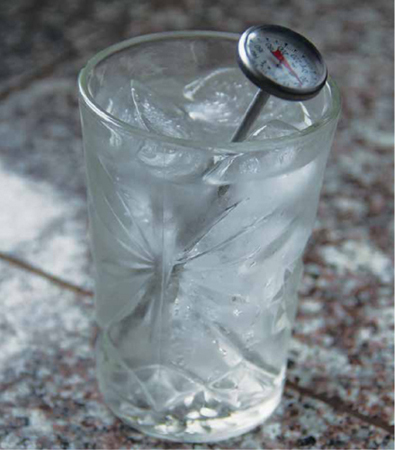
Thermometers should be checked for accuracy by placing in ice water where it should read 33oF (1oC). This thermometer was reading 10 degrees too high before adjusting the nut on the back with pliers.
LADLES, SPOONS, AND SPATULAS
Milk and curd can be stirred with any stainless steel spoon, but a flat, perforated cheese ladle works the best, as it allows you to move curd gently without damaging it. It also serves as a way to disperse rennet over the top of the milk and stir top to bottom. A cheese ladle can be purchased from a cheesemaking supply company or you can make one by bending the end of a flat, slotted skimmer (available at most kitchen and restaurant supply stores). A stainless steel and a plastic spatula are also handy for stirring milk at high temperatures and scraping curds from cheesecloth.
RIPENING SPACES
For cultured milks and some cheeses, you will need to be able to hold the milk’s temperature for many hours, sometimes up to 24, while the bacteria cultures grow and ripen the milk. You don’t need a fancy piece of equipment to do this. You can set up a nice little ripening space using an ice chest, also known as a picnic cooler. Ice chests are simply well-insulated containers and not necessarily just for ice or cooling. If you use an ice chest to ripen your milk, be sure to place a thermometer in the milk so that you can make sure that it stays at the right temperature. If it tends to cool off, you may want to place a jug of water at the target temperature in the chest and cover everything with a towel or two to help keep the temperature stable. You can modify the temperature of the hot-water bottle to help maintain your goal temperature.
Depending on the time of year, you can also ripen your milk anywhere where you can keep it at the right temperature — behind a stove, on the counter, it doesn’t matter; as long as the milk is safe from pets, being spilled, or contamination, you can ripen it wherever works.
KNIVES
Curd can be cut with a long, rounded blade knife or a long, rounded spatula such as those designed for putting frosting on cakes. A regular kitchen knife can be used, but may not reach the sides of the pot evenly and is more likely to scratch the surface of the container. Whatever knife you use, the blade should be long enough to reach the bottom of the pot without the handle going into the curd.
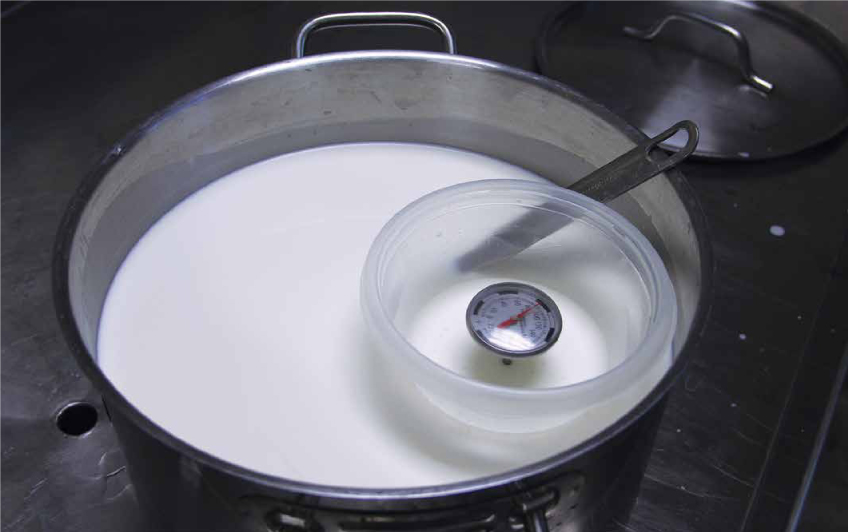
You can make your thermometer float by using a small plastic tub with a hole pierced in the bottom.
pH METERS
When you first get started making cheese, don’t worry about measuring acid production. As you become a more advanced cheesemaker — or if you are already comfortable with a bit more science — you will want to start measuring acid development as a way to learn more about milk quality and how quickly acid is being made during cheesemaking. This is usually best done using a pH meter. Some folks hope to use pH strips for their cheesemaking, but I don’t recommend them as the final word in acid monitoring. While pH strips are helpful at some stages, they are not accurate enough to read the tiny changes that are important to the cheesemaker and can only be used on liquids.
CLOTHS
Cheesecloth is used to collect curd during draining, to help form the cheese during pressing, and also to help the cheese drain well by wicking moisture away from the curd and toward drainage holes in the form. According to the texture of the curd, the cheesecloth needs to be tightly woven so as to prevent bits of curd from escaping through it or being stuck in it. Don’t confuse real cheesemaking cheesecloth with another fabric that is also labeled as cheesecloth and is available in many grocery and fabric stores. This type of cloth has a very open weave meant for draining soup stock and jelly; it will not retain the curd of draining cheese. The best cheesecloth has a thread count of 120 threads per inch. Another cheesecloth, often labeled butter muslin, with a thread count of 90 threads per inch, might work for some cheeses, but its weave is too open for pressed cheeses.
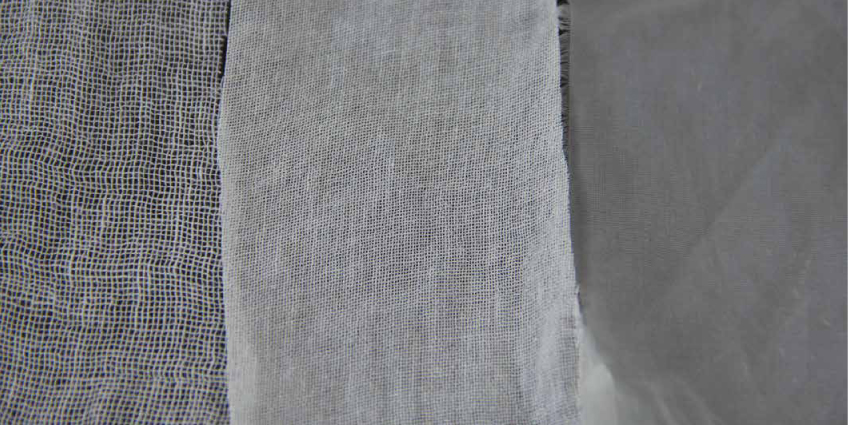
Cheesecloth comes in a variety of weaves, some are better for draining one type of cheese or another. Pictured from left, 90 thread count, 120 thread count (my favorite for most cheeses), and organdy (great for draining yogurt and other soft cheeses. Not pictured is a grocery store cheesecloth or gauze which is only about 40-60 thread count and useless for draining cheese.
For extra fine textures during draining, such as yogurt and fromage blanc, a finely woven fabric called organdy is a great choice. Organdy can be purchased from most fabric stores. Choose one that is made of polyester, not silk, as it will be much more durable. I am still using the same piece of organdy that I started with in the early 1990s! If you don’t have organdy, a double layer of 120 thread count cheesecloth will work just fine.
Often the lessons call for dampening the cloth before use. This helps keep it in place and starts the cheese draining a bit more quickly. You can dampen the cloth with either warm water or preferably some warm whey from cheesemaking.
FORMS AND MOLDS
Cheese forms, or molds, are usually made from food-grade plastic or stainless steel. Cheese forms need to meet the needs of the cheese — in other words, they need to be sturdy enough for the weight at which the cheese will be pressed and have enough drainage holes to allow the cheese to drain properly. Some cheeses don’t need any weight when being pressed, and others need a great deal. Usually, cheeses that need a lot of weight during pressing don’t need as many openings in the cheese form, while those that don’t use much if any weight need many openings for the whey to drain from the curd. Forms for cheeses that are pressed should include a follower. The follower is a piece that fits just inside the form and onto which the weight for pressing the cheese is placed. The follower quite literally “follows” the cheese as it presses down into the form.
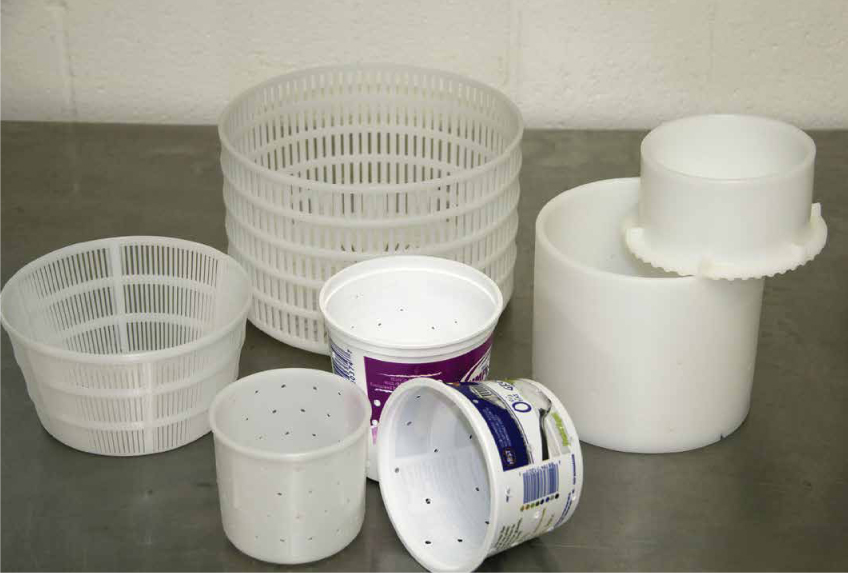
An assortment of plastic cheese forms. Clockwise from left: Basket form, basket form with straight sides, form with follower, homemade forms, small straight-sided form.
COLANDERS AND SIEVES
A colander and a stainless steel mesh sieve are useful to help collect curd during the making of many cheeses. Choose a colander that is either made of stainless steel or plastic, not copper or aluminum (for the same reasons that these metals aren’t suitable for the cheesemaking pot). I like a small to medium-sized sieve with a finely woven mesh for catching tiny curds.
PRESSES
Very few cheese types need the extreme pressure that a mechanical press provides. Most cheeses can be made by using other weights, such as water jugs or barbells. A cheese only needs as much weight as it takes to press the rind closed and tighten the paste (as the interior of the cheese is called) to the desired texture. If the curd is salted before it goes into the press, as with cheddar and some other cheddar types, then the tremendous force of a mechanical press is required in order to get the curd to knit back together. Similarly, curd that is very dry by the end of the process, such as with Parmesan-type cheeses, will likely need a mechanical press. Small screw-type presses that will make about a five-pound wheel of cheese can be purchased from a cheesemaking supply company. They are relatively expensive.

A stainless steel screw press with pressure gauge.
A ratcheting strap press can be made for under $10.00 and will work with any straight-sided cheese form and follower. Pictured here with a large tomme form capable of making an 8 lb (4 kg) cheese.
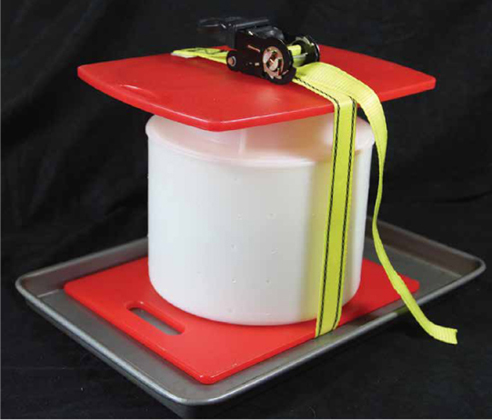
HOW TO MAKE A SIMPLE, EFFECTIVE PRESS AT HOME
You can make a very effective press for under $10.00 — and without any engineering or DIY savvy! All you need is the following:
1ratcheting strap from the hardware store
2plastic cutting boards
1Cheese form and follower — many different forms will likely work with the same press.
Set your cheese form on top of one of the cutting boards. Set the other board on top. Then connect the ratcheting strap (it should come with instructions) to form a loop. Fit the loop around the sandwiched boards and form and pull the excess strap through the ratchet. Cut off most of the excess, leave enough to allow for larger forms to fit between the boards. Then carefully burn the cut edge of the strap with a lighter so that it melts a little and won’t fray out later. There, now you have a press capable of making any cheese! You won’t know exactly how much pressure you are applying, but I will give you plenty of tips in the recipes to help you know that you are pressing at the right pressure.
MATS AND RACKS
Mats and racks are needed to set draining and drying cheeses on. They allow for air circulation around the cheese and let any dripping moisture fall away from the cheese. Cheese mats are made of food-grade plastic and look almost identical to plastic cross-stitch mats (available in craft stores). In fact, I know several commercial cheesemakers that use these craft store mats with no problem. Plastic sushi mats are another nice option. Stainless steel or coated cooling racks (also known as baker’s racks) are great to place underneath the plastic cheese mats to help increase drainage and airflow.
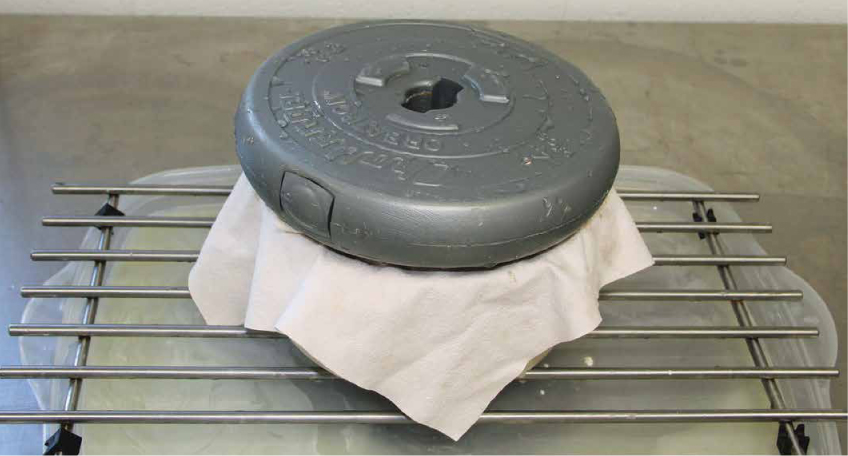
Using a barbell weight to press cheese in a form setting on a rack over a tray. The cloth is covering the follower to help keep the weight from slipping.
TRAYS AND TUBS
During draining and pressing, you may need a tray to collect or divert the whey that is pressed out of the cheese form so that it does not pool around the base of the cheese. A glass baking dish, sink drainboard, or a tray will all work fine for the job. For some cheeses that we will make later, you will need a good-sized plastic food tub with a lid to hold the cheese during brine salting or drying.
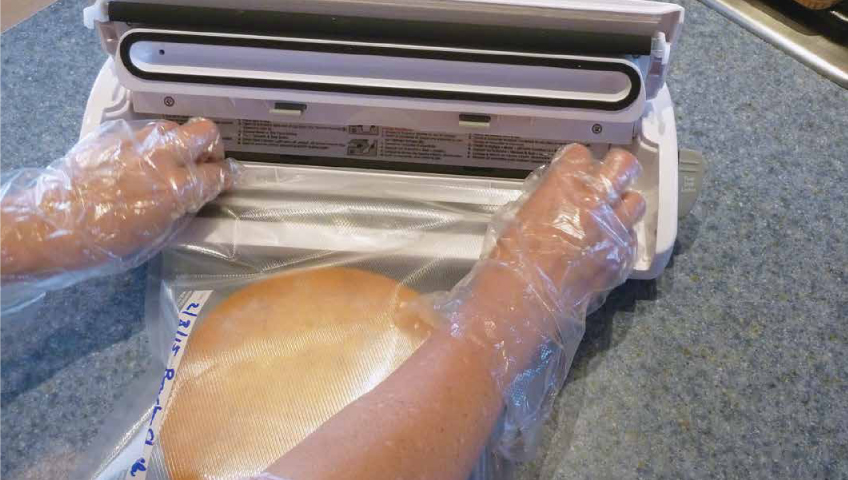
Cheese professional (www.curdsandwine.com) and home cheesemaker Gisela Claassen vacuum seals her original bourbon cheddar. CREDIT: PHOTO BY ARNE CLAASSEN
If you don’t mind working with a bit of harmless mold, cheeses can be aged in a plastic tub or a bag to create a natural rind and more distinctive flavor. The tub will help keep the humidity high enough around the cheese so that it doesn’t dry out. This method of aging requires quite a bit more vigilance and work on your part than when the cheeses are aged in a vacuum-sealed bag. We’ll cover the techniques for aging in more detail in chapter 8.
VACUUM-SEALING EQUIPMENT
A vacuum sealer is handy for storing and aging cheese. Any home-quality vacuum sealer can be used as long as the bags that fit it are large enough to hold your cheese wheels. If possible, choose a sealer that will put a double seal on the bag, or seal it double in two steps. For small wheels, I like to use the resealable zipper-lock type vacuum bags and the handheld vacuum pump that works with them. They have the advantage of being reusable, but the size choices are more limited.
AGING SPACES
Cheeses can be aged at home in the refrigerator or in a wine/beverage cooler. Refrigerator temperatures range from 40oF (4.4oC) to just above freezing at 33oF (0.5oC). Even within the unit, the temperature can vary. All cheeses will age, as long as they aren’t freezing, but generally do best between 40oF (4.4oC) and 55oF (12oC). Wine/beverage coolers are designed to keep things at a very cheese-aging-friendly temperature, so if you can get one of these units, your cheeses will thank you. If not, go ahead and use whatever fridge you can — it will still work!

A cheese air drying (top right) and others aging vacuum sealed in Canadian cheesemaker Ian Treuer’s home aging unit. For more visit www.muchtodoaboutcheese.com. CREDIT: PHOTO BY AND COURTESY OF IAN TREUER
PREPARING CHEESEMAKING TOOLS
The equipment preparation for all cheeses is similar, so we’ll cover it just once. I won’t include this very repetitive process in the recipes, but you should follow it every time you make cheese.
When I work in our licensed creamery, I use a lot of hot water, a lot of cleaning solutions, and a lot of elbow grease. I also wear scrubs, a hair cover, gloves, and boots that are only used in the creamery. When I make cheese in our home kitchen, I am pretty relaxed by comparison. Cheesemaking equipment should be very clean, of course, but I don’t keep a sink filled with bleach and water ready to rinse and re-sanitize all of the tools and my hands.
A thorough handwashing and vigorous scrubbing with dish soap of all of your equipment will remove almost 100 percent of any dirt, residue, or microbes of concern. After each cheesemaking session and wash-up, be sure to allow everything to air dry thoroughly. Bacteria need moisture to grow, so keeping equipment dry between uses is a great way to prevent contamination. An automatic dishwasher can be used to clean equipment instead of hand washing it. Before use, it is a good idea to rewash anything that has not been used and washed in some time, say a week or so. If you are going to use it right away, you don’t have to let it air dry.
You can sanitize your equipment just before use if desired. For the home cheese kitchen, my favorite sanitizer is boiling hot water. You can fill or partially fill your main cheese pot with water, bring it to a boil, then dip all of your tools into the water. Pour a bit of the water over a tray and lay your tools on this tray. Use the same hot water to rinse your already-clean forms and cheesecloth as well. If you are going to use them immediately, they don’t need to air dry.