Biscuits: Sweet and Savory Southern Recipes for the All-American Kitchen (2015)
Biscuit Neighbors and Kin
![]()
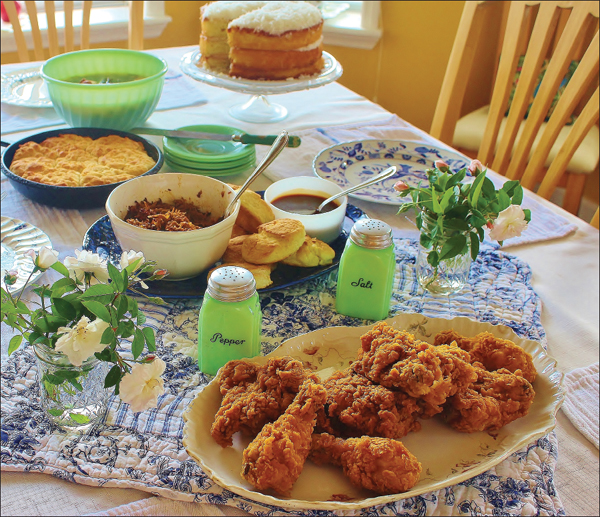
With a few simple modifications, basic biscuit dough is easily transformed into something that doesn’t resemble modern biscuits. Hopefully, this chapter will encourage experimentation with biscuits and instill confidence that knowing basic biscuit techniques will lead to wonderful homemade recipes. In the South, we loosely define relatives to include people close to the family not related by blood. Customarily, children are taught to call special adult friends of the family Aunt and Uncle. We consider it ill-mannered for a child to call an adult by their first name, yet it seems impersonal for close family friends to be called Mr. and Mrs. So, it’s logical to include recipes that are closely related to biscuits in a biscuit cookbook. We don’t want to leave anyone out.
Hushpuppies
Cheese Wafers
Irish Soda Bread
Spinach Parmesan Scones
Southern Tea Cakes
Blackberry Cobbler
Peach Raspberry Scones with Peach Glaze

Hound dogs are as much a part of Southern tradition as grits. Meet our magnificent Basset Hound, Belle.
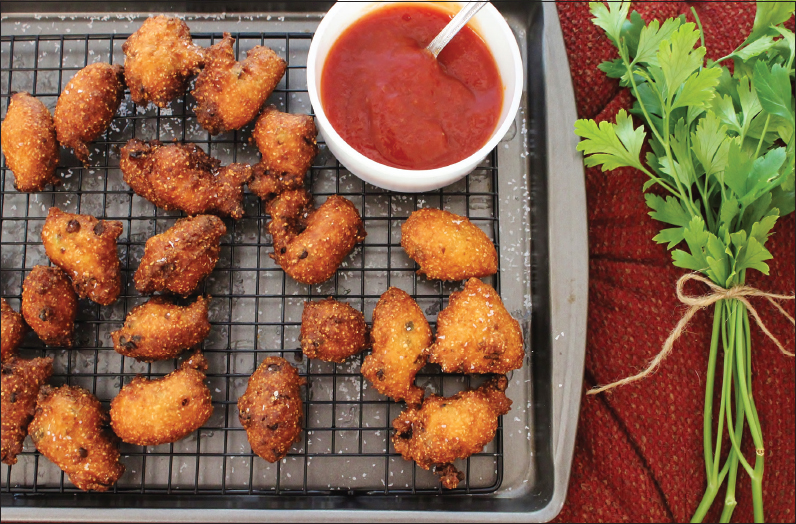
Hush, Puppy!
According to folklore, this traditional Southern dish got its name when hunters mixed up a similar concoction to feed to their barking hunting hounds, telling them, “Hush, puppy!” Traditional hushpuppies contain green onions. Whether they were included in the mixture fed to hush the barking dogs is left to your imagination. Nothing can be found in literature to confirm or deny the absence or presence of onions. Hushpuppies are a standard fried fish accompaniment. My grandmother would use the breading left over from fish to make hushpuppy batter. That’s another fine example of efficient Southern cooking.
Hushpuppies
Yield: 30 pieces
Preheat 3 inches of cooking oil to 350°
Tiny balls of cornmeal dough flavored with green onions are deep fried to make a perfect match for fried fish. If you’ve ever had hushpuppies that were greasy and soggy, I’m just as sorry as I can be. They shouldn’t be greasy at all if the proper cooking technique is followed. You need a cooking thermometer to maintain the proper temperature.
1 cup stone ground cornmeal (not cornbread mix)
½ cup all-purpose soft winter wheat flour
½ teaspoon salt
½ teaspoon baking powder
1½ tablespoons sugar
¼ cup green onions, finely diced
1 cup buttermilk
1 egg
Add first 5 ingredients to a bowl and stir well. Stir in green onions.
In a separate bowl, whisk together buttermilk and egg. Add to flour mixture and stir well.
Heat 3 inches of cooking oil to 350° in a pan.
Drop teaspoons of batter into the hot oil. About one minute after one side starts to brown, flip to the other side using a large slotted spoon. Turn occasionally and don’t let one side get a lot browner than the other or the hushpuppies will be hard to flip over. They will want to stay with the light side up. If this happens, turn the light side down and submerge them in the grease using the slotted spoon to hold them down. Fry in batches and don’t overcrowd the pan. Keep an eye on the temperature of the oil and be sure to keep it at 350°. Each batch will take 5 to 7 minutes to cook. Take them up when they are a deep golden brown.
Drain on a rack. Sprinkle with additional kosher salt while still hot. Serve with cocktail sauce.
Cocktail Sauce
⅓ cup ketchup
¼ cup chili sauce
Juice of ½ of a lemon
1 teaspoon horseradish
1-2 teaspoons of honey
Mix all ingredients together.
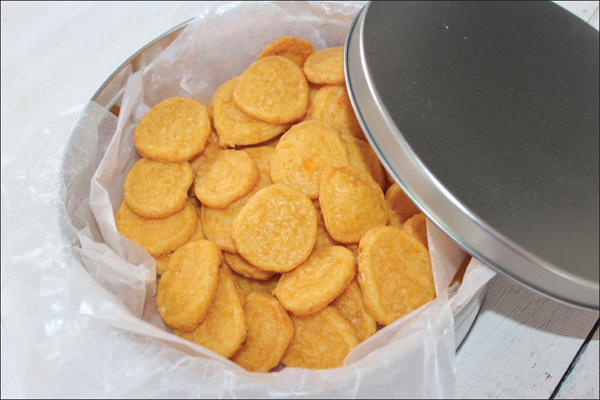
Cheese Wafers
Yield: approximately 90 (1-inch) wafers
Preheat oven to 375°
Delicate enough for a tea party yet sturdy enough for a cocktail party, cheese wafers and cheese straws have shown up at more Southern food-related events than Carter’s has liver pills. For cheese straws, place the dough in a cookie press and make ribbons of dough on the baking sheet. The shape of cheese wafers more closely resembles its biscuit cousin, historical biscuits, than do cheese straws. Historical biscuits were made without leavening, which resulted in a flat, crisp disk.
8 ounces sharp cheddar cheese, grated while cold and brought to room temperature
½ cup unsalted butter, room temperature
1½ all-purpose flour
½ teaspoon kosher salt
¼ teaspoon cayenne pepper, or to taste
½ teaspoon dry mustard
1 tablespoon water, optional
Cream cheddar cheese and butter with an electric mixer until smooth. Mix together flour, salt, cayenne pepper, and dry mustard. Gradually add to cheese mixture and mix on low speed until incorporated. Add water if dough is too dry to stick together. The dough should be soft and dense.
Divide the dough in half and roll each half into two cylinders about 1 inch thick. Each cylinder will be about 16 inches. Wrap in waxed paper and chill in refrigerator for at least one hour.
Cut into ¼-inch slices. Place slices 1 inch apart on a baking sheet sprayed with nonstick spray.
Bake in a 375° preheated oven for about 18 minutes, or until edges are slightly brown. Baking sheets may need to be rotated during baking.
Remove from oven. Use a spatula to gently coax the wafers from the baking sheet and transfer wafers to a cooling rack. Cool completely. Store at room temperature in an airtight container and place waxed paper or parchment paper between layers.
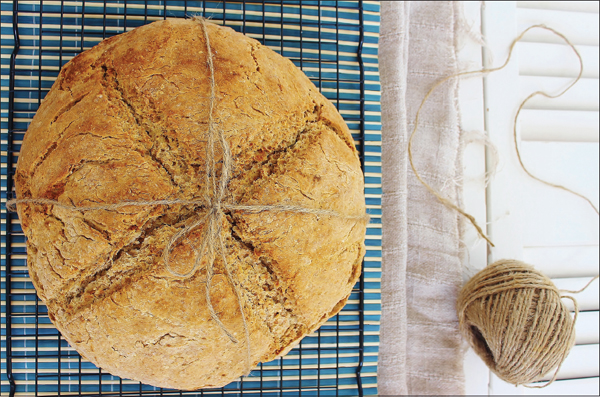
Irish Soda Bread
Yield: 1 loaf
Preheat oven to 425°
The traditional version of this bread is rustic and meant to be simple, just like biscuits. It has a hard crust and sounds hollow when tapped.
It’s essentially biscuit dough without adding additional fat except what’s in the buttermilk, and the dough is shaped into a loaf instead of small individual portions. There are many Americanized versions floating around, but the traditional version used but four ingredients: all-purpose flour, soda, salt, and buttermilk. This version uses whole wheat flour, in additional to white, and produces a darker, more flavorful bread. Folk lore has it that you cut an X to get the devil out and a cross if the bread is to be blessed. You need to make a decision about your personal situation.
3 cups buttermilk
1½ teaspoons baking soda
4 cups stone ground whole wheat flour
2 cups all-purpose soft winter wheat flour
2 teaspoons kosher salt
Stir baking soda into buttermilk and set aside. If the mixture bubbles, the baking soda is still good. If it doesn’t bubble, you need to buy more.
Place both types of flour and salt in a large mixing bowl and stir.
Make a well in the center and pour in buttermilk and soda. Stir until the flour is wet.
Turn out onto a floured surface. Sprinkle with flour. Knead gently and add more flour as necessary until the dough is no longer sticky. Form into a ball and place on baking sheet sprayed with nonstick spray or covered with a baking mat.
Using hands, press out the dough in a circle that is 1½ inches thick.
Using a sharp knife, make an X ¼-inch deep in the top of the dough. Lightly brush top with cooking oil.
Bake in a preheated 425° oven for 25 minutes; reduce heat to 350° for an additional 15 minutes.
Cool on a baking rack. For best results, the loaf shouldn’t be cut for 6 hours. Best of luck trying to wait that long.

Spinach Parmesan Scones
Yield: 16 scones
Preheat oven to 450°
Scones and biscuits are either similar or different according to who you ask. Some think scones are sweet and usually have add-ins such as fruit or nuts. I have a chapter in this book devoted to dessert biscuits, so the sweet versus savory argument doesn’t pass muster with me. The biggest difference supported by literature is the addition of egg to the scone batter. I took the egg principle, added it to a biscuit batter with the addition of savory elements. The outcome is quite nice, if I do say so. Serve warm for best results.
2 cups self-rising soft winter wheat flour
½ cup unsalted butter, cubed and chilled
1 cup grated parmesan cheese
10-ounce package frozen chopped spinach, thawed and excess water removed
½ cup buttermilk
1 egg
Add flour to bowl. Rub or cut in butter until flour resembles coarse meal. Stir in parmesan cheese and spinach.
Whisk egg into buttermilk and pour into flour mixture, Stir until flour is wet.
Turn out onto a floured surface. Sprinkle with flour and knead gently, add more flour as needed until dough is no longer sticky.
Shape dough into a rectangle 1-inch thick. Cut in eight equal squares and cut each square diagonally.
Place 1 inch apart on a baking sheet sprayed with a nonstick spray or covered with a baking mat. Brush tops with cooking oil.
Bake in a preheated 450° oven for 17 to 20 minutes or until golden brown. Serve warm.
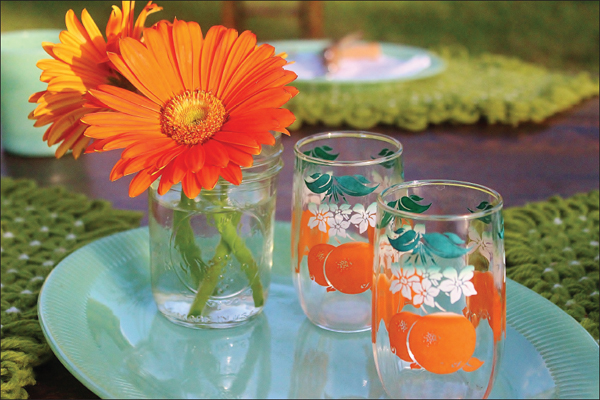
Found at an antique shop, these glasses are exactly like the glasses Granny used to cut out tea cakes.
Granny’s Tea Cakes
It’s hard to describe the taste of a Southern Tea Cake: not as sweet as a sugar cookie but sweeter than a biscuit. If you want sugar cookies, make sugar cookies. But, don’t make a batch of Southern Tea Cakes and declare, “These are the worst sugar cookies I’ve ever eaten.”
Shug, these ain’t sugar cookies.
Authentic Southern Tea Cakes are made from ingredients that even poor Southerners were likely to have on hand: flour, sugar, butter, eggs, and buttermilk. Spices were not always affordable; extracts or flavorings were a tad bit more accessible.
My grandmother’s recipe is the only one I’ve seen that directs you to mix wet and dry ingredients together at the start. I would love to know the story behind that. This recipe was handed down from my grandmother’s mother, and I don’t know the first experimenter to test the mixing technique. I caution you to pulse the ingredients until the flour is wet or it will fly out of the bowl and all over your kitchen.
This little tea cake has special meaning for me. It’s the only thing resembling a cookie that I ever knew my grandmother to bake. Outside of cobblers and occasional pies, she wasn’t a big baker. She preferred cooking over baking. I follow right along in those footsteps, too, but I do remember her making these tea cakes. If I was with her when she made them, she’d give me the job of cutting them out with a vintage juice glass that had beautiful designs of oranges and leaves. She never owned a cookie cutter and considered them extravagant. If she wanted to make big biscuits or cookies and a juice glass was too small, she used a soup can or a Vienna sausage can.
We would cut out the tea cakes and bake them. Then, we’d remove them from the oven, cool slightly, stack them high on a plain dinner plate from the cupboard, and set the plate in the middle of the enamel kitchen table. We sat down to the table together. Granny sat across from me, wearing a flower-printed house dress and assumed her usual 45° angle in her chair. She never sat perpendicular to the table, always at an angle. She’d rest her left arm on the back of her chair, pick up a tea cake in her right, and tell me the story of how her mother used to make these very same tea cakes for her and her siblings.
No matter how many times she told the story, she always interjected, “And we was some young’uns who was mighty proud to get ’em.”
Despite my youth, I knew these tea cakes were special to my grandmother. She grew up in the poorest part of the Deep South and treats were few and far between. Her tea cakes aren’t highly flavored with spices or covered in decadent icing. Some may think they are short on flavor. Within the tea cake is something more important than gourmet flavor, though. These tea cakes have a legacy. Now, it’s my turn to share the legend of the tea cake with my grandchildren.

Southern Tea Cakes
Yield: about 60 (2-inch) tea cakes
Preheat oven to 350°
To follow my grandmother’s instructions from her unique recipe, and to mix all the ingredients together in the beginning, you must be sure to pulse the mixture until the flour is wet. After the dough is mixed, the technique is the same as my biscuit dough technique. The dough will be wet when it’s turned on to a well-floured surface. Sprinkle with flour and keep working it in, adding more as needed, until the dough is no longer sticky and holds its shape. Divide the dough into four equal portions, wrap in plastic wrap, and chill at least two hours. Work with one portion of dough at a time, leaving the others in the refrigerator. The tea cakes hold their shape better if the dough remains chilled until you’re ready to bake them.
4 cups all-purpose flour
2 teaspoons baking powder
1 teaspoon baking soda
2 eggs
2 cups sugar
½ cup buttermilk
1 cup (2 sticks) unsalted butter, softened
1 teaspoon vanilla
Place flour, baking powder, and soda in a large mixing bowl. Stir together.
Add remaining ingredients and mix with electric mixer. Pulse until the flour is wet. Mix with electric mixer until all ingredients are incorporated and the dough is thick and sticky. The dough gets rather thick in just a few minutes.
Turn out the dough onto a well-floured surface. Sprinkle with flour. Keep adding flour until the dough is no longer sticky and it holds its shape. I’ve had to add anywhere from ½ cup to 1 cup.
Divide the dough into fourths. Wrap each section with plastic wrap and chill for at least two hours up to overnight.
When ready to bake, remove one section from the refrigerator. Place dough on floured surface. Roll or pat to ½-inch thickness. Cut out tea cakes and place 1 inch apart on a baking sheet that has been greased or covered with a baking mat.
Bake at 350° for 15 minutes or until bottoms have browned slightly. Don’t over bake.
Remove to a cooling rack.
Repeat with remaining dough.
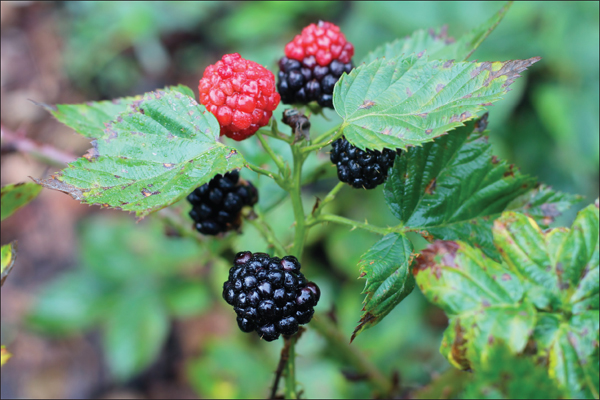
It’s near impossible to find wild blackberry patches these days, so I grow my own.
Blackberries from the Beginning
It started with blackberries that grew by the railroad track in Geneva, Alabama, just down the street from my grandparent’s house in the Cotton Mill Village. I spent a lot of time during the summer with my grandparents in that little southeastern Alabama town. Summer in the South means insufferable heat, but it also means blackberries.
As a small child, I would pick blackberries for Granny to make cobblers, pies and jelly. She’d arm me with a bucket and an admonition, “Be particular for snakes, Shug.”
During the 1960s in small town America, you could get away with sending little children alone to pick blackberries next to the railroad tracks among snakes, chiggers, and thorns the size of nickels. The bushes grew thick and the thorns were protective of the berries. Occasionally, a train would come along. I would stop picking, count the cars, and wave to the engineer on the caboose.
Blackberry summers began my love affair with food that’s lasted almost six decades. I’m not sure what part of it I actually enjoyed. Was it the freedom of being responsible enough to have a job as important as picking the berries that Granny would turn into delicious cobblers and jelly? Was it the challenge of seeing how quickly I could fill my bucket? Or was it simply that I loved the smell of the berries as they cooked away in Granny’s little kitchen, knowing what the end result would be?
One thing was for sure—I learned to appreciate the connection between self-sufficiency, food, and memories. The pride I felt in bringing home a full bucket of berries joined forces with the anticipation of the goodness that was soon to come out of my Granny’s kitchen to produce one little girl who was just about to burst at the seams. I remember the sweet, fruity wine-like aroma that wafted throughout the house as Granny cooked the berries into jelly and cobblers. I thought the scratches from the thorns and the occasional chiggers were worth it all. But most of all, it was worth it hearing Granny sing her hymns. It was a happy time. Blackberries are the one food most closely tied to my earliest, fond food memories.
Wild blackberry bushes are hard to come by now, so I’ve planted my own. I never get tired of looking at them. Seeing blackberries ready for the picking is a gift to my sense of overall well-being. It just makes me happy. I don’t have a railroad track running through my backyard, so I can’t recreate the whole blackberry summer memory. Besides, trains no longer have cabooses and the engineers don’t seem as friendly now.
Blackberry summers are the reason the blog Syrup and Biscuits exists. The association I made between blackberry picking and goodness soon spread to various other southern food creations that came out of my Granny’s kitchen. At an early age, I was keenly aware of the power that is unleashed when people share good food. Granny’s affinity for wanting to feed people infected me. If there’s a cure for this infection, I hope I never find it. The love of feeding people is a gift from God that came by way of Granny. I felt like I needed to write about it.
Granny singing, the aroma of blackberries cooking away, and the promise of cobblers and jelly … That’s what heaven will be like. Amen.
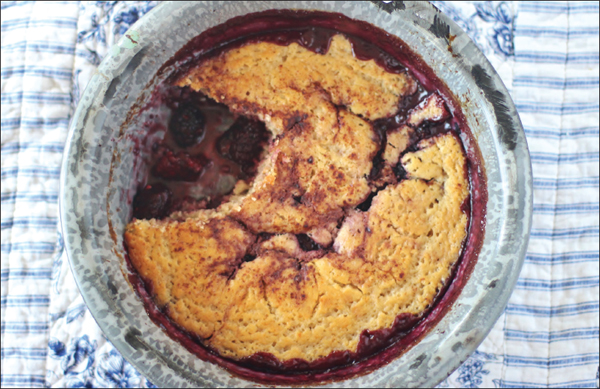
Blackberry Cobbler

Yield: 8 to 10 servings
Preheat oven to 350°
Having something that tastes unbelievably good that’s easy and quick to make is a prize. In fact, this cobbler won me a prize: a Blue Ribbon.
If you’re picking blackberries, then grab a handful of red ones, too. The tartness of the red berries accentuates the flavor of the cobbler. If you can’t get red ones, then add a tablespoon of lemon juice.
1 stick unsalted butter
4 cups blackberries, fresh or frozen without sugar
¼ cup water
1 cup sugar
2 cups self-rising flour
2 cups milk
2 cups sugar
1 tablespoon fresh lemon juice, optional
cinnamon
Melt butter in 9-by-13-inch baking pan.
Place berries, sugar, and water in a pot and bring to a quick boil. If the berries are particularly sweet, you might not need the full cup of sugar in the berry mixture. If you’re using lemon juice instead of red berries, add it to the berry mixture.
While berries are coming to a boil, mix 2 cups sugar and flour in a large bowl. Add in milk and stir well until smooth.
Pour batter over melted butter. Add hot berry mixture to the pan. Don’t stir. Sprinkle with cinnamon.
Bake in a 350° oven for 30 to 45 minutes until mixture is bubbly and top has started to brown. The center will be somewhat jiggly but not loose. Let cool 15 minutes before serving.
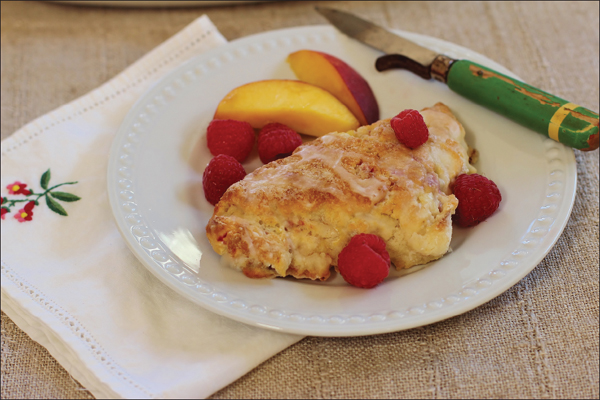
Peach Raspberry Scones
with Peach Glaze
Yield: 16 scones
Preheat oven to 450°
I shared a recipe for savory Spinach Parmesan scones, so it seems fitting that I share a more traditional version of scones: sweet with fruits and nuts. Raspberries were on sale at the grocery store and a load of beautiful ripe peaches had just arrived. We picked up some pecans in South Georgia on our way home from the International Biscuit Festival in Knoxville, Tennessee. The availability of those three items served as inspiration for this recipe.
2 cups self-rising soft winter wheat flour
¼ cup granulated sugar plus extra to sprinkle on top
½ cup unsalted butter, cubed and chilled
1 medium ripe peach, peeled and finely diced (about ¾ cup)
½ cup fresh raspberries, frozen may be substituted
½ cup pecans, chopped
1 egg
½ cup buttermilk
Cooking oil
Add flour and sugar to a large mixing bowl and stir lightly.
Cut or rub in butter until flour resembles coarse meal.
Add peaches, raspberries, and pecans to flour mixture. Gently stir until coated with flour.
Whisk together buttermilk and egg in small bowl and pour into flour mixture. Gently stir with a large wooden spoon until the dough is wet. Don’t be concerned that the raspberries break apart.
Turn out dough onto a well-floured surface. Sprinkle flour on dough and work it in, adding more as needed until the dough isn’t sticky and it holds its shape.
Pat out dough into the shape of a rectangle 1-inch thick. Use a pizza cutter to cut into eight sections and each section into two triangles.
Pick up the triangles with a spatula. This helps hold its shape. Place 1 inch apart on a large baking sheet that’s been greased or covered with a baking mat. Brush tops with cooking oil and sprinkle with sugar.
Bake in a 450° preheated oven for 15 minutes or until tops are golden brown and toothpick inserted comes out clean.
Remove to a cool sheet pan and glaze with Peach Glaze.
Peach Glaze
1 ripe medium peach
1-2 cups powdered sugar, depending on the amount of juice in the peach
¼-½ teaspoon apple cider vinegar
Peel peach and slice. Place slices in a fine mesh sieve over a small bowl and press out the juice with the back of a fork.
Add enough powdered sugar to make the glaze thick but pourable. If the peach is too sweet, add ¼ to ½ teaspoon apple cider vinegar to balance out the flavor.
Drizzle over the scones while they are still warm.