Franklin Barbecue: A Meat-Smoking Manifesto (2015)
✵ Chapter Two
At the restaurant, occasionally we show our most enthusiastic guests around the backyard where we cook the meat. Now, in most restaurants, people who are invited into the kitchen by the chef usually don’t make a big point about seeing the stoves or inquire about every last detail of the ovens. Yet, here at Franklin Barbecue, every single person who comes back wants to know about the smokers—how long have I had them, which ones did I make myself, what are the differences among them. What is it about the barbecue smoker that inspires such curiosity and scrutiny?
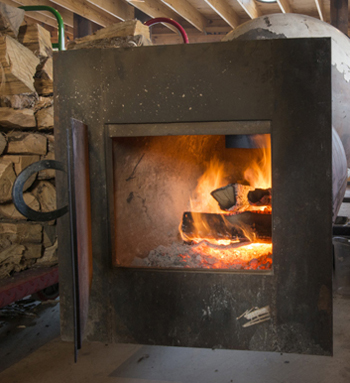
I’m not sure I can answer that question, except that meat smokers, whether they’re little backyard fixtures or massive hunks of welded steel sitting on the back of a trailer, are where the magic happens. It’s the slowest, least-guarded magic trick in the world, yet it never fails to amaze people how a raw hunk of meat can be transformed into juicy deliciousness by such a simple apparatus. Thanks, thermodynamics!
With so few ingredients and tools needed to make superlative Central Texas-style barbecue, each one is obviously of crucial importance. Yet, of course, every choice you make is fraught with its own complexities. What kind of smoker to buy or build and in what dimensions are puzzling questions that make for hours of agonizing inquiry for anyone interested in barbecuing.
Although I occasionally find myself having to cook on other people’s smokers and using styles of cooker I’m not accustomed to (usually when I’m invited to cook at various events around the country), for the most part I just stick to what I know: the classic horizontal offset smoker.
Now, an experienced pitmaster should be able to produce good results on any cooker, but obviously the best chances for success are when you’re working with tools you’re comfortable with and that have delivered good results in the past.
To learn how to smoke meat in the Central Texas style, you don’t need to spend several thousand dollars on a fancy custom rig or even build your own. Although the quality of materials and construction of a smoker are indeed important to producing large quantities of great meat over a long period with high levels of consistency, many beginners will want to start off with a smaller investment in time and money. Whether you’re an aspiring professional pitmaster or just someone who likes to cook at home, this chapter is intended to teach you how to buy the best cooker for your needs, some useful hacks to make it work better, some tips on how to care for it, and for other DIY fanatics like me, even some thoughts on how to weld one yourself. I’m not into bells and whistles and am certainly into getting a good deal, so I’m the last person who’ll tell you to run out and buy the biggest, most expensive cooker you can get your hands on.
Does equipment really matter? Yes and no. Any barbecue situation is about simply knowing how to deal with and get the best results from the conditions you’ve got. I’ve got six cookers at the restaurant right now. They’re all pretty much identical, yet they all cook differently, changing throughout the season. In some weather conditions, one will be more consistent or provide a more thorough, even temperature and smoke, while another might cook more slowly or unevenly than usual.
I graduated to these smokers because I needed more capacity. We were having backyard barbecues for an ever-expanding bunch of guests, and I needed to be able to cook more than one or two briskets at a time. If you’ve read the previous chapter of this book, you’ll know that I started off with an entry-level New Braunfels smoker that I bought on sale for $100 at an outdoors store here in Austin. Its weaknesses were … well, it had mostly weaknesses. Its strengths were that it was cheap and that it used real wood: the first and primary requirement for making proper Texas barbecue. Was it a great-quality smoker? No, but then neither was I, and as you’d expect, the barbecue I produced from it wasn’t that good either.
But you’ve got to crawl before you can walk, and even though I didn’t know what I was doing on that thing at the time, I suppose I learned something from every cook I did on it.
It wasn’t until a little further down the road when I started building my own smokers that my cooking got more dialed in. (And, by the way, it’s still getting there. I’ve always got a lot to learn.) Built in early 2014, the sixth cooker I added to the restaurant—Nikki Six, it’s called—is so far the best of them all. Little tweaks here and there (and I mean little) to the design seem to have had a sizable impact, and meats on Nikki Six finish faster and just as well as on my veteran cookers like Muchacho and Rusty Shackleford.
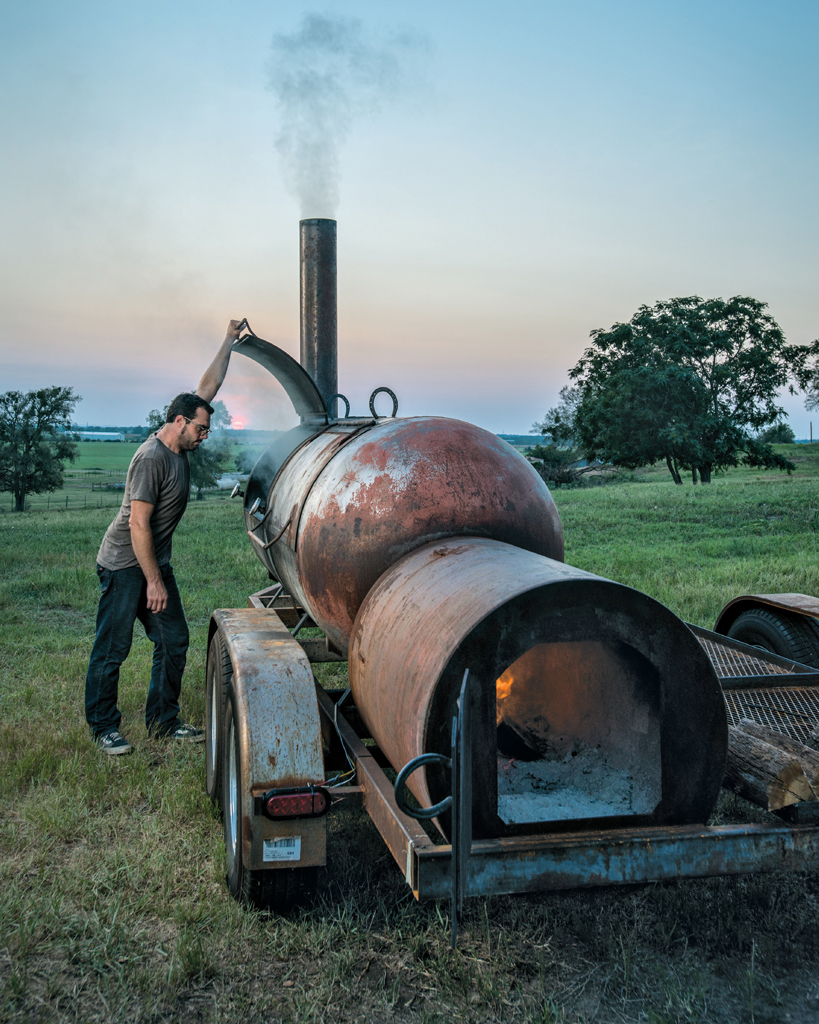
So why the offset smoker? For one thing, it’s what we do here in Central Texas: old-school barbecue, as opposed to the smokehouses of Carolina or the gas-fired commercial smokers you find almost everywhere. I’ve been surrounded with this kind of barbecuing my entire life. Two, I love the offset cooker because it’s such a simple, primal vessel for smoking meat. Three, it’s ideal for cooking with a wood fire, which is a huge key to the great flavors we’re after. (That’s why one of the monikers of these types of cookers is “stick burner.”) It’s just a massively simple device for converting fire and air into smoke and heat, which are focused on a path in a chamber and then allowed to exit through an exhaust pipe on the opposite end of the cooker from the firebox. The only moving parts are a few doors on hinges. Couldn’t be more fundamental.
However, a basic sailboat is a simple and primal vessel too, yet it still requires competent handling to both avoid disaster and ensure a graceful and elegant ride.
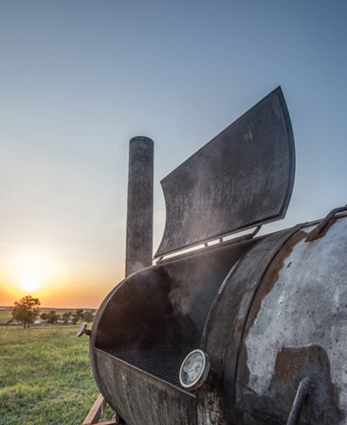
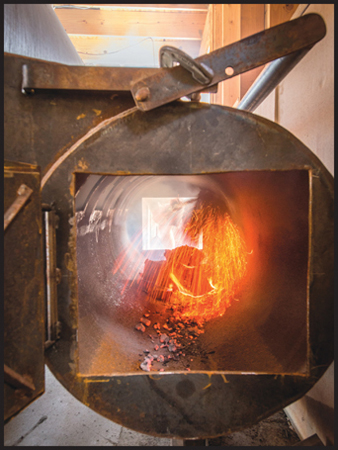
As with a sailboat, much of the expertise in handling a smoker comes in dealing with the elements. In this case, it has to do with the wood you choose, the airflow to the fire, and the weather of the day. But when you’ve set yourself up well and the fire is effortlessly crackling, a clear, blue smoke is swirling out of the stack, and your meat is gradually browning to perfection, there are few better feelings in the world.
PROPERTIES AND TYPES OF WOOD SMOKERS
I hold no science or other higher learning degrees of any kind. But I do think it’s important to understand something about the tools you’re using. Knowing how they work will help you use them more effectively.
Basically, people will make barbecue cookers out of almost anything. I’ve seen them built from everything from old water heaters to filing cabinets. To qualify as a smoker, all you need is a place to hold a fire and a place to put the meat so it cooks in the smoke (rather than over direct heat). In the sections that follow, I outline the different types of smokers, and the basic way they function.
Barbecue Pits
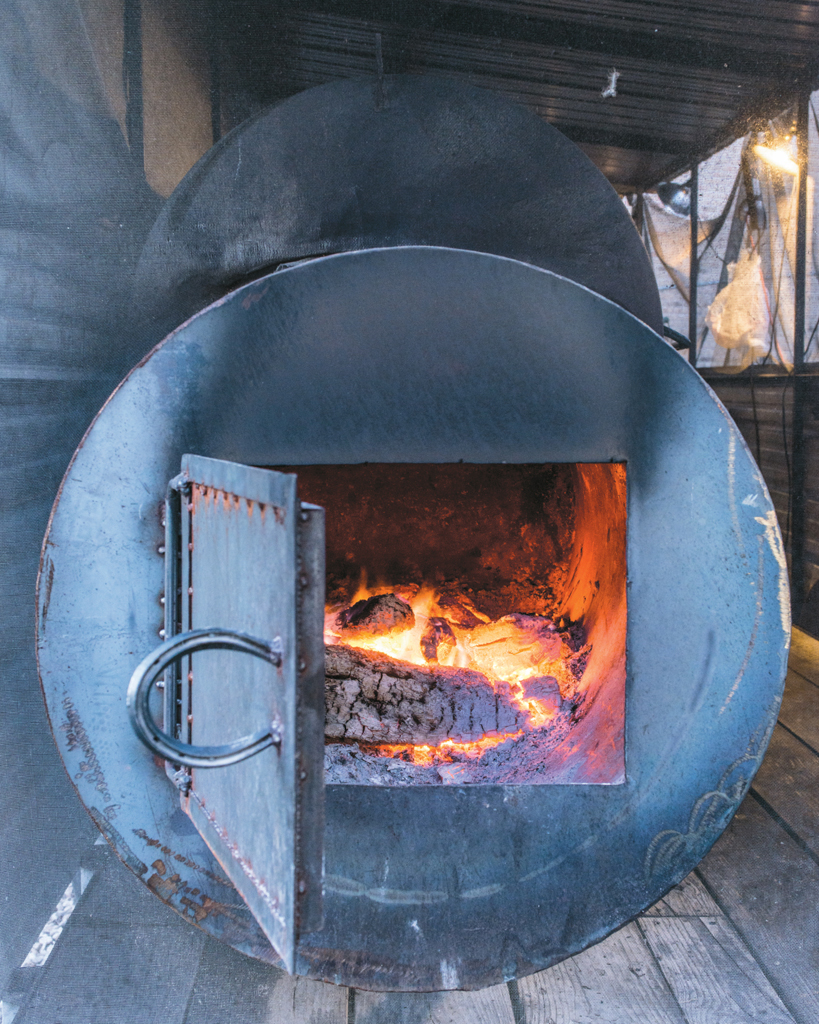
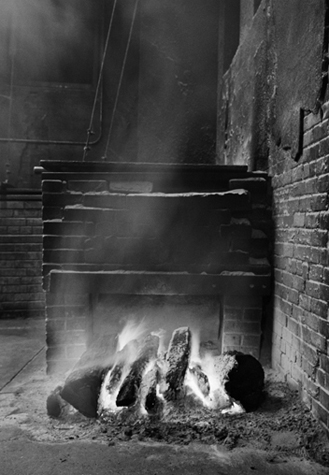
The fact that people still call barbecue cookers “pits” suggests the origin of this style of cooking: a fire contained in a hole in the ground. In Central Texas, the fire might still be slightly dug into the ground, as it is at Smitty’s (see Smitty’s Market and the photo below), where the “pits” are big brick boxes taking smoke and heat up through an opening from an adjacent wood fire that burns in a shallow indented pit in the floor of the restaurant.
This is smoke collecting at its most basic. You could just as easily dig a hole in the ground, build a fire in it, construct a cinder-block structure next to it and a chimney at the other end, and smoke something successfully, if you could get convection to pull the heat and smoke in. All basic offset cookers are advancements of that ancient concept.
Offset Cookers
The style of “pit” I use likely originates from a different tradition, one that’s welding intensive. Offset smokers, like the ones at Franklin, owe their popularity to the deep connection in Texas between the oil and barbecue industries. You’ll often hear of the supposed affinity oilmen had for smoked meat, what with so many people finding work in Texas oilfields during the twentieth century. Oil extraction and refinement require a lot of metalwork, and so it’s quite common to see barbecue smokers cut from old oil drums or welded from sections of heavy steel pipe. There are stories that in down times for the oil industry, bosses had their welders build barbecue pits to keep them busy.
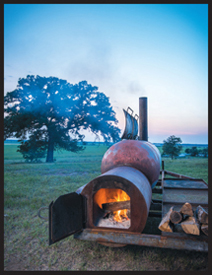
My smokers don’t come from oil drums or pipeline but from used propane tanks. We take long 1,000-gallon propane tanks and cut four doors, each up to 3 feet long, along the length of them to make our cook chambers. At one end, we attach a smaller tank of 250 gallons, cut in half, for the firebox, and at the other end, we affix a tall, wide smokestack made from pipe. Clearly, acquiring and welding a 1,000-gallon tank isn’t practical for most home cooks, so I’ve suggested a couple of tips for adapting your own, appropriately sized smoker in the section “Modifying a Cheap Store-Bought Smoker”.
Reverse Flow Smokers and Tuning Plate Smokers
The offset smokers I build are as simple as they come. However, there are many tricked-out versions of offset smokers that are available to home cooks. One example is the reverse flow smoker. In the reverse flow, the smokestack is located on the same side of the rig as the firebox, with the intent that the heat and smoke will travel to the far end of the smoker under a plate beneath the grates and, unable to escape there, will be pulled back to the smokestack, thus making a complete tour of the cook chamber and smoking the meat more efficiently and evenly.
Another option is an offset smoker outfitted with what are called tuning plates: heavy metal plates suspended in the bottom of the cook chamber to balance the differences in temperature that inevitably occur along the length of the chamber. Typically, the plates are laid snugly next to one another at the firebox end to form a buffer against the powerful direct heat coming from the fire. Farther away from the fire, small gaps are left between the plates to allow more heat to rise into the chamber holding the meat.
I don’t really care too much for either design, but that’s maybe because I’ve learned to cook my way on a simple, unmodified cooker. I don’t feel that I get my preferred amount of convection pulling heat and smoke through the cooker with the reverse flow, and frankly, it just changes the dynamic I’m used to. As for tuning plates, I haven’t worried about those things at all, instead just relying on knowing my smoker and using experience to cook on it properly. A lot of people believe in plates and reverse flow, but my feeling is that I don’t want anything restricting airflow in the smoker. Ultimately, you need to figure out what works best for your style of cooking and follow that road with confidence.
OFFSET SMOKERS

The So-Called Cheap Offset Cooker
If you read around, you’ll find that a good deal of antipathy exists for what is called the cheap offset smoker. This is the kind of horizontal smoker with a low price tag that sits chained up outside a Home Depot. Of course, that’s exactly what I started with—my New Braunfels Hondo was nothing if not a cheap offset.
I began with one of those because I didn’t know any better and because that’s all the money I could scrounge together. But the cheap offset smoker is in many ways set up for failure, especially for people who are just learning. It is inconsistent and porous and because the metal is so thin, it doesn’t retain heat well. When I picked up my second cheap smoker, which was abandoned at the curb and advertised in the Free section of Craigslist, I couldn’t believe my good fortune. Today I can easily imagine its owner screwing up yet another brisket and simply wanting the thing out of sight. And, no, owning two cheap smokers does not improve your odds of success. But I do think that my cooking inevitably got slightly better as I continued to cook on them. So if a cheap offset smoker is all you can afford—and you’ll know it’s a “cheap” one not only because of the price tag but also because of its use of very thin metal and rickety design (see “What to Look for When Buying a Smoker,”)—I say buy it. A cheap offset is better than no smoker at all, and you can always modify it a bit to somewhat mitigate its feebleness. You might not be able to achieve greatness, but you’ll be able to learn, as I did.
UPRIGHT DRUM SMOKER
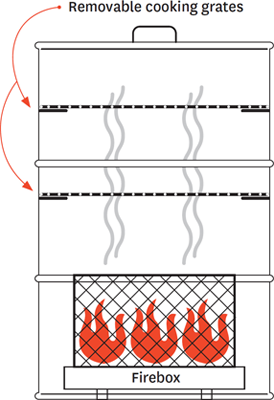
Upright Drum Smoker
The only smoker that is more basic than the offset is the upright drum smoker. This design uses a single barrel or drum with the fire built at the bottom and the heat and smoke rising vertically through a shelf or series of shelves containing your meat. Since what you are cooking will be sitting above the heat source, it’s necessary to position it high above the fire. Also, since you can’t burn wood, which produces flames that will burn the meat, you’ll be relying on charcoal and wood chips, which don’t give the same flavor as burning wood.
This is a similar technique to what you’d use if you were smoking on a basic Weber kettle grill or on a Big Green Egg or other kamado-style cooker. You place the coals on one side and the meat on the other, cover, and get the smoke and heat you need. Again, the drawbacks are relying on smoke from smoldering—not burning—wood and the difficulty of regulating temperature and airflow. Big Green Eggs and company are a better choice than a flimsy Weber kettle, because their thick ceramic sides allow them to stabilize and hold a temperature more efficiently, which is what you need for long cooks. They’re basically naturally fired outdoor ovens with smoke.
THE COOKERS OF FRANKLIN BARBECUE
I’ve gone through quite a number of smokers in my day, but here’s the roster we’re playing right now at the restaurant.
NUMBER TWO ✵ This smoker, which I built during the heyday of the barbecue truck, now sits on a trailer in my driveway and gets pulled out occasionally for a mobile cook. It is made of a 500-gallon tank, has an insulated firebox with an 8-inch stack, and is the model all my 1,000-gallon smokers are based on. It is my favorite!
MUCHACHO ✵ Built just after we moved into the restaurant space to satisfy still-rising demand for barbecue, I made Muchacho in my standard design of a 1,000-gallon propane tank, with a firebox made from a 250-gallon tank cut in half and insulated with a 24-inch liner. We use him for brisket, ribs, and turkey.
RUSTY SHACKLEFORD, AKA SHORTY ✵ Demand continued to rise and rise, so a couple of months after Muchacho, I built Rusty with the same design. Rusty has since been renamed “Shorty” because we had to take 20 inches off him to fit him into the new covered smokehouse we built in the summer of 2014. Shorty helps us out with brisket, beef ribs, turkey, pork butts, and sausage.
MC5 ✵ The line kept growing, so I just kept building smokers. A good, solid cooker, MC5 is my least favorite mostly because the grate is ¾ inch lower. That’s the way it goes—every cooker is different, even if it basically looks the same. MC5 does its service with briskets and ribs.
NIKKI SIX ✵ My favorite 1,000-gallon cooker! Nikki cooks ribs and briskets faster and better than all of the others.
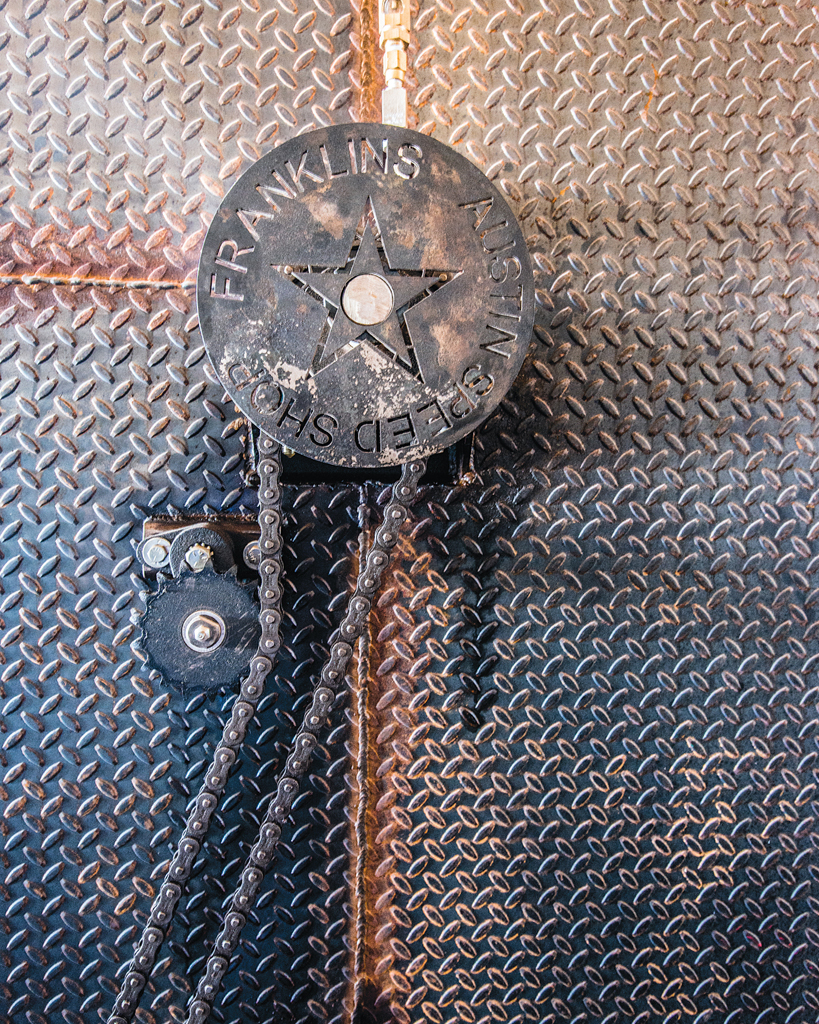
BETHESDA ✵ The most ambitious cooker I’ve ever built, Bethesda is a big, bad mama. She is a rotisserie, which means she has sturdy racks that rotate around, cooking ribs and briskets more evenly and in less space than in long, horizontal smokers. Bethesda can handle seventy-two racks of ribs at once, cooking them evenly and deliciously, and unlike all commercial rotisseries (which rely on gas for heat), Bethesda is completely wood fired. My favorite part? Some badass local dudes who design motors for drag racers built the motor that drives her.
CONVECTION
HOW SMOKERS WORK
With any new smoker I see, the most important consideration is airflow. It’s the airflow that dictates how evenly, quickly, and effectively the smoker cooks.
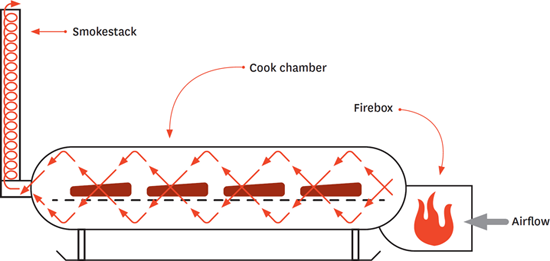
You probably understand the principles of airflow intuitively, but it always helps to be able to visualize the mechanics. It’s fairly basic thermodynamics. Cooler air is drawn in through the firebox door by the fire, which is ravenously consuming oxygen to keep itself going. With the cool air pulled into the fire from one direction, the rapidly expanding hot air is pushed off from the fire in the opposite direction—into the cook chamber. We know that, due to the expansion of gases when heated, hot air rises because it is less dense than cool air. (Scientists would tell you that what’s happening is that cooler air is falling because it is denser and thus more affected by gravity.) Anyway, this movement of air is convection.
For offset cookers, the action of the fire is not the only force driving the movement, however. The smokestack is another part of the engine, working in tandem with the fire. Thanks to something called the stack or chimney effect, columns have a way of focusing the energies of convection. As the hot air is sucked into the cook chamber, an imbalance of air pressure from the cooler air outside can create tremendous airflow that will in turn create convection inside the cooker, and, when everything’s right, the heat and smoke will move continuously and vigorously from the fire out through the stack. Hot air that’s moving cooks things faster and more evenly than stale warm air (which is continuously being cooled by the thing being cooked), thus crucially speeding up cooking times. The smokestack is an essential part of getting the hot air flowing.
Smokestacks and chimneys need to have the right proportions with regard to the cook chamber and firebox so they vent the heat and smoke properly. Too tall a smokestack and the cooler outside air will exert more pressure on the dwindling heat, which will back your smoker up and ultimately extinguish your fire. Too big an opening on the cook chamber will cause the smoke and heat to evacuate too quickly and you won’t have enough heat or smoke for cooking.
A science book covering combustion and convection might have formulas that describe all of this and might lead you to a reasonable ratio of firebox volume to cook chamber volume to smokestack height and diameter. But when I’m building a smoker, I just tend to eyeball it. I can offer some advice, however: longer smokestacks tend to pull harder. And it’s easier to make a stack shorter than it is to make it longer (I’ve done both). In other words, you can always dampen a stack that works too well, but it’s much harder to make a stack “pull harder.” The best thing to do is to get a measure of your smoker’s draw and be willing to lengthen the stack somewhat if you think it might help or shorten it if you think things are getting bogged down. There’s no better way to discover this than by simply learning your cooker.
Ultimately, repetition is the key to cooking well on any cooker, but especially a standard offset cooker. Experience, patience, and attention are going to be the keys to successful cooks. I’ve talked to many people who’ve screwed up a brisket because they left the cooker for too long, weren’t watching their temperatures, fell asleep, and so on. Heck, I’ve done the same things myself. There’s nothing worse than ruining a big expensive piece of meat into which you’ve already put hours.
But the more you use your cooker, the better you’ll understand its airflow, the needs of its fire, the draw out through the smokestack, the high and low temperature points within the cook chamber, and more. And as you get to know this simple machine, your cooking will get better and better.
Of course, at the end of the day, if you’re buying a new smoker, you still want something that makes your job as easy as possible. Yes, practice does make perfect, but better still would be to buy or build a smoker that sets you up for success. I’ve worked with many of the varieties of commercial offset cookers out there and can offer you the following tips when you’re looking to make your next smoker purchase.
WHAT TO LOOK FOR WHEN BUYING A SMOKER
Because barbecue is so popular these days, you’ll find a huge variety of smokers in a wide range of prices on the market. In some cases you get what you pay for; in others not so much. As with any significant purchase, you should avoid an impulse buy and take a while to consider a number of factors before you choose. Some of these factors may seem obvious, but I think it’s good to be reminded of them, if nothing else than for the sake of due diligence.
Do You Have a Place to Put It?
This may seem like a foolishly basic point, but it’s worth considering. People can become infatuated with barbecues the way kids get about puppies. They want one real bad, but after a month of scooping up poop and having to walk the animal twice a day, suddenly they’re foisting those chores off on their parents. Likewise with great barbecue. After having tasty brisket somewhere, people become inspired, and in the excitement of the moment, they rush out to the store to buy a smoker. It’s when they get it home that they realize it takes up a third of their yard or that they’ll have to stow it in the garage behind all of that other stuff. They’ll have to clean it and take care of it too. Suddenly it’s wasting away. Don’t let your cooker become a neglected puppy!
My advice is to figure out exactly where you’re going to put it before you buy it. Some of these smokers have a big footprint, so take a measurement and really visualize the space. Also consider that you’ll need to access the firebox with enough space to throw in another piece of wood. You’ll want to be able to get around this thing. And it must be freestanding, not leaning up against a wooden fence or a side of the house. (That’s obvious, I know, but every year some three thousand homes burn down because of barbecue and grill fires, according to the National Fire Protection Association.)
And if it’s a smaller backyard cooker, it’s better not to stow it in the back of the garden shed or garage. Chances are that you’ll use it less often than you would if it’s placed in plain sight and you see it every day. Consider these simple things before laying down your money.
What and How Much Do You Plan on Cooking?
I was so excited when I got my first smoker. It could hold one, maybe two briskets comfortably—enough to serve ten to twenty people. But it wasn’t long after my first cook that I was invited to cook for a friend’s birthday and then a wedding party, and then our backyard barbecues started to expand. In effect, I’d outgrown my smoker after just a couple of cooks. So you need to think about how you’ll use your cooker, especially if you’re planning to buy something that costs more than a couple of hundred dollars.
For how many people will you usually be cooking? If it’s just you and a couple of friends, you might not need too much space on the grill. But if you often daydream about being referred to as “the barbecue guy” and cooking for big parties, you’ll probably want to start off with something that can handle more volume.
Volume is important, because the slow part of “low and slow” cooking is very real. It’s not like a steak, where you can just throw another one on and it’s done in 5 to 10 minutes. In fact, with barbecue you get significantly less than what you started with. Over 12 hours, 25 pounds of brisket gradually becomes 15, and you can’t “throw another one on” when your cousin decides to invite her neighbors. Slowness and capacity have continuously challenged us at the restaurant—how to find enough grill space to do the volume we want to do when we need it done. As it is, our smokers are in use 24 hours a day. We are literally at maximum capacity. So, if you’re firing up the smoker for a big party and doing a couple of briskets, you have to remember that those things will occupy the entire surface of a small smoker for 12 to 18 hours. You won’t have a chance to cook anything else on there before the party starts, so it had better be enough.
TO INSULATE YOUR FIREBOX OR NOT
Some fireboxes are insulated, using everything from multiple layers of metal, fire bricks, and fiberglass insulation to mineral wool. Ultimately, the question of whether to have an insulated firebox or not depends on the nature of the cooker you use and where you’re cooking.
The main reason to insulate your firebox is to improve heat retention. Once up to temperature, an insulated firebox will hold its temperature much better than an uninsulated one, even if you’ll be going in and out of the cook chamber a bit, which always costs you heat. Other advantages to insulation are much more efficient fires and therefore lower fuel costs. (My first smoker, Number One, doesn’t have an insulated firebox, and it uses almost twice as much wood as Number Two, which does.)
Insulated fireboxes are a must for people who live in cold climates and want to cook in winter. You’ll want a well-insulated firebox so you’re not constantly battling to keep your temperatures up.
There are corollary disadvantages too. If the firebox is insulated with rock or with an extra layer of metal, the cooker will be heavier and consequently more difficult to move around. If logistics are a concern, this is something to think about. Also, too much insulation can generate too much heat for a smaller cooker. If the firebox is too well insulated, it will keep its coals warm for really long periods, hardly requiring wood fuel to keep its temperature up. This way, without smoke, the cooker is basically an oven. We do want a smoker to exhaust its fuel at a fast-enough rate that we can keep adding wood to maintain a continuous supply of smoke. A certain amount of inefficiency can be a good thing. It’s important to be able to balance the power of the heat source with the cooking vessel—a giant bonfire is counterproductive if you’re just trying to scramble a single egg.
That sense of proportion is why I think an insulated firebox is really important for a large-scale cooker, but not as critical on a smaller one, as long as the smaller one is still constructed out of reasonably thick ¼- or ⅜-inch steel. For really long cooks in which you’ve got anywhere from five to twenty-five briskets going, you’re going to need that steady, powerful source of heat from an insulated box. If you’re just doing one or a handful of briskets, you can manage fine without.
My large cookers’ fireboxes are two concentric cylinders with a small pocket of air between them. They’re round instead of the more common square firebox because the round firebox allows me to build up a nice deep bed of coals at the base of the circle. Wood stacked across the arc of the circle gets natural airflow between it and the coal bed. I also like the way the flames rise in the round firebox and are forced to curl around the edges. I feel (no hard science here) this helps create a certain amount of vorticity that propels the air, heat, and smoke with great velocity and chaos into the cook chamber.
Speaking of brisket, before you buy your smoker, take a look at how big a full 12-pound brisket measures and then think about how many you can get on the cooker you’re looking at. And you don’t want the meat smushed up against the edges either. It needs to have space around it for airflow. Now visualize a couple of racks of ribs, which can measure between 12 and 18 inches in length. Also consider height, such as the stature of a whole turkey, which you will quite likely want to smoke some Thanksgiving.
Quality of the Build
Now you’re in a hardware or outdoors shop looking at the various models of offset smokers they have. As with anything you’re buying—a car, a jacket, a puppy—you’re going to want to consider the quality of the materials and workmanship. If you’ve never bought a smoker before, how will you know what’s good or not? First and foremost, trust your instincts: you’ll be surprised to what degree rickety construction—and, likewise, really good craftsmanship—will stand out to even unpracticed eyes. But there are also some other details to consider.
If you’re cooking with wood—and, after all, that is what we’re talking about here—there are some important qualities you should be looking for. Wood fires are more inconsistent and variable than those fueled by gas, charcoal, or electricity. Therefore, heat retention is key, and good heat retention is a feature of thicker metal. At the low end of the price spectrum, you’ll definitely see a number of cookers whose cook chamber and firebox are built out of thin, stamped sheet metal. You’ll want to avoid those, as the heat will spike or escape quickly, leading to terribly uneven cooking. Likewise, it will be hard to achieve and hold decent temperatures in colder weather. Thicker metal is more expensive and unwieldy to transport, but it will save a ton of aggravation during your cooks. Acceptably thick metal will run anywhere from ⅛ to ⅜ inch thick. You’ll know metal that’s too thin, because it’s not much thicker than sheet metal.
Durability is also a significant question. If you buy a new smoker, season it, modify it, and spend months discovering its inner habits and quirks, you won’t be too happy if its doors don’t fit, its screws buckle, or it burns through in a year or two. Of course, this is a particular worry with cookers made of thinner metal. Rust is an inevitability with anything made from metal, but thin fireboxes can rust through within a couple of years of moderate usage. Best to look for a solid, well-constructed or insulated firebox. Especially with cookers made of thinner metal, good maintenance means dealing with rust as it occurs: take a wire brush, sandpaper, or steel wool and scour rust out when you see it pop up.
Along the same lines, you need to examine the quality of the closures, seals, and of the insulation, if there is any (see “To Insulate Your Firebox or Not,”). Doors lacking seals or outfitted with flimsy ones will leak heat and smoke copiously, which makes a cook uncontrollable and unpredictable. Seals should be tight and completely cover the gap between the door and the body of the cooker, usually from the outside. If at the store you see a smoker with a door that seems to fit so perfectly and snugly that you’re convinced it’s well sealed, don’t be convinced. Just wait until you get it home and get it fired up at 300°F for 10 hours. You’ll see even thicker metals twist and shift when heated, and suddenly a seemingly well-made smoker of dainty metal becomes a contorted, ill-fitting heat sieve.
DETAILS AND ACCESSORIES
Good, simple offset smokers have few moving parts, but the ones they do sport should be of good quality and soundly integrated.
Thermometers are important. While making good barbecue requires touch and instinct, I refer to temperature gauges dozens of times every hour. I’d go as far as saying that great barbecue is impossible without them. So, two things that you want to look for in your prospective smoker are thermometer placement and quality. The gauge should be located down at grill height. If it’s not, but rather placed up at the top of the chamber, make sure that it won’t be too hard to install a new thermometer yourself, as I discuss later in this chapter.
Also, check to make sure that it’s a good-quality, heavy-duty thermometer. The probe will be sitting for long periods of time in a hot environment filled with soot, tar, smoke, and grease. Chances are the included thermometer won’t be of the greatest pedigree, so make sure that you can replace it with one of your own purchased down the road.
A baffle is a device (such as a wall or screen) that is used to control the flow of something (such as a fluid, light, or sound). In a cooker, it’s a plate used to redirect heat and smoke as they enter the cook chamber from the firebox. It’s often welded right above the opening between these two spaces, so it redirects the heat from the fire down and disperses it into the cooker, instead of letting it rise up and out through the top. It also adds to that chaotic effect, getting heat and air bouncing around, reducing unevenness in the cooking. I think it’s important to have one of these in pretty much every offset smoker design.
I use the firebox door to control airflow to the fire (more on that in the fire chapter), but a damper on the smokestack can be a handy tool to further control the rate of draw. It’s also handy for closing off the stack if your smoker’s not going to be in use for a while, to keep the critters out. However, if you do leave a smoker completely closed up, it can eventually get moldy inside. So, if you’re not going to be using it for a long time, always leave it cracked.
Other things to consider include the handles of the cooker and firebox doors. Are they made of a less conductive material so that you can grab them without melting the skin on your hands? Are they sturdy and well attached?
Finally, is there an outlet for drippings? Over a 12-hour or longer cook, a brisket might lose half its weight. Most of that is just going to drip down into the bottom of the cooker in the form of grease and rendered fat which, incidentally, is a fire hazard. You’ll want to get it out of there rather than just letting it pile up and turn rancid. It’s much easier to have some sort of drain or valve to let it pour out than to have to remove the grates, lean in, and scoop it out by hand. I’d look for a cooker that has a drip pan, a place for a drip pan in the bottom, or a drain at one end from which grease can run out.
BUILDING A SMOKER
I started our business back in the trailer with a smoker that I bought from someone else. But since then, for the barbecue we sell at the restaurant, we haven’t cooked on a smoker that I didn’t build or design myself.
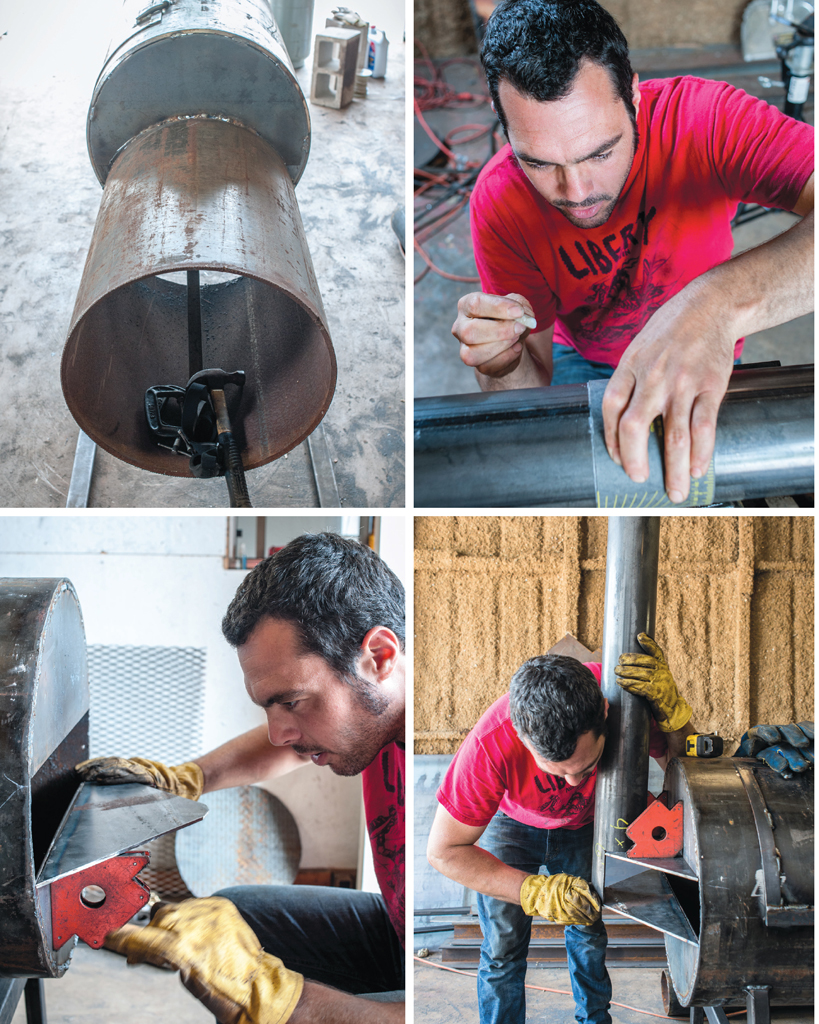
Building a smoker might sound like a daunting task, but if you have the right tools and some common sense, it’s not as hard as you might think. It helps to be drawn to taking things apart, tinkering, and building stuff, which I am. Since I was kid, I’ve liked deconstructing things just to figure out how they work. If I didn’t know how to use a tool, I just taught myself. It’s that simple. And building a smoker can be too.
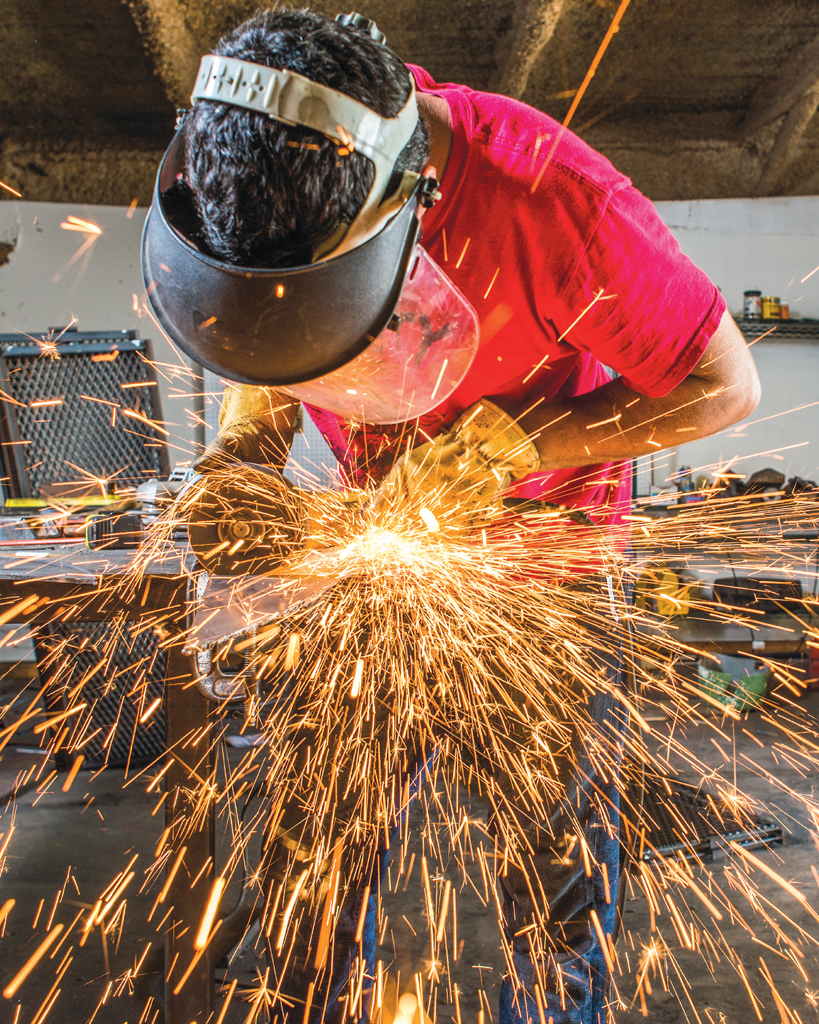
You’ll need elementary metalworking skills. If you read that last sentence and thought, Yeah right, buddy, just skip ahead to “Modifying a Cheap Store-Bought Smoker”, where there are some more entry-level projects laid out. But welding big, stupid hunks of metal is not as hard as it might look. Welding complicated, delicate things like jet engines—now that’s another story. But I started welding when my parents gave me a rig, and I basically taught myself. The more I welded, the better—and faster—I got.
Building smokers got a lot easier for me when I rented a basic workshop space in a small industrial park on the outskirts of Austin and stopped doing it in the sweltering heat and uneven ground of my backyard. Now it’s just the sweltering heat of the shop. But it was indeed the backyard where I started the hot, grimy activity of welding together large pieces of heavy steel. It also got easier when I procured an old, 1970s Komatsu forklift. But by then we were well into business at the restaurant, and I needed to add cooking capacity and speed as quickly as possible. I spent many, many brutal days cooking from 2 a.m. at the restaurant, working through lunch, then heading off to weld for a few hours before grabbing a quick bite to eat and collapsing.
In this section of the book, I want to take you through some of the basic decisions and processes you’ll want to consider if you go the route of building your own smoker. This is by no means a manual, and I’m offering no schematics or measurements. Indeed, I never started with any of those myself for any of the many smokers I’ve built. Rather, I’ve just employed my eyeballs and good judgment when designing and figuring out proportions. As I said, it’s not rocket science—just effort, commitment, and a small degree of handiness.
Speaking of which, here’s a look at some tools you’ll need. I own these tools because I do a lot of welding. But if you don’t see yourself getting grimy and breathing slag on a regular basis and still want to try your hand on a one-time project, I’m sure you can find hardware shops that will rent the tools for the few days that you’ll need them.
Welder ✵ I recommend a MIG welder over a stick, which, in my opinion, is not as easy to use. A MIG you can just plug in and go. A 140-amp wire-feed MIG should be sufficient for light jobs and plugs into a standard home outlet.
Welding helmet ✵ I have an auto-darkening one; it’s neat.
Angle (disc) grinder ✵ I have a big one and a smaller one from DeWalt. You use these to grind down your welds, smooth sharp and jagged edges, cut thinner pieces of metal, and the like.
Dry-cut metal saw ✵ This speeds up cutting of thinner metal rods, pipes, and tubes, but you could also get by without one.
Assorted measuring tools and clamps ✵ These are what you’d need for any building project: levels, measuring tape, soapstone pencil (for marking steel), magnetic welding angles, gloves, and a range of vice clamps for holding pieces together before you apply the weld.
Choose Your Material for the Body and Firebox
A simple horizontal offset smoker is really just two cylinders welded together with legs and a smokestack or some fundamental variation of that. Most homemade smokers I’ve seen are made of scrap metal, a detail that brings the satisfaction of creating something for cheap or for free with your own ingenuity, which, as you can tell from chapter one, is what I’m all about.
The first thing you’ll need to do is figure out what you want to make your main body out of. As noted earlier, I use old propane tanks for my big smokers. These are 1,000-gallon tanks that are 16 feet long. The fireboxes are made from a 250-gallon tank, cut in half. I like propane tanks for their ready-made cylindrical shapes, their rounded ends, and their heavy but manageable 5⁄16-inch steel walls.
Before I proceed, I must offer a disclaimer: I am in no way recommending you procure and cut into a used propane tank. In industrial zones you can often find whole yards full of used propane tanks just sitting there, rusting in the dirt. They sit because they’re difficult to recycle, as some propane outfits won’t sell them for scrap because there’s a chance they’ll blow up upon deconstruction. It’s said that working propane tanks are never completely empty and that even the metal used to fashion them is porous and can absorb potentially explosive propane traces. Resale of used propane tanks might be illegal in your area, or you may find that some shops will refuse to sell them because of liability. I’ve been stymied on many occasions, yet I’ve also found businesses that will gladly sell.
So, now that my disclaimer is out of the way, I will say that these propane graveyards often have used tanks with open or busted valves that would almost certainly not have any gas left in them. Also, before using the tanks, people often fill them with water and lots of dish soap to force out any remaining gas and the stinky mercaptans added to propane to give it an odor (so we will notice when there’s a leak).
Alternatives to propane tanks include finding two pieces of used big steel pipe from a discount store or a scrap metal operation and fusing them together. Diameters of 20 or 24 inches will work well for this purpose. Or you can always buy plate steel and have a machine shop roll it for you to a length and diameter of your choosing.
Typically, if your firebox is insulated, it doesn’t have to be quite as big as an uninsulated firebox.
Notes on Building the Stand
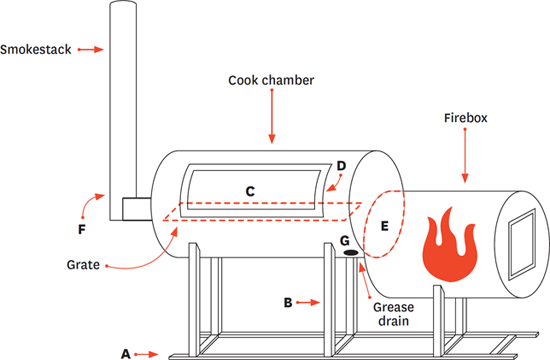
Once I’ve determined the dimensions of the smoker’s body and firebox, I set out to making the legs and the stand. For smaller smokers I’d use 1-inch square steel tubing that comes in 12-foot lengths. For bigger ones, I’ve used 2-inch square steel tubing. Determine and cut the lengths of tube for the two pieces that make up the base. These look like skis. I prefer these to freestanding legs on casters because they offer more reinforcement. I choose a length a couple of inches longer on each side than the entire assembly is going to be, including the cook chamber and firebox. Position these parallel to each other as far apart as the diameter of the pipe or tank and weld a couple of crossbars in between them (see “A” ON FIGURE 1).
Next, build the leg assemblies. For this, consider what is a comfortable height for the actual grill that will hold the meat. After all, this will be your cooker, so you might as well design it to fit your own body. I’m 5 feet 10, and for me, the ideal (waist) height is 36 inches off the ground (see “B” ON FIGURE 1).
There’s no need to get fancy when shaping the ends of the legs that will attach to the tank. Cutting a 45° angle on these ends will allow it to fit the cylinder pretty closely, and you can fill in the gaps through welding.
After you’ve cut and fused the leg pieces together and perhaps reinforced them with their own crossbar, you can weld them to the base skids to create the whole stand. Then you’ve got to lower your tank or pipe onto the stand. I can do this easily with a forklift now, but in the old days of backyard builds, I’d have to use ropes and pulleys and a tree branch to lift the metal cylinder onto the shafts of the legs. Once that’s done, however, all the parts are easy to fuse together. By this point it’s starting to take shape, though you will probably want to attach tires or casters for easier movement of something that will end up weighing several hundred pounds. I recommend good, strong casters. Estimate how much your assembly will weigh and buy casters that are rated appropriately.
The most important thing in building the stand is this: Don’t cut corners. Don’t have flimsy welds; use strong-enough materials.
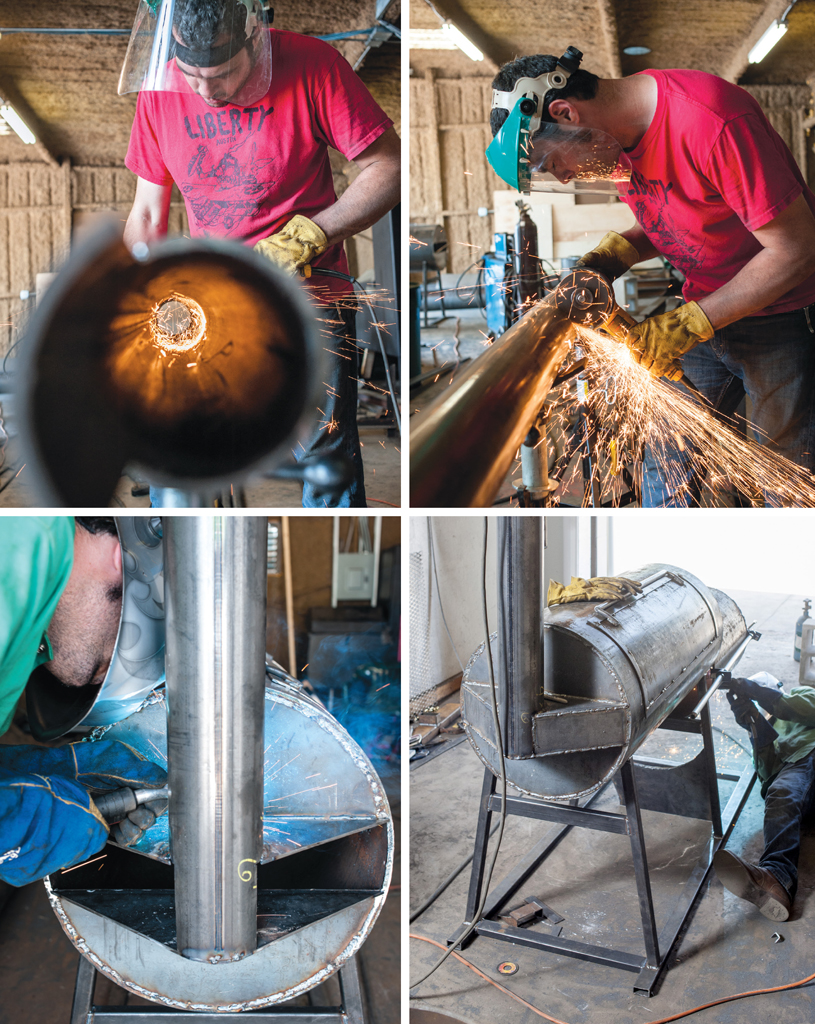
Cutting the Doors
Figure out how many doors you’ll need to be able to access every section of your cooking area. Doors are pretty easy to design and cut. Things to remember about the cook chamber doors is that they should extend right down to the height of the grill itself (which should be located at the midpoint of the circle) and extend up close to the apex of the circle (see “C” ON FIGURE 1). Make sure to give yourself room to work. When you need to reach in there to place or turn heavy pieces of meat, you’ll realize that the cook chamber doors need to be fairly wide and pretty much span the entire length of the chamber.
One tip I can offer: don’t cut the entire piece of the door completely out after marking it on the side of the cylinder. Rather, I leave the corners just barely attached. That allows me to weld on the hinges before cutting out the last connecting bits of the door, saving a lot of trouble in trying to realign what ends up being a very heavy piece of metal.
For the firebox, just weld a piece of plate metal to cover the end of the cylinder and mark a pretty good-size door, one that’s long enough to get decent-size logs in and then to be able to shift those around with a shovel or poker.
I spend way too much time making my own hinges from steel rods and tubes. A much easier solution is to buy some heavy-duty ones at a welding supply store.
The final step is to weld the strips of flat bar trim to the edges of the doors so they overlap the sides of the cook chamber and firebox (see “D” ON FIGURE 1), making a snug fit to ensure very little heat and smoke escape and cold air doesn’t get pulled in.
Attaching the Firebox and Smokestack
If your firebox and cook chamber are both made out of pipe or other cylindrical metal, when you attach them, the opening will resemble a football, an oval-shaped aperture existing in the zone where the two circles of pipe overlap each other. The bigger the opening, the more heat you’ll get flowing directly into the cook chamber. You’ll need to install a small plate (see Details and Accessories) to prevent grease from entering the firebox. Try to position the top of firebox to meet the cook chamber at grate level; that should give you a good-size aperture (see “E” ON FIGURE 1). Remember, grate level should be waist high for you, the eventual pitmaster. Fireboxes that are set too low won’t draw as well.
You’ll see lots of commercial cookers with the smokestack coming out of the top of the cook chamber at the opposite end from the firebox. But I do things differently: my chimneys are attached at about grate level, which means I weld it to the side of the cook chamber rather than the top (see “F” ON FIGURE 1). This is because I want the smoke and heat to flow across the meat thoroughly and evenly rather than be on a rush to rise out of the cooker. You can attach the stack any way you prefer. You can buy prefabricated 90° exhaust elbows. I tend to buy a pipe, cut a piece out of one end, and fabricate an assembly that allows it to attach to the farthest end of the cook chamber at the midpoint. And, in general, I prefer pretty wide and tall smokestacks. I wouldn’t go any smaller than a 4-inch diameter, and I like them to be as long as possible, between 3 and 4 feet for a smaller backyard smoker. I usually just determine the length in 6-inch increments. Better to have too much draw than too little. You can always install a damper to regulate airflow if you feel it’s pulling too hard once you’ve fired the thing up.
FIGURE 1
Last Things
Once you’ve got all of this built and cut, it’s quite easy to go in and install the brackets that will support the grates that hold the meat. Naturally, you’ll want to install several brackets for good support, since the grates will have to be in pieces to facilitate easy placement and removal. I cut the brackets out of what’s called angle iron, which you can find at any metal shop. For the grates, I buy steel raised expanded metal. I put a frame on the outside of each grate, like a window screen, for structural integrity and because it makes the grate much easier to take in and out when we clean. Make sure that you construct your “screens” small enough that they can be inserted and removed through the width of your cook chamber door.
Above the opening between the firebox and cooker, below the grate inside the chamber, I like to add a small plate to deflect the direct heat that will enter from the firebox. This small but crucial step will buffer some of that intense heat and allow you to use more of that cooking surface on the end close to the firebox.
Last but not least, don’t forget to make a hole in the cook chamber, at the end closest to the firebox (see “G” ON FIGURE 1), from which grease can drain (into a bucket that you’ll place underneath).
Burn It Out
Before using any new smoker, be it store-bought or homemade, it’s crucial to burn it out with a hot fire to seal up the pores of the metal and incinerate any remains and by-products—oil, grease, metal shavings, and any other gunk—of the manufacturing process. I build as big a fire as I can and let it go for an hour or so. Then treat your smoker like a cast-iron skillet and season it by rubbing vegetable oil, tallow, or lard into the metal.
MODIFYING A CHEAP STORE-BOUGHT SMOKER
Building a smoker from scratch is, even for the most bullish barbecue enthusiast, a big—and perhaps impractical—endeavor. Even I didn’t start out by building a smoker from the ground up. But that doesn’t mean you’re stuck using whatever smoker you can buy in a traditional outdoors or cookware store. I’ve found that with some relatively simple modifications (okay, I know, this is coming from the guy who just admitted to owning a forklift and welding for fun), you can improve practically any smoker you buy.
Installing a Proper Temperature Gauge
One of the easiest and most essential modifications you can make is to install a decent thermometer in a smoker that doesn’t have one or replace or reposition the thermometer that comes preinstalled in many entry-level smokers.
Knowing your cooking temperature and keeping it consistent are two of the most important factors in barbecue. If they even have a temperature gauge, most inexpensive smokers position it, stupidly, at the top. Perhaps this convenience is meant for lazy people who want to be able to read it without bending over, but it’s a useless placement for reading the temperature at the cooking surface where the meat is. Because heat rises, the temperature of the area near the top of the smoker is going to be higher than the temperature down where the meat is, which is obviously the only place that matters. In addition, smoker companies save money by using inferior thermometers, which only compounds the problems of bad placement. You’ll want to throw down a few bucks for a higher-quality thermometer. After that, the work is easy and takes only a few minutes, yet moves you significantly down the road toward improving your homemade barbecue.

Equipment
✵ Thermometer: There are many of these on the market, at varying prices. Without question, my favorite is the Tel-Tru Barbecue Thermometer BQ300, which costs between $40 and $50. I recommend one that has a 2.5- to 4-inch stem and is made out of high-quality stainless steel, shatter-proof glass and plastic, and paint that won’t fade over time. Tel-Tru makes a variety of models, and if you order on the Internet, you might also want to throw in the Thermometer Installation Kit to ensure that you’ve got everything you need.
✵ Drill with a hole-saw attachment capable of drilling through light metal.
Steps
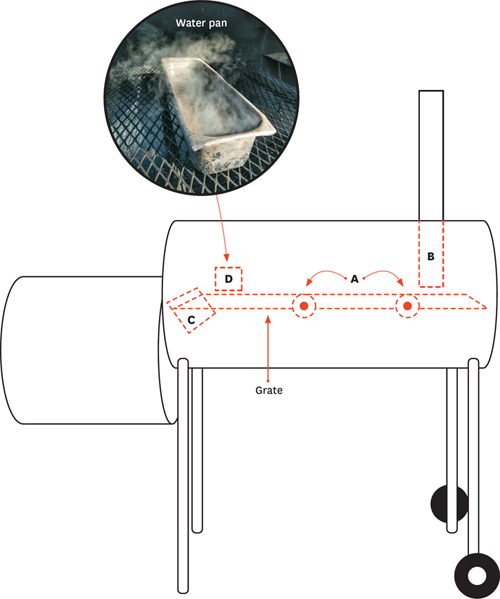
1 ✵ First, determine exactly where to drill the hole. The temperature gauge should be positioned between the meat and the heat, right at meat level. This means the hole you’re going to drill will be near the edge of the lid, close to where the lid meets the grill top, about 1½ inches from the bottom edge of the smoker’s lid because that’s about where the center of a piece of meat would be. To determine the distance from the firebox opening, measure the length of a hypothetical 10- to 12-pound brisket, which is generally somewhere between 15 and 22 inches long. It’s easy enough to measure this out inside the smoker and then eyeball it on the lid, where the hole needs to be drilled. On the outside of the lid, mark off with a pencil or a Sharpie where you’re going to drill the hole (see “A” ON FIGURE 2).
2 ✵ Next, select the right-size hole saw. If you use a Tel-Tru, the website tells you the size of the hole you’ll need for each model. Otherwise, you can measure the back of the temperature gauge to figure out the diameter of the hole needed to allow the gauge to fit securely.
3 ✵ Finally, time to drill. Easy enough. All it takes is a steady hand. Now, insert the temperature gauge and screw it in from the back, making sure it fits snugly but not too tight. Adjust the dial for easy reading but make sure not to turn it by the gauge, which can throw off calibration.
Extending the Stack
When I cook on other people’s smokers, one of the biggest challenges is bad airflow. Smoke may be billowing out the chimney, but often too slowly and without enough force. The solution for this is to extend the smokestack upward, which will increase the draw.
In the discussion on building a cooker (see Building a Smoker), I mentioned that I like to position the smokestack to leave from the midpoint of the back of the cook chamber, not the top, because it pulls the heat more evenly across the surface of the meat. Many store-bought smokers have the stack connecting at the top of the chamber, creating exactly this problem. The solution for this is to lengthen the smokestack inside the cooking chamber down to within a couple of inches of grate level.
In a pinch, to extend the smokestack upward, I’ve been known to collect empty soup cans, cut out the bottoms, and pinch them onto the smokestack to gain several inches or a foot. But, for a longer-term solution, you can get thin flexible sheet metal and a few screws or clamps and simply wrap it around the stack to increase the length. Likewise, extending the smokestack down to grate level is not hard.
Equipment
✵ Flexible aluminum or steel hose, a foot or two, at the diameter of your smokestack (hose usually comes in 1-inch-diameter increments)
✵ Hose clamp to match the diameter of the hose
✵ Screwdriver
✵ Clippers to cut the metal
Steps
1 ✵ The smokestack will likely protrude slightly into the interior of your cook chamber. Measure the diameter to determine the width of steel hose you’ll need to buy.
2 ✵ After procuring a short length of tubing, attach it with the clamp around the edge of the smokestack, tightening the screws of the clamp.
3 ✵ Measure the length you’ll need to extend the smokestack within an inch or two of grill height and cut off the rest of the hose. This should extend the smokestack inside the cook chamber to reorient airflow closer to the grill (see “B” ON FIGURE 2).
Heat Buffer Plate
The flow of heat from the firebox into the cook chamber is largely a good thing, except for on the side closest to the firebox, where the heat will be much greater than on the far side. And if you’ve got a smoker packed with meat, which retards airflow, heat has an even tougher time getting over to the far end of the chamber, creating a frustrating disparity between ends of the cook chamber.
One solution to this problem is to install a baffle (buffer plate) above the opening to the firebox, extending at a downward angle into the cooking chamber (see “C” ON FIGURE 2). In a pinch, I’ve even jammed an old license plate into that opening. But with more time and space, it wouldn’t be hard to cut a piece of thick metal from something lying around.
Water Pan
I’m of the mind that you should always use a water pan while cooking on an offset smoker, so this isn’t a modification so much as a technique. It adds humidity (which is constantly being whisked out by convection) to the cooking environment, which is important to your success, as it helps hasten the cooking process while slowing the drying process of meat. But if the smoker you bought doesn’t have a built-in place for a water pan (and it probably doesn’t), you could buy a small, 4- or 6-inch-deep, narrow steam table pan at a restaurant supply store (although really, any small metal container will do), place it on the grate nearest to the firebox, and keep it filled with water while doing a cook (see “D” ON FIGURE 2).
FIGURE 2
CARE AND MAINTENANCE
Taking good care of your cooker is crucial for both its own longevity and for the quality of what comes out of it. At the restaurant, we clean the smokers once a week, on the day we’re closed to the public, and we periodically take one off duty to perform maintenance and adjustment.
Home cookers will not be running 24 hours a day as ours do, so there will be far less wear and tear. But time always takes its toll, so here are some ways to care for your smoker.
First, as mentioned earlier, make sure to burn out a new smoker. Get a vigorous wood fire going and let it rage for a good 45 minutes or an hour—as long as it takes. This is also a good thing to do if you haven’t used your cooker in a long time and don’t clean it regularly and the inside is covered with rancid grease or mold. The process is roughly the same as any modern, self-cleaning oven.
After burning it out, you should treat it like a cast-iron skillet. Wipe away any smoke or ash and then apply oil to the surface. I like to use tallow, which is beef fat from our brisket cooks. But any sort of vegetable oil will work just as well. You want to season the metal with the oil, as it helps form a protective layer that slows down the onset of rust.
As for regular maintenance on our cookers, once a week we use shovels to clean the bottoms thoroughly of any grease or burnt bits that have fallen down there. We take a wire brush to the grates and then hose the whole thing off. If you’re cooking on your smoker only periodically, you’ll want to do this after each use.
Another thing you’ll want to do after each use is to shovel the ashes out of the firebox and dispose of them. (Use a shovel, don’t hose it out. Do not get water in the firebox.) Leaving them in there, especially on smokers made of thin-gauge metal, greatly accelerates the rate of rust. And once your firebox has rusted out, it’s hard to repair.
LAST THOUGHTS
Building, modifying, and thinking about smokers is a big part of what I and any serious barbecue cook does. We’re always looking at our cookers and thinking of ways to make them more efficient, cook more evenly, and—for the restaurant—cook faster. That said, once you get one that’s in great tune, you’ll know it. Then the trick is to use it over and over, every time taking note of its cooler and hotter zones, the way it cooks in different weather conditions, and always trying to get a sense of the way heat and smoke are flowing through there when the door is closed. The more you work with a smoker, the more you’ll understand it. That’s when you might get the hankering to modify one you’ve bought. And after you’ve reached the limits of what homemade modifications can offer, that’s when you might consider building your own. In any case, you end up having a pretty intimate relationship with your smoker. You should know it well and hopefully spend many happy hours together.