Great British Bake Off - Bake it Better: Sweet Bread & Buns - Linda Collister (2016)
Baker’s Guide
Skills
Once your ingredients and equipment are lined up, you’re ready to start baking some delicious sweet bread and buns!
The recipes in this book are designed to take you from absolute beginner to baking your own showstoppers. All the recipes tell you exactly what to do stage-by-stage, but you’ll notice that some of the terms in the recipe methods are highlighted in bold. This means there’s additional information about them in this section if you want to find out a bit more detail or to refresh your memory.
From mixing and kneading your dough to checking that your sweet bread and buns are properly cooked, this is the place to start, whether you’re completely new to baking or want to pick up a few expert tips.
HOW TO MIX THE DOUGH
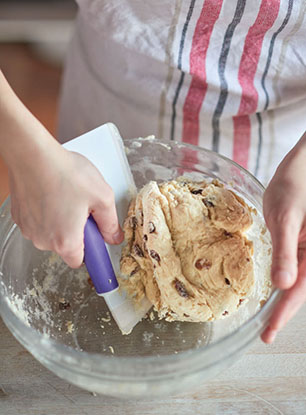
The key thing to remember when mixing dough is that you need to keep your yeast alive. Yeast (see here) is a simple living organism and is easily killed, by salt in particular. Weigh out your flour and put it in your mixing bowl, then mix in the salt and any sugar, spices, dried flavourings (like cocoa powder), nuts, dried fruit or raising agents as instructed in the recipe, before adding the yeast last - this is to ensure that the yeast doesn’t come into direct contact with the other ingredients. Give it a stir before adding the liquids, which may include honey, eggs, oil or liquid flavourings (such as vanilla or almond extract). Many yeasted dough recipes specify lukewarm milk or water, and if they do, it’s important that the liquid is not too hot or it could kill the yeast. Dip your little finger into it: it should feel just comfy. Mix it all together and work the liquids in with a wooden spoon, your hand - using it like a paddle - or the dough hook attachment of a large free-standing mixer on the slowest speed. Use a dough scraper to get down to the bottom of the bowl, so that your ingredients are fully mixed together (see photo, here).
You will find that many of the bakes in this book actually have fruit and nuts that are incorporated after the dough has been mixed and left to rise. These are usually very rich doughs that need extra time for the yeast to get going and raise the dough before the heavy ingredients are added.
Some breads, such as scones and some plainer or firmer doughs, have butter worked into the flour before the yeast and liquid is added. To do this, add the chilled and diced butter to the flour and rub it in using just the tips of your fingers, until the mixture looks like fine crumbs.
How to mix a very wet dough
Some doughs are initially made by simply combining the flour, water, salt and yeast with either a round-bladed knife or your hand to make a moist and shaggy dough - it is not kneaded or ‘worked’ as you don’t want the gluten to be developed. This is the basis of laminated dough (see here).
HOW TO KNEAD
The process of kneading ensures the yeast is evenly distributed so that your dough rises evenly. It also develops the gluten in the flour, which means the dough will rise well. The stronger the flour (meaning the more protein it contains, see here) the more gluten there is, and the more your dough is able to rise. Kneading develops the gluten from a tangled mass to a network of chains that stretch around the bubbles of carbon dioxide produced by the yeast. Kneading your dough properly is vital in most bread-making, the main exception being doughs that will later be laminated, such as for Croissants (see here); these should not be kneaded as developing gluten here can produce a tough result.
It can help if you let the dough hydrate before you knead it; leave your dough uncovered in its bowl for about 5 minutes before you start to knead and you’ll find the kneading process easier because the flour will have had time to absorb the liquid properly. This makes a particular difference with wholemeal and rye flours, which often need more liquid than white flours, and are slower to hydrate. Check the consistency of the dough after you have left it to hydrate to see whether or not it needs a little more flour or water. When kneading rye or wholemeal dough, give the dough (and yourself) a break: halfway through, cover your dough with an upturned bowl and have a rest for 5-10 minutes, then continue. Kneading in shorter bursts helps the gluten to gradually develop and strengthen.
Very soft doughs are kneaded in the bowl by slapping them up and down until the dough is stretchy - no extra flour is used, so the dough becomes more pliable and firmer but still soft. These include the cake-like Brioche à Tête and Mini Tropeziennes (see here and here).
How to knead by hand
1. In your bowl, bring the dough together into a ball. It should be firm enough to leave the sides of the bowl clean. If it is a bit sticky, sprinkle over a little extra flour; or add a few drops of liquid if there are dry patches. Try not to add too much of either.
2. Turn out your dough onto a very lightly floured or oiled worktop (unless otherwise stated) and set a timer - most of the doughs in this book are kneaded by hand for 10 minutes but do check the recipe.
3. Hold the end nearest down with one hand and use the other hand to pull and stretch out your dough away from you, using the heel of your hand. Gather the dough back into a ball. Give the ball a quarter turn and repeat the stretching action.
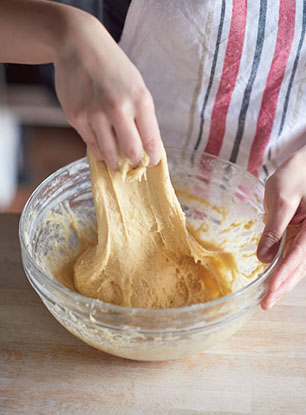
4. Repeat these movements over and over until your dough begins to change in texture and appearance to feel and look smooth, glossy and very pliable, then shape your dough into a neat ball and leave to rise, as your recipe requires.
How to knead very soft doughs
Very soft doughs kneaded on a worktop can be tricky to handle, but you don’t want to add a lot of extra flour or you risk drying out the dough. A plastic dough scraper will help you lift and move the dough around; it will also help you cope with escaping ingredients, such as fruit and nuts.
Some really soft, cake-like doughs or batters, such as for the Crumpets on here, are best kneaded by ‘slapping’ it up and down in the bowl, using your warm hand as a paddle (see photo, here). Some doughs are worked until they are so stretchy they will lift off the worktop in one piece; others just until they are very smooth and stretchy, so check the instructions.
How to knead using a free-standing mixer
This will cut down the kneading time to about 4-5 minutes. Use the dough hook attachment of the mixer and set it to the slowest possible speed and be careful not to overwork the dough in the mixer; this is a real danger when using food-processors, which is why it’s actually best to avoid using them for kneading. Overworking the dough may cause you to over-extend the gluten and end up with a collapsing bread with large holes in it. While it’s impossible to over-knead by hand, always take care when using a mixer. You’ll also need to keep an eye out for under-kneading, which can produce a loaf that’s soggy, flat or dense.
How to test if the dough has been kneaded
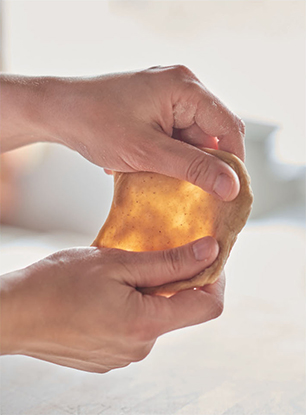
Often called the windowpane test, this is where you take a piece of dough, roughly the size of an egg, and stretch it between your fingers to make a thin, translucent sheet (if your dough has fruit or nuts added, you will need to choose a piece without fruit or nuts in it). If it doesn’t stretch out, or it tears easily, then knead it for a little while longer (see photo, here).
HOW TO MAKE AN ENRICHED DOUGH
There are many ways to make a dough richer: replacing some or all of the water with eggs or milk, and adding fat (usually butter, but sometimes oil or lard). Because the yeast has had to work harder to leaven the heavier-than-usual mix, greater care has to be taken. Sometimes you will see that the recipe uses a bit more yeast, and the rising and proving times increase in number and/or length to allow for slower growth.
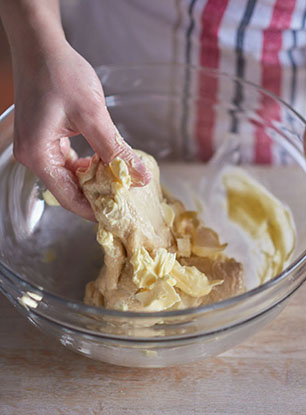
Butter is often added after the initial dough has been made and is the correct (often very soft and sticky) consistency. For cake-like brioche and panettone doughs the butter should be the same temperature as the dough, and roughly the same consistency so it can be easily incorporated. The best way is to use your hands; their gentle warmth works perfectly as you squeeze the butter together with the dough through your fingers (see photo, here). Stop when you can’t see any more streaks of butter. If you prefer to use a free-standing mixer, fit the paddle attachment rather than the dough hook and use the slowest speed.
Because the dough has such a high fat content, it often needs thorough chilling so it is firm enough to shape; rising and proving is often slightly different from plain doughs so do check the recipe instructions.
Learn with: Panettone (here) and Mini Tropeziennes (here)
HOW TO MAKE A LAMINATED DOUGH
This is the trickiest of all the bread-making techniques but one you can master with practice. It is used to give croissants and other Danish pastry doughs their distinctive flakiness. Often this type of dough is also called an enriched dough, because it has a richer flavour from all the butter it uses (sometimes as much butter is used as flour, and sometimes eggs and cream are added too), but lamination actually refers to the way in which the dough is folded and layered.
What makes it so flaky rather than spongy - like a regular bread dough - is the way the butter is rolled into the dough to make hundreds of layers. The final lightness is the result of the water in the butter and the dough turning to steam in the oven and puffing up the fragile layers as it cooks.
Unlike regular yeasted doughs, it is important not to develop the gluten in the flour, as you need to avoid creating elasticity, which will prevent the layers of dough puffing up. Avoid overworking or over-stretching the dough, so it doesn’t shrink rather than swell in the oven, and stick to the chilling/relaxing times given in the recipe. Don’t let the butter get warm and start to ooze out of the dough, or it will be hard to handle and end up greasy and heavy. Rise and prove it in a spot that is not too warm, and in hot weather chill the dough for a little longer or use cold water to mix the dough. Keep a dry pastry brush next to the rolling pin and brush off the excess flour before folding the dough to stop the dough becoming dry and heavy.
1. Mix and rise the dough as in your recipe. Make sure it is chilled before you start the lamination process - the butter also needs to be chilled.
2. Sprinkle a little flour on the butter to be worked in, then lay it between two sheets of baking paper. Pound or beat it with a rolling pin until it is half its original thickness. Remove the baking paper, fold the butter in half, then cover with baking paper and pound again. Keep doing this until the butter is pliable but still very cold. Beat it into square of about 10cm, or as instructed in your recipe (see photo, here).

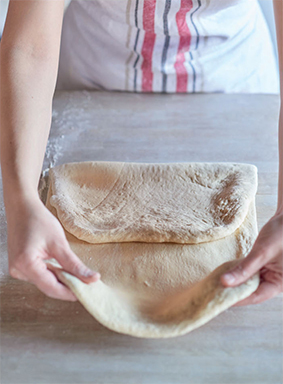
3. Scoop out the chilled dough onto a floured work surface - there’s no need to punch it down. With a lightly floured rolling pin, roll out in four directions to make four flaps with a thick square in the centre.
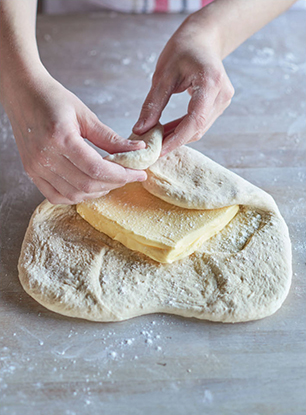
4. Put the butter, lightly dusted with flour, in the centre and fold the flaps of dough over to enclose it (see photo, here). Gently press the seams with the rolling pin to seal in the butter.
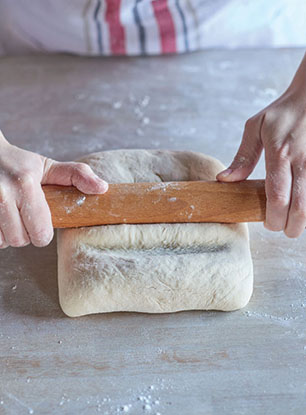
5. Turn the dough upside down (seams facing down) and lightly press with the rolling pin to flatten it - be careful you don’t squeeze the butter out (see photo, here). Wrap and chill as instructed in your recipe.
6. Gently roll out the dough to a rectangle about 54 × 18cm (or as in your recipe), then fold in three: fold the bottom third of the dough up to cover the centre third, then fold the top third down to cover the other two layers to make a neat square (see photo, here). Lightly press the edges with the rolling pin to seal, then wrap in clingfilm and chill as instructed in your recipe before continuing. This is your first ‘turn’.
7. When the dough has chilled, lift it up and give it a quarter turn anti-clockwise so the folded, rounded, edge is by your left hand. Roll out the dough to a rectangle and fold it in three again, just as before. This is your second ‘turn’. Wrap and chill the dough for an hour (or as given) then give it two more ‘turns’. Wrap and chill the dough as before and continue with your recipe.
Learn with: Kouign Amann (here) and Croissants (here)
HOW TO RISE AND PROVE DOUGH
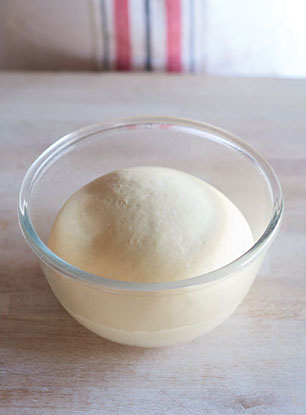
Rising is very important, as this is the time when the yeast produces the bubbles of gas that cause the dough to rise and expand. Most recipes require the dough to rise until double its original size (see photo, here).
Yeast likes air (which it gets from kneading), food (from the flour, sugars or other sweeteners or malt added to your dough), moisture (from the liquid in the dough, and in the atmosphere) and warmth. For the best results, bakers like to provide the dough with a moist and gently warm atmosphere so it doesn’t dry out and form a skin (this will be visible in the finished loaf as a dry or tough line running through it).
A room temperature of 20-24°C (68-75°F) is ideal for rising dough. If it is left in too hot a place, the yeast will grow too rapidly and the dough can become distorted and have a slight aftertaste.
At cooler temperatures the yeast develops more slowly. Some bakers prefer slower fermentation as it results in a richer flavour and a chewy crumb, so they mix the dough with cool or chilled water and leave it to rise in a cool place, or even the fridge, overnight. With some experimentation you can also slow fermentation using less yeast.
Proving is the name given to the last rising before baking, which happens after you’ve shaped the dough. Some breads only have one rising/proving stage, while breads with a really fine, cake-like texture, such as the Panettone (see here), have multiple rises so that the gas bubbles are repeatedly broken up and become smaller and smaller.
Some of the bakes in this book don’t have any rising or proving stages. These ‘quick’ breads rely on the chemical effects of the ingredients to produce gas bubbles to leaven the dough. Scones, baked doughnuts and soda breads all use bicarbonate of soda (an alkali) in combination with an acidic ingredient, such as cream of tartar, buttermilk or yoghurt; these instantly start reacting to produce bubbles of gas when combined with liquid.
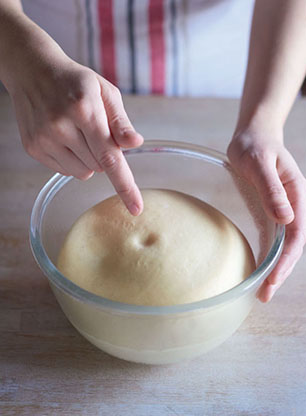
How to check if your dough is sufficiently proved
First look at its size. After shaping, your dough needs to be left to prove and rise until it has roughly doubled in size. How long this takes will depend on the temperature of your dough and how lively your dough is. If it’s under-proved once it goes in the oven, it can suddenly expand in an unexpected way and become misshapen; if over-proved, your dough is likely to collapse in the oven as the gluten can’t cope with all the gas bubbles. To test whether or not your dough is oven-ready, gently prod it with your finger: if it springs back, then it’s not quite ready; if it returns to its original shape fairly slowly, or if there is a very slight dent (see photo, here), then it’s ready. A large dent means it is over-proved (you can sometimes save the dough by gently kneading and reshaping, and carefully proving again).
HOW TO KNOCK BACK AND SHAPE
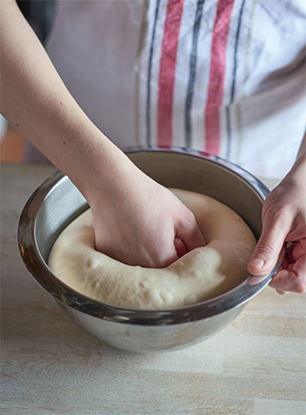
Most doughs (laminated dough is the exception) need to be knocked back before shaping, and gently kneaded to redistribute the gas bubbles. Knocking back breaks up the large gas bubbles within the dough so that you get smaller, finer bubbles that will rise more evenly. Use your knuckles to punch down your risen, puffy dough so it collapses back to its original size (see photo, here); some bakers prefer to fold the dough over on itself two or three times. Once shaped, leave to prove before baking.
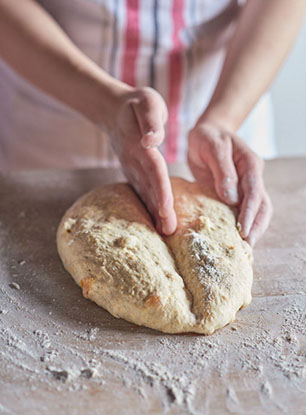
To make an oval loaf
Form the knocked back dough into an oval, then make a crease in the dough lengthways along the centre with the edge of your hand (see photo, here). Roll the dough over to make a sausage (crease in the centre), then roll onto the prepared baking tray so that the seam is underneath, the top is smooth and the loaf is evenly shaped. Slash or snip the top, cover and prove before baking.
To make a tin loaf
Pat the knocked-back dough into a rectangle, with the shortest side the same length (not width) as the tin. Don’t use too much flour on the work surface or you may dry out the dough and create a gap in the centre when it bakes. Brush excess flour away with a pastry brush. Roll up the dough firmly, like a Swiss roll, pinch the seam together well, then put your dough into the tin, seam-side down, usually with the ends tucked under at each end. Slash or snip the top, cover and prove before baking.
To make a round loaf
Gently knead your knocked-back dough into a ball shape. Roll the ball around under your cupped hand until it becomes smooth and neatly shaped. Set the ball on a prepared baking tray and snip or slash the top, then cover and prove before baking.
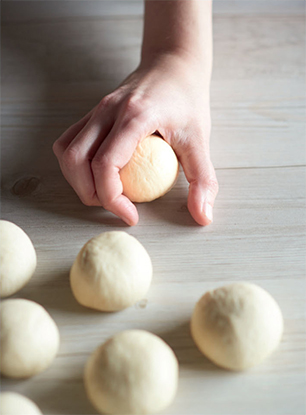
To shape small buns and breads
Small buns are shaped the same way as round loaves, by rolling a small ball of dough on the worktop under your cupped hand (see photo, here). For doughs that are rolled out and then have shapes stamped out, such as Mini Tropeziennes (see here), lightly dip the cutter or sharp knife in flour before you start, and avoid dragging or stretching the dough out of shape by using short, sharp movements. For slicing up long rolls of filled dough (see Chelsea Buns, here), use a large and very sharp knife and a sawing motion. Clean and re-flour the knife between slices to avoid a messy result.
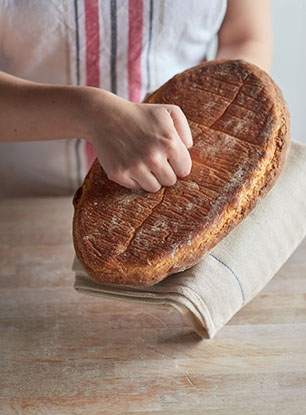
HOW TO TEST IF YOUR BREAD IS DONE
Carefully remove the hot bread from the oven and turn it out, upside down, into one hand (wearing heavy-duty oven gloves or using a thick, dry tea towel). Tap the underside of the loaf with your knuckles (see photo, here). If the bread sounds hollow, like a drum, then the loaf is cooked through; if you just get a dull ‘thud’, put the bread back into the oven, directly onto the oven shelf. Bake for a few more minutes, then test again - a slightly over-baked loaf will taste far, far better than an under-baked one.
Follow the individual recipe instructions, as there are several recipes where this test does not apply - for non-yeasted breads, such as the Toasted Coconut Banana Bread (see here), the cocktail stick test is best: insert a cocktail stick into the middle of your bake and if it comes out clean, it is ready. Some small individual bakes like croissants and larger, sticky ones like Chelsea Buns, also have their own guide to ‘doneness’.
HOW TO STORE SWEET BREAD AND BUNS
Most bakes are best eaten the same day, but some can be kept at least overnight. Wrap non-sticky cold bakes in a clean tea towel, sticky ones in baking paper, foil or clingfilm, and store in a cool spot in a bread box or cake tin. To freeze, wrap tightly in clingfilm once cold, or store in a freezer bag (or sealed plastic container) for up to 1 month.