The Car Hacker's Handbook: A Guide for the Penetration Tester - Craig Smith (2016)
Chapter 12. ATTACKING WIRELESS SYSTEMS WITH SDR
In this chapter, we’ll delve into embedded wireless systems, beginning with embedded systems that transmit simple wireless signals to the ECU. Embedded wireless systems can be easy targets. They often rely on short-range signals as their only security, and because they’re small devices with specific functionalities, there are typically no checks from the ECU to validate the data outside of the signal and the CRC algorithm. Such systems are usually good stepping stones for learning before looking at more advanced systems, such as those with keyless entry, which we’ll look at hacking in the latter part of the chapter.
We’ll look at the technology that unlocks and starts your vehicle as we explore both the wireless side of keyless entry systems and the encryption they use. In particular, we’ll focus on the TPMS and wireless key systems. We’ll consider possible hacks, including ways that the TPMS could be used to track a vehicle, trigger events, overload the ECU, or spoof the ECU to cause unusual behavior.
Wireless Systems and SDR
First, a quick primer on sending and receiving wireless signals. To perform the type of research discussed in this chapter, you’ll need an SDR, a programmable radio that sells anywhere from $20, for example, RTL-SDR (http://www.rtl-sdr.com/), to over $2,000, for example, a Universal Software Radio Peripheral (USRP) device from Ettus Research (http://www.ettus.com/). The HackRF One is a good and very serviceable option from Great Scott Gadgets that will cost you about $300, but you’ll most likely want two so you can send and receive at the same time.
One significant difference between SDR devices that has a direct effect on cost is the sample rate, or the number of samples of audio carried per second. Unsurprisingly, the larger your sample rate, the more bandwidth you can simultaneously watch—but also the more expensive the SDR and the faster the processor needs to be. For instance, the RTL-SDR maxes out at around 3Mbps, the HackRF at 20Mbps, and the USRP at 100Mbps. As a point of reference, 20Mbps will let you sample the entire FM spectrum simultaneously. SDR devices work well with the free GNU Radio Companion (GRC) from GNURadio (https://gnuradio.org/), which you can use to view, filter, and demodulate encoded signals. You can use GNU Radio to filter out desired signals, identify the type of modulation being used (see the next section), and apply the right demodulator to identify the bitstream. GNU Radio can help you go from wireless signals directly to data you can recognize and manipulate.
NOTE
See the Great Scott Gadgets tutorials at http://greatscottgadgets.com/sdr/ for more on how to use SDR devices with GNU Radio.
Signal Modulation
To apply the right demodulator, you first need to be able to identify the type of modulation a signal is using. Signal modulation is the way you represent binary data using a wireless signal, and it comes into play when you need to be able to tell the difference between a digital 1 and a digital 0. There are two common types of digital signal modulation: amplitude-shift keying (ASK) and frequency-shift keying (FSK).
Amplitude-Shift Keying
When ASK modulation is used, the bits are designated by the amplitude of the signal. Figure 12-1 shows a plot of the signal being transmitted in carrier waves. A carrier wave is the amplitude of the carrier, and when there’s no wave, that’s the signal’s resting state. When the carrier line is high for a specific duration, which registers as a wave, that’s a binary 1. When the carrier line is at a resting state for a shorter duration, that’s a binary 0.
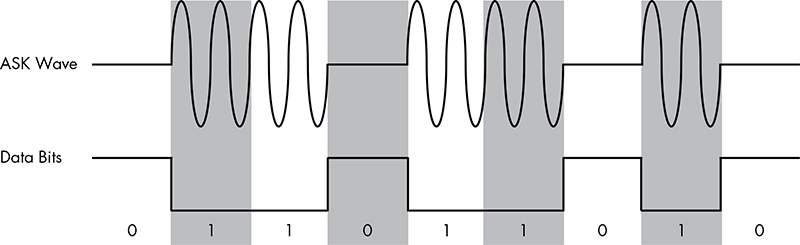
Figure 12-1: ASK modulation
ASK modulation is also known as on-off keying (OOK), and it typically uses a start-and-stop bit. Start-and-stop bits are common ways to separate where a message starts and where it stops. Accounting for start-and-stop bits, Figure 12-1 could represent nine bits: 0-1-1-0-1-1-0-1-0.
Frequency-Shift Keying
Unlike ASK, FSK always has a carrier signal but that signal is instead measured by how quickly it changes—its frequency (see Figure 12-2).
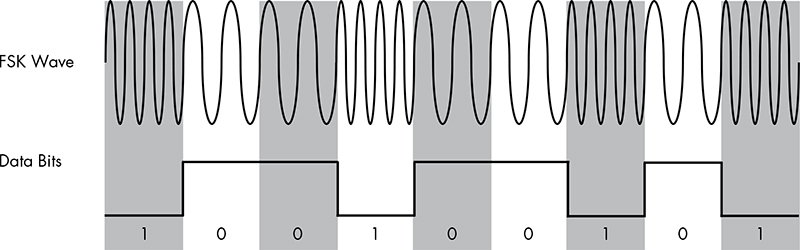
Figure 12-2: FSK modulation
In FSK, a high-frequency signal is a 0, and a low-frequency signal is a 1. When the carrier waves are close, that’s a 1, and when they’re spaced farther apart, that’s a 0. The bits in Figure 12-2 are probably 1-0-0-1-0-0-1-0-1.
Hacking with TPMS
The TPMS is a simple device that sits inside the tire and sends data on tire-pressure readings and wheel rotation and temperature, and warnings about certain conditions like low sensor batteries to the ECU (see Figure 12-3). The data is then displayed to the driver via gauges, digital displays, or warning lights. In the fall of 2000, the United States enacted the Transportation Recall Enhancement, Accountability, and Documentation (TREAD) Act, requiring that all new vehicles have a TPMS system installed in order to improve road safety by alerting drivers to underinflated tires. Thanks to TREAD, the TPMS has widespread adoption, making it a prevalent attack target.
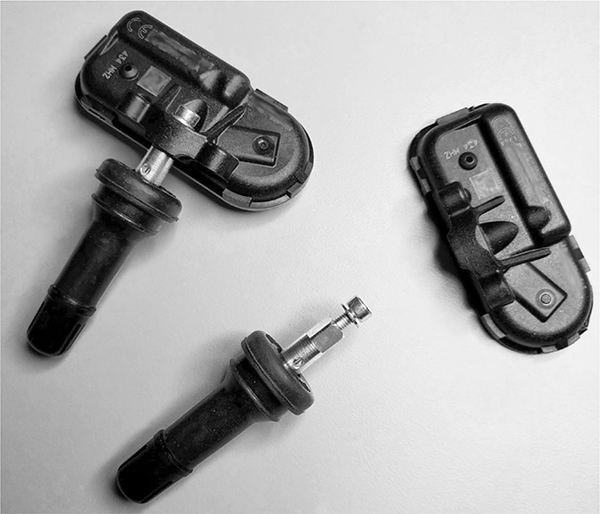
Figure 12-3: Two TPMS sensors
The TPMS device sits inside the wheel and transmits wirelessly into the wheel well, allowing its signals to be partially shielded by the body of the vehicle in order to prevent too much leakage. Most TPMS systems use a radio to communicate with the ECU. The signal frequency varies between devices but typically runs at 315 MHz or 433 MHz UHF and uses either ASK or FSK modulation. Some TPMS systems use Bluetooth, which has its pros and cons from the perspective of an attacker: Bluetooth has a greater default range, but the Bluetooth protocol can also enable secure communication, making it harder to intercept or connect to. In this chapter, I’ll focus on TPMS systems that use radio signals.
Eavesdropping with a Radio Receiver
Most public research on TPMS security is summarized in “Security and Privacy Vulnerabilities of In-Car Wireless Networks: A Tire Pressure Monitoring System Case Study” from researchers at the University of South Carolina and Rutgers University.1 The paper shows how the researchers were able to eavesdrop on a TPMS system from 40 m away using a relatively low-cost USRP receiver ($700 to $2,000) to sniff its wireless signals. (As mentioned earlier, you could use a different SDR.) Once the signals have been captured, GNU Radio can be used to filter and demodulate them.
TPMS systems have very weak signals and, therefore, don’t leak data too far from the vehicle. In order to overcome the low leakage factor of a TPMS system, you could add a low-noise amplifier (LNA) to your radio receiver to increase the sniffing range, which should allow you to capture a TPMS signal from the side of the road or from a vehicle traveling alongside the target. You could also implement directional antennas to boost your range.
TPMS sensors transmit only every 60 to 90 seconds, and sensors usually aren’t required to send information until the vehicle is traveling at 25 mph or higher. However, many sensors transmit even when a car is idle, and some transmit even when the car is off. When auditing a stationary vehicle that’s powered off, be sure to send a wake-up signal to trigger a response from the TPMS.
The best way to know how your target TPMS sensor works is to listen for packets with the vehicle completely off. You most likely won’t see any communication without a wake-up signal, but some devices may transmit at slow intervals anyhow. Next, turn the vehicle on and leave it in an idle state. The ECU should prompt the tire to respond at the very least during startup, but most likely it’ll poll every so often.
Once you see the TPMS signal, you’ll need to decode it in order for its contents to make sense. Thankfully, researcher Jared Boone has made that easy with a suite of tools designed to capture and decode TPMS packets. You’ll find the source code for his gr-tpms tool at https://github.com/jboone/gr-tpms/ and the source code for his tpms tool at https://github.com/jboone/tpms/. After using these tools to capture and decode TPMS packets, you can analyze the captured data to determine which bits represent the system’s unique ID as well as any other fields.
TPMS Packets
TPMS packets will typically contain the same information, with some differences between models. Figure 12-4 shows an example of a TPMS packet.

Figure 12-4: An example TPMS packet
The SensorID is a 28- or 32-bit number that’s unique to each sensor and registered with the ECU. If your only goal is to fingerprint a target for tracking or triggering an event, the SensorID is probably the only part of the packet you’ll care about. The Pressure and Temperature fields contain readings from the TPMS device. The Flags field can contain extra meta-data, such as a warning about a low battery in a sensor.
When determining packet encoding, check whether Manchester encoding was used. Manchester encoding is commonly used in near-field devices, like TPMS systems. If you know what chipset is being used, the data sheet should tell you whether it supports Manchester encoding. If it does, you’ll first need to decode the packet before parsing its contents. Jared Boone’s tools can assist with this task.
Activating a Signal
As mentioned, sensors generally transmit around once a minute, but rather than waiting 60 seconds for the sensor to send a packet, an attacker can send a 125 kHz activation signal to the TPMS device with an SDR to elicit a response. Your interception of this response will need to be timed carefully, though, because there’s a delay between when you send an activation signal and when the response is transmitted. For example, if you’re receiving from the side of the road and the vehicle is traveling too fast past your sensor, you could easily miss the response.
The activation signal is designed primarily for TPMS test equipment, so it may be tricky to use it on a moving vehicle. If the target vehicle sends packets when it’s stationary or off, your task will be much easier.
TPMS sensors don’t use input validation. The ECU will check to make sure that it recognizes only the SignalID, so the only attribute you, as an attacker, need to know or match is the ID.
Tracking a Vehicle
It’s possible to use TPMS to track vehicles by placing receivers in the areas you wish to track. For instance, to track vehicles entering a parking garage, you’d simply need to place some receivers by the entrance and exit areas. However, to track vehicles around a city or along a route, you’d need to strategically place sensors along the area to be tracked. Because the sensors would have limited range, you’d have to place them around intersections or freeway on- or off-ramps.
As mentioned, TPMS sensors broadcast their unique ID every 60 to 90 seconds, so you’ll miss a lot of signals if you’re recording IDs on a high-speed road. To improve your chances of capturing signals, send the activation signal to wake up the device as it passes. The sensor’s limited distance can also affect your ability to gather IDs, but you could add an LNA to your tracking system to increase the range.
Event Triggering
Besides simply tracking a vehicle, TPMS can be used to trigger an event, from something simple like opening a garage door when the car approaches to something more sinister. For instance, a malicious actor could plant a roadside explosive and set it to detonate when it receives a known ID from the TPMS sensor. Because you have four tires, the attacker would have reasonable assurance that they have the right vehicle if they receive a signal for each tire. Essentially, using all four tires would allow you to create a basic but accurate sensor fingerprint for a target vehicle.
Sending Forged Packets
Once you have access to the TPMS signal, you can send your own forged packets by setting up GNU Radio as a transmitter instead of as a receiver. By forging packets, you can not only spoof dangerous PSI and temperature readings but also cause other engine lights to trigger. And because sensors still respond to activation packets while the vehicle is off, it’s possible to drain a vehicle’s battery by flooding the sensor with activation requests.
In the paper “Security and Privacy Vulnerabilities of In-Car Wireless Networks” referenced previously, the researchers flooded the sensors with spoofed packets, eventually managing to completely shut down the ECU while the vehicle was in use. Shutting down the ECU either halts the vehicle or forces it into “limp mode.”
WARNING
Shutting down the ECU while a vehicle is traveling at high speed could be extremely dangerous. Even though playing with TPMS may seem innocuous, be sure to take standard safety precautions when assessing any vehicle.
Attacking Key Fobs and Immobilizers
Anyone who has driven a modern vehicle is likely familiar with the key fob and the remote unlock. In 1982, radio-frequency identification (RFID) was first introduced into remote keyless vehicle entry systems via the Renault Fuego, and it’s been in wide use since 1995. Earlier systems used infrared, so when working with one of these earlier vehicles, you’ll need to assess the key fob by recording the infrared light source (which is not covered in this chapter). Today’s systems use a key fob to send an RFID signal to a vehicle to remotely unlock the doors or even start the vehicle. The key fob uses a transponder operating at 125 kHz to communicate with an immobilizer in the vehicle, which prevents the vehicle from starting unless it receives the correct code or other token. The reason to use a low-frequency RFID signal is to allow the key system to work even if the key fob runs out of battery power.
We’ll examine using SDR devices to analyze wireless communications set by the wireless key fobs used to unlock and start vehicles. While older key fobs use a simple fixed code to start the vehicle, most modern systems rely on a rolling code or a challenge-response system that prevents simply recording and playing back a fixed code by challenging the key fob to perform a task, like completing a calculation and returning the correct answer. These calculations require both a bit more power and the use of a battery, which also makes it possible for the key fob to communicate on a higher frequency from a greater distance.
Remote keyless entry systems typically run at 315 MHz in North America and 433.92 MHz in Europe and Asia. You can use GNU Radio to watch the signal sent by a key fob or use a tool like the Gqrx SDR (http://gqrx.dk/) for a nice real-time view of the entire bandwidth brought in from your SDR device. Using Gqrx with a high sample rate (bandwidth) allows you to identify the frequency of an RFID signal as it’s sent from a key fob to a vehicle. For example, Figure 12-5 shows Gqrx set to listen at 315 MHz (the center, vertical line) and at offset -1,192.350 kHz, as it monitors a key fob unlock request for a Honda. Gqrx has identified two peaks in the signal that are likely to be the unlock requests.

Figure 12-5: Gqrx capture of a key fob unlock request
Key Fob Hacks
There are plenty of ways to hack key fob systems, and I’ll give examples of a few methods an attacker might use in the following sections.
Jamming the Key Fob Signal
One way to attack a key fob signal is to jam it by passing garbage data within the RFID receiver’s passband, the area the receiver is listening to for a valid signal. The width of the passband window includes some extra space where you can add noise to prevent the receiver from changing the rolling code while still allowing the attacker to view the correct key sequence (see Figure 12-6).
While holding onto that valid unlock request in memory, the attacker waits for another request to be sent and records that request, too. The attacker can then replay the first valid packet to the vehicle, causing it to lock or unlock the car, depending on the signal sent by the key fob. When the car owner leaves the vehicle, the attacker has the last valid key stored and can replay it to open the vehicle doors or start the vehicle. This attack was demonstrated by Samy Kamkar at DEF CON 23 on both vehicles and garage door openers.2

Figure 12-6: Jamming the passband filter to preserve the key exchange
Pulling the Response Codes from Memory
Sometimes it’s possible to find the response code still in the immobilizer’s memory, even a few minutes after the key fob has stopped sending signals. This provides a window of opportunity to start the car not by capturing signals live from a key fob but rather by pulling the signal from the immobilizer’s memory.
If an area of memory can be identified to contain this information, then the attacker needs to either quickly get access to the vehicle or have a device on the vehicle that can respond to record this information.
Brute-Forcing a Key Code
Some response codes can be accessed by brute force, though the feasibility of a brute-force attack depends on the key code length and algorithm. (We’ll discuss the cryptography behind these key systems in “Immobilizer Cryptography” on page 220.) In order for a brute-force attack to succeed, the attacker needs to build custom software to brute-force the key using an SDR, a custom hardware component, or—better yet—a combination of the two. For instance, if the key fob detected brute-forcing attacks, you may want to have some custom hardware reset the key fob on lockout by bouncing the power.
Forward-Prediction Attacks
If an attacker is able to observe challenge-response exchanges that occur when the key fob sends a signal to the vehicle and the vehicle’s transponder responds, the attacker can perform a forward-prediction attack. In such an attack, the attacker observes multiple challenges and from those, predicts what the next challenge request will be. If the transponder’s pseudorandom number generator (PRNG) is weak, this attack may well succeed. To greatly simplify this example, if the PRNG was based on when the key fob first received power, an attacker could seed their own random number generator with a matching start time. Once the attacker was synced to the target, the attacker could predict all future codes.
Dictionary Attacks
Similarly, if an attacker can record numerous valid challenge-response exchanges between the key fob and the transponder, they can store them in a dictionary and then use the collected key pairs to repeatedly request challenges from the transponder until one challenge matches a response in the dictionary. This tricky attack is possible only when the keyless entry system doesn’t use sender verification to make sure that responses are valid. The attacker would also need to be able to continuously request authentication from the transponder.
In order to perform a dictionary attack, the attacker would need to build a system to trigger the key fob request and record the exchange with an SDR. An Arduino wired to the button press of the researcher’s valid key fob would suffice. Assuming the authentication takes place over CAN, it’s also possible to grab the key fob ID over ultra-high frequency and attempt to gather the key stream by replaying and recording the communication over the CAN bus, as discussed in “Reversing CAN Bus Communications with can-utils and Wireshark” on page 68. Using custom tools, this would be possible to repeat over any bus network. For more information on this type of attack, see the paper “Broken Keys to the Kingdom”.3
Dumping the Transponder Memory
It’s often possible to dump the memory of the transponder to get the secret key. In Chapter 8, we examined how to use debugger pins, such as JTAG, as well as side-channel analysis attacks to dump memory from the transponder.
Reversing the CAN Bus
To gain access to a vehicle, an attacker can simulate the lock button press using the CAN bus reversing methods discussed in Chapter 5. If the attacker has access to the CAN bus, they can replay lock and unlock packets to control and occasionally even start the vehicle. Sometimes CAN bus wires are even accessible from outside the vehicle; for instance, some vehicles have CAN bus running to the tail lights. An attacker could pop out a tail light and tap into the CAN bus network in order to unlock the vehicle.
Key Programmers and Transponder Duplication Machines
Transponder duplication machines are often used to steal vehicles. These machines, the same as those used by a mechanic or dealership to replace lost keys, can be purchased online for anywhere from $200 to $1,000. Attackers acquire the transponder signal from their target vehicle and use it to create a clone of the key, by either having a valid key nearby or using one of the attacks discussed earlier. For example, the attacker—possibly a valet or a parking garage attendant—might jam the door lock signal and then sneak into the vehicle and attach a custom dongle to the OBD-II connector. The dongle would acquire the key fob communication and possibly even include a GPS broadcast to allow the attacker to locate the vehicle later. The attacker would later return to the vehicle and use the dongle to unlock and start the car.
Attacking a PKES System
Passive keyless entry and start (PKES) systems are very similar to traditional transponder immobilizer systems, except that the key fob can remain in the owner’s pocket and no button needs to be pressed. When a PKES system is implemented, antennas in the vehicle read RFID signals from the key fob when it’s in range. PKES key fobs use a low-frequency (LF) RFID chip and an ultra-high-frequency (UHF) signal to unlock or start the vehicle. The vehicle ignores UHF signals from the key fob if the LF RFID signal isn’t seen, meaning that the key isn’t nearby. The RFID on the key fob receives a crypto challenge from the vehicle, and the microcontroller on the key fob solves this challenge and responds over the UHF signal. Some vehicles use RFID sensors inside the vehicle to triangulate the location of the key fob to ensure the key fob is inside the vehicle. If the battery dies in a PKES key fob, there’s typically a hidden physical key in the fob that will unlock the door, though the immobilizer will still use the RFID to verify that the key is present before starting the vehicle.
There are typically two types of possible attacks on a PKES system: a relay attack and an amplified relay attack. In a relay attack, an attacker places a device next to the car and another next to the owner or holder of the key fob (the target). The device relays the signals between the target’s key fob and the vehicle, enabling the attacker to start the car.
This relay tunnel can be set up to communicate over any channel that’s fast and has a larger range than the normal key fob. For instance, a device placed near the target could set up a cellular tunnel to a laptop near the vehicle. Packets would go from the target’s key fob into the device to be transmitted over cellular and replayed by the laptop. For more information, see “Relay Attacks on Passive Keyless Entry and Start Systems in Modern Cars.”4
An amplified relay attack uses the same basic principles as a relay attack but with only a single amplifier. The attacker stands by the target vehicle and amplifies the signal, and if the target is nearby with the key fob, the vehicle will unlock. This is an unsophisticated attack that simply increases the range of the vehicle’s sensors. It’s been seen in the wild, primarily in residential neighborhoods, prompting a series of news articles advising residents to put their keys in their refrigerator or wrap them in aluminum foil when they’re at home to prevent them from sending a readable signal. Obviously, treating your keys like lunch is silly, but until auto manufacturers provide an alternative solution, I’m afraid you’re stuck with homemade Faraday cages.
Immobilizer Cryptography
Like most systems in a vehicle, immobilizer systems are usually created using a combination of cheap components. As a result, manufacturers have become creative with things like cryptography, which has introduced numerous weaknesses into these systems. For example, some immobilizer vendors make the common mistake of creating their own crypto and hiding it behind a trade secret clause designed to protect it instead of validating it with public scrutiny. Known as security through obscurity, this method is almost always doomed to fail, and it’s why we don’t see a standard cryptography implementation to handle the key exchange between the key fob and the immobilizer.
The immobilizer-key exchange uses a challenge-response system and PRNGs. The PRNG is equally important as the crypto algorithm, as a poor PRNG can lead to predictable results regardless of how good your crypto algorithm is.
The typical key exchange implementation follows this general sequence:
1. The immobilizer sends a challenge to the key using a PRNG.
2. The key encrypts the challenge using a PRNG and returns it to the immobilizer.
3. The immobilizer sends a second random number challenge.
4. The key encrypts both challenges and returns them to the immobilizer.
These algorithms are typically from the pseudorandom function (PRF) family, which generate what only look like random output given random input. There’s a strong reliance on generated randomness in order for these systems to work properly. Some of these systems have already been cracked and the cracking methods widely disseminated, but some still remain unbroken. Unfortunately, because manufacturers don’t have systems in place to update their key fobs’ firmware, you’ll see all of these algorithms in use if you look long and hard enough.
The following are some of the known proprietary algorithms still in use and their current crack status—that is, whether they’ve been broken or not. Whenever possible, I identify which vehicles you may see the algorithm used in.
NOTE
This section is designed to assist in your research. Each area should give you basic information on the key system you’re looking at and details that should help you to jump-start your crypto research. This section isn’t meant to explain cryptography, and I won’t delve into the intricacies of the mathematics behind each algorithm.
EM Micro Megamos
Introduced 1997
Manufacturer Volkswagen/Thales
Key Length 96 bits
Algorithm Proprietary
Vehicles Porsche, Audi, Bentley, Lamborghini
Crack Status Broken but the attack methods have been censored by lawsuit
The Megamos cryptographic system has a particularly interesting history. Megamos “optimized” its key handshake by requiring only one round of challenge and response and eliminating the second round, as outlined earlier. While an attacker attempting to crack a challenge-response key would normally need access to the target key, they could crack Megamos without a key present because the Megamos challenge response is never actually acted on by the vehicle’s transponder. This flaw basically skips the key challenge portion and provides only an encrypted key.
The Megamos memory is a 160-bit EEPROM, organized into 10 words, as shown in Table 12-1. Crypt Key is the secret key storage, ID is the 32-bit identifier, LB 0 and LB 1 are the lock bits, and UM is the 30 bits of user memory.
Table 12-1: Layout of the Megamos Memory Space
|
Bit 15 |
Bit 0 |
Bit 15 |
Bit 0 |
|
Crypt Key 95 |
Crypt Key 80 |
Crypt Key 15 |
Crypt Key 0 |
|
Crypt Key 79 |
Crypt Key 64 |
ID 31 |
ID 16 |
|
Crypt Key 63 |
Crypt Key 48 |
ID 15 |
ID 0 |
|
Crypt Key 47 |
Crypt Key 32 |
LB1, LB0, UM 29 |
UM 16 |
|
Crypt Key 31 |
Crypt Key 16 |
UM 15 |
UM 0 |
This algorithm was cracked publicly in 2013 when Flavio D. Garcia, a security researcher at the University of Birmingham, published a paper called “Dismantling Megamos Crypto: Wirelessly Lockpicking a Vehicle Immobilizer”.5 Garcia and two fellow researchers from Radboud University Nijmegen, Barış Ege and Roel Verdult, notified the chipmakers, Volkswagen and Thales, nine months prior to the scheduled publication of their paper. Volkswagen and Thales reacted by suing the researchers for having identified the vulnerabilities, and the researchers lost the court case because the algorithm was leaked online. The leaked algorithm was used in pirated software—the Tango Programmer from VAG-info.com—for adding new keys. The researchers acquired this software and reversed the internals of the software to identify the algorithm.
In their paper, the researchers analyzed the algorithm and reported on the vulnerabilities they found, though the actual exploit was apparently not trivial and there were much easier ways to steal a car with a Megamos system. Nevertheless, the research was placed under a gag order, and the findings weren’t made public. Unfortunately, the problem with Megamos still exists, and it’s still insecure—the gag order simply prevents vehicle owners from determining their risk because the research isn’t publicly available. This is a prime example of how the auto industry should not respond to security research.
You can find a transcript of the court decision here: http://www.bailii.org/ew/cases/EWHC/Ch/2013/1832.html. In order not to leak any details, I’ll simply quote the court case:
In detail the way this works is as follows: both the car computer and the transponder know a secret number. The number is unique to that car. It is called the “secret key”. Both the car computer and the transponder also know a secret algorithm. That is a complex mathematical formula. Given two numbers it will produce a third number. The algorithm is the same for all cars which use the Megamos Crypto chip. Carrying out that calculation is what the Megamos Crypto chip does.
When the process starts the car generates a random number. It is sent to the transponder. Now both computers perform the complex mathematical operation using two numbers they both should know, the random number and the secret key. They each produce a third number. The number is split into two parts called F and G. Both computers now know F and G. The car sends its F to the transponder. The transponder can check that the car has correctly calculated F. That proves to the transponder that the car knows both the secret key and the Megamos Crypto algorithm. The transponder can now be satisfied that the car is genuinely the car it is supposed to be. If the transponder is happy, the transponder sends G to the car. The car checks that G is correct. If it is correct then the car is happy that the transponder also knows the secret key and the Megamos Crypto algorithm. Thus the car can be satisfied that the transponder is genuine. So both devices have confirmed the identity of the other without actually revealing the secret key or the secret algorithm. The car can safely start. The verification of identity in this process depends on the shared secret knowledge. For the process to be secure, both pieces of information need to remain secret—the key and the algorithm.6
In reality, any robust crypto algorithm can be known. In fact, as any cryptographer will tell you, if knowing the math behind an algorithm jeopardizes the security of that algorithm, the algorithm is flawed.
The court case determined that the attacks were hard to mitigate and would require a complete redesign. The researchers offered other lightweight algorithms that could be used in the redesigned key systems, but because the research was silenced, no key systems were updated. The Megamos algorithm is still found in key programmers like Volkswagen’s Tango Programmer, among others.
EM4237
Introduced 2006
Manufacturer EM Microelectronic
Key Length 128 bits
Algorithm Proprietary
Vehicles Unknown
Crack Status No known published cracks
EM4237 is described by the manufacturer as a generic, long-range, passive, contactless tag system that uses transponders. This is similar to a beefed-up proximity card used for building access but with a range of 1 to 1.5 m. Normally, EM4237 requires a high-security, 128-bit password, but it can run in a low-security mode that requires only a 32-bit password if, for example, the key fob is low on battery, as it takes less energy to compute a 32-bit key than a 128-bit key. The system’s low-security mode key is located in the same memory section of the transponder as the high-security mode key, and the system can be toggled between high and low security without having to reenter the password/key. The EM4237 transponder claims to be compliant with vicinity card standards (ISO/IEC 15693), which offers full encryption of the RF channel (13.56 MHz). When auditing EM4237, ensure that implementation on your target matches the specification.
Hitag 1
Introduced Unknown
Manufacturer Philips/NXP
Key Length 32 bits
Algorithm Proprietary
Vehicles Unknown
Crack Status Broken
Hitag 1 relies on a 32-bit secret key and is susceptible to a brute-force attack that can take only a few minutes. You won’t find Hitag 1 used in many of today’s vehicles, but Hitag 1 transponders are still used in other RFID products, such as smart keychains and proximity cards.
Hitag 2
Introduced 1997
Manufacturer Philips/NXP
Key Length 48 bits
Algorithm Proprietary
Vehicles Audi, Bentley, BMW, Chrysler, Land Rover, Mercedes, Porsche, Saab, Volkswagen, and many more
Crack Status Broken
Hitag 2 is one of the most widely implemented (and broken) algorithms in vehicles produced around the world. The algorithm was cracked because its stream cipher, shown in Figure 12-7, is never fed back into the original state, making the key discoverable.
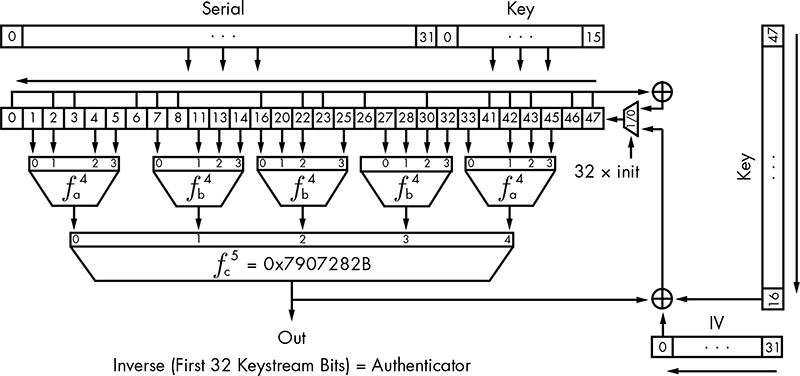
Figure 12-7: Hitag 2 cipher
Hitag 2 keys can be cracked in under a minute by using a type of smart brute-forcing that intelligently picks the next guess rather than trying every possibility. The Hitag 2 system can be brute-forced so quickly because it doesn’t even use its full bit length, and when the transponders are introduced into a system, they don’t produce true random numbers during initialization. Both Hitag 1 and Hitag 2 are also vulnerable to dictionary attacks.
You’ll find numerous papers online that discuss a multitude of weaknesses in Hitag 2, such as “Gone in 360 Seconds: Hijacking with Hitag2”.7
Hitag AES
Introduced 2007
Manufacturer Philips/NXP
Key Length 128 bits
Algorithm AES
Vehicles Audi, Bentley, BMW, Porsche
Crack Status No known published cracks
This newer cipher relies on the proven AES algorithm, which means that any weaknesses in the crypto will result from a manufacturer’s implementation. As I write this, there are no known cracks for Hitag AES.
DST-40
Introduced 2000
Manufacturer Texas Instruments
Key Length 40 bits
Algorithm Proprietary (unbalanced Feistel cipher)
Vehicles Ford, Lincoln, Mercury, Nissan, Toyota
Crack Status Broken
The algorithm used by the digital signal transponder DST-40 was also used in the Exxon-Mobil Speedpass payment system. The DST-40, a 200-round unbalanced Feistel cipher, was reverse engineered by researchers at Johns Hopkins University who created a series of FPGAs to brute-force the key, allowing them to clone the transponders. (FPGAs make it possible to create hardware that’s custom designed to crack algorithms, which makes brute-forcing much more feasible.) Because an FPGA is specialized and can run with parallel inputs, it can often process things much faster than a general-purpose computer.
The attack on DST-40 takes advantage of the transponder’s weak 40-bit key and requires no more than one hour to complete. To perform the attack, the attacker must get two challenge-response pairs from a valid transponder—a relatively easy task, since DST-40 responds to as many as eight queries per second. (See “Security Analysis of Cryptographically-Enabled RFID Device” for more details on this crack.8)
DST-80
Introduced 2008
Manufacturer Texas Instruments
Key Length 80 bits
Algorithm Proprietary (unbalanced Feistel cipher)
Crack Status No known published cracks
When DST-40 was cracked, Texas Instruments responded by doubling the key length to produce DST-80. DST-80 isn’t as widely deployed as DST-40. Some sources claim that DST-80 is still susceptible to attack, though, as of this writing, no attacks have been published.
Keeloq
Introduced Mid-1980s
Manufacturer Nanoteq
Key Length 64 bits
Algorithm Proprietary (NLFSR)
Vehicles Chrysler, Daewoo, Fiat, General Motor, Honda, Jaguar, Toyota, Volkswagen, Volvo
Crack Status Broken
Keeloq, shown in Figure 12-8, is a very old algorithm, and there have been many published attacks on its encryption. Keeloq can use both a rolling code and a challenge response, and it uses a block cipher based on nonlinear feedback shift register (NLFSR). The manufacturer implementing Keeloq receives a key, which is stored in all receivers. Receivers learn transponder keys by receiving their IDs over a bus line programmed by the auto manufacturer.
The most effective cryptographic attack in Keeloq uses both a slide and a meet-in-the-middle attack. The attack targets Keeloq’s challenge-response mode and requires the collection of 216 known plaintext messages from a transponder—the recording of which can take just over one hour. The attack typically results only in the ability to clone the transponder, but if the manufacturer’s key derivation is weak, it may be possible for the attacker to deduce the key used on their transponders. However, attacking the crypto has become unnecessary because newer dedicated FPGA clusters make it possible to simply brute-force the key.
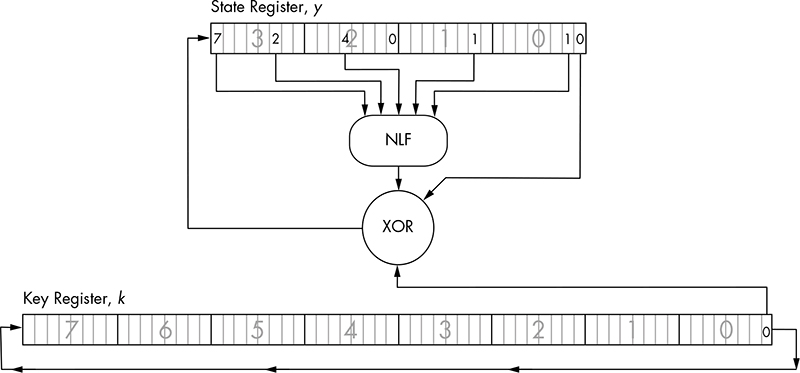
Figure 12-8: Keeloq algorithm
Keeloq is also susceptible to a power-analysis attack. A power-analysis attack can be used to extract the manufacturer’s key used on the transponders with only two transponder messages. If successful, such an attack typically results only in the ability to clone a transponder in a few minutes by monitoring the power traces on the transponder. Power analysis can also be used to get the manufacturer key, though such an attack could take several hours to perform. Once the attacker has the master key, they can clone any transponder. Finally, because Keeloq takes varying clock cycles when using its lookup table, it’s also susceptible to timing attacks. (For more on power-analysis and timing attacks, see Chapter 8.)
Open Source Immobilizer Protocol Stack
Introduced 2011
Manufacturer Atmel
Key Length 128 bits
Algorithm AES
Crack Status No known published cracks
In 2011, Atmel released the Open Source Immobilizer Protocol Stack under an open source license, making it freely available to the public and encouraging public scrutiny of the protocol design. As I write this, there are no known attacks on this protocol. You can download the protocol from the Atmel site: http://www.atmel.com/.
Physical Attacks on the Immobilizer System
So far, we’ve looked at wireless attacks and direct cryptography attacks against the transponders. Next, we’ll look at physical modification and attacks to the vehicle itself. Physical attacks typically take longer to perform and aren’t meant to be stealthy.
Attacking Immobilizer Chips
One way to attack an immobilization system is to physically attack the immobilizer chip. In fact, it’s possible to completely remove the immobilizer chip (typically from a vehicle’s ECU) and still operate a vehicle, though perhaps not quite normally. At the very least, this removal would create a DTC and turn on the MIL, as discussed in “Diagnostic Trouble Codes” on page 52. In order to physically remove immobilizer-based security, you can purchase or build an immobilizer bypass chip and then solder it where the original immobilizer chip was to keep the rest of the ECU happy. These chips, sometimes referred to as immo emulators, typically cost $20 to $30. You’d still need to have a key cut for the vehicle, but having bypassed any challenge-response security entirely, the key would simply unlock and start the vehicle.
Brute-Forcing Keypad Entry
Now, for a change of pace: Here’s one method for brute-forcing a keypad lock on a vehicle; this particular method was discovered by Peter Boothe (available at http://www.nostarch.com/carhacking/). If the vehicle has a keypad under the door handle with buttons labeled 1/2, 3/4, 5/6, 7/8, 9/0, you can manually enter the following sequence in about 20 minutes to unlock the car door. You don’t have to enter the entire sequence—you can stop entering the code whenever the doors unlock. For convenience, each button is labeled 1, 3, 5, 7, and 9, respectively.
9 9 9 9 1 1 1 1 1 3 1 1 1 1 5 1 1 1 1 7 1 1 1 1 9 1 1 1 3 3 1 1 1 3 5 1 1 1 3
7 1 1 1 3 9 1 1 1 5 3 1 1 1 5 5 1 1 1 5 7 1 1 1 5 9 1 1 1 7 3 1 1 1 7 5 1 1 1
7 7 1 1 1 7 9 1 1 1 9 3 1 1 1 9 5 1 1 1 9 7 1 1 1 9 9 1 1 3 1 3 1 1 3 1 5 1 1
3 1 7 1 1 3 1 9 1 1 3 3 3 1 1 3 3 5 1 1 3 3 7 1 1 3 3 9 1 1 3 5 3 1 1 3 5 5 1
1 3 5 7 1 1 3 5 9 1 1 3 7 3 1 1 3 7 5 1 1 3 7 7 1 1 3 7 9 1 1 3 9 3 1 1 3 9 5
1 1 3 9 7 1 1 3 9 9 1 1 5 1 3 1 1 5 1 5 1 1 5 1 7 1 1 5 1 9 1 1 5 3 3 1 1 5 3
5 1 1 5 3 7 1 1 5 3 9 1 1 5 5 3 1 1 5 5 5 1 1 5 5 7 1 1 5 5 9 1 1 5 7 3 1 1 5
7 5 1 1 5 7 7 1 1 5 7 9 1 1 5 9 3 1 1 5 9 5 1 1 5 9 7 1 1 5 9 9 1 1 7 1 3 1 1
7 1 5 1 1 7 1 7 1 1 7 1 9 1 1 7 3 3 1 1 7 3 5 1 1 7 3 7 1 1 7 3 9 1 1 7 5 3 1
1 7 5 5 1 1 7 5 7 1 1 7 5 9 1 1 7 7 3 1 1 7 7 5 1 1 7 7 7 1 1 7 7 9 1 1 7 9 3
1 1 7 9 5 1 1 7 9 7 1 1 7 9 9 1 1 9 1 3 1 1 9 1 5 1 1 9 1 7 1 1 9 1 9 1 1 9 3
3 1 1 9 3 5 1 1 9 3 7 1 1 9 3 9 1 1 9 5 3 1 1 9 5 5 1 1 9 5 7 1 1 9 5 9 1 1 9
7 3 1 1 9 7 5 1 1 9 7 7 1 1 9 7 9 1 1 9 9 3 1 1 9 9 5 1 1 9 9 7 1 1 9 9 9 1 3
1 3 3 1 3 1 3 5 1 3 1 3 7 1 3 1 3 9 1 3 1 5 3 1 3 1 5 5 1 3 1 5 7 1 3 1 5 9 1
3 1 7 3 1 3 1 7 5 1 3 1 7 7 1 3 1 7 9 1 3 1 9 3 1 3 1 9 5 1 3 1 9 7 1 3 1 9 9
1 3 3 1 5 1 3 3 1 7 1 3 3 1 9 1 3 3 3 3 1 3 3 3 5 1 3 3 3 7 1 3 3 3 9 1 3 3 5
3 1 3 3 5 5 1 3 3 5 7 1 3 3 5 9 1 3 3 7 3 1 3 3 7 5 1 3 3 7 7 1 3 3 7 9 1 3 3
9 3 1 3 3 9 5 1 3 3 9 7 1 3 3 9 9 1 3 5 1 5 1 3 5 1 7 1 3 5 1 9 1 3 5 3 3 1 3
5 3 5 1 3 5 3 7 1 3 5 3 9 1 3 5 5 3 1 3 5 5 5 1 3 5 5 7 1 3 5 5 9 1 3 5 7 3 1
3 5 7 5 1 3 5 7 7 1 3 5 7 9 1 3 5 9 3 1 3 5 9 5 1 3 5 9 7 1 3 5 9 9 1 3 7 1 5
1 3 7 1 7 1 3 7 1 9 1 3 7 3 3 1 3 7 3 5 1 3 7 3 7 1 3 7 3 9 1 3 7 5 3 1 3 7 5
5 1 3 7 5 7 1 3 7 5 9 1 3 7 7 3 1 3 7 7 5 1 3 7 7 7 1 3 7 7 9 1 3 7 9 3 1 3 7
9 5 1 3 7 9 7 1 3 7 9 9 1 3 9 1 5 1 3 9 1 7 1 3 9 1 9 1 3 9 3 3 1 3 9 3 5 1 3
9 3 7 1 3 9 3 9 1 3 9 5 3 1 3 9 5 5 1 3 9 5 7 1 3 9 5 9 1 3 9 7 3 1 3 9 7 5 1
3 9 7 7 1 3 9 7 9 1 3 9 9 3 1 3 9 9 5 1 3 9 9 7 1 3 9 9 9 1 5 1 5 3 1 5 1 5 5
1 5 1 5 7 1 5 1 5 9 1 5 1 7 3 1 5 1 7 5 1 5 1 7 7 1 5 1 7 9 1 5 1 9 3 1 5 1 9
5 1 5 1 9 7 1 5 1 9 9 1 5 3 1 7 1 5 3 1 9 1 5 3 3 3 1 5 3 3 5 1 5 3 3 7 1 5 3
3 9 1 5 3 5 3 1 5 3 5 5 1 5 3 5 7 1 5 3 5 9 1 5 3 7 3 1 5 3 7 5 1 5 3 7 7 1 5
3 7 9 1 5 3 9 3 1 5 3 9 5 1 5 3 9 7 1 5 3 9 9 1 5 5 1 7 1 5 5 1 9 1 5 5 3 3 1
5 5 3 5 1 5 5 3 7 1 5 5 3 9 1 5 5 5 3 1 5 5 5 5 1 5 5 5 7 1 5 5 5 9 1 5 5 7 3
1 5 5 7 5 1 5 5 7 7 1 5 5 7 9 1 5 5 9 3 1 5 5 9 5 1 5 5 9 7 1 5 5 9 9 1 5 7 1
7 1 5 7 1 9 1 5 7 3 3 1 5 7 3 5 1 5 7 3 7 1 5 7 3 9 1 5 7 5 3 1 5 7 5 5 1 5 7
5 7 1 5 7 5 9 1 5 7 7 3 1 5 7 7 5 1 5 7 7 7 1 5 7 7 9 1 5 7 9 3 1 5 7 9 5 1 5
7 9 7 1 5 7 9 9 1 5 9 1 7 1 5 9 1 9 1 5 9 3 3 1 5 9 3 5 1 5 9 3 7 1 5 9 3 9 1
5 9 5 3 1 5 9 5 5 1 5 9 5 7 1 5 9 5 9 1 5 9 7 3 1 5 9 7 5 1 5 9 7 7 1 5 9 7 9
1 5 9 9 3 1 5 9 9 5 1 5 9 9 7 1 5 9 9 9 1 7 1 7 3 1 7 1 7 5 1 7 1 7 7 1 7 1 7
9 1 7 1 9 3 1 7 1 9 5 1 7 1 9 7 1 7 1 9 9 1 7 3 1 9 1 7 3 3 3 1 7 3 3 5 1 7 3
3 7 1 7 3 3 9 1 7 3 5 3 1 7 3 5 5 1 7 3 5 7 1 7 3 5 9 1 7 3 7 3 1 7 3 7 5 1 7
3 7 7 1 7 3 7 9 1 7 3 9 3 1 7 3 9 5 1 7 3 9 7 1 7 3 9 9 1 7 5 1 9 1 7 5 3 3 1
7 5 3 5 1 7 5 3 7 1 7 5 3 9 1 7 5 5 3 1 7 5 5 5 1 7 5 5 7 1 7 5 5 9 1 7 5 7 3
1 7 5 7 5 1 7 5 7 7 1 7 5 7 9 1 7 5 9 3 1 7 5 9 5 1 7 5 9 7 1 7 5 9 9 1 7 7 1
9 1 7 7 3 3 1 7 7 3 5 1 7 7 3 7 1 7 7 3 9 1 7 7 5 3 1 7 7 5 5 1 7 7 5 7 1 7 7
5 9 1 7 7 7 3 1 7 7 7 5 1 7 7 7 7 1 7 7 7 9 1 7 7 9 3 1 7 7 9 5 1 7 7 9 7 1 7
7 9 9 1 7 9 1 9 1 7 9 3 3 1 7 9 3 5 1 7 9 3 7 1 7 9 3 9 1 7 9 5 3 1 7 9 5 5 1
7 9 5 7 1 7 9 5 9 1 7 9 7 3 1 7 9 7 5 1 7 9 7 7 1 7 9 7 9 1 7 9 9 3 1 7 9 9 5
1 7 9 9 7 1 7 9 9 9 1 9 1 9 3 1 9 1 9 5 1 9 1 9 7 1 9 1 9 9 1 9 3 3 3 1 9 3 3
5 1 9 3 3 7 1 9 3 3 9 1 9 3 5 3 1 9 3 5 5 1 9 3 5 7 1 9 3 5 9 1 9 3 7 3 1 9 3
7 5 1 9 3 7 7 1 9 3 7 9 1 9 3 9 3 1 9 3 9 5 1 9 3 9 7 1 9 3 9 9 1 9 5 3 3 1 9
5 3 5 1 9 5 3 7 1 9 5 3 9 1 9 5 5 3 1 9 5 5 5 1 9 5 5 7 1 9 5 5 9 1 9 5 7 3 1
9 5 7 5 1 9 5 7 7 1 9 5 7 9 1 9 5 9 3 1 9 5 9 5 1 9 5 9 7 1 9 5 9 9 1 9 7 3 3
1 9 7 3 5 1 9 7 3 7 1 9 7 3 9 1 9 7 5 3 1 9 7 5 5 1 9 7 5 7 1 9 7 5 9 1 9 7 7
3 1 9 7 7 5 1 9 7 7 7 1 9 7 7 9 1 9 7 9 3 1 9 7 9 5 1 9 7 9 7 1 9 7 9 9 1 9 9
3 3 1 9 9 3 5 1 9 9 3 7 1 9 9 3 9 1 9 9 5 3 1 9 9 5 5 1 9 9 5 7 1 9 9 5 9 1 9
9 7 3 1 9 9 7 5 1 9 9 7 7 1 9 9 7 9 1 9 9 9 3 1 9 9 9 5 1 9 9 9 7 1 9 9 9 9 3
3 3 3 3 5 3 3 3 3 7 3 3 3 3 9 3 3 3 5 5 3 3 3 5 7 3 3 3 5 9 3 3 3 7 5 3 3 3 7
7 3 3 3 7 9 3 3 3 9 5 3 3 3 9 7 3 3 3 9 9 3 3 5 3 5 3 3 5 3 7 3 3 5 3 9 3 3 5
5 5 3 3 5 5 7 3 3 5 5 9 3 3 5 7 5 3 3 5 7 7 3 3 5 7 9 3 3 5 9 5 3 3 5 9 7 3 3
5 9 9 3 3 7 3 5 3 3 7 3 7 3 3 7 3 9 3 3 7 5 5 3 3 7 5 7 3 3 7 5 9 3 3 7 7 5 3
3 7 7 7 3 3 7 7 9 3 3 7 9 5 3 3 7 9 7 3 3 7 9 9 3 3 9 3 5 3 3 9 3 7 3 3 9 3 9
3 3 9 5 5 3 3 9 5 7 3 3 9 5 9 3 3 9 7 5 3 3 9 7 7 3 3 9 7 9 3 3 9 9 5 3 3 9 9
7 3 3 9 9 9 3 5 3 5 5 3 5 3 5 7 3 5 3 5 9 3 5 3 7 5 3 5 3 7 7 3 5 3 7 9 3 5 3
9 5 3 5 3 9 7 3 5 3 9 9 3 5 5 3 7 3 5 5 3 9 3 5 5 5 5 3 5 5 5 7 3 5 5 5 9 3 5
5 7 5 3 5 5 7 7 3 5 5 7 9 3 5 5 9 5 3 5 5 9 7 3 5 5 9 9 3 5 7 3 7 3 5 7 3 9 3
5 7 5 5 3 5 7 5 7 3 5 7 5 9 3 5 7 7 5 3 5 7 7 7 3 5 7 7 9 3 5 7 9 5 3 5 7 9 7
3 5 7 9 9 3 5 9 3 7 3 5 9 3 9 3 5 9 5 5 3 5 9 5 7 3 5 9 5 9 3 5 9 7 5 3 5 9 7
7 3 5 9 7 9 3 5 9 9 5 3 5 9 9 7 3 5 9 9 9 3 7 3 7 5 3 7 3 7 7 3 7 3 7 9 3 7 3
9 5 3 7 3 9 7 3 7 3 9 9 3 7 5 3 9 3 7 5 5 5 3 7 5 5 7 3 7 5 5 9 3 7 5 7 5 3 7
5 7 7 3 7 5 7 9 3 7 5 9 5 3 7 5 9 7 3 7 5 9 9 3 7 7 3 9 3 7 7 5 5 3 7 7 5 7 3
7 7 5 9 3 7 7 7 5 3 7 7 7 7 3 7 7 7 9 3 7 7 9 5 3 7 7 9 7 3 7 7 9 9 3 7 9 3 9
3 7 9 5 5 3 7 9 5 7 3 7 9 5 9 3 7 9 7 5 3 7 9 7 7 3 7 9 7 9 3 7 9 9 5 3 7 9 9
7 3 7 9 9 9 3 9 3 9 5 3 9 3 9 7 3 9 3 9 9 3 9 5 5 5 3 9 5 5 7 3 9 5 5 9 3 9 5
7 5 3 9 5 7 7 3 9 5 7 9 3 9 5 9 5 3 9 5 9 7 3 9 5 9 9 3 9 7 5 5 3 9 7 5 7 3 9
7 5 9 3 9 7 7 5 3 9 7 7 7 3 9 7 7 9 3 9 7 9 5 3 9 7 9 7 3 9 7 9 9 3 9 9 5 5 3
9 9 5 7 3 9 9 5 9 3 9 9 7 5 3 9 9 7 7 3 9 9 7 9 3 9 9 9 5 3 9 9 9 7 3 9 9 9 9
5 5 5 5 5 7 5 5 5 5 9 5 5 5 7 7 5 5 5 7 9 5 5 5 9 7 5 5 5 9 9 5 5 7 5 7 5 5 7
5 9 5 5 7 7 7 5 5 7 7 9 5 5 7 9 7 5 5 7 9 9 5 5 9 5 7 5 5 9 5 9 5 5 9 7 7 5 5
9 7 9 5 5 9 9 7 5 5 9 9 9 5 7 5 7 7 5 7 5 7 9 5 7 5 9 7 5 7 5 9 9 5 7 7 5 9 5
7 7 7 7 5 7 7 7 9 5 7 7 9 7 5 7 7 9 9 5 7 9 5 9 5 7 9 7 7 5 7 9 7 9 5 7 9 9 7
5 7 9 9 9 5 9 5 9 7 5 9 5 9 9 5 9 7 7 7 5 9 7 7 9 5 9 7 9 7 5 9 7 9 9 5 9 9 7
7 5 9 9 7 9 5 9 9 9 7 5 9 9 9 9 7 7 7 7 7 9 7 7 7 9 9 7 7 9 7 9 7 7 9 9 9 7 9
7 9 9 7 9 9 9 9 9
This method works because the key codes roll into one another. The vehicle doesn’t know where one code ends and the other one starts, which means that you don’t have to try each possibility in order to stumble on the right combination.
Flashback: Hotwiring
No car hacking book would be complete without some discussion of hotwiring—a truly brute-force attack. Unfortunately, this attack has been obsolete since about the mid-1990s, but you still see it in countless movies, so I’m including it here. My goal isn’t to help you go out and hotwire a car but to give you a sense of how hotwiring was done.
In the past, ignition systems used a vehicle’s key to complete an electrical circuit: turn the key and you’ve connected the starter wire to the ignition and battery wires. No tricky immobilizer system got in the way of the vehicle starting; the security was purely electrical.
To hotwire a susceptible car, you’d remove the steering wheel to expose the ignition cylinder and typically three bundles of wires. Using the car’s manual or simply by tracing the wires, you’d locate the ignition-battery bundle and the starter wire. Next, you’d strip the battery and ignition wires and twist them together (see Figure 12-9). Then, you’d “spark” the bundle with the starter wire to start the car. Once the car started, you’d remove the starter wire.
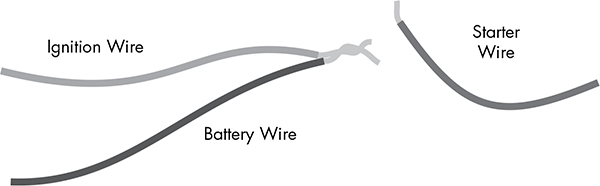
Figure 12-9: Simple illustration of which wires to cross
If a car had a steering wheel lock, you’d bypass it by breaking off the metal keyhole spring and breaking the lock, or sometimes just by forcing the wheel to turn until you broke the lock.
Summary
In this chapter, you learned about low-level wireless communications. We went over methods for identifying wireless signals and common attacks against wireless communications. We demonstrated a few hacks using the TPMS to show that even seemingly benign devices are vulnerable to attack. We also reviewed key fob security and demonstrated a few simple hacks there. Vehicle theft is rapidly adapting to modern electronic vehicles, and keyless system attacks are one of the main hacks used in thefts. Understanding the different systems, their strengths and weaknesses, and how to attack them can help you understand how vulnerable your vehicle is to theft. Finally, we discussed some old-school nonelectronic hacks, like manually brute-forcing door keypads and hotwiring.
In Chapter 13, we’ll look at a common, and arguably less malicious, type of hacking: performance tuning.