The Car Hacker's Handbook: A Guide for the Penetration Tester - Craig Smith (2016)
Chapter 9. IN-VEHICLE INFOTAINMENT SYSTEMS
In-vehicle infotainment (IVI) system is the name often given to the touchscreen interface in a car’s center console. These consoles often run an operating system such as Windows CE, Linux, QNX, or Green Hills and may even run Android in a VM as well. They can support numerous features with varying levels of integration with the vehicle.
The IVI system offers more remote attack surfaces than any other vehicle component. In this chapter, you’ll learn how to analyze and identify an IVI unit, how to determine how it works, and how to overcome potential hurdles. Once you understand your IVI system, you’ll have gained a great deal of insight into how your target vehicle works. Gaining access to the IVI system will not only allow you to modify the IVI itself but also will open a door to additional information about how your vehicle works, such as how it routes CAN bus packets and updates the ECU. Understanding the IVI system can also provide insight into whether the system phones home to the manufacturer; if it does, you can use access to the IVI to see what data is being collected and potentially transmitted back to the manufacturer.
Attack Surfaces
IVI systems typically have one or more of these physical inputs that you can use to communicate with a vehicle:
Auxiliary jack
✵ CD-ROM
✵ DVD
✵ Touchscreen, knobs or buttons, and other physical input methods
✵ USB ports
One or more wireless inputs
✵ Bluetooth
✵ Cellular connection
✵ Digital radio (such as Digital Audio Broadcasting)
✵ GPS
✵ Wi-Fi
✵ XM Radio
Internal network controls
✵ Bus networks (CAN, LIN, KWP, K-Line, and so on)
✵ Ethernet
✵ High-speed media bus
Vehicles often use CAN to communicate with their components, such as modules, ECUs, IVI systems, and telematic units. Some IVI systems use Ethernet to communicate between high-speed devices, whether to send normal IP traffic or CAN packets using Electronic System Design’s NTCAN or the Ethernet low-level socket interface (ELLSI). (For more on vehicle protocols, see Chapter 2.)
Attacking Through the Update System
One way to attack the IVI system is to go after its software. If your skill set primarily lies in the realm of software-related services, you may feel most comfortable with this method, and if you’ve ever researched embedded devices, such as home Wi-Fi routers, some of the methods discussed in the following should look familiar to you.
We’ll focus on using system updates to gain access to the system. It may be possible to access the system through other software means, such as a debug screen, an undocumented backdoor, or a published vulnerability, but we’ll focus on gaining access through software updates because that method is the most generic across IVI systems and is the primary one used to identify and access a target system via software.
Identifying Your System
In order to fully understand your target IVI system, you must first determine what kind of software it’s running. Next, you need to figure out how to access this software, which often involves looking for the methods the IVI uses to update or load its operating system. Once you understand how the system updates, you’ll have the knowledge you need to identify vulnerabilities and modify the system.
Before you can begin making modifications, you need to know what operating system the IVI is running. The easiest way to do so is to search for the brand of the IVI—first, by looking for a label on the outside of the IVI unit or frame. If you don’t see a label, look for a display option on the interface that displays software version numbers and often the device name. Also, check online to see whether anyone has already researched your target system and, if the system is manufactured by a third party, whether it has a website and firmware updates. Download any firmware or tools you can find for later use. Find out how the system is updated. Is there a map update service available? What other update methods are available? Even if you find that system updates are sent over the air, it’s usually possible to find USB drives or a DVD containing map updates, like the one from a Honda Civic shown in Figure 9-1.
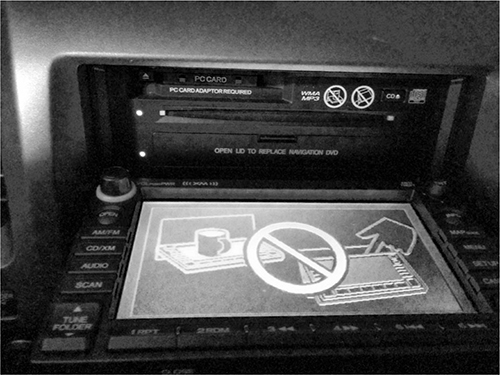
Figure 9-1: NavTeq infotainment unit in an open state
This IVI has a normal CD tray for music at the top plus a hidden plastic door at the bottom that folds down to reveal a DVD tray holding the map software.
Determining the Update File Type
System updates are often delivered as compressed files with .zip or .cab file extensions, but sometimes they have nonstandard extensions, like .bin or .dat. If the update files have .exe or .dll extensions, you’re probably looking at a Microsoft Windows-based system.
To determine how the files are compressed and their target architecture, view their headers with a hex editor or use a tool such as file available on *nix-based systems. The file command will report a file’s architecture, such as ARM or, as with the Honda Civic IVI shown in Figure 9-1, a Hitachi SuperH SH-4 Processor. This information is useful if you want to compile new code for a device or if you plan on writing or using an exploit against it.
If the file command hasn’t identified the type of file, you may be looking at a packed image. To analyze a firmware bundle, you can use a tool such as binwalk, which is a Python tool that uses signatures to carve out files from a collected binary. For instance, you can simply run binwalk on your firmware image to see a list of identified file types:
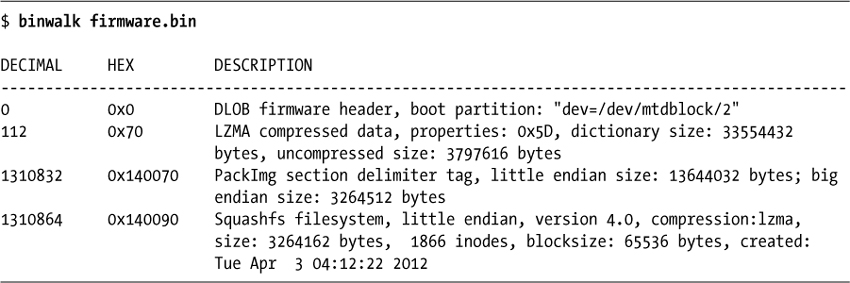
Using the -e flag would extract each of these files for further analysis and review. In this example, you can see a SquashFS filesystem was detected.
This filesystem could be extracted with the -e flag and then “unsquashed” using the unsquashfs tool to view the filesystem, as I’ve done here:
$ binwalk -e firmware.bin
$ cd _firmware.bin.extracted
$ unsquashfs -f -d firmware.unsquashed 140090.squashfs
The binewalk -e commands will extract all known files from firmware.bin to the folder _firmware.bin.extracted. Inside that folder, you’ll see files named after their hex address with an extension that matches the detected file type. In this example, the squashfs file is called 140090.squashfs because that was the location in firmware.bin.
Modifying the System
Once you know your system’s OS, architecture, and update method, the next thing to do is to see whether you can use this information to modify it. Some updates are “protected” by a digital signature, and these can be tricky to update. But often there’s no protection or the update process will simply use an MD5 hash check. The best way to find these protections is to modify the existing update software and trigger an update.
A good starting point for system modification is something with a visible result, like a splash screen or icon because once you successfully change it, you’ll know immediately (see Figure 9-2).
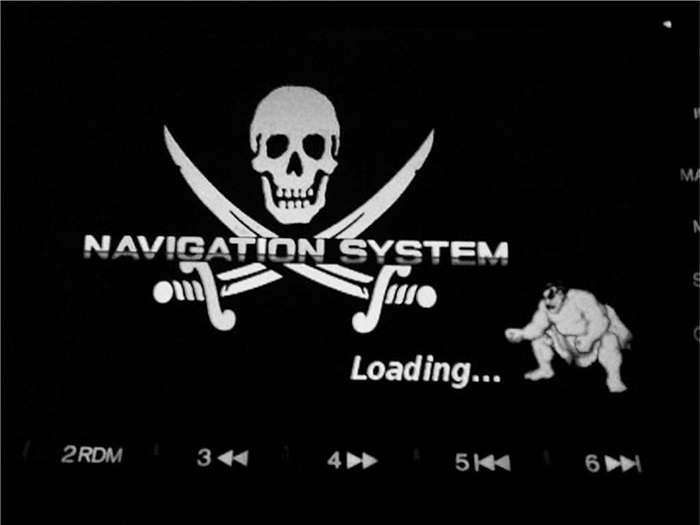
Figure 9-2: Example modification: NavTeq unit with a modified splash screen
Figure 9-2 shows how I modified the splash screen of an IVI system by replacing the normal background image with a Jolly Roger flag and the vehicle’s emblem with a character from Street Fighter. Replacing images in your splash screen is a safe way to ensure you can modify the IVI system without much risk of breaking the system.
Find an image in your update file, modify it, then reburn the update DVD and force a system update. (Find out how in the IVI’s manual.) If the update files were compressed in a single archive, be sure to recompress the modified version so that it appears in the same format as before you modified it.
If you run into a checksum issue and your update fails, look for a file in the update that might be a hash, such as a text file containing strings like 4cb1b61d0ef0ef683ddbed607c74f2bf. You’ll need to update this file with the hash of your new modified image. You may be able to guess the hashing algorithm by looking at the size of the hash and performing some trial and error. For instance, an 8-character hash, such as d579793f, may be CRC32; a 32-character hash, such as c46c4c478a4b6c32934ef6559d25002f, may be an MD5 hash; and a 40-character hash, such as 0aaedee31976f-350a9ef821d6e7571116e848180, may be SHA-1. These are the three most common hash algorithms, but there are others you might come across, and a quick Google search or reference to the tables at https://en.wikipedia.org/wiki/List_of_hash_functions should give you a clue as to which algorithm was used.
The Linux tools crc32, md5sum, and sha1sum will let you quickly calculate the hash of an existing file and compare it to the contents of the original text file. If you can generate a hash that matches that of the existing file, then you’ve found the correct algorithm.
For example, say you find a single file on an update DVD called Validation.dat that lists the contents of the files on the DVD, as shown in Listing 9-1. This listing includes the names of three files on the DVD and their associated hashes.
09AVN.bin b46489c11cc0cf01e2f987c0237263f9
PROG_INFO.MNG 629757e00950898e680a61df41eac192
UPDATE_APL.EXE 7e1321b3c8423b30c1cb077a2e3ac4f0
Listing 9-1: Sample Validation.dat file found on an update DVD
The length of the hash listed for each file—32 characters—suggests that this might be an MD5 hash. To confirm, use the Linux md5sum tool to generate an MD5 hash for each file. Listing 9-2 shows what that would look like for the 09AVN.bin file.
$ md5sum 09AVN.bin
b46489c11cc0cf01e2f987c0237263f9 09AVN.bin
Listing 9-2: Using md5sum to see the hash of the 09AVN.bin file
Compare the hash for 09AVN.bin in Listing 9-1 with the results of running md5sum in Listing 9-2, and you’ll see that the hashes match; we’re indeed looking at an MD5 hash. This result tells us that in order to modify 09AVN.bin, we’d need to recalculate the MD5 hash and update the Validation.dat file that contains all the hashes with the new hash.
Another way to determine the algorithm used to create the hash is to run the strings command on some of the binaries or DLLs in your update package to search for strings in the file, like MD5 or SHA. If the hash is small, like d579793f, and CRC32 doesn’t seem to work, you’re probably looking at a custom hash.
In order to create a custom hash, you need to understand the algorithm used to create that hash, which will require digging in with a disassembler, such as IDA Pro, Hopper, or radare2, which is free. For instance, Listing 9-3 shows sample output from a custom CRC algorithm viewed in radare2:
| .------> 0x00400733 488b9568fff. mov rdx, [rbp-0x98]
|- fcn.0040077c 107
| ||| | 0x0040073a 488d855ffff. lea rax, [rbp-0xa1]
| ||| | 0x00400741 4889d1 mov rcx, rdx
| ||| | 0x00400744 ba01000000 mov edx, 0x1
| ||| | 0x00400749 be01000000 mov esi, 0x1
| ||| | 0x0040074e 4889c7 mov rdi, rax
| ||| | 0x00400751 e8dafdffff call sym.imp.fread
| ||| | sym.imp.fread()
| ||| | 0x00400756 8b9560ffffff mov edx, [rbp-0xa0]
| ||| | 0x0040075c 89d0 mov eax, edx ➊
| ||| | 0x0040075e c1e005 shl eax, 0x5 ➋
| ||| | 0x00400761 01c2 add edx, eax ➌
| ||| | 0x00400763 0fb6855ffff. movzx eax, byte [rbp-0xa1]
| ||| | 0x0040076a 0fbec0 movsx eax, al
| ||| | 0x0040076d 01d0 add eax, edx
| ||| | 0x0040076f 898560ffffff mov [rbp-0xa0], eax
| ||| | 0x00400775 838564fffff. add dword [rbp-0x9c], 0x1
| || ; CODE (CALL) XREF from 0x00400731 (fcn.0040066c)
| |`-----> 0x0040077c 8b8564ffffff mov eax, [rbp-0x9c]
| | | | 0x00400782 4863d0 movsxd rdx, eax
| | | | 0x00400785 488b45a0 mov rax, [rbp-0x60]
| | | | 0x00400789 4839c2 cmp rdx, rax
| `======< 0x0040078c 7ca5 jl 0x400733
Listing 9-3: Disassembly of a CRC checksum function in radare2
Unless you’re good at reading low-level assembler, this may be a bit much to start with, but here we go. The algorithm in Listing 9-3 reads in a byte at ➊, multiplies it by 5 at ➋, and then, at ➌, adds it to the hash to calculate the final sum. The rest of the assembly is mainly used by the read loop to process the binary file.
Apps and Plugins
Whether your goal is to perform firmware updates, create custom splash screens, or achieve other exploitation, you’ll often find that you can get the information you need to exploit or modify a vehicle by going after IVI applications rather than the IVI operating system itself. Some systems allow third-party applications to be installed on the IVI, often through an app store or a dealer-customized interface. For example, you’ll notice there’s usually a way for developers to sideload apps for testing. Modifying an existing plugin or creating your own can be a great way to execute code to further unlock a system. Because standards are still being written to define how applications should interface with the vehicle, every manufacturer is free to implement its own API and security models. These APIs are often ripe for abuse.
Identifying Vulnerabilities
Once you’ve found out how to update your system—whether by modifying the splash screen, company logo, warranty message, or other item—you’re ready to look for vulnerabilities in the system. Your choice of how to proceed will depend on your ultimate goal.
If you’re looking for existing vulnerabilities in the infotainment unit, the next step is to pull all the binaries off the IVI so you can analyze them. (This research is already covered in great detail in several books about reverse engineering, so I won’t go into detail here.) Check the versions of binaries and libraries on the system. Often, even in the case of map updates, the core OS is rarely updated, and there’s a good chance that an already identified vulnerability exists on the system. You may even find an existing Metasploit exploit for the system!
If your goal is, for example, to create a malicious update that wiretaps a vehicle’s Bluetooth driver, you have almost everything you need at this stage to do so. The only piece you may still need is the software development kit (SDK), which you use to compile the target system. Getting your hands on one will make your task much easier, although it’s still possible to create or modify a binary using a hex editor instead. Often the infotainment OS is built with a standard SDK, such as the Microsoft Auto Platform.
For example, consider a navigation system with certain protections designed to prevent a customer from using a DVD-R in the system. The manufacturer’s original idea was to charge owners $250 to purchase updated mapping DVDs, and they wanted to prevent people from simply copying someone else’s DVD.
In its attempt to prevent this type of sharing, the manufacturer added several DVD checks to the navigation system, as shown in the IDA display sample code in Figure 9-3. But say as a consumer you want to use a backup copy of your purchased DVD in your system rather than the original because your car gets really hot during the day and you don’t want the DVD to warp.
While an ordinary consumer isn’t likely to be able to bypass these DVD checks, it would be possible to locate the DVD checks and replace them with no-operation instructions (NOPs), which would make the checks literally do nothing. Then you could upload this modified version of the DVD check to your IVI and use your backup DVD for navigation.
NOTE
All the hacks mentioned so far can be done without removing the unit. However, you could dig even deeper by taking the unit out and going after the chips and memory directly, as discussed in Chapter 6.
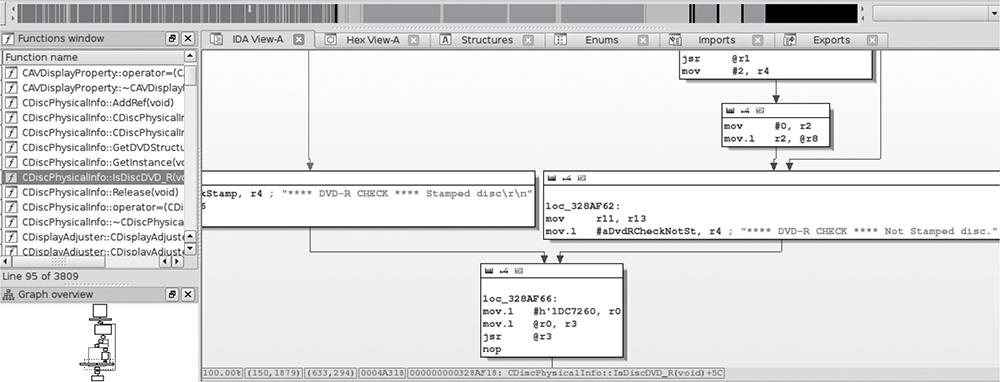
Figure 9-3: IDA view of DVD checks
Attacking the IVI Hardware
If you’re more comfortable attacking hardware than software and you’re able to remove the IVI from the target vehicle, you can go after the IVI system hardware instead. For that matter, if you’ve had no luck accessing the IVI system software, a hardware attack might provide additional insight that’ll help you find a way in. You’ll sometimes find that you can access system security keys by attacking the hardware when something like the update method mentioned earlier fails.
Dissecting the IVI Unit’s Connections
If you’re unable to gain access to a vehicle’s system through the update method discussed in the previous section, you can attack the IVI’s wiring and bus lines. Your first step will be to remove the IVI unit and then trace the wires back to the circuit board in order to identify its components and connections, like the ones shown in Figure 9-4.

Figure 9-4: Connector view of a double DIN IVI unit
When you take your IVI unit out, you’ll see a lot of wires because, unlike aftermarket radios, OEM units are heavily connected to the vehicle. The back metal panel on the IVI usually doubles as a heat sink, and each connector is often separated by its functionality. (Some vehicles keep the Bluetooth and cellular piece in another module, so if you’re looking to research a wireless exploit and the IVI unit doesn’t have this wireless module, continue looking for the telematics module.)
By tracing the actual wires or looking at a wiring diagram like the one shown in Figure 9-5, you can see that the Bluetooth module is actually a separate piece from the navigation unit (IVI). Notice in the diagram that the Bluetooth unit uses CAN (B-CAN) on pin 18. If you look at the navigation unit’s wiring diagram, you can see that instead of CAN, K-Line (pin 3) is directly attached to the IVI unit. (We discussed these protocols in Chapter 2.)
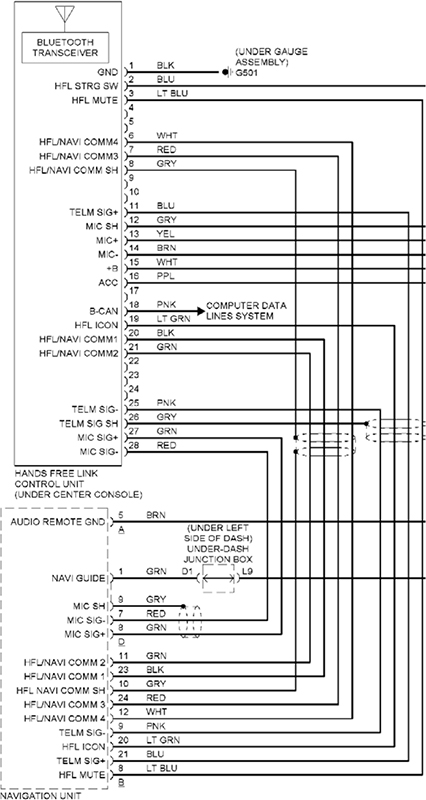
Figure 9-5: Hands-free wiring diagram
If you can determine whether your target is connected to a network bus, you’ll know just how much your exploit can control. At the very least, the bus directly connected to the target can be influenced by any code you put on the target system. For instance, in the wiring examples shown in Figure 9-5, a vulnerability in the Bluetooth module would give us direct CAN access; however, if we exploited the IVI’s navigation system, we’d need to use K-Line instead (see Figure 9-6). You can tell which network you have access to by looking at the wiring diagram in Figure 9-5 and seeing whether K-Line or CAN are connected to your target device. Which bus you’re on will affect your payload and what networked systems you’ll be able to influence directly.
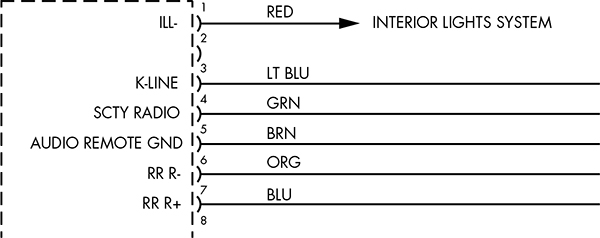
Figure 9-6: K-Line specified in the wiring diagram for the navigation unit
Disassembling the IVI Unit
If your goal is to directly attack the system hardware or if you don’t have a wiring diagram showing the connections to the entertainment unit, you’ll need to start taking the unit apart. Because IVI units are really compact and they bundle a lot of functionality into a small area, taking them apart means removing lots of screws and several layers of connected circuit boards. The disassembly task is time consuming and complicated and should probably be your last resort.
To begin disassembly, start by removing the case. Each unit comes apart differently, but typically you can remove the front and back plate screws and then work your way down from the top. Once inside, you’ll most likely find a circuit board like the one shown in Figure 9-7.
Although the print on the circuit board is a little hard to read, you’ll probably find that many of the pins are labeled. Pay close attention to any connectors that are attached to the circuit board but not connected or that are covered by the heat sink. You’ll often find that certain connectors used during the manufacturing process are left behind, disconnected on the circuit board. These can be a great way in to the IVI unit. For example, Figure 9-8 shows a hidden connector revealed once the back panel was removed on the target IVI.
Hidden connectors are a great place to start when going after a device’s firmware. These connectors often have methods to load and debug the firmware running on the systems, and they can also provide serial-style debugging interfaces that you can use to see what’s happening with the system. In particular, you should look for JTAG and UART interfaces.
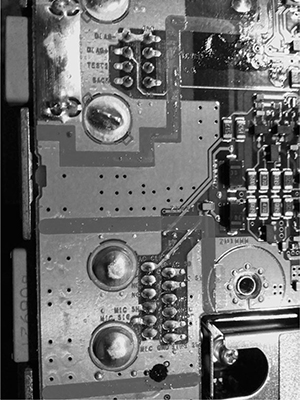
Figure 9-7: Many pins and connectors are labeled directly on the PCB.
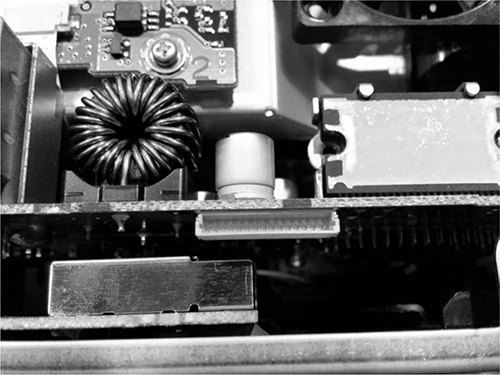
Figure 9-8: Nonexposed hidden connector
At this stage, you should start tracing the pins and looking at data sheets for the onboard chips. After a bit of sleuthing as to where these pins connect, you should have a better idea of what you’re dealing with and the intended purpose of this hidden connector. (See Chapter 8 for more on analyzing circuit boards and reverse engineering hardware.)
Infotainment Test Benches
Instead of tampering with your own factory-installed entertainment unit and risking damage, you can experiment with a test bench system, whether that’s one from a junkyard or an open source development platform. (Aftermarket radios aren’t a good choice because they don’t usually tie into the CAN bus network.) In this section, we’ll look at two open source entertainment systems that you can run in a VM on a PC, the GENIVI demo platform, and Automotive Grade, which requires an IVI.
GENIVI Meta-IVI
The GENIVI Alliance (http://www.genivi.org/) is an organization whose main objective is to drive the adoption of open source IVI software. Membership is paid, but you can download and participate in the GENIVI software projects for free. Membership, especially board-level membership, in GENIVI is very costly, but you can join the mailing list to participate in some of the development and discussions. The GENIVI system can be run directly on Linux with no need for an IVI. It’s basically a collection of components that you can use to build your own IVI.
In Figure 9-9, a high-level block diagram of the GENIVI system shows how the pieces fit together.
The GENIVI demo platform has some basic human-machine interface (HMI) functionality: the FSA PoC stands for fuel stop advisor proof-of-concept (proof of concept because certain of these apps aren’t used in production). The FSA is part of the navigation system and is designed to alert drivers if they are going to run out of fuel before reaching their destination. The Web browser and audio manager PoCs should be self-explanatory. Another component not shown in the figure is the navigation app. This app is powered by the open source Navit project (http://www.navit-project.org/) and uses a plugin for the freely licensed OpenStreetMap mapping software (https://www.openstreetmap.org/).
The GENIVI’s middleware components make up the core GENIVI operating system, and they’re discussed here in the order in which they appear in Figure 9-9 (persistency is excluded since there isn’t currently any documentation on this module):
Diagnostic log and trace (DLT) An AUTOSAR 4.0-compatible logging and tracing module. (Autosar is simply an automotive standards group; see https://www.autosar.org/.) Some features of the DLT can use TCP/IP, serial communications, or standard syslog.
Node state manager (NSM) Keeps track of the vehicle’s running state and is responsible for shutdown and for monitoring system health.
Node startup controller (NSC) Part of the NSM persistence. Handles all data stored on a hard drive or flash drive.
Audio manager daemon The audio hardware/software abstraction layer.
Audio manager plugins Part of the audio manager daemon.
Webkit Web browser engine.
Automotive message broker (AMB) Allows an application to access vehicle information from the CAN bus without having to know the specific CAN bus packet layouts. (The system you’re talking to must support OBD or AMB directly in order for this to work.)
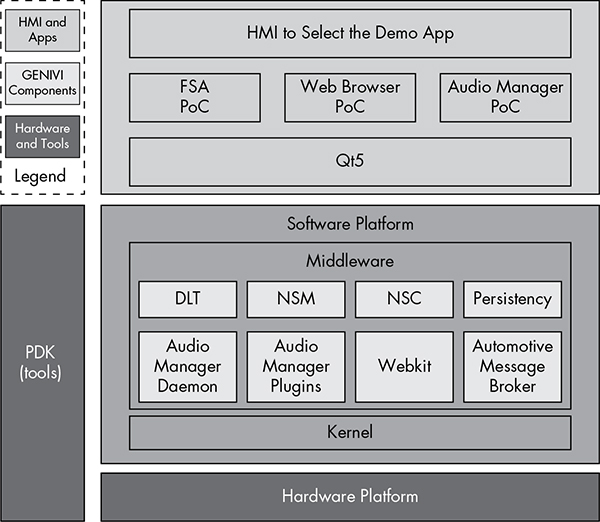
Figure 9-9: GENIVI software layout
Building the Environment
The easiest way to build the GENIVI system on Linux is to use a Docker image. First, grab the easy build like this:
$ git clone https://github.com/gmacario/easy-build
NOTE
This Docker image won’t work on the eCryptfs filesystem that Ubuntu uses on home directories, so make sure to download and follow these instructions outside your default home directory.
You’ll need Docker installed if you don’t already have it. On Ubuntu, this command is:
$ sudo apt-get install docker.io
Then, cd into the easy-build/build-yocto-genivi folder in your Home directory and run this:
$ sudo docker pull gmacario/build-yocto-genivi
$ sudo ./run.sh
Docker builds a little VM for you to work in, and running run.sh should put you in a root terminal environment in the Docker instance.
Now, finish the install by getting the rest of the GENIVI build and creating an image that you can use in the QEMU VM. Run the following commands:
# chmod a+w /dev/shm
# chown build.build ~build/shared
# su - build
$ export GENIVI=~/genivi-baseline
$ source $GENIVI/poky/oe-init-build-env ~/shared/my-genivi-build
$ export TOPDIR=$PWD
$ sh ~/configure_build.sh
$ cd $TOPDIR
$ bitbake -k intrepid-image
The output of the final bitbake command should look something like this:
Build Configuration:
BB_VERSION = "1.24.0"
BUILD_SYS = "x86_64-linux"
NATIVELSBSTRING = "Ubuntu-14.04"
TARGET_SYS = "i586-poky-linux"
MACHINE = "qemux86"
DISTRO = "poky-ivi-systemd"
DISTRO_VERSION = "7.0.2"
TUNE_FEATURES = "m32 i586"
TARGET_FPU = ""
meta
meta-yocto
meta-yocto-bsp = "(detachedfromdf87cb2):df87cb27efeaea1455f20692f9f1397c6fcab254"
meta-ivi
meta-ivi-bsp = "(detachedfrom7.0.2):54000a206e4df4d5a94db253d3cb8a9f79e4a0ae"
meta-oe = "(detachedfrom9efaed9):9efaed99125b1c4324663d9a1b2d3319c74e7278"
As of this writing, the build process errors out on fetching the Bluez package.
Remove the following file, and try bitbake again:
$ rm /home/build/genivi-baseline/meta-ivi/meta-ivi/recipes-connectivity/bluez5/bluez5_%.bbappend
Once everything is finished, you should have images in your tmp/deploy/ images/qemux86/ folder.
Now you’re ready to run your image in an emulator. For ARM emulation, run this:
$ $GENIVI/meta-ivi/scripts/runqemu horizon-image vexpressa9
For x86, use this command:
$ $GENIVI/poky/scripts/runqemu horizon-image qemux86
And this command is for x86-64:
$ $GENIVI/poky/scripts/runqemu horizon-image qemux86-x64
You should now be ready to research a GENIVI-based IVI system. As you’ve seen, the steps can be a bit daunting. The most difficult part of working on GENIVI is getting it up and running. Once you have a system to look at, you can pick any executable to begin your security audit.
Automotive Grade Linux
Automotive Grade Linux (AGL) is an IVI system that you can run on a physical IVI unit. Unlike GENIVI, AGL doesn’t have a costly board structure. AGL’s goals are similar to those of GENIVI: it’s trying to build an open source IVI unit as well as other related parts, such as telematics and instrument clusters.
As of this writing, you should be able to find a demo image of AGL for VMware (last released in 2013), installation instructions, and a bootable USB version for x86 at the AGL website (http://automotivelinux.org/). These images are designed to run on in-vehicle computer hardware, like the Nexcom VTC-1000, a headless Linux device that comes with CAN and touchscreens. Unlike the GENIVI project, the AGL demonstration images are mainly designed and tested to run on hardware, although it may be possible to run some development images in a VM.
As you can see in Figure 9-10, the AGL demonstration image has a very pretty interface, but don’t expect all applications to run smoothly, as many are simply placeholders that are actively being built. Because AGL is normally tested on physical hardware, you’ll have to spend around $1,000 to get the hardware necessary to install AGL smoothly. It’s also possible to get an image to run on a QEMU VM as well. (One nice thing about buying a development IVI is that you can program it to work with any vehicle.)
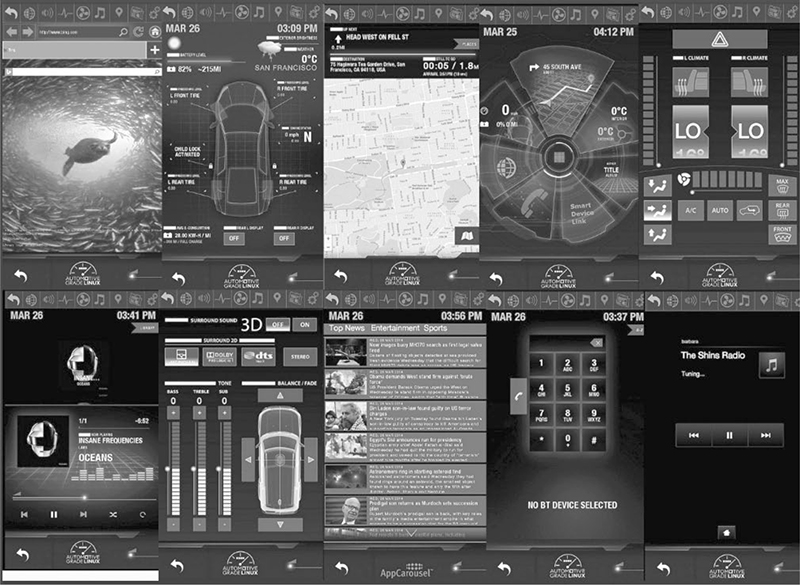
Figure 9-10: Automotive Grade Linux sample screens
Acquiring an OEM IVI for Testing
If you decide to run a physical IVI unit for testing, you’ll have to either pull a factory (OEM) IVI system from an existing vehicle or buy a development IVI, such as the Nexcom VTC-1000 or a model like those referenced in the Tizen hardware compatibility list (https://wiki.tizen.org/wiki/IVI/IVI_Platforms).
If you choose to go the OEM factory-installed route, you can buy one from the dealership or pull one from a junkyard. Development and OEM IVI units purchased directly from a dealership will typically run from $800 to $2,000, so it’s much more cost-effective to pull one from a junkyard, though it may be difficult to find your target high-end IVI system. You can also buy non-OEM aftermarket units, such as Kenwood or Pioneer, which—while often cheaper—typically won’t tie into a vehicle’s CAN system.
Unfortunately, pulling a radio out of a modern vehicle without destroying it isn’t an easy task. You’ll often need to remove the plastic around the gauge cluster on the dashboard and the plastic around the radio before you can remove the radio from its harness. If you run into an antitheft security code for the radio, check the owner’s manual for the code, if you’re lucky enough to find that. If you can’t find the code, be sure to grab the VIN from the donor vehicle because you might need it to get or reset the antitheft PIN. (If you grabbed the ECU from the vehicle, remember you can query that to get the VIN as well.)
You’ll need to refer to the wiring diagram for your IVI system in order to get it to start on its own, but you can leave out most of the wires that you’re not testing. If you’re building an OEM-based unit, it may be worth your while to completely disassemble the unit and to connect any test connectors so that you’ll not only have the normal IVI system running but also be able to access any of the hidden connectors.
Summary
You should now be comfortable analyzing your existing radio system. We’ve covered how to safely work in a VM or test environment to find vulnerabilities in IVI systems. These systems hold a lot of code and are the most powerful electronic systems in a vehicle. Mastery of the IVI units will give you full control of your target, and there’s no part of a vehicle with a greater concentration of attack surface than the IVI system. When performing security research, an IVI and telematics system will provide you with the most valuable vulnerabilities, and you’ll find that the vulnerabilities found in these systems will often be remote or wireless and directly connected to the vehicle’s bus lines.