Close Up Photography in Nature (2014)
5
The Power of Flash
Our close-up subjects can be illuminated by many natural light sources, but modifying those sources with flash is nearly always effective at dramatically improving the photographic lighting situation. The qualities of the light on the subject are such major contributors to the quality of our images that flash augmentation can be an enormous benefit to most of our close-up images. This happy situation is generally not found in landscape photography because of the size and distance of the usual subjects, but all accomplished close-up and macro shooters must master the art and science of mixing flash with various natural light sources
AMBIENT LIGHT DEFINED
We’ll frequently use the term ambient light, so let’s make sure we’re all on the same page when we write about it. Ambient light is sometimes called natural light or available light. I often get a chuckle from that last term, as I’ve never yet been able to make an image with unavailable light! Ambient light refers to the light that illuminates the subject, but not supplied by the photographer. It might arise from the bright sun, from overcast clouds, from a streetlight, from a lamp in a room, a moonlit sky, and so on. Moreover, it is often some combination of more than one source. Flash, however, is a light source introduced by the photographer.
ADVANTAGES OF FLASH
Close-up photographers accused of flashing are generally found innocent when even the judge comes to appreciate the splendid quality of light, the ease of creative control, and the remarkable improvement in close-up images that the modern flash can offer. The court will generally advise those close-up photographers only to keep their flash batteries well charged, to use their flashes often, and to read this book carefully and frequently.
Oh, while I think of it, we’ll be using the term flash two ways. One refers to a burst of light and the other refers to the hardware gizmos that generate that light. The photography literature over the years has used terms like flashgun, speedlight, and strobe-lite, and undoubtedly a few more, but not to worry, it’s all the same thing. We’ll stay consistent with much of the world and use the term flash for both the light and the hardware, relying on context to reveal the meaning.
One quality of the light emitted by a flash is its color. It’s generally the color of mid-day sunlight, although we might sometimes creatively change it with colored filters. We describe the color of light by its color temperature. Another quality of the light on our subject is its direction, and our typical flashes are small and easily directed as we wish. Some of today’s flashes offer a zoom feature to allow control of the width of the beam of light.
APPLICATIONS OF FLASH IN CLOSE-UP PHOTOGRAPHY
FILL-FLASH TO REDUCE CONTRAST
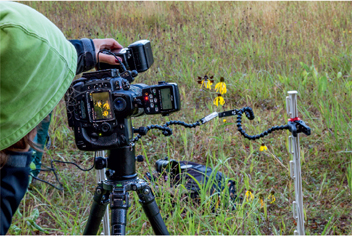
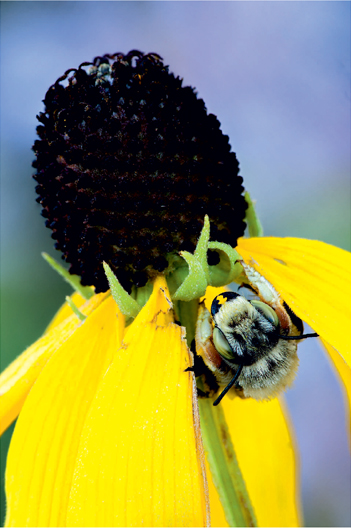
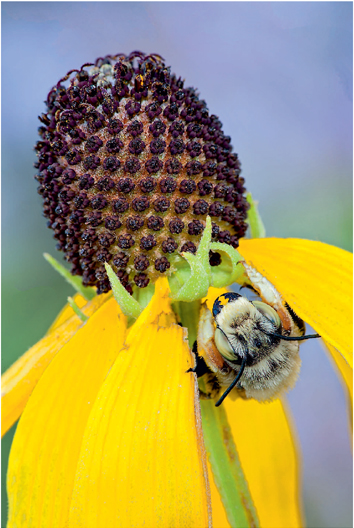
Barbara is carefully watching the Live View display to make sure this Common Whitetail Dragonfly is perfectly still when she fires the camera. Canon 7D, 24-70mm lens at 60mm, 1/2, f/20, ISO 100, Cloudy, fill-flash.
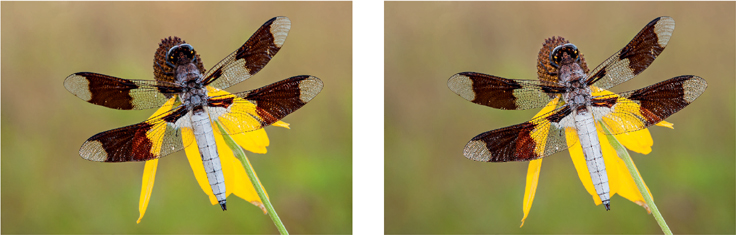
The Common Whitetail in part b makes a fine image, but no flash is used. In part c, a little fill-flash adds some sparkle to the wings, opens up some shadows, and brightens the white abdomen. Nikon D3, 200mm, 1/2.5, f/22, ISO 200, Cloudy, fill-flash.
Fill-flash is the term used when a correct exposure is achieved by the ambient light, but we add additional light to the dark areas (shadow areas) of the subject. By augmenting the ambient light with flash, we reduce the overall contrast of the subject and capture greater detail throughout the image. Fill-flash is the most common use of flash in close-up photography.
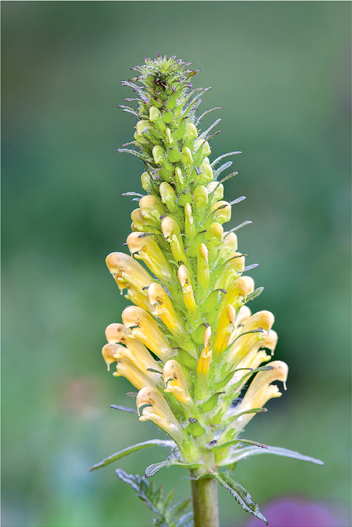
This lovely wildflower is saddled with a terrible name—Bracted Lousewort. This is a fine natural light version of it, but the yellow flowers blend into the light green background too much. Canon 5D Mark III, 180mm, 1/2, f/10, ISO 100, Cloudy.
FILL-FLASH TO IMPROVE COLOR
Consider a wildflower growing in a green forest. The ambient light has two colorcasts—the blue light from the sky and the green light reflected from the leaves on the trees. This is a photographically unpalatable witch’s brew of light, but a strong flash burst, having the color of sunlight, can reduce or even overcome the undesirable colorcasts. And although we can make some colorcast corrections in post-capture editing, it’s hard to do with mixed light and generally best to get it right in the camera.
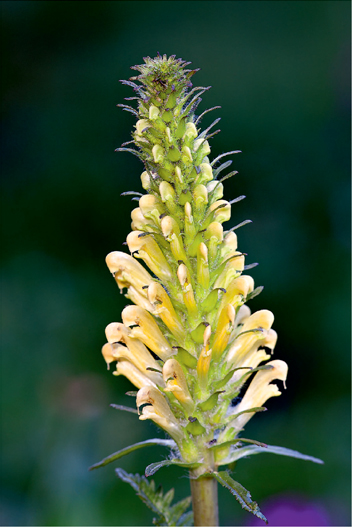
The natural light is underexposed 1 stop by increasing the shutter speed to 1/4 second. This darkened both the flower and the background. Main flash is used to properly expose the yellow flower while the background remains 1 stop darker. Canon 5D Mark III, 180mm, 1/4, f/10, ISO 100, Cloudy.
MAIN FLASH
Fill-flash is used when the basic exposure is by ambient light, and flash is applied only to open up the shadows. The exposure would be correct even without using the flash! We’ve already said that, but it’s important enough to repeat. Now, let’s discuss using flash as the main light, or as it is sometimes called, the key light. Here, the basic exposure is via the flash, and it’s the ambient light that serves to fill in the subject’s shadow areas. The image would be underexposed without using the flash! When the flash is used as the main light, it is easy to darken the background a little to make the subject more prominent in the image. If the light is too low in contrast, main flash is the key to increasing the contrast, especially when the flash is used to side light or back light it. Main flash is an incredibly valuable technique largely unknown among close-up nature photographers, and it’s a goal of this book to shed some light on the subject.
BALANCED FLASH
This occurs when flash is used to light a portion of the image, usually the foreground and not the background, though the reverse is also possible. Ambient light is used to light the other portion of the image.
Contemplate a dew-laden dragonfly sleeping on a wildflower in dim shade, but having a green meadow or blue sky background brightly illuminated by sunlight. A very contrasty subject—so much so that our camera is unable to record detail in both shadow and highlight areas. Here’s a technique: Set an exposure that will result in the background being as you wish it, and then use your flash and the flash exposure compensation (FEC) control to properly expose the dragonfly roosting on the flower. The background is entirely exposed by the ambient light, and the dragonfly is exposed mostly by the flash.
The reverse happens, too. Photograph an uncommon white Indian Paintbrush wildflower. Two feet behind the white flower are normal deep magenta Paintbrush flowers. When the white flower is optimally exposed, the dark maroon flowers behind it appear too dark in the image. Put a wireless flash near the magenta flowers to properly expose them with the flash by adjusting the flash exposure compensation control (FEC). The white flower in the foreground is nicely exposed with ambient light. The background flowers are nicely exposed with some ambient light and much more light from the flash. Now the white flower and the dark flowers behind it are all nicely exposed. You capture plenty of detail because the contrast in the light between the foreground and background is much less. The flash balances the darker background with the light foreground flower.
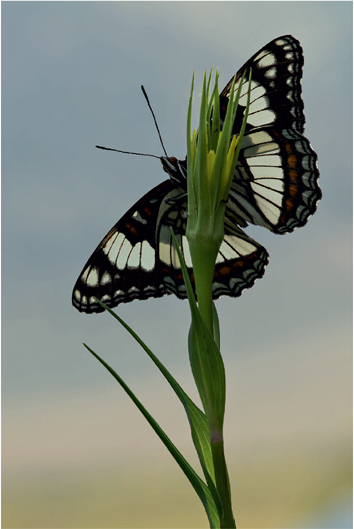
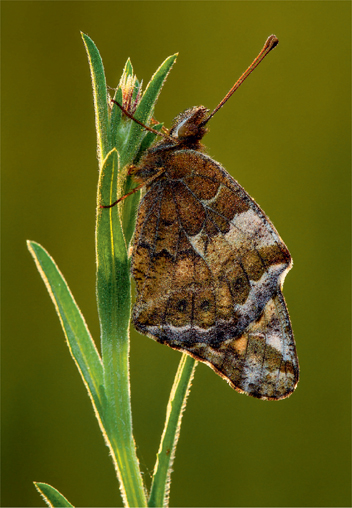
We like the gray clouds behind this Weidemeyer’s Admiral and the view from underneath the butterfly, but the light is too dim underneath it. Nikon D4, 200mm, 1/20, f/22, ISO 200, Cloudy.
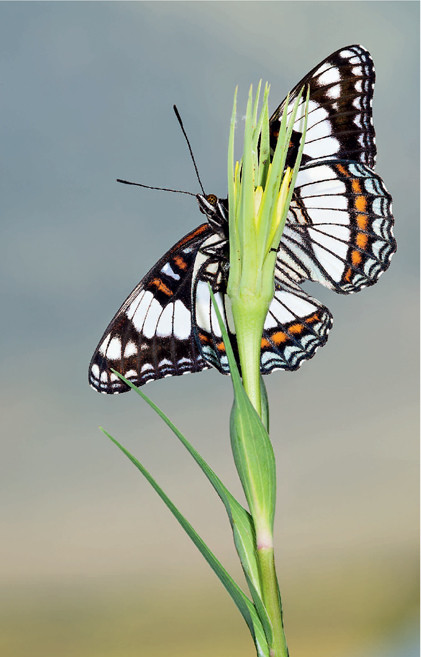
A Nikon SB-800 flash effectively adds light to the butterfly to better highlight it against the gray sky. This is an example of balanced flash where the background is nicely exposed with ambient light only and the dark butterfly is well exposed primarily with flash to balance out the huge difference in the ambient light on the subject and the background. Nikon D4, 200mm, 1/20, f/22, ISO 200, Cloudy, one flash with +.7 FEC.
FILL-FLASH, MAIN FLASH, AND BALANCED FLASH
Many of our workshop students confuse these terms. If they’re new to you, be certain to read the descriptions above until you fully understand the three uses of flash. Remember that the ambient light is the primary light with fill-flash and the light from the flash is the weaker or secondary light. Main flash is the opposite. When using main flash, the flash is the primary light and the ambient light serves as the fill light. Balanced flash means one portion of the image is illuminated with flash and the rest is lit with ambient light. Generally, flash and ambient light are not used to light the same area in the image.
FREEZE CAMERA AND SUBJECT MOVEMENT
It’s probably safe to assume that your flash system doesn’t use magnesium flash powder and, luckily, modern electronic flash guns have adjustable output. Note, though, that the light output is not controlled by changing its intensity, it’s controlled by changing the length of time—the duration—of the light burst. When used in automatic modes, the duration of a modern flash may range from about 1/1000 of a second all the way down to about 1/27,000 of a second. The shorter the flash duration, the greater the likelihood of freezing the motions of the camera and the subject and getting a sharp image. But where we do encounter subject or camera movement, we must be careful about ghost images in balancing flash and shutter speed. Suppose we’re using a shutter speed of 1/60 second and suppose the light, the ISO, and the aperture all allow discernable exposure. When the shutter opens, the flash fires, but it may be gone in 1/1000 of a second. That short burst of light renders a sharp image on the sensor, but if the shutter stays open for the full 1/60 second, there will be additional exposure of the subject from the ambient light. Should the subject or camera move after the flash has extinguished but before the shutter closes, we get the ghost image. The secret is to use a fast enough shutter speed to eliminate exposure by the ambient light and let the flash do the work!
HOW THE FLASH WORKS
You don’t need to know the intricacies of the internal workings of a flash, but knowing a few tidbits might be helpful. The key components are the battery, the voltage converter, the storage capacitor, and the flash tube. Some flashes can operate from household power, but most operate from batteries. Either way, the voltage converter changes the low voltage of the batteries or the house power up to a much higher voltage, maybe around 300 volts or even more. Electrical energy at that higher voltage is stored in the capacitor awaiting a signal to fire the flash. When the camera, or the operator, gives the signal, the stored energy flows out of the capacitor and into a glass tube filled with xenon gas. The ignited gas causes the brilliant flash of light that we want! Once the gas has been ignited, we cannot control the intensity of its light, but we can control the duration of the light by electrically extinguishing the ignited gas.
BATTERY TIPS
The recycle time of a flash is the time necessary to recharge the capacitor and illuminate its ready-light, showing it’s able to make another flash. Recycle times may vary from a fraction of a second to several seconds, but like recovery from a nasty cold, the faster the better. Well-charged batteries help lower recycle times. We find good quality and well-charged rechargeable batteries do the job best.
Rechargeable batteries cost more initially but amortize well over the long term and avoid the toxic waste of disposal of one time only use batteries. The rechargeable batteries that work well for us include Eneloop, Powerex, and Sanyo 2700. We make it a habit to recharge them after each photo session and immediately before beginning another photo session.
SYNCHRONIZATION (SYNC) SPEED
The sync speed of a camera is the fastest shutter speed that will allow proper exposure by the flash. In virtually all of our modern DSLR cameras, shutter operation involves a movement of two shutter curtains best described separately for slower (lower) shutter speeds and faster (higher) shutter speeds.
At slower shutter speeds, the first curtain opens, allowing light to hit the sensor, and then the second curtain covers the sensor, shutting off the light. The short time when the first curtain is fully open but the second hasn’t yet begun to close is our opportunity to fire a flash and expose the entire sensor.
At faster shutter speeds, the first curtain starts moving, but before it fully opens, the second curtain begins following it. The effect is that of a traveling slit, which does expose the whole sensor with continuous ambient light, but not all at once. There’s no one time when the entire sensor can be seen by the incoming light and hence no one time we can fire a flash that exposes the entire sensor.
The maximum shutter speed at which we can fire a flash and expose the entire sensor is called the synchronization speed, or sync speed, sometimes called the x-sync speed. Depending on the camera, it’s generally between 1/200 second and 1/320 second. If we use a conventional flash at any higher shutter speed, part of our image will not see the flash and will be underexposed. The sync speed itself and all slower speeds will be okay.
You can find your camera’s sync speed from the manual. Most of today’s clever cameras are smart enough to somehow warn you if you attempt to use a pop-up or hotshoe mounted flash at shutter speeds above the sync speed. Indeed, the camera may do more than warn you. Typically, the camera will automatically change the shutter speed to the sync speed. This does not mean it is impossible to accidently shoot with a shutter speed faster than sync speed. If you attach a simple PC cord to the flash and the camera, the camera will fire the flash without knowing it is there and you can certainly shoot faster than the sync speed. Of course, depending on the shutter speed, only a portion of the image will be exposed and the rest remains unexposed.
HIGH-SPEED SYNC
Having so carefully explained why you can’t use a shutter speed above the camera’s sync speed, let me explain how this sometimes isn’t true. It’s probably part of a vast worldwide conspiracy to make me look foolish—not hard to do. Remember the traveling slit of faster shutter speeds? If your camera offers a high-speed sync mode, the clever camera breaks up the flash burst into several shorter duration bursts and fires them sequentially as the slit travels across the sensor. The good news is that all segments of the sensor receive light from the flash. The bad news is that the capacitor energy is not applied to a single flash burst, but is dissipated in multiple short bursts, each of lesser energy than the full flash, so the effective exposing power of the flash is reduced. In other words, the flash is considerably weaker, perhaps 2 or more stops, and the subject must be much closer to expose properly.
High-speed sync is a wonderful feature when you must, absolutely must, shoot with a fast shutter speed, but luckily that’s pretty rare in close-up photography. When handholding at large apertures (f/2.8 or f/4.0) in bright sun, it could be pretty handy.
FLASH BASICS
POP-UP FLASH
Many cameras offer a convenient pop-up flash built into the top of the camera. Pop-ups have their uses, but close-up photography isn’t one of them. Here’s a laundry list of why you shouldn’t illuminate your close-up subjects with the popup flash:
✵The flash, being very small, emits a harsh light generally not very flattering to the subject.
✵The pop-up flash is relatively weak and often can’ adequately illuminate a distant background.
✵The mounting location occasionally causes part of the flash beam to be obscured by lenses and lens hoods, throwing a dark shadow on the subject.
✵The direction of the light is in a straight line from camera to subject with no side light component, thus masking texture, detail, and shape.
✵Adding back light to the close-up subject is usually incredibly effective, but not possible with a flash mounted on the camera.
This Wine Cup blossom will soon be fully opened. Using a shallow depth-of-field to completely throw the background out of focus, and a weak fill-flash to open up the shadows a little, Barbara uses high-speed sync to allow the flash to work with a shutter speed that is higher than the sync speed for the camera. Shooting with big apertures (f/2.8 to f/5.6) while using flash will often require the use of high-speed sync because the shutter speed is fast. Nikon D3, 200mm, 1/320, f/5, ISO 200, Cloudy, Manual exposure for the ambient and automatic flash for the fill-flash.
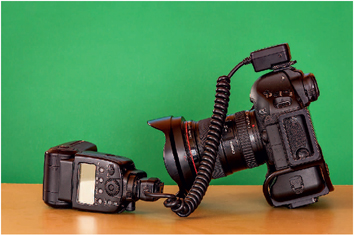
Using the flash off the camera is crucial in close-up photography. The pop-up flash on many cameras can be set to send signals to a Remote (Slave) flash, allowing wireless control of the flash. It works well!
On the other hand, some pop-up flashes can be effectively used in a Commander or Master mode. The pop-up flash is not used to illuminate the subject, but is used just to transmit commands from the camera to Remote flashes being used off-camera. Note: Some setups allow the pop-up flash to transmit the commands to the Remote flash and contribute light to the subject simultaneously.
OFF-CAMERA FLASH
Many benefits accrue when the flash is not mounted on the camera, but instead is used remotely. Old-fashioned manual techniques such as PC cords and photoelectric slaves still work for firing Remote flashes, but they’re cumbersome and thoroughly made obsolete by modern dedicated flash systems that provide camera and flash intercommunication via infrared beams of light, light pulses, or radio. We’ll describe some of the available choices.
DEDICATED FLASH CABLES
The least expensive camera-to-flash communications path is via a dedicated cable connecting the camera to the flash. Cables come in various lengths including stretchable curly cords, with connectors appropriate to the camera and flash for which they’re designed. At the camera end they connect to the camera hotshoe. These cables preserve the same communications systems as if the flash were mounted directly on the camera’s hotshoe. For example, a Canon 430 EX II or 580 EX II flash can be connected to any Canon EOS camera with an OC-E3 (Off-Camera Shoe Cord) for about $70. Nikon users can use an SC-28 or SC-29, or their predecessor, the SC-17. When buying flash cables, be careful to verify that your selection is compatible with your camera and flash. Cables offered by your camera’s manufacturer ensure compatibility.
Dedicated flash cables are troublesome when using the flash as the main light and you need a longer cable to reach the subject areas needing illumination. Trying to stretch the cable, especially in cold weather, can pull on the camera causing blurred subjects, or worse, toppling it over. A work-around, sometimes, is to join two or more cables to attain additional length. Cables are better in fill-flash applications where the flash is closer to the lens/subject axis, and so the typical 3 foot cable length is more than adequate.
Using a dedicated cord to connect the flash to the camera does work. However, the limitations include: it only works with one flash at a time, the cord may not be long enough for back lighting, the cord may accidently touch the subject and ruin the image, you have to buy the flash cable and carry it with you, and it takes time to connect it to both the camera and the flash.
One downside to using cables for a Remote flash with a tripod-mounted camera is the awkwardness of moving it all when changing composition. One never has quite enough hands to manage the camera, the tripod, and one or more Remote flashes. You can’t put the flash in your pocket easily without disconnecting the cable and then reconnecting it later. I suppose you can let one dangle from the tripod, but none of these is a good solution. The best setup is to scrap the dedicated cable and use a sophisticated wireless control of the Remote flash. That’s what Barbara and I use. To move our gear when recomposing, we quickly tuck the flash into our pocket, and with both hands unencumbered, we’re unhampered by an entangling cable.
Dedicated flash cables provide an inexpensive means of controlling Remote flashes, but it’s far more convenient to use either an infrared optical link, a radio link, or some other wireless signal. If you already have one or more cables, certainly keep them as a guard against failure of your more sophisticated control system or its batteries suddenly dying.
WIRELESS FLASH
It was new technology only a few years ago, but every camera system we’ve recently seen includes a wireless flash capability. These systems work amazingly well and greatly simplify the formerly arcane flash techniques so much that practically all camera makers offer them. It is in your best interest to use them!
TERMINOLOGY
When a pop-up flash or a flash mounted in the hotshoe is used to control other flashes, some maker-specific terminology comes into play. The flash doing the controlling is called the Commander by Nikon and flashes being controlled are called Remotes. For the same items, Canon refers to Master and Slaves. We’ve always thought the Canon terms are uncomfortable, but we do use them to avoid confusing our many Canon-bearing students. We much prefer Nikon’s Commander and Remote nomenclature, and we’d be pleased if all camera makers were to adopt it.
PROGRAM THE POP-UP FLASH
If your camera has a pop-up flash that can be used as a Commander flash, or Master flash, this choice is selected somewhere in the camera’s menu system. The feature implicitly requires that the Remote or Slave flashes are of the same system, that is, a compatible Nikon flash for use with Nikon Commander pop-up flashes and a compatible Canon flash for use with Canon Master pop-up flashes. Other camera makers use similar systems.
When a pop-up flash is programmed as a controller, it generally outputs only enough light to communicate with its Remote units, and not enough light to illuminate the subject. However, there are systems that can configure the pop-up to do both simultaneously. Beware! If you program the pop-up flash to transmit signals to a Remote flash and forget later you have done that, you may run into a confusing problem. If you later decide to use the pop-up flash to light the subject, it may fire a burst of light, but nothing is illuminated. If this happens, immediately check to see if the pop-up flash is still set to the Commander or Master selection. Choose the default setting for the pop-up flash and it should work as expected.
DEDICATED FLASH CONTROLLER
What if your camera has no pop-up flash? Canon has offered its $225.00 ST-E2 Speedlite Transmitter for many years. It’s an optical device that communicates with other Canon flashes and usually mounts to the camera’s hotshoe, although it can be mounted remotely and connected by a dedicated flash cable. I’ve done that myself when shooting with my 500mm lens peeping out through an opening in a wildlife blind. I found that the ST-E2 mounted on the camera inside the blind had no optical path to the Remote flashes outside the blind and would not fire the Remote flashes. I solved the problem by using a dedicated flash cable to reposition the ST-E2 from the camera hotshoe to a new position duct-taped to the lens hood that was outside the blind. There, the ST-E2 easily communicated with the Remote flashes. Nikon’s equally effective optical flash controller is the $250.00 SU-800 Commander.
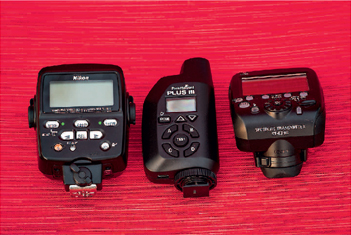
Wireless flash control systems are by far the most convenient way to use flash. Many systems are available. Pictured here from left to right are the Nikon Wireless Speedlight Commander SU-800, PocketWizard Plus III (two are needed), and the Canon Speedlite Transmitter ST-E3-RT.
The flash controllers we use offer more than one channel on which the communications occur. It’s an important feature. I once advised a group of students to purchase Canon 580II EX flashes and ST-E2 controllers preparatory to a workshop. During the workshop, I overheard three students excitedly talking about flash problems, and I discovered that each of them was experiencing seemingly random flashes not triggered by the student. In fact, I caught one student curiously staring into his flash wondering what was wrong. My shouted warning came just a wee bit too late to save him from a full-face blast of light. It turned out, of course, that all three students had set their systems to use Channel #1, and whenever one student pushed the shutter button, all three of their flashes fired. It didn’t take long to change each student’s equipment to a different channel. Their ST-E2 controllers offer four selectable channels, so it’s a good thing that we didn’t have five shooters in that group!
USING THE FLASH AS A CONTROLLER
The Canon 580EX II and the Nikon SB-910, and others of today’s more advanced flashes, can be configured to serve either as a Remote flash or as a Commander. Then, using it as a Commander, compatible flashes can be set to supply additional light in multi-light applications. Most non-pop-up flashes used as Commanders can be programmed to emit light to help with the exposure when it is desirable.
OPTICAL COMMUNICATIONS
Both Nikon and Canon systems provide control of Remote flashes by short pulses of light sent by the controllers. They are sent just before the main burst of light intended to illuminate the subject. They happen so fast that you can’t discern them by eye. Commander or Master controllers can easily manage several Remote flashes at once, up to about 30 feet away, but there must be an unobstructed line-of-sight path between them. For most photographers, optical communications are reliable and relatively inexpensive. Barb and I have regularly used these systems for years.
THIRD-PARTY RADIO CONTROLS
As we’ve noted, the optical flash-control systems have shortcomings in range and in line-of-sight requirements, but both shortcomings are overcome by radio-based control systems. A small radio transmitter-receiver is mounted on the camera or connected by cable, and it communicates via radio with other transmitter-receivers located at the Remote flashes. These systems are reliable and feature a long range of 100 yards or more. They have no line-of-sight requirement and happily communicate around corners and while inside nonmetallic enclosures.
Several companies offer radio-based flash control systems, but perhaps the best known system is the highly reputed PocketWizard. It and its competition are relatively expensive, but they’re widely used by serious photographers. I’ve used them only rarely myself because I’ve owned and relied on the ST-E2 for many years. That notwithstanding, one of my students wanted to place a flash behind the water of Scott Falls, a small Michigan waterfall, to backlight the water. He could never make it work with optical flash control because of the distance involved and because the falling water heavily attenuated the optical signal from the optical controller. The PocketWizard’s radio signal did the job just fine!
But buyer beware! Online auction sites offer many radio control systems at small fractions of the price of “serious equipment.” Generally, these controls do a bare bones firing of a Remote flash without permitting through-the-lens (TTL) metering of the flash and without permitting any control over the output of the Remote flashes. Since TTL metering is essential for close-up photography, if you plan to buy an inexpensive system, be sure to understand its limitations.
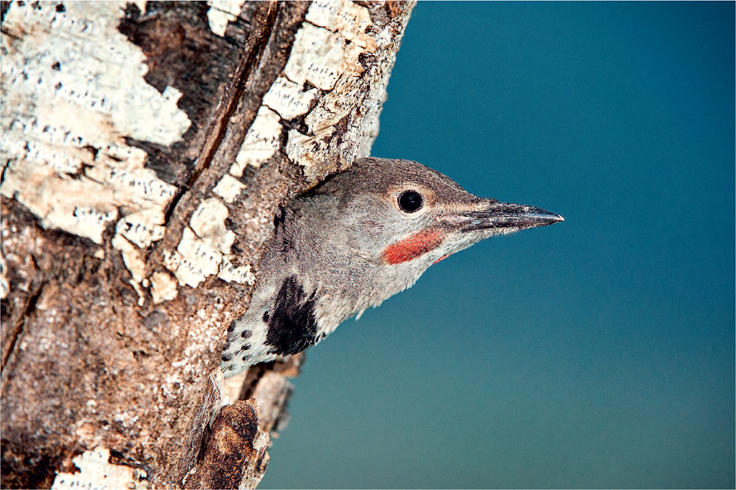
Most wireless flash controllers use optical signals to control the Remote flash. These usually work fine, but the signal can be blocked by an object, so line-of-sight between the transmitter and the flash is important. When using a photo blind to photograph this Common Flicker, optical controllers may not work because the blind material blocks the signal. Fortunately, radio controllers are available for such situations. The Canon ST-E3-RT sends radio signals (it cannot send optical signals) which makes it terrific for blind work when used with the new Canon 600EX-RT speedlite. Canon 5D Mark III, 500mm with 25mm extension tube, 1/200, f/9, ISO 200, Flash WB, Manual exposure for the ambient light and automatic flash for the bird, Canon ST-E3-RT radio controller with the Canon 600EX-RT speedlite.
RADIO TRANSMISSION
Radio controllers work beautifully over long distances and independent of line-of-sight. Nonetheless, I’ve encountered a problem with radio-based flash controllers. I was using the Canon system for close-ups of butterflies. My system comprised the 600EX-RT flash and the ST-E3-RT flash controller, both recently introduced. It all worked gratifyingly well—perhaps too well. Why too well? Because it always worked! When I needed to inhibit the flash to shoot an ambient light only image for comparison with the flash image, I couldn’t just hold my hand over the controller, put it behind my back, or stuff it into my pocket. The silly thing just unabashedly kept on firing its Remote. To disable it, I had to either turn the controller off or the flash off. You may think that’s a pretty feeble objection, but to Barb and me, efficiency is everything. Having to turn the flash on and off 122 times during a close-up photo session is monotonous and tiring. For this reason, we prefer optical systems for close-up photography so we can easily block the wireless signal with our bodies whenever we want to.
However, shortly before sending this manuscript to the publisher, I discovered the release button (REL) on my new Canon 600 flash. Pressing the REL button on the flash fires the camera with a radio signal. This enormous convenience makes it worthwhile to use the radio-controlled flash.
CLOSE-UP FLASH TECHNIQUES
Yuck! Did I really make that horrible image? Have you occasionally asked that question? All too many photographers shun flash photography because of the many ugly images they’ve shot in the past or that they’ve seen made by others. More often than not, the “yuckiest” of flash shots can be traced to a single flash used as the sole light source and a resultant high-contrast image with a black background. If one adjusts exposure settings to properly expose a flash-illuminated full-frame flower, it’s not uncommon that the background, assuming it’s a couple feet or more away, will be a few stops underexposed and be black. Readily accepted by the nature photographers of forty years ago, such images are today widely considered passé.
There are several ways to avoid the pitfall. One way is to use additional flashes, so that one flash illuminates the close-up subject, perhaps our delicate flower, and another flash (or flashes) illuminates the flower’s background. A simpler way is to shoot with a mix of ambient light and flash. It sounds complicated, but it’s not. That last sentence reminds me of a friend who is helping edit this book. Al often intones Hart’s Law of Photography, a maxim stating that nothing in photography is especially complicated—photography is made up of very simple things—you just have to remember a million (okay, plenty) of them! He’s certainly right in this case—it really isn’t complicated. Years ago, before itsy-bitsy microcomputers infested our photo gear like ants at a picnic, yes it was awkward. Nowadays, though, automatic flash control and regular reliance on the RGB histogram, highlight alerts, and image preview make the mixing of ambient light and flash the proverbial piece of cake. Let’s take a look at just how to do it.
SET THE AMBIENT LIGHT EXPOSURE FIRST
The secret (now unclassified) of a good mix of ambient light and flash light is to first decide the part to be played by the ambient light. Let’s say we are relying on it to light the background. Do we want the background to be normally exposed, that is to say, of about the same brightness as the foreground flower will be? Do we want the background to be slightly subdued, say a stop or so underexposed? Do we want it 2 stops underexposed? Upon answering that question, we merely (1) meter our scene and set an exposure for the desired background and (2) rely on through-the-lens flash metering and the flash exposure compensation control (FEC) to set the flash to properly expose our flower. Not to worry—we’ll be expanding on how to do this.
SHOOT ON A TRIPOD
It has often been written that the most important accessory a photographer can own is a good tripod. Good in this case should preclude the $29 garage sale bargain. Be prepared for a significant expenditure. But a good tripod is well worth it. Professional photographers in the close-up world very strongly appreciate the indispensable nature of a sturdy tripod. Some spend nearly as much for their tripod and its head as they do for their camera! All too many shooters think of the tripod solely as a means to hold the camera steady, and so it does. But they may not appreciate the vastly greater importance of camera steadiness when doing macro photography. At higher magnification, any camera movement causes the subject to shimmer over a larger portion of the sensor and significantly reduces image sharpness. Moreover, beyond camera support and steadiness, the tripod frees up your hands for holding a flash, tripping the shutter, blocking light from viewfinder ingress, and holding your hat to shield the lens from sunlight.
But, and here’s one great big but! (I can say that if I use only one “t”.) Maybe every bit as important, or even more so, is the ability of the tripod to give you time to carefully study your image. When you’re handholding, there’s a natural inclination to push the button right now and be finished with it. With the camera on a tripod, you can be perfectly comfortable in taking time to study your composition, to be sure half your butterfly’s wing is not out of the frame, to ensure no ugly brown leaf is intruding into the image, to check whether changing the camera angle a little would improve the image, and on and on. Having unhurried time to do a little composition study can vastly improve your images. It’s an extremely important feature of tripod use!
SPECIFIC FLASH TECHNIQUES
FILL-FLASH PROCEDURES
The most common use of flash in close-up photography is for fill purposes. Even in heavily diffused light such as that which is present on a heavily overcast day, one can find objectionable shadows in a close-up subject. Sometimes these shadows can be satisfactorily reduced or even eliminated by judicious placement of one of those often puzzling springy little fold-up reflectors, but it’s generally much easier just to point a flash at the offending shadows. The flash successfully adds light to the shadows and lowers the subject contrast. Let’s describe two of the most effective ways to mix ambient and flash illumination.
MANUAL EXPOSURE FOR THE AMBIENT LIGHT AND USE OF FILL-FLASH
First, set up a proper exposure for only the ambient light. Let’s say your subject needs considerable depth-of-field, so set your aperture to f/16 or f/18. If not already there, set your ISO to the setting of best image quality, that is, the native ISO, typically 100 or 200. It gives minimum noise in the shadow areas. Next adjust the shutter speed to get a proper exposure. Use your RGB histogram and your highlight alerts to confirm the exposure.
Now you’ve easily found the perfect exposure for the ambient light, but you’ll often still see objectionably deep shadows hiding the natural color and detail. You want to be a real photographer and not merely a snapshot grabber, so you’ll take the time needed to eliminate or reduce those shadows. Here’s how: With the flash set to its ETTL metering mode, use the flash exposure compensation (FEC) control, and for a starting point, dial in −1 or maybe −1.3 stops or so. If you’re using off-camera flash, hold it near the front of the lens, but behind the front, and point it at the subject. Shoot an image and check the image you shot in your LCD monitor to see how you now like the shadow areas. Still too dark? Okay, change your FEC to −.7 stops and make another test. If the previous exposure used an FEC of −1.3 stops, using −.7 stop FEC (minus 2/3 of a stop) will add more light to the shadows. Continue adjusting the FEC until you have a pleasing balance between the ambient light exposure and the flash exposure. The goal is to reveal more color and detail in the shadows without completely eliminating them.
Don’t worry about minor changes in flash position when you’re handholding your flash because the camera’s TTL flash-metering system automatically compensates for position changes you make. In other words, if the flash is held a few inches closer or farther away from one shot to the next, the automatic flash will adjust its output for minor distance changes and you need not worry about it. Do note, though, that movement of the flash causes exposure changes in accordance with the so-called Inverse Square Law. So, be alert when using your flash in a manual mode where the system does not automatically control flash output. For this reason, it’s best to avoid manual flash in close-up photography.
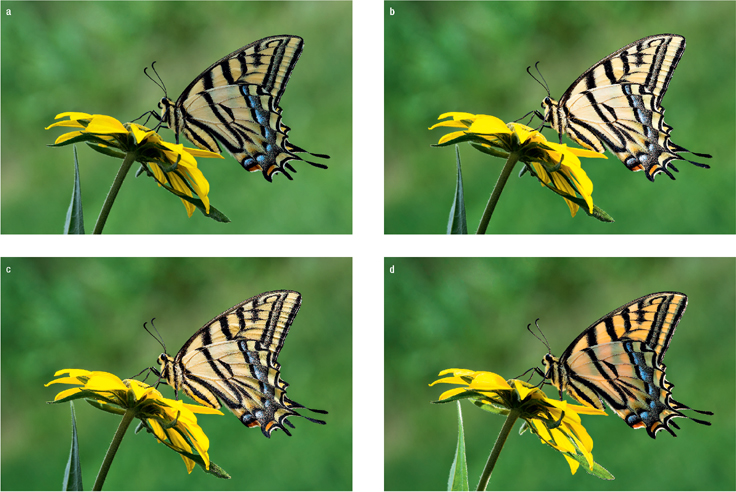
One of America’s largest butterflies, the Two-tailed Swallowtail occasionally wanders into our backyard garden where it seeks flowers for nectar. In part a, the butterfly is photographed using natural light exclusively. Part b shows the desirable effect of underexposing the butterfly by about 1/3 stop and then adding direct frontal flash. The butterfly separates nicely from the background. Even better, though, is to raise the flash above the butterfly to almost directly overhead and skim the light from the flash across the butterfly’s wings as seen in part c. The skimming light creates texture in the wings. Finally, in part d, the flash is held above and behind the butterfly to produce a lovely back light effect. Picture data for part as follows: Nikon D4, 200mm, 1/6, f/22, ISO 200, Cloudy. In the other three images, the shutter speed is increased to 1/8 second to darken the ambient light and an SB-800 flash is used.
FLASH ANGLE FOR FILL-FLASH
Inexperienced flash users often tend to get too fancy with positioning their flash. Sometimes they point it at various angles that don’t do a good job of filling shadows. Not to dissuade you from creative experimentation, but be aware that merely filling shadows is generally best done by having the flash close to the lens and pointed at the subject. It is important to fill in the shadows being captured by the camera.
FILL TO TASTE
A couple of paragraphs earlier, we recommended that you experiment with flash fill by using the FEC control and then judging the appearance of the result by its appearance on the LCD display. You may recall (we hope) that in Chapter Two, Barbara and I condemned, in the strongest publishable terms, using the LCD to judge exposure. Why are we recommending it now? We’re not! We did recommend that your ambient light exposure be established, as always, by your RGB histogram and highlight alerts. We’re just saying that, in this case, you must use the LCD to judge the extent of your flash fill because the histogram is already close to the right wall of the histogram due to using ETTR techniques with the ambient exposure.
APERTURE-PRIORITY AND FILL-FLASH
In the previous example of fill-flash, the exposure for ambient light was determined by Manual exposure methods to achieve a proper RGB histogram. You then set the flash exposure by the FEC control to achieve pleasant shadow fill.
Now, however, we’re going to explore using fill-flash when using Aperture-priority for the ambient light. Continue to keep in mind that the camera system that measures ambient light exposure and the system that measures and controls flash exposure, the TTL system, are two different and independent systems. Therefore, you use the camera’s exposure compensation (EC) control to adjust the ambient light exposure and a different control, the flash exposure compensation (FEC) control to adjust the amount of fill-flash. We advise that you absolutely understand the difference, recognize when you need one and the other, and know where on the camera to find them. Do keep in mind that some flashes (Canon’s for example) offer a more convenient FEC on the flash—the one I use—that is not buried in the camera’s menus.
Here is the logical order in which to make a picture! With the flash turned off, or otherwise disabled, set your camera to Aperture-priority, generally A or Av on your camera controls. Then, thinking of the depth-of-field (DOF) that you want in this image, enter an aperture (f/stop). Often in nature close-up work, you’ll use f/16, f/18, or f/20 to get a large DOF, although for a more planar subject where less DOF is needed, you might select a larger aperture, knowing that your lenses give better performance at the larger apertures around f/8 to f/11. Also, for best quality, set your ISO to your camera’s native ISO setting. Be sure to cover the viewfinder eyepiece before shooting to avoid spoiling the exposure because of the ingress of stray light. Then take a test shot. In Aperture-priority, your camera will select and use the presumably proper shutter speed. Consult your RGB histogram and your highlight alerts to see whether the exposure is consistent with the ETTR rules we’ve suggested in Chapter Two. If not, correct the exposure with your exposure compensation control and take another test shot. Continue the process until you have the optimum exposure for the ambient light as shown by the histogram where the rightmost data nearly touches the right wall of the histogram. Now for the flash!
Turn the flash on, position it near the lens but slightly behind the front of the lens and pointed toward the subject. Set your FEC to −1 stop or so (more about that later), and take a test shot using the flash. Evaluate the fill light by studying the image shadows on your LCD monitor and if necessary, change the FEC up or down until you like the shadow appearance on your LCD. You have filled to taste, and having done it a few times, you’ll have seen just how easy it really is. Note: Although it is usually best to hold the flash slightly behind the lens hood, it is permissible to hold the flash between the lens hood and the subject as long as the flash unit does not appear in the image.
Bees commonly sleep on wildflowers. This fine specimen is photographed for more than 15 minutes while it snoozes quietly. Here’s the natural light version. Nikon D3, 200mm, 1/1.6, f/22, ISO 200, Cloudy.
HOW MUCH FILL DO YOU NEED?
Your call—not mine. The right answer is whatever floats your boat, and it’ll surely vary from image to image. For a given image, some shooters like lots of contrast and let the shadows remain deeper. Others prefer less contrast and brighten the shadows more. Now let’s talk a little more about the flash exposure. The camera’s TTL system measures the light reflected from the subject and controls the flash duration. Yet the TTL system is burdened by the very same problem that plagued the meter designer. When shooting flowers, we have those with the bright petals and those with the dark petals. if the reflected light is bright, is it because the flash was bright or because the flower was bright? Perhaps both? The camera doesn’t know and must just assume your close-up subject is mid-toned reflectance. So you’ve got to think about that when setting your flash. If the subject is bright, use the FEC to add some light. If the subject is dark, subtract some light. Yeah, we know it sounds backward, but it’s true. The TTL flash exposure metering system behaves the very same way as we explained the basic camera meter, or to say it in fancier words, it’s counterintuitive! For example, we said above to make the initial test shot at about −1 stop. But, if the subject is very bright, you might start with your FEC set to zero compensation, and if very dark, you might start with your FEC set to −2 stops or so. Either way, review your image on the LCD for shadow detail that pleases you, and if necessary, change the FEC and make additional test shots until you have your perfect image!
Fill-flash (-1 FEC) is used to open up some of the soft shadows and brighten up the flower which helps to separate both the bee and the flower from the background. The color temperature of the flash is similar to bright sun. A little light from the flash counteracts the excess blue in the overcast light and makes the flower and the bee more yellow in color. Nikon D3, 200mm, 1/1.6, f/22, ISO 200, Cloudy, fill-flash from a Nikon SB-800.
MAIN FLASH
We’ve already explored fill-flash, where the main exposure is via ambient light and flash is used to fill in shadow detail. Now let’s look into using the flash itself to provide the main exposure while the ambient light provides the shadow fill. The flash is now the main light, or, as sometimes called, the key light. Using flash as the main light is critically important to good close-up work, and practitioners should strive to appreciate its artful benefits and master its techniques. We’ll try to help.
Barb and I started seeing opportunities to beneficially use flash as a main light about twenty years ago, although we surely did not invent it. We got the idea from a book on portrait photography, in which the author described killing the ambient to make a flash-illuminated person stand out from the background. Then, and now, it’s a technique well-known in portraiture, and Barb and I were happy to adopt (okay, copy) the idea for our nature photography with gratifying results. Sadly, this powerful technique remains largely unknown to the majority of nature and outdoor photographers. Let’s change that from this day forward.
WHEN TO USE MAIN FLASH
Imagine a calm and overcast early summer morning in a meadow full of wildflowers. Your eyes fall on a gorgeous yellow flower, and you see that it’s in pristine condition. With your camera securely mounted to your rock-steady tripod, you carefully compose a nice image. Using the techniques we’ve described, you determine the perfect ambient exposure. The image on your LCD monitor looks satisfactory, but just seems to lack that certain something. The flower seems to fade into a vaguely yellow background and doesn’t jump out at the viewer, or as we sometimes say, the subject lacks pop. So how do you make the subject pop?
One way would be to darken the background without darkening the flower. The flower would appear more prominent. I suppose you could have a patient friend hold up a large dark blanket to shield the background from the ambient light, but you probably have enough to think about without having to cope with the vocal grousing of an overstressed shooting companion. I love to be of help to Barb whenever I can, but let me tell you, standing still while holding up a large diffuser not only makes for sore arms, it can be the ultimate in boring! Watching grass grow is way more exciting! Is there a better way?
MAIN FLASH PROCEDURES
As always, determine the optimum ambient exposure as we just recommended above. Now darken the background’s response to the ambient light by deliberate underexposure, perhaps by 1 stop or so. For example, let’s say the optimum ambient light exposure using ETTR is 1/4 second at f/16 and ISO 200. Using Manual exposure, you could underexpose 1 stop by changing any of the control settings to reduce the light by 1 stop. You could change the shutter speed to 1/8 second, the aperture to f/22, or the ISO to 100. However, in this case you might opt to maintain the present DOF by not changing the aperture. You might want to leave the ISO at the camera’s native setting to minimize image noise. After considering the three possibilities, you opt to change the shutter speed. A new test shot using a shutter speed of 1/8 second shows a darker background and an RGB histogram that has moved to the left, including the rightmost data which retreats from the right wall of the histogram by 1 stop. Not the ideal ETTR histogram, but as they say over in the prosecutor’s office, you’re making a “knowing, willing, and intelligent,” decision to underexpose the background.

This Variegated Fritillary is wonderfully back lit by soft early morning sunshine. Canon 7D, 180mm, 1/6, f/14, ISO 100, Shade.
Now everything in the image is darker than our optimum ETTR exposure, including the colors and tonalities of the subject flower. Let’s add flash just to the poor underexposed flower. It’s a yellow flower of fairly high tonality (brightness), perhaps a stop or so above mid-toned yellow, so the TTL flash metering system is going to underexpose the flower, too. Hah! We’re clever photographers and we recognize that, so we use our FEC control to dial in +1 stop of flash compensation. Add light to bright! We take test shots at various FEC settings, changing a third of a stop here and a third of a stop there until we find the flower exposure we like best—the one that makes the target flower pop but doesn’t actually overexpose it. How do we know the flower isn’t overexposed? There are no blinkies on the flower, and the rightmost data isn’t climbing the right wall of the histogram. A note, incidentally, about FEC controls: some cameras have them and some flashes have them and sometimes both have them. Be sure to consult both your camera manual and your flash manual to see which is the correct way or the more convenient way for you to change flash exposure. I know I’m nagging, but I’m just sayin’, the flash compensation system and its controls and the camera’s ambient compensation system and its controls are two fully independent systems, and contrary to the old song about love and marriage, here you can have one without the other. With my Canon systems, I change FEC on the flash and Barb’s Nikon systems let her make FEC adjustments on her camera.
We like this image better because the ambient light back lighting continues to nicely rim the butterfly, but the detail in the wings of the butterfly facing the camera is improved when the flash brightens it. We call this important lighting technique crosslighting because the ambient light comes from behind the butterfly and the flash comes from the opposite direction. Canon 7D, 180mm, 1/10, f/14, ISO 100, Shade, fill-flash.
There’s another caveat. In our recommendations on flash fill, we suggested that you position your flash near the front of the lens, albeit far enough back to prevent light from the flash from directly entering the lens, and to keep the flash unit out of the image. We also suggested that you point the flash along the camera-subject line for the most pleasing fill of the shadows. Now, however, with the flash being used as the main light and not fill, we’re changing our story. Now you can experiment with the positioning of the flash, and try a little side lighting, try the other side, try a little top lighting or even back lighting. Whenever you find a nice lighting direction, you can then fiddle with the exact exposure using test shots as suggested above. Changes to flash exposure will have a negligible effect on the background exposure because of the different distances from flash to subject and flash to background. As you run through a series of test shots looking for the absolutely finest image, don’t forget to always wait for your flash ready-light to okay the next shot.
These techniques will produce close-up images where the main subject is properly exposed against a background that’s a bit darker. The subjects always nicely separate from the darker background. The methods may seem complex in the initial reading, but after a little practice will become second nature. You’ll never begrudge the little work needed to become comfortable with the technique, because your close-up subjects will take on a whole new level of visual drama!
FOR APERTURE-PRIORITY FANS
You can easily use Aperture-priority to achieve effective images where the main subject stands out from a more muted background. Select an aperture, let’s say f/11, to strike a good balance between the needed DOF and diffraction considerations, and a high enough shutter speed to combat the breeze wiggling the flower. As always when using an automatic mode, ensure that the viewfinder eyepiece is closed off to prevent stray light from entering and causing underexposure. Use the camera’s ambient light compensation control to add or subtract light as appropriate. Suppose that for a bright background you end up having dialed in +2/3 stop of compensation, and now have a well-exposed background. But you want a darker background, so reduce the exposure 1 stop by changing the compensation to −1/3 stop. If the background is not now at the brightness you want, take additional test shots at different compensation levels until the background brightness is pleasing. Now introduce the flash and vary the flash angle routinely, using different FEC levels until you get a high-impact, high “wow factor” image—a perfectly exposed flower leaping out from a slightly darker but not black background!
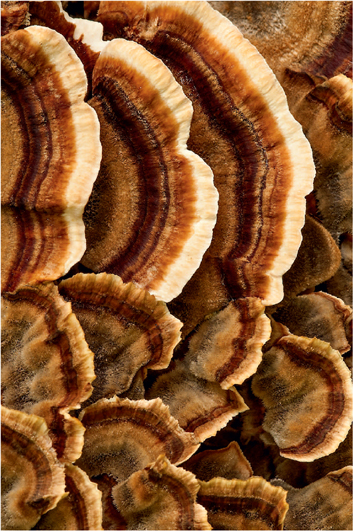
Turkeytail fungi don’t move even in a steady breeze. All fungi can benefit by adding light from a flash. The flash is set to −1.3 stops using the flash exposure compensation control (FEC) on the camera. The close distances in close-up photography demand using the flash on automatic and adjusting the output with the FEC. Nikon D300, 200mm, 1/2, f/22, ISO 200, Cloudy.
THE INVERSE SQUARE LAW
No, it has nothing to do with the legalities of a backwards nerd. It’s a fundamental law of physics that’s used to describe, among other things, the way the light from a flash is distributed and spreads out depending on the subject’s distance from the flash. I did promise in Chapter Two not to dump a bunch of theory on the reader, but permit me a little slack here because it’s important enough to be worthy of exploring. One way to express it goes: “The intensity of light from a point source falling on a subject is inversely proportional to the square of the distance from the source.” Did that clear it up? Maybe not. I know that in my physics classes it took me some time to really understand it. It has to do with the way the light spreads as it travels away from the flash. The farther it goes, the greater the area it illuminates and the dimmer it gets. If a flash (not a true point source, but who cares?) lights up a flower at a distance of 1 foot and lights up the background at a distance of 2 feet, the background will have a lower light intensity falling on it than did the flower. According to the law, if the flash to background distance is twice as great as the flash to flower distance, then the background will receive only 1/4 as much light as the flower. We multiplied the distance times 2, and squared 2 to get 4. Then we took the inverse of 4, to get 1/4. Whew! Stated in user friendlier terms, the background receives 2 stops less light than the flower.
Here’s another example: Suppose the flower is 1 foot from the flash, but the background is now 4 feet from the flash. We square the 4 to get 16 and take the inverse to see that this background only gets 1/16 of the light as on the flower. The background in the first example was twice as far from the flash as was the subject and was illuminated at −2 stops below the flower. The background in this example is twice as far as the first background and is 4 stops below the flower.
So, the rule to remember is that whenever we double the distance to a background, it gets only 1/4 as much light and we lose 2 stops. Conversely, if we cut the distance to the background to half of what it was, it gets 4 times as much light or gains +2 stops.
The Inverse Square Law explains why light from our flash falls off so quickly as distance increases and why it’s so easy to purposefully or inadvertently have a purely black background in our images. When we use flash as the main light and shoot at a high shutter speed, say the sync speed of 1/250 second, the background is very dark. Use the language of stops to think about it. Say the normal exposure for the background required a shutter speed of 1/4 second. Going from 1/4 to 1/8 to 1/15 to 1/30 to 1/60 to 1/125 to 1/250 is a movement of 6 stops! Our background is 6 stops underexposed! That’s dark. Real dark. Black, in fact.
In the Manual exposure mode, use your selection of shutter speed, and in Aperture-priority use your ambient exposure compensation control, to set the background as you see fit. Student pilots are frequently cautioned by their instructors: “Fly the airplane, don’t let the airplane fly you.” It applies to your close-up photography just as well—fly the camera—make it do what you want it to do! In other words, take control.
Again, taking a lesson so to speak from students, law students are incessantly taught to “apply the law to the facts” when analyzing a case. Here again, we too can learn. We’ll get splendid close-up images if we apply the equipment we have and the methods we know to the results we want.
ADD CONTRAST WITH FLASH
Outdoor photographers know well that the low contrast light on a cloudy day is ideal for many close-up subjects and especially for flowers. Untold thousands of superb flower images are made every year under these splendid light conditions. Yet sometimes just a little more contrast adds a great deal to the image as it brings out more of the shape, texture, and detail. Flash is the perfect tool for adding a tiny sprinkle of light to enhance the contrast.
As we’ve done before, determine the optimum exposure for the ambient light. We’ll say it again for emphasis—use either Manual exposure or Aperture-priority with the RGB histogram and highlight alerts for a good ETTR exposure. Now under-expose the ambient light exposure a little—perhaps 2/3s of a stop. Set the flash at zero compensation and position the flash to one side of the main subject. Try to the left. Try to the right. Try up. Now try down. Try placing the flash somewhat behind the subject to get a little of that dramatic rim-lighting, but be sure to keep the flash itself out of the frame. Back lighting will highlight tiny details along the edges of the subject and should the subject be at all translucent, back lighting can produce a lovely glow.
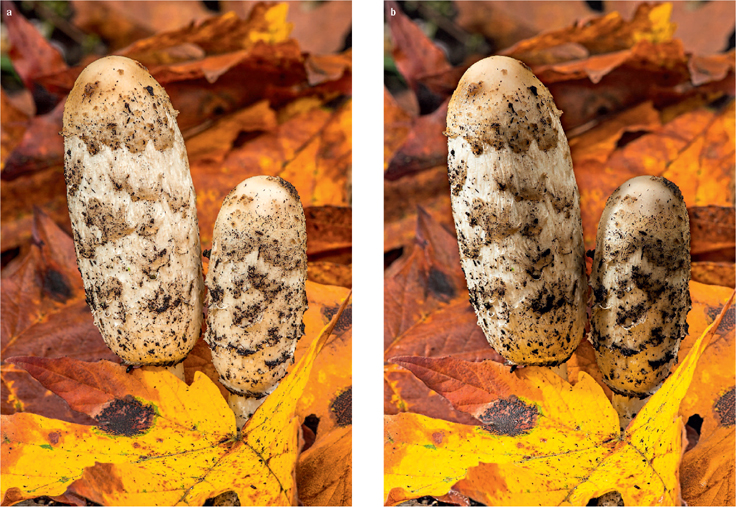
Shaggy Mane mushrooms grow in damp spots during the autumn. They make fine subjects for photography and these two are especially handsome on a rainy day. The image is okay as it is, but sometimes a little contrast can improve their appearance and make them look more three-dimensional. Canon 5D Mark III, 180mm, 1/15, f/18, ISO 200, Cloudy. In part b, a Canon 580 Speedlite is held on the left side and above the mushrooms to create sidelight.
Irrespective of where you place the flash, if you like the result at all, then experiment with the amount of flash, using your FEC control to do test shots at different levels of flash between, let’s say, +1 stop and −1 stop. Barb and I have found that when the ambient light is diffuse, adding just a pinch of light to slightly increase the contrast is highly effective when from the side or from above or behind. Don’t overdo it, though!
SHUTTER SPEED CONTROLS THE AMBIENT EXPOSURE
Once more, we’re repeating a concept because it’s important—and because beginners often have trouble understanding why fiddling with the shutter speed changes the background exposure and not the flower exposure. Using automatic through-the-lens flash metering, the flash output is adjusted using the flash exposure compensation control (FEC). The FEC is set to pleasingly expose the subject with the chosen camera settings—perhaps ISO 100, f/16, and a shutter speed of 1/30 of a second. Once the optimum flash exposure for the subject is determined in the usual way with the histogram and highlight alert, the shutter speed is irrelevant for the flash exposure. It’s because the duration of the flash burst is on the order of 1/1000 of a second or even less in a lot of close-up work due to the closeness of the subject. The flash burst comes and goes so fast, that when the flash is the main light, the exposure on the flower is determined by the flash metering system irrespective of the shutter speed as long as the shutter speed is fast enough to prevent exposure by the ambient light. The flash provides the main light on the flower, but usually it can’t light up the more distant background due to the Inverse Square Law. Therefore, when using Manual exposure, selecting a faster shutter speed reduces the ambient light exposure of the background. Slowing the shutter speed—changing from 1/4 second to 1/2 second—increases the background brightness. Neither changes the flash exposure on the subject because it is controlled by the FEC.
APERTURE-PRIORITY EXPOSURE OR MANUAL EXPOSURE?
Both modes work well in close-up photography. It’s up to the user. Aperture-priority is good for those who struggle with the concepts of shutter speeds and lens openings or the language of stops. Just set the f/stop most suitable for your desired DOF and the camera will select the shutter speed for an average exposure. If the shooter needs to adjust the exposure because the subject is not average tonality, but is brighter or dimmer, or they wish to alter the brightness of the background, then the shooter uses the camera’s exposure compensation control to add or subtract light. Again, for the umpteenth time, remember the necessity to shield the viewfinder eyepiece from allowing light entry. Barb uses this method consistently by using one hand to shield the viewfinder eyepiece (not actually touching the camera) and the same hand holds her remote release and fires the camera. Her other hand holds the flash. It works well for her.
While I have little control over Barbara’s methods, I at least can define my own. I much prefer to use the Manual exposure mode because I can so easily and quickly juggle my controls by this many stops or that. Stop-think (the language of stops) is so ingrained in me that I don’t have to agonize over this many stops or that while I’m working with them. That’s why I so strongly urge my students to use stop-think over and over until it is second nature.
It is efficient to set up a camera to offer the most natural and fastest presentation of dial direction and exposure indicator direction. I’ve done that, and I suggest you do, too. I’ve set all of my controls to operate in 1/3 stop increments. As a result, I can add or subtract whatever light the subject demands merely by counting the clicks of my dials. If I need to subtract 1 2/3 stops of light without even taking my eye from the camera, I just rotate the shutter speed dial in the correct direction to increase the shutter speed a total of five clicks and there I am! My eye is to the viewfinder when I’m working, thus blocking ingress of stray light, so I don’t have that to worry about. Finally, if I need to compensate an exposure, I don’t have to bother finding and operating a separate exposure compensation dial. I’m already managing shutter speed and aperture by watching the exposure meter indicator, so all I need to do is set the indicator to a different reading—a little this way or a little that way—with the controls I’m already using. My Canon exposure scale has the plus side on the right and the minus side on the left, which makes perfect sense if you consider the histogram. Plus, I used a custom function that Canon calls Dial Direction during TV/AV—to reverse my dial direction, so adding light, either with the shutter speed or aperture dial, is simply done by turning the dial to the right (clockwise) as viewed from the camera rear. It’s all so very simple—so very fast—so very intuitive—it is puzzling why everyone isn’t doing it. It only takes a little practice!
SIDE LIGHTING AND BACK LIGHTING
Using flash as a main light is the best way to add strong side light, or perhaps strong back light, to a subject. Sometimes with flat subjects, like leaves, feathers, and butterflies, a stop or so of ambient underexposure along with a proper side lighting flash exposure is terrific for revealing texture and other surface detail. Even with only one flash, the contrast isn’t too high because of the ambient exposure that serves as the fill light.
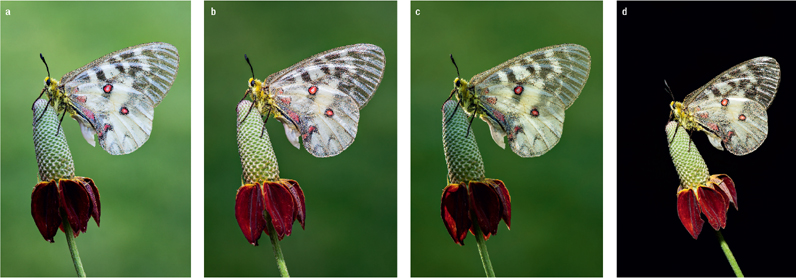
Let’s do a light study with this cooperative Rocky Mountain Parnassian. In part a, only natural light is used. It is okay, but we feel the image is stronger by using main flash to light it as shown in part b. Even better, use the main flash behind and above the butterfly to back light it as seen in part c. Some photographers like black backgrounds, but we don’t. It is easy to do as you see in part d. Simply increase the shutter speed enough to underexpose the ambient light by at least 5 stops of light and then properly light the butterfly with flash. If the background is a couple of feet behind the subject, the light fall off from the flash produces a very dark or totally black background. We prefer color in the background and don’t like the harsh light created by a single flash when used as the only light source. We also don’t care for the dark areas of the subject—antennae and legs—merging into the black background. Flash is such a valuable photo tool that we use it for a portion of the light in at least 75 percent of our close-up images. Canon 5D Mark III, 180mm, 1/5, f/20, ISO 200, Cloudy. Flash is used to shoot parts b, c, and d. The only exposure control that changed happened in part a when the shutter speed is made faster to underexpose the ambient light by 1 stop of light and in part d when the shutter speed is increased from 1/5 second to 1/160—a change of - 5 stops of ambient light, but has no effect on the flash output.
Back light can bring a dramatic and lustrous glow to some subjects. Occasionally it doesn’t work well on opaque subjects, although even there it can produce nice rim light. But if the subject is at all translucent, back light does a terrific job of revealing detail while making the subject itself appear like a light source. Many close-up workers would benefit from using back light more than they do. It’s a superb technique for lethargic butterflies that in the early morning are too cold to fly away. Look for them in a dewy meadow early in the morning anytime the ambient temperature is below 55 degrees Fahrenheit (F).
BALANCED FLASH
The term balanced flash is used to describe a situation where a portion of an image is illuminated mainly by ambient light and another portion of the image is illuminated mainly by flash. A good example might be found in a meadow early on an August morning. Imagine encountering a dew-laden dragonfly in the shade of a tree, but with a background of sunlit blue sky. You’re fluent in stop-think, so your very first thought is not about being late for your wedding scheduled in a couple of hours, it’s that the light on the dragonfly is several stops under the bright blue sky background. It’s a high contrast scene that just might exceed the dynamic range of your sensor. Your impending honeymoon probably means that waiting for an overcast day isn’t on the cards, so you need a more immediate means of lowering the scene contrast. Enter balanced flash!
You can’t think of an easy way to darken the sun, so you opt to brighten the dragonfly. It’s not very complicated. Set your camera up for either Manual exposure or Aperture-priority. As you’ve done many times, use your RGB histogram and your highlight alert blinkies to find a good exposure for the sky. Choose an exposure that produces a pretty blue sky. Since the sky has little contrast or detail, it does not need to be exposed according to the ETTR exposure guidelines—it can be darker.
Now that you have a pleasing blue sky background, you’ll notice the dragonfly in the shade is severely underexposed.
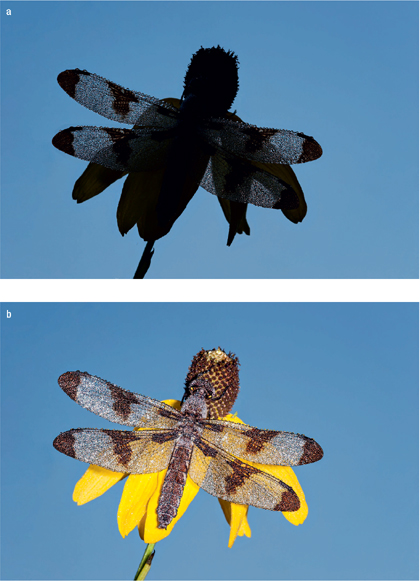
This is a good time to use balanced flash. The sleeping Twelve-spot Dragonfly is still in the shade on a cool morning. The background is the much brighter sunlit blue sky. Expose for the sky and the dragonfly is severely underexposed as shown in Part a. Expose for the dragonfly and the blue sky is hopelessly overexposed. There is no way to expose both well with ambient light unless the sun also lights the dragonfly. Remembering the sun in our camera bag—the flash—we set the ambient exposure for the sky and then use automatic flash and the FEC control to properly light the dragonfly. Part b shows how the flash balances out the difference in light between the dragonfly and the sky. It is a powerful technique that all close-up shooters must master! Part a: Nikon D3, 200mm, 1/100, f/22, ISO 200, Cloudy. Part b: the only change is the light being added with a Nikon SB-800 and + .7 FEC.
That’s easy to fix! Turn on your flash with the FEC control set to zero, point the flash at the dragonfly and shoot a test image. Use the histogram and highlight alert to expose the dragonfly according to the ETTR guidelines. Study the image on the LCD monitor to see how the dragonfly compares to the background. If too dark, add +1 or so with the FEC, or if too bright, then try −1 stop or so with the FEC. Try another test shot, and, if necessary, continue until you like the balance between the dragonfly and the sky.
If you’re using Aperture-priority, be sure to compose the subject well before starting the procedure. If you change composition between making the background exposure and the dragonfly exposure, the underlying exposure may change, thus corrupting your test shots. This is not a problem in the Manual exposure mode. It is just one more reason why Barb and I so often prefer the Manual exposure mode.
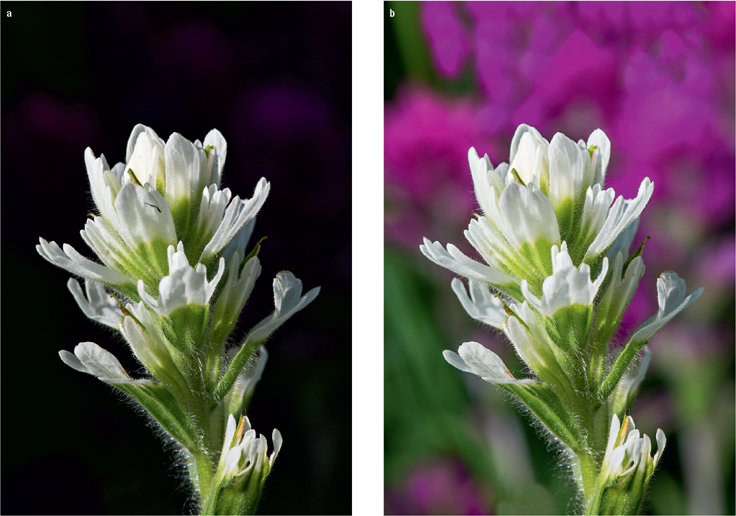
Balanced flash is usually used to light a dark subject in the foreground because the background is bright. This white morph Indian Paintbrush is the opposite situation. When the white flower is properly exposed to retain detail, the darker red flowers in the background become nearly all black as you see in part a. Use wireless flash (part b) and hold it close to the Paintbrush in the background to light them up and balance the white blossom with the dark red ones behind it. Part a: Canon 5D Mark III, 180mm, 1/80, f/14, ISO 100, Cloudy. Part b: the only change is flash is used to light the background and the FEC is set to +1.
To summarize, in the dragonfly example we used our LCD display to view the image after it was shot to make the background a pretty blue while ignoring the exposure of the insect. Then we caused the insect to be properly exposed by adding flash and by adjusting the flash exposure with our FEC control until we were satisfied with the balance between subject and background.
COMPENSATING FOR DARK BACKGROUNDS
Suppose that instead of the bright background we just discussed, we find the opposite—a background a few or more stops below the dragonfly, butterfly, caterpillar, or whatever. The exact nature of the main subject is unimportant. What’s important is how to achieve a balance between the subject and a darker background. We concluded before that we couldn’t darken the sun, so it’s logical to realize we probably can’t brighten it either. Nor, generally, can we brighten the background with flash or other photographer-supplied light because the backgrounds are too large, or too far away, or both. And yet, sometimes you rule! Suppose you come across a fine looking group of light-colored fungi growing on a tree trunk. The background is another tree, about 6 feet beyond the subject fungi, and that tree has a dark bark. To properly expose the fungi, you use the ambient light, with or without a fill-flash to fill the shadows. Then, you put a flash in position to illuminate the dark tree in the background. Use the FEC control to adjust the background exposure for a pleasing balance with the fungi. Having your ever-patient shooting companion hold that second flash, or perhaps employing a light stand while using optical or radio wireless flash makes it all very easy.
CAMERA-MOUNTED FLASH
Many a close-up photographer has acquired a flash bracket to attach the flash to the camera, or has acquired a lens-mounted macro flash system. These latter systems hold one or two flashes arranged near the front of the lens. These flash setups typically allow the flash heads to be positioned at different angles, allowing more lighting options than a hotshoe-mounted flash.
We own and use two different lens-mounted flash systems. I’ve had success with Canon’s Macro Twin Lite MC-24EX, and Barbara does equally well using her Nikon R1C1 wireless optical close-up system. Although we prefer handholding the flash so we can move it to different positions as quickly as possible, handholding the flash requires that the camera be supported on a tripod. We have seen people handhold both the flash and the camera, but it looks awkward and unappealing. I did try it once and discovered I could not point the flash perfectly while holding the camera, too.
If you are determined to shoot handheld, then one sort or another of on-camera flash mounting is the way to go. Handholding with dedicated lens-mounted macro flash setups is certainly more convenient when stalking leaping grasshoppers and flitting butterflies.
Bracket-mounted flash setups are also very effective when you can’t use a tripod. Many butterfly houses showcasing exotic specimens are adamant in banning tripods because everyone is in close quarters and the tripods are at least an impediment if not a downright hazard. Beyond that, some subjects are too active to stalk with a clumsy tripod-mounted rig. Handholding is not a good idea when using ambient light because the generally long shutter speeds engender soft images. But, if using flash as a main light where the bulk of the illumination comes from the flash, the very short flash duration of 1/1000 second or so, a mere millisecond, will effectively freeze the subject’s motion and minor camera movement to give sharp images. Even when shooting at a sync speed of 1/200 second or so, it’s the flash that’s doing the lighting. Moreover, if additional flashes are used, then the burst duration of each of them is reduced, and they may be firing at an extremely short 1/5000 second or even less. Regardless of the exact flash duration, when the motion of a photogenic but wriggly-wiggly bug is frozen by a high-speed flash burst, Barb and I always sing a couple of celebratory choruses of “Freeze a jolly good fellow!”
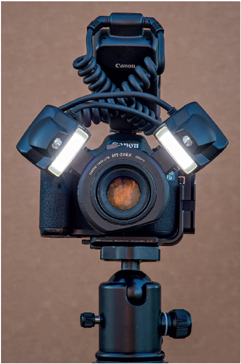
Many camera systems offer a macro flash setup like the Canon Macro Twin Lite MT-24EX or the Nikon R1C1. The Canon MT-24EX pictured here has two small lights that can rotate around the circular flash holder and they can tilt in or out to change the lighting angle. The light output from each flash can be varied to provide lighting ratios. We use the Nikon and Canon system and they work fine. They are especially good at high magnification and when it is necessary to shoot handheld.
There are some serious considerations involved in handholding a camera with either a lens-mounted or bracket-mounted outfit. Sharp images require that practically all of the light stimulating the sensor must come from the flash to reap the benefit of the flash’s speed. Too much ambient light, even at the high sync speed of 1/200 or so, can often cause ghost images or lack of sharpness. Where the ambient light is low, and where the background is somewhat behind the main subject, our ole nemesis, the Inverse Square Law, can easily cause a black or very underexposed background. Most practitioners find black backgrounds to be undesirable, especially for subjects usually found in daylight, like butterflies.
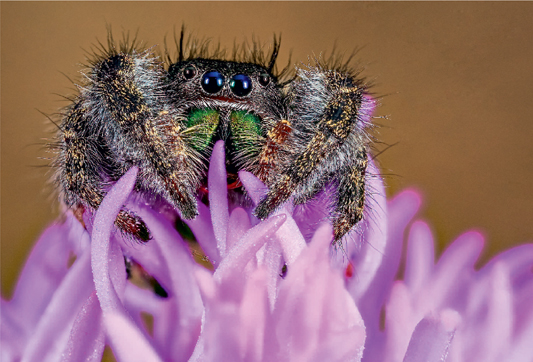
The dual flash setup nicely lights the jumping spider. While using a tripod, thirteen images are shot where the focus is varied slightly between them. These images are combined with Helicon Focus to achieve extreme depth-of-field that is not possible in any other way. Canon 5D Mark III, 65mm macro, 1/8, f/11, ISO 400, Flash WB, flash from the Canon Macro Twin Lite MT-24EX.
Occasionally that’s not a problem. Consider a beetle strolling along on the light-colored sand. The sand is so close to the subject that light falloff is negligible, and both subject and background can be properly exposed.
It’s hard to focus during handheld shooting because of the very limited depth-of-field characteristically encountered in close-up work. Focusing handheld is nearly impossible when shooting at magnification ratios higher than life-size. Due to that DOF issue, it can be critically important to get a precisely parallel alignment of the subject plane and the sensor plane to minimize the DOF requirement, and that’s hard enough to do on a tripod, let alone by handholding!
One nice attribute of flash brackets is the possibility of mounting two flashes on them, which then allows you to vary the light ratio between them to get a more attractive lighting. For example, if you have two flashes, one on each side of the camera, and you set one flash a stop down from the other, you get a lighting ratio that introduces soft shadows helping to reveal subject shape. Flash brackets, regardless of mounting, are nowhere as fast to use as a flash held in your hand.
What if you want to back light a nice fuzzy milkweed? Flash brackets generally permit some movement of the flash, but to my knowledge none readily permits back lighting, always easier to do when the flash is not camera-mounted!
Barb and I don’t often use our dedicated flash brackets, but they’re sure a lot better than nothing in circumstances where the tripod is banned, too awkward to use, or where its bulk alarms wary subjects. Many beginning close-up shooters shun tripods because they’re heavy, they’re expensive, they’re awkward, they’re ugly, etc. etc. etc., but as I’ve said in an earlier chapter, tripods are often described as photography’s most important accessory. We believe that, and hope that either you do, or you quickly come to believe it.
SHOULD THE FLASH BE DIFFUSED?
A single flash can produce a very harsh, high-contrast light. Size and distance are two influencing factors. All else being equal, large lights produce softer light than small lights. Closer flashes produce softer light because the closer the light, the larger it is relative to the subject. A small camera-mounted flash can be large indeed, especially when positioned only a few inches from a little spider.
Sometimes photographers soften their flash output by attaching a diffuser, or a soft-box, to their flash. Whether you do that, too, depends on whether the flash is a main light or fill light, what exposure is being allowed by the ambient light, the size of the flash lens, the flash to subject distance, and of course, what you want the image to convey to the viewer. You’ll get better and better at those decisions as you become more experienced. Any diffusion device will attenuate the light from the flash to some extent, but the camera’s automatic TTL system will easily compensate for it. That said, we seldom diffuse the flash because we nearly always mix ambient light and flash together and may use more than one flash at the same time. These multiple light sources make it easy to control the contrast without diffusing the flash.
CONCLUSION
About 75 percent of our close-up images are made with some flash, and we use it, albeit less often, in both wildlife and landscape work. I hope you’ve gleaned from this chapter that we consider it enormously important to us and, in turn, to our students. It’s especially valuable in close-up work. The effective use of flash takes some understanding and practice, but it is well worth both. Done well, flash illumination will considerably improve most, if not all, of your close-up images. The versatility that flash can bring to your close-up photography is probably greater than you presently realize, but as you use it more and more, you’ll even hit upon new and effective ways to use it. Enjoy the journey!
One frigid March morning everything outside our home was covered with frost. Barbara noticed the frosted horsehair adorning the strands of wire. A slight, but persistent breeze was blowing, so Barbara had to capture the subject in a single image during a lull. The ambient light was underexposed by two-thirds of a stop to darken the background. Electronic flash provided the main light to properly expose the frosty fence and the hair while not brightening the background. Nikon D4, 200mm micro, ISO 640, f/18, 1/100, Cloudy WB.
The Plamp is attached to the long stem of this Scarlet Gilia to hold it still. Canon 7D, 180mm, 1/1.7, f/14, ISO 100, Cloudy, fill-flash.