Close Up Photography in Nature (2014)
2
Exposure Essentials
We’ve long ago lost count of the books, articles, workshops, and bar conversations devoted entirely to the “Whatta ya shootin’ at?” exposure question. Happily, today’s digital technology rides in on its photographic white steed making it all very easy. A few simple guidelines guarantee your images are always perfectly exposed!
Cameras offer three major controls over image exposure. The first is the ISO setting, the image sensor’s sensitivity to the incoming light. The second is the lens aperture, which we frequently, but not quite accurately, called the f/stop. And third is the shutter speed, which determines the length of time the incoming light is permitted to strike the sensor. You need only set these three simple controls correctly, and you maximize desirable detail in your image while minimizing unwanted noise in the shadow areas.
Explaining exposure, though, is not all that easy. As a photo instructor, I’ve been known to spout endless exposure minutiae on and on until I’m nearly hoarse. But relying on the magic of digital photography, I can now say much less and teach much more. So, in this book I’m going to avoid most of the mathematics of the digital camera. You don’t need to know that information anyway, and you don’t need to know precisely how the sensor measures light or exactly how the camera records colors. Instead, we’ll cover just what you really need to know to make splendid close-up images.
AVOIDING COMMON EXPOSURE MISTAKES
Many a new digital photographer tries to judge exposure by the brightness of the image displayed on the camera LCD monitor. No matter how tempting, and yes it is, don’t do it! Okay, so Barbara and I both did it in the beginning, but we soon learned how wrong it was. The appearance of the image on the monitor is markedly affected by ambient light, so in bright daylight the image seems underexposed, yet in darker surroundings, the very same image seems overexposed. The user’s viewing angle also affects image brightness. Moreover, the monitor display of many cameras can be made to look brighter or dimmer just by simple camera adjustment. But neither ambient light, viewing angle nor monitor brightness relates to the image’s exposure. Knowing that the best exposure collects the most data, preserves the most highlight detail, and minimizes image noise, you need another way to detect exposure accuracy. You cannot, cannot, cannot, accurately judge your exposure by looking at the LCD monitor.
Likewise, don’t judge exposure by how the image looks on your computer monitor or on your digital projector, where the same error factors are in play. The ambient light levels, instrument brightness settings, and user viewing angles all affect the image’s appearance on those displays as well, effectively masking whether the exposure is good or bad.

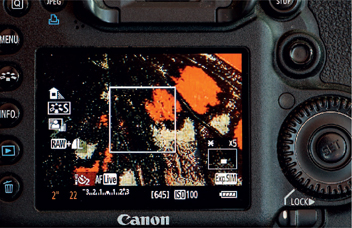
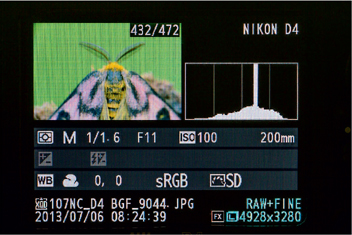
Many photographers still erroneously judge the exposure by how the image appears on the LCD display such as this butterfly on the back of my Canon 5D Mark III. Don’t judge the exposure this way. The ambient light affects the appearance of the image too much and most LCD displays can be dimmed or brightened by the user making the LCD display inaccurate for judging the exposure.
So if you genuinely understand that you can’t judge exposure by assessing the image on the camera’s LCD monitor or on your computer monitor or projection screen, what’s the poor bewildered photographer to do?
THE AVERAGING HISTOGRAM AND HIGHLIGHT ALERT
Overexposure is perhaps the photographer’s most egregious blunder next to dropping his new camera onto the rocks. Luckily, many digital cameras allow the photographer to activate two accurate exposure aids. The histogram accurately tells whether the image is properly exposed, and if not, how to correct it. And where some overexposure is shown, the highlight alert feature reveals just what image portions are affected. When the highlight alert feature is activated, overexposed image areas blink black and white, earning the photographer’s buzzword blinkies. If the overexposed areas are caused by specular highlights, like the sparkling water drops on a frog’s back or dewdrops on a flower blossom, we don’t need to capture detail in such highlights. It’s okay to let them remain overexposed. By allowing those highlights to remain overexposed, we maximize detail captured in the remaining and important areas of the image.
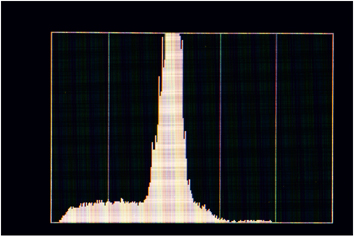
Use your camera’s histogram display to judge the exposure. The rightmost data of the histogram should be close to the right wall on the graph. In this image of a Canon 5D Mark III display, this Averaging histogram’s rightmost data is about 1 stop from the right wall and indicates the image is underexposed.
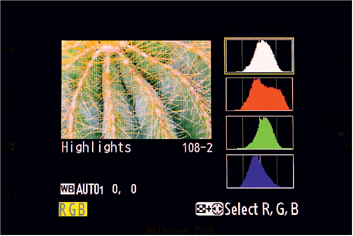
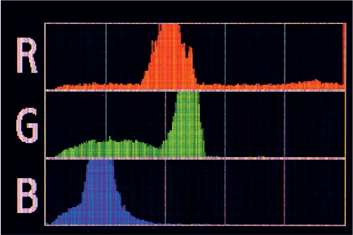
This Nikon D4 histogram display includes both the Averaging histogram at the top and the RGB histogram that shows a separate histogram for each of the three color channels—red, green, and blue. This histogram display shows the exposure is excellent as the rightmost data is nicely snuggled up to the right wall of the histogram.
If the histogram shows overexposure and blinkies reveal the overexposure occurs in important image areas where detail is wanted, it’s time to reconsider our exposure!
Probably the most useful tool in digital photography, the histogram is a simple bar graph representing the different brightnesses in the image. The graph displays darker tones to the left and lighter tones to the right, with the height of the data showing the relative amounts of these darker and lighter tones. The actual numerical data is unimportant and not shown. Do recognize that there’s no correct shape for all histograms. None. There’s no such thing as an ideal histogram, and the shape of any histogram is peculiar to its own subject matter. Your white flower image will have an entirely different histogram shape from your brown toad image. What is definitely critical about the histogram is not its shape, but its placement within the graph space.

Dahlias are popular domesticated flowers. Overall, the flower is mostly light in tone. Notice the abundance of histogram data on the right side of the histogram chart. This data represents the lightest tones in the flower. Canon 5D Mark III, 180mm, 1/1.3, f/16, ISO 100, Shade.
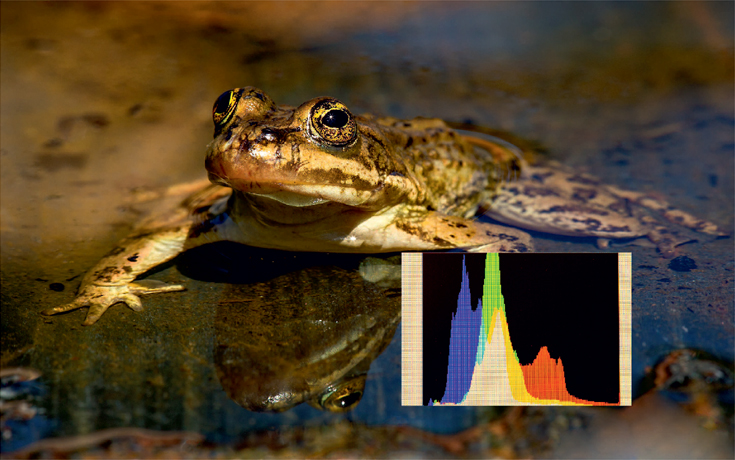
The Spotted Mountain Frog in this small pond is mostly made up of dark tones. Although you still want to Expose to the Right (ETTR), notice the bulk of the brightness values appear left of the center on the histogram. Canon 5D Mark III, 180mm, 1/100, f/16, ISO 320, Cloudy, fill-flash.
A proper exposure for any image will cause its rightmost histogram data, regardless of shape, to be as far to the right edge of the graph space as possible, within a couple of guidelines explained below.
JPEG AND RAW IMAGE CONSIDERATIONS
The largely unprocessed data taken directly from any camera’s light sensor is called its RAW data. The sensor’s millions of micro-sized pixels collect incoming light, distributed according to the light’s color. The brightness of the light collected by each photosite is converted to a minute electrical signal. The tiny signal is digitized by an in-camera gadget called an analog-to-digital (A/D) converter to form the RAW image. If the camera provides RAW files as an output format, the digitized signal from the A/D converter is sent to the camera’s memory card, essentially unchanged, as a RAW file.
Most cameras offer JPEG files as an output format. The photosite data goes through the same A/D conversion, but then undergoes extensive in-camera processing. The dictates of the camera designers and the options selected by the photographer as to color saturation, image size, resolution, sharpness, and additional changes, are all applied before the image is delivered to the memory card as a JPEG file.
Summarizing briefly, JPEGs are more convenient ready-to-go files, but they offer less control to the photographer. Use JPEGs if you do not want to spend a lot of time editing and adjusting your photos on a computer. RAW files are more time consuming because they require more post-capture editing, but they offer much greater creative control and flexibility. Some cameras will allow an image to be delivered in both formats, a feature that may appeal to certain photographers. We always set our cameras to capture both a RAW file and a JPEG of every image we shoot. Then we can choose the file we want to work with later.
THE IDEAL JPEG EXPOSURE
The all-important guideline in JPEG exposure is that highlights in which detail is needed must absolutely not be overexposed.
The ideal JPEG exposure produces a histogram where the rightmost histogram data does not quite touch the right edge of the graph space.
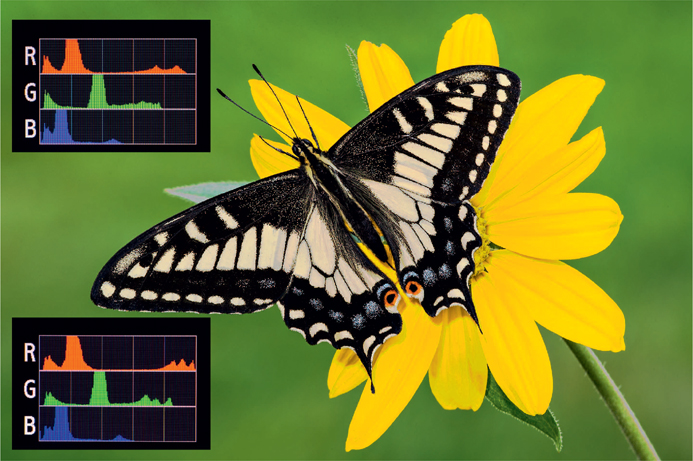
This Anise Swallowtail is basking on a cool afternoon. Using the RGB histogram display, notice the red color channel has data farthest to the right. The histogram in the upper left corner is an ideal exposure for a JPEG because the rightmost data of the red channel stops just shy of the right wall of the histogram, which ensures the highlights are not overexposed. The histogram display in the bottom left corner is better for a RAW exposure because the red channel’s data actually touches the right wall. Nikon D4, 200mm, 1/5, f/22, ISO 200, Cloudy.
If you’re interested in a bit of trivia, JPEG files are 8-bit files. That’s because the JPEG format divides its subject matter into 256 different brightness levels, or tonalities, from 0 (pure black) up to 255 (pure white). Why are 256 different tonalities described mathematically? Because computer folks like to work with numbers expressed in powers of 2 and 256 is equal to 2 raised to the 8th power.
THE IDEAL RAW EXPOSURE
Here’s our guideline for proper exposure of RAW files:
The ideal RAW file exposure actually allows the rightmost edge of the histogram curve to touch the right edge of the graph space, as long as extensive climbing of the right edge of the graph space is avoided.
Each and every photo in our nature photography instructional books is exposed by the above guideline. A histogram actually touching the right edge of the graph space is desirable because it captures the maximum amount of image detail. It’s allowable because a RAW histogram is derived from an embedded JPEG file, and the already mentioned internal processing of the JPEG file causes the RAW histogram to show highlight overexposure (clipping) before clipping actually occurs. So you can allow a RAW exposure perhaps up to a full stop over that which hits the right edge of the graph space and still not clip important highlights.
You may one day encounter good cause to deviate from the above JPEG and RAW exposure guidelines. If you can articulate a rational reason to do so, then have at it! Otherwise, using histograms and blinkies according to these guidelines has proven, over millions of exposures, to produce the finest images.
THE RGB HISTOGRAM
Many cameras offer a second form of histogram, called an RGB histogram. It’s actually three separate histogram curves, one each for the camera’s red data, blue data, and green data. It’s a far more precise representation of your exposure. It is very helpful in all photography and especially in close-up photography. Suppose you’re photographing a bright red mushroom growing against a deep green moss background. The Averaging histogram, often called the Luminous histogram, though Canon calls it the Bright histogram, is largely determined by the exposure of the large green background. The green moss can generate a good histogram even though the bright red mushroom might be badly overexposed with loss of detail in the reds.
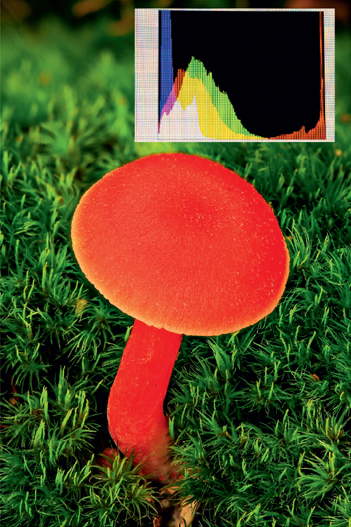
One of our workshop students found this tiny red mushroom growing in the moss during a 2013 fall color workshop. A long macro lens is used to isolate the mushroom against the green background. The entire mushroom is made sharp by shooting a series of ten images where the focus is varied slightly. All of the images are merged into a single image with tremendous overall sharpness using Helicon Focus. As expected, the inserted RGB histogram shows the red channel has data farthest to the right. Canon 5D Mark III, 180mm, 1/2.5, f/13, ISO 100, Cloudy, fill-flash.

This blue delphinium grows abundantly in our backyard. Anytime a single color dominates the image, you can expect the color channel that matches the color of the subject will show data farthest to the right. The inserted RGB histogram clearly shows that. Canon 5D Mark III, 180mm, 1/5, f/16, ISO 100, Shade.
The three-channel RGB histogram may initially appear intimidating, but it’s easily mastered. After ensuring that the RGB histogram is activated in the camera menu, the shooter needs only to determine which of the three color-channel histograms has data farthest to the right and apply that histogram alone to our above exposure guidelines. Going back to the example of the bright red dragonfly on a green leaf, we’d see that the red channel histogram is farthest to the right. Ignoring the other channels, we merely expose so that the red channel histogram complies with our above rules. In conclusion:
If shooting JPEG files, we expose so the red-channel histogram data closely approaches, but does not touch, the right edge of the graph space.
If shooting RAW files, we expose so the red-channel histogram data touches, but does not extensively climb, the right edge of the graph space.
If our image of an appetizing bunch of blueberries resulted in the blue channel’s data being farthest to the right, we just follow the same rules while using the blue channel.
You’ve probably noted we’re always recommending an exposure causing certain histogram behavior on the right side of the graph space. Those rules have become known as expose to the right rules or by their acronym ETTR.
See? That’s it! Perfect exposures every time, easy and right at your fingertips!
CLIPPING ON THE LEFT
So far we’ve addressed clipping on the right wall of the graph space. It’s of no importance whatsoever if the data touches the top edge of the graph space as long as it is not climbing the far left or right wall, but we do want to address the left wall of the histogram. The left wall is where the darker tones of our image will lie, and if our image has a lot of dark tones, we’ll see histogram data approaching, touching, or even climbing the left wall. If we’ve exposed according to our ETTR rules and our histogram curve is approaching or even just touching the left wall, we will have a fine exposure.
If, however, we’ve followed the ETTR rules and we have extensive climbing of the left wall of the graph space, then the contrast of our subject matter exceeds the dynamic range of our camera sensor and we must do one or more of the following:
✵Ignore the left-wall issue and accept whatever blocked up shadows and digital noise are present.
✵Use HDR techniques to accommodate the excessively contrasty subject.
✵Reduce subject contrast by lighting changes, for example by fill-flash or a diffusion cloth. High contrast can be somewhat mitigated by using software fixes, but it is always best to control the contrast problem at the moment of exposure if that is at all feasible.
✵Come back tomorrow when the light is better.
HOW IMAGES LOSE HIGHLIGHT DETAIL
My inner self has never quite recovered from my college physics classes. I probably spend too much time wondering how and why things behave as they do. While leading a snowmobile photo tour in Yellowstone National Park some years ago, I was wondering how detail is lost in a digital image, and after a couple of sleepless nights, the answer dawned on me. I remembered my youthful high-speed snowmobiling and how I’d run at 100 mph, but only on sunny days, never when cloudy. I remembered how the shadows caused by sunlight on the snow revealed the dips and bumps in the snow so that I could prepare for them. On cloudy days there were no shadows, no dips and bumps were visible, and an invisible bump was hazardous indeed.
Losing detail in a digital image is similar. Suppose you’re photographing an orange Great Spangled Fritillary. This butterfly has warm brown, red, and orange tones that vary in color and brightness. Consider an orange area of this butterfly. Because the camera sensor recognizes 256 different tonal levels for JPEGs, let’s assume that properly exposed brown areas result in sensor pixels exposed to various levels near a tonal value of 220. Some pixels are at 224, some at 230, some at 218, and so on. It’s the difference in these brightness levels that provides the detail in the orange areas of the image.
Now let’s increase the exposure until all of the pixels making up the orange areas are raised from the levels around 220, and you keep raising and raising them. Eventually all the pixels of the orange areas reach the saturation level of 255. At that point, when all have reached saturation and every pixel looks like every other pixel, there’s no detail left in that area of the image, and we say that the area is overexposed! Can you see any detail in looking at a sheet of pure white paper in bright light?
If a group of pixels are identical in color and brightness, one cannot see any detail among them.
METERING MODES
Today’s DSLR cameras generally offer three or more metering modes. These metering modes affect the way the exposure meter operates and are not to be confused with exposure modes such as Manual, Aperture-priority, Program, etc. My Canon camera offers four metering modes, called Spot, Partial, Center-weighted, and Evaluative.
Spot-metering gives exposure information based only on the light reflected from a very tiny portion of the subject. Partial metering covers a larger area in the middle of the image, a larger spot so to speak. Center-weighted metering assesses the brightness of the entire image area, but places emphasis on the central area of the subject. Some cameras allow user selection of the area of emphasis. Nikon’s Color Matrix metering, and Canon’s Evaluative metering, and the multi-segment metering of other manufacturers, are surely the most sophisticated metering modes, assessing the entire image area and applying advanced software algorithms to reach their conclusions.
None of these metering modes is perfect. Some photographer-entered exposure compensation is needed most of the time, depending on the subject and lighting conditions. Luckily, all cameras offer some means to compensate the exposure, though how it is done can vary. Using the Manual exposure mode, you compensate by changing the shutter speed, ISO, or aperture while guided by the exposure scale in the viewfinder. In Aperture- or Shutter-priority, one changes an exposure compensation dial whenever it is necessary to adjust the standard exposure the camera automatically sets.
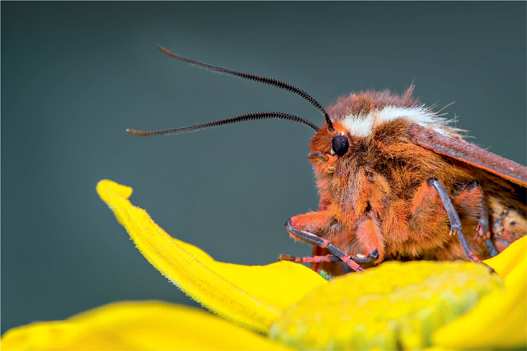
Achieving the optimum exposure is important for top-quality images. Notice the wonderful detail in the white hairs on the moth’s head, excellent overall color saturation, and detail in the yellow flower. A good exposure preserves highlight detail, captures the maximum amount of image data, and reduces noise in the shadows. Nikon D4, 200mm, 1/4, f/22, ISO 200, Cloudy, fill-flash.
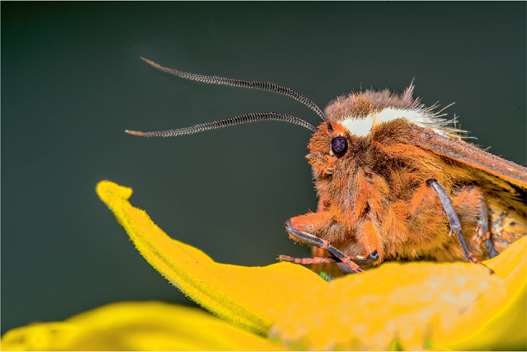
This image of the moth is seriously overexposed by at least 2 stops of light. The camera would warn you of this problem by showing the rightmost data bunched up and climbing the right wall of the histogram graph and the camera’s highlight alert would blink off and on in all of the light areas. Notice the lack of detail in the flower and the white patch on the head. Nikon D4, 200mm, 1 sec, f/22, ISO 200, Cloudy, fill-flash.
WHY SPOT-METERING IS OBSOLETE
The camera designer is in a quandary when designing any exposure meter. The meter cannot tell whether a bright subject is bright because it has high reflectivity or because it’s under bright light or some combination of each. He solves his quandary by making an assumption that all subject matter is of average tonality. Under that assumption, the meter can be thought to be measuring just the light falling on the subject. But it’s not true that all subjects are of average tonality. Some subjects are bright (think white trillium) and some subjects are dark (think big black beetles). So, the only way the photographer can always get a proper exposure is to understand the meter idiosyncrasy, to be on constant alert for nonmid-toned subjects, and to override (compensate) the meter reading as necessary.
Over years of shooting finicky slide film with my top-of-the-line Nikon and Canon cameras, I used Spot-metering exclusively. I developed a metering strategy that worked perfectly for me. I Spot-metered something representative of the important parts of the image and added or subtracted light as demanded by the metered area’s difference from average tonality. If the metered area was bright, I increased exposure by adding light. If dark, I reduced exposure by subtracting light. Yes, the compensation direction is counter-intuitive, but trust me, it is correct!
The system worked perfectly. Barbara and I taught it to thousands of our workshop students over twenty-five years. In fact many photographers attended our workshops just to learn that system that they’d heard so much about. But, woe is me! This exposure system, some of my most innovative ideas, is now antiquated and obsolete. With today’s digital cameras, you need only use your Evaluative or Matrix metering, check your histogram to ensure ETTR appropriate for your JPEG or RAW usage, compensate according to your RGB histogram and blinkies, and it’s an optimal exposure every time!
BE WILLING TO CHANGE
Although I invested zillions of hours in developing good Spot-metering strategies for use with slide film, I quickly abandoned the method when I realized it was unnecessary using digital cameras. Barbara and I make it a habit of questioning how we do things with our cameras. We find that it helps to occasionally try things we haven’t done before.
As an example, we’re not big fans of the Aperture-priority exposure mode, but Barbara uses it occasionally for wildlife photography, and I use Shutter-priority frequently for wildlife when it is the best exposure mode for the photographic problem at hand. Shutter-priority can be a big help on some occasions, such as when the light is changing so fast that I manually can’t keep up with it when photographing animals. We use it in those circumstances. So, do try new things. Don’t stay in the rut of old techniques when there are often new and better approaches to achieving your photographic goals. For close-up photography, however, we find little use for either mode. Should changing levels of ambient light be a problem, then the Aperture-priority exposure mode, which, unlike Manual exposure, monitors changing ambient light, is a logical choice to use, since depth-of-field is critical most of the time.
THE LANGUAGE OF STOPS
The idea of stops is a simple and precise means of thinking about controlling light in photography. The concept applies perfectly to ISO settings, to lens f/stops, to shutter speeds, and to flash output. You’re now reading a book on close-up photography, and that probably means that you’re already familiar with the stop concept, but for those who need a refresher, we’ll review it briefly.
ISO
An ISO number is a measure of the camera sensor’s sensitivity to light. The higher the ISO rating, the less light needed to form a properly exposed image. Every sensor has a native ISO rating, an ISO that will cause the sensor data to be used without electronic manipulation of the data. In most cameras the native ISO rating is either 100 or 200. Other ISO ratings can be achieved by electronic amplification of the sensor data, and by so doing the camera becomes much more versatile. However, a price is paid in greater image noise that appears as random specks of colors or brightnesses where they should not be. Noise tends to make the image appear less sharp.
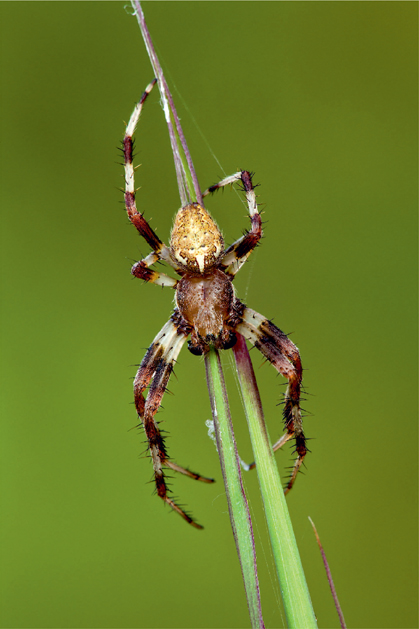
We love the pose this spider assumed while climbing. Although a Plamp is used to support the grass below the spider, a slight breeze gently wiggled the spider. To counteract the breeze, a higher than normal ISO is used to allow a faster shutter speed. Canon 5D Mark III, 180mm, 1/30, f/18, ISO 640, Shade, fill-flash.
Image noise may be meaningless or unacceptable, depending on the ISO used, the characteristics of the camera, the nature of the subject matter, and the intended use of the image. Noise reduction software can be utilized in post-processing to reduce the harmful effects of noise.
A camera with a native ISO of 100, for example, might offer additional ISO standard settings of 50, 200, 400, 800, 1600, 3200, 6400, 12,800, and even much higher. Note the numbers are doubles or halves of the adjacent number. That means that each ISO standard setting is either twice as sensitive to light as the next one, or half as sensitive as the next one, depending on which way you are looking. As with shutter speeds and apertures, each doubling or halving of the light is a change of 1 stop.
ISO 1600 is 1 stop more sensitive than ISO 800. If ISO 800 gives correct exposure, then ISO 1600 will give correct exposure with only one-half of the light. If ISO 1600 is needed to give correct exposure, then images shot at ISO 400 will be 2 stops underexposed, assuming, of course, the shutter speed and the f/stop remain the same. That doubling and halving of light is the crux of stops theory, and we’ll be talking lots more about it. And while we’ll be talking about ISO changes in terms of stops, be aware that most cameras offer the opportunity to change ISO numbers in increments smaller than 1 stop, and offer in-between ISO settings of 1/3 stop increments.
Although the native ISO always gives the best image quality, sometimes we must use a different ISO because of other considerations. We may be in dim light, or may need a high shutter speed to arrest subject motion, and so we need to compromise. With many modern cameras, shooting at ISO ratings modestly above the native ISO compromises image quality so very little that it’s wise to do so.

Bracken ferns wiggle if any air moves. This leaf has two Plamps attached to it, one on the right and one on the left to help it remain still. Even with two Plamps, it still trembled from time to time. Therefore, the shutter speed is increased by increasing the ISO to allow it. Nikon D3, 200mm, 1/15, f/22, ISO 400, Cloudy.
In close-up photography, the native ISO is preferred. Yet if a combination of native ISO of 100 and a small aperture needed for depth-of-field results in a shutter speed of 1 second, and 1 second is too long for the wind-blown flower, then now’s the time to hike up that ISO and increase the shutter speed. Raise the ISO by 3 stops, going from ISO 100 to ISO 800, and you can now raise the shutter speed by the same 3 stops, going from 1 second to 1/8 second. At 1/8 second your battle against the wind is much improved if you wait for a temporary lull!
SHUTTER SPEED
The shutter speed is the length of time that the shutter remains open and allows light to strike the sensor. The faster the shutter speed, the less light is received. So, while we use fast shutter speeds to arrest both subject motion and camera motion, we must deal with the exposure implications of less light. When we use long (slow) shutter speeds to capture a lot of light, we must deal with the motion issues.
A typical camera offers shutter speeds ranging from 30 seconds to 1/8000 of a second in 1 stop increments. The sequence might be, in seconds:
30, 15, 8, 4, 2, 1, 1/2, 1/4, 1/8, 1/15, 1/30, 1/60, 1/125, 1/250, 1/500, 1/1000, 1/2000, 1/4000, 1/8000
Notice that the sequence is in stops. Each shutter speed is half or double the one next to it, so that a shutter speed change of 1 stop either doubles or halves the amount of light passed. As with f/stop settings, smaller increments of 1/2 stop or 1/3 stop are often available.
There is frequently an additional setting, called B or Bulb. The Bulb setting allows you to open the shutter on demand, and then close it on demand. It’s used for shutter openings longer than 30 seconds, and while handy for such long exposure projects as shooting fireworks and star trails, it has little use in close-up photography.
One additional consideration is the minimum shutter speed usable while handholding the camera. A common rule of thumb for handholding is the slowest shutter speed usable while handholding is the reciprocal of the lens focal length. So when using a 200mm lens, always use a shutter speed of 1/200 second or faster. Perfectionists among us and users of electronically stabilized lenses may modify the rule. Whenever possible, use a tripod. Most of your close-up shooting will be on a tripod, not only to arrest camera motion but, importantly, to allow careful image composition and precise focus.
In close-up photography, shutter speed control is particularly important. You should memorize the different shutter speeds offered by your camera and know how to change light by the number of stops you need. A slower shutter speed offering more light will cause histogram data to move right, and conversely, a faster shutter speed moves it to the left. Most of your close-up shooting will be on a tripod, not only to arrest camera motion but equally importantly to allow careful image composition and precise focus. You will often be using a small aperture such as f/16 or f/22 because of your need for a relatively large depth-of-field. You will also want to use the lower ISO settings because of the better image quality. With all of those parameters limited, you need the flexibility of the wide range of shutter speeds to control exposure.
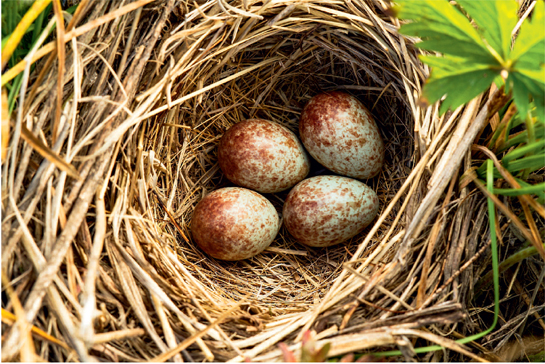
While photographing wildflowers along a high mountain stream, a White-crowned Sparrow flushed nearby. I quickly noticed the four eggs in the ground nest. I switched to ISO 800 which gave me enough shutter speed to handhold the camera—something we rarely do. I photographed the eggs in less than 1 minute and left the area to allow the bird to return. Canon 5D Mark III, 180mm, 1/125 second, f/11, ISO 640, Cloudy.
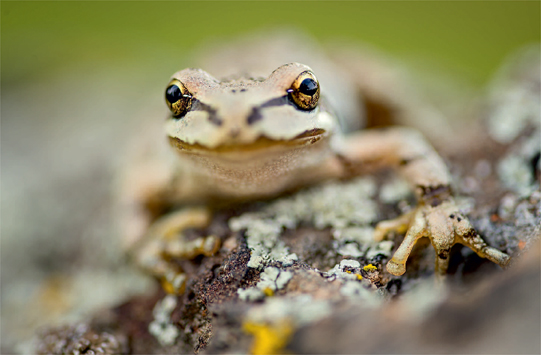
Depth-of-field is the zone of acceptable sharpness. It is primarily determined by subject magnification and the aperture. Notice how small the zone of sharpness is on this Pacific Chorus Frog. Nikon D4, 200mm, 1/60, f/5.6, ISO 100, Cloudy.

The zone of sharpness is much greater when the frog is photographed at f/22. Nikon D4, 200mm, 1/2.5, f/22, ISO 100, Cloudy.
DEPTH-OF-FIELD
When a camera is focused at any given distance, only objects at that distance are truly sharp, but objects a bit closer and a bit farther may be acceptably sharp because of the characteristics of the human eye and brain. The distance between the nearest acceptably sharp objects and the farthest acceptably sharp objects is called the depth-of-field (DOF).
Several factors affect DOF, but subject magnification and lens aperture (f/stop) are the major considerations in most close-up work. Greater magnifications reduce DOF and larger apertures reduce DOF as well. Magnification is generally dictated by the size of the subject and by the desired image, so aperture remains as the primary DOF control parameter. The smaller the aperture, the greater the DOF, so a great deal of close-up work is done at f/16 and f/22. Don’t forget to use the ISO as an aid in selecting a suitable aperture! A higher ISO will allow you to shoot with a smaller aperture.
F/STOP AND APERTURE
A lens’s aperture and its f/stop are not precisely the same thing, but the two are intimately related. Nonetheless, many photographers use the term interchangeably, as I do. Technically, aperture refers to the size of the adjustable iris hole through which the light passes, and it can be user adjusted from its design maximum to its design minimum.
The f/stop precisely describes the math relationship between the lens focal length and the size to which the aperture has been adjusted. It’s the ratio of lens focal length to aperture diameter. As an example, a 55mm lens adjusted to an iris diameter of 5mm is set to an f/stop of f/11 (55mm divided by 5mm). Ignoring the technical distinction, most photographers will simply say that the above lens is set to an aperture—rather than an f/stop—of f/11.
Although smaller and smaller apertures give greater DOF, there’s a problem. As the aperture’s iris gets smaller and smaller, a greater percentage of the total light passing through the aperture strikes the edges of the fine blades of the iris. In so doing they are bent, or diffracted, from their original path, resulting in image softness. The effect is called diffraction. Putting it in perspective, a 20mm lens at f/32 has an aperture of 0.625mm or only 0.025 inches—the thickness of a matchbook cover. Through such a small aperture, so much light is diffracted that the image softness is unacceptable. That’s why short focal length lenses, like the 20mm lens, rarely offer such small aperture choices as f/32. Using such a small f/32 aperture yields great depth-of-field, but little is sharp due to the deleterious effects of diffraction. For this reason, we tend to avoid even f/22 with our macro lenses, and normally use f/16 or f/18 when we seek the maximum depth-of-field.
The f/stops or f-numbers to which one can set a lens, just like ISO settings and shutter speed settings, run in stops. The standard f/stop numbers are:
1 1.4 2 2.8 4 5.6 8 11 16 22 32 45 64
A fast glance shows that these numbers are not halves and doubles like ISO and shutter speed numbers. Why not? Well, to double and halve the amount of light passing through, we must double or halve the area of the aperture circle, not its diameter. The area of the aperture is not linearly related to its diameter, so we get these funny numbers. Nevertheless, changing an aperture from f/5.6 to f/2.8, a change of 2 stops, does indeed quadruple the amount of light passing through, and changing the aperture from f/11 to f/16 cuts the light in half. Like the shutter speed settings, the lens f/stops are often adjustable in 1/2 stop and 1/3 stop increments.
Remember that the small apertures are those with the big numbers like f/16, and large apertures are those with small numbers, like f/4. Here’s a question: If your 200mm lens is set to f/22 and your 20mm lens is set to f/22, which lens has the larger aperture? The arithmetic above shows that although both lenses at these settings pass the same amount of light to the sensor, the aperture in the 20mm lens is much smaller, thus creating more diffraction-induced softness at f/22.
THE LAW OF RECIPROCITY
Wow! The very name sounds complicated, eh? Well, not so, now that we can speak in stops. Let’s look at it. Assume that at some ISO, we have a good exposure at 1/60 of a second and f/8. We need additional depth-of-field, however, and would like to use f/16. We recognize that we’d be reducing the light by 2 stops, so we merely cause the shutter to be open 2 additional stops from 1/60 of a second to 1/15 of a second. The exposure of 1/60 second and f/8 gives the same amount of light as an exposure of 1/15 second and f/16. The two exposures are reciprocal exposures. Let’s try one more.
Say we have a good exposure at 1/125 second and f/11, but our fast-moving butterfly wings are blurred. We need a faster shutter speed. We can increase the shutter speed to 1/1000 second, a light lowering change of 3 stops. To maintain the correct exposure, we just open the aperture by the same 3 stops, going from f/11 to f4. F/11 at 1/125 second and f/4 at 1/1000 second give the same exposures because they are reciprocal exposures.
Likewise, changes in ISO expressed in stops have the same effect as changes in shutter speed and/or apertures. Suppose that on an overcast day we’re shooting a wiggly caterpillar using ISO 100, 1/8 second, and f/16. The caterpillar is moving around a bit and we’d like to use a higher shutter speed, say 1/125 second. That reduces the light by a full 4 stops. To compensate by changing the aperture, we’d have to open the aperture by 4 stops, to f/4 but at f/4 we’d have inadequate depth-of-field to keep the entire caterpillar in sharp focus. But wait! We’re not done! We can increase the shutter speed by the necessary 4 stops, leave the aperture at the f/16 we need for good DOF and just compensate for the higher shutter speed by raising the ISO 4 stops from 100 to 1600. At ISO 1600 we might get a little noise in our image, but at least we’d have a sharp caterpillar! Thinking in stops makes it all easy! Admittedly, if stops are new to you, then it will take some time and effort to become comfortable with them. There is little choice here for you must learn to speak the language of stops to gain complete control over exposure.
EXPOSURE MODES
PROGRAM (P)
Program (P) is a fully automatic exposure mode commonly used by beginners who either don’t understand the camera or by those who don’t want to be bothered by having to control their camera. In this mode, the camera meter assesses subject brightness and the camera’s software uses a set of not necessarily true assumptions to reach an ISO setting, aperture setting, and shutter speed setting that will make a good exposure. Some camera makers, Canon for example, use the term standard exposure instead of good exposure. Unfortunately, the software doesn’t know how fast the subject is moving, how much DOF the photographer desires, whether the user is handholding or using a tripod, or the all-important tonality of the subject. So the Program mode can give a good result much of the time, but gives less than optimum results lots of times. It’s not commonly used by serious photographers, though some outstanding photographers find it useful. We sometimes use it to photograph our small party after we have had a little too much wine. When I don’t want to or can’t think too clearly, I use it to make the decisions for me. Perhaps P stands for the party mode!
SHUTTER-PRIORITY (S OR TV)
This is a semi-automatic exposure mode that requires the user to manually select the ISO and the preferred shutter speed. Then, based on the metered subject matter, the camera automatically selects the correct aperture to make a good exposure. Again we’re faced with the fact that the camera cannot compensate for subject matter tonalities far from average, so the shooter, as always, must remain alert to the need for exposure compensation.
Shutter-priority is not an effective mode when shooting closeups on a tripod because the aperture will be changing around with subject brightness, and in those circumstances we generally want the aperture to be controlled for DOF purposes. Sometimes, though, Shutter-priority will make sense, such as when handholding and you need to maintain a certain shutter speed to arrest camera motion. Most camera makers use the letter S on the controls to identify this mode, although Canon uses Tv for time value. It would be helpful if the photo community standardized their terms and icons.
APERTURE-PRIORITY (A OR AV)
This semi-automatic exposure mode requires the user to manually select the aperture and the ISO. Then, based on the metered subject matter, the camera automatically selects the correct shutter speed for a good exposure. Once again, the photographer must compensate for non-average subject tonality or exposure problems caused by contrasty light. We’ll later expand on that and some other problems of using automatic exposure modes.
Most cameras designate this mode on their controls by the letter A, but Canon uses Av for aperture value. Many outstanding close-up photographers actually use this mode, but read on to consider some of the problems.
MANUAL EXPOSURE (M)
Barbara with her Nikons and I with my Canons use Manual exposure for the vast majority of our close-up, landscape, and wildlife photography. We manually choose ISO settings, shutter speeds, and apertures, completely controlling our cameras and leaving nothing to unknown software mavens making unspecified assumptions and unidentified compromises. We regularly achieve superbly exposed images using the meter’s exposure indicator scale that appears in the viewfinder along with the RGB histogram and the highlight alert. We’ll shortly expand on these methods.
EXPOSURE MODES AND METERING MODES
We’ve already addressed this, but modes are important enough to review. The term metering modes refers only to how the meter operates, and the viewing patterns it uses to determine the recommended exposure data. The common metering modes are Spot-metering, Partial Metering, Center-weighted Metering, and Evaluative or Matrix Metering. The term exposure modes, however, refers to how the camera uses metered exposure data in such automated exposure modes as Program, Aperture-priority, or Shutter-priority, or by the photographer using the Manual exposure mode. Some cameras offer a few additional automatic modes for specialized subjects like flowers, sports, landscapes, and others, but we find little reason to use them. Nevertheless, the Manual and Aperture-priority exposure modes remain the most useful choices for close-up photography.
THE TROUBLE WITH AUTOMATIC EXPOSURE MODES
We’ve already touched on the metering problem, but let’s look at it in more detail. It’s important because a thorough understanding of the meter’s behavior allows a much easier mastery of exposure. It gets back to the problem of designing an exposure meter because two variables affect the light reflected from the subject.
One variable is the intensity of the light falling on the subject. It’s called the incident light. Strong incident light, bright sunlight for instance, can make dark objects look bright and bright objects even brighter. Weak incident light makes bright objects look dark and dark objects even darker. The second variable is the reflectance of the subject, which determines the percentage of the light falling on the subject that’s reflected. Dark objects like a Mourning Cloak butterfly have low reflectance and reflect a small portion of the light falling on them. Bright objects like the white petals of a flower have higher reflectance and reflect a larger portion of the light falling on them.
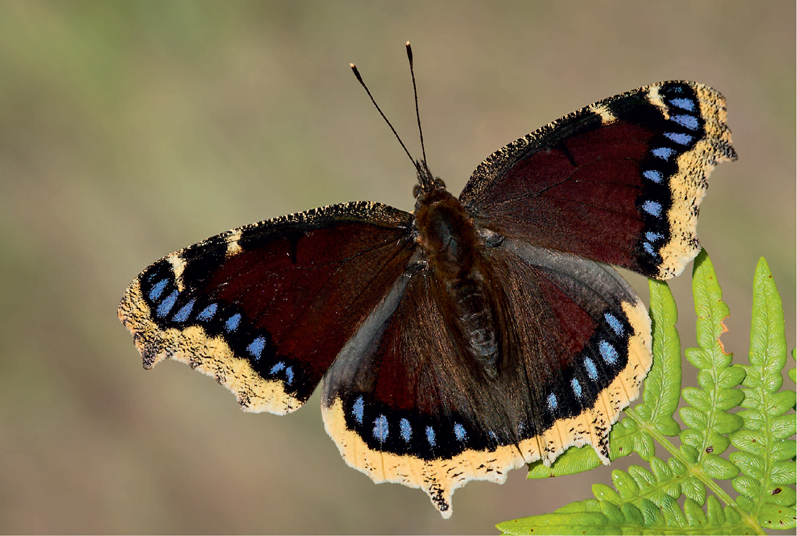
The Mourning Cloak butterfly is dark overall. Nevertheless, still expose to make the rightmost data closely approach the right wall of the histogram. Do not clip the highlights by climbing the right wall. Nikon D4, 200mm, 1/40, f/22, ISO 200, Sun.
Here’s the fundamental question: When a camera meter measures a certain amount of light reflected from the subject, is it because of the subject’s reflectance or because of the intensity of the incident light? A little of this and a little of that? More of the other? The meter can’t tell. But, if it doesn’t know, it can’t provide the proper exposure.
To resolve the matter, the meter engineer makes a big assumption! The engineer assumes that all subject matter is of medium reflectance. He ignores white flowers, he ignores black Mourning Cloak butterflies, and he assumes that all subjects reflect about 18 percent of the incident light falling on them. He picks that 18 percent number because over the years most people interested in the matter have concluded that on average, the world we live in reflects that amount of light. For us close-up photographers, though, many wonderful subjects deviate considerably from 18 percent reflectance, so the meter often fails us.
An object of any color that reflects about 18 percent of the light that falls on it is said to be a mid-toned object, or to have middle tonality. Clear blue skies in mid-afternoon are approximately mid-toned blue. So are your blue jeans. General foliage, on average, on an overcast day, is about mid-toned green. The palm of your hand is about 1 stop brighter than mid-toned, that is to say, twice as bright.
By assuming everything reflects exactly 18 percent of the incident light, then the light reflected from any subject can be a measure of the incident light. Now, the meter can give us some answers. But wait! What if the subject isn’t mid-toned? What about dark leaves? What about white petals? Black butterflies? Now we have a new problem. The engineer’s assumption results in meter readings making all images turn out mid-toned. Our meter reading of the black butterfly will produce an image of a mid-toned gray butterfly. Our meter reading from the white flower will give an image of a mid-toned gray flower.
This time it’s up to the photographer to solve the problem. The competent shooter must know what mid-toned subjects look like, and when the subject is not mid-toned, compensate for the meter’s wrongful assumption.
When metering the black butterfly, the photographer needs to reduce the light a bit to avoid an image of a gray butterfly and get an image of a black butterfly. Here, minus a stop or so should do the job.
When metering the white flower, the photographer needs to increase the light a little to avoid an image of a gray flower and get an image of a white flower. Here, plus a stop or perhaps 2 stops should do the job.
The above concepts apply not only to black and white subjects, but apply equally to all colors, be they light, dark, or mid-toned.
The knowledgeable photographer using an automatic exposure mode adjusts the camera’s exposure compensation control to override the meter’s recommendation. Be careful here. Your camera also has a flash exposure compensation control, usually denoted with a plus and minus symbol and a zigzag arrow. We’ll say more about this in Chapter 5. Be sure to use the ambient light exposure compensation control.
The knowledgeable photographer, using the Manual exposure mode, adjusts ISO, shutter speed, or aperture, or some combination, to override the meter’s recommendation.
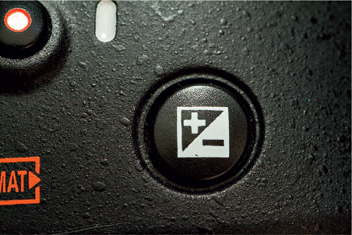
Here’s the icon for adjusting the ambient light exposure when using an automatic exposure mode. It represents the Exposure Compensation (EC) control.
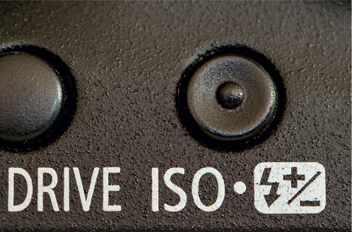
An icon that includes a plus and minus symbol and a zigzag arrow (think lightning bolt) indicates the flash exposure compensation (FEC) control.
By all means make certain you understand the information in this section, and if not read it over and over until you do. To a high degree, a good gut feel for these concepts separates the skilled photographers from the snapshot takers.
LIGHT THROUGH THE VIEWFINDER
Throughout the first thirty years of my career, I used Manual exposure exclusively. When I switched to digital cameras in 2003, I tried some Aperture-priority shooting because of the convenience of the histogram and highlight alerts. I was photographing one day in a Michigan bog where I’d found a tiny carnivorous sundew plant. Using a Canon 65mm macro lens at more than twice life-size, I filled the frame with a tight image of the leaf with its shiny dewdrops, and I shot in Aperture-priority. My histogram showed nearly 2 stops of underexposure. I instinctively added a couple of stops of light by setting the exposure compensation control to the plus 2 stops of light position and shot again. Again, an underexposed histogram. Huh? Why should an additional 2 stops of light still give an underexposed image? I couldn’t understand that. I switched to the Manual exposure mode and that made everything work just fine. It became clear there was some problem with the camera’s Aperture-priority mode. Luckily, before shipping the camera back to Canon, I remembered that the instruction manual had mentioned something about a little plastic gizmo to be attached to the viewfinder when in automatic modes. I’d long lost the little plastic shield, but the thought was enough to give me a clue to help me understand what had happened.
When in any of the automatic modes, Aperture-priority, Shutter-priority, Program, or any other, the metered data from the subject is measured through the lens and delivered directly to the camera to form the exposure. However, an uncovered viewfinder allows light to enter the viewfinder opening and mix with the light coming through the lens, thus seriously corrupting the meter reading.
After writing the above paragraph, I tried it with my present gear just to make sure I’d written about it correctly. I set up a test using Aperture-priority and pointed the camera at a dark subject in the shade while bright sunlight shone on the viewfinder eyepiece. I added a polarizing filter and a Kenko 36mm extension tube to the optical path. I shielded and unshielded the viewfinder opening, and allowing it to remain unshielded resulted in an astonishing 6 stops of underexposure! I had set up a worst case scenario. Pointing the camera lens at a dark subject in the shade, adding a polarizer and extension tube, and letting the bright sun strike the unclosed viewfinder all served to make the light through the viewfinder problem more severe. I could have made it worse, though, by adding a 2x teleconverter to the camera. Try this yourself to help you fully understand this enormous problem that you run into frequently when shooting close-ups.
Some cameras, as mentioned, provide a plastic shield to cover the viewfinder, and some cameras have a built-in shutter curtain to cover the viewfinder. When using any automatic mode with your eye away from the viewfinder, use your hat or your hand or your viewfinder shields, but always make sure your viewfinder opening is covered.
In concluding this topic, here’s a final thought. The viewfinder problem is generally considered an issue peculiar to automatic modes. However, a student of mine tells of a time when his Nikon was in Manual exposure mode on a tripod. My (he says luckless, I say careless) student and close friend were standing alongside the tripod viewing his metering scale on the top LCD panel and not through his viewfinder, thus leaving his viewfinder uncovered. This caused him to set an exposure that was too dark.
CHANGES IN SUBJECT SIZE
A beautiful white flower growing among rich green leaves cries out to be photographed. Using an automatic exposure mode, you put on your macro lens and make a lovely composition in which the flower petals fill about a third of the frame. The meter makes a reading based on a 30-70 percent mix of white and green and delivers that information to the camera. You remember to cover your viewfinder and you shoot. With the very white flower, that 30-70 percent mix might just average out to be around mid-tone, and your resulting picture is splendid. It’s so good that you want to shoot another image with the flower even bigger!
Remaining in Aperture-priority, you move closer to the flower, which now fills 90 percent of the image frame. You shoot again. Now, the 90 percent white image, only 10 percent green, averages out to be much brighter—perhaps at least a stop above mid-tone. You shoot. The meter, required by its very heritage to produce mid-toned images, delivers appropriate exposure data to the camera, the shutter speed is increased, and you get a very sad appearing gray flower. This is simply one more reason to consider using Manual exposure to avoid having the camera change the exposure without your permission.
DIFFICULT OPERATING CONDITIONS
It’s dark. It’s frigid. Your fingers are cold. You’re shivering. You’re wearing gloves. You’re getting more and more frustrated. The outstanding photograph is unfolding right in front of you, and any or all of these conditions are making it really tough to smoothly use the camera’s controls. Many photographers, having experienced such conditions, conclude that it’s much easier simply to further turn a shutter speed dial or an aperture dial that they’re manipulating anyway, rather than to seek out and fiddle with a separate Exposure Compensation dial. That alone convinces many shooters to stick with Manual exposure.
A THIRD HAND
Good close-up technique often requires use of a remote release to trip the shutter so that camera motion is eliminated. If one hand is thus occupied, and the other hand is busy holding the flash, your reflector or diffuser, which hand will you use to block the viewfinder? Using Manual exposure and determining the exposure while looking through the viewfinder to block extraneous light ingress will always eliminate the viewfinder problem. While it is true that most photographers who use any of the other automatic exposure modes also look through the viewfinder and block the light, the problem arises when they remove their eye to shoot the image with a remote release or 2 second self-timer, allowing the camera to automatically change the exposure unfavorably.
AUTOMATIC EXPOSURE USING LIVE VIEW
Another way to get along with automatic exposure modes is available if your camera offers a Live View mode and live histogram. The live histogram shows exposure data for the image about to be made while the shutter is open and the mirror is up, forming the Live View image. The mirror being up prevents any viewfinder light ingress. So you merely set the desired aperture or shutter speed according to your preferred mode, adjust the other parameter with the exposure compensation control to achieve a good histogram as we’ve discussed, shoot, and enjoy your well-exposed image!

Some cameras provide a live histogram when using the Live View mode. It offers a quick way to get close to the optimum exposure. However, once the image is shot, be sure to check the actual histogram the image generates.
Magnifying the Live View image is the best way to sharply focus the lens on the most important part of the subject when using manual focus. In the interest of full disclosure, we seldom use the live histogram for exposure, but nearly always use a magnified Live View image for focusing and for detecting subject movement.
A downside to the method is that the Live View shooting consumes lots of power and your battery won’t thank you. So it’s a good idea to minimize Live View usage, or perhaps a better idea to carry one or two extra fully charged camera batteries. Please ensure that batteries are carried safely! If the unprotected terminals of the battery in your pants pocket are accidentally shorted out by your car keys, you’re going to get a quick, but unhappy, introduction to hot pockets!
Yet another downside to the Live View scheme is that in much of our close-up work, we use flash to open shadows, to reveal texture, to improve color, or to control background tonality. When flash is in use, the cameras we use deactivate the live histogram, depriving us of that feature. The live histogram display on my Canon cameras turns gray when a flash is attached to the camera and turned on, telling me it cannot give an accurate reading because it does not know how much light will be added to the image from the flash. Barbara and I use flash for more than 75 percent of our close-up work, so the Live View technique for metering usually isn’t that valuable to us. Of course, the flash could be turned off, the live histogram used to get the ambient light exposure, and then the flash could be turned back on. That does work, though it is a cumbersome and messy way to do it. We use Live View to manually focus and then turn it off.
MANUAL EXPOSURE TECHNIQUES
Barbara and I use Manual exposure modes for the vast majority of our shooting. Lest we seem in a technical rut, and before expanding on Manual exposure considerations, let me say that in our wildlife shooting, we use Aperture-priority a little and Shutter-priority frequently. We use them when the ambient light is changing so fast that we just can’t keep up with the changes. Having said that, rapidly changing ambient light is a minor and infrequent problem in our closeup work.
In Aperture-priority and in Shutter-priority, the photographer sets two control parameters and the camera automatically sets the third. The photographer using Manual exposure sets all three. Yes, one more control to set, but the problems of the automatic modes are largely wiped out.
This is a point I need to emphasize to so many beginners, so important that I hope you’ll indulge my doing it again here and now:
When the camera is in Aperture-priority or Shutter-priority, the meter’s data is delivered to the camera, and the camera sets the third parameter.
When the camera is in Manual exposure, the meter’s data is delivered not to the camera, but to the photographer, and the photographer sets all three parameters—the ISO, shutter speed, and aperture (f/stop).
In either automatic or Manual modes, good photography more often than not requires the photographer to compensate the exposure, but it’s generally easier and faster using Manual exposure.
Absent photographer intervention, there is absolutely no exposure difference in the resulting images. None! This is not well understood, so let me explain. Using Manual to adjust the exposure to make the indicator align with the zero position on the exposure scale in the camera’s viewfinder is exactly what the camera does automatically when using Shutter-priority, Program, or Aperture-priority if the exposure compensation control is set to zero.
Reader, do get used to Manual exposure. Once you’re used to it, you’ll find it to be both fast and accurate, and you’ll probably relegate auto modes only to special occasions. To become comfortably fast with manual methods, memorize the standard set of f/stops, the standard set of shutter speeds, and the standard set of ISO settings. Ensure you’re fluent in thinking in stops. With a little study and practice you can quickly change exposures this way and that doing nothing but counting clicks when the shutter speed or aperture dial is turned without even bothering to look at the camera!
Accomplished close-up photographers tend to work in favorably low contrast light of adequate intensity to give a proper exposure with camera settings appropriate to the image. Using the proper settings means a preference for the native ISO to ensure minimal image noise, a preference for a small enough aperture to ensure adequate depth-of-field, and a high enough shutter speed to ensure arresting any subject or camera movement.
Incidentally, another good reason to use the camera’s native ISO, when possible, is that generally the camera’s dynamic range is greatest at the native ISO and the maximum amount of subject contrast can be captured in the image without loss of highlight or shadow detail.
Let’s photograph a pink flower. I set the ISO to the native 100 of my Canon 5D Mark III camera. I want to have as much of the flower in sharp focus as reasonably possible, so I choose f/16 to maximize depth-of-field. On this bright overcast day, my meter suggests a shutter speed of 1/8 second, and I shoot. Drat! My lovely pink flower is rendered a dark and dingy pink. There’s that meter again, making everything mid-toned! I check the RGB histogram that appears on the LCD after the first image is shot, and because the pink flower is predominately colored by reds, I find that the data of the red-channel histogram is farthest to the right, but not nearly far enough. I need to add some light. Okay, I just decrease my shutter speed three clicks to 1/4 second, a +1 stop change in the light, and now I have my nice flower image. I double-check the RGB histogram, and now I find that the rightmost part of the red channel histogram is touching the right wall of the graph space.
By the way, in my camera menu I’ve chosen the 1/3 stop option for my control increments. Every click on my ISO, aperture, and shutter speed dials changes the setting by 1/3 stop and every three clicks changes the setting by a whole stop. By counting clicks as I turn my exposure control dials, I know my camera settings without even looking at the camera.
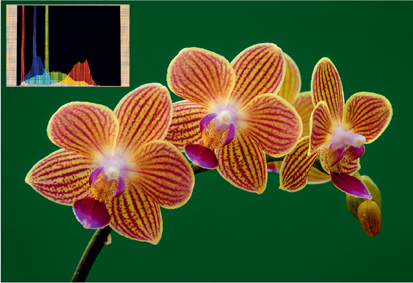
We photographed this domestic orchid in our greenhouse on a cloudy and windy morning. This image is 1 stop underexposed. This creates more noise in the shadows, less overall detail, and a reduction in color tones. Notice the rightmost red data is quite far from the histogram’s right wall. Canon 5D Mark III, 180mm, 1/6, f/18, ISO 250, Shade, fill-flash.
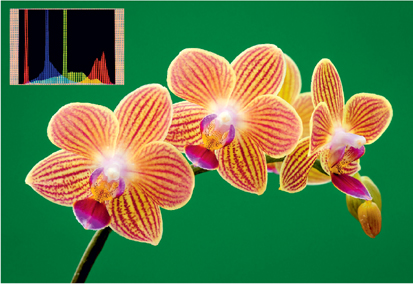
The orchid is properly exposed in this example. The histogram graph shows a better overall distribution of tones and the rightmost red data is snuggled up to the right wall of the histogram. Canon 5D Mark III, 180mm, 1/3, f/18, ISO 250, Shade, fill-flash.
SPEEDING UP THE MANUAL EXPOSURE PROCESS
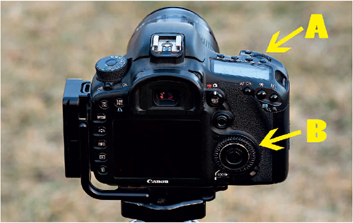
Here’s the view of the back of John’s Canon 5D Mark III camera. The top right main control dial (A) adjusts the shutter speed. Turning this dial clockwise slows the shutter speed down which adds light to the exposure. Please know that Manual exposure is being used. Turning the main control dial counterclockwise does the opposite. The control dial (B) on the back of the camera adjusts the aperture. Turning it clockwise opens the aperture which adds light to the exposure. Turning it counterclockwise stops the lens down more and reduces the exposure. It is crucial to know where your shutter speed and aperture controls are without looking at the camera and you should instantly know which way to turn the dial to add or subtract light to make exposure simple and fast. Note: A custom function is set to make both of these dials reverse direction to make it more logical.
It makes for efficient camera usage to know exactly where a specific control is on your camera body. Cameras are different, so memorize the location of your ISO control, your aperture control, and your shutter speed control. Sometimes cameras have more than one knob or dial available to assign an exposure control to it. One of them may be more convenient than the other. Also, some cameras have one or more programmable controls that can be made to do a user-chosen duty. Memorize your control locations! It’s extremely convenient to be able to manage your camera, especially the shutter speed and the aperture, when not even looking at it! Memorize it with your hands!
THE EXPOSURE SCALE
In any exposure mode you will see an exposure scale appearing somewhere, probably inside the viewfinder, usually at the bottom. Here’s an example:
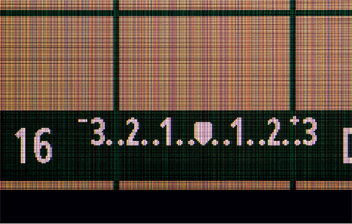
Your camera probably has an exposure scale in the viewfinder, in an LCD window on the camera, or both. Take the time to understand and know your scale. This Canon 5D Mark III scale that appears in the Live View image and in the viewfinder shows plus and minus 3 stops of light in 1/3 stop increments. Adding light (+) is on the right side of the scale and subtracting light (−) is on the left side.
The sample exposure scale shown covers a range from −3 stops on the left through zero and then up to +3 stops on the right, in increments of 1/3 stop. However, some cameras have scales from −2 stops to +2 stops instead, and most of today’s DSLRs allow user selection of increments of 1/2 stop or 1/3 stop, although most photographers select the more precise 1/3 stop increments. My own Canon 5D Mark III has a +/− 3 stop scale in 1/3 stop increments, and so does Barbara’s Nikon D4.
It’s not uncommon for some new shooters trying Manual exposure to become frustrated when nothing happens on the exposure scale as they twist and turn the dials for ISO, aperture, and shutter speed. Almost always the reason is that the exposure indicator (pointer) is off the scale. If, for example, the meter is recommending f/4 but the lens setting is f/22, the pointer is trying to show a 5 stop underexposure. However, with a scale that only goes to −3 stops, the pointer won’t even get on the scale until the lens setting is closer to the meter info. Many cameras provide a flashing signal or small arrow to aid the shooter in recognizing the condition and to point in which direction to correct the exposure. Watch out! This always happens when you’re handling the camera with its lens cap on!
REVERSING THE EXPOSURE DIALS
During a 2007 Michigan photo workshop, one clever student quickly came to appreciate the many merits of Manual exposure and promptly adopted it. One day he asked me in exasperation, “Why do I have to turn my shutter speed or aperture dial to the left to add light and move the histogram data to the right?” It was confusing him and seemed counterintuitive. Me too! His irritation brought to mind that buried in the camera menus (he was using the same Canon 5D Mark II camera as I) was an option to reverse the direction of the control dials. One could change the shutter speed dial and the aperture dial to make turning them to the right (as viewed from the rear of the camera) add light and move the histogram data to the right. Of course, to decrease the exposure, turn the dials to the left, the same direction you want the histogram data to move. In my Canon menus I found the correct custom function. It is called Dial Direction during Tv/Av. Although not said, this custom function works with Manual exposure, too. After making the changes, the histogram moved back and forth in the more intuitive manner when turning the control dials. Both student and teacher smiled at how much more expedient the camera became.
Some Nikons offer another nice feature. They allow the user, via the Custom Functions menu, to reverse the direction of the exposure indicator scale, too. The default Nikon scale has the (+) end of the exposure scale on the left end and the (−) end of the scale on the right end. (The Canon exposure scale is made with the plus side on the right.) This is often confusing to some, but it’s easy to reverse the scale and get it into the more logical orientation. Although not all cameras offer the flexibility of reversible dials and reversible exposure scales, if your camera does, be sure to take the time to set it up and maximize your personal comfort. It will make working with the camera’s exposure controls much easier.
CALIBRATING THE HISTOGRAM DISPLAY
When looking at histogram data that you’d like to move within its graph space, it’s very convenient to know just how much light change is needed to move the data a desired amount. The histogram graph spaces of most cameras have fine vertical lines dividing the graph space into segments. You can make your exposure changes much more efficiently if you know just how much exposure change is needed to move the histogram data from one line to another.
Calibrate your histogram display because it makes arriving at the optimum exposure quicker. Notice the left and right walls of this Canon histogram display. Also notice the extra four vertical lines within the walls. Photograph a white piece of paper to determine how much light must be added or subtracted to move the histogram data one entire vertical line. Adjust the exposure from the white paper to make the histogram spike coincide with the line immediately to the left of the right wall. Now add light in 1/3 stop increments until the data spike aligns with the right wall. The amount of stops it takes to do this is the increment value. With my Canon 5D Mark III, I must add about 1.3 stops of light to move the histogram data from one vertical line to the next one on the right.
The Nikon D4 histogram display has one less vertical line between the histogram walls. It takes about 1.7 stops of light to move the histogram data from one vertical line to the next.
Here’s how to learn. Shoot a plain white sheet of paper in even light, with the paper filling the frame. Since all tones of the image are the same white, the resulting histogram will approximate a thin vertical line. Now take additional shots at different exposures to make the histogram move around in the graph space until the column of histogram data is over one of the fine vertical lines. Use one of the lines near the center. Now increase the exposure in 1/3 stop clicks until the histogram data coincides with the next vertical line to the right of the one you started with. The change in exposure to move the histogram from one vertical line to the other is what you want to know.
Now, whenever you look at your histogram and see that your histogram should be moved this far or that, you need only note how far in terms of the vertical lines of the graph space, and you can make the correction in probably only one jump. It eliminates a lot of the time-consuming guesswork of zeroing in on the correct exposure when I learned that my Canon camera has vertical graph space lines about 1 stop and a tiny bit more apart. That’s close enough to 1 stop for my purposes. Suppose the rightmost data of my histogram is about 2/3 of the way from the right wall of the graph space. Thinking ETTR, I recognize that as being about 2/3 stop underexposed. I merely change one of my 1/3 stop exposure controls by two clicks toward more light, and without so much as looking at a knob, I’ve got a perfect exposure! Incidentally, while Canon cameras typically have six vertical graph space lines (including the left and right wall of the histogram graph) and in my camera they’re about 1 stop apart, Barb’s Nikons have five vertical graph space lines about 1 2/3 stops apart between the left and right wall of the histogram. So one needs to do a slightly different calculation with the Nikons, but it nonetheless significantly speeds up exposure changes.
CONCLUSION
I hope you’ve concluded that Barbara and I vastly prefer using Manual exposure in most of our photography, but especially in our close-up and macro work. By teaching literally thousands of students in our workshops, we’ve consistently seen that most quickly learn the techniques, learn to expose quickly and correctly, and never look back.
In spite of our preferences though, for those who do choose to use automatic exposure modes, know that Aperture-priority makes the most sense in changing light because of the importance of depth-of-field control in close-up work. Besides, as we’ve said, Aperture-priority is particularly useful in conjunction with Live View and the live histogram.
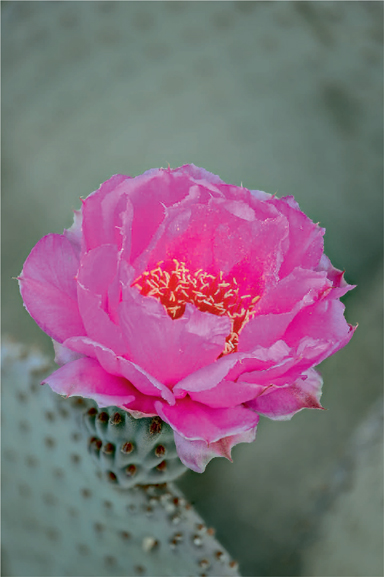
Beavertail cactus bloom during March in Tucson, Arizona. Barbara focused the entire blossom sharply while keeping the cactus pads behind it out of focus using focus stacking. She shot six images in which the focus was changed slightly from the front of the blossom to the back of it. To keep the background out of focus, she used f/4.5 to keep the depth of field shallow. Although focus stacking is typically a way to optimally focus everything in the image, Barbara uses it here to selectively focus only the blossom while keeping everything else out of focus. As you might surmise, the red channel histogram with the magenta blossom had data recorded farthest to the right. The six images shot to capture the depth in the blossom were combined with Zerene Stacker. Nikon D4, 200 micro, ISO 100, f/4.5, 1.6 seconds, Cloudy WB.
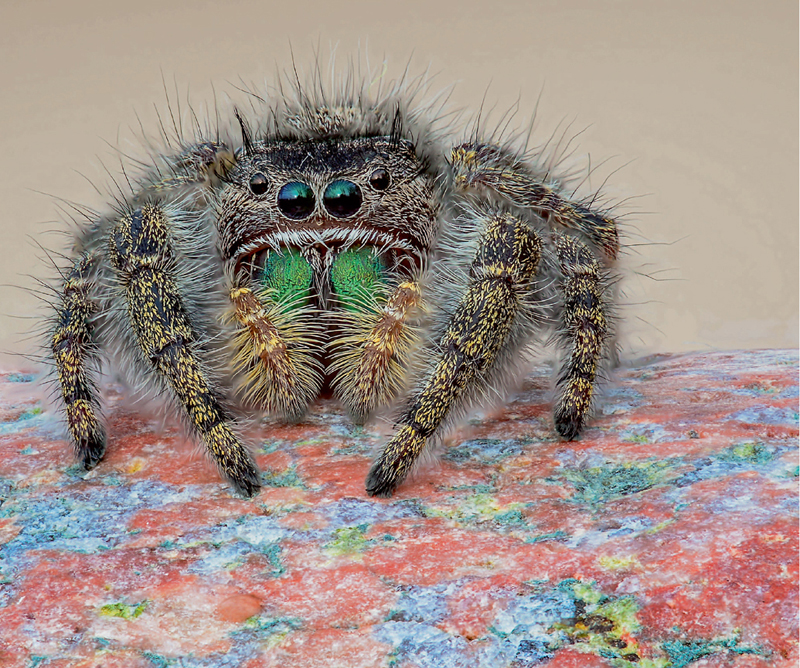
Barbara isn’t a big fan of spiders, but she tolerates jumping spiders. On a cool morning, we enticed this jumping spider to perch on a stone while Barbara varied the focus and shot 24 images. She ran the images through Zerene Stacker to merge all of them into one sharp photo. Nikon D4, 200mm, 1/4, f/11, ISO 200, Cloudy.