A Backpacker?s Guide to Making Every Ounce Count: Tips and Tricks for Every Hike (2015)
CHAPTER THREE
THE BIG THREE
Years ago, while working in Corporate America, I worked for a company that employed over 7,000 employees worldwide. I remember my supervisor would take any issue and offer three possible solutions. I started paying attention when the second or third issue came up and he offered three solutions. “This is not a big problem,” he would say. “You have three choices here on what to do next.” He would offer the three choices, and one of them would ultimately lead me to the correct solution each time.
I thought it was odd that there were always three solutions, but there were. It may be that there were more than three, but that was his method.
Likewise, we have three areas to look at to help us reduce some weight from our pack. I ran across this method while on YouTube, and after seeing this more than a few times, I started to take notice. They are the Big Three.
Weight is a big concern for Gram Weenies, and there are two weights on which we concentrate: the base weight and the pack weight.
The Big Three refers to the biggest three items in your pack, other than food. The three largest, if not heaviest, items in your pack are the pack itself, your shelter, and your sleep system.
These three may not be the heaviest items, but they are possibly the largest. On some trips, my food bag is heavier than any piece of gear in my pack.
If you can get the main three items down to three pounds or less, you will be on your way to becoming a lightweight backpacker. Working on getting your big three down in weight might be an ongoing process. Due to financial constraints, I couldn’t just go out and get the lightest pack, bag, and shelter I could find all at once. It takes time, and I am still on the lookout for lighter options.
On a week-long trip I took in November 2013, my food bag weighed over eight pounds and five ounces. My pack is an Osprey Exos 58, which weighs in at two pounds, ten ounces, according to REI. Mine weighs a few ounces less than that because I shortened my straps.
You can see how the biggest items may not necessarily weigh the most; however, they are three items that can be reduced down to three pounds or less—with a little work.
The Pack
The first of the three biggest items in your arsenal is the pack itself.
I used to carry a name-brand pack that weighed over five pounds. It had an internal frame and some internal aluminum reinforcements to provide extra support. The bag itself was made of some heavy canvas-type material, which looked like it would withstand a trip or two up Mount Everest, but it did not have enough volume for a trip of that extent. The pack was seriously too rugged to meet my needs, as I later learned.
On one trip, I actually tried to lighten my load by tearing it down at camp and removing the aluminum struts that were embedded in the main compartment—it didn’t help much at all. In retrospect, this was probably one of my first steps down the path to becoming a Gram Weenie; I just didn’t recognize it at the time. As I said earlier, the pack and all the gear weighed forty pounds, so I knew I needed to figure out a way to lighten my load. For me, the first logical step was to find a lighter pack.
Several years later, after having learned a bit more, I took a three-night trip to the Smoky Mountains in the winter. I bought an external-frame pack from a local sporting goods store, and the pack might have been defined as a lightweight backpack. The frame was plastic, and the straps were quite adjustable. The pack weighed a little over 4 pounds and 8 3/8 ounces, so I was already 2 pounds lighter.
Unfortunately, the pack broke at Kephart Shelter. I didn’t have a burial for the deceased pack because the area that broke is fixable. I can simply add a brace and a couple of small aluminum nuts and bolts, and voilà, it will be back in service. I might use it on some early fall or late spring trips when I don’t usually carry a lot of weight. It might not be an ultra-light pack, but it will work on some of my warmer weather trips.
There is a fine line separating lightweight and ultra-lightweight backpacking. The designation actually refers to the base weight, which is all the gear that meets your basic needs for the trip. These nonconsumable items are, but not limited to, your shelter, sleep system, clothes you carry, water treatment, fire-making tools, kitchen equipment, and other items that don’t change in weight as the trip progresses. Or if you want to look at it this way, all your gear minus your consumables.
Consumable items are the items that are reduced in weight as the trip progresses, like toilet paper, food, Chapstick [or lip balm], and so on.
Here is a guide to help define the three areas that most folks will look at when deciding in which backpacking category they belong. These base weights are just a guideline to go by:
|
Lightweight |
20-30 lb. |
|
Ultra-lightweight |
10-20 lb. |
|
Insanity Under |
10 lb. |
Just because you have a four- or five-pound pack does not mean you can’t reach lightweight status. Just be mindful of the contents of the pack, and you might still make it. A friend of mine almost accomplished this very thing on a trip up the Approach Trail at Springer Mountain, here in Georgia. His base weight was just over twenty pounds, and this was with a four- to five-pound pack. Remember that this was the weight of his pack without the food, water, and other consumables.
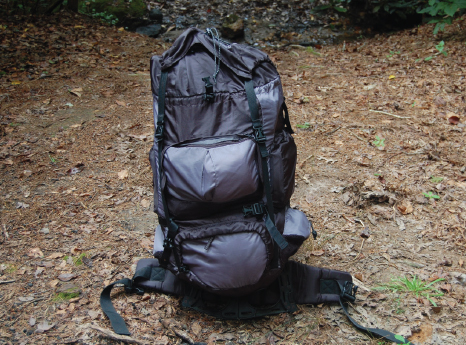
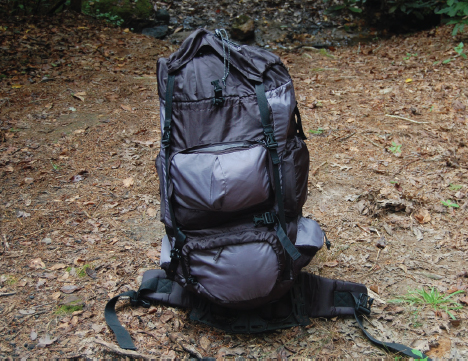
Not long after my Smoky Mountains trip, I went shopping and found the last pack I will ever buy (hopefully).
The Osprey Exos 58 Large, weighing in at two pounds, ten ounces (per REI’s description). I think I have a winner. REI.com labels the pack as an “ultra-light backpack.” The volume is 3,722 cubic inches (61 liters). This pack is fantastic, but I am not here to give a full review, I am simply telling you about why I selected this to be my primary pack.
The Exos 58 has a thirty-pound limit, which forces me to select lighter gear and fewer items. I didn’t want to surpass the thirty-pound limit for my pack weight, so I had to force myself to go down the path to Gram Weenieism.
Force yourself to select a pack with somewhat limited volume, and you will be forced to rethink the rest of your gear. The pack’s weight limit helped me lighten my load. Knowing the limits might help you to be more aware of the rest of your gear, which will in turn help you to go lighter.
On one backpacking trip, one of the guys had an eighty-liter pack. I mean it was huge and it was full. Another member of our group told me that he fills the pack up to the limit regardless of the trip. On a summer trip, the pack is full. In winter, the pack is full.
I just don’t understand why anyone would fill an eight-liter pack to capacity for a weekend summer trip. This guy is definitely not a Gram Weenie. He’s a great guy, but he carried way too much weight, in my opinion.
Do not judge a hiker by the pack or the weight of the pack he or she carries. If a hiker wants to carry an eighty-pound pack on a weekend trip, it is that hiker’s prerogative.
I was backpacking with a couple of high-school boys of some family friends in Virginia, and we met a hiker who claimed to have been hiking for months. He said he started in Florida and that his ultimate goal was to hit Canada. He was carrying a pack that looked to be as tall as I am, and it was full.
He walked up to us while we were waiting around finishing our snacks and drinking water. He came out of the woods, via the trail, and stopped to talk, but he never took the pack off.
It looked like an older external-frame pack from the seventies. He had what looked like duct tape on the straps and on areas that might have been for small repairs. It seemed clear to me that this pack had seen quite a few miles over the years. He said he would hike until he collapsed each night and pitched his tent on the actual trail. Not a few feet off of the trail, but on the actual trail.
I thought this was a bit disrespectful because some folks do hike well into the night—sometimes because it is cooler. I didn’t mention my objection, as I did not know this guy; we were all tired, and I didn’t want to start anything that might be confrontational. I figured if what he said was true, he had already been confronted by other hikers on the trail stumbling into his camp.
We talked for a bit, and when we reached the subject of his pack, he got very upset when I asked him how much it weighed. He literally got angry. He gripped his trekking poles tight, his face got red, he raised his voice, and he looked mad. Thinking back, I am glad I didn’t mention how it was wrong to camp on the actual trail. There is no telling what he would have done.
He explained how it wasn’t anyone’s business how much weight he was carrying and then said something that made sense. A lot of sense.
“If someone wants to carry a hundred pounds, and is able to, and has everything they want or need, it is their business.”
You know, he was right. He wanted to carry the weight, and was able to carry the weight, so he carried the weight. That was his decision.
Try not to get caught up in what everyone else is carrying; make an informed decision and make the best of it on the trail.
His weight probably consisted of many items that he needed for a cross-country hike. Florida to Canada is more than just a stroll in the woods. He probably had a gun in there as well. He may have had more food than I would carry and no telling what else. Basically, since we didn’t know his whole story, we were in no place to judge him or his pack.
Internal, External, and Frameless Packs
You can select your pack from a wide variety of styles, with different kinds of sizes, colors, volume, weight belt or beltless, thin straps or wide straps, straps with and without pads, one main pocket or many pockets, and many more options. However, there are three basic types of packs: those with internal frames, external frames, and packs with no frames at all.
You also may find little day packs, but I doubt you will get much use out of a day pack for a week-long trek. The packs we’re talking about here are ones designed for multiple-night or multiple-week treks.
Some of the old-school backpackers years ago, as well as some now, used a pack with an aluminum frame attached on the outside, providing more room inside. They also had anchor points on the outside of the pack to which they attached some gear.
I have seen some bloggers state that they feel a backpacker with gear attached to the outside of their pack signals a newbie. They feel that all gear needs to be inside.
I don’t necessarily agree with that statement. I’m not a newbie, and I do have a few strapped-down items on the outside for specific reasons. A motto I go by is planning right and packing light. Part of planning right has to do with where the gear is stowed away within your pack—or on the outside.
I have a Nalgene bottle on the outside that I do not under any circumstances want inside of my pack. Let me just say that this Nalgene bottle is yellow for a reason. Need I say more? I also have a polyester shirt that I sometimes carry on the outside of the pack, and my Crocs are there as well. Once I have eaten enough food and have made room inside my pack, the Crocs eventually go inside. All three of these items are secured using a shock cord that I have in my pack.
A little side note here: I have a habit of modifying most of my gear when I can to make it more suitable to my needs. I love the DIY aspect of backpacking, and I am handy with a sewing machine and other tools, so when I can modify a piece of gear to customize it, I will. Whichever pack you get, you can always modify it to some degree without jeopardizing the integrity of the pack.
Another item attached to the outside of my pack is my ground cloth, which is a small section of flooring cut out of an old tent. Wrapped up inside the ground cloth, in its own little case we call snake skins, is my rain fly. I keep the tarp here because it protects the bottom of my pack when the pack is sitting on the ground. It is also the very first thing I remove once we get to camp. If the ground cloth gets sacrificed while protecting the backpack, so be it. The material for making a ground cloth is fairly cheap, and I can replace it more easily than my pack.
When I start out hiking, even in the winter months, I wear very little, so the shirt is there should I need to put it on to help me get warm. I keep the shirt on the outside so I can get to it quickly without having to open my pack and dig it out. When I get too warm, I take it off and quickly secure it under the shock cord and keep going. The yellow Nalgene bottle is my “P” bottle.
Once I get to camp, the first thing I do is hang my backpack on a tree with a little sling I made and unfold my ground cloth. Then I take off my boots and put on my Crocs. This is why they are on the outside of the pack. I can put these on quickly to provide my feet a little relief from my hiking boots. I then set up my rain fly that was wrapped up in the ground cloth to get it off the ground. I keep the rain fly packed in the snake skins until the evening.
I then reach in and unpack my hammock and tree huggers. I set that up and then take a break. I lay down for a bit and rest my feet, back, and knees. It feels so great to get some relief from walking all day. At night, I will deploy the rain fly and flip one side over so only one half is staked down. When I get ready to turn in, I flip the one side back and attach the tie-outs to the stakes already in the ground.
Be respectful of others on the trail where you hike. If you have gear on the outside of your pack, for whatever reason, secure it so it doesn’t make noise. One of the reasons I go backpacking is to get away from the noise and enjoy the serenity of the outdoors.
Let’s take a brief and maybe obvious look at the pack types.
The external framed pack is a good pack, and you can attach items to the frame, as I described above, and yet still have plenty of room inside. The goal is to pick a pack that is comfortable and meets your needs for the trips you will be taking, and it needs to hold all your gear. Be mindful of the total volume of the pack. Your pack of choice needs to be big enough to carry all your items, and this may be a trial-and-error process until you have been on a few trips and become more familiar with your gear and how much volume is required inside the pack.
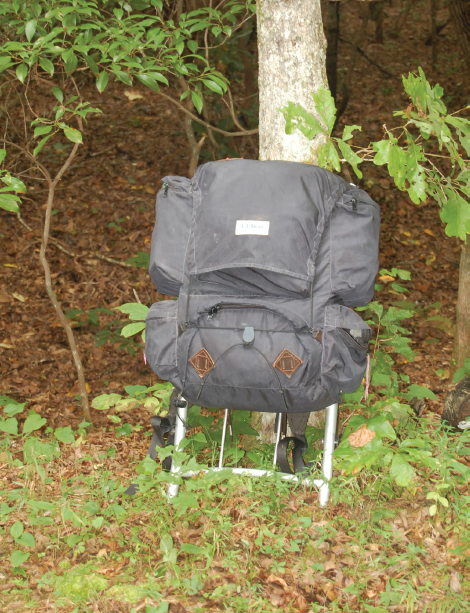
Here is a pack I bought from a local sporting goods store, which has the design of the old school pack, but with a plastic external frame.
The pack’s frame is adjustable to accommodate several sizes and body types. This is the pack that broke on me while on a trip in the Smoky Mountains. I will eventually repair it and use it as a spare or maybe use it on some trips during the warmer months.
You may find, as I do, that external-framed packs tend to carry differently from internal-framed ones or packs that are frameless. You may want to go to your local outfitter and pick out different types, load them up with gear, and walk around the store for several minutes. This will help you see how each pack type sits with your body type.
However, in my opinion, the first thing to consider is the pack’s weight when empty, before you determine the volume you need. You are after all trying to go light, right? You may also find that an internal-frame pack and an external-frame pack of the same volume will vary in weight. I suggest you spend a lot of time when picking out your pack. Packs can get expensive, and it would be a bad thing to spend most of your money from your backpacking fund on a pack only to get out on the trail and discover that you made a mistake. I went through two other packs prior to landing on my Osprey Exos 58. I may get another pack one day, but for now, this is my pack of choice.
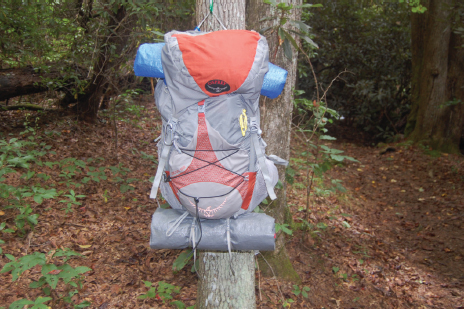
The internal-framed pack is just what it sounds like—the frame is inside the pack. Most internal-frame packs that I have seen have D-rings or loops and straps available to let you attach small gear. You may want to attach a dirty pair of shoes, or even a little yellow bottle, or wet gear to the outside so you don’t dirty up the inside. My Osprey has a stretchy pocket with a drain hole at the bottom specifically designed to hold wet gear, a feature I love. This is where my raincoat rides.
I have seen some through-hikers starting their long trek at Springer Mountain Shelter line their packs with the large construction-grade black trash bags. One guy used a large trash compactor liner for his pack. This protects the inside of the pack from dirty gear and keeps the gear dry if it rains. When I asked why he had an inner bag as well as a waterproof pack cover, he stated that he was through-hiking up the Appalachian Trail and wanted the extra protection. With the liner inside the pack, and the pack cover, he was confident that the gear as well as the pack were protected from getting wet.
Frameless packs don’t have any frames. The design makes them strong enough to carry all your gear without the need for a frame. Some of these frameless packs are super light, and some even have external pockets for some of your lighter or smaller gear.
When selecting a pack, get some help from the folks at your local outfitter so you can be fitted with the right size, style, and type. Explain all your needs to the associate so they can point you in the right direction. Just make sure the weight of the pack is what you are looking for. Ensure that the volume and the weight limit are acceptable as well. You may have other considerations that I might not be aware of, so you can add those to the list as you see fit, but since our goal is to have the lightest pack possible, regardless of the pack you select, you will still be able to remove a few ounces from the pack.
Packing Your Pack
Typically, there are a couple of theories on how to pack. Some say to load all the heavier items near the middle, closest to your body, to help with maintaining your “center of gravity.” This is what I do. I load my sleeping bag in the bottom and stuff all my soft gear—like my hammock, spare clothes, and bug net—down in the corners around the larger bulky items. My stove and fuel go on top, as well as my food bag, which is the heaviest item in my pack starting out.
This is my method. I have spoken with the guys at my REI store, and they told me that women need to pack differently. I am not sure about this, so research how to load your pack. Ask yourself if you are comfortable with the load.
During my SCUBA diving days, we used the phrase “comfort and fit” when deciding which gear to buy. Did it fit correctly and was it comfortable to wear? I would say that the same goes for backpacking gear, especially your pack. If the pack is not comfortable, and you are planning a trip that is to last the weekend or even a week or longer, you will have a very bad trip. Please don’t get into the mindset of “I will get used to it.” If you take that chance, you may regret it.
Once you have selected your pack, you may be able to shave a few ounces from it to help it be a little bit lighter.
Shelter
The second of the Big Three is your shelter.
Staying out of the weather, whether it is the rain, snow, hot sun, or wind, is a top priority when on the trail. A dependable shelter, in my opinion, is the most important item to have in your pack—next to your knife, lighter, water purification system, sleeping bag … okay, okay, it is all very important. That is the thing with backpacking: if something is not important, it is unnecessary, so you may not need to pack it. More on luxury items in Chapter Five.
A good shelter will protect you from the elements. You may have seen the survival shows where the survivalists built a shelter as soon as they could before the sun set. In the show where they were in a wet environment, they needed to get out of the water and dry, so they headed to higher grounds or to the trees. In the desert, they had to be off the ground because of the creepy crawlies like scorpions or snakes and tried to find some shade there. In the snow-covered areas, they built snow caves to protect themselves from the bitter wind and cold.
Rule of Three … the average person, in average situations, can survive about three hours unprotected from the elements.
If you are not protected from the elements while on the trail, your trip will be very uncomfortable to say the least. There are three primary shelters you might see other backpackers using. Depending on your comfort zone, you will need to make your decision about which shelter type is best for you once you have more information.
Regardless of which shelter you select, you will need to keep a few things in mind. They are without a doubt, price, as well as comfort, level of protection, and of course, weight.
The primary goal for a shelter is to protect you from the wind, rain, and temperature. You have to ask yourself what you want out of a shelter as far as weight, style, and comfort. If you’re thinking about going as light as possible, I would say that style might not be at the top of your list of priorities.
Which is more important to you, comfort or safety? Or do you want the same shelter everyone else is using? I don’t care about anybody else. If someone has a shelter that I like, and it is light, and comfortable, and can keep me warm, I might consider it as my next shelter. However, I don’t just go out and get something because it is the next best thing out there. Safety is not my biggest concern. Now follow along here and let me explain. We are backpacking, so for me, weight is at the top of the list, coupled with comfort. The safest way to camp, in the safest shelter possible, would be to stay at a hotel, and that is not my definition of camping. I mean how safe can you really be, wrapped up in a thin piece of tent material, hammock, or out in the open lying on a tarp? I want comfort and light weight.
Do you want heavy, light, or ultra-light? Or an easier question to ask is this: do you want to sleep on or off of the ground? I am a little biased here because I prefer the hammock, but more on that later. Let’s first look at the shelter options more closely.
Tents
My wife bought me a four-season Kelty tent that weighs eight pounds, and I love it. I have used it on several occasions when she goes camping with me, but I don’t like carrying a tent around and sleeping on the ground. That would mean I would have to take an air mattress or some sort of pad to sleep on. The forest floor can be rough on the back, and let’s face it, all that extra stuff means extra weight. I can’t carry around too much weight and follow the philosophies of Gram Weenieism.
There are some lightweight and reasonably priced tents out there if you look hard enough. You can opt for a dome tent or an A-frame tent, which are both good and each have their pros and cons. They also may even weigh a lot less than my four-season tent. If you choose a larger tent, for two or more campers, you will need to look into sharing the load, which I cover in Chapter Thirteen.
Here are a few of the pros that go along with camping in a tent:
✵ You share the load with a fellow hiker who will also be sleeping in the tent.
✵ At night, you can store all your gear in the tent so it stays drier and warmer than if you stored it outside.
✵ You have the privacy for when you need to change clothes or when nature calls. And for this, tents are great.
✵ Your tent becomes a nice tight little storage unit with you and all your stuff.
✵ However, you also have some cons as well:
✵ You need to find a level area that is clear of roots, sticks, and rocks before you can set up a tent.
✵ You have to sleep on the hard, cold ground or carry padding to sleep on.
✵ You run the risk of getting wet if a rainstorm rolls in, so if the weather looks questionable, you will need to look for a higher spot to pitch your tent. I have had this experience, and it is not a fun one. It added to the memories of the trip, but we were miserable, and it took way too long to dry out all the gear.
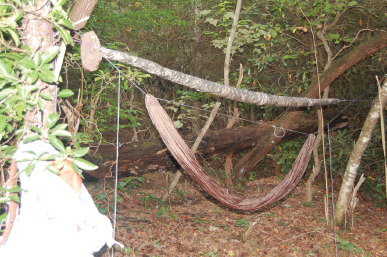
Hammocks
Since I am a hammock camper, this is my preferred way to sleep. Imagine sleeping on a fluffy cloud—I feel like I’m sleeping on a cloud every time I hit the trail. My hammock and rain fly weigh four pounds and five ounces, which doesn’t quite make my Big Three limit.
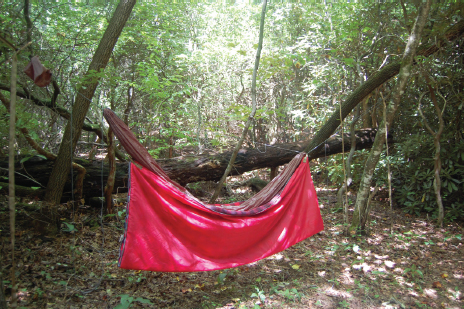
I have several combinations of hammocks. I have a Clark Jungle hammock (my newest and favorite one), two Eno hammocks, and a few DIY hammocks. I sleep comfortably and I’m warm, but more importantly, the hammock is light. I don’t carry tent poles (the Clark has two very tiny poles that weigh very little). I don’t carry any kind of air mattress either—just me on a cloud. After a long day of hiking, my hammock is the first thing I set up. Then I kick back and rest a little while swinging back and forth like on a little swing. A hammock is great for sleeping, but some can set it up like a chair. Ground dwellers (those who sleep in a tent) can’t do this.
Here is a shot of my Clark.
When ground dwellers lie down to rest after a long day of trekking through the woods, they are on the hard ground, even if they have an air mattress or foam pad. It is just easier for me to get in and out of my hammock than to crawl in and out of a tent.
Also, after bending over and picking up wood to build a fire, and other camp activities, my back hurts by the time I finally turn in. However, in the morning, after having slept on, well … basically I sleep on air, I have no back pain. Why, you might ask? That’s a good question. I have three words for you.
No pressure points.
In a hammock, you don’t have anything pushing against your back, so your muscles can rest without any resistance. Sleeping in a hammock is so nice once you find your sweet spot. In some hammocks, you sleep in a slight diagonal position, off center with the foot end slightly elevated so when you do find your sweet spot, you actually sleep level. In my Clark, I don’t sleep in a diagonal, I sleep straight and level.
However, this is not a book on hammock camping. I want to talk about going light, and a hammock is quite a bit lighter than a tent (depending on the tent you select). You might be able to find a two-man tent that weighs less than my hammock setup, so keep looking. I don’t carry my hammock in a stuff sack. The Clark and the Eno both come with a stuff sack built into the body of the hammock, but in my pack, I simply stuff the loose hammock in and around my other gear, filling in the open corners within the pack. Because of this, my hammock takes up very little room.
I don’t need any hardware with my setup either. I don’t use any carabiners for the hammock or the rain fly. So again, no wasted weight. My suspension is a one-inch-wide length of webbing that holds my whoopee slings—no knots. I use a Bowline knot on one end of my rainfly line, but even under a lot of tension, the Bowline knot is easily untied. Everything else is a whoopee sling made out of 3/8-inch amsteel. The Bowline knot is in fact a knot, but unties easily, and the rest of my setup does not have any knots; I call it a no-knot setup.
Even though the hammock is much lighter than some tents, there is an even lighter option.
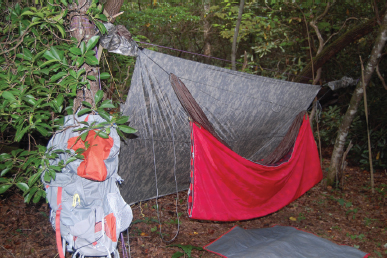
The Tarp
Some true ultra-light backpackers may be thinking that a tarp is the lightest thing out there, and they would be right. When you sleep, you can fold the tarp in a way that part of it is above you acting as your rain fly.
Some hammock campers use an oversized rain poncho, which serves as a dual-purpose item. The poncho acts as a raincoat for the hiker when it rains and a tarp when the backpacker sleeps on the floor. Not for me.
The tarp can be set up quickly in case a rain storm should sneak up on you. For now, just know that you have an option to lightening your pack by sleeping in something other than a tent. If you don’t mind sleeping on the hard, cold forest floor, go with a tarp. You can find several ways to set up a tarp in such a way to keep you somewhat dry.
You have some of the same cons with a tarp as you do with the tent:
✵ You still need to find a flat area with nothing poking up, and find high ground if it should rain.
✵ A tarp is less secure when it’s raining since you have two open ends and maybe more, depending on how you set it up.
✵ Since your tarp doesn’t come with a bug net, you run the risk of cold critters, both animals and insects, climbing into your sleeping bag with you, trying to get warm. In the warmer months, don’t forget about snakes.
While sleeping on a tarp, some hard-core ultra-lightweight backpackers sleep on their clothes or their pack as a pad, which also provides insulation. That seems a bit too bulky for me as well.
A true Gram Weenie would probably opt to use a tarp for a shelter. Since I don’t have the back for sleeping on the ground, or enjoy hearing my bones sounding like a breakfast cereal in the morning, I opt for sleeping in a hammock with a rain fly. If your goal is to convert completely to Gram Weenieism, and become an ultra-light backpacker, the tarp may just be your choice of shelter on the trail.
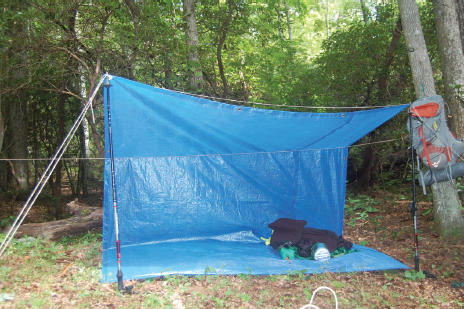
The tarp is light and can be rolled and stored outside of your pack so it will not take up any room inside. Setting up a tarp is quick, and there are several ways to do it.
Let’s say that you’re on the trail, and the rain slows down your gait, but you decide to keep on hiking. Then you hear the clap of thunder rolling in from the north. You see the clouds darken, and then your inner instinct yells so loud that your fellow trekkers even hear the taunts. “Take shelter! Now!”
You can set the tarp up in a quick-mode style:
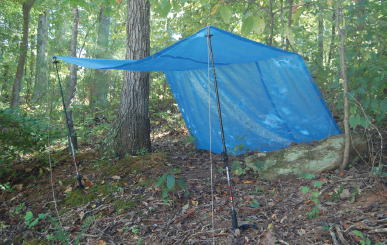
Your tarp, some cordage that you have (remember the 5 Cs), and your trekking poles are all you need. You can have your tarp set up in no time while others are still trying to find a flat piece of dirt and fit their tent poles together. Either that, or they will be hunkering down and waiting out the storm under your tarp. Which is fine, so don’t get me wrong. When on the trail, another thing to remember is it’s important to take care of your own needs while also being willing to help others when they struggle. We are all on the same team with the same goal: to experience God’s creation in its raw natural form. If one member of the team suffers, the whole team suffers, so help out where you can, when you can, as much as you can.
Sleep System
The third item of the Big Three is your sleep system. Sleeping bags and a sleeping pad, or for the hammock campers, an underquilt (for the colder trips), make up your sleep system. If you are in a tent, your sleep system will be what you sleep in and/or on.
I opt for the underquilt and no pad for my hammock because after sleeping on a pad inside of a hammock, I found that the pad had a habit of slipping out from under me and my backside got cold. You don’t want a cold tushy when you are camping.
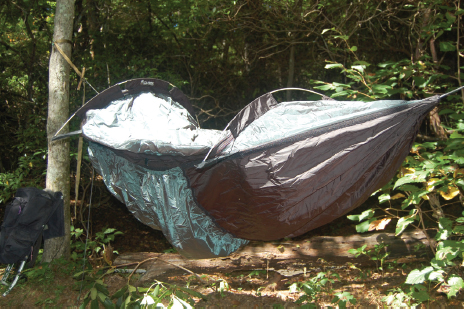
An underquilt, in its simplest description, is a unit that hangs underneath your hammock and insulates your backside from the cold.
The underquilt can be another sleeping bag or a down quilt, or even made out of another material like Insultex. I have even seen pictures of hammock campers using their down coat as an underquilt, also known as “UQ,” which makes their down coat a dual-purpose item.
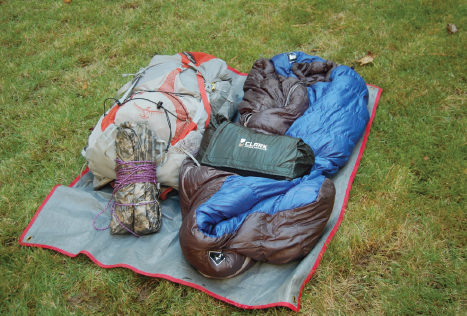
Here is one of my old sleeping bags I modified to be used as an underquilt, shown with one of my ENO hammocks.
Right now I use a DIY underquilt made out of Insultex along with my down sleeping bag, and I stay quite warm. My sleeping bag and UQ weigh in at 3.99 pounds. DOH! I missed it that time, too, didn’t I?
So, for my three big-ticket items, I have this much weight:
Pack: 2.79 pounds
Shelter: 4.34 pounds
Sleep system: 3.99 pounds
Grand total for the Big Three: 11.12 pounds. Wow, I almost made it. My ultimate goal is to get the total down to ten pounds or less. I may even cut my underquilt down to a two-thirds quilt or even in half. It’s a journey, becoming a Gram Weenie, but we have only just begun … began … which is it? Well, like we say in Georgia, we’re just gettin’ started, folks.
So how can you lighten your load with your sleep system? Well, since your sleeping bag is the primary item of your sleep system, let’s start there. Without a doubt, your synthetic bags will be heavier than their down counterparts.
You can go with a wool blanket, which is by far the best way to go since wool will keep its insulation value even when wet. But who wants to lug around a wool blanket?
Your typical down sleeping bag can weigh around a pound or up to three pounds depending on which brand you choose. While researching sleeping bags for this book, I found a synthetic “Big Agnes” rated for +15° (F) and a Down “Sierra Designs” rated for +13° (F) that were the same size—they were both listed as “regular.”
The Big Agnes weighs three pounds four ounces (fifty-two ounces) and costs $169.95, and the Sierra weighs one pound fifteen ounces (thirty-one ounces) and costs $499.95. The two bags are similar in rated temperature, and you can see the difference in weight—you do the math.
Moreover, since the Sierra is down, it will be more compact than the Big Agnes. More down means more “fluff,” which also means it will be more heavy. The fluff is where you get your insulation.
Regardless of the bag you get, the less you wear while in the bag, the warmer you will be. I know it sounds crazy, but it is true. Try it, you might be surprised.
Several years ago I went on a trip in the Smoky Mountains, where we spent our last night at Ice Water Spring Shelter. The shelter was on top of a bald (a mountaintop without trees), and it was very windy that night.
Because there were very few trees around the shelter, it got very cold. Our thermometer told us it got down to 5°F. I have no idea what the wind chill was, but, Da-gum, it was some kind of cold that night.
I slept in my REI Halo, which is rated to +25°F. You would think I was cold, but like I stated earlier, I slept in very few clothes. Once I got into my sleeping bag, I stripped down to my base layer and stored my fleece as the bottom layer and put my pants at my ankles.
I used my shirts as a pillow and zipped myself up tight. The only thing that was exposed to the outside air was my face. We slept in a shelter, as per regulations, which helped with the wind, but it was still cold. Up in the Smoky Mountains, they do not allow camping in tents, so we had to use the shelters.
In the middle of the night, nature called. I couldn’t just stand up in the shelter and use my yellow Nalgene bottle because of all the other campers, so I had to get up and get dressed and walk to the wood line to take care of my business. I slipped my shirts on and started fighting with my pants.
I was so snug in my sleeping bag, it was harder to get my pants on than it was to take them off. Without thinking, I unzipped the bag all the way down and then it hit me. The five-degree plus wind-chill hit me like a backhoe, and I started shivering uncontrollably. I was on the edge of hypothermia and I knew it.
When you get cold, your body starts to shiver and tries to raise its core temperature. Shivering and shaking generates heat, and this is a defense mechanism built into our bodies to survive when the temperature drops. We all shiver occasionally, but we are able to get warmer again, and the shivering stops.
The thing is, I could not stop shivering. I had all my clothes back on, which included my base layer, a layer of fleece, my pants, a shirt, and my down coat. And I still could not stop shaking. I climbed out of my bag, closed the bag, and headed to the woods. Trying to answer the call of nature in the middle of a cold night is tough enough. Try it when you can’t stop shaking.
Once I finished my business, I ran back to the shelter and stripped back down to my base layer shaking so violently I honestly thought I was going to lose my dinner—rehydrated spaghetti, meat sauce, and a Snickers bar.
Once in my bag, again wearing very little, I was warm in only a few minutes. I was so thankful I had my down sleeping bag that night.
The thing to remember about a sleeping bag is to go with down if your checkbook will allow. Down keeps you warmer and is very compressible, unlike synthetic bags.
I use a simple stuff sack with my sleeping bag because I want to protect it from other gear in the bag, but I don’t, as a rule, use stuff sacks for any of my fabric-based gear like my hammock or bug net. I use sacks for gear like food and personal items. When you use a stuff sack for your hammock, tent, rain fly, or other fabric-type gear, you create pockets within your pack allowing for dead air space.
My stove, shoes, food bag, and personal kit are bulky items that create dead air pockets throughout my pack. I use my clothes, hammock, and bug net to fill in those dead-air pockets. This way, I am able to use every cubic inch of my pack, which could, if I let it, allow me to take more gear. For me, dead-air pockets are just as bad as dead weight. Because my sleeping bag is in a stuff sack, not a compression sack, it becomes flatter as the weight of the other gear is loaded into the pack.
This is one trick I use when I pack. This allows me to get more gear in the bag and fill in some of the unused open spaces created by more bulky items like my stove. I could just stuff my sleeping bag down into my backpack without the stuff sack, but then I would be exposing the bag to the possibility of getting damaged or dirty.
Hopefully the tips on the Big Three have helped you reduce your weight a bit, and you now have an idea of how we think, so do you want to go further?
I thought you might. What kind of backpacker are you, or what kind do you want to strive for?