Explosive Calisthenics, Superhuman Power, Maximum Speed and Agility, Plus Combat-Ready Reflexes--Using Bodyweight-Only Methods (2015)

6
KIP-UPS
KUNG FU BODY SPEED
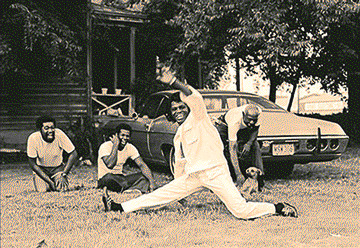
Very few athletes have seriously attempted a muscle-up, but you’d be pressed to find a teenage dude today who hasn’t done his damndest to pull off a kip-up. For those few of you who aren’t aware of the movement (or the name: it’s sometimes called a nip-up), the kip-up is the most explosive way of getting up off your back: you “roll up” your body and spring your legs out and down. It’s not difficult to understand the allure of the kip-up. It’s a mesmerizing movement—one second you’re on your back, the next you’re up on your feet, like magic. And they seem to be everywhere. Kip-ups are part of tricking and street dance styles; and you see them in pro wrestling all the time. Possibly the crown for most epic wrestling kip-up of all time goes to The Rock. With a silent speed, he’d effortlessly roll up, and—thwip—he was suddenly on his feet, graceful as a cat. He got so good the old-fashioned way: practice. Back when he was training in wrestling as a kid, he made it a point to always get up off the canvas via a kip-up. Even if he hit the deck a hundred times in a session, even if he was exhausted, he kipped himself up. When it comes to masters of the kip-up, I have to also give a shout-out to the great Jackie Chan. He was busting out perfect kip-ups back in his earliest movies, and he did ‘em so well that you won’t find a kung fu movie anywhere today where some master doesn’t kip-up.
Is it any wonder this move is so widely attempted?
Unfortunately, just because a lot of folks try the kip-up, it doesn’t follow that a lot of them can do it. I’d estimate that only one in ten kids who try the kip-up actually manage it—and remember, these are teens who are mostly in way better shape than their adult counterparts. Most adults wouldn’t even attempt this move. And it’s a crying shame, because aside from just looking like a cool “trick”, the kip-up is actually a surprisingly useful technique in explosive calisthenics Why is it “useful”? Because it teaches athletes to push their bodies up explosively, through the hands; it teaches basic balance and equilibrium; and it builds huge levels of high-speed snap into the waist and spine. You will often hear weight-lifters talking about “hip snap”. Well, forget about weights—the kip-up will teach you the gold standard hip snap. Best of all, these qualities all act as a perfect training ground for athletes who want to move to more sophisticated acrobatic movements, like front and back flips.
For these reasons, I’m convinced that the kip-up should be the very first skill-based explosive chain athletes start working with, after they make some progress with the basic power drills: jumps and power pushups.
DECONSTRUCTING KIP-UPS
I’ve already touched on some essential elements of the basic kip-up. The points which require attention typically are:
THE ROLL-UP
Before you can kip-up, you need to explode your legs out in a kick. Super-athletes can do this with minimal telegraphing, but most of us have to coil our bodies up—like springs—to aid with the kick. The easiest way to generate the momentum you need is to begin with a full range-of-motion on the roll-up—bring your knees up close to your head. Believe it or not, a proper dynamic roll-up is beyond the abdominal power of most people. I’d advise all would-be kip-uppers to begin with some kind of compound midsection exercise to condition this area. Since you raise your legs in the roll-up, leg raises are the obvious choice. Stay away from junk like crunches or ab-machines and infomercial gimmicks, as they isolate the abdominals, and thus don’t train the muscles which cross the hips (hip flexors). They are the key to this kind of real-world stuff.
A classic example of a roll-up prior to a kip. (For the full move, check out page 126.)
Lying straight leg raises—awesome preconditioning for the roll-up!
HAND POSITIONING
To help with the kick, you need to stabilize your roll-up and assist with your hands. Truly advanced athletes can dispense with the hands altogether, but it’s still a key learning stage in the technical chain. The hands need to quickly be placed fingers-down alongside the ears—those of you used to bridging (hopefully most of you) will be familiar with this pattern and will pick it up quickly. The arms also assist in the initial push, to get things moving with the kick. This can seem like a strange angle to push from, and if your rotator cuffs are stiff you may have trouble. The steps in this chapter will get you there, but if your body is used to the bridge push-up from Convict Conditioning, it’ll be a breeze. (See—I told you all that stuff was useful!)
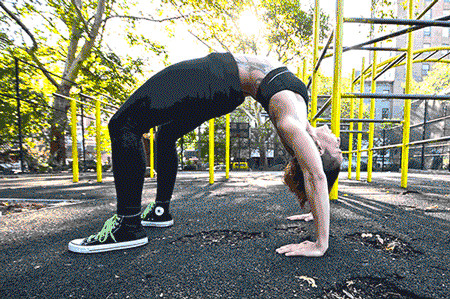
The bridge and all its variants are magnificent preconditioning drills for many of the exercises in this book—the kip-up is no exception. Check out the identical hand position with the roll-up (opposite page).
THE KICK
The kick is where the basic kip-up starts to get tricky for most athletes. For a start, it has to be powerful; along with the push from the hands, the kick needs to generate enough momentum to counter the body’s mass and lift you from the ground. Luckily, if you have been working on your jumps, this will not pose a serious problem. The kick should proceed immediately after the roll-up—you are really “bouncing” up out of the roll. If you leave it too long, the elastic energy of the roll-up will dissipate. Coil and explode! The main mistake most athletes make is trying to kick out, or worse, out and down, to the floor—where they think their feet should wind up. This is an error. What you need is not to get your feet to the floor fast—you need to utilize your leg and body power to gain height. You do this by focusing on kicking up. I know what you’re thinking—if I’m kicking up, how do I rotate?
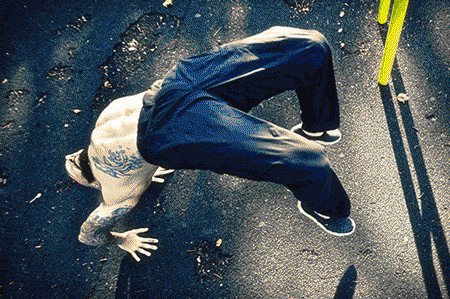
A fraction of second after the upwards kick, the feet start returning to the ground.
THE ROTATION
It’s your hips, upper-body and arms that rotate you—not your legs. Bear this in mind: even though you are generating vertical (upwards) power with your legs, your feet won’t just fly straight up. They can’t. If you have performed a good, deep roll-up, your feet will be behind you, so what will actually happen is that your body will spring out like a lock-knife, but real fast. Your waist will be the hinge. At that point, it’s not your legs that rotate you, but the continuation of your hand-push into a downwards swing, plus the hip-snap I mentioned earlier—which, essentially, is a lot like a super-fast sit-up. Looking at a point in the far distance above the horizon beyond your feet will keep the head and neck in the right place. The legs kinda take care of themselves at this stage, believe it or not: they naturally arc downwards towards the floor. For most athletes the rotation is the hardest part to master; but it’s also the most rewarding, in terms of conditioning. Not only does it build that gold hip-snap and high-speed abs, the partial (90 degrees) rotation also acts as a form of kinesthetic preparation for more demanding rotation acrobatics an athlete might also want to master (such as the front and back flip, both 360 degree rotations).
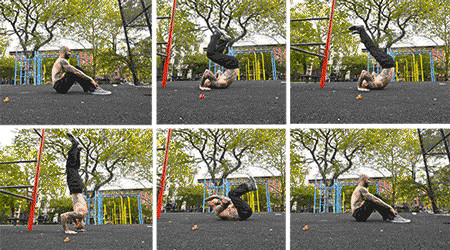
THE KIP-UP CHAIN
The biggest challenge for most de-conditioned individuals will be the rapid roll-up stage—the abdominal muscles and hips will be too weak. Rolling sit-ups (step 1) take care of that by working the midsection in a similar range-of-motion to the classic kip-up. Once the backwards swing of the legs is mastered, the athlete needs to learn the throw his or her momentum forwards after that movement; and this is where rolling squats (step 2) come in.
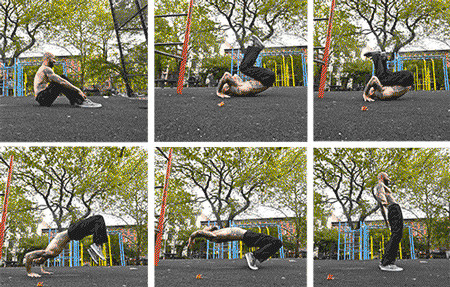
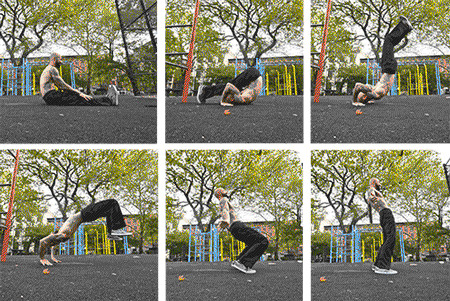
The next step is to start working on the vertical momentum; the kick-up with a hand push. Shoulder pop-ups (step 3) are a great drill for this, and are used by most coaches in teaching a proper kip-up. With bridge kips (step 4) the athlete starts exploding out with the legs, landing on the feet—but only in a bridge position, not standing. The hip-snap—the throwing forward of the waist—is the next skill to be learned, in butt kips (step 5) where you throw your torso forward but land on your glutes. The next step, half kips (step 6) are a transitional stage, during which you are building momentum to kip up fully on your feet—the classic kip-up (step 7).
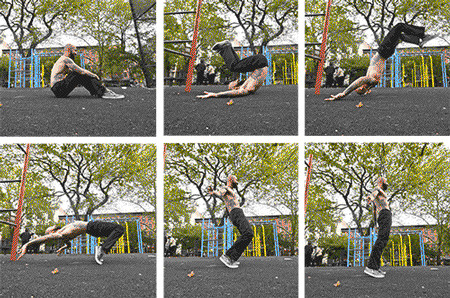
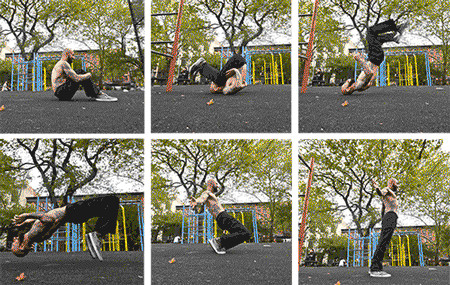
For most people, the classic kip-up is the only real kip-up style they know. In fact—with practice and dedication—most athletes can achieve even more advanced variations. Keeping the legs straight (step 8) is the basic way of rendering the move tougher: without movement at the knee, the hips and spine have to open at high speed. Another way to make the waist work hard is to take the arms out of the movement; a transitional stage is to make pushing through the hands harder, and you can do this by placing your hands out to the sides. This is the wushu kip-up (step 9). The Master Step is attained by taking the hands out of the movement completely: the super-tough no-hands kip-up (step 10).
![]()
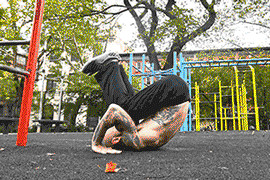
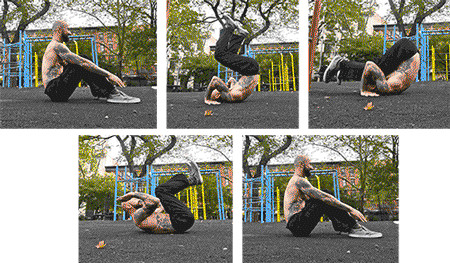
STEP ONE: ROLLING SIT-UP
PERFORMANCE
· Sit on the floor with your knees bent and heels on the ground. You can place your palms on the floor or on your lower legs.
· Roll onto your back, bringing your legs above your body; keep a bend at the knees.
· As you roll up, place your hands palms down by your ears, with the fingers pointing to your feet (the same hand position as used in bridging). Take some of your weight through your palms.
· Continue swinging your legs over and back, as you roll up onto your upper-back and shoulders.
· Bring your knees close to your head, being careful not to hit yourself in the face.
· Roll back into the starting position.
· Repeat the technique.
EXERCISE X-RAY
Rolling sit-ups are a fantastic conditioning exercise which strengthen the midsection, hips and back in preparation for the kip-up. They also contain many of the movement patterns essential for the full kip-up (step 7); for example: the roll onto the shoulders; the swing back-then-forward of the lower limbs; and the crucial fingers-facing-feet hand position. This movement will also prepare the vestibular system for the rapid reversal we find in kip-ups. This drill is also low-impact, meaning you can practice it frequently—essential for all fundamentals.
REGRESSION
If bringing your legs close to your face is too strenuous for now, begin by just swinging your legs up above your head.
PROGRESSION
At the top of the movement, touch your toes to the ground behind your head.
![]()
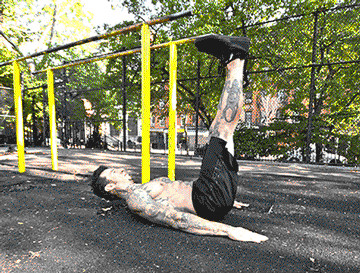
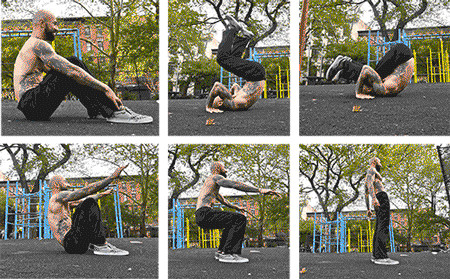
STEP TWO: ROLLING SQUAT
PERFORMANCE
· Sit on the floor with your knees bent and heels on the ground. You can place your palms on the floor or on your lower legs.
· Roll onto your back, bringing your legs above your body; keep a bend at the knees.
· As you roll up, place your hands palms down by your ears, with the fingers pointing to your feet (the same hand position as used in bridging). Take some of your weight through your palms.
· Continue swinging your legs over and back, as you roll up onto your upper-back and shoulders.
· Bring your knees close to your head, being careful not to hit yourself in the face.
· Roll back into the starting position, but allow your momentum to push you further forward, until your hips leave the ground. Keeping your arms out in front of you, finish in a low squat position.
· Follow through and extend into a standing position.
· Squat down and roll back, then repeat the exercise.
EXERCISE X-RAY
Rolling squats follow on from rolling-sit-ups. The first part of the movement is the same, but you follow it by standing up—this requires the athlete to generate extra forward momentum. (It’s the ability to generate forward momentum which really determines whether a full kip-up will happen.) For this reason, rolling squats are a great early drill to have under your belt.
REGRESSION
Some beginners have trouble generating enough momentum to get into the low squat position. If this is you, when your glutes touch the ground, place your hands on the floor and push up with your fingers.
PROGRESSION
Folding your arms in front of your chest will take them out of the movement, forcing the legs and waist to generate the required momentum.
![]()
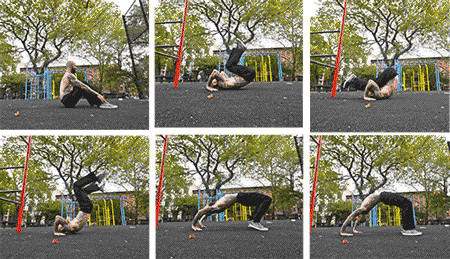
STEP THREE: SHOULDER POP
PERFORMANCE
· Sit on the floor with your knees bent and heels on the ground.
· Roll onto your back, bringing your legs above your body; keep a bend at the knees.
· As you roll up, place your hands palms down by your ears, with the fingers pointing to your feet (the same hand position as used in bridging). Take some of your weight through your palms.
· When your feet are above your head, explode your legs straight up, to gain some vertical momentum.
· Simultaneously, push down through your palms, briefly “popping” your shoulders and head an inch or two off the ground.
· Try to cushion the descent of your shoulders as much as possible, using muscular tension in your arms and shoulders (think of them as springs compressing).
· Roll back into the starting position and repeat the exercise.
EXERCISE X-RAY
Steps 1 and 2 taught you how to use your legs and waist to generate some basic momentum. This step begins strengthening and conditioning the wrists and shoulders for the task of explosively pushing the body up, as is required in a classic kip-up (step 7).
REGRESSION
If you can’t quite lift your shoulders off the floor, just focus on getting your legs above you and kicking hard, vertically. In time you’ll gain some height.
PROGRESSION
If this is easy, just push your shoulders higher off the ground. (Hand-balancers can push all the way up into a handstand from this position!)
![]()
STEP FOUR: BRIDGE KIP
PERFORMANCE
· Sit on the floor with your knees bent and heels on the ground.
· Roll back and swing your legs up as you place your hands in the bridge position (by your ears, with the fingers pointing to your feet).
· Roll onto your upper-back and shoulders and squeeze into a tight ball, with your bent knees close to your head (this will give you a better position to spring out from).
· To gain momentum, “unravel” by exploding your legs in an arc, up and then down towards the ground as you simultaneously push down through your palms.
· Use the momentum to lift your head and upper-back off the floor—push through your arms to help with this. As your feet strike the floor, you should only be supported by your palms and both feet.
· Hold this position—which is essentially a bridge—for a moment.
· Lower your body back down and repeat the exercise.
EXERCISE X-RAY
The goal of this step is to learn to generate enough lower-body power to throw the head, shoulders and upper-back off the floor. We don’t need them to flip forwards yet—that will come in more intermediate steps.
REGRESSION
If you can’t generate the necessary momentum to push your upper-back and head off the ground, you can begin by just practicing kicking up and down in an arc, striking the ground with your feet, but keeping your shoulders/head in contact with the floor. Your head and shoulders will lift if you practice.
PROGRESSION
Develop this movement by improving the quality of the bridge. At first you will only be able to kick out into a semi-bridge, with your head close to the floor; in time you will be able to extend your arms (and legs) more fully.
![]()
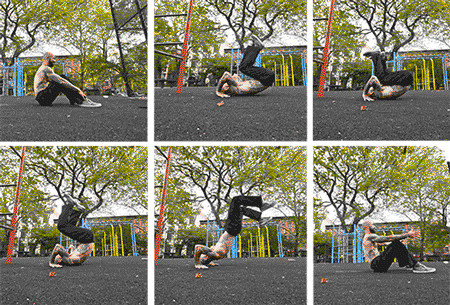
STEP FIVE: BUTT KIP
PERFORMANCE
· Sit on the floor with your knees bent and heels on the ground.
· Roll back and swing your legs up as you place your hands in the bridge position (by your ears, with the fingers pointing to your feet).
· Roll onto your upper-back and shoulders and squeeze into a tight ball, with your bent knees close to your head (this will give you a better position to spring out from).
· To gain momentum, “unravel” by exploding your legs in an arc, up and then down towards the ground as you simultaneously push down through your palms hard enough to lift them off the ground.
· As you kick off, throw your torso and hands forwards, almost like an explosive sit-up.
· Don’t try to land on your feet at this stage. Just aim to land on your butt and your feet with your torso upright.
· Lower your body back down and repeat the exercise.
EXERCISE X-RAY
Once you can generate enough power to lift your head and back off the floor (step 4), the next step is to lift the hands off the floor and throw the torso even further forward. If you can use this drill to master the skill of landing on the butt with the torso upright, the next step (6) should come pretty easy.
REGRESSION
You can begin this drill easily, just by kicking in an arc and landing on your butt while bringing the head and back a short way off the floor. In time, you can learn to finish in the upright “sit-up” position.
PROGRESSION
The more momentum you generate, the easier it will be to land on your feet a fraction of a second before you fall back on your butt. When you can do this you have essentially reached step 6, half kips.
![]()
STEP SIX: HALF KIP
PERFORMANCE
· Sit on the floor with your knees bent and heels on the ground.
· Roll back and swing your legs up as you place your hands in the bridge position (by your ears, with the fingers pointing to your feet).
· Roll onto your upper-back and shoulders and squeeze into a tight ball, with your bent knees close to your head (this will give you a better position to spring out from).
· To gain momentum, “unravel” by exploding your legs in an arc, up and then down towards the ground as you simultaneously push down through your palms hard enough to lift them off the ground.
· As your feet touch down, continue throwing your torso and hands forwards.
· Land on both feet, even if only for a fraction of second, before falling back onto your butt.
· Roll back and repeat the exercise.
EXERCISE X-RAY
In step 4 you learned the leg-arc motion; in step 5, you learned to throw the torso forward. Now it’s just a matter of fusing these patterns together more explosively until you can propel your center of gravity forwards enough to land on your feet, even if only for a fraction of a second.
REGRESSION
Athletes trying the kip-up for the first time often “discover” this movement by accident. You try to kip up, but you can’t throw your center of gravity quite forward enough to stay stable in the squat, and you tip backwards. In reality, you are nearly there—all it takes now is a little drill practice.
PROGRESSION
You can use tricks to help you stay upright after the kip—like “catching” a stable object, or a partner’s hands. These are really just a distraction from the real job of teaching your body to build the extra power needed to shoot you forward. How do you do this? Drill! Again and again and again!
![]()
STEP SEVEN: KIP-UP
PERFORMANCE
· Sit on the floor with your knees bent and heels on the ground.
· Roll back and swing your legs up as you place your hands in the bridge position (by your ears, with the fingers pointing to your feet).
· Roll onto your upper-back and shoulders and squeeze into a tight ball, with your bent knees close to your head (this will give you a better position to spring out from).
· To gain momentum, “unravel” by exploding your legs in an arc, up and then down towards the ground as you simultaneously push down through your palms hard enough to lift them off the ground.
· As your feet touch down, keep your torso and hands forwards.
· Land on the balls of both feet, into a squatting position. Keep the head and hands forwards until you are stable, and stand upright.
· Squat down, roll back and repeat the exercise.
EXERCISE X-RAY
This is the classic kip-up, beloved by martial artists, street dancers and pro wrestlers, to name but a few. Achieving this infamous move is impossible without an explosive waist (hips and lower back), super-fast legs and the total-body agility of a panther. If you have got this far, congrats—you have earned the envy of millions of Bruce Lee fans. Never has getting knocked on your ass been more fun.
REGRESSION
One way of getting your feet under you quicker is to try kipping up into a wider stance. This can work in helping some athletes get their first kip-up.
PROGRESSION
The contrary principle to the regression holds true—the closer your feet are on landing, the more momentum you need. Try keeping your feet together if you want to make those kip-ups harder. (This works for all kip-up styles.)
![]()
STEP EIGHT: STRAIGHT-LEG KIP-UP
PERFORMANCE
· Sit on the floor with your legs straight.
· Roll back and swing your legs up, keeping them straight, as you place your hands in the bridge position (by your ears, with the fingers pointing to your feet).
· Roll onto your upper-back and shoulders and swing your legs over your head, still keeping the legs straight. Your knees should come close to your head.
· Explode your legs up by straightening at the hips as you simultaneously push down through your palms hard enough to lift them off the ground.
· As you take-off, bend the legs and whip them underneath you as you continue the forward motion begun by your torso and arms.
· As your feet touch down, keep your torso and hands forwards.
· Land on both feet, into a squatting position. Keep the head and hands forwards until you are stable, and stand upright.
· Squat down, roll back and repeat the exercise.
EXERCISE X-RAY
If you thought the regular kip-up (step 8) was the Master Step of the kip-up chain, think again! Beginning the kip-up with straight legs is of a much higher difficulty level. With regular kip-ups, you can use your thighs and glutes to extend your legs, generating extra momentum. With straight legs, the hips and waist are forced to do the work, making the drill much tougher.
REGRESSION
Regressions are simple and continuous for this exercise. Once you can perform a regular kip-up (step 7), just try to use less leg bend over time. The greater the knee-bend, the easier the kip-up.
PROGRESSION
To make the exercise harder, don’t begin by rolling back from a sitting position—this adds momentum. Begin lying flat on the floor instead. (This progression works with all the steps in this chain.)
![]()
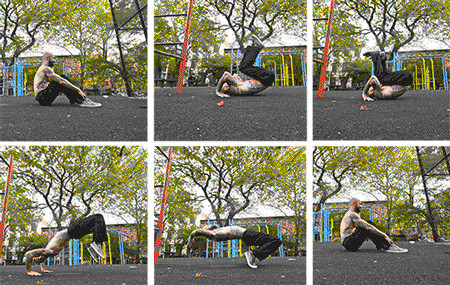
STEP NINE: WUSHU KIP-UP
PERFORMANCE
· Sit on the floor with your knees bent and heels on the ground.
· Roll back and swing your legs up as you place your arms out on the ground, at right-angles from your body.
· Roll onto your upper-back and shoulders and squeeze into a tight ball, with your bent knees close to your head (this will give you a better position to spring out from).
· To gain momentum, “unravel” by exploding your legs in an arc, up and then down towards the ground as you simultaneously push down through the backs of your arms.
· As your feet touch down, keep your torso and hands forwards.
· Land on the balls of both feet, into a squatting position. Keep pushing the hips and chest forwards until you are stable, and stand upright.
· Squat down, roll back and repeat the exercise.
EXERCISE X-RAY
It’s probably natural to assume that the best way to move from regular kip-ups (step 7) to no-hands kip-ups (Master Step) is to begin using just one arm—then moving on to zero arms. In fact this is unlikely to work. Your body is smart, and pretty soon you’ll be pushing twice as hard through the single arm. The secret to moving from regular kip-ups to hands-free kip-ups is to learn to use your arms differently. The wushu style—with the arms outstretched—will force you to use much less arm power compared to the traditional hands-by-ears pushing position, which is very strong.
REGRESSION
Different arm positions will make this exercise easier. You can begin with the bridge-style arm position, but push through the knuckles/backs of the hands instead of the palms. Straighten the arms over time. Holding the arms straight out from the body is the hardest variation.
PROGRESSION
To make the exercise even harder, you can use the straight-leg style described in step 8.
![]()
MASTER STEP: NO-HANDS KIP-UP
PERFORMANCE
· Sit on the floor with your knees bent and heels on the ground.
· Roll back and swing your legs up, while keeping your arms to your sides (they must never touch the floor during this move).
· Roll onto your upper-back and shoulders and squeeze into a tight ball, with your bent knees close to your head (this will give you a better position to spring out from).
· To gain momentum, “unravel” by exploding your legs in an arc, up and then down towards the ground; keep your arms off the floor and to the side of your body.
· As your feet touch down, keep your torso and hands forwards.
· Land on the balls of both feet, into a squatting position. Keep the arms to your side as you stand upright.
· Squat down, roll back and repeat the exercise.
EXERCISE X-RAY
If there is a more impressive—or explosive—way to power up off the floor, then humans haven’t invented it yet! Novices who see experts perform this incredible move often assume that the performing athlete must have a neck of steel to get the job done. Although you should avoid this exercise if you have neck problems, it’s not true that you need huge neck strength—the neck only acts as a lever for a split-second, if at all. The power here is really generated by the waist and legs. Master this advanced drill, kid, and your total-body speed and agility will start bursting off the charts.
To really make this technique elite, you can apply several of the progressions outlined in this chapter; for example, you can begin the move from a lying position (see page 128), or attempt it with straight legs (as for step 8). Crossing your arms over your chest will also make things brutal.
GOING BEYOND
ROLL KIP
An acrobatic variant of the kip-up is the roll kip; from standing, perform the beginning stage of a forward roll. When your upper-back contacts the floor, you will be in a position not unlike a roll-up (see page 128)—use the momentum to kick out into a kip-up.
HEAD KIP
A logical extension of the roll kip is the head kip. Who says you gotta be on your upper-back to kip-up? You can do it from your head with a little practice (although this is obviously much easier if you’re comfortable in a headstand). I don’t necessarily endorse this move—it does little for power, and is flavored more like a trick than a sensible training drill. But for those of you with strong necks and a sense of adventure, it’s there to explore if you want.
DITANG BREAKFALL
Those of you who want a more vigorous version of the kip-up should try the ditang breakfall. Developed originally as a martial arts move, you dip and hop back onto your upper-back and shoulders, immediately rebounding via a kip-up using elastic power. It looks cool, but please experiment carefully. Start with a soft or cushioned surface and don’t attempt it unless you’ve had a lot of training hours already.
Hip-hop contains a brutal approach to the kip-up known as rubber banding. Essentially, you perform a ditang breakfall, kip-up onto your feet, and repeat. The goal is to perform all the reps rhythmically and gracefully. Easy to say, not easy to do. Like the head kip and ditang breakfall this is all just for entertainment purposes: I’m not advising you to try ‘em. One bad rep could mean one screwed up neck, or worse, clear?
SMALL SPACE DRILLS
Following are three useful speed and power techniques you can utilize in your routine for variety, as ancillary work or to train your muscles from different angles. They are all solo drills, and they require zero equipment. Unlike the progressive exercises in the chains, most of the following drills can be performed rhythmically for higher reps, and can work well when used with any of the chains in this book. In this sense, they can also work as warm-ups or finishing exercises in an explosives session.
BRIDGE PUSH-OFFS
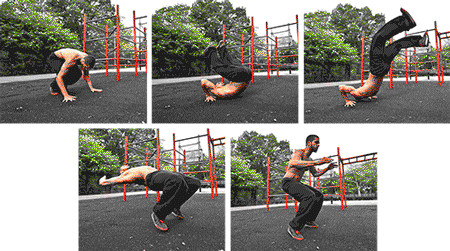
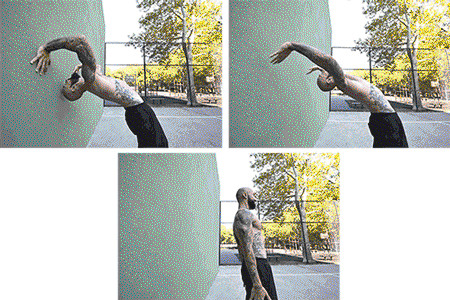
Stand a short distance from a sturdy wall, facing away from it. Bend back and place your hands on the wall, bending your arms as much as you can. Once your arms are well bent, push away from the wall fast enough to end up standing. This drill is a great one to condition the shoulder and arm muscles for the kip-up hand position. If it’s too easy, move further from the wall, or try using just one hand.
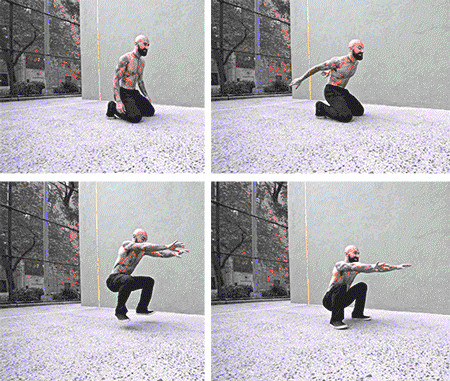
SITTING KIPS
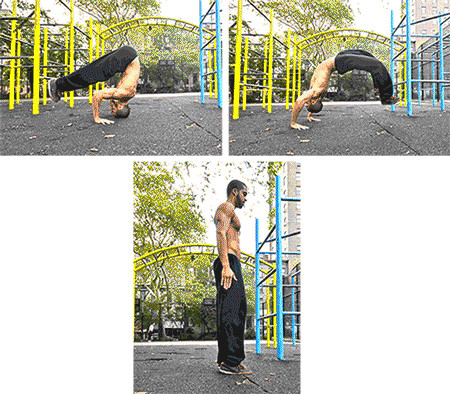
Kneel down on your shins and insteps, Japanese-style (In the photos, Al is performing a slightly easier version on his toes). Throw your arms and torso up with a snap, using the small amount of height you get from this to whip your legs out from under you. Finish in a standing position. The sitting kip is a great example of a speed drill, and imparts the kind of hip-snap that’s needed in real kips. A few reps of this beauty is a great addition to any routine, especially if you feel like you’re slowing down.
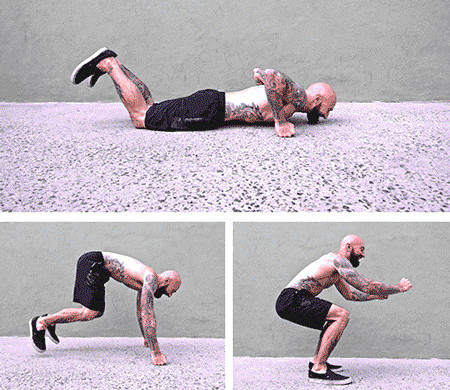
PRONE KIP
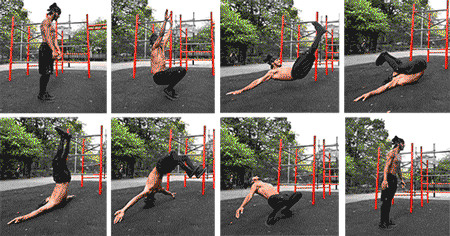
This is a fairly rare drill, though it was a favorite of Brett “the Hitman” Hart back in the day. Lay face down with your knees bent and your body and palms supporting you. Push down hard through the hands to gain enough height to whip your legs in underneath you. Finish standing. Can also be done from the palms instead of the fists. Another wonderful variation on the classic kip-up.
LIGHTS OUT!
At the beginning of this chapter, I mentioned that fact that most kids—most boys, anyways—have tried their best to pull off a kip-up. In fact, it’s about time more adult athletes began exploring this movement as a serious tool in their power armory.
A major part of the reason athletes of all ages avoid kip-ups is that they see them as a binary movement—all or nothing. Some people (the light, lucky ones) can bang out kip-ups the first time of trying. Others know they can’t, so they avoid the motion. If this is you, I’m asking ya for a mindset change. Stop thinking of kip-ups as a single movement, and rather as a family of techniques. Some versions are elite-level Shaolin tough; others are more family friendly and can be performed by almost anyone. If you begin at the beginning, you too can progress up through these movements, and be whipping onto your feet with pride.
Trust me, nobody’s looking, and nobody cares but you and me. To paraphrase the Godfather of Soul, “Get down on the floor, then get up offa that thing!”