The Complete Chess Course From Beginning To Winning Chess! (2016)
Book Eight
How to Play the d-pawn Openings
Queen’s Gambit Accepted
In order to evade the difficult problems which confront the defender in the Queen’s Gambit Declined, some players prefer to accept the gambit by answering 2.c4 with 2…dxc4. This clears the long diagonal which extends out from a8, and Black hopes to fianchetto his light-square bishop to exploit this long diagonal.
Theoretically, this is an excellent notion - but there are drawbacks. Black’s immediate surrender of the center gives White more space, quicker development, and the makings of a powerful pawn center.
Black may try a different approach after 2…dxc4 by developing his light-square bishop to g4. Aggressive though this seems, White knows how to hit back hard. Thus the acceptance of the gambit involves Black in thorny problems.
(a) 4…e6 Variation
Queen’s Gambit Accepted
White - Black
1.d4 d5 2.c4 dxc4 3.Nf3 Nf6 4.e3 e6
It is instructive to observe that it would be futile for Black to try to hold on to the gambit pawn. Thus, if 4…b5 5.a4! c6 6.b3!. No matter how Black plays, he loses back the pawn and remains with a weakened queenside pawn structure.
5.Bxc4 c5
An important counter-thrust. By engaging the d-pawn at once, Black takes much of the sting out of an eventual e3-e4 by White.
6.0-0 a6 7.Qe2 Nc6 (D)
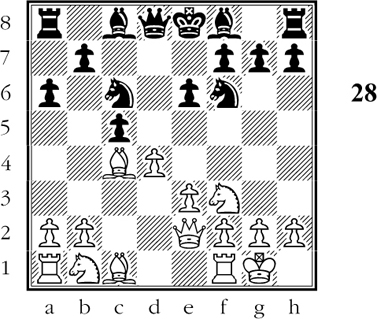
Position after 7…Nc6
White has two advantageous ways to proceed: 8.dxc5! in order to fianchetto his dark-square bishop on a powerful diagonal; or 8.Rd1! in order to operate on the center files with his rooks.
Proceeding with inexorable logic, White can get a clear-cut positional advantage with 8.dxc5! Bxc5 9.a3! b5 10.Ba2 Bb7 11.b4 Be7 12.Bb2 0-0 13.Nbd2!. The point of White’s play is clearly revealed in his last move: his queen knight can occupy the c5-square. As for Black, his queen knight, being developed differently, cannot imitate this convincing maneuver.
There follows: 13…Qb6 14.Nb3 Rfd8 15.Rac1 Rac8 16.Nc5 with a distinctly superior position for White.
8.Rd1 b5
In order to answer 9.Bd3 or 9.Bb3 with 9…c4! 10.Bc2 Nb4! and …Nxc2 assuring Black the positional advantage of two bishops against bishop and knight.
9.dxc5 Qc7 10.Bd3 Bxc5
Not 10…Nb4 11.a4! Nxd3 12.Qxd3 b4 13.c6! with a stranglehold on Black’s game, as he cannot play 13…Qxc6?? because of 14.Qd8#.
11.a4! b4
The alternative 11…bxa4 12.Rxa4 Nb4 is not appealing because of 13.Bb5+! Bd7 14.Bxd7+ Nxd7 15.Bd2 etc.
12.Nbd2 0-0 13.Nb3 Be7
White now plays 14.e4 followed by Bg5 and Rac1 leaving Black with a cramped, difficult game.
(b) 4…Bg4 Variation
Queen’s Gambit Accepted
White - Black
1.d4 d5 2.c4 dxc4 3.Nf3 a6 4.e3 Bg4
As we have already seen, it would be pointless for Black to play 4…b5 because of 5.a4 c6 6.b3! etc. Instead, he develops his light-square bishop, pinning White’s king knight.
5.h3 Bh5 6.Bxc4 e6 7.Qb3! (D)
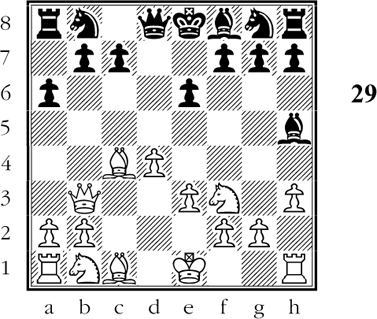
Position after 7.Qb3!
Protecting the b-pawn poses an awkward problem for Black, as neither 7…Qc8 nor 7…Ra7 looks inviting.
7…Bxf3 8.gxf3 b5 9.Be2 c5 10.a4 b4 11.dxc5 Bxc5
White has two bishops against bishop and knight, and he can make good use of the open g-file. In addition, Black’s queenside pawn structure has been weakened. The position definitely favors White.