The Complete Chess Course From Beginning To Winning Chess! (2016)
Book Eight
How to Play the d-pawn Openings
Queen’s Gambit Declined
Since the turn of the century this opening, beginning with 1.d4, has been the favorite line of play used by the masters. It is much less popular among average players, who have some psychological difficulties with it. When they have White, they do not care to play 1.d4. Yet when they have Black, they are exceedingly uncomfortable when their opponent starts with 1.d4.
Consequently the Queen’s Gambit is a formidable weapon, both technically and psychologically. The player who is reasonably familiar with its fine points has a marked advantage over his rivals.
What makes the Queen’s Gambit such a dreaded weapon is that White often obtains much greater freedom of action for his pieces. As a result, he gets a frequently decisive command of the board. Sometimes this takes the form of slow strangulation of Black’s forces; sometimes, through his superior mobility, White is able to win by extraordinarily brilliant play.
This explains why most players are afraid to play Black against the gambit. They either know from dreadful experience or from reputation of this opening that they are about to confront a very trying ordeal. Yet, as has been explained, these same players, when they have White, will avoid playing the Queen’s Gambit! Rightly or wrongly, they feel they do not know enough about it.
The Queen’s Gambit starts with these moves:
1.d4 d5 2.c4 (D)
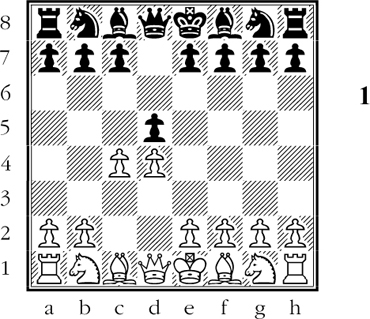
Position after 2.c4
White threatens to obtain an overwhelming pawn center with cxd5. If Black plays 2…dxc4, White may still very well obtain the overwhelming pawn center.
White’s offer of a pawn by 2.c4 constitutes the Queen’s Gambit. A gambit, as you know, is an opening in which material is offered speculatively for the purpose of gaining development or other advantages. The e-pawn opening gambits, such as the King’s Gambit or the Evans Gambit, have a highly speculative character. The Queen’s Gambit, in most forms, is less of a gamble, as White can generally recover the pawn with ease. (For example, if Black plays 2…dxc4, White can recover the pawn immediately with 3.Qa4+ if he wants to.)
Thus we see that there is little about the gambit that can be called speculative. On the other hand, 2.c4 embodies a definite threat. White is momentarily threatening to remove Black’s center pawn. If he gets rid of Black’s d-pawn, White can soon continue with e2-e4, obtaining a broad pawn center and leaving Black with a hopeless inferiority in space. (White, in the position of Diagram 1, threatens 3.cxd5 Qxd5 4.Nc3 followed by 5. e4 with an overwhelming position.)
Our main problem is: how is Black to maintain a firm foothold in the center? To maintain a hold in the center is essential for Black. If he loses out in the center, he will be faced with the danger of White’s getting overwhelming control of the board. (This is exactly what happens when Black is not familiar with the pitfalls of this opening.)
The object of our treatment of this vital opening is to familiarize you with the basic schemes that must be followed by White and Black. You will see what White aims for, and how Black parries the dangers involved. After you read this section, you should be able to play the Queen’s Gambit Declined for either side, with a fair amount of confidence.
Queen’s Gambit Declined 2…e6 Defense
To ensure his hold on the center, Black must support his d-pawn with a pawn move. Then, if White plays cxd5, Black replies e(or c)xd5. In this way he keeps a pawn at the d5-square and maintains a solid foothold in the center.
Black has two supporting pawn moves that will answer the purpose: 2…e6 (treated in this section) and 2…c6 (treated in the next section).
So let us see the consequences of 2…e6.
2…e6 (D)
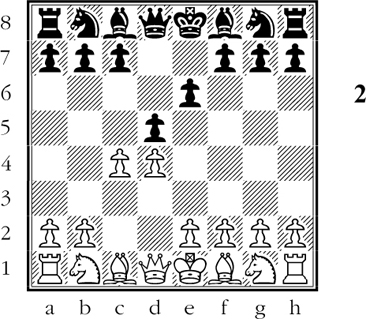
Position after 2…e6
Black now has a firm foothold in the center, but a new problem has arisen for him: how is he to develop his light-square bishop?
By playing 2…e6, Black has blocked the diagonal of his light-square bishop. This piece is solidly hemmed in by the black pawn at e6, which is why the bishop is sometimes known as “the problem child of the Queen’s Gambit.”
It is this serious loss of mobility which often leads to defeat for Black. If he fails to bring out the bishop, his development remains inadequate for the rest of the game, giving White an advantage which often reaches right down into the ending. Worse yet, many a player of the black pieces is not even aware of this danger!
However, since we do see the problem, how are we to solve it? There are two possible ways: (a) to strive for …e5, which will open the bishop’s diagonal, or (b) to fianchetto his bishop by playing …b6 or …b5. These, then, are generally Black’s objectives. Where he fails to achieve them, his light-square bishop’s lack of mobility may often lose the game for him.
Diagram 3 shows the consequences of Black’s failing to solve the problem of the light-square bishop. (D)
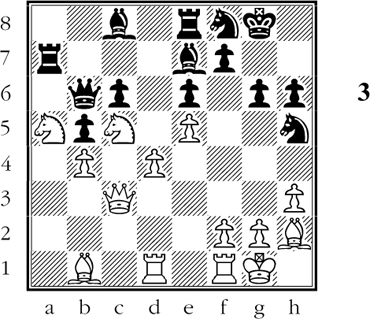
No matter how Black turns and squirms, he cannot develop his light-square bishop. It is hemmed in in all directions by black pawns on light squares (his e-, c-, and b-pawns).
When we turn to specific variations, we find that they revolve to a considerable extent about this problem. But White has other trumps that Black must watch out for.
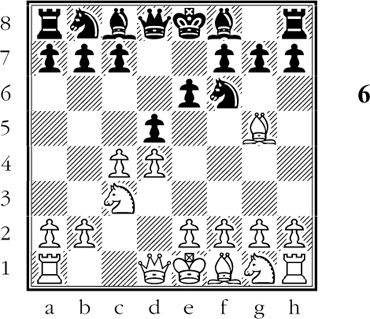
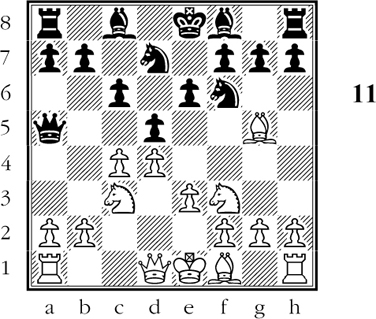
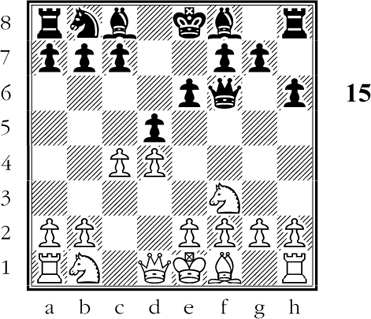
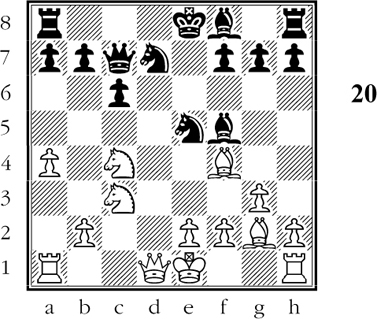
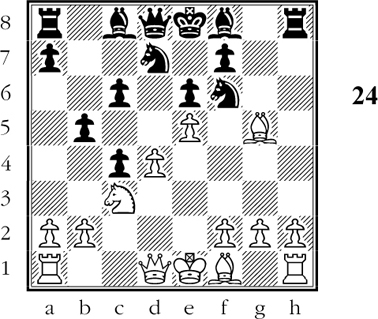
Thus, White can often post his king knight on e5 very effectively. Here the knight has a magnificent center outpost, radiating power in all directions. An example of this is seen in Diagram 4. White’s queen, knight, and bishop aim powerfully at the kingside, while his rook on c3 is poised for Rh3 or Rg3. (D)
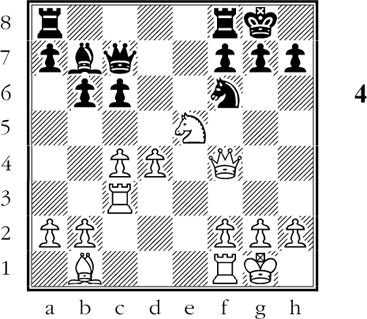
If Black tries 1…Nd7 (to get rid of White’s knight), the sequel might be 2.Rh3 h6 3.Rxh6!! gxh6 (or 3…f6 4.Rh8+!! Kxh8 5.Qh4+ Kg8 6.Qh7#) 4.Qg3+ Kh8 5.Ng6+! fxg6 6.Qxc7.
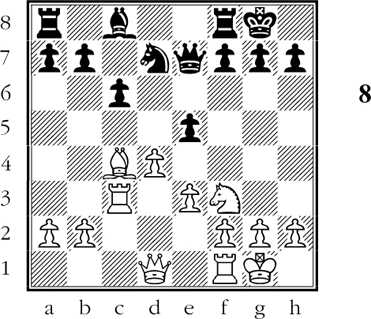
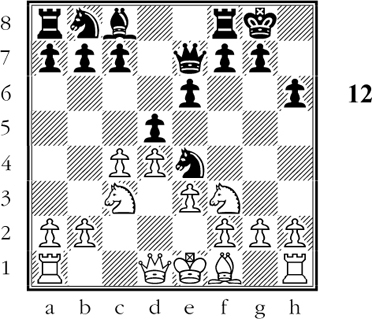
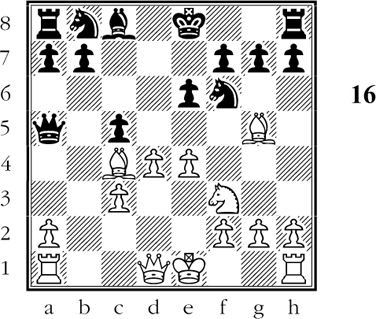
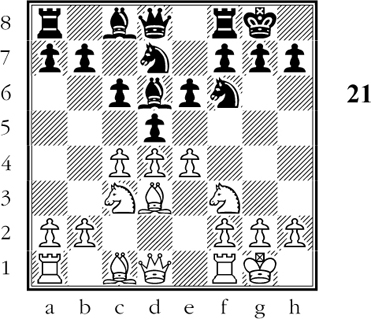
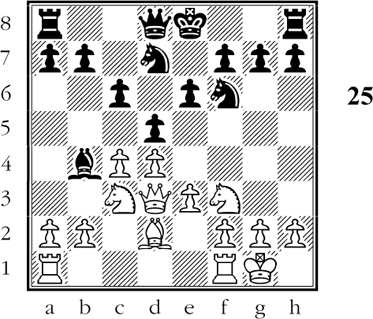
Another danger (partly illustrated in the play arising from Diagram 4) is that White’s light-square bishop can operate formidably on the b1-h7 diagonal, leading to the heart of Black’s castled position. This menace becomes even more drastic if White’s queen is on the same diagonal, as in Diagram 5. (D)

White plays 1.Bb1 (with the threat of 2.Bxf6 Bxf6 3.Qxh7#). Black stops this with 1…g6, but there follows 2.Bxf6 Bxf6 3.Ne4! Be7 4.b4! and White wins a piece.
Finally, you must remember that White’s second move in the Queen’s Gambit Declined (2.c4) often allows him to open the c-file and post his queen rook powerfully on it. (An example of this appears on page 257.) Black must be in a position to neutralize this pressure, and the best way for him to do it is to aim for a fairly early …c5, assuring himself counterplay for his own rooks on the c-file.
Thus you see that the dangers Black must meet are many, varied, and formidable. Yet there is no reason to despair. If Black is unaware of the dangers, there is a strong likelihood that he will succumb to them. If he is aware of them, however, he can take countermeasures in good time.
(a) Orthodox Defense
Queen’s Gambit Declined
White - Black
1.d4 d5 2.c4 e6
Now White has the choice of bringing out his queen knight or king knight. 3.Nf3 is less exact, as it may lead to variations (e), (f), or (g), which give Black an easier game that after 3.Nc3.
3.Nc3 Nf6 4.Bg5 (D)
Position after 4.Bg5
By now playing 4…Nbd7, Black sets one of the most popular traps in the whole range of the openings: 5.cxd5 exd5 6.Nxd5?? Nxd5! 7.Bxd8 Bb4+ 8.Qd2 Bxd2+ 9.Kxd2 Kxd8 and Black has won a piece!
4…Nbd7
It doesn’t matter whether Black plays 4…Nbd7 or 4…Be7. But if he wishes to adopt the Cambridge Springs Defense - Variation (c), he must play 4…Nbd7.
5.e3 Be7 6.Nf3 0-0 7.Rc1!
The rook move exercises a powerful restraining grip on Black’s game. It sets up the potential pressure of the rook on the c-file.
7…c6
Temporarily neutralizing the pressure of White’s rook along the c-file. Of course, Black still means to play …c5 at a suitable moment later on. (D)

Position after 7…c6
Black must think hard about the problem of developing his light-square bishop. Note that at this moment the bishop does not have a single move!
8.Bd3
This is a critical position, and Black can easily go wrong. In one game, for example, the play was 8…b6? 9.cxd5 Nxd5 10.Nxd5 cxd5 11.Bxe7 Qxe7 12.Rc7! Qb4+ 13.Qd2 Qxd2+ 14.Kxd2 a6 15.Rhc1 and White has a strategically won game.
Nor is the preparation for fianchettoing Black’s light-square bishop fully successful: 8…h6 9.Bh4 dxc4 10.Bxc4 b5 11.Bd3 a6 12.0-0 c5 13.a4! (this forces a weakening of Black’s queenside pawns) 13…c4 14.Bb1 Nd5 15.Bxe7 Qxe7 16.b3! and Black ends up with a weak pawn on the queenside.
8…dxc4 9.Bxc4 Nd5
Black has surrendered the center in order to free his constricted position by several exchanges - and also in the hope of freeing his imprisoned bishop.
10.Bxe7 Qxe7 11.0-0
White can avoid the exchange of knights with 11.Ne4, but after 11…N5f6 12.Ng3 e5! (freedom for the bishop!) Black stands well enough.
11…Nxc3 12.Rxc3 e5 (D)
Position after 12…e5
At last Black has made the liberating move …e5, which means that the development of his bishop is assured.
In the event of 13.dxe5 Nxe5 14.Nxe5 Qxe5 15.f4 Black can hold his own with 15…Qe4! 16.Bb3 Bf5 17.Qh5 g6 18.Qh6 Rad8 etc.
13.Qb1!
With this move White continues to maintain some advantage in space. If now 13…e4 14.Nd2 Nf6 15.b4! a6 16.Rfc1 Bg4 17.a4 and White has strong play on the c-file with the coming b4-b5 etc.
Probably best for Black is 13…exd4 14.exd4 Nb6 15.Bb3 Qf6 16.Re1 Be6 17.Bxe6 fxe6 18.Rce3 Rae8. White still has more space for his pieces, but Black has completed his development and has a strong point for his knight at d5.
(b) Exchange Variation
Queen’s Gambit Declined
White - Black
1.d4 d5 2.c4 e6 3.Nc3 Nf6 4.Bg5 Nbd7 5.e3 c6 6.cxd5 exd5
It will become clear later on that White is pursuing a definite policy with this exchange of pawns, despite the fact that the swap allows Black to open the diagonal for his light-square bishop.
7.Bd3 Be7
Planning to free his game with 8…Ne4!.
8.Qc2! (D)
Position after 8.Qc2!
White’s last move has prevented 8…Ne4? which would now be answered by 9.Bxe7 winning a pawn. So Black must find some other way to free himself.
White plans to play Rb1 in due course, followed by b2-b4-b5. If Black then exchanges pawns (…cxb5) he is left with a weak d-pawn and b-pawn; aside from that, White has the mastery of the open c-file.
On the other hand, if Black stands pat against the “minority attack” and allows White to play bxc6, then Black is left with a backward c-pawn on the open c-file. Such a pawn remains a lasting weakness right into the endgame stage.
Here are some typical possibilities: 8…Nh5 9.Bxe7 Qxe7 10.Nge2 g6 11.0-0 f5 12.Rab1 0-0 13.b4! a6 14.a4 f4! (counterplay on the kingside) 15.Nxf4 Nxf4 16.exf4 Rxf4 17.Ne2 Rf6 18.b5 axb5 19.axb5 Nf8 20.bxc6 bxc6 Black is left with the backward c-pawn. Or 8…Nf8 9.Nf3 Ne6 10.Bh4 g6 11.0-0 0-0 12.Rab1 Ng7 13.b4! Bf5 (getting rid of the problem child) 14.b5 Bxd3 15.Qxd3 Nf5 16.bxc6 Nxh4 17.Nxh4 bxc6. Again Black is left with the backward c-pawn.
8…0-0 9.Nf3 Re8 10.0-0 Nf8
Now it is still too soon for 10…Ne4? for then 11.Bxe4! wins a pawn (Black’s h-pawn is unprotected.)
11.Rab1 Ne4 12.Bxe7
If now 12.Bxe4 Bxg5 and Black is safe.
12…Qxe7 (D)
Position after 12…Qxe7
Again White is in position to carry out the minority attack: 13.b4! a6 14.a4 Nxc3 15.Qxc3 followed eventually by b4-b5 with a strong initiative.
(c) Cambridge Springs Defense
Queen’s Gambit Declined
White - Black
1.d4 d5 2.c4 e6 3.Nc3 Nf6 4.Bg5 Nbd7
A good alternative is 4…Bb4, with ideas akin to those of the Nimzo-Indian Defense (page 268).
After 4…Nbd7 White can, if he wishes, transpose into the Exchange Variation with 5.cxd5 or 6.cxd5.
5.e3 c6 6.Nf3 Qa5 (D)
Position after 6…Qa5
With his last move Black pins White’s queen knight, exploiting the absence of White’s dark-square bishop. Note that 7.cxd5 is not so good now, as Black has 7…Nxd5, intensifying the pin.
7.Nd2
Taking measures against the pin. Black can now get equality with 7…Bb4 8.Qc2 dxc4 (attacking White’s bishop) 9.Bxf6 Nxf6 10.Nxc4 Bxc3+ 11.Qxc3 Qxc3+ 12.bxc3 Ke7 13.f3 Bd7 14.Rb1 b6 15.Ne5 Rhc8 followed by …c5. However, the main line is even simpler and more promising.
7…dxc4 8.Bxf6 Nxf6 9.Nxc4 Qc7 10.Rc1 Nd5! 11.Bd3 Nxc3 12.bxc3
Not 12.Rxc3? Bb4, winning the exchange.
12…Be7 13.0-0 0-0 14.f4 g6 15.Ne5 c5
The position is approximately even. White has a freer game, but Black’s bishop pair has great potential power.
(d) Lasker’s Defense
Queen’s Gambit Declined
White - Black
1.d4 d5 2.c4 e6 3.Nc3 Nf6 4.Bg5 Be7 5.e3 0-0 6.Nf3 h6 7.Bh4 Ne4! 8.Bxe7 Qxe7 (D)
Position after 8…Qxe7
Black’s emphasis is on exchanging and simplifying so as to liberate his remaining forces.
Black has already achieved a satisfactory position, for example 9.Nxe4 dxe4 10.Nd2 e5!. Then if 11.Nxe4? exd4 12.Qxd4?? Rd8 and Black wins a piece.
Or if 9.Qc2 Nxc3 10.Qxc3 dxc4! 11.Bxc4 b6! 12.0-0 Bb7 13.Be2 Rc8! 14.Rfd1 c5! and Black stands well.
9.cxd5 Nxc3 10.bxc3 exd5
Black’s bishop is liberated at last.
11.Qb3 Rd8 12.c4 dxc4 13.Bxc4 Nc6 14.Qc3 Bg4 (D)
Position after 14…Bg4
Black’s bishop has developed with a threat of 15…Bxf3 16.gxf3 Nxd4 (or 16…Rxd4).
15.0-0 Bxf3 16.gxf3 Qf6
Black has a thoroughly satisfactory position. All his pieces are in good play.
(e) Semi-Tarrasch Defense
Queen’s Gambit Declined
White - Black
1.d4 d5 2.c4 e6 3.Nc3 Nf6 4.Nf3 c5
Thanks to the fact that White’s fourth move here is less energetic than 4.Bg5, Black can hit back vigorously in the center. (D)
Position after 4…c5
If now 5.Bg5 cxd4 6.Nxd4 e5 7.Nf3 d4 8.Nd5 Be7 9.Nxe7 Qxe7 with a good game for Black.
5.cxd5 Nxd5!
After 5…exd5 Black would be faced with the later possibility of dxc5, leaving him with an isolated d-pawn as in Variation (h).
6.e4 Nxc3 7.bxc3 cxd4 8.cxd4 Bb4+ 9.Bd2 Bxd2+
As in the previous variation, Black frees his game by exchanging pieces.
10.Qxd2 0-0 11.Bc4 Nc6 12.0-0 b6 13.Rfd1 Bb7
Black has developed his light-square bishop satisfactorily. After 14.Qf4 Rc8 he has a good game. White has a powerful-looking pawn center, but Black has the queenside majority of pawns. Both sides have good prospects for the middlegame.
(f) Duras Variation
Queen’s Gambit Declined
White - Black
1.d4 d5 2.c4 e6 3.Nf3 Nf6 4.Bg5 h6!
This takes advantage of the fact that White’s third move is not quite so strong as 3.Nc3.White’s next move is practically forced, for if 5.Bh4 Bb4+! 6.Nc3 dxc4! and Black can hold the gambit pawn in all variations.
Proof: if 7.e4? g5!, winning White’s e-pawn (this is the point of 4…h6!. If 7.e3 b5! (this is the point of 5…Bb4+!). Finally, if 7.Qa4+ Nc6 8.a3 Bxc3+ 9.bxc3 Qd5! 10.e3 b5 and again Black keeps the pawn.
5.Bxf6 Qxf6 (D)
Position after 5…Qxf6
Black has the positional advantage of the two bishops against bishop and knight; but his position is somewhat constricted.
6.Qb3 c6 7.Nbd2 Nd7 8.e4 dxe4 9.Nxe4 Qf4 10.Bd3 Nf6 11.Nxf6+ Qxf6 12.0-0 Bd6 13.Rfe1 0-0
Equal game. White has a freer position, but Black’s forces have considerable power, especially if he can free his light-square bishop.
(g) Vienna Variation
Queen’s Gambit Declined
White - Black
1.d4 d5 2.c4 e6 3.Nf3 Nf6 4.Bg5 Bb4+ 5.Nc3 dxc4 6.e4 c5
This counter-thrust in the center leads to very exciting play. Here again Black has taken advantage of the fact that 3.Nf3 is less energetic than 3.Nc3.
An extremely complicated game can now arise from 7.e5, but it appears that Black can hold his own, for example 7…cxd4 8.exf6 gxf6 9.Qa4+ Nc6 10.0-0-0 fxg5 11.Nxd4 Bxc3! 12.bxc3 Bd7! 13.Nxc6 Qc7! etc. Or 8.Qa4+ Nc6 9.0-0-0 Bd7! 10.Ne4 Be7 11.exf6 gxf6 12.Bh4 Rc8! 13.Kb1 Na5 14.Qc2 e5! and Black has compensation for the piece down. (His pawns are powerful.)
7.Bxc4
Black can now play 7…cxd4 8.Nxd4 Bxc3+ 9.bxc3 Nbd7 with a perfectly safe game. However, 8…Qa5 seems much too risky: 9.Bxf6! Bxc3+ 10.bxc3 Qxc3+ 11.Kf1 Qxc4+ 12.Kg1 Nd7 (not 12…gxf6? 13.Rc1 winning) 13.Rc1! Qa6 14.Bxg7 and White has a terrific initiative.
7…Bxc3+! 8.bxc3 Qa5! (D)
Position after 8…Qa5!
Black must win a pawn, for example 9.Qc2 (or 9.Qb3) 9…Nxe4! etc. Or 9.Bxf6 Qxc3+ 10.Nd2 gxf6 11.dxc5 Nd7 etc.
This line of play is unsatisfactory for White, as Black wins material.
(h) Tarrasch Defense
Queen’s Gambit Declined
White - Black
1.d4 d5 2.c4 e6 3.Nc3 c5 4.cxd5! exd5
White intends to burden Black with an isolated d-pawn (see White’s ninth move).
5.Nf3 Nc6 6.g3! (D)
Position after 6.g3!
White will fianchetto his light-square bishop in order to exert powerful pressure on Black’s weak d-pawn.
6…Nf6 7.Bg2 Be7 8.0-0 0-0 9.dxc5!
This is the move that sets off White’s advantage. The counter gambit 9…d4 simply leaves Black a pawn down after 10.Na4 Bf5 11.Bf4 Ne4 12.b4! Bf6 13.b5 Ne7 14.Be5.
9…Bxc5 10.Na4 Be7 11.Be3 Ne4 12.Rc1
White has a marked positional advantage, thanks to Black’s isolated d-pawn.
Summary: After 3.Nc3, Black’s most promising defenses appear to be the Cambridge Springs Defense and Lasker’s Defense. After 3.Nf3, Black does well with the Semi-Tarrasch Variation, the Duras Variation or Vienna Variation.
Queen’s Gambit Declined Slav Defense (2…c6)
By propping up his d-pawn with 2…c6 Black takes up the fight for the center in the same way as when playing 2…e6. However, 2…c6 does not block his light-square bishop and, as we would expect, we often see the black bishop developed to f5 (or even to g4) in this line of play.
After 2…c6 Black frequently accepts the gambit on move 4, on the theory that he can fight for the center by playing his light-square bishop to f5. White generally gets the better of it, however, by angling for e2-e4, or trying to control the center in some other fashion.
Despite the early …c6, Black will generally try to free his game in the late opening or early middlegame by playing …c5.
The so-called “Semi-Slav” defenses involve Black’s playing …e6 after …c6. As this hems in his light-square bishop, he will generally try to fianchetto his problem child.
(a) Deferred Acceptance of the Gambit
Slav Defense
White - Black
1.d4 d5 2.c4 c6 3.Nf3 Nf6 4.Nc3 dxc4
Here 4…Bf5 looks logical, but after 5.cxd5! cxd5 6.Qb3! Black is in trouble because of the twofold attack on his b- and d-pawns.
After 4…dxc4 White can play to recover the gambit pawn directly by 5.e3 b5 6.a4 b4 (if 6…a6 7.axb5 cxb5 8.Nxb5 etc.) 7.Na2 e6 8.Bxc4 etc. But as this leaves his queen knight out of the game, White chooses a different way.
5.a4 Bf5 (D)

Position after 5…Bf5
Black has achieved his heart’s desire - development of the light-square bishop.
6.Ne5
The alternative is 6.e3 e6 7.Bxc4 Bb4 (to restrain an eventual e3-e4) 8.0-0 0-0 9.Qe2. Now Black can try to stop e3-e4 or accept it as inevitable.
Thus 9…Ne4 10.Bd3! (an interesting pawn sacrifice) 10…Bxc3 (if 10…Nxc3 11.bxc3 Bxc3 12.Rb1 and White regains the pawn) 11.bxc3! Nxc3 12.Qc2 Bxd3 13.Qxd3 Nd5 14.Ba3 with a magnificent development in return for the pawn.
Or 9…Bg4 10.h3 Bxf3 11.Qxf3 Nbd7 12.Rd1 (not 12.e4 at once because of 12…Nb6) 12…e5! 13.d5! (if 13.dxe5 Nxe5) 13…Bxc3! 14.dxc6! e4! 15.Qf5 Be5! 16.cxd7 Qc7! and Black can just about hold his own. (D)
Position after 6.Ne5
White intends to fianchetto his light-square bishop. He will recover the gambit pawn by capturing it with his king knight.
6…Nbd7
Here 6…e6 looks plausible, but after 7.f3! Black’s light-square bishop can run into trouble, for example 7…Bb4 8.Nxc4 0-0 9.Bg5! c5 10.dxc5 Qxd1+ 11.Kxd1 Bxc5 12.e4! Bg6 13.Ne5. White will play Nxg6, obtaining the positional advantage of two bishops against bishop and knight.
7.Nxc4 Qc7 8.g3! e5 9.dxe5 Nxe5 10.Bf4 Nfd7 11.Bg2 (D)
Position after 11.Bg2
Black has developed freely and rapidly, but the pin on his king knight promises to be troublesome.
11…f6 12.0-0 Rd8 13.Qc1! Be6 14.Ne4!
The point is that after 14…Bxc4 15.Qxc4 Nxc4 16.Bxc7 White has a very favorable endgame with his two bishops against bishop and knight.
14…Bb4 15.a5!
White has a very strong position. If now 15…Bxc4 16.Qxc4 Bxa5?? 17.Qe6+ Kf8 18.Rfd1! and White’s pressure must be decisive. Or 15…0-0 16.Nxe5 Nxe5 17.Nc5 with powerful pressure.
(b) Semi-Slav: Classical Variation
Semi-Slav Defense
White - Black
1.d4 d5 2.c4 c6 3.Nf3 Nf6 4.Nc3 e6 5.e3 Nbd7
Against the “stonewall” setup of 5…Ne4 6.Bd3 f5 White has the vigorous 7.g4!!.
6.Bd3 Bd6
The conservative 6…Be7 allows White to play 7.0-0 0-0 8.b3! b6 9.Bb2 with a strong white initiative because his light-square bishop’s aggressive position contrasts favorably with the passive position of Black’s dark-square bishop.
7.0-0 0-0 8.e4! (D)
Position after 8.e4!
White opens up the game advantageously, for if 8…dxc4 9.Bxc4 e5 10.Bg5! with a more aggressive development.
8…dxe4 9.Nxe4 Nxe4 10.Bxe4 Nf6
Not 10…e5? 11.dxe5 Nxe5 12.Nxe5 Bxe5 13.Bxh7+! Kxh7 14.Qh5+ winning a pawn.
11.Bc2
White has distinctly the freer game. Note that Black’s light-square bishop is still hemmed in.
(c) Semi-Slav: Meran Variation
Semi-Slav Defense
White - Black
1.d4 d5 2.c4 c6 3.Nf3 Nf6 4.Nc3 e6 5.e3 Nbd7 6.Bd3 dxc4 7.Bxc4 b5 8.Bd3 (D)
Position after 8.Bd3
Black can avoid the intricacies of the following play by continuing 8…Bb7 9.e4 b4! 10.Na4 c5 11.e5 Nd5 etc.
8…a6 9.e4
After the colorless 9.0-0 c5 10.a4 b4 11.Ne4 Bb7 Black has an easy game (generally true when he succeeds in developing the light-square bishop).
9…c5! 10.e5 cxd4! 11.Nxb5! Nxe5!
If instead 11…axb5 12.exf6 Qb6 13.fxg7 Bxg7 14.0-0 Bb7 15.Bf4 0-0 and Black’s king is somewhat exposed because of the missing g-pawn.
12.Nxe5 axb5 13.Qf3 (D)
Position after 13.Qf3
To all appearances Black is in serious trouble, but he has ingenious resources.
13…Bb4+! 14.Ke2 Rb8
Calmly ignoring 15.Nc6, which he can answer with 15…Bb7.
15.Qg3 Qd6! 16.Nf3 Qxg3 17.hxg3 Bd6 18.Nxd4 Bd7
White has regained his pawn, and the position is even. However, this variation is too complicated and dangerous for the average player.
(d) Semi-Slav: Anti-Meran Gambit
Semi-Slav Defense
White - Black
1.d4 d5 2.c4 c6 3.Nf3 Nf6
After 3…e6 White can calmly protect the gambit pawn with 4.e3 - or he can go in for the complex alternative 4.Nc3!? dxc4 5.e3 b5 6.a4 Bb4 7.Bd2 a5 8.axb5 Bxc3 9.Bxc3 cxb5 10.b3! Bb7! 11.bxc4 b4 12.Bb2 Nf6 and White’s powerful center is more or less balanced by Black’s bristling queenside passed pawns.
4.Nc3 e6 5.Bg5!?
Avoiding the Meran Variation which could arise after 5.e3 Nbd7 6.Bd3 dxc4 7.Bxc4 b5 etc. 5…dxc4!?
Leading to dangerous complications, whereas the sedate alternative 5…Nbd7 would transpose to quieter lines like the Cambridge Springs Defense, Orthodox Defense, or Exchange Variation. After Black’s last, 6.e3 is too slow because of 6…b5. Therefore:
6.e4 b5 7.e5 h6
This and Black’s next move are forced.
8.Bh4 g5 9.Nxg5! hxg5
If 9…Nd5 10.Nxf7! Qxh4 11.Nxh8 etc.
10.Bxg5 Nbd7 (D)
Position after 10…Nbd7
Though Black is temporarily a pawn down and must lose back the extra piece, he has excellent prospects. Thus, if 11.Qf3 Bb7 12.Be2 Qb6! 13.exf6 c5! with a splendid position.
11.g3 Qa5
A good alternative is 11…Bb7 12.Bg2 Qb6 13.exf6 c5! 14.dxc5 Bxc5 15.0-0 0-0-0.
12.exf6 b4 13.Ne4 Ba6!
An exciting position in which both sides have weaknesses and attacking possibilities.
(e) …Bf5 Variation
Slav Defense
White - Black
1.d4 d5 2.c4 c6 3.Nf3 Nf6 4.e3 Bf5
Thus Black avoids the intricacies of the Meran Variation and develops his problem bishop. But White manages to maintain the initiative.
5.Bd3 Bxd3 6.Qxd3 e6 7.Nc3 Nbd7 8.0-0 Bb4
Hoping - in vain - to stop e3-e4. If instead 8…Bd6 9.e4 with greater freedom of action for White.
9.Bd2! (D)
Position after 9.Bd2!
White has set a trap! If Black castles now, then 10.Nxd5! wins a pawn.
9…Ba5 10.b4! Bc7
Not 10…Bxb4 11.Nxd5! Nxd5 12.cxd5 Bxd2 13.dxc6! bxc6 14.Nxd2 and White has a substantial positional advantage.
11.e4 dxc4 12.Qxc4
White has a noticeably freer game.
(f) Exchange Variation
Slav Defense
White - Black
1.d4 d5 2.c4 c6 3.cxd5 cxd5 4.Nc3 Nf6 5.Nf3 Nc6 6.Bf4 (D)
Position after 6.Bf4
White’s exchange at move 3 gives the variation its name. If now 6…e6 7.e3 Be7 and Black’s conservative development has the drawback of blocking his light-square bishop’s diagonal.
6…Bf5!
Black develops his problem bishop, although he sees difficulties ahead.
7.e3 e6 8.Qb3 Bb4!
So that if 9.Ne5 Qa5!, counterattacking vigorously.
9.Bb5 0-0!
Black is not afraid of 10.Bxc6 for then 10…Bxc3+ 11.Qxc3 Rc8! is strong (12.Qa3 Rxc6 13.Qxa7 Bd3!).
10.0-0 Bxc3 11.Bxc6 Bxb2 12.Bxb7 Bxa1 13.Rxa1
White must regain the exchange, with a perfectly even position resulting.
Summary: Black’s best practical chances seem to arise from the Meran and Anti-Meran lines in the Semi-Slav form. The deferred acceptance of the gambit is less suitable for Black because it leaves White with too much freedom of action.