The Complete Chess Course From Beginning To Winning Chess! (2016)
Book Six
How to Fight Back
Chapter Six
Point of No Return
In almost every game of chess there comes a crisis that must be recognized. In one way or another a player risks something - if he knows what he’s doing, we call it a “calculated risk.”
If you understand the nature of this crisis; if you perceive how you’ve committed yourself to a certain line of play; if you can foresee the nature of your coming task and its accompanying difficulties, all’s well. But if this awareness is absent, then the game will be lost for you, and fighting back will do no good.
One of the things that makes the masters the great players they are is just this awareness of “the point of no return.” They know when they have committed themselves irrevocably. At that point they begin to play with all their determination, all their ingenuity. In the following game, for example, the point of no return comes as early as White’s fourth move, and as you study his play there is not the slightest doubt in your mind that he’s well aware of the crisis.
King’s Gambit
White - Black
1.e4 e5 2.Nc3 Nc6 3.f4 exf4 4.d4!?
One of the riskiest forms of the King’s Gambit, this brings us to the point of no return as far as this game is concerned.
White hastens to form a broad, powerful pawn center, but at the cost of exposing his king to attack. It makes quite a difference in this opening whether White is an inexperienced player who cannot foresee the dangerous consequences of Black’s reply, or whether he is a great master who well knows that from now on he must be unremittingly on his guard.
4…Qh4+
The point. Black drives the white king to e2. Thus White has lost the castling privilege, and in addition, he blocks the development of White’s light-square bishop. This sounds like the haphazard play of a tyro. And yet, precisely because White knows he’s reached the point of no return, he makes these hardships dissolve as if they had never existed.
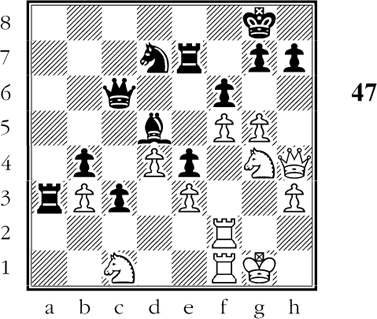
5.Ke2 d6 6.Nf3 Bg4 7.Bxf4 0-0-0 8.Ke3! (D)
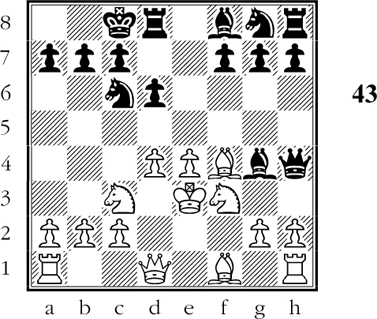
Black to move
What does White threaten?
Because White knows that every move must tell in this critical situation, he plays with great resourcefulness. By unpinning his previously pinned knight, he now threatens 9.Nxh4, winning a piece!
But the king move has other important meanings. For example, it protects the bishop at f4, while at the same time making room for the development of the other white bishop.
8…Qh5 9.Be2 Qa5 10.a3! Bxf3 11.Kxf3!
Black expected 11.Bxf3 g5 12.Bg3 Bg7 13.Ne2 h5 14.h3 Nf6 and Black has good attacking possibilities.
But after the surprising king move, White can answer 11…g5 with 12.b4!, so that after 12…Qb6 he has 13.Be3 with a number of powerful threats, such as 14.d5 or 14.Nd5 or 14.Na4, harrying the black queen.
11…Qh5+ 12.Ke3 Qh4 13.b4! g5 14.Bg3 Qh6
Black thinks he has the attack, but he’s quite wrong. White has the makings of a very strong attack on the queenside. He has a valuable line for his king rook on the open f-file. He is well ahead in development, and the astonishing fact is that his king is snug and safe behind the rampart of White pawns.
As for Black, his forces are divided and undeveloped. His queen is out of play and will be useless in the coming play.
15.b5 Nce7 16.Rf1! Nf6 17.Kf2 Ng6 18.Kg1 Qg7
By now there’s no doubt that White has survived the crisis. His king is artificially castled and quite safe. Meanwhile, Black’s king is headed for trouble.
19.Qd2 h6 20.a4 Rg8 21.b6!! axb6 22.Rxf6! Qxf6
White’s play is very fine. By means of 21.b6!! he forced open an important line to be used in attacking the black king. And with 22.Rxf6! he removed the one black piece which might have hindered the progress of the coming attack.
23.Bg4+ Kb8 24.Nd5 Qg7 25.a5 (D)
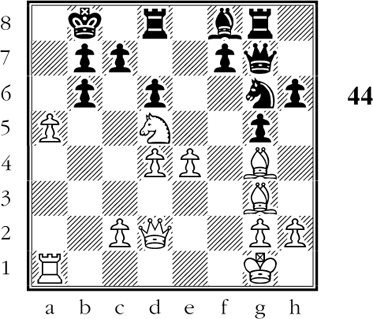
Black to move
Is 25…b5 a good defense?
White’s policy is naturally to open a file against the black king. If Black tries to cross his intentions by playing 25…b5, White still breaks through, thus: 26.a6 b6 27.a7+ Kb7 28.a8Q+ Rxa8 29.Rxa8 Kxa8 30.Nxc7+ Kb7 31.Ne8 Qh8 (what a move!) 32.Qc3 and White must win.
25…f5 26.axb6
Ignoring the attack on his bishop, as he threatens mate beginning with 27.Ra8+!.
26…cxb6 27.Nxb6
Another winning line is 27.Qc3 (threatening 28.Nxb6 and 29.Ra8#). If then 27…Rc8 28.Qa3 decides at once.
27…Ne7
Or 27…Kc7 allowing 28.Qc3+ with crushing effect.
Again and again we must marvel at the skill with which White has changed the scenery. His king is perfectly safe, while Black’s king is nothing but a punching bag.
28.exf5
Still menacing. This time he threatens 29.Qc3 Nc6 30.Ra8+ Kc7 31.Nd5+ Kd7 32.f6+ winning Black’s queen.
28…Qf7 29.f6!
So that if 29…Qxf6 30.Qc3 Nc6 31.Ra8+ Kc7 32.Nd5#!. Black avoids this, but he soon has to undergo such a grievous loss of material that it might be considered equivalent to resigning.
29…Nc6 30.c4 Na7 31.Qa2 Nb5 32.Nd5 Qxd5 33.cxd5 Nxd4 34.Qa7+ Kc7 35.Rc1+ Nc6 36.Rxc6#
Thus you see how White’s superb timing and awareness of the crisis saved the game for him. His alert capture with the king at move 11 was the turning point of the struggle. Very few players could have seen this startling possibility. Credit it all to White’s recognition of the point of no return.
In the next and final game, we have one of the finest examples of a crisis which develops toward the end of the opening. Once this point of no return is reached, each player knows exactly where he stands, and exactly what he must do to achieve success and avoid failure. The tension increases to an almost unbearable degree as each player follows his indicated course to the foreordained conclusion.
Queen’s Gambit Declined
White - Black
1.d4 d5 2.c4 e6 3.Nc3 Nf6 4.Bg5 Be7
This is a totally different kind of opening from the one we saw in the previous game. Here there will be no immediate danger for either king; the goals, at least for the time being, will be vaguer, and the chances of coming to grips will be more remote.
5.Nf3 Nbd7 6.Rc1 0-0 7.e3 b6
In order to develop his bishop on the long diagonal. Now the crisis gradually shapes up. (D)
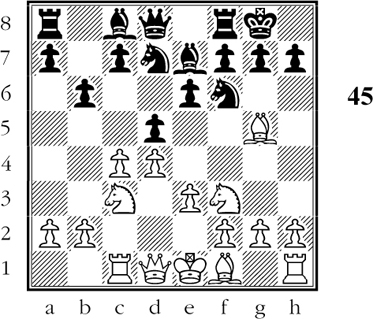
White to move
Black tries to solve the problem of developing his light-square bishop.
8.cxd5
Now if Black retakes with his knight, he will allow White to lord it over the center (by means of e3-e4 later on, for example). Black therefore recaptures with his e-pawn, in order to retain a firm grip on the center squares.
8…exd5 9.Bd3 Bb7 10.0-0 c5
If White exchanges pawns at this point, he allows Black some additional freedom. Besides, White wants to plant a centralized knight at the e5-square. For this purpose, he needs to keep his d-pawn at d4.
11.Re1 c4
White has passed the point of no return. He has allowed Black to establish a queenside majority of pawns. That is to say, Black’s three queenside pawns (a-, b, and c-pawns) are opposed by White’s two queenside pawns (aand b-pawns). If Black systematically advances his queenside pawns, he will eventually obtain a far-advanced passed pawn.
Unless White is able to set up some countervailing advantage, the black passed pawn will win the game for Black. Since White deliberately allowed this dangerous state of affairs to arise, we say that he’s passed the point of no return.
12.Bb1 a6 13.Ne5! b5 14.f4 Re8 15.Qf3 Nf8
Black, you will observe, has set his queenside pawns in motion. What is White’s counterplay? To attack on the kingside. So, from now on, you will see that White tries to build up an attack on the kingside. Black wants to prepare the advance of his queenside pawns, but he also needs to take time out to try to construct a foolproof defense for his king.
16.Ne2 Ne4 17.Bxe7 Rxe7 18.Bxe4 dxe4 19.Qg3 f6 20.Ng4 Kh8 21.f5 Qd7
Both sides are making progress, though Black underestimates the dangers of his position and is inclined to proceed too slowly.
22.Rf1 Rd8 23.Rf4 Qd6 24.Qh4! Rde8 (D)
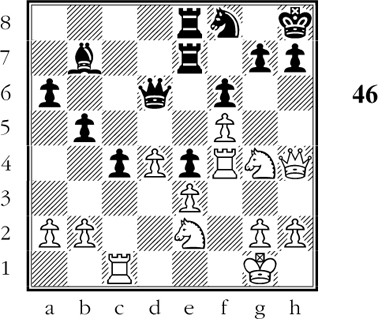
White to move
What is the proper plan for White?
If Black is given enough time, he will advance his queenside pawns. White must therefore attack as rapidly as possible on the kingside. The way to do this is to open a file on the kingside by advancing the g-pawn.
White’s proper course was therefore 25.Nf2! (making way for the pawn) 25…Bd5 26.g4! h6 (preventing 27.g5) 27.Qg3! (to play up the h-pawn) 27…b4 28.h4! and White is ready to advance 29.g5 as a counterpoise to Black’s nasty threats on the queenside.
Instead, White misses the point:
25.Nc3?
This is wrong, as it neglects the possibility of advancing the g-pawn. Aside from that, this knight move is a waste of time, as the knight will soon be driven away by …b4.
25…Bd5 26.Nf2 Qc6 27.Rf1 b4 28.Ne2 Qa4
Now White is hard pressed. To begin with, the threat of 29…Qxa2 has to be met.
29.Ng4!
Very neat. If 29…Qxa2? 30.Nxf6! gxf6 31.Qxf6+ and wins. Black must guard against the threat.
29…Nd7 30.R4f2!
Another brilliant resource, which combines threats on the kingside with indirect defense of the queenside. After 30…Qxa2 31.Nf4 Bf7 32.Ng6+ Bxg6 33.fxg6 White’s attack must succeed.
For example: 33…h6 34.Nxh6!! gxh6 35.Qxh6+ Kg8 36.Rf5! whereupon the coming 37.Rh5 decides in White’s favor.
Or 33…Nf8 34.Nxf6! gxf6 35.Rxf6 Kg8 36.Rf7 and White wins.
30…Kg8 31.Nc1 c3!
Thus Black at last obtains the dangerous passed pawn whose existence was prophesied by 11…c4. White’s situation is now truly desperate.
32.b3! Qc6 33.h3 a5 34.Nh2 a4 35.g4 axb3 36.axb3
The tension mounts from move to move. Black must stop for a moment of consolidation to hold back White’s attack by 36…h6. Then after 37.Qg3 Nf8! 38.h4 Nh7! White is still unable to play 39.g5. With his kingside attack stymied, he would be truly helpless against Black’s queenside attack.
36…Ra8?
This is truly the point of no return for Black. Once he allows White’s next move, he is doomed to defeat.
37.g5!! Ra3 38.Ng4! (D)
Black to move
White’s ingenious and courageous counterattack saves the game for him.
Black now wins a pawn, which gives him two connected passed pawns on the queenside. Since they need only a few moves to advance to the eighth rank and queen, and since the bulk of White’s forces are on the kingside, it would seem that White is hopelessly lost.
38…Bxb3
After the game, 38…Rxb3, giving up the exchange, was suggested in order to preserve the bishop for defending the kingside. However, this ingenious notion would not have sufficed. For example: 39.Nxb3 Bxb3 40.Rg2 Kh8 41.gxf6 gxf6 42.Ne5! Nxe5 43.dxe5 and now White wins after 43…Rxe5 44.Qh6! - or 43…c2 44.e6! and wins.
But after his last move (38…Bxb3) Black expects 39.Nxb3? Rxb3 40.Rg2 Rb2! and Black’s queenside counterplay wins for him.
Instead, White lets the bishop dangle and gains a valuable tempo:
39.Rg2!
If now 39…fxg5 40.Qxg5 Kf8 41.Nxb3 Rxb3 42.f6 and White’s attack crashes through to victory.
39…Kh8 40.gxf6
If Black tries 40…Nxf6 here, then 41.Ne5 Qe8 42.Ng6+ wins for White.
40…gxf6 41.Nxb3!
An important part of his attack. He now eliminates the bishop, which protects the g8-square.
41…Rxb3 42.Nh6!
Now the absence of the bishop tells cruelly against Black. White threatens 43.Rg8#, and if 42…Re8 43.Nf7#!
42…Rg7
The only move. But White has some beautiful resources.
43.Rxg7 Kxg7 44.Qg3+!!
So that if 44…Kf8 45.Qg8+ Ke7 and 46.Qxb3 - magnificent chess!
44…Kxh6
And now, in the event of the plausible 45.Rf4? Black plays 45…Rb1+, etc. getting a draw by perpetual check.
But White has a resource which he foresaw a good many moves ago.
45.Kh1!!
Threatening 46.Rg1 and 47.Qh4#. Black is lost.
45…Qd5 46.Rg1 Qxf5 47.Qh4+ Qh5 48.Qf4+ Qg5 49.Rxg5 fxg5 50.Qd6+ Kh5 51.Qxd7 c2 52.Qxh7#
In these two thrilling games you have seen telling examples of one of the most important concepts in chess - the crisis which forces a player to continue on a certain course. You have seen the enormous advantage enjoyed by the player who is familiar with the theory of the point of no return. To be unaware of this critical point leaves the attacker, as well as the defender, at the mercy of his opponent. To possess this knowledge gives you the most valuable, and perhaps least understood, of all the weapons you can use to fight back when you’re hard pressed by enemy attack.