The Complete Chess Course From Beginning To Winning Chess! (2016)
Book Six
How to Fight Back
Chapter Three
Half a Point is Better than None
A great writer once observed that you can tell a master by the way he limits his ambitions. There is a lot of truth in this observation.
Have you ever realized how your ambitions become broader or narrower during the course of a game? When your opponent is attacking fiercely and when you’re hard pressed, you’d be very glad to escape with a draw. Yet, a moment later, when the pressure has eased off, you’ve forgotten all about your worries, and you play headlong for a win.
Some players are even more optimistic, or shall we say, more stubborn. Even in the most difficult situations, they insist on “all or nothing” - win or lose. And very often they lose precisely because they refuse to concede the half point. (In competitive play, a win equals one point, a draw equals a half point.)
What I’m getting at is this: there are some positions so difficult to defend that you do well to accept a draw. Very often, to despise the possible draw means a forced loss. Sometimes it means a likely loss, or a grim, uphill fight at best.
Consequently, to force a draw in such a difficult position is a real accomplishment. Some players still look on a draw as a disgrace or a misfortune; however, when you look at the following examples, you will realize how much skill and artistry go into the job of forcing a draw in a lost position.
Drawing by Perpetual Check
A perpetual check is often a welcome resource in disagreeable situations. Take Diagram 15 as a case in point. (D)
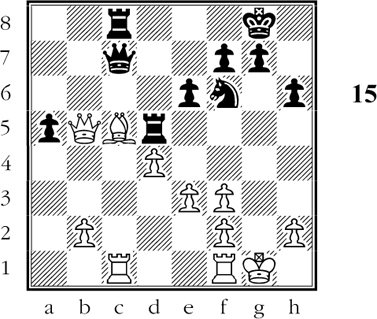
Black to move
With a pawn down, Black welcomes the opportunity to force a draw by perpetual check. How?
Black finds a wonderfully ingenious resource to draw the game.
1…Qxh2+! 2.Kxh2 Rh5+
And now, believe it or not, Black has a forced draw even though he is a queen down!
3.Kg3 Rg5+ 4.Kf4 Rf5+
White agrees to a draw, for after 5.Kg3 Rg5+ 6.Kh3 Rh5+ he still cannot make any headway. In this example you see with beautiful clarity the usefulness of forcing a draw in a position that would be lost by the usual run-ofthe-mill moves. And who can deny that Black displayed the highest artistry in finding this exquisite resource?
When we turn to Diagram 16, we find that the defender is in an even more desperate situation. White threatens Qb7#. If Black defends with 1…Rb8 or 1…Nb6, then 2.Qc6+ forces checkmate. (D)
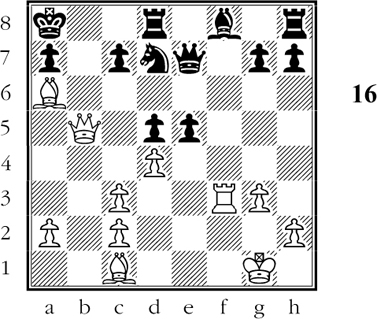
Black to move
Can Black save the game? If so, how?
Black’s position is desperate; no doubt of it.
But note this: in order to build up his attack, White had previously sacrificed a rook. With a rook ahead, Black can well afford to give up material in order to escape form the mate trap.
Is there some counter-sacrifice that offers a way out? let’s try the only possibility:
1…Nc5!!
Splendid play! The point is that if 2.dxc5 (again threatening mate), Black wins with 2…Qxc5+ forcing the exchange of queens and a winning endgame, thanks to his material advantage.
Thus Black has prevented Qb7#, and meanwhile he threatens …Nxa6, squelching the attack once for all.
But suppose White plays 2.Ba3 with a view to …Bxc5 and wins? Can Black still hold out? Yes! - his position holds by a hair, but it holds. In the event of 2.Ba3, Black parries deftly with 2…Qd7!!.
In that case, 3.Qxd7 Nxd7 is equivalent to resignation on White’s part. Thus he is forced to play 3.dxc5, allowing Black to continue 3…Qxb5 with a winning endgame.
White sees that this won’t do at all. This time he’s the one who’s happy to take a perpetual check. So:
2.Qc6+ Kb8 3.Qb5+ Ka8 Drawn.
Both sides must be content with the drawn result. White draws despite his material minus; Black draws despite the mating menace.
In Diagram 17 the play is even more exciting. White is the great Professor Anderssen, one of the finest attacking players in the history of the game. The black pieces are played by Zukertort, his most brilliant pupil. Both of these masters of sparkling combinative play outdo themselves in conjuring up magnificent resources. (D)
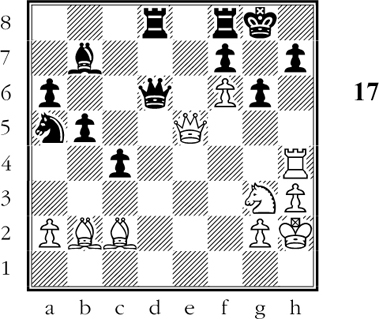
White to move
White, who is two pawns and the exchange down, must stake everything on his attack. Black is hard put to it to escape disaster.
White begins an extraordinarily brilliant attack with:
1.Qg5!
Threatening Qh6 followed by mate. What is Black to do?
1…Qd2!
A superb defense which parries White’s threat and in turn threatens …Qxg2#. At this point, most players handling the white pieces would resign. But White finds an amazing resource:
2.Nf5!!
A move that sparkles with pretty possibilities.
For example, if 2…Qxc2 3.Ne7+ Kh8 4.Rxh7+ Kxh7 5.Qh4#.
Or 2…Qxg2+ 3.Qxg2 Bxg2 4.Ne7+ Kh8 5.Nxg6+ fxg6 6.f7+ followed by mate - or 5…Kg8 6.Ne7+ Kh8 7.Rxh7#.
Black finds the only defense.
2…Qxg5
Has White gone mad? Black has not only won the queen; he actually threatens mate on the move. But Black will be happy to get a draw!
3.Ne7+ Kh8
Apparently White has shot his bolt.
4.Nxg6+!!
As we have seen earlier, Black gets mated if he plays 4…fxg6 or 4…Kg8. He must give back the queen.
4…Qxg6 5.Bxg6
And now if 5…fxg6 6.f7+ forces mate!
5…Rd7!
With formidable counterthreats. White is now happy to take the perpetual check:
6.Rxh7+ Kg8 7.Rg7+ Drawn.
Black cannot avoid the perpetual check. White must take it because he is still a rook down. One of the finest examples of master chess ever played.
Drawing by Stalemate
The examples of perpetual check we’ve just seen have an almost miraculous quality about them. They remind us that if we have faith, we can often achieve the impossible.
To bring about a stalemate is in the nature of things just as miraculous. An opponent who is good enough to win material from you ought to be good enough not to let you hoodwink him with stalemate. And yet these miracles do happen.
An extraordinary instance occurred in the position of Diagram 18, in which White, with two pawns to the good, allowed his alert opponent to escape with a draw. (D)

White to move
What is the best way for White to guard the attacked bishop?
White’s bishop is attacked. There are many ways to meet the threat, but it was White’s misfortune to overlook a delightful tactical possibility.
One of the simplest ways to continue was 1.Qg5+ Kg7 2.Bf3. Instead there followed:
1.Bf3??
What could be more plausible? And yet the move is an unforgivable blunder. For now the black king is in a stalemate position. Black pounces on his chance to escape from a lost game.
1…Qf2+!!
Draw! For after 2.Kxf2 Black is left without a move. Nor will 2.Kh2 help, for then Black plays 2…Qg3+! or 2…Qg1+!. Similarly, on 2.Kg4 Black has 2…Qg3+!. Imagine White’s chagrin!
In the position of Diagram 19 the play proceeds in an even more spectacular manner. Here it’s not a question of either player blundering. White makes an ingenious attempt to win; Black foils him in an even more ingenious manner! (D)
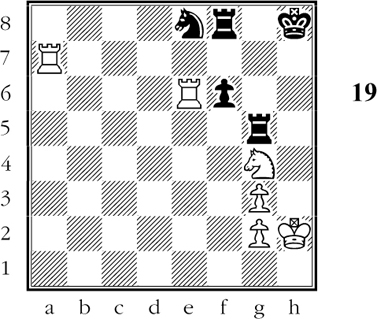
White to move
White’s winning plan will tax Black’s defensive resources to the utmost.
The powerful position of one of his rooks on the seventh rank gives White an ingenious winning idea:
1.Rxe8!
Expecting 1…Rxe8 2.Nxf6 and wins because of the double threat of 3.Rh7# or 3.Nxe8.
Black is apparently lost, but he finds a masterly defense based on a piquant stalemate idea.
1…Rh5+!
A mysterious-looking move which is the basis of Black’s plan.
2.Kg1 Rxe8 3.Nxf6 Rh1+!!
This first point!
4.Kxh1 Re1+ 5.Kh2 Rh1+!!
The final point. After 6.Kxh1 Black is stalemated. A witty finish.
Our final example of stalemate is equally amusing. In the position of Diagram 20 Black finds himself in an apparently hopeless situation. White has four pawns for the exchange, and Black’s king is exposed to attack. (D)
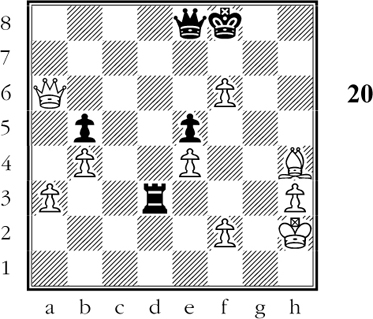
Black to move
Black’s position seems ripe for resignation. Instead, he forces a sensational draw.
What now happens is almost too good to be true. However, it did happen in an international master’s tournament!
1…Rxh3+!
White can hardly decline the rook, as this would cost him his bishop.
2.Kxh3 Qe6+!!
And who could expect such a move?
3.Qxe6 Drawn.
Black is stalemated! Unfortunately, White’s comment is not on record.
Drawing by Repetition of Moves
This drawing method is not too frequent, but it has produced some remarkable finishes. It implies an equilibrium of forces, in which both players are compelled to draw because they have no better line of play. Diagram 21 is a good example. (D)

White to move
Black threatens 1…Rxf1+! 2.Kxf1 Rd1#. Because of the variation just pointed out, White decides to unpin his rook:
1.Kh1!
White is momentarily safe, but now Black finds an even more vicious pin:
1…Qe2!
Threatens 2…Rxf1+ or 2…Qxf1+ followed by mate.
And of course White must not play 2.Rxe2?? because of 2…Rxf1#. So White defends with:
2.Kg1! Qe3!
Renewing the threat of …Rxf1+ followed by …Rd1#.
3.Kh1! Qe2! 4.Kg1! Qe3!
Abandoned as a draw. Neither player can vary from the prescribed sequence without losing. A fine example of ingenious play on both sides.
Diagram 22 illustrates the same delicate technique, but in an even more attractive form. (D)
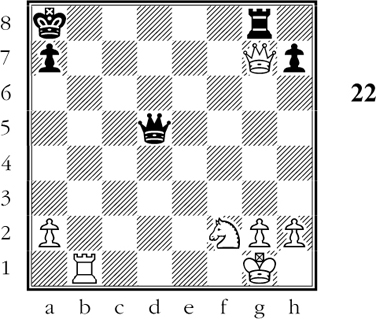
White to move
Though a knight and a pawn to the good, White is apparently lost. If he moves his queen off the g-file, he gets mated.
White cannot move his queen, true. But he can resort to our tried and true resource: counterattack. Therefore:
1.Rb5!
Masterly play! If 1…Qxb5 2.Qxg8+ wins.
Worse yet, Black’s queen is rooted to the spot, for 1…Qc4? or 1…Qe6? allow 2.Qb7#.
How then does Black protect his rook?
He doesn’t! Instead, he counterattacks:
1…Re8!
Threatening …Re1#. Now he threatens …Qxb5 as well.
White finds the only way to parry both threats:
2.Rb1! Rg8!
Naturally, in view of his material minus, Black must renew his attack on the white queen.
3.Rb5!
Just as naturally, White must renew his attack on the black queen.
3…Re8! 4.Rb1! Rg8! Drawn.
The forced back-and-forth moves of the rooks lead to a forced draw.
All these examples have been vastly entertaining and equally instructive. They reinforce the moral that a draw is a perfectly welcome and legitimate goal in desperate positions where you can see no better solution. For half a point is better than none; a draw is better than a loss.