The Complete Chess Course From Beginning To Winning Chess! (2016)
Book Five
How to Win When You’re Ahead
Chapter Eleven
Beware of Overconfidence!
Nothing is so conducive to overconfidence in chess as winning some material from your opponent.
And, by the same token, nothing is so discouraging as losing back that material - or more - through some ill-considered, overconfident move.
Such mistakes, when committed in the opening, may be neutralized later on. A good recovery is even possible after a middlegame mistake. But in the endgame, when the outcome of the game is already in sight, last-minute blunders stemming from overconfidence can be painfully costly.
The Element of Surprise
Overconfidence breeds error when we take for granted that the game will continue on its normal course; when we fail to provide for an unusually powerful resource - a check, a sacrifice, a stalemate. Afterwards the victim may wail, “But who could have dreamt of such an idiotic-looking move?” (D)
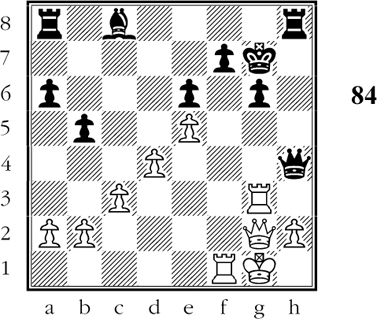
Black to move
Black is a piece ahead but he is a bit backward in development. He sees that his queen rook cannot be captured because of the reply …Qxh2#. This makes him so overconfident that he distains the careful (and winning) 1…Ra7.
In Diagram 84 Black blunders with:
1…Bb7??
Black relies on 2.Qxb7 Qxh2#. But -
2.Rxf7+!!
The brilliant resource that Black completely overlooked.
2…Kxf7 3.Qxb7+ Qe7
If the king moves, White captures the rook with check and still has time to stop Black’s mating threat.
4.Rf3+!
The finesse that really establishes the soundness of the combination.
4…Ke8 5.Qxa8+ Qd8 6.Qxd8+ Kxd8 7.Rf6 Ke7 8.Rxg6 Kf7 9.Rg2 Ke8 10.Rg7 Rh3 11.Ra7
Of course White’s enormous advantage in material must win easily for him.
Stalemate in Master Play!
This actually happened to one of the greatest living grandmasters; he overlooked an obvious stalemate possibility.
Samuel Reshevsky had the white pieces in this easily won position in the world championship candidate’s tournament of 1953. (D)
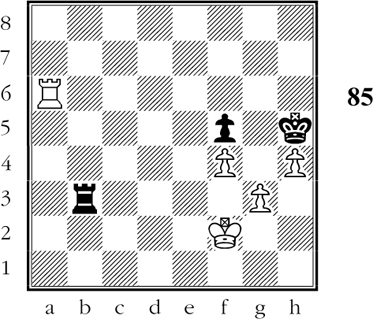
White to move
With two pawns ahead, White should win in due course. His proper play is 1.Ra1, with a slow but sure win in prospect. Instead, he completely overlooks a stalemate!
White’s continuation in Diagram 85 was the thoughtless move:
1.Rf6??
This gives Black the chance of a lifetime:
1…Rf3+!!
Now if 2.Ke2 Rxg3 3.Rxf5+ Kxh4 and Black has an easy draw, as White’s forces are too badly placed to derive any value from the extra pawn.
2.Kg2 Rxg3+!! Draw.
If White captures the impudent rook, Black is stalemated. If White proudly refuses to capture the rook, the sequel might be: 3.Kh2 Rh3+!! 4.Kg2 Rg3+!! 5.Kf2 Rh3 with a drawn rook and pawn ending as in the last note.
So White swallows his pride and accepts the draw at once.
He Who Laughs Last
With a pawn ahead, Black was indulging in rather breezy counterplay which eventually led to the position of Diagram 86. (D)
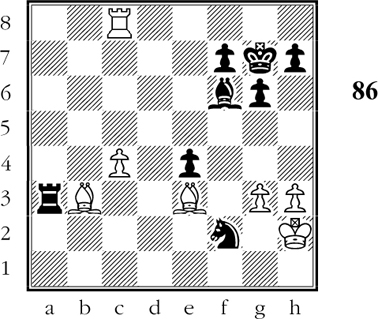
White to move
White attacks the knight, but his light-square bishop is pinned. If White plays 1.Bxf2, Black replies 1…Rxb3. However, Black has missed a surprise mating threat.
In Diagram 86 White suddenly unleashes a mating threat.
1.Bc5!!
Attacks Black’s rook and also threatens 2.Bf8+ Kg8 3.Bh6+ and mate next move.
1…Be7
Black manages to lose “only” the exchange; but of course this is enough to lose the game.
2.Bxa3 Bxa3 3.c5! e3 4.c6! Ne4 5.Re8 f5 6.Bc4 Bd6 7.c7!
It doesn’t matter what Black does. The passed c-pawn will cost him a piece.
7…Bxg3+ 8.Kg2 Bxc7 9.Re7+ Kf6 10.Rxc7 f4 11.Kf3 Black resigns.
With a rook ahead White wins as he pleases.
All’s Well that Ends Well
But dwelling on the blunders of overconfidence would be a sorry note on which to end this book. So, let’s take a last look at a situation in which the prospective winner has become too confident, and yet manages to make a masterly recovery before it’s too late. (D)
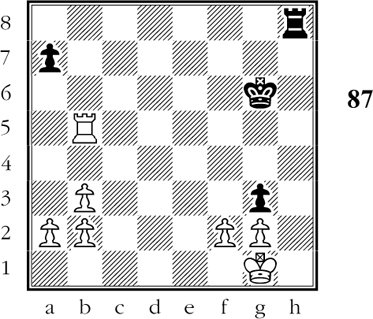
Black to move
With three pawns to the good, White is understandably lighthearted in this situation. Black’s fantastic reply soon shatters this over-confident mood.
1…Rh1+?! 2.Kxh1 gxf2
Neither White’s king nor his rook, so it seems, can stop the black pawn from queening.
Nevertheless, White can save the game. To Black’s surprise-by-violence he has an even more effective surprise-by-violence.
3.Rf5!! Kxf5 4.g4+!! Kxg4
Now White is ready for the saving move:
5.Kg2 Black resigns.
For White disposes of the dangerous pawn and then wins on the queenside.
And so White has triumphantly vindicated the thesis of the book: superior force should win!