The Complete Chess Course From Beginning To Winning Chess! (2016)
Book Five
How to Win When You’re Ahead
Chapter Eight
Sundry Endings
In this chapter we study several types of endings that are somewhat more difficult than the ones we have examined so far. In each case, except the last example, one of the players is a pawn ahead. And in each case, the winning method is highly instructive and of great practical value.
Rooks and Minor Pieces
Diagram 61 reveals a wealth of tactical detail which is remarkable, considering how many pieces have been exchanged. (D)

Black to move
Despite Black’s extra pawn White would have good fighting chances here if Black did not have some clever tactical resources at his disposal.
In Diagram 61 Black plays:
1…f3!
First tactical point: if now 2.Rf2 Rxc3! 3.Kxc3 Ne4+ followed by 4…Nxf2 and Black has won a piece.
2.Ra1 f2!
Second tactical point: if now 3.Kd3 Rh5 4.Rh1 Rxh2! 5.Rxh2 f1Q+.
3.Rf1 Nf5+! 4.Kd3 Rxc3+!
The third tactical point: Black will come out a piece ahead.
5.Kxc3 Ne3 6.Rxf2 Nd1+
White had no choice.
7.Kd4 Nxf2 8.h4 Ng4 9.Ke4 h6 White resigns.
For if 10.Kf4 Nf6! 11.Ke5 g5! 12.hxg5 hxg5 13.Kf5 g4!. Now White can never capture the knight, for the black pawn will queen. Black first confiscates the remaining white pawn with his king; then he marches the king over to the kingside; finally, he escorts his pawn to the queening square.
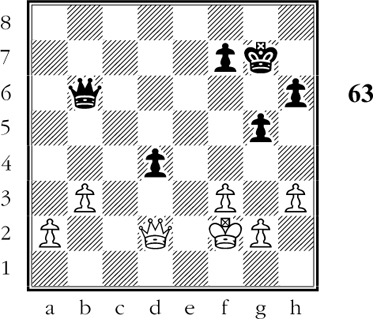
In Diagram 62 we are back in the realm of the highly systematic procedure. (D)

Black to move
White is a pawn ahead and he has all the remaining black pawns under attack. He also has all the black pieces in uncomfortable defensive positions. In such situations the attacker’s problem is: how can I step up the pressure?
White is well prepared for 1…Kc7+, which he will answer with 2.Ke5 Kb6 3.b4! (a beautiful pin!) 3…Bd3 4.Bxc5+ and 5.Kd4.
1…Bd3 2.Bh2+ Kd7+ 3.Ke5
White threatens 4.Bg1 winning the c-pawn.
3…Kc7
And now if 4.Bg1 Kb6 5.b4 Bxc4 (thanks to 1…Bd3).
4.Kd5+ Kb6 5.Rxa6+!
The point of the subtle king maneuvers.
5…Kxa6 6.Kxc6 Bb1 7.Kxc5 Bxa2 8.b4 Kb7
With two pawns ahead, the win is no longer difficult. Note how carefully White avoids the difficulties that later turn up in Diagram 77.
9.b5! Bb1 10.Kb4 Be4 11.c5 Bf3 12.c6+! Ka8 13.Kc5 Bg2 14.b6 Bxc6 15.Kxc6 g5 16.b7+! Black resigns.
For the pawn queens and immediately forces checkmate. (But note that 16.hxg5?? produces stalemate.)
Queen and Pawn Endings
These endings are proverbially difficult, and exasperating too. The player who is behind in material often has a wealth of checks at his disposal. It takes the greatest patience to survive such a series of checks.
Since we are only interested in the principles underlying the winning process, we shall study two comparatively easy queen and pawn endings. (D)
White to move
White is a pawn ahead, but what is more important is that he has two connected passed pawns on the queenside. He means to advance them even if he has to give up several kingside pawns in the process.
1.Qd3 f6 2.Ke2 Qe6+ 3.Kd2 Qe5 4.b4! Qh2 5.Qe2 Qc7 6.Qd3 Qh2
This is where White decides on the all-out push of the queenside pawns.
7.b5! Qxg2+ 8.Qe2! Qxh3
Black naturally avoids 8…Qxe2+ 9.Kxe2 with a king and pawn ending which is lost for him because of White’s remote passed pawn.
9.b6! (D)
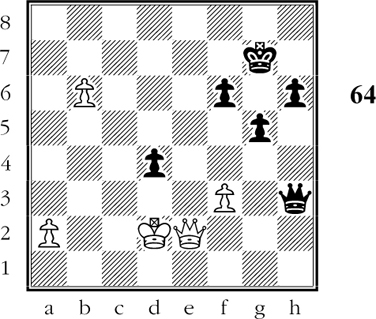
Black to move
White’s material plus has actually turned into a minus, but his b-pawn has become very menacing. If now 9…Qc8 10.Qe7+ followed by 11.Qc7! forces the immediate queening of the pawn.
9…Qd7 10.Qc4!
With the winning threat of 11.Qc7: the pin would force the exchange of queens, whereupon the remote passed pawn would decide the outcome at once.
10…Kg6 11.Qc7 Qe6 12.Qc2+! f5 13.Qb3!
Again the sinister motif of the king and pawn ending which is hopeless for Black.
13…Qe5 14.b7 Qb8 15.Kd3 Kf6 16.Qb6+ Ke7 17.Qxh6! Qe5 18.Qh7+! Ke6
An exquisite variation here is 18…Kf8 19.b8Q+! Qxb8 20.Qh8+; Or 18…Kd8 19.Qh8+! Qxh8 20.b8Q+. In either case, White wins the queen by X-ray attack.
19.Qg8+ Ke7 20.b8Q Qe3+ 21.Kc4 Qc3+ 22.Kb5 Black resigns.
With a queen down, Black has no chance.
In Diagram 65 the winning process is equally interesting. (D)
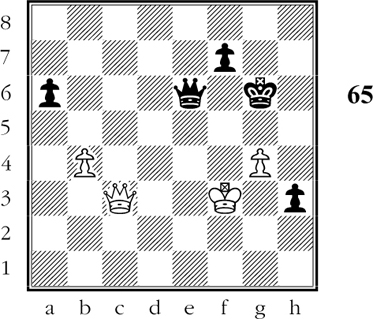
Black to move
Black is a pawn ahead and it is clear that his hopes of a win rest on the well-advanced h-pawn. The proper exploitation of this passed pawn again depends on an X-ray attack.
In Diagram 65 Black’s winning move is:
1…Qd5+!
If now 2.Kf4 h2! 3.Qc2+ Kg7 and White is lost, for if 4.Qxh2 Qd6+ winning the white queen by an X-ray attack. If 2.Ke3 f6 threatens to win at once with …Qe5+. After White meets this threat, Black advances …Kg5, with a lengthy but assured win in sight.
2.Kg3 Qg2+ 3.Kh4 h2 4.Qd3+ Kg7 5.Qd4+ f6!
And now White can resign, for after 6.Qa7+ Kg6! or 6.Qd7+ Kh6! his queen has no more checks.
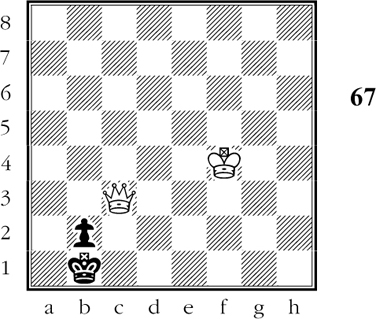
Queen vs. Pawn
This sounds like child’s play, but in this special case it is hard work despite the enormous disparity in material.
White wants to bring his own king to the vicinity of the black king and pawn in order to construct a mating position. (D)
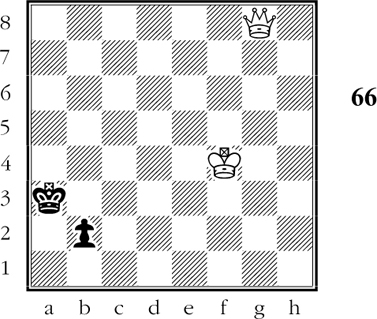
White to move
If Black’s pawn were less advanced, White would win easily. As it is, the pawn threatens to queen. Luckily White has an artistic winning method at his disposal.
There is only one way to accomplish this: to give a series of checks designed to force the black king in front of his pawn! Here’s how to do it:
1.Qb8 Ka2 2.Qa7+ Kb3 3.Qb6+ Kc2 4.Qc5+ Kd2 5.Qb4+ Kc2 6.Qc4+ Kd2 7.Qb3 Kc1 8.Qc3+ Kb1 (D)
White to move
At last White has forced the black king in front of the pawn, so the pawn isn’t threatening to queen. This gives White a breathing spell, enabling him to rush his king to the scene of action.
9.Ke3! Ka2 10.Qc2 Ka1 11.Qa4+ Kb1 12.Ke2!
Another way is 12.Kd3! Kc1 13.Qc2# - but not 12.Kd2?? with an inglorious stalemate.
12…Kc1 13.Qd1#