The Complete Chess Course From Beginning To Winning Chess! (2016)
Book Five
How to Win When You’re Ahead
Chapter Six
Rook and Pawn Endings
This type of ending occurs more frequently than any other kind of endgame. For this reason it is valuable to know something about the qualities of the rook.
One of the most powerful ways to post a rook is on an open seventh rank. Here your rook can create havoc among the opposing pawns.
The rook can accomplish a great deal when it is on open lines - open files and open ranks.
When you have a passed pawn, aim to place your rook behind it. Then the rook aids the pawn’s push toward the queening square.
If your opponent has the passed pawn, you likewise do best to place your rook behind the pawn, not in front of it. In the latter position, your rook loses much of its mobility, because if it gives up the blockade, the passed pawn can march toward the queening square.
In this type of ending the kings, too, play a very active role, guarding their own pawns and attacking the enemy’s.
Remember that when you are a pawn to the good in a rook and pawn ending, you can often reduce your opponent to helplessness by threatening the exchange of rooks, bringing the game to a simple king and pawn ending which is easily won.
Two Basic Endings
The position in Diagram 42 is of fundamental importance, as it shows a basic setup that can often be reached when a player is a pawn ahead. (D)
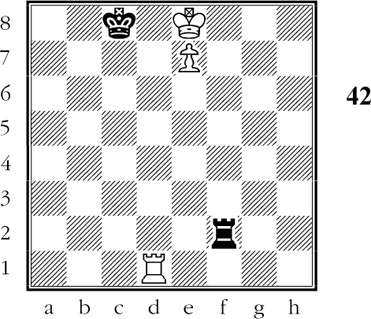
White to move
In order to be able to win, White must make room for his king, and he must then shield his king from checks by the black rook. White does this by “building a bridge.”
1.Rc1+ Kb7
White needs a subtle preparatory move before moving his king out and threatening to queen.
2.Rc4!!
Thus if 2.Kd7 Rd2+ 3.Ke6 Re2+ 4.Kd6 Rd2+ 5.Ke5 Re2+ and it is clear that White is not getting anywhere.
2…Rf1 3.Kd7 Rd1+ 4.Ke6 Re1+ 5.Kf6 Rf1+ 6.Ke5 Re1+ 7.Re4!
Now you can see the point of White’s first and second moves. He drove away the black king, and now he has shielded the white king from checks. The passed pawn must queen.
The next ending (Diagram 43) shows a stratagem that often proves useful. (D)
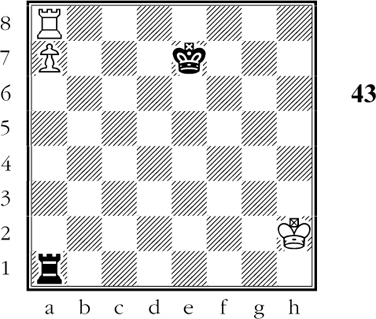
White to move
Black threatens to bring his king to b7, winning White’s extra pawn and thereby achieving a draw. But White wins by an “X-ray attack.”
1.Rh8!! Rxa7 2.Rh7+
This X-ray attack forces Black’s king to move, after which White plays Rxa7, followed by a quick checkmate.
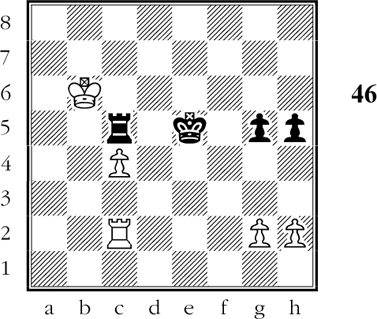
Passed Pawns Win
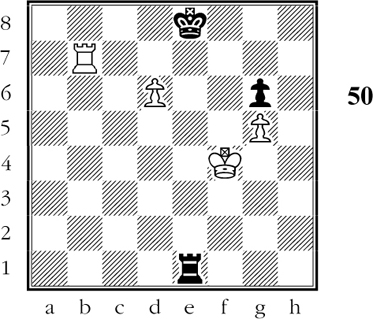
In Diagram 44 it takes some neat play to win with the extra pawn. (D)
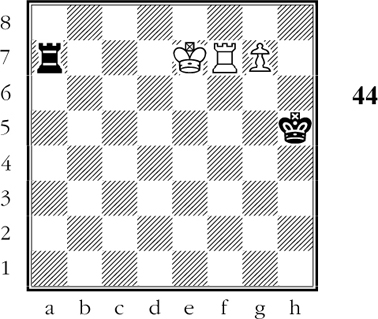
White to move
White’s pawn is on the point of queening, but White’s king is in check, and 1.Kf8 is futile in view of 1…Ra8+. To get a hint of the position that White needs, look at Diagram 19.
Believe it or not, the play from Diagram 44 requires White to play his king all the way back to g2. Thus:
1.Kf6
If now 1…Ra8 2.Rf8 forces the queening of the passed pawn. So Black must keep on checking.
1…Ra6+
Black hopes for 2.Ke5?, when 2…Rg6, followed by …Kh6 will win the dangerous pawn. But White has a finesse:
2.Kf5!
So that if 2…Rg6 3.g8Q Rxg8 4.Rh7# (See Diagram 4.)
2…Ra5+ 3.Kf4! Ra4+
And now if 3…Rg5 White has a pin with 4.Rf5!, knocking out the black rook and thus forcing the queening of the pawn.
4.Kf3!
White is endlessly resourceful. This time he figures on 4…Rg4 5.Rf5+ Kh4 (forced) 6.Rf4! again winning by pinning.
4…Ra3+ 5.Kg2 Ra2+ 6.Rf2!
At last Black is out of checks. His reply is forced:
6…Ra8 7.Rf8!
Of course Black cannot exchange rooks. Here is his last try:
7…Ra2+ 8.Kf3 Ra3+ 9.Ke4 Ra4+ 10.Kd5 Ra5+ 11.Kc6 Ra6+ 12.Kb7 Black resigns.
At last the pawn is able to queen.
This delightful ending shows how wrong some players are in thinking that endgames do not allow scope for combinative play.
In Diagram 45, however, White proceeds in highly systematic manner. (D)
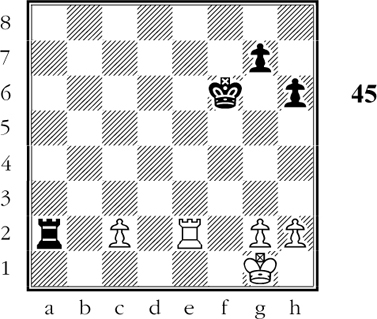
White to move
Note that White’s rook very efficiently cuts off the black king from contact with White’s passed pawn. On the other hand, White’s king can actively support the passed pawn.
1.Kf2 h5 2.Ke1! g5 3.Kd2 Kf5 4.Kd3 Ra8 5.c4 Rd8+ 6.Kc3 Rc8
To prevent c4-c5; but White makes progress all the same.
7.Kb4 Rb8+ 8.Ka5 Rc8 9.Kb5 Rb8+ 10.Ka6 Rc8
Now White gets his rook behind the passed pawn.
11.Rc2! Ke5 12.Kb7! Rc5 13.Kb6! Black resigns. (D)
Black to move
Black resigns because 13…Kd6?? 14.Rd2+ loses on the spot; and if 13…Rc8 14.c5 and Black can do nothing against c5-c6-c7 and Kb7.
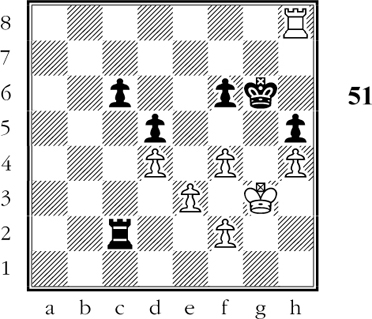
Diagram 47 gives the winner greater difficulties. (D)
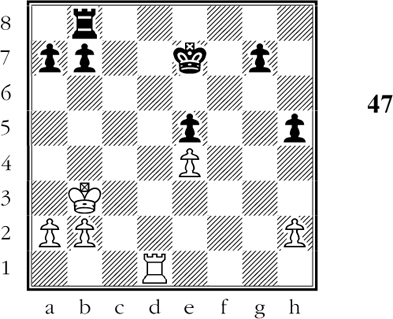
Black to move
Black is a pawn ahead, but he has no passed pawn. To get one, he advances his king-side pawns. His two-to-one majority should give him a passed pawn.
1…g5! 2.Rg1 g4
If now 3.h3 Rg8 4.hxg4 Rxg4 and Black has his passed pawn.
3.Rc1 Rd8 4.Rf1 Rd3+!
Very strong, for if 5.Kc2 Re3 6.Rf5 Re2+! 7.Kc3 Rxh2 8.Rxe5+ Kf6 9.Rf5+ Kg6 and Black’s two connected passed pawns win quickly for Black by their advance.
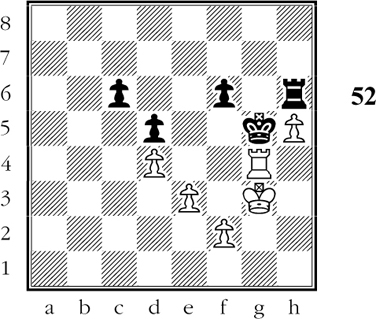
5.Kc4 Rd4+ 6.Kc5 Rxe4 7.Rf5 h4 8.Rh5 g3 9.hxg3 hxg3 10.Kd5 Re2! (D)
White to move
As in Diagram 45, the weaker side’s king is cut off from the remote passed pawn. And if 11.Rxe5+ Rxe5+ 12.Kxe5 g2 and the passed pawn queens.
11.Rg5 g2 12.b4 Kf6 13.Rg8 Kf5 14.Rg7 Rd2+!
Chasing White’s king away from Black’s other passed pawn.
15.Kc4 Kf4
White resigns, as Black’s king will support the advance of the g-pawn to the queening square.
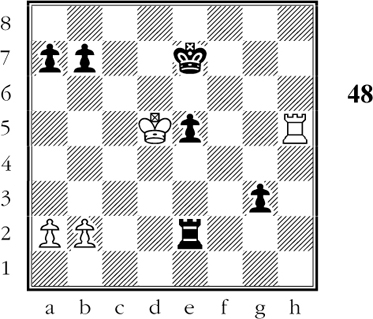
We have previously discussed swapping down to a won king and pawn ending. Diagram 49 is an example of how to carry out the simplification. (D)
White to move
White has a passed d-pawn. Note also that Black’s remaining pawn is weak and White may be able to win it.
1.Rb7+ Kf8
If 1…Ke8 (to approach the passed pawn), White has 2.Rg7, winning Black’s remaining pawn.
2.d6
Threatening Rb8+ and d6-d7, forcing the queening of the passed pawn.
2…Ke8
Black fights hard. If 3.Rb8+? Kd7. Or if 3.Rg7? Re6 4.d7+ Kd8 and Black can draw. (D)
White to move
White wins by giving up his extra pawn in order to get a won king-and-pawn ending.
3.Re7+! Rxe7 4.dxe7 Kd7
If now 4…Kxe7 5.Ke5 Kf7 6.Kd6 Kf8 7.Ke6 Kg7 8.Ke7 Kh7 9.Kf7 winning Black’s pawn. White then has a standard win as in Diagram 27.
Black prays for 5.Ke5? Kxe7 when he has the opposition and the white king cannot penetrate.
5.Ke4! Ke8
If 5…Kxe7 6.Ke5! and White’s king penetrates as in the note to White’s fourth move.
6.Kd5 Kd7
And if 6…Kxe7 7.Ke5! wins.
7.e8Q+! Kxe8 8.Ke6 Black resigns.
If 8…Kf8 9.Kf6 and wins as previously shown.
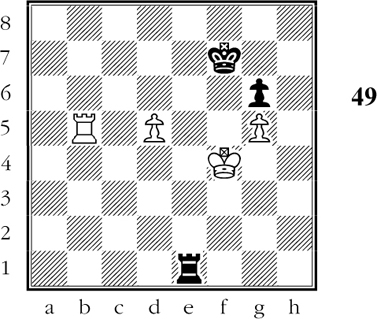
And in Diagram 51, too, White wins instructively by relying on simplification into a king and pawn ending. (D)
White to move
White’s pawn position is very unwieldy and his king has no way to play an active role. His logical course is to exchange his advanced f-pawn for Black’s h-pawn.
1.f5+! Kxf5 2.Rxh5+
Now White has created invasion possibilities for his king, and he has obtained a passed pawn.
2…Kg6 3.Rh8 Kf5 4.Rg8! Rc1 5.Kg2 Ra1 6.h5 Ra7 7.Rg3 Rh7 8.Rh3 Kg5 9.Kf3 Rh6
After 9…Rxh5 10.Rxh5+ Kxh5 Black is lost. This will be explained later on.
10.Rh1 Kf5 11.Kg3 Kg5 12.Rh4 Kf5 13.Rf4+ Kg5 14.Rg4+ (D)
Black to move
And here, too, if 14…Kxh5 15.Rh4+ Kg5 16.Rxh6 Kxh6 Black is lost, as we shall see later on.
14…Kf5 15.Kh4 Rh8 16.Rg7 Ra8 17.h6 Ra1 18.Rg3 Rh1+ 19.Rh3 Rg1
And now, if White carelessly plays 20.h7???, apparently succeeding in queening the pawn, Black has a perpetual check with 20…Rg4+! etc.!
20.Rf3+! Kg6 21.Rg3+! Rxg3 22.Kxg3 Kxh6 23.Kg4 Kg6 24.Kf4
Now we see why White was so eager to get into the king and pawn ending at the cost of his extra pawn. If Black tries 24…f5 25.Ke5 Kg5 26.f3! Kg6 27.f4! wins for White, as Black must give up the f-pawn.
24…Kg7 25.Kf5 Kf7 26.f3! Black resigns.
For if 26…Ke7 27.Kg6 Ke6 28.f4 Ke7 29.f5 winning the f-pawn. And if 26…Kg7 27.Ke6 achieves the same result. A splendid example of efficient endgame planning.
Two Rooks Apiece
Endings with two rooks on a side do not occur very often. However, they are worth noticing for the aggressive power of two smoothly cooperating rooks. Take Diagram 53 as an example. (D)
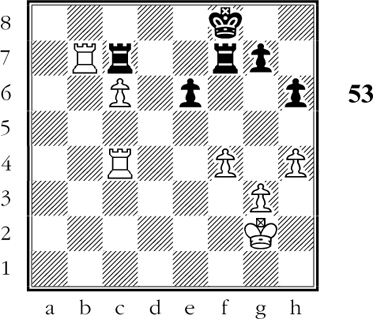
White to move
For White to play 1.Rxc7? Rxc7 would be a big mistake, as Black could play …Ke7 and …Kd6 to win back his pawn. White must therefore rely on the offensive power of his rooks.
Therefore, in the position of Diagram 53, White plays:
1.Ra4!
This clever move threatens to win a rook by 2.Ra8+ Ke7 3.Rxc7+ etc.
Black is in trouble, for if he tries 1…Rxc6?? then 2.Ra8+ Rc8 3.Rxc8#! Not much better is 1…Rxb7 2.Ra8+ Ke7 3.cxb7 and the pawn queens. Even escape by 1…g6 2.Ra8+ Kg7 will not do for then 3.Raa7! forces the exchange of all the rooks, whereupon the passed pawn queens.
1…Rc8 2.Raa7 Rf5
And now if 2…Rf6 White wins with 3.Rd7! as his c-pawn is still immune. There might follow 3…g6 4.Rab7 h5 5.c7! Ke8 6.Rh7! and Black has no defense whatever to the coming 7.Rb8!.
3.Rxg7 Rxc6 4.Rh7
Threatening mate. The rooks have tremendous power on the seventh rank, with the result that White wins a second pawn.
4…Kg8 5.Rxh6 Rb5 6.h5 Rb3 7.Rg6+ Kh8 8.Rf6
Threatening 9.Rf8#.
8…Rb8 9.h6 Rg8 10.Rff7
Again threatening mate.
10…Rg6 11.Rf8+ Rg8 12.Rxg8+ Kxg8 13.Re7 Black resigns.
For White can win in a variety of ways, such as advancing his g-pawn.
This impressive example repeats the lesson taught repeatedly in this chapter - that the rook unfolds enormous power on open lines.