The Complete Chess Course From Beginning To Winning Chess! (2016)
Book Two
The Nine Bad Moves
Number Nine
Losing a Won Game
Of all the different kinds of mistakes in chess, losing a won game is undoubtedly the most exasperating. No other mistake is more likely to rob you of self-confidence.
What do we mean by a “won game”? When you have a demonstrable mate, a sizeable material advantage, a decisive attack, you have a won game. Some advantages are clearer than others; for example, a forced “mate in three” brooks no argument, whereas the advantage of a piece ahead may allow the losing side to play on for a long time.
The ways in which players lose won games can be grouped under a fairly small number of types. Some, when they have an advantage in material, seek complications instead of exchanging remorselessly. As the game simplifies, the excess of material becomes more telling; contrariwise, obscure complications give the prospective loser a chance to turn the tables and befuddle his opponent.
Faulty execution of a winning combination has lost many a game on the very brink of victory. In such cases a player sees the winning idea, plays the winning sacrifice, and then inverts the order of his follow-up moves or misses the really clinching point of his combination.
A fault shared by many players is the habit of drifting aimlessly once they have achieved a winning position. Like the man who can’t bring himself to say goodbye, they dawdle and delay, seemingly unable to bring the game to a successful conclusion. Even great masters have suffered from this affliction.
Closely related to this psychological handicap is the notion that once a player has achieved a decisive advantage - winning a rook, for example - he can relax, take it easy, and let nature take its course. This often turns out disastrously, especially against an opponent who is determined and resourceful.
Quite different, but equally unsuccessful, is the player who gives way to despair all too soon. He may even go so far as to resign in a position where he has a quick forced mate!
Most of the faults that turn a won game into a lost one are really aspects of character and temperament. Post-mortem analysis shows us what went wrong in the last game, but does not tell us what to do in the next game. To acquire this ability to win won games consistently, you must train yourself to play with determination, to play at all times the best chess of which you are capable, and to give equal care to every type of position.
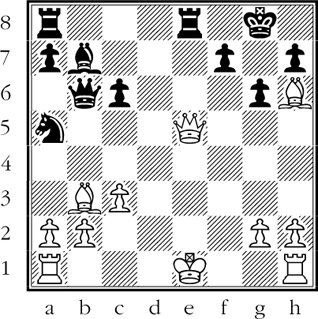
It will help you to remember that every player has the shattering experience of losing a won game. Every great player owes a good deal of his success to his ability to apply himself to all types of position; and even the best players have their lapses from time to time. (D)
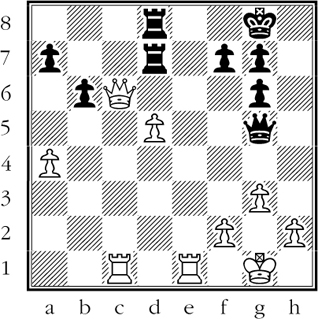
White to move
At first sight, we get the impression that White is in a bad way. His vulnerable d-pawn, attacked three times, must go lost. Yet White has deliberately aimed for this position! He senses a weakness of Black’s first rank - despite the black king’s “loophole” at h7.
1.Qxd7!!
An amazing resource which should win quickly.
1…Rxd7
White has a forced win - if he plays the right move.
2.Rc8+??
But this is not the right move. Black has a winning defense.
2…Rd8 White resigns.
White is left with a rook for the queen - a hopeless disadvantage. Now let us retrace our steps and see where White went wrong. Start from the diagramed position:
2.Re8+! Kh7 3.Rcc8
To stop Rh8#, Black must submit to ruinous loss of material - for example 3…Rd8 4.Rexd8 Qxd8 5.Rxd8 and White has an overwhelming advantage in material. (D)
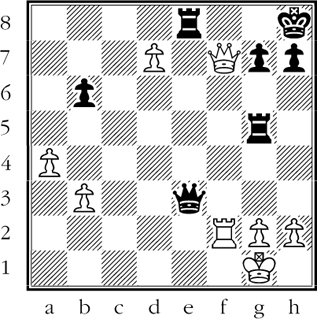
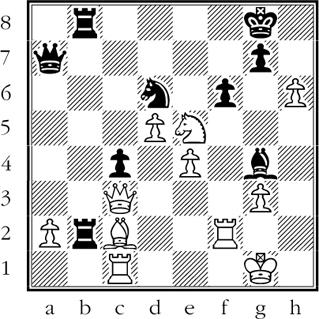
Black to move
A rook up, Black nevertheless finds White’s far advanced d-pawn a troublesome enemy to contend with. However, by playing the careful 1…Rd8, Black can consolidate his position and eventually win the game. Note that after 1…Rd8 the reply 2.Qf8+?? would be faulty, for after 2…Rxf8 White would find to his horror that the contemplated 3.Rxf8# is impossible - his rook is pinned at f2!
In the actual game, however, Black’s move in the diagramed position was:
1…Rg8??
After this disastrous blunder, White can force checkmate by 2.Qxg8+! Kxg8 3.d8Q+ Qe8 4.Qxe8#.
But White did not play this line. Instead, he resigned!
Such misjudgments of position are all too frequent. Once White saw that he could not force checkmate after 1…Rd8, he completely lost heart and did not even bother to look for the obvious checkmate available after 1…Rg8. (D)
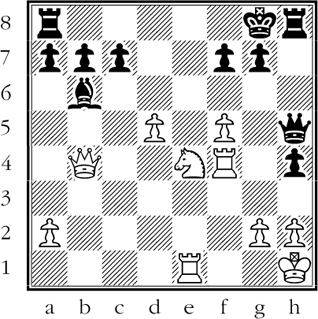
Black to move
After winning a pawn in the opening Black has been playing a patient defensive game and trying to get his harried king to a place of refuge. He must now meet the threat of 1.Nf6+! gxf6 2.Rg4+ Kh7 3.Rxh4 winning his queen. What is Black’s best continuation of his skillful defense?
Black can meet the threat of Nf6+ and at the same time get some much-needed development by playing 1…Rh6. In that case he remains a pawn to the good and has little to fear, as his king is safe from attack.
1…f6?
A double mistake: he fails to get the king rook into the game, and he does not parry White’s threat.
2.Nxf6+! gxf6 3.Rg4+ Qxg4
The loss of the queen is unavoidable, for if 3…Kf7? 4.Qe7#. Or if 3…Kh7 4.Qe7+ and mate soon follows.
4.Qxg4+ Kf8 5.Re6 Rh6 6.Qf4! Kg7 7.Re7+ Kf8 8.Qxh6+ Kxe7 9.Qg7+ Black resigns.
For after 9…Kd6 10.Qxf6+ White’s passed pawns assure him an easy win. (D)

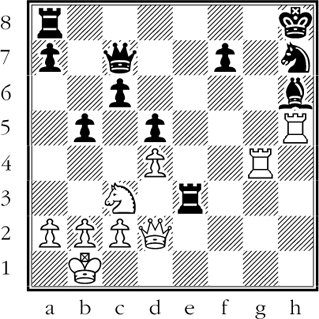
White to move
Black has received the odds of queen rook. White is so far behind in material that he sees his only hope of victory in a complicated line of play that will befuddle his weak opponent. This explains White’s next move, which, unsound as it is, gives Black several ways to go wrong.
1.Nxf7
It is not easy for Black to find the right reply to this surprising move.
Thus if 1…Bxf7?? 2.Nd6+ winning Black’s queen because Black’s bishop is pinned.*
Or if 1…Kxf7 2.Bxe6+ Qxe6 3.Ng5+ Bxg5 4.Rxe6 Kxe6 5.Qg4+ winning either Black’s bishop on g5 or his knight on d7. The resulting position would be lost for Black because of the exposed position of his king.*
The right way is 1…Qxf7 2.Nd6+ Bxd6 3.Bxe6 Qf6 and Black has nothing to fear from any discovered check by White’s bishop on e6. With his enormous material advantage, Black would win without much trouble.
Bewildered by the complications, Black plays:
1…Ngf6?? 2.Nfd6+ Kf8 3.Nxf5
And White wins easily.* (D)
Black to move
With a piece ahead, Black is quite confident of winning. His confidence is justified, but caution is indicated too. Black’s problem is that his bishop is attacked, and his bishop in turn guards his rook at e3. The proper course is 1…Qd6 followed by …Re6 and all is well.
With ordinary care, Black’s material advantage will yield him an easy win.* Certainly there is little point in his embarking on risky tactical complications.
Actually it is White who needs the tactical complications. Why? Being substantially behind in material, he stands to lose if the game continues placidly. Therefore a policy of “mixing it” is psychologically favorable for White.
It is Black’s misfortune that he sees a move which he thinks is a “killer.” Here it is:
1…Re4?
Deliberately offering the bishop. Now if 2.Qxh6?? Re1+ wins the queen. Or if 2.Rxh6?? Rxg4 and Black is a rook ahead.
So far, so good; but White has still another move which Black has completely overlooked.
2.Nxe4!! Bxd2 3.Nf6! Black resigns.
Black has no way of meeting the menace of Rxh7#. His foolish search for complications has lost a won game. (D)
White to move
Though White threatens Qg7#, he cannot carry out his threat because of the pin on the e-file which wins his queen. In the actual game, White was so depressed that he resigned. Had he been alert, he would have found a way to force victory in this desperate-looking situation. How?
1.Bxf7+!
This looks like a “spite check” - the last gasp before resigning.
1…Kxf7
Forced - not that Black seems to have anything to worry about, as he still maintains the pin.
2.Rf1+ Kg8
Again forced. But now White has run out of checks - or so it would seem.
3.Rf8+!!
Another spite check? No, much better than that - White forces Black to give up the pin on the queen. Result: White’s mating threat comes to life.
3…Rxf8 4.Qg7#!
Remember, none of this happened! White resigned in the diagramed position, unaware that he had a checkmate within his grasp! (D)
Black to move
Black can win a piece for several pawns by 1…fxe5, remaining with a won game. Unfortunately, he sees a way to win the exchange. Without any attempt to check the soundness of the idea, Black plunges into his combination. Only two moves later, he finds that he is checkmated!
Instead of playing the simple winning move 1…fxe5, Black rushes into an “attractive” combination:
1…Qxf2+? 2.Kxf2 Nxe4+
The point of Black’s sacrifice. His knight cannot be captured, as White’s bishop is pinned by a black rook. Thus Black wins White’s queen by a forking check which attacks White’s king and queen at the same time.
3.Ke3 Nxc3
Now Black expects 4.Nxg4, leaving him with the material advantage of a rook for a bishop. But he is in for a disagreeable shock:
4.h7+! Kh8
If 4…Kf8 5.h8Q+ and wins.
5.Nf7#!
The careful 1…fxe5 would have won for Black. The careless 1…Qxf2+? lost for him.