The Complete Chess Course From Beginning To Winning Chess! (2016)
Book Two
The Nine Bad Moves
Number Eight
Underestimating your Opponent’s Threats
Threats are harder to see than captures. Some moves threaten checkmate, some threaten captures, some involve a general improvement in position. Some threats are crude, brutal, obvious. Others are unbelievably subtle in their intentions, refined in their execution. Some threats are sound and directed toward winning the game. Others are based on a foolish idea and will prove disastrous for the player who has devised them. Some threats are irresistible, others can be topped by a stronger threat.
In a game between good players, threats and counterthreats are essentially a matter of interplay of ideas and intentions. If each player does not always see through his opponent’s threats, he is at least prepared for them. Thus, as in the case of captures, it is important to realize that threats are always possible, that they must be looked for.
That is why threats are most dangerous when they are devised by an opponent who seems to have a lost game. When victory seems within your grasp is just the time when you are most likely to underestimate the other player’s resources. “Simple” positions, too, are the downfall of many a player who feels that the game no longer requires careful scrutiny. Overconfidence is unquestionably the quality that leads many players to overlook their opponent’s threats. (D)
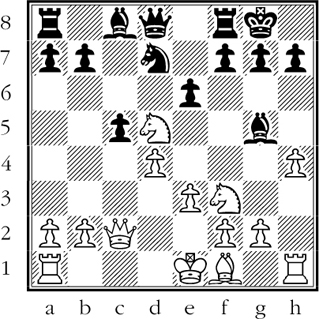
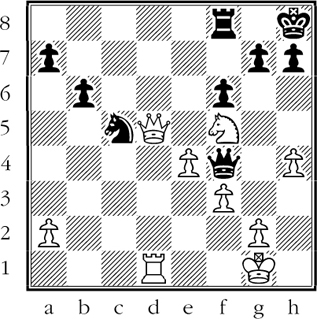
Black to move
All that Black sees in this position is that one of his bishops is attacked, and that he can capture the advanced white knight if he wishes. Yet White threatens one of the most startling brilliancies ever played on the chessboard. Can you see White’s threat and how to meet it?
But Black is blind to the explosive possibilities in the position and plays:
1…Qa5+??
Black’s safest course is 1…Be7 avoiding the opening of the h-file and also guarding his c-pawn.
2.b4!!
After this Black can avoid mate only by losing his queen!
2…cxb4 3.Qxh7+!!!
This was White’s hidden threat.
3…Kxh7 4.hxg5+ Kg6 5.Ne7# (D)
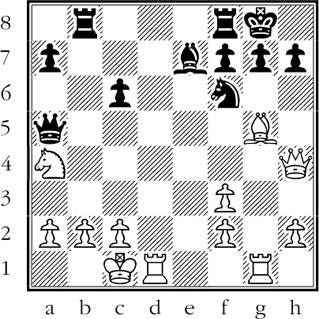
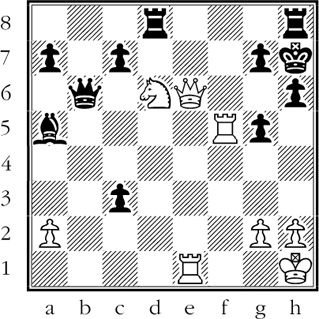
Black to move
Black is well aware that the open g-file may be dangerous for his king. But he feels he has adequate counterattacking chances on the open b-file. He is carried away by the idea of playing …Rb4. This move, he believes, will win a piece for him. He is wrong!
1…Rb4?
Now White has to have his wits about him; merely retreating his attacked queen loses the knight.
2.Bxf6!! Rxh4 3.Rxg7+ Kh8
Black saw this far ahead, and he is well satisfied. He expects 4.Rg5+ Bxf6 5.Rxa5 Rxh2 etc.
But White has an extraordinary continuation:
4.Rg8++!!!
Who can blame Black for overlooking the threat of White’s not even bothering to win the black queen - but sacrificing a rook as well?!
4…Kxg8 5.Rg1+ Rg4 6.Rxg4+ Qg5+ 7.Rxg5#
Black went wrong by ignoring the threat of the open g-file. The cautious 1…Kh8! would have neutralized the attack and maintained his counterattack as well. (D)
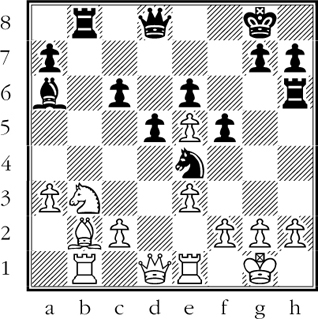
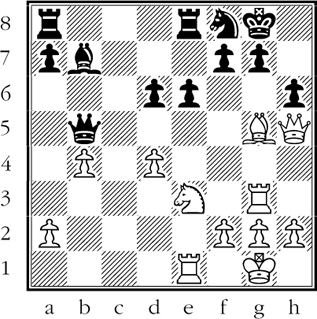
White to move
Black has a powerful attacking position. His bishop has a sweeping diagonal; his knight is strongly centralized; both rooks are on open files; there is a devastating threat of …Qh4, with the murderous double threat of …Qxh2# or …Qxf2+ and …Ng3#. How is White to defend himself?
To meet the threat of …Qh4, White chooses the most obvious method - a line that is absolutely ruinous!
1.g3??
Thus he prevents …Qh4 - or so he thinks. But this purely mechanical move fails to provide against the formidable concentration of Black’s forces against White’s king.
The move Black chooses in reply seems fantastic, but only on the surface. Actually it is quite logical because it is based on the activity of the other black pieces.
1…Qh4!!!
Now Black threatens 2…Qxh2#!.
How is White to defend himself? If he tries 2.gxh4, then 2…Rg6+ 3.Qg4 Rxg4+ 4.Kh1 Nxf2#.
So, after 1…Qh4!!! White resigns!
Now go back to the diagram. White could have countered the threat with 1.Qf3. Then if 1…Qh4 2.h3 and White is secure - at least for a while. (D)
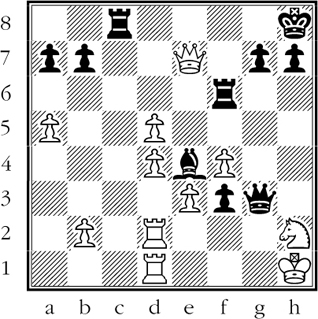
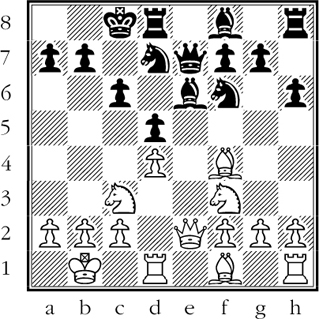
Black to move
White has just played 1.Qe7, satisfied that by threatening Qxe4 he wards off the terrible threat of …f2+. Note that White is not afraid of …Bxd5 (renewing the threat); for then he can play e3-e4, blocking out the bishop. Nevertheless, White overlooks still another threat at Black’s disposal.
1…Qe1+!!
Who can blame White for not seeing this move, which looks utterly nonsensical?
And yet capturing the queen loses very quickly, as you will see. Therefore White considers what happens if he fails to capture the queen.
For example, 2.Nf1 Rh6+ 3.Rh2 (or 3.Kg1 f2+ 4.Rxf2 Rh1#) 3…Qf2!!, and White is comically helpless against the coming 4…Qg2#. (the rook at h2 is pinned!)
2.Rxe1 f2+! 3.Qxe4 fxe1Q+ 4.Kg2 Qxd2+ White resigns.
Hopelessly behind in material, White has nothing to play for.
Black’s inspired queen sacrifice is an example of chess imagination at its very finest. White provided against the immediate discovered check, but he failed to realize that Black’s sly postponement of the discovered check could actually increase its power enormously. (D)
Black to move
Can you see what White is threatening? Black misses it completely, because he ignores his weakness on the first rank. How can Black make his position reasonably safe?
Black sees a chance to win White’s h-pawn. Without stopping to look any further than this shallow possibility, he plays:
1…g6??
With 1…Qc7 Black could have parried White’s threat.
2.Qf7!!
Threatens 3.Qxf8# or 3.Qg7#.
2…Ne6
If 2…Rxf7 3.Rd8+ with mate next move.
3.Rd8!!
This dazzling stroke is much more forcing than 3.Qxe6 gxf5 - which leads to nothing for White.
3…Qc1+
Desperation. If 3…Nxd8 4.Qxf8# or 4.Qg7#. If 3…Rxd8 4.Qxf6+ Kg8 5.Ne7#!.
4.Kh2 Qf4+ 5.Kh3 Black resigns.
Black cannot capture the white decoy rook. Meanwhile he is helpless against a variety of mating threats, the most brilliant being 6.Qg7+!! Nxg7 7.Rxf8#. White’s queen was diabolically active; Black’s queen did nothing for the defense. (D)
White to move
White appears to have a lost game. He cannot move his knight - for example, 1.Nc4?? Qxe6 2.Rxe6 Rd1+ forces mate. Yet White deliberately played for this position, relying on a winning threat that Black has completely overlooked. What is White’s resource that Black missed?
One can hardly blame Black for not foreseeing the line of play by which White forces victory. Even the crippled knight plays a part!
1.Rf6!!
Threatens 2.Rxh6+ gxh6 3.Qf7#.
1…Rhf8
If 1…gxf6 2.Qf7#.
2.Qf5+ Kg8 3.Rxf8+ Rxf8 4.Qxf8+!!
The second point of White’s magnificent plan.
4…Kxf8 5.Re8#!
Beautiful play indeed; yet, can we completely excuse Black for failing to see White’s subtle resource?
Take another look at the diagrammed position. What hint is there of things to come? Note that Black’s forces are badly split, with his queen and bishop practically out of play. When you study the situation carefully, you see that the black king must really fend for himself, and can get little assistance from his forces. These factors are the key to Black’s defeat. (D)
White to move
Black has just played …h6, under the impression that this wins White’s bishop. This reasoning seems convincing, as a move of the menaced bishop will lose the white queen. How does White’s aggressively posted rook at g3 spoil this plausible plan?
1.Bf6!!
This is the spectacular threat that Black has completely overlooked.
1…Qxh5
Black must capture, as his queen is unguarded.
2.Rxg7+ Kh8 3.Rxf7+ Kg8 4.Rg7+ Kh8 5.Rxb7+ Kg8
These “windmill” moves are amusing - but not for Black!
6.Rg7+ Kh8
The time has come for Black to win back the queen.
7.Rg5+ Kh7 8.Rxh5 Kg6
A slight consolation for Black - he regains the lost piece.
9.Rh3 Kxf6 10.Rxh6+ Black resigns.
With three pawns down, Black has nothing to play for.
Black is Shown the Threat - and Misses It!
Petroff’s Defense
White - Black
1.e4 e5 2.Nf3 Nf6 3.Nxe5 d6 4.Nf3 Nxe4 5.Qe2 Qe7 6.d3 Nf6 7.Bg5 Be6 8.Nc3 Nbd7
Since neither player can develop his king bishop both are likely to castle queenside.
9.d4 d5 10.0-0-0 c6
Not good. Since he will probably castle on the queenside, the pawn weakness will endanger Black’s castled position.
11.Kb1 h6 12.Bf4! 0-0-0 (D)
13.Qa6!!
This unwelcome intrusion was made possible by Black’s weakening 10th move. If now 13…bxa6?? 14.Bxa6#!.
The fact that Black does not capture the queen indicates that he sees through this variation. This in turn should give him the key to White’s threat - but it doesn’t!
13…Nh5??
Best was 13…Qb4, countering the threat by preventing the sacrifice which follows.
14.Qxc6+!!! bxc6 15.Ba6#!
Another example of the weakening effect of a pawn advance on the castled position.