The Complete Chess Course From Beginning To Winning Chess! (2016)
Book Two
The Nine Bad Moves
Number Seven
Failing to Guard against Captures
Few mistakes can be more costly in chess than failing to guard against captures. A capture is often the turning point of a game; it may involve gaining a decisive advantage in material or, in some cases, a vastly superior position.
Sometimes a capture is bound up with a sacrificial combination, in which a piece of great value is given up for one of slight value. Such captures are naturally difficult to foresee. Much more common are those situations in which a capture is quite obvious.
Why are such captures overlooked? Probably because they turn up in positions that seem simple and routine; the player’s alertness is lulled; he forgets that almost every position in chess has some element of attack and threat. Positions that are simple on the surface will often turn out, on careful scrutiny, to contain a fantastic wealth of intricate details. If you can acquire the faith that almost every chess position, no matter how simple, has its share of tactical possibilities, you are well on the way to overcoming any tendency to overlook captures.
In the next game, Black overlooks a deadly capture that checkmates him on the 13th move. “Who would have dreamt that it was possible?” is the wondering comment of most chessplayers. Well, the player who saw and executed this combination certainly dreamt it was possible. Whether he found the combination by logical reasoning or by a flash of “inspiration,” his example is one that we should imitate. (D)
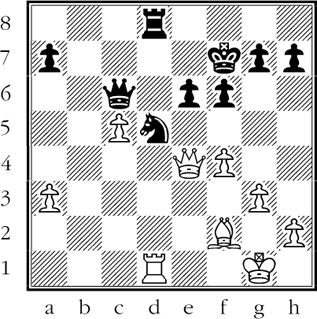
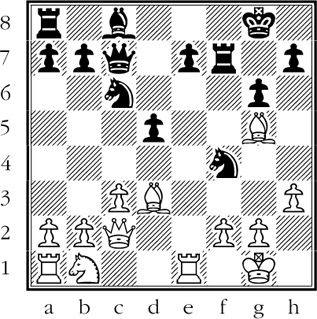
White to move
Without bothering to look very deeply into the position, White snaps at a loose pawn. It is curious that he fails to see the crushing though obvious reply. This kind of slip often occurs in positions that look too “simple” to require careful appraisal and calculation.
1.Qxh7??
This blunder converts a probably drawn position into immediate loss for White.
The chances are that White expected 1…Ne3? in reply. In that event, 2.Rxd8??? allows 2…Qg2#, while 2.Bxe3 is answered by 2…Rxd1+ winning the exchange. However, White has 2.Qh5+ Ke7 3.Bxe3 winning a piece.
But in reply to 1.Qxh7?? Black has a devastating alternative:
1…Nxf4!!
If now 2.Rxd8??? Qg2#. Or 2.gxf4 Rxd1+ and White loses his bishop as well.
After 1…Nxf4!!, White resigned. The real finesse of this move lies in the fact that it renders Qh5+ impossible for White, leaving him without a defense. (D)
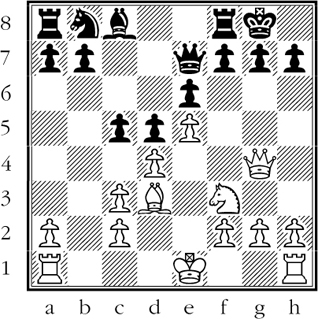
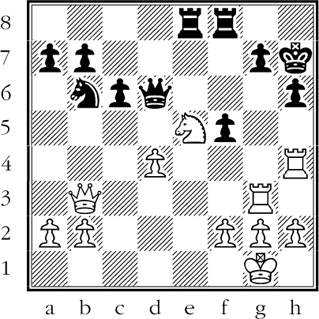
Black to move
One of the queerest things that can happen in a game of chess is seen when a player actually provokes his opponent to make a capture that wins the game! Even forceful moves may have a drawback - on occasion they stimulate the other player to find an even more forceful reply.
Black’s uneasiness about the strong position of White’s bishop is understandable. The bishop points at Black’s castled position; in combination with White’s queen and knight, the bishop may take part in a winning attack.
To ward off danger, Black should play 1…f5! as the best means of preventing Bxh7+ and gaining ground no matter how White replies. Instead, in his anxiety to be rid of the annoying bishop, Black plays:
1…c4?? 2.Bxh7+! Kxh7
On 2…Kh8 3.Qh5 and Black is in a mating net.
3.Qh5+ Kg8 4.Ng5 Black resigns.
Black is helpless against the threat of Qh7#. If he tries 4…Re8 there follows 5.Qh7+ Kf8 6.Qh8#. Naturally 4…Qxg5 5.Qxg5 leaves Black with a decisive material advantage. (D)
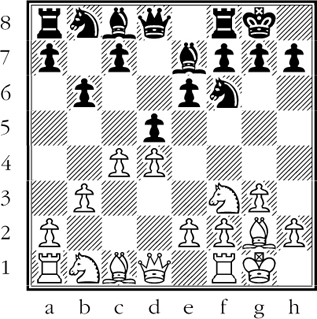
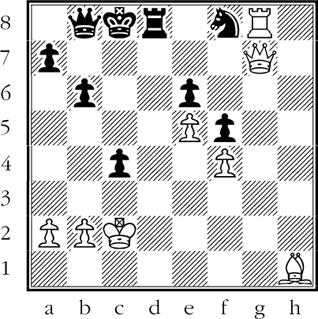
Black to move
White’s fianchettoed bishop at g2 exerts strong pressure along the long diagonal. To neutralize this pressure to some extent, Black should play 1…Bb7. Instead, Black overlooks capture possibilities by a faulty move which further opens the long diagonal.
1…dxc4?? 2.Ne5!
Now White’s bishop at g2 strikes along the whole diagonal, threatening Bxa8. Poor Black cannot block the diagonal with 2…Nd5? for then 3.bxc4 wins a piece.
2…c6
Forced. Black expects 3.Nxc6 Nxc6 4.Bxc6 Rb8 5.bxc4 and White has won “only” a pawn. But White has another capturing possibility, totally unforeseen by Black.
3.Bxc6!!
A paradox - who would expect White to part with the mighty bishop? The reply is forced.
3…Nxc6 4.Nxc6 Qc7 5.Nxe7+ Qxe7 6.Ba3!
This explains the “mysterious” capture on move 3. Black’s queen must give way, allowing the loss of the exchange by 7.Bxf8, after which White has an easy win based on his advantage in material. (D)
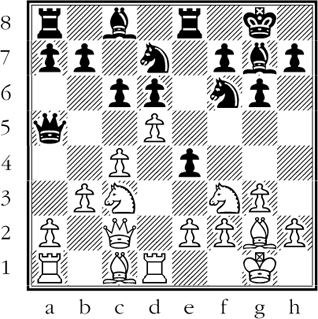
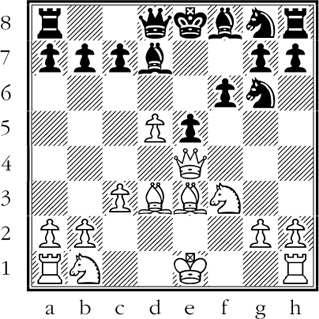
White to move
Some positions have “danger signals” to warn us. Here is such a position. White’s knight at f3 is en prise. Also the loose position of White’s knight on c3 may lead to trouble, in view of the powerful thrust of Black’s bishop at g7 along the long diagonal. Can you see why?
White’s immediate problem is what to do about his attacked knight at f3. Moving the menaced knight requires careful analysis. Thus if 1.Ng5 Nxd5! 2.cxd5 (or 2.Nxd5 Bxa1) 2…Qxc3. The right move is 1.Nd4!, salvaging one knight from attack and closing the long diagonal so that the other knight is no longer menaced. If then 1…cxd5 2.cxd5 Nxd5 3.Nxe4 and Black’s weak d-pawn must fall.
Unfortunately for White, he misses this resource and decides on counterattack. Such a policy is always risky, for some hidden possibility may spoil your calculations.
1.dxc6? exf3 2.cxd7
Anticipating capture by 2…Bxd7 3.Bxf3 etc.
2…Nxd7!!
The capture that White overlooked! It unmasks the bishop on the long diagonal, leaving two white pieces attacked. One of them must be lost. (D)
White to move
White has a double problem here. He has weakened his kingside with the advance of his h-pawn, and he must therefore be on the alert against any threats on that wing. His other difficulty is that his development has been haphazard and ineffectual.
White would do well to remove Black’s aggressively posted knight at f4. Instead, he decides on what he thinks is a judicious retreat.
1.Bf1?
This “prudent” move, played to give the kingside additional protection, actually leads to disaster; for now White’s queen is no longer protected.
1…Nxh3+!
Taking admirable advantage of the weakness of White’s castled pawn formation.
White must capture the intruder.
2.gxh3 Nd4!
Now the other knight becomes troublesome. White cannot play 3.cxd4?? because his queen is unguarded. (This is the consequence of 1.Bf1?.)
3.Qd3 Nf3+
Black has a field day on the smashed-up kingside. White cannot move his king, for this allows 4…Qh2#. Therefore, White must give up his queen, suffering a decisive loss of material.
4.Qxf3 Rxf3 White resigns. (D)
Black to move
The essential point about this position is that as long as the queens remain on the board, White has attacking chances; if the queens are removed, Black reasons, White will have a lost endgame because of the awkward position of his rooks. Black is therefore unduly eager to bring about the exchange of queens.
While it is true that White’s rooks would be badly posted in an endgame, they are placed very effectively for attacking purposes in the above position. Black completely misses the point by offering the exchange of queens with:
1…Qd5??
Theoretically, this may seem an excellent move. In actual fact, it loses on the spot.
2.Rxg7+! Kxg7 3.Qg3+ Kf6
If 3…Kh7 4.Qg6+ forces mate. (This explains why Black’s queen was needed at d6.)
4.Rxh6+ Ke7 5.Qg5+ Black resigns.
White mates next move.
In the diagramed position, Black should first have consolidated his position with some such move as 1…Rf6 before offering the exchange of queens.
Countless games have been lost in just this way - overlooking some small but vital tactical detail. (D)
Black to move
Tactical oversights sometimes come about because a player is so preoccupied with long-range problems that he misses the down-to-earth capturing possibilities that must be watched for from move to move. This kind of absent-mindedness brings about Black’s downfall here.
Though a pawn ahead, Black is definitely on the defensive. White’s queen, rook, and bishop all exert powerful pressure, while Black’s pieces can barely find a square to move to.
Black’s immediate problem is to do something about his doubly attacked knight. Unfortunately, if 1…Nd7 2.Qg5! leaves Black without a good move* - 2…Qc7? 3.Bb7+! or 2…Rxg8 3.Qxg8+ Kc7 4.Qxe6 and wins.
To solve the problem, Black hits on a finesse:
1…Qc7?
This move - so Black thinks - guards his knight indirectly, for if 2.Rxf8? Qxg7 etc. But White has another capture which Black overlooked:
2.Qxf8! Rxf8 3.Rxf8+ Kd7 4.Rf7+ Black resigns.
For Black loses his queen and remains a clear piece down.
Overlooking a Capture that leads to Checkmate!
Blackmar-Diemer Gambit
White - Black
1.d4 d5 2.e4!? dxe4 3.f3 exf3 4.Nxf3
White has offered a pawn in the hope of getting a big lead in development. With careful play, Black has nothing to fear.
4…Bg4 5.Be3 Nc6 6.c3 e5
After this optimistic reply Black’s pieces are driven back. He gets an easier game with 6…e6.
7.d5 Nce7 8.Qa4+ Bd7 9.Qe4 f6 10.Bd3 Ng6?? (D)
Black’s last move is plausible, and yet it allows a forced mate!
11.Qxg6+!! hxg6 12.Bxg6+ Ke7 13.Bc5#!
How did this catastrophe come about? Naturally, Black did not dream that the queen sacrifice was possible. What features of the position might have helped him to see danger ahead?
Firstly, Black’s king is in the center, where, as we know, he is vulnerable. Secondly, the development of his pieces has become tangled up, so that the king can expect no help from his own forces. Finally, Black has advanced his f-pawn, which opens up a line of approach for White’s pieces.
All these factors create danger for Black - but they need not necessarily be fatal. If Black is aware of the difficulty, he will be careful in selecting a knight move. For example, 10…Nf5 is quite safe and provides relief for the cramped state of Black’s pieces. It is the careless 10…Ng6??, played without understanding of the position, that leads to a catastrophe.