The Literature Book (Big Ideas Simply Explained) (2016)
FOUR
In ankle-driven movements, you bend at the ankle, moving your shin forward over the top of your foot. This movement—called dorsiflexion—forces your hips and ankles to provide more stabilization and increases the demands on your calves, quads, and glutes. It also gives your knee a much larger range of motion than it has during, say, hip-driven exercises. Form may vary, and
![]()
ANKLE DRIVEN
![]()
some lunge patterns may not have as much bend at the ankle, but I still consider them ankle-driven and always encourage my clients to practice at least some healthy forward movement of the shin and knee during their lunges. It helps create good movement habits and elasticity through the lower leg, which strengthens your ankles and tones your leg muscles.
SQUAT
![]()
Primary muscle groups: Quadriceps, Hamstrings, Glutes
Secondary muscle groups: Calves, Abdominals, Spinal erectors
19
BASE
SQUAT
20
INTERMEDIATE
SPLIT SQUAT
21
ADVANCED
REAR ELEVATED SPLIT SQUAT
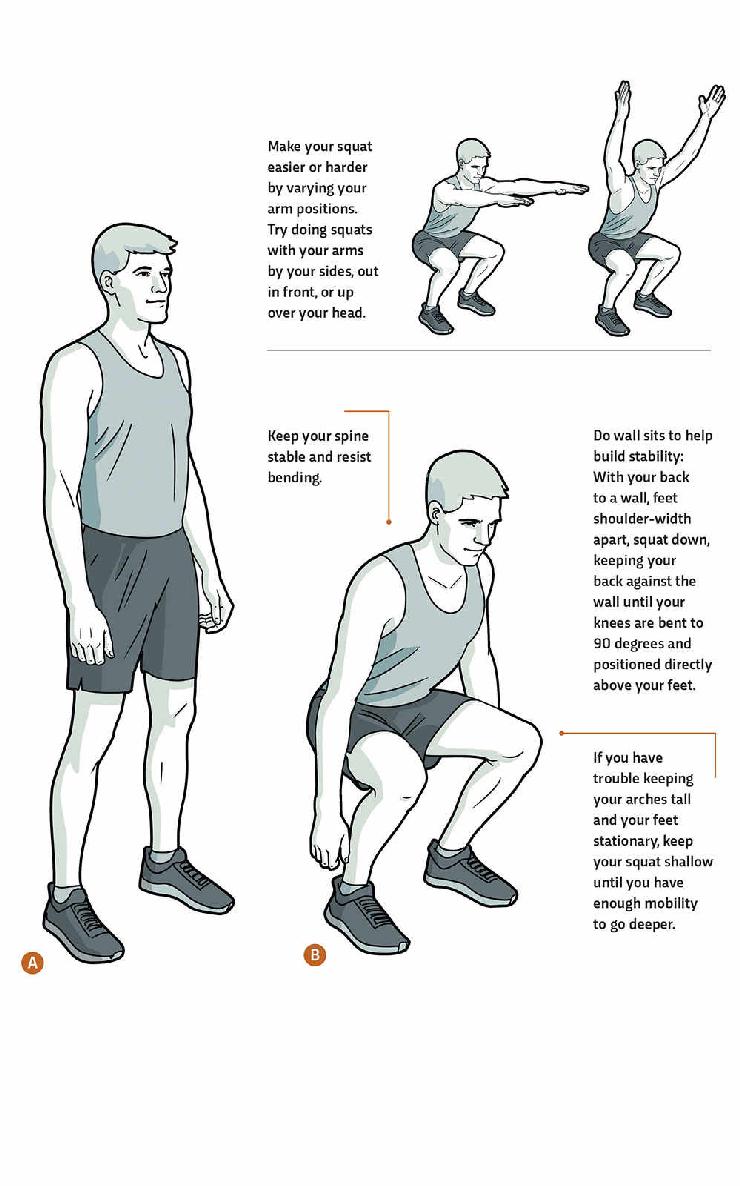
One of the most functional movements of any workout routine, the squat is the best way to get to the ground and up. The squat burns tons of calories and, when done correctly, challenges both your upper body’s stability and your legs’ mobility, so you get a core workout while you work on your quads and glutes. A correct squat distributes your weight evenly between the heels and the balls of your feet and positions your spine parallel with your shin bone (tibia). Once you’ve mastered the basic move, you can push yourself even harder with variations like the one-sided split squat and the high-intensity rear elevated split squat.
19 / SQUAT
Most of us know what a squat looks like, but it’s not quite as simple as it seems. If you want to avoid injury and really sculpt your thighs and glutes, there are a few things to pay attention to. Feet don’t need to be parallel but should ideally be no more than 15 degrees out. However, the shin bone and knees do need to come straight over the midline of the foot, matching whichever angle you’ve decided to use. The arch of your foot should not collapse. If your toes are forced wider as you descend, you most likely need to work on your ankle mobility (calf stretches can help). Your knees can come out over your toes as long as you have enough ankle mobility and your weight stays evenly distributed between the balls of your feet and your heels. If you need to put your arms out in front to balance, that’s okay, but strive for the mobility to keep your weight centered without using your arms as a counterbalance.
GOAL: You want to get your shin bone parallel with your spine at the bottom of the squat. Do 20 repetitions. Form is everything on this exercise.
1Stand with your feet shoulder-width apart (or slightly wider if needed) and within 15 degrees of parallel. ![]()
![]()
2While keeping a tall chest, bend your knees and begin to squat as low as you can while still maintaining control of the movement, or until the tops of your thighs are parallel with the ground. ![]() Make sure to keep your weight evenly distributed between your heels and the balls of your feet.
Make sure to keep your weight evenly distributed between your heels and the balls of your feet.
![]()
3Press through your heel and midfoot and rise, with your hips and shoulders moving as one unit, back to your starting position. ![]()
20 / SPLIT SQUAT
A split squat keeps both feet stationary like a regular squat, but it starts from a staggered foot position, where one is out in front of the other. The ideal distance between your feet is whatever distance brings your back hip to a neutral position at the bottom of the squat. To figure out how far that is for you, start your split squats from a comfortable half-kneeling position until you’re more familiar with the movement. This is a good way to practice hip stability before moving on to lunges.
GOAL: Try to keep your feet parallel and your spine vertical throughout all your repetitions. Once you can do 20 repetitions on each side with perfect form, try out the Rear Elevated Split Squat (21).
1Get down on one knee and start in a half-kneel with your bottom knee lined up under your hip and your hip lined up under your shoulder. Plant your front foot firmly on the ground, relatively close to the bottom knee. ![]()
![]()
2Keeping your spine vertical, press through both feet and rise to a split stance with both feet flat on the ground, one out in front of the other. ![]()
![]()
3Try to maintain your balance as you slowly return to the half-kneel position. ![]()
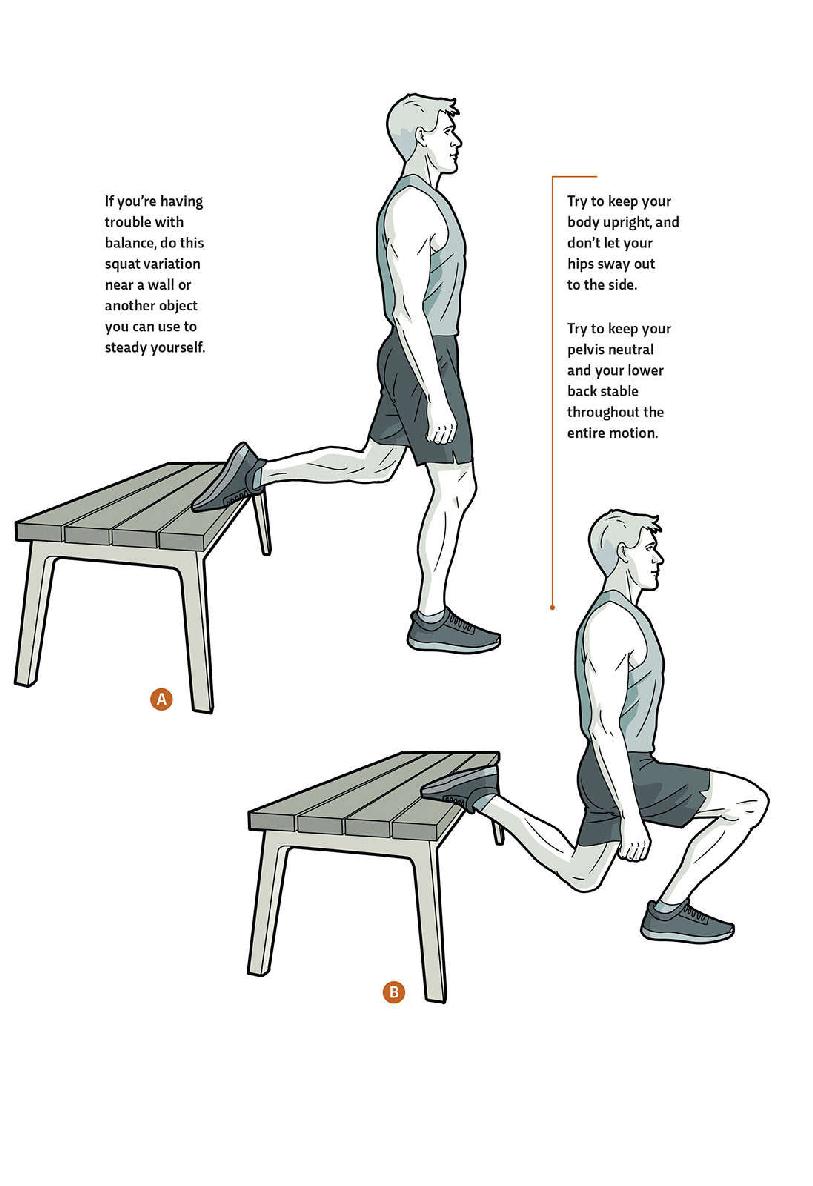
21 / REAR ELEVATED SPLIT SQUAT
In this variation of the split squat, the rear leg is raised up behind you on a chair, bench, or other object so it can’t contribute to the raising and lowering of your body. Make sure you have something to grab onto when you first try this one, as it can be a challenge to keep your balance throughout the entire motion—but that challenge is what gives you strong thighs, glutes, and core muscles. It’s very important to make sure the hip on the working leg stays in line with your shoulder, knee, and ankle. Otherwise, you may just be reinforcing bad movement mechanics and opening yourself up to injuries.
GOAL: 20 repetitions on each side
1Elevate one foot behind you on a step or bench, preferably with your foot flat and your toes pointed back, so that the tops of your toes rest on the step or bench. ![]()
![]()
2Hop out on the standing leg until you start to feel a stretch in the hip flexor of the back leg. That means you’re in the right position.
![]()
3Slowly lower yourself on the standing leg until the top of your thigh is parallel with the ground. ![]()
![]()
4Drive up through the standing leg only and return to your starting position. ![]()
LUNGE
![]()
Primary muscle groups: Quadriceps, Hamstrings, Glutes
Secondary muscle groups: Calves, Abdominals, Spinal erectors
22
BASE
REVERSE LUNGE
23
INTERMEDIATE
WALKING LUNGE
24
INTERMEDIATE
SIDE LUNGE
Lunges create the opportunity to work your legs one at a time while also challenging your balance and core stability. Lunges can be done in many directions, but for this group of variations, we’ll focus on reverse lunges, walking lunges, and side lunges. They all strengthen your quads, hamstrings, and glutes, giving you powerful, toned upper legs.
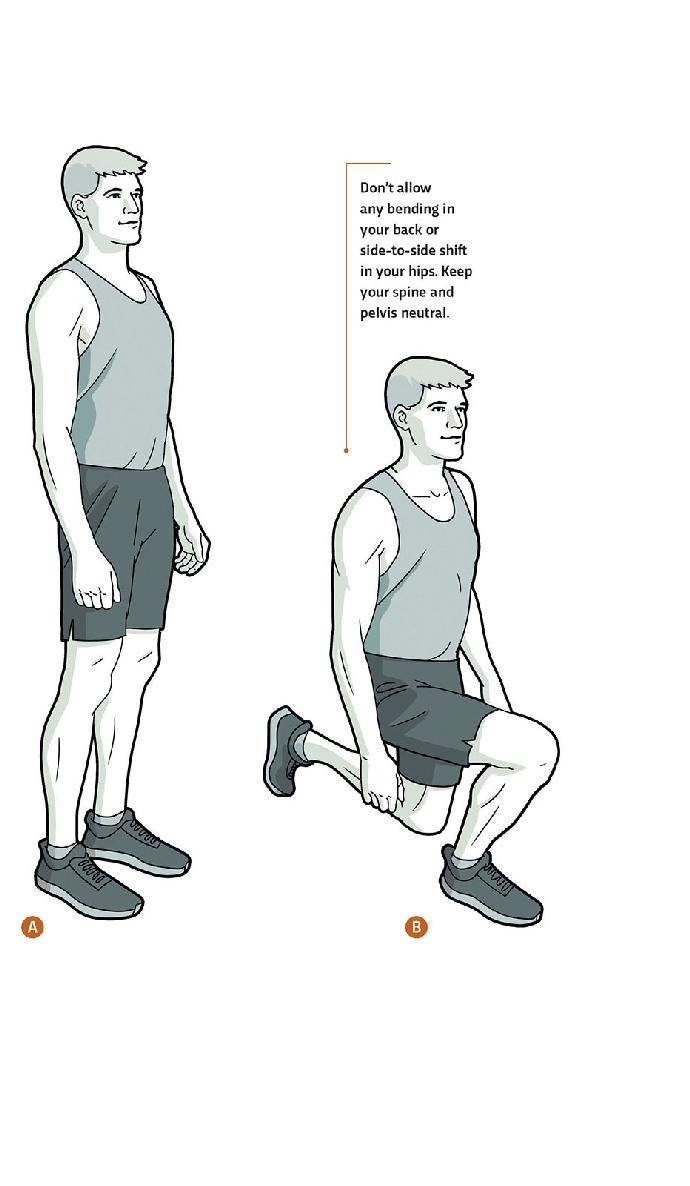
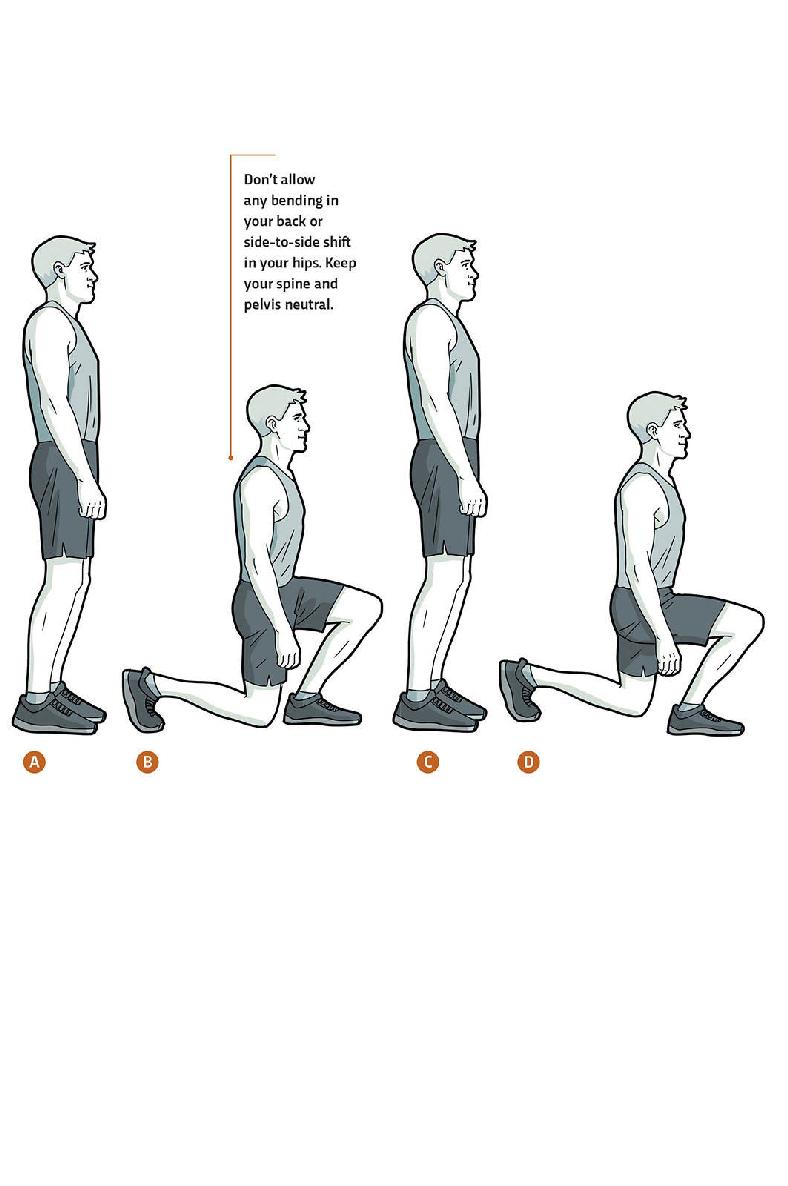
22 / REVERSE LUNGE
The reverse lunge is the simplest of the lunges because it doesn’t require you to shift your base of support. As with the squat variations above, the working leg remains stationary throughout the entire movement of the reverse lunge, so your body has an easier time accommodating to the shift in your center of gravity that happens as the nonworking side moves backward. It’s a great place to start building control of single-leg function and stabilization. Just make sure your shin and knee pass directly over your midfoot without causing your foot to turn out (see proper form for this shown in illustration B here.) Your knee can come out over your toes as long as your weight stays evenly distributed across your foot.
GOAL: 20 repetitions on each side
![]()
1Stand upright with your feet together. ![]() Slowly lift your left leg and step backward while at the same time bending your right knee to lower yourself toward the ground. You should be moving toward a half-kneeling position with your weight mainly on your standing (right) leg.
Slowly lift your left leg and step backward while at the same time bending your right knee to lower yourself toward the ground. You should be moving toward a half-kneeling position with your weight mainly on your standing (right) leg. ![]()
![]()
2As the knee of your left leg approaches the ground, drive through your right leg and return to the starting position. ![]()
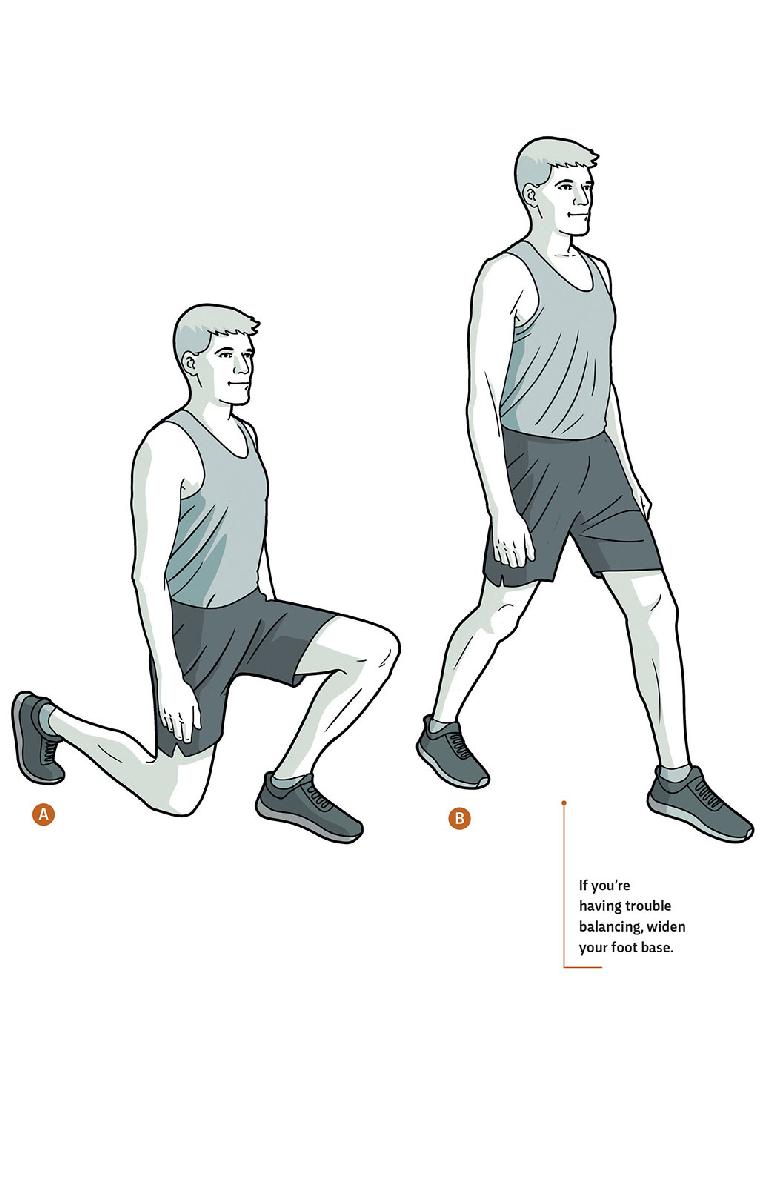
23 / WALKING LUNGE
This is one of the most functional variations of the lunge because it mimics and exaggerates a motion we do every day: walking. In this exercise you’ll alternate lunging legs and travel across an open area. This lunge does involve changing your center of gravity and your base of support as you move, which makes it harder than the reverse lunge (22). Again, make sure your shin and knee pass directly over your midfoot and your weight is evenly distributed across your foot.
GOAL: 20 repetitions on each side
1Stand upright with your feet together. ![]() Step forward with one leg and slowly drop yourself toward a half-kneeling position.
Step forward with one leg and slowly drop yourself toward a half-kneeling position. ![]()
![]()
2As your back knee approaches the ground, drive up through the front leg and return to the standing position you started in—except now you’ve traveled a few feet forward. ![]()
![]()
3Repeat, stepping forward with your other leg. ![]()
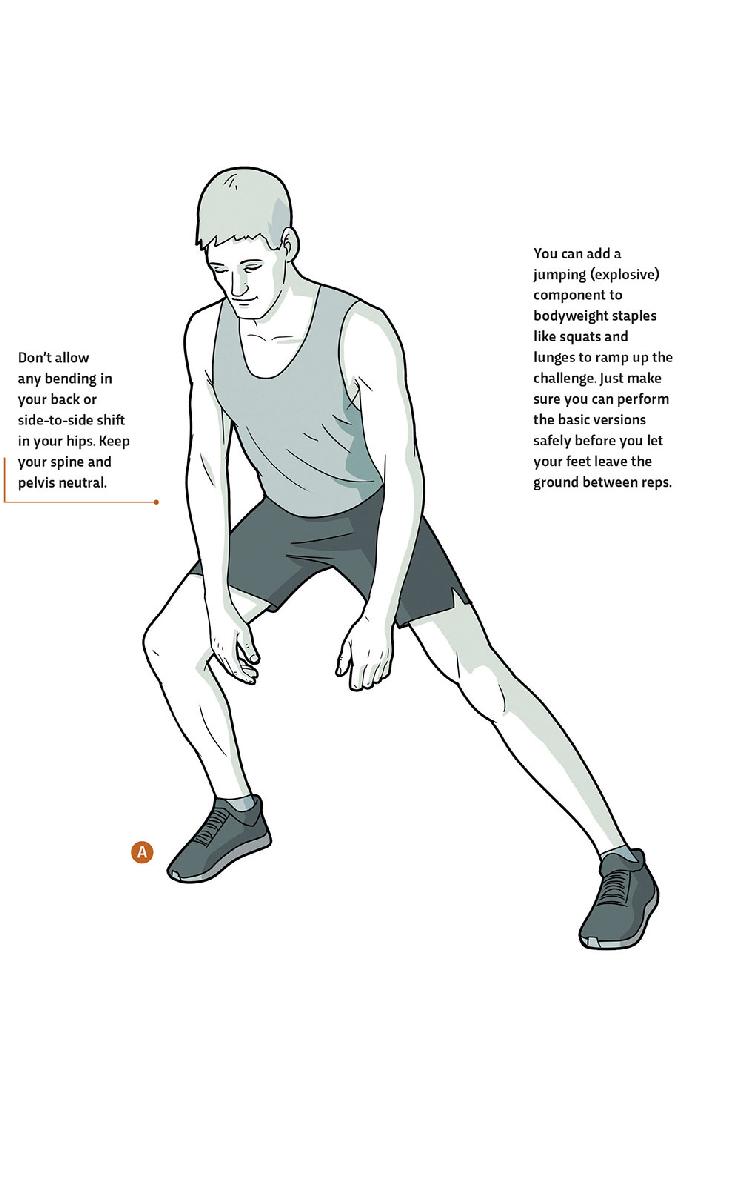
24 / SIDE LUNGE
In this variation, you step directly out to one side, dropping into a side lunge while maintaining a locked knee and planted foot on the trailing leg. You challenge the flexibility of the muscles that squeeze your thighs together as well as your stretch reflex as you push off the lunging side and pull yourself back to standing. You also develop your hip stabilization as you keep your hip, knee, and ankle in line with one another despite the sideways momentum as you drop into your lunge. As with all lunge variations, make sure your shin and knee pass directly over your midfoot and that your weight is evenly distributed across your foot.
GOAL: 20 repetitions on each side
1Start with your feet together in a standing position. Step straight out to one side as far as you can, dropping into a lunge. Keep the trailing leg straight, the sole of your foot planted on the ground. ![]()
![]()
2As the thigh of the lunging leg gets close to being parallel with the floor, push through that midfoot and start momentum back toward your starting position.
![]()
3Transfer your weight to the trailing leg as you rise and use your inner thigh to finish your return to a standing position. Repeat, stepping to the side with your other leg.
STEP-UP
![]()
Primary muscle groups: Quadriceps, Hamstrings, Glutes
Secondary muscle groups: Calves, Spinal erectors, Abdominals
25
BASE
FORWARD STEP-UP
26
INTERMEDIATE
TRANSVERSE STEP-UP
27
INTERMEDIATE
FORWARD STEP-DOWN
The step-up is another classic functional exercise because it imitates one of the main ways we change our elevation in everyday life: climbing stairs. These step-up variations all require a sturdy step, bench, or retaining wall close to knee height, and they’ll all help strengthen your quads, glutes, and hamstrings. Like lunges, step-ups can be done in several directions. Here you’ll focus on a forward step-up, a transverse step-up, and a forward step-down.
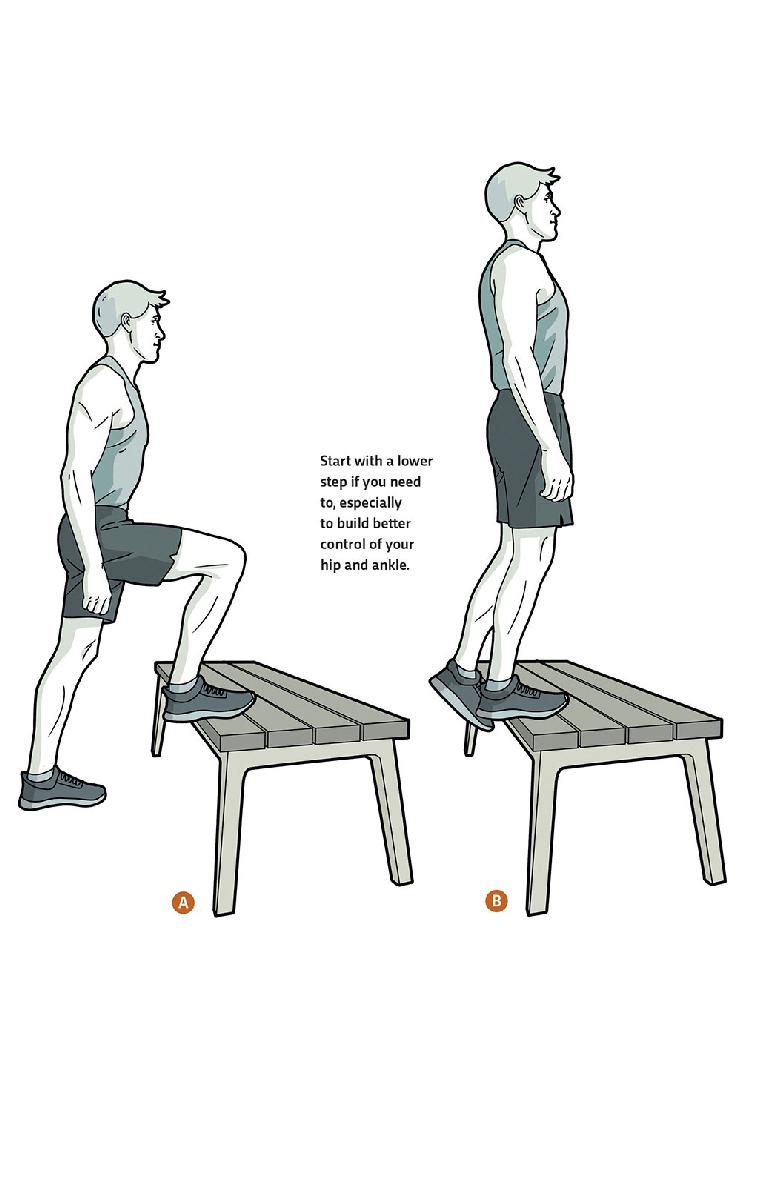
25 / FORWARD STEP-UP
The forward step-up involves a large range of ankle dorsiflexion, where you bend at the ankle, moving your shin forward over the top of your foot. That means it’s extra important that your shin and knee pass straight over the middle of your foot and that your foot is not turned out. As your weight shifts forward, you’ll feel your upper body start to lean forward and your hips push backward to accommodate a stiff ankle. Try not to let that happen. You may also notice your hip shifting sideways, which is another compensation you want to avoid. In this exercise you’ll step up and lower yourself repeatedly with the same leg until you reach your desired repetitions before switching to the other side. Keep your spine neutral and strive for good control of your ankle and foot.
GOAL: The greater range of motion you develop in your ankle joints, the more control you’ll have over your ankle and foot. When you can do 20 repetitions on each side, you’re ready for the Transverse Step-Up (26).
1Stand roughly 12 inches from your chosen step. Raise one leg and place that foot flat on top of the step. ![]() Find the right amount of bend in your ankle joint to keep the hip, knee, and ankle in line with each other.
Find the right amount of bend in your ankle joint to keep the hip, knee, and ankle in line with each other.
![]()
2Keeping your spine neutral, drive up through your high leg and bring yourself to a standing position on top of the step. ![]()
![]()
3With the same working leg, slowly lower yourself back to the starting position. ![]()
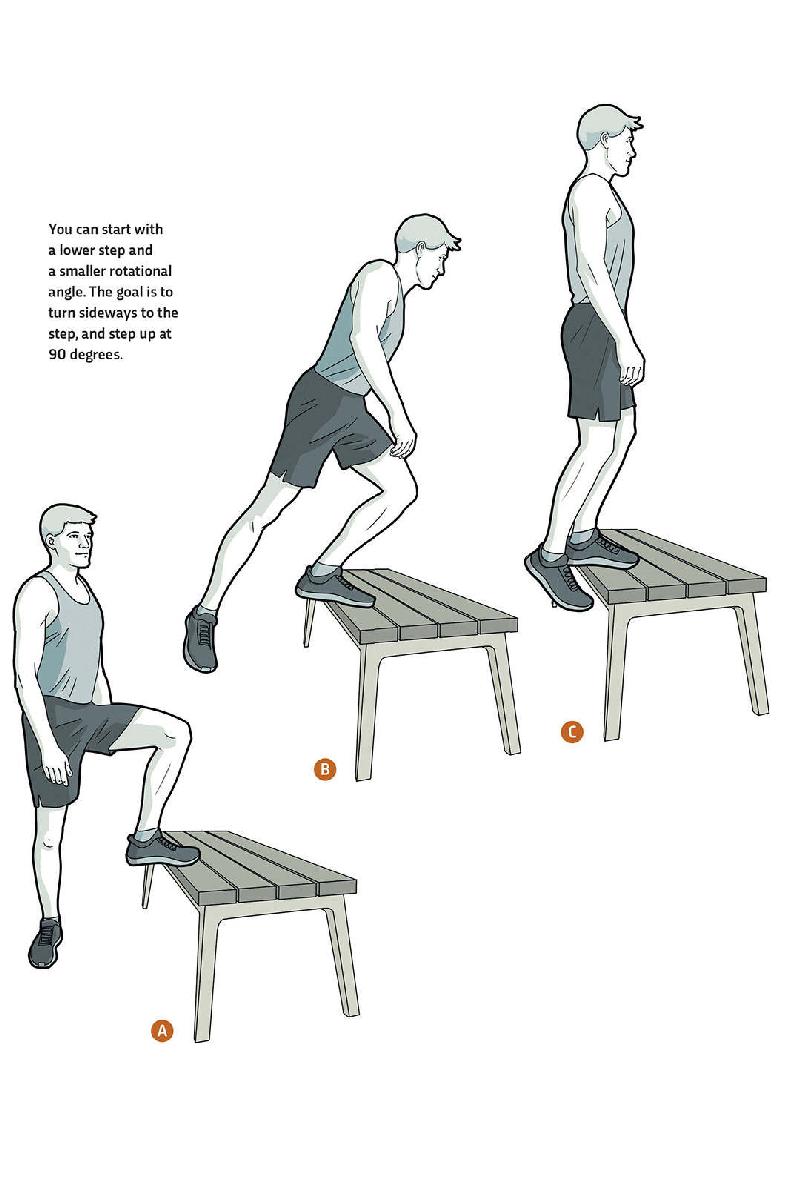
26 / TRANSVERSE STEP-UP
This variation is similar to the forward step-up (25), but at first, you turn 45 degrees from the step, turning your body at your hip—not your spine—as you make your step up and then again as you reverse the motion. In addition to working your upper legs, this transverse, or “crosswise,” aspect forces your hips to stabilize through internal and external rotation. As with the forward step-up, keep your spine neutral.
GOAL: Facing sideways to the step with your foot at 90 degrees. 20 repetitions on each side
1Stand roughly 12 inches from your chosen step, with your body turned away from the step at 45 degrees, and your foot on the step, also at 45 degrees. ![]()
![]()
2Press up evenly through the foot on the step, lifting your body while simultaneously rotating your hip ![]() and coming to rest on the top of the step with your feet together.
and coming to rest on the top of the step with your feet together.
![]()
3Return to your starting position by reversing the movement ![]() and stepping down while turning out.
and stepping down while turning out. ![]()
27 / FORWARD STEP-DOWN
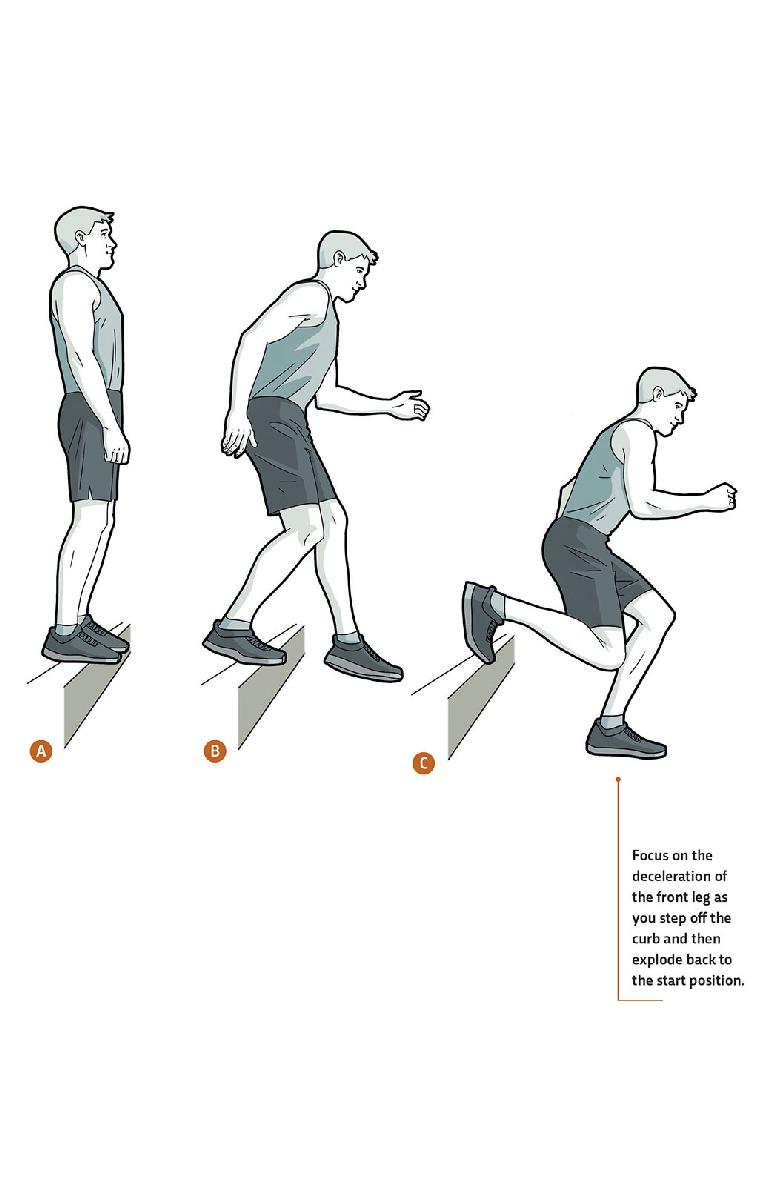
Although here you’ll step down instead of up, you’re still working your upper legs and glutes. You’re also working your knees. In fact, this exercise can put excessive pressure on your knees, especially if you lack proper flexibility in your hips and ankles, so please perform it with caution, and stop if it causes knee pain or if you have a known issue that might be subject to injury. Start by stepping down from something the height of a curb, then gradually increase to something mid-shin height if you want more difficulty. Pay close attention to your ankle, and prevent the predictable compensation: your foot turning out. This is especially important on the back leg during the second half of the motion as you return to the starting position.
GOAL: Work on landing softly with your stepping leg, making as little noise as possible. Aim to do 10 repetitions on each side.
1Stand on a curb or a step about 4 to 8 inches high with your toes at its edge. ![]()
![]()
2Slowly step forward, controlling your descent with the back leg ![]() until the forward leg makes contact with the ground on the lower level and bends to absorb the shock.
until the forward leg makes contact with the ground on the lower level and bends to absorb the shock.
![]()
3Descend into your forward leg until the knee of your back leg reaches the height of the curb or step. ![]()
![]()
4Drive off the midfoot of your front leg, springing off the ground and finishing your momentum by returning your back leg to its starting position. ![]()
JUMP
![]()
Primary muscle groups: Quadriceps, Hamstrings, Glutes
Secondary muscle groups: Calves, Abdominals, Spinal erectors
28
BASE
FLOOR JUMP
29
INTERMEDIATE
BOX JUMP
30
ADVANCED
ONE LEG POWER JUMP
Jumps are a great way to build the explosive power of your legs and get your heart rate up, but don’t do them until you can squat comfortably without your knees turning inward. Your ankles, knees, and hips should remain in line with each other throughout the entire jump and should be strong enough to slowly lower your body weight as you land. Here you’ll start with a stationary floor jump straight up in the air, then progress to a box jump and, for a real challenge, a one-leg power jump from a staggered stance with the working leg up on a step.
28 / FLOOR JUMP
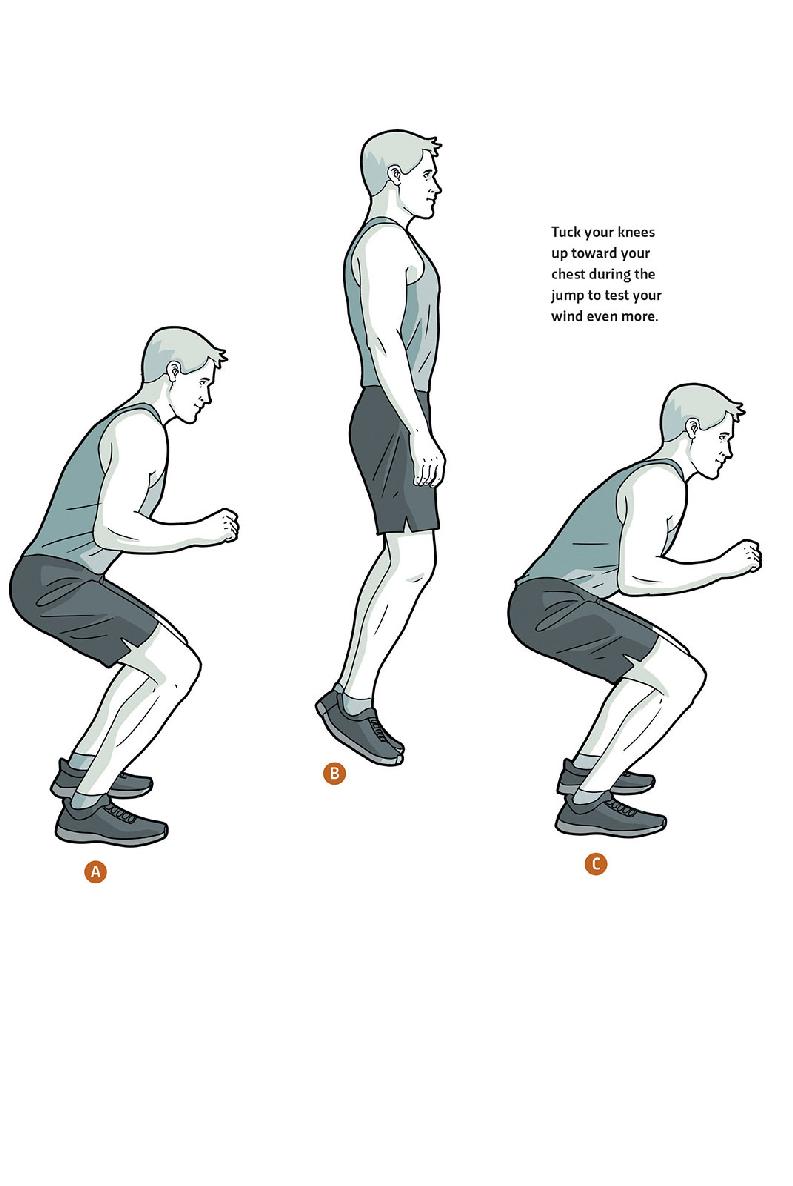
The floor jump is a stationary jump without equipment. You jump as high as you can straight up in the air. As you land, you comfortably absorb the shock with your feet closer together and then take a small hop back and drop back into a three-quarter squat for the next rep. As you get better, you can try landing directly back in the three-quarter squat and immediately starting the next rep without any pause.
GOAL: Slowly eliminate the regressed landing until you can land directly in the three-quarters squat and rapidly repeat the motion. When you can do 20 repetitions with that squat landing, you’re ready to try Box Jumps (29).
1Stand with your feet shoulder-width apart. Squat to about three-quarters depth ![]() and spring up, jumping just a few inches forward and landing upright.
and spring up, jumping just a few inches forward and landing upright. ![]() Remember to keep your ankles, knees, and hips in line the whole time.
Remember to keep your ankles, knees, and hips in line the whole time.
![]()
2Hop backward a few inches, absorbing the shock of the landing with a three-quarters squat. ![]()
![]()
3Repeat the jump sequence, traveling slightly forward during the jump and slightly backward during the return.
29 / BOX JUMP
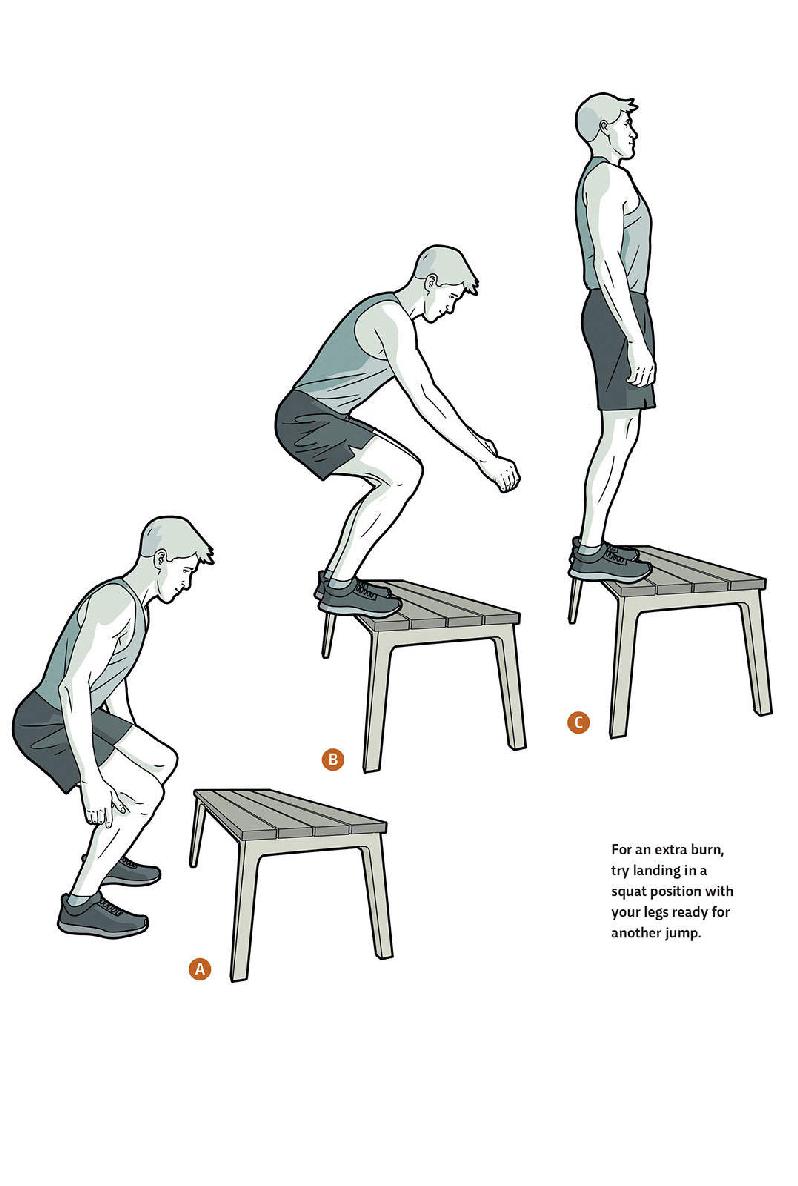
Box jumps are like floor jumps (28), except instead of landing back on the floor, you jump up onto a step, box, or other elevated surface. They allow you to train only the explosive phase of movement associated with jumping without worrying as much about shock absorption. Jumping onto an elevated level is more difficult, but it puts much less stress on your joints, so you can do more reps without fear of injury. It can be a little unnerving to jump to another surface, so proceed with caution. When you step back down off the step at the end of the jump, alternate the leg you use so each leg gets similar work. And as with any jump, don’t forget to maintain functional alignment throughout.
GOAL: 20 repetitions
1Stand with your feet shoulder-width apart about 12 inches in front of a knee-high step or other elevated surface.
![]()
2Drop into a three-quarters squat. ![]() Quickly spring up and forward as high as you can, landing on top of the step.
Quickly spring up and forward as high as you can, landing on top of the step. ![]()
![]()
3Drive up through your legs to a standing position on top of the step. ![]() Step backward off the step as you would during the second half of a forward step-up (25), alternating the working leg with each repetition.
Step backward off the step as you would during the second half of a forward step-up (25), alternating the working leg with each repetition.
30 / ONE LEG POWER JUMP
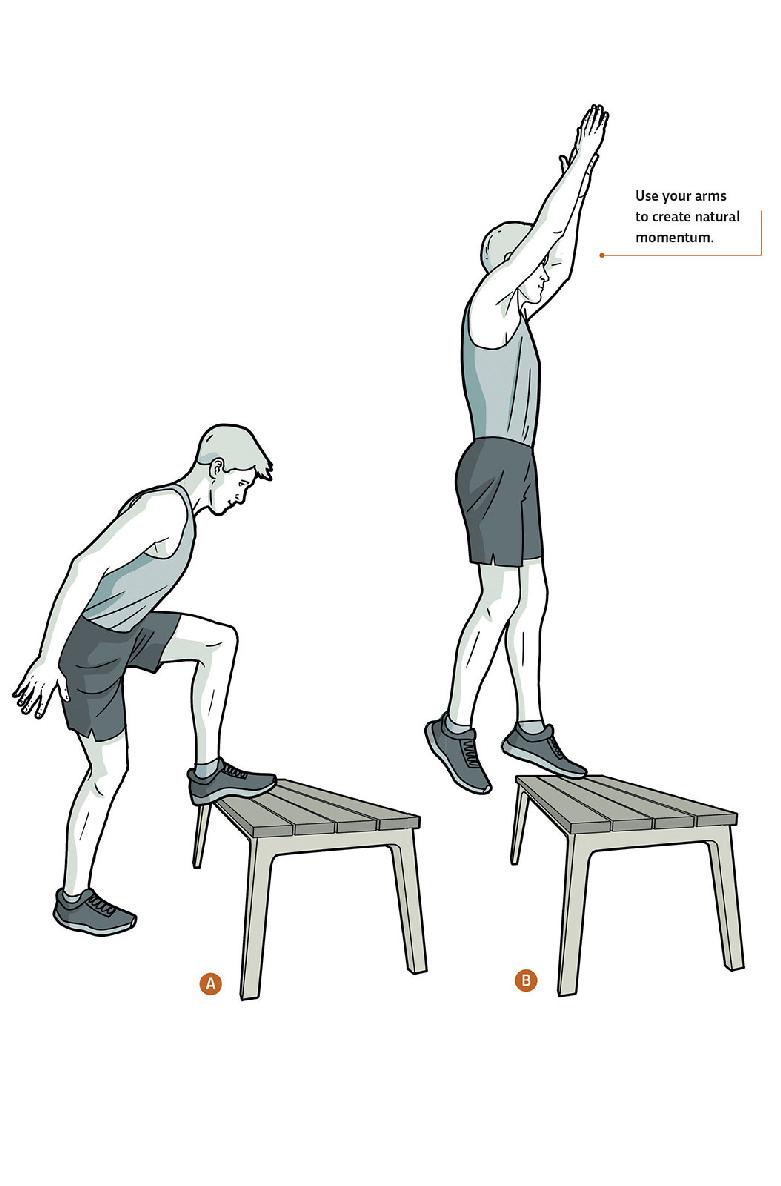
Ready to jump with one leg? Here you use a step like you did with the box jump (29) in order to soften your landing and allow for more rapid repetitions. Those rapid reps are great for building not just leg strength but also cardiovascular efficiency.
GOAL: Work toward maintaining 4 inches or more of vertical jump through every repetition. Aim to do 20 repetitions on each side.
1Stand in front of your step with one foot up on the step and the other on ground level. ![]()
![]()
2Jump up, pressing off the foot on the step to jump as high as you can. ![]()
![]()
3Land on that same leg, still on the step, and slowly lower your weight as the other leg lands back on the ground in its original position. ![]()
DYNAMIC JUMP
![]()
Primary muscle groups: Quadriceps, Hamstrings, Glutes
Secondary muscle groups: Calves, Abdominals, Spinal erectors
31
BASE
ICE SKATER
32
INTERMEDIATE
BROAD JUMP
33
ADVANCED
POWER BOUND
A jump is classified as dynamic when it involves a large shift in your center of gravity and direction. This makes the jumps much more difficult for your nervous system to handle, because your brain has to figure out how to keep your balance and activate different muscles accordingly. Dynamic jumps help train your ankles, hips, core, and leg muscles to react to the demands put on them, while still providing stability.
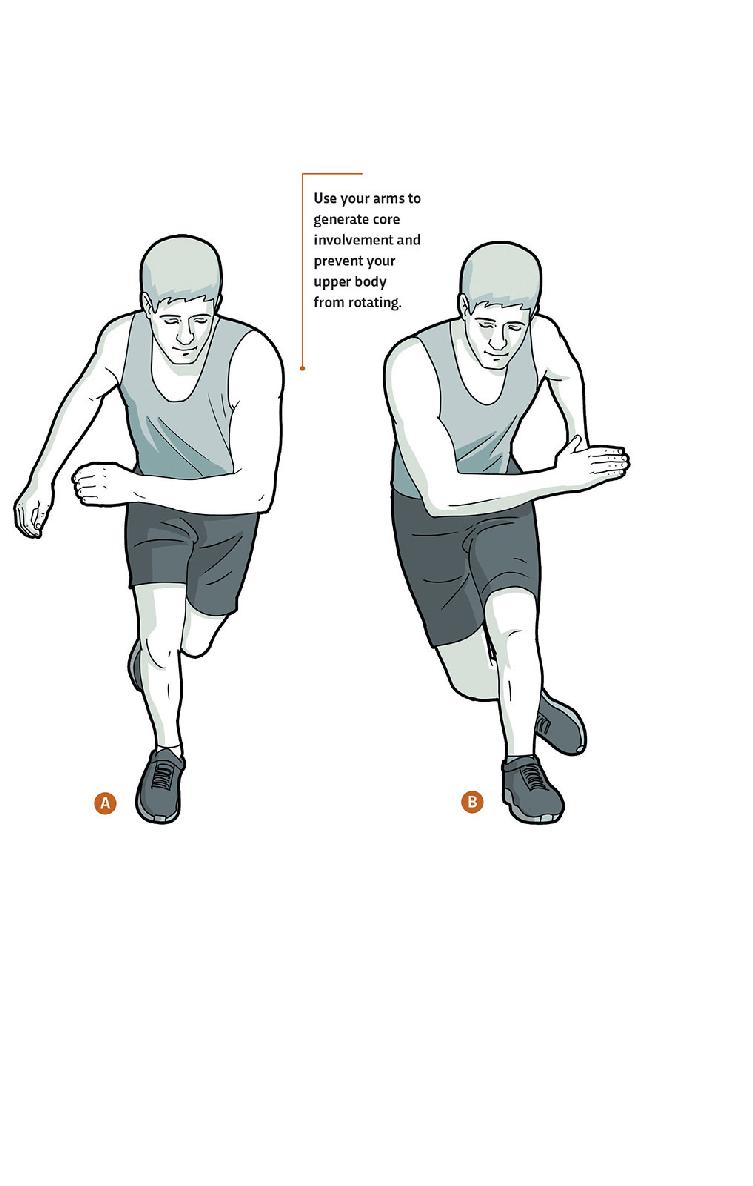
31 / ICE SKATER
Ice skaters are dynamic jumps that mimic the side-to-side motions you make when cutting direction on a playing field or court. Your goal is to cover as much horizontal distance as you can with each jump, not to jump high up into the air. This is another great exercise for increasing your heart rate, and like the side lunge (24), it improves your hip stabilization as you try to keep your knee in line with your ankle and hip.
GOAL: Work toward a stride length of half your height. So if you’re 6 feet tall, aim to jump 3 feet to the side.
1Stand with your feet together and your knees slightly bent. Hop out to your right as far as you can, landing on your right foot ![]() , which should face straight forward as you land. Allow your knee to bend as you absorb the shock. Let your left leg pass behind your right, and your arms cross your body, to help prep for the next jump.
, which should face straight forward as you land. Allow your knee to bend as you absorb the shock. Let your left leg pass behind your right, and your arms cross your body, to help prep for the next jump.
![]()
2Immediately push off your right foot and hop in the other direction, landing on your left foot. ![]() Continue alternating between feet, trying to cover as much horizontal ground as possible.
Continue alternating between feet, trying to cover as much horizontal ground as possible.
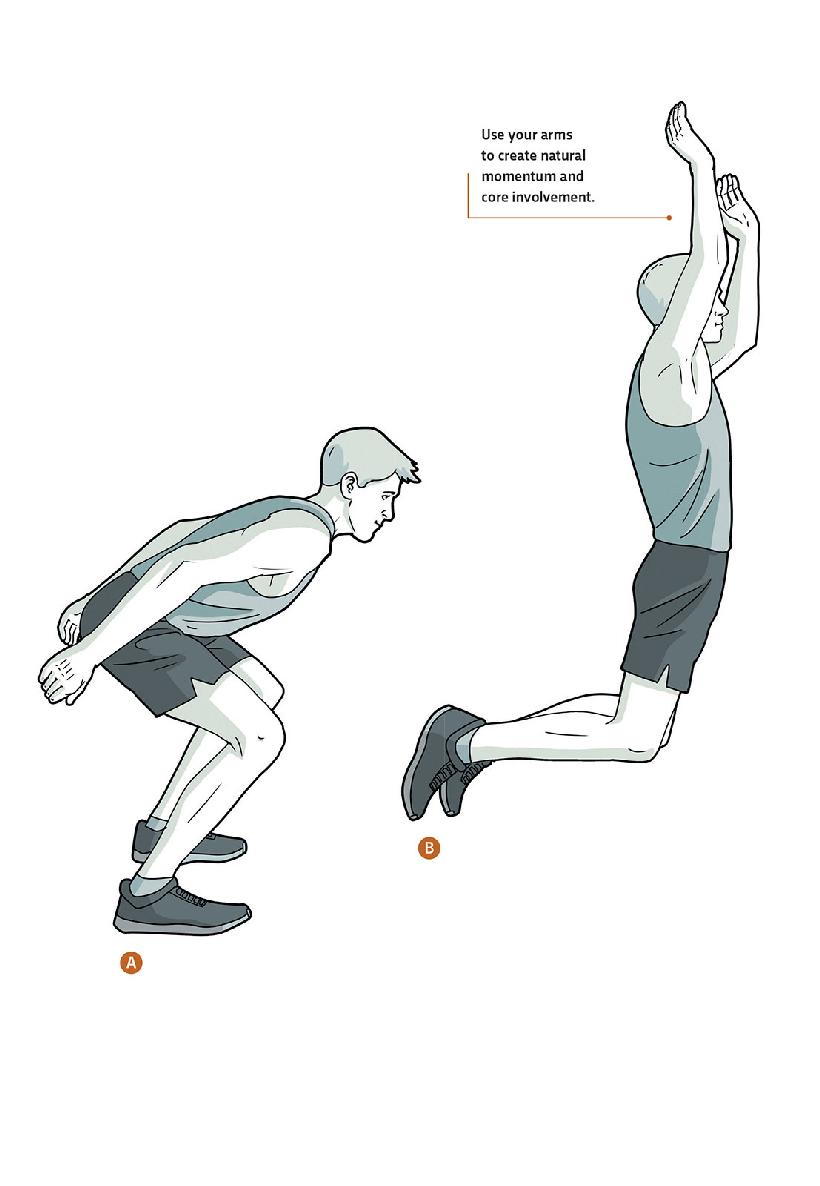
32 / BROAD JUMP
The broad jump is another explosive movement that allows you to take off and land on the same surface. Like the ice skater (31), the broad jump tries to cover as much horizontal distance as possible, but this time you jump forward instead of to the side. Both your feet should take off together and land together, making as little noise as possible. Make sure your hips, knees, and ankles stay in line. Do not allow your knees to collapse inward during take-off or landing.
GOAL: You want to reposition your feet as minimally as possible between jumps. Work up to doing 20 repetitions.
1Stand with your feet shoulder-width apart. Drop into a three-quarters squat, ![]() then spring forward, going for distance, not height.
then spring forward, going for distance, not height. ![]()
![]()
2Land with both feet in another three-quarters squat. ![]()
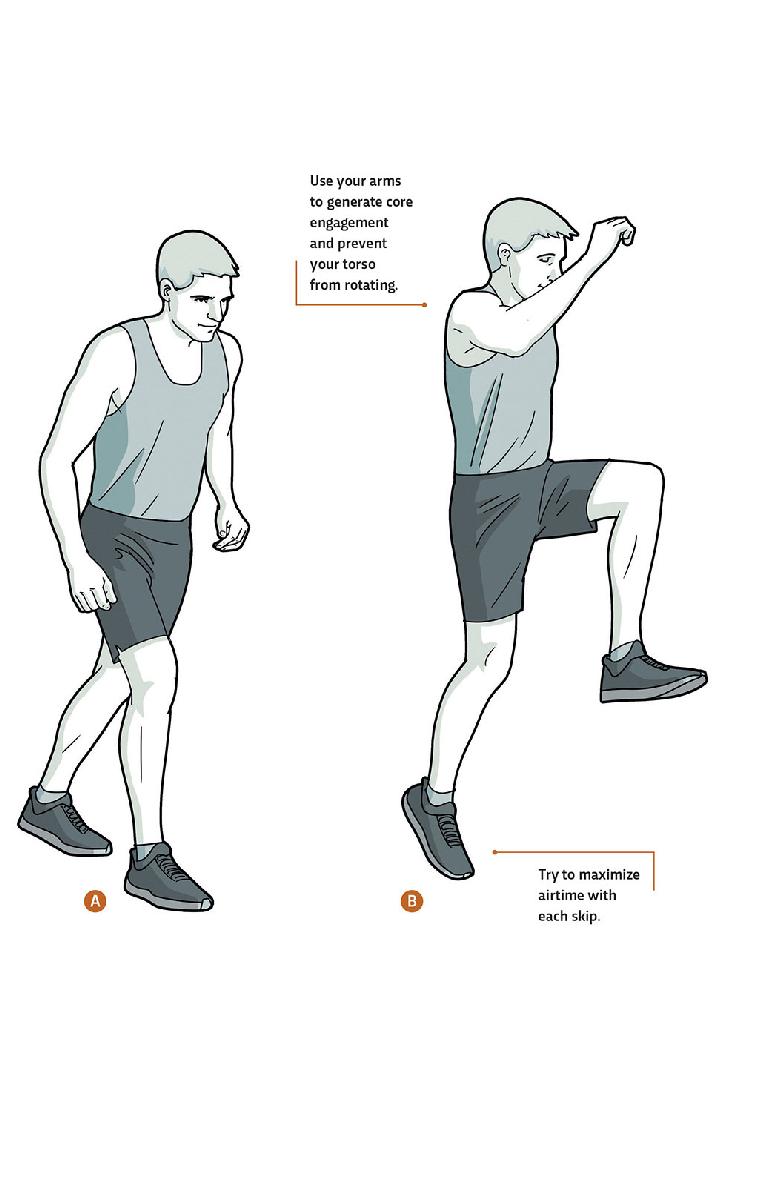
33 / POWER BOUND
Power bounds are essentially adult-size skips that you use to travel as far as you possibly can. Again, distance will be your priority here, so you’ll need some space for this exercise. If you need to do it in circles to fit inside a certain area, go ahead, but make sure you switch directions with each set.
GOAL: Work toward a stride length of three-quarters of your height. So if you’re 6 feet tall, you should be jumping about 4.5 feet forward. Aim to do 20 repetitions on each side.
![]()
1Start in a staggered stance, aligning the toes of your back foot with the heel of your front foot, with the arm that’s on the same side as your back foot forward. ![]()
![]()
2Drive your forward arm back and your backward arm forward as you leap from your forward leg as far as you can, landing on that same leg. ![]()
![]()
3When you land, quickly take a step with the other leg, landing in a staggered stance so that you’re ready to repeat the motion on the other side.

BRIDGE
SHOULDER-ELEVATED BRIDGE
STRAIGHT LEG HIP EXTENSION
HIP HINGE