Survive: Mountains (2016)
ORIENTEERING, NAVIGATION, AND SIGNALING
FINDING YOUR WAY
There’s lost … and then there’s really LOST. The first lost is more of a temporary misplacement and easily takes care of itself. The second lost is the “I really don’t know where I am and may not be able to get back to where I need to be” and is more serious. This is the type of lost you will need help to solve, and you may or may not be prepared for. It’s also possible that your maps no longer cover the area you have wandered into or you don’t have any maps at all.
What to Do
Step 1: Don’t panic! Stay calm; stop and look at the map or topography, using your last known point as a reference. People often consider just one possibility and attempt to make the terrain fit their assumption. Unfortunately, they’re often in a different spot than they think they are.
+Tip: Three blows on a whistle is a universal signal for help.
Consider all the possible places you could be on the map. Narrow it down to what fits, using landmarks to triangulate your location on the topo map. You can always retrace your steps to get back on track. If you can determine your location without a doubt, you may be able to figure out a different route to intersect your planned route.
If you’re totally lost, STOP. Remain calm and evaluate the situation. Remember, “Undue haste makes waste.” Try to remember any landmarks you passed or how long ago you made a turn that changed your course. Can you identify any obvious features (trails, roads, bodies of water, cliffs, changes in vegetation, etc.) that you recently passed? Think about how long you have until dark. If it’s going to get dark before you can return to any known points, stay put and set up camp. It’s better to set up at a place when you know you’re lost than to push on in the dark and get even more lost.
If you’re hiking with a group, talk things over and figure out a reasonable plan of action for determining your location and getting back on track. Don’t act rashly! If you head out in one direction on a whim and have to backtrack, you end up wasting a lot of extra energy and time, and probably increase your worries.
Step 2: If you need rescuing when you’re lost, it can take hours or even days to be found. Help rescuers find you by making a small smoke fire, or, if it’s not too much effort, find an open area and lay rocks out in an X or a triangle formation. Also lay out some brightly colored clothes or your pack. Use something that will reflect sunlight onto planes flying overhead or anything else that might help. If you’re lost at night, don’t camp near running water. The water sounds will make it harder for you to hear voices or people nearby.
If you’ve called for a helicopter rescue or used a PLB (personal locator beacon), be ready to give details about your, or an injured patient’s, condition. Details should include urgency, name, age, sex, and location. If calling, give them your best estimate of location, whether you intend to move, and, if so, where you intend to go. When a helicopter or plane flies over, stand toward it with your arms held in a Vshape if you need help. If your arms are in a straight line at a diagonal, like a slash, it means “All OK.”
+Tip: ALWAYS leave an itinerary and trip details with people you trust. Ideally, make sure they’re in touch with one another as well. When on a long hike, I always give people my planned itinerary and resupply spots. I call or e-mail from each stop to let them know where I am and roughly when they should next hear from me. If they don’t hear from me and it’s more than a day late, they can initiate the search-and-rescue system, providing an idea of where I should be.
+Tip: I can’t emphasize this enough: If you have a map, regularly check your position on it; note where you think you are, and make a mental note of the time you are checking. You’ll get to know your pace and where you should be at these intervals. Also check the time at known points, such as bridges, peaks, and other obvious features, as well as road, river, and trail crossings. That way, if you get lost, you will have an idea of how far from those features you’ve traveled and will have a better idea of where you are on the map.
If you’ve managed to find your way before a rescue team arrives, change your PLB signal or call them back to call off the rescue effort. It costs a lot of money to organize and deploy rescue services—and you can be held liable for them. If you do call a rescue service, try to make their job as easy as possible by using the signaling tactics mentioned. This will help your chance of survival and speed up the rescue process.
EMERGENCY NAVIGATION
Without a compass or an altimeter watch, there are a few easy tricks to get your bearings.
Timekeeping and Navigation
One of the most important tenets of good navigation is checking your location on the map at random intervals and matching your location with the time. This gives you an idea of both your pace and location. Then, if you get off course, you can refer back to the last time you were still on course and have a better idea of where you are because you know where and when you were last on course. You can then make plans to either double back or adjust your route to get back on course. You can also count how many steps that you take in a certain amount of time and then estimate about how far you have traveled by knowing how long your stride is and assuming that you maintain roughly the same steps per time period.
Wear a watch, and know when sunset will occur. If your watch fails, knowing when sunset will occur can still help you figure out what time it is. Cover the sun with your thumb, palm facing you. Each finger above the horizon represents 10 to 15 minutes before sunset.
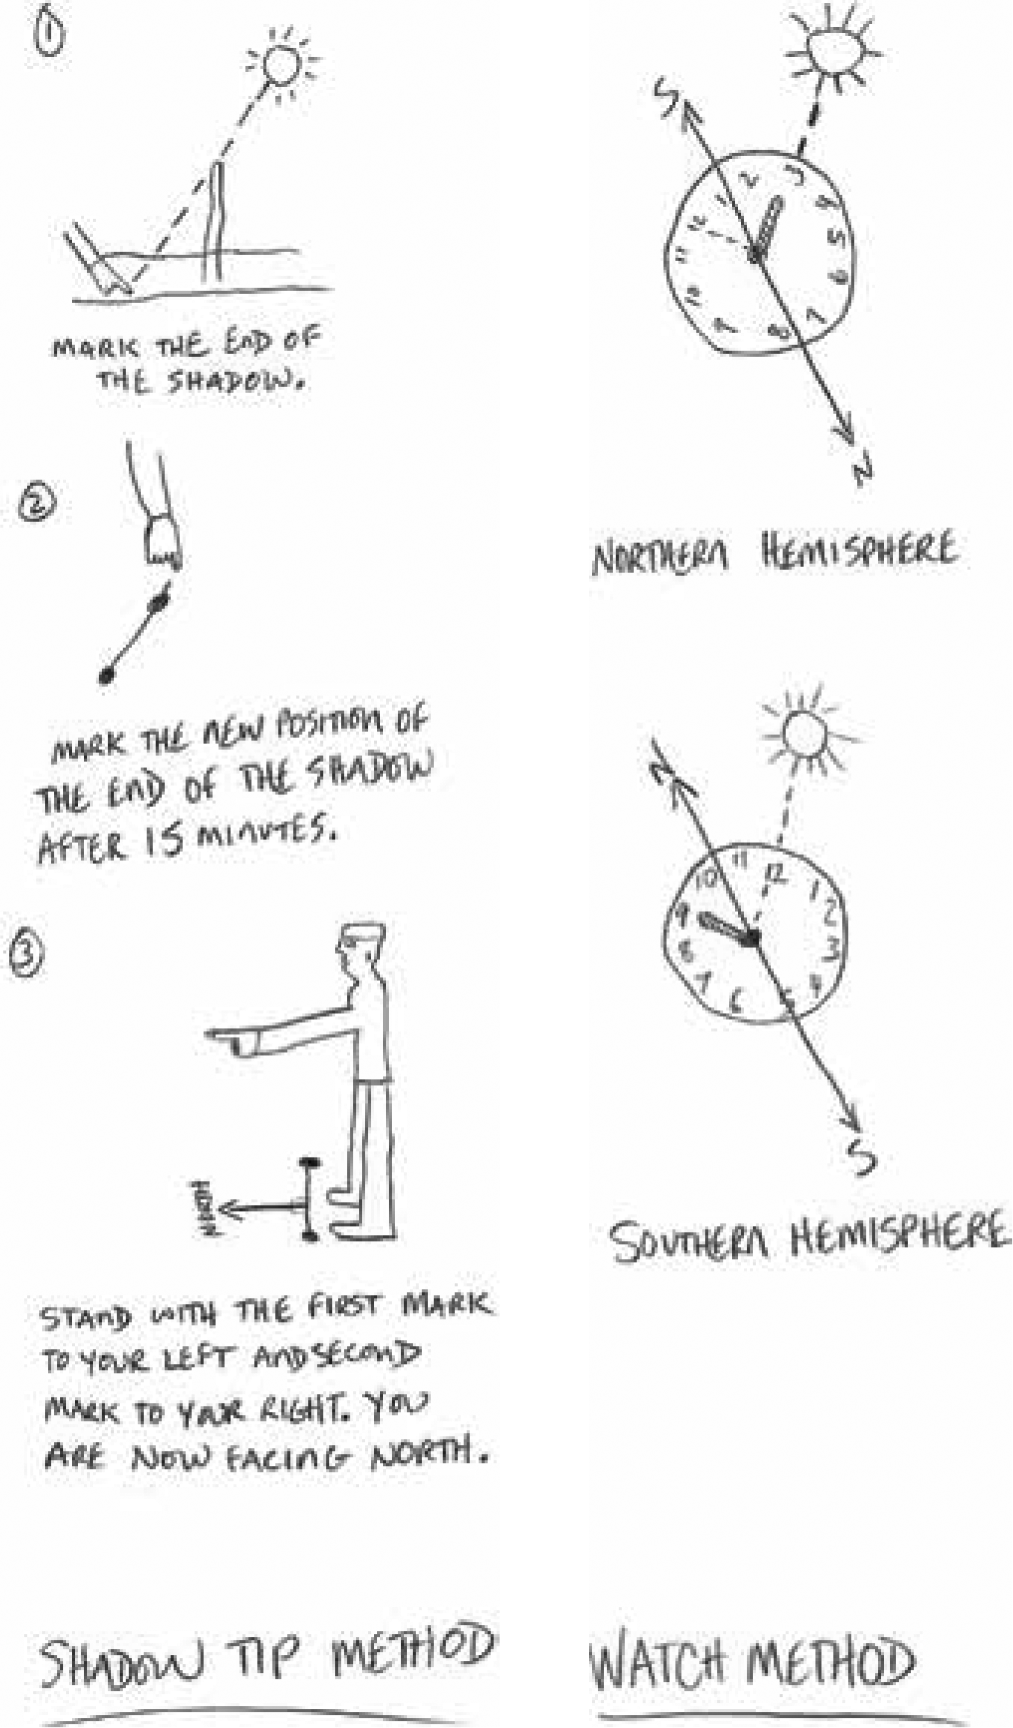
You can use the sun to tell direction using two methods. An analog watch face’s hour hand can help you determine direction, as can a stick in the ground. In the northern hemisphere the sun is due south at noon (it’s easier to tell before and after summer, when the sun travels lower in the sky). In the southern hemisphere the sun is due north at noon (again it’s easier to tell when the sun is lower in the sky).
When using an analog watch in the northern hemisphere to determine direction, point the hour hand in the direction of the sun, keeping the watch face flat. Halfway between the hour hand and the 12 is south. So if it is 5 p.m. in the northern hemisphere, south would be between 2 and 3. North is opposite that, and west and east are perpendicular. In the southern hemisphere, point the 12 on the watch face toward the sun. Halfway between the 12 and the hour hand is north.
Alternatively, you can place a 3-foot-tall stick, your trekking pole, or something else upright in the ground. Mark the location at the end of the shadow. Wait about 15 to 20 minutes, and mark the tip of the shadow again. Draw a line connecting the two marks. This shows you an approximate east to west direction; you can calculate north and south by drawing a perpendicular line.
Nighttime Navigation
I don’t recommend traveling at night when you are lost unless it is truly an emergency. The likelihood of getting increasingly lost or experiencing an injury increases while traveling in the dark. If you travel at night, make sure to take all precautions that you would during the day and more. Try to avoid potential avalanche slopes, but if you must cross them, go one at a time. Take extra care when crossing creeks or rivers in the dark.
Here are some nighttime navigation tricks to stay on track:
✵ If the moon rises before the sun has set, the illuminated side will be the west side. If the moon rises after midnight, the illuminated side will be the east. This can provide you with a rough east-west orientation at night.
✵ If it is a crescent moon, you can draw an imaginary line from the top tip of the crescent to the bottom tip and continue the imaginary line to the horizon to find due south.
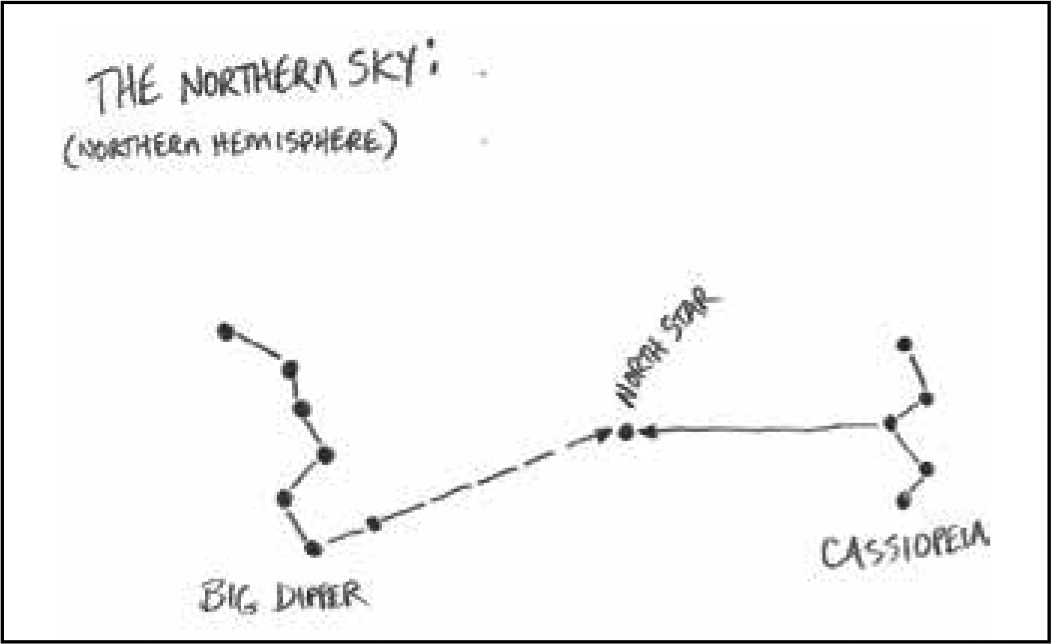
✵ In the northern hemisphere, you can tell north by finding the Big Dipper and Cassiopeia and locating Polaris (the North Star). These constellations and Polaris never set. The Big Dipper and Cassiopeia are always directly opposite each other and rotate counterclockwise around Polaris. The Big Dipper is made up of seven stars, with the two stars forming the outer lip of the Dipper known as the “pointer stars”because they point to Polaris. Imagine a line from the outer bottom star to the outer top star of the bucket, then extend the line about five times the distance between the pointer stars. The North Star will be along this line. Cassiopeia has five stars that form a W on its side. The North Star is straight out from Cassiopeia’s center star. After locating the North Star, you can locate true north (the direction to the North Pole) by drawing an imaginary line straight down to the horizon.
+Tip: Try this trick if you can’t find a map with distances between trail junctions or the key distances that you want to know. Hold a string to the map’s scale, and mark the string to match miles, half miles, and more if you need to. You can then use the string to measure distances on the trail or map, which will give you a fairly accurate measure of distances. Since the trail or path you took or will take is not a straight line, it is hard to accurately measure the distance of a convoluted path without the use of a string. Bend the string to follow the curves of the route, then mark the end of the section that you desire to measure on the string or hold your finger in place. Measure the distance on the string using the map’s scale in the legend. This method will give you a more accurate distance.
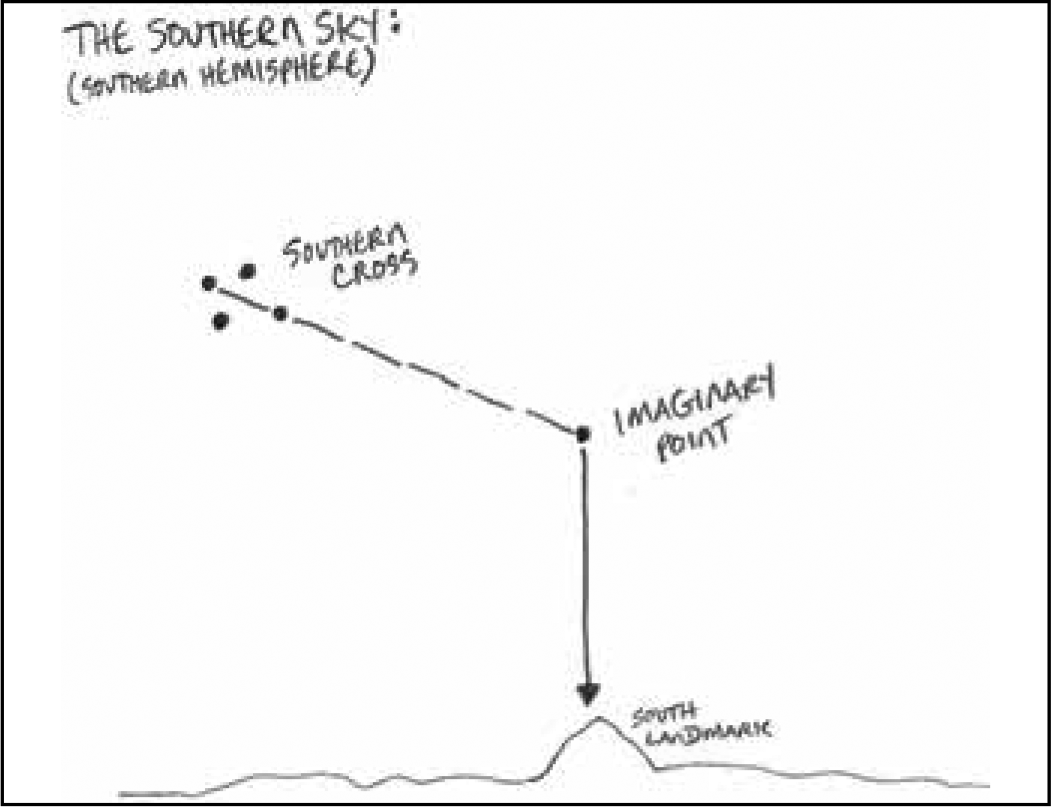
✵ In the southern hemisphere, look for the Southern Cross. It has five stars, and its four brightest stars form a cross that tilts to one side. The two stars that make up the long access are the pointer stars. To locate south, imagine a distance five times the distance between the pointer stars, and extend this distance from the lower pointer star. The point where the imaginary line ends is in the general direction of south. Look to the horizon, and locate a landmark below this point to act as a bearing.
+Tip: It is a common misconception that if you are lost, you should try to follow a creek or river downstream to civilization. This is often not the best approach. In some areas rivers flow directly into the ocean and there is no civilization along the route. In other places the river has carved a canyon with dangerous drop-offs and no possible exit. In the Intermountain West of the United States, many of the water sources eventually flow to inland basins, only to evaporate in the summer heat. A map will dictate what you should do. But if you don’t have a map, it is best to get a view from a high point and make your plans and travel path accordingly. Your knowledge of settlements and the specific area you are in will also guide your egress route.
SIGNALING FOR HELP WITH WHAT YOU HAVE
Here are some options to signal for help:
✵ Three of anything is considered the universal sign for help. This includes three consecutive blows on a whistle (use two fingers if you aren’t carrying a whistle) and three successive flashes from a headlamp or flash on your camera (it helps to be in an open area). Many headlamps now also have strobe features.
✵ Lay out bright clothes in an open area in a line or a triangle.
✵ Try using your cell phone to call or text; 911 calls will work on any network. If texting, text your location and condition to your entire contacts list. Save your battery by only turning on your cell phone for a few minutes each day.
✵ Make a fire in an open area to signal your location, or make three fires in the shape of a triangle. If it is daytime and a fire will be hard to see, add wet leaves, green wood, or green vegetation to create smoke and make your fires more visible.
+Tip: When making a triangle or X using any of the above methods, remember that you are signaling to someone in the air. Try to contrast the color of the rocks against the ground. If you are on snow, get dark-colored tree branches or rocks. If you are in a meadow, get light-colored objects. Also make the triangle bigger than you might think you need. The sides should be at least 3 feet wide and 18 feet long.
✵ You can use your cell phone or GPS screen to reflect the sunlight between two fingers. Point the sun reflection at your target and move it back and forth between your fingers to signal.
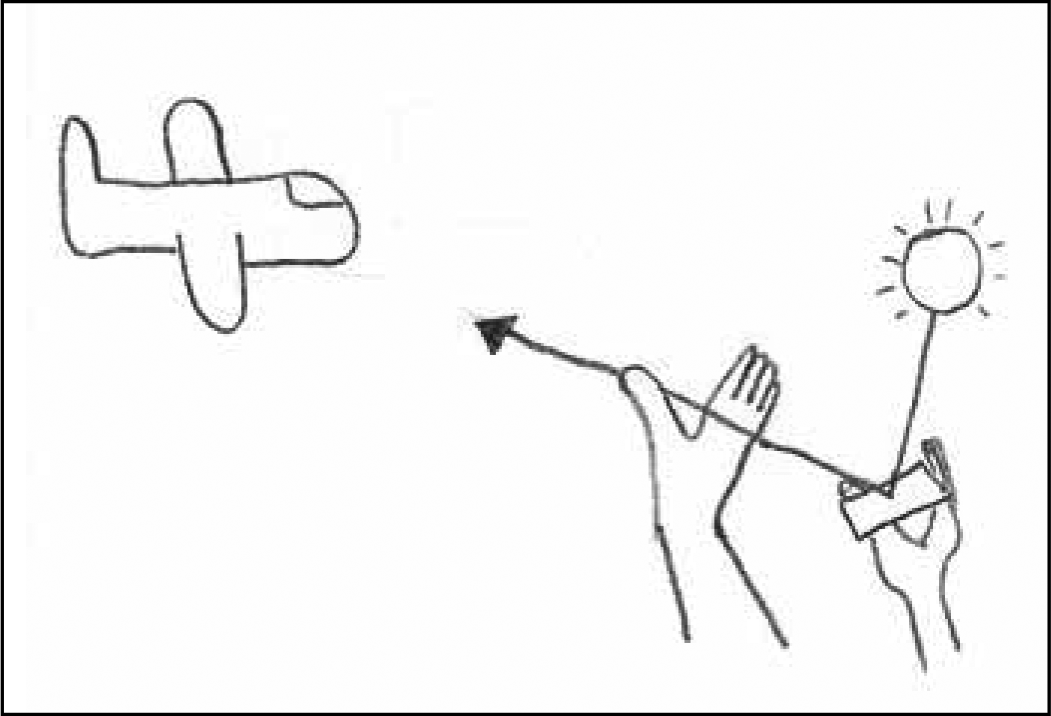
✵ Pull a metallic-lined food wrapper tight and reflect the sun’s light with it, signaling the same way as above.
✵ If the ground is snow-covered, pile dark-colored objects, like rocks or branches, in an X shape in an open area on top of the snow. If you can’t get to the rocks, you can walk and pack down the snow so it is clearly human-made. When doing this, keep in mind the orientation of the X since ideally you would want the shadow in the trough to be present in the snow most of the day.
If you move to a different location, make sure to leave signs indicating your direction of travel and your planned route.