Eat Yourself Fit: Make Your Workout Work Harder - Rosanna Davison (2016)
PART 7. EAT YOURSELF FIT RECIPES
POWER-PACKED MAINS
Fitness tip
Complete sources of PROTEIN, COMPLEX CARBS and some HEALTHY FATS are all important for building and maintaining lean muscle, reducing body fat and sustaining ENERGY LEVELS. Every one of these power-packed mains, soups and salads is designed to boost vitality and support and improve fitness levels and body composition, depending on your personal goals. Some are LOW-CALORIE and some are more hearty, but all are packed with DELICIOUS FLAVOURS, simple to make and created to help you reach your highest HEALTH and FITNESS POTENTIAL.

Lean Green Soup
SERVES 5-6 | PER SERVING: 74 CALORIES | 4.3G PROTEIN | 13G CARBS | 1.3G FAT
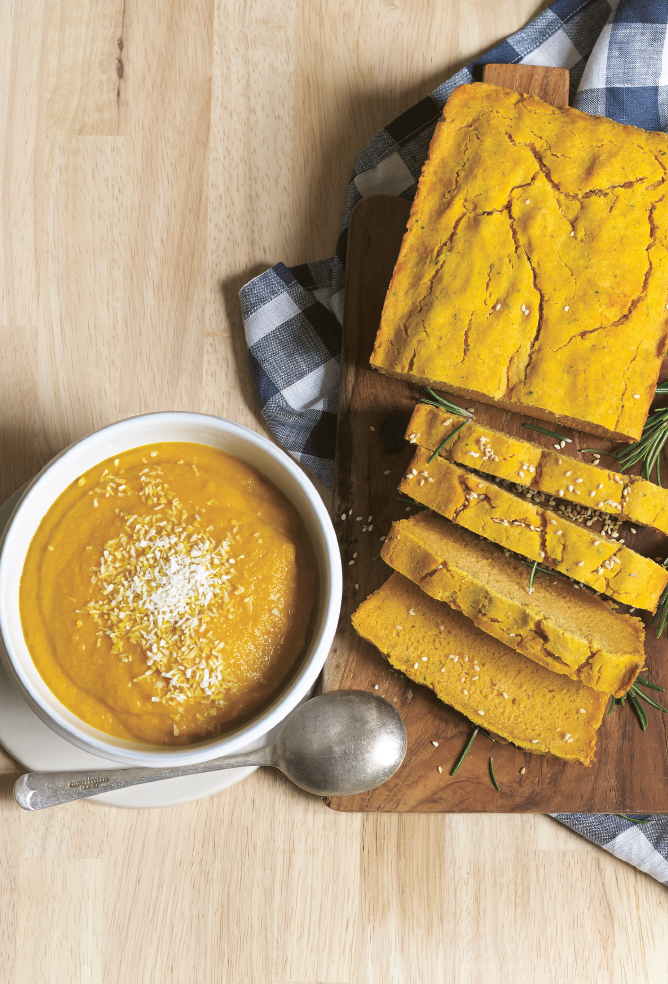
Green smoothies are a wonderful addition to your diet in warmer months, but when your body craves hot food in wintertime, this soup is perfect for boosting your intake of greens and increasing your energy levels too. Filling and rich in fibre yet low in calories, it’s ideal for making in a big batch and enjoying over a few days. I love it with a slice of the toasted roast garlic and rosemary bread here.
2 tbsp low-sodium tamari or water
1 red onion, finely diced
3 garlic cloves, minced
1 tsp finely chopped fresh ginger
3 courgettes, sliced
200g fine green beans, chopped
200g frozen peas
135g broccoli florets
1.2 litres low-sodium vegetable stock
3 tbsp fresh mint leaves
1 tsp dried thyme
pinch of dried chilli flakes (optional)
sea salt and freshly ground black pepper

1Heat the tamari or water in a large saucepan set over a medium heat, then add the onion, garlic and ginger and cook for 4-5 minutes, until the onions have softened. Add the courgettes, green beans, peas and broccoli and cook for 3-4 minutes, stirring well. Add the stock, mint, thyme, chilli flakes, if using, and some seasoning. Bring it to the boil for 3-4 minutes, then lower the heat and allow the vegetables to simmer for 25-30 minutes, until soft.
2Transfer the soup to a blender or else use a hand-held blender to blitz the soup until smooth. Taste and adjust the seasoning if necessary. Serve hot. Any leftovers can be stored in an airtight container in the fridge for three or four days or frozen for up to three months.
Carrot, Coconut and Red Lentil Soup
SERVES 2 | PER SERVING: 266 CALORIES | 12G PROTEIN | 50G CARBS | 3.3G FAT
Carrot and coconut work deliciously well to produce a smooth, creamy texture, while the split red lentils add a blast of high-fibre protein for a soup that will keep you feeling full for hours.
2 tbsp low-sodium tamari or water
1 red onion, finely chopped
2 garlic cloves, minced
1 tbsp finely chopped or grated fresh ginger
8 medium carrots, cut into chunks
2 celery stalks, cut into chunks
2 tsp chopped fresh thyme or 1 tsp dried thyme
500ml low-sodium vegetable stock
250ml low-fat coconut milk
4 tbsp split red lentils
1 tbsp fresh lemon juice
2 tsp smoked paprika
1 tsp ground turmeric
sea salt and freshly ground black pepper
2 tsp unsweetened desiccated coconut, to garnish

1In a large saucepan set over a medium-high heat, heat up the tamari or water. Add the onion, garlic and ginger and cook for 4-5 minutes, until the onion begins to soften. Add the carrots, celery and thyme and cook for 5-6 minutes, until the carrots begin to soften, stirring frequently.
2Add the vegetable stock, coconut milk, lentils, lemon juice, smoked paprika, turmeric and salt and pepper to taste. Ensure that the vegetables are fully covered in the liquid, then partly cover the saucepan with a lid, turn the heat up and bring to the boil for 2-3 minutes. Bring the heat down to medium and allow the soup to simmer for 15-20 minutes, until the carrots are soft and the lentils are cooked through.
3Transfer the soup to a blender and blitz on high power until the soup is smooth and creamy, or use a hand-held soup blender to blend it in the saucepan. Serve hot, topped with a sprinkle of desiccated coconut. Any leftovers can be stored in a covered container in the fridge for three or four days.
Curried Cauliflower and Sweet Potato Soup
SERVES 4 | PER SERVING: 126 CALORIES | 6.1G PROTEIN | 26.8G CARBS | 0.8G FAT
Cauliflower and curry spices make a delicious duo and work perfectly with the caramelised sweetness of roast sweet potato and garlic. This is my idea of a perfect lunch.
coconut oil, to grease
1 head of cauliflower, cut into florets
2 medium sweet potatoes, peeled and cut into chunks
2 garlic cloves, peeled
sea salt and freshly ground black pepper
3 tbsp tamari
1 red onion, finely sliced
1 tbsp curry powder
2 tsp finely chopped fresh ginger
750ml low-sodium vegetable stock
1 tsp ground turmeric
pinch of cayenne pepper (optional)
2 tbsp chopped fresh coriander, to garnish

1Preheat the oven to 190°C. Lightly grease a large baking tray with coconut oil or line with non-stick baking paper.
2Spread out the cauliflower florets, sweet potato chunks and garlic cloves on the lined tray and lightly season with sea salt and black pepper. Place the tray in the oven and roast the vegetables for 30-35 minutes, until lightly golden and crisp. Set aside.
3Heat up the tamari in a large saucepan set over a medium heat. Sauté the onion for 2-3 minutes, until it begins to soften, then add the curry powder and ginger and continue to stir for another 1-2 minutes. Add the vegetable stock to the saucepan, followed by the roast cauliflower, sweet potato and garlic, then stir in the turmeric, cayenne pepper, if using, and some salt and pepper. Bring the soup to the boil for 2-3 minutes, then cover partly with a lid, lower the heat and allow it to simmer gently for about 10 minutes.
4Transfer the soup to a blender and blend on high until smooth, or keep it in the saucepan and use a hand-held blender to blend the ingredients into a soup. Serve hot garnished with the chopped fresh coriander. Any leftovers can be stored in a covered container in the fridge for up to four days.
Skinny Cauliflower Tabbouleh with Toasted Sesame Seeds
SERVES 4 | PER SERVING: 66 CALORIES | 1.7G PROTEIN | 8.3G CARBS | 3.6G FAT
This version of tabbouleh contains all the familiar flavours of the traditional dish, including plenty of parsley, but uses finely processed cauliflower to make it a lighter alternative.
4 tbsp sesame seeds
500g cauliflower
60g fresh flat-leaf parsley, chopped
20g fresh mint leaves, chopped
1 red onion, finely chopped
1 garlic clove, minced
15 cherry tomatoes, quartered
10-12 pitted Kalamata or other black olives (optional)
¼ cucumber, chopped into cubes
2 tbsp fresh lemon juice
2 tbsp tamari
2 tsp cold-pressed extra virgin olive oil
1 tsp smoked paprika
pinch of dried chilli flakes (optional)
sea salt and freshly ground black pepper

1Preheat the oven to 180°C.
2Spread out the sesame seeds on a small tray. Toast for 10-12 minutes, until golden. Remove from the oven and set aside.
3Rinse the cauliflower and cut into chunks. Place it in a food processor and pulse until it becomes like coarse grains, similar to couscous. Transfer to a large mixing bowl and add the remaining ingredients.
4Top with the toasted sesame seeds and serve chilled. Any leftovers can be stored in an airtight container in the fridge for three or four days.
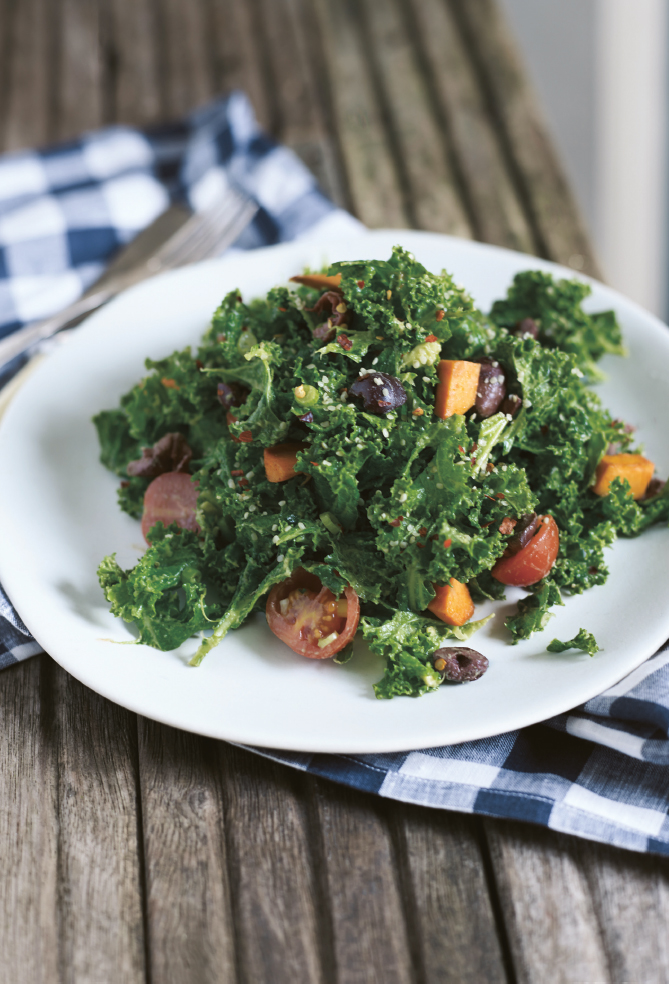
The Ultimate Kale Salad
SERVES 2 | PER SERVING: 434 CALORIES | 20G PROTEIN | 47.6G CARBS | 22.8G FAT
A hearty, wholesome and satisfying kale salad, this is one of my absolute favourite go-to healthy meals. Massaging the avocado, lemon juice and sea salt into the kale helps to break down its waxy leaves and gives a delicious taste and texture to the salad.
coconut oil, to grease
1 medium sweet potato, peeled and cut into bitesized chunks
3 tbsp tamari
½ tsp smoked paprika
200g fresh kale
1 ripe avocado
4 tbsp nutritional yeast (optional but advised)
2 tbsp fresh lemon juice
sea salt and freshly ground black pepper
10-12 cherry tomatoes, halved
10-12 Kalamata or other black olives, pitted
4 spring onions, chopped
pinch of dried chilli flakes (optional)
2 tbsp hulled hemp seeds

1Preheat the oven to 200°C. Lightly grease a baking tray with coconut oil or line non-stick baking paper.
2Spread the sweet potato chunks out on the tray. Drizzle with 1 tablespoon of the tamari, then sprinkle on the smoked paprika. Roast in the oven for 20-25 minutes, until golden brown and crisp. Set aside.
3Wash the kale well and pat dry. Remove the tough stems, then tear the leaves into smaller pieces and place in a large mixing bowl.
4Cut the avocado in half, remove the stone and scoop out the flesh into the mixing bowl. Add the nutritional yeast, lemon juice and a pinch of salt and pepper. Using your hands, massage the mixture into the kale leaves until they become tender and well coated, then top with the roast sweet potato, cherry tomatoes, olives, spring onions and chilli flakes, if using. Drizzle on the remaining 2 tablespoons of tamari and mix everything together well.
5Divide into serving bowls, top with hemp seeds and serve. Any leftovers can be stored in an airtight container in the fridge for up to three days.
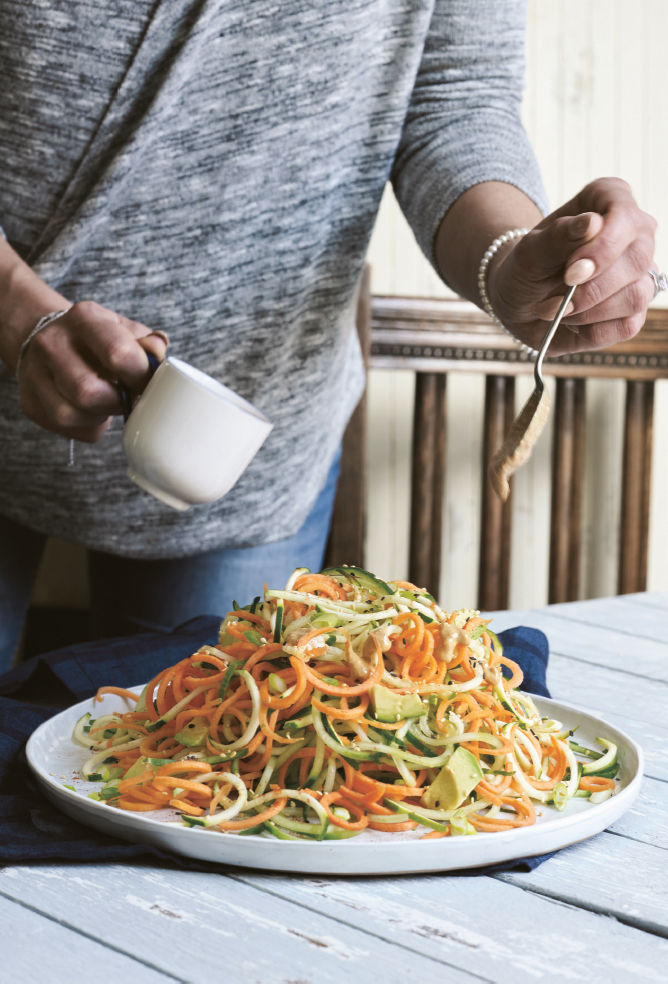
Carrot Noodle Salad with Ginger-Miso Dressing
SERVES 2 | PER SERVING: 204 CALORIES | 5.4G PROTEIN | 17.9G CARBS | 14.4G FAT
Crisp and creamy, this nutritious salad makes a great light meal drizzled with a tangy ginger-miso dressing and topped with crunchy sesame seeds.
1 tbsp sesame seeds
2 large carrots
1 courgette
1 cucumber
½ ripe avocado, stoned, halved and cut into cubes
4 spring onions, finely chopped
2 handfuls of fresh coriander, chopped
FOR THE GINGER-MISO DRESSING:
juice of ½ fresh lime
3 tbsp cold water
1 tbsp tahini
1 tsp miso paste
½ tsp chopped fresh ginger
½ tsp smoked paprika
½ tsp Japanese ume plum seasoning
sea salt and freshly ground black pepper

1Preheat the oven to 190°C.
2Spread the sesame seeds on a small tray. Toast in the oven for 8-10 minutes, until lightly browned. Allow to cool while you prepare the rest of the salad.
3Prepare the carrot, courgette and cucumber noodles using a spiraliser or vegetable peeler and place in a large mixing bowl. Add the avocado, spring onions and coriander and mix well.
4Place all the ginger-miso dressing ingredients in a blender or food processor and blitz until smooth and creamy. Taste and season as needed. Pour the dressing over the vegetables and toss them in the dressing.
5Divide the salad between two bowls and top with the toasted sesame seeds.
Ginger, Chilli and Lime Broccoli with Toasted Sesame Seeds
SERVES 2 | PER SERVING: 65 CALORIES | 3.1G PROTEIN | 10G CARBS | 2.6G FAT
This is one of the best ways to dress up steamed broccoli and turn it into a really tasty little side dish or as part of your main meal. As a filling and fibre-rich but low-calorie, low-carb vegetable, broccoli is a great food for anyone on a mission to lose a few pounds of body fat.
1 tbsp sesame seeds
1 head of broccoli, broken into florets
1 garlic clove, minced
¼ red chilli, deseeded and finely chopped
1 tbsp tamari
1 tbsp fresh lime juice
1 tsp finely chopped or grated fresh ginger
sea salt and freshly ground black pepper

1Preheat the oven to 190°C.
2Spread the sesame seeds out on a small baking tray. Toast in the oven for 10-12 minutes, until golden, then set aside.
3Half fill a medium-sized saucepan with cold water and top with a steamer basket or colander to steam the broccoli. Heat the water over a medium-high temperature until the water starts to simmer, then spread the broccoli evenly across the basket and cover with a lid. Steam the broccoli for just 4-5 minutes, until it has softened but remains quite crunchy.
4Transfer the broccoli to a mixing bowl and add the garlic, chilli, tamari, lime juice, ginger, toasted sesame seeds and some salt and pepper. Toss all the ingredients together well and serve.
5Any leftovers can be stored in an airtight container in the fridge for up to three days.
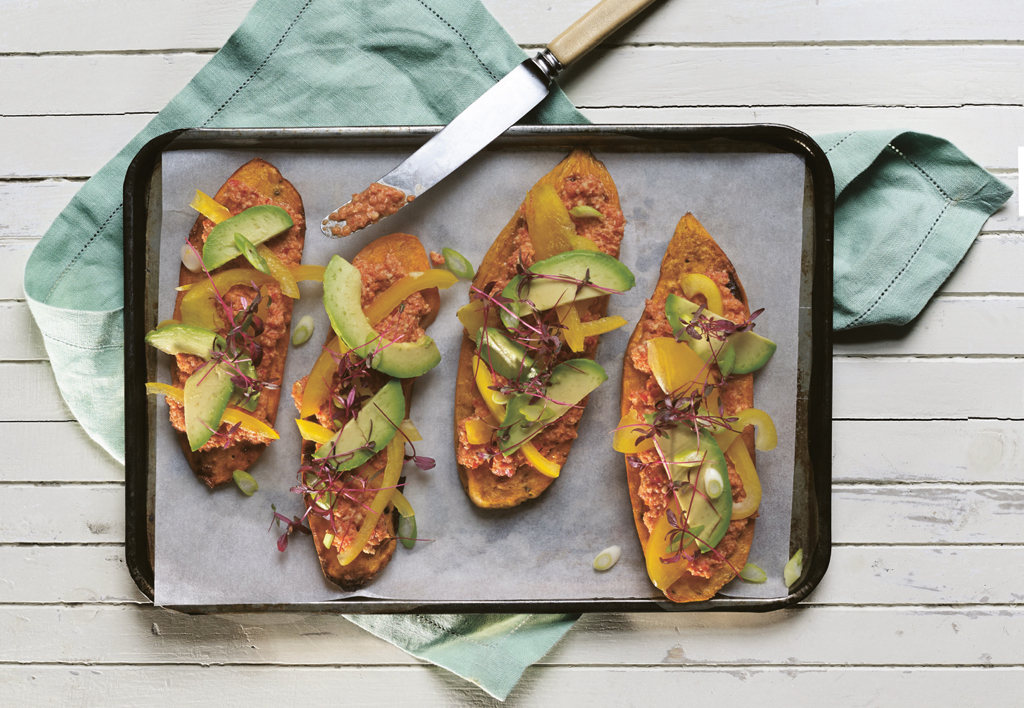
Sweet Potato and Avocado Bruschetta with Smoky Red Pepper Hummus
SERVES 2 | PER SERVING: 536 CALORIES | 11.4G PROTEIN | 51.3G CARBS | 25.2G FAT
The Italian favourite just got a whole lot healthier with my crisp, roasted sweet potato version of bruschetta. Normally made using bread, the slices of sweet potato are more filling and nutritious, topped with a thick spread of smoky red pepper hummus and chopped veggies.
coconut oil, to grease
2 medium sweet potatoes
1 tbsp tamari
1 tsp smoked paprika
sea salt and freshly ground black pepper
1 ripe avocado, halved, stoned and thinly sliced
1 yellow or red bell pepper, deseeded and finely sliced
2 spring onions, thinly sliced
1 handful of fresh coriander, chopped
FOR THE SMOKY RED PEPPER HUMMUS:
50g raw walnuts, chopped
2 large red bell peppers, deseeded and roughly chopped
1 garlic clove, chopped
2-4 tbsp unsweetened almond milk, to blend
1 tsp smoked paprika
pinch of cayenne pepper (optional)

1Preheat the oven to 200°C. Lightly grease a baking tray with coconut oil or line with a sheet of non-stick baking paper.
2Peel the sweet potatoes and use a sharp serrated knife to slice each of them lengthways into three slices (make it four slices if you prefer them thinner). Lay out the slices on the baking tray, drizzle with the tamari and sprinkle with smoked paprika and some salt and pepper to taste. Bake the potatoes in the oven for 20-25 minutes, until they turn golden brown and crisp around the edges. Remove from the heat and set aside.
3To make the hummus, place all the ingredients in a food processor or blender. If you think your machine will have trouble blending the walnuts, soak them first in a bowl of cold water for 1-2 hours. Blend on a high speed until the mixture is smooth, using extra almond milk or water to help it blend if necessary. Season to taste with salt and pepper.
4Spread the hummus on top of the sweet potato bruschetta, then top with some avocado, pepper, spring onions and coriander. Season again as needed. Any leftovers can be stored in an airtight container in the fridge for two or three days.
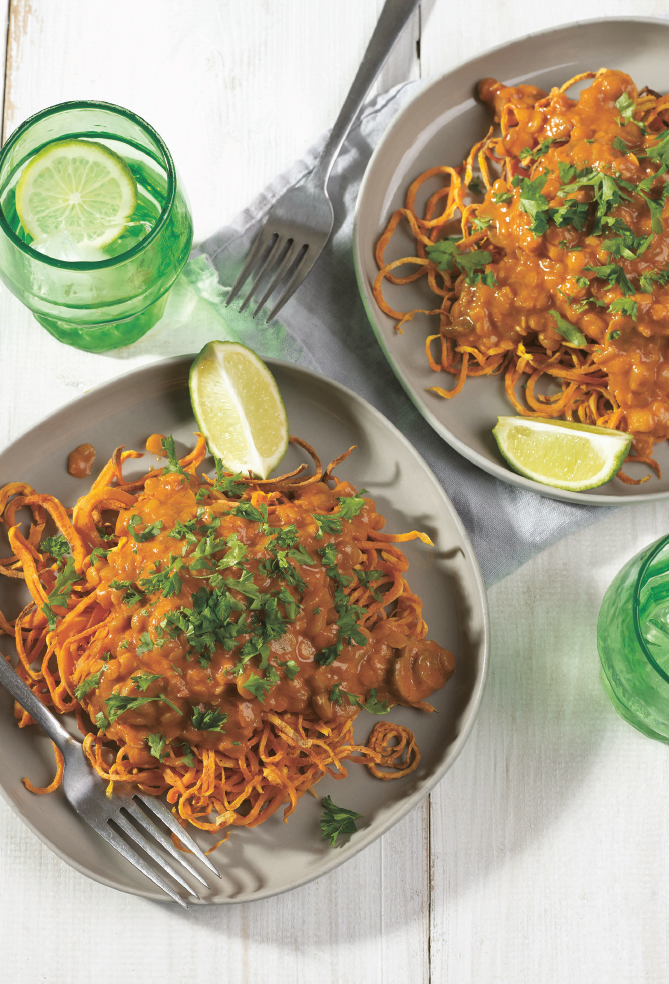
Baked Sweet Potato Noodles with Red and Yellow Dahl
SERVES 2 | PER SERVING: 385 CALORIES | 27.2G PROTEIN | 43G CARBS | 14.8G FAT
Baked sweet potato noodles are one of my favourite meals because they’re so healthy, versatile and can be prepared with many different flavours. I’ve paired them here with a protein- and fibre-rich coconut milk dahl made with red lentils and split yellow peas for a really nourishing yet low-calorie meal.
FOR THE BAKED SWEET POTATO NOODLES:
coconut oil, to grease
1 large or 2 medium sweet potatoes
1 tsp smoked paprika
sea salt and freshly ground black pepper
FOR THE LENTIL DAHL:
2 tbsp low-sodium tamari or water
1 small or medium red onion, diced
1 garlic clove, minced
1 tsp chopped fresh ginger
625ml low-fat coconut milk
4 tbsp tomato purée
2 tsp smoked paprika
1 tsp ground turmeric
1 tsp ground coriander
pinch of dried chilli flakes
95g white mushrooms, sliced
90g split yellow peas
90g split red lentils
1 handful of fresh parsley, chopped, to serve
lime wedges, to serve

1Preheat the oven to 190°C. Lightly grease a baking tray with coconut oil or line it with a sheet of non-stick baking paper.
2Peel the sweet potato and cut off the pointed ends. Process the sweet potato through a spiraliser or vegetable peeler to create noodles. Spread the noodles out on the tray and sprinkle with the smoked paprika and salt and pepper to taste.
3Bake the noodles for 15-20 minutes, until they begin to turn golden brown. Toss them with a fork halfway through the baking time to turn them over. When baked, remove the tray from the oven and set aside.
4In a saucepan set over a medium heat, heat up the tamari or water and cook the onion, garlic and ginger for 3-4 minutes, until they soften. Add the coconut milk, tomato purée, spices and seasoning and mix well, then add the mushrooms, split peas and lentils. Partly cover the saucepan with a lid and allow the mixture to simmer for 15-20 minutes, stirring regularly to ensure it doesn’t burn. Remove the lid for the final few minutes to allow any liquid to evaporate more quickly, or else add some warm water if it appears too thick. Taste at this point and adjust the seasoning if necessary.
5Serve the noodles topped with the lentil dahl. Sprinkle with the chopped parsley and place some lime wedges on the side.
Coconut, Chickpea, Spinach and Sun-Dried Tomato Stew
SERVES 4 | PER SERVING (WITH QUINOA): 339 CALORIES | 15.6G PROTEIN | 57.3G CARBS | 8G FAT
Chickpeas, spinach and sun-dried tomatoes are three of my favourite foods, so it made sense to gather them all into one deliciously warming stew. This is a great meal to make in a big batch at the beginning of the week and eat over a few days. Enjoy it with a side of fluffy quinoa for a nourishing, low-fat and high-protein meal.
2 tbsp low-sodium tamari or water
1 small red onion, finely chopped
55g sun-dried tomatoes, chopped
4 garlic cloves, minced
1 tbsp grated fresh ginger
zest of 1 lemon
pinch of dried chilli flakes (optional)
1 x 400g tin of cooked chickpeas, drained and rinsed
200g baby spinach
1 x 400ml tin of low-fat coconut milk, shaken well before opening
2 tbsp fresh lemon juice
2 tsp smoked paprika
1 tsp ground turmeric
sea salt and freshly ground black pepper
180g quinoa
chopped fresh coriander, to garnish
unsweetened desiccated coconut, to garnish

1In a large saucepan set over a medium-high heat, heat up the tamari or water. Add the onion and cook for about 5 minutes, until the onion starts to soften. Add the sun-dried tomatoes, garlic, ginger, lemon zest and chilli flakes, if using. Cook for 3 minutes, stirring frequently to prevent them from burning.
2Turn the heat up to high and add the chickpeas. Cook for 2-3 minutes, until they’re coated with the garlic, ginger and onion mixture and are beginning to turn golden. Add the spinach to the saucepan one handful at a time, stirring to allow it to wilt. Pour in the coconut milk and add the lemon juice, smoked paprika, ground turmeric, salt and pepper. Bring the stew to a simmer, then turn down the heat and cook for 10 minutes, until the chickpeas are warmed through. Taste and add more salt and lemon juice, if desired.
3Meanwhile, to cook the quinoa, first rinse it well in a sieve under cold running water. Place the rinsed quinoa in a medium-sized saucepan and cover with double its volume of water. Cover the saucepan partly with the lid and bring it to the boil for 2-3 minutes, then lower the heat and allow it to simmer for 10-12 minutes, until most of the water has evaporated and the quinoa seeds have opened out. Remove from the heat and set aside to absorb the remaining water. Season with a pinch of sea salt and freshly ground black pepper.
4When you’re ready to serve, use a fork to fluff up the quinoa. Divide the quinoa between four bowls and top with the stew. Garnish with the chopped coriander and unsweetened desiccated coconut.
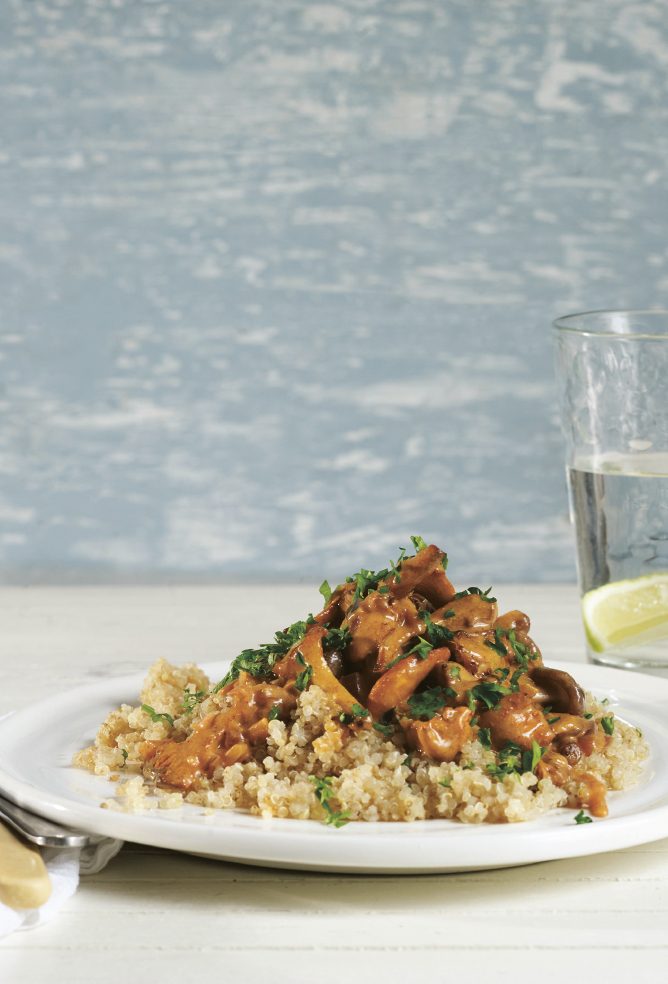
Creamy Mushroom and Quinoa Stroganoff
SERVES 2 | PER SERVING: 286 CALORIES | 27.6G PROTEIN | 56.2G CARBS | 16.4G FAT
This is one of my favourite hearty and healthy comfort food meals, perfect for those that crave a ‘meatier’ texture. Made with chunky mushrooms and a smooth and creamy herbed sauce, it’s rich in flavour and super satisfying served with quinoa.
2 tbsp low-sodium tamari or water
1 red onion, finely chopped
2 garlic cloves, minced
500g sliced Portobello or white mushrooms, chopped
125ml low-sodium vegetable stock
2 tbsp low-fat coconut milk
1 tbsp fresh lemon juice
3 tbsp nutritional yeast
1½ tsp smoked paprika
1 tsp Dijon mustard
pinch of cayenne pepper
sea salt and freshly ground black pepper
1 handful of fresh parsley, finely chopped, plus extra to garnish
90g quinoa

1Heat the tamari or water in a large saucepan and add the onion and garlic. Cook for 4-5 minutes, until the onion softens. Add the mushrooms and cook for another 8-10 minutes, until lightly browned. Add the vegetable stock, coconut milk and lemon juice, then stir in the nutritional yeast, smoked paprika, mustard, cayenne pepper and seasoning. Partly cover the saucepan and simmer for 5-6 minutes. Lower the heat, remove the lid and stir the mixture, allowing any excess liquid to evaporate. Add the parsley, stir well and adjust the seasoning as needed. Remove from the heat and set aside.
2To cook the quinoa, first rinse it well under cold running water. Place the quinoa into a medium-sized saucepan and cover with double its volume of water. Cover the saucepan partly with the lid and bring it to the boil for 2-3 minutes, then lower the heat and allow it to simmer for 10-12 minutes, until most of the water has evaporated and the quinoa seeds have opened out. Remove from the heat and set it aside to absorb the remaining water. Season with a pinch of sea salt and freshly ground black pepper.
3To serve, use a fork to fluff up the quinoa. Divide it between two bowls or plates and serve the mushroom stroganoff on top, garnished with fresh parsley. Any leftovers can be stored in a covered container in the fridge for two or three days.
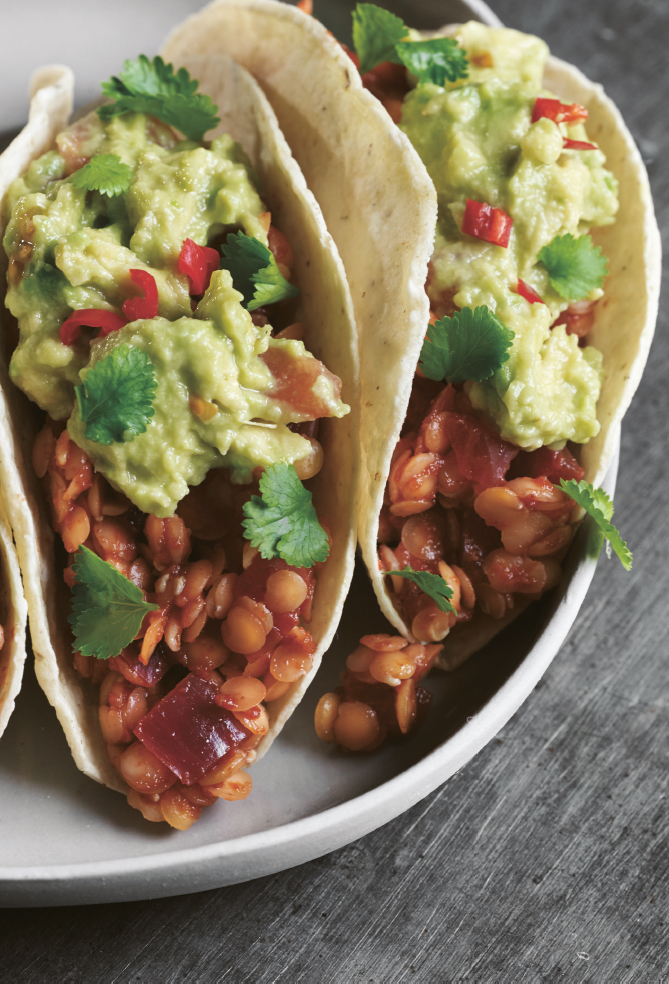
Lime and Chilli Red Lentil Tacos with Guacamole
SERVES 4 | PER SERVING (WITH GUACAMOLE): 357 CALORIES | 13.8G PROTEIN | 28G CARBS | 8.2G FAT
Lentils are one of the best foods for keeping body fat low and building lean muscle. As a complete protein, they contain all the essential amino acids plus fibre, minerals and antioxidants. I love split red lentils as they’re easy and quick to cook, and they taste great mixed with spices and served with guacamole. Avocado helps to build smooth, firm, plump skin and it quenches dehydrated skin with plenty of essential fatty acids. The vitamin C in the lemon boosts collagen production for a younger-looking complexion.
500ml water
200g split red lentils
2 tbsp low-sodium tamari or water
1 red onion, finely chopped
2 garlic cloves, minced
2 tbsp tomato purée
1 tsp smoked paprika
½ tsp ground cumin
zest and juice of 1 lime
pinch of dried chilli flakes (optional)
sea salt and freshly ground black pepper
tortilla wraps, taco shells or 2 heads of iceberg lettuce, to serve
fresh coriander leaves, to garnish
FOR THE GUACAMOLE:
2 ripe avocados, halved and pitted
2 medium tomatoes
2 garlic cloves, peeled
2 tbsp fresh lemon juice
1 tsp smoked paprika
pinch of cayenne pepper (optional)

1Heat the water in a medium saucepan set over a medium-high heat and add the dried lentils. Bring the water up to the boil for 2-3 minutes, then lower the heat, partly cover the saucepan with a lid and simmer for 15-20 minutes, until the lentils are soft and cooked through. Remove from the heat and drain away any excess water.
2While the lentils cook, heat up the tamari or water in a saucepan or frying pan. Cook the onion and garlic until golden and the onion starts to soften. Remove from the heat and place in a mixing bowl. Add the tomato purée, smoked paprika, ground cumin, lime zest and juice, chilli flakes, if using, and seasoning to taste. Combine everything together, then add the cooked lentils and mix together well. Taste and adjust the seasoning as needed.
3To make the guacamole, scoop the soft avocado flesh into a blender or food processor, followed by the rest of the ingredients. Blend until well combined, but leave some chunks if preferred. Taste and adjust the seasoning if necessary.
4Serve the lentils topped with a dollop of guacamole in tortilla wraps or taco shells or use iceberg lettuce leaves for a low-carb option. Garnish with a few coriander leaves. Any leftovers can be stored in an airtight container in the fridge for three or four days, but guacamole is best eaten on the day it’s made.
Thai-Spiced Veggie Burgers with a Spicy Peanut Sauce
MAKES 6-8 | BURGERS PER SERVING: 226 CALORIES | 10.3G PROTEIN | 23G CARBS | 11.3G FAT
I adore Thai food and the wonderful array of herbs and spices used in traditional cooking. For this recipe I have combined some of my favourite flavours with sweet potato, kidney beans and an irresistible spicy peanut sauce.
1 large or 2 medium
sweet potatoes
3 garlic cloves, minced
8g fresh coriander, finely chopped
6 tbsp hulled hemp seeds
2 tsp finely chopped or grated fresh ginger
70g gluten-free rolled oats
1 x 400g tin of red kidney beans, drained and rinsed
2 tbsp milled flaxseeds
4 tbsp cold water
juice of ½ lime
1 tbsp tamari
½ tbsp coconut oil, melted, plus extra to grease
1 tsp smoked paprika
sea salt and freshly ground black pepper
6-8 Portobello mushrooms, to serve
iceberg lettuce leaves, to serve
FOR THE SPICY PEANUT SAUCE:
95g smooth peanut butter (look for an organic brand free from added sugar and palm oil)
1 garlic clove, peeled
juice of 1 lime
2 tbsp tamari
1 tsp finely chopped or grated fresh ginger
5-6 drops of liquid stevia or 1 tsp honey (optional)
pinch of dried chilli flakes
sea salt and freshly ground black pepper
dash of almond milk, to blend

1Preheat the oven to 190°C. Lightly grease two baking trays with coconut oil or line with non-stick baking paper.
2Peel the sweet potato and use a regular box grater to grate it into a large mixing bowl. Add the garlic, coriander, hemp seeds and ginger and mix together well.
3Place the oats in a blender or food processor and blend on high for 1-2 minutes, until a coarse flour forms. Add the oat flour to the bowl with the sweet potato mixture.
4Add the kidney beans to the blender or food processor and process until they become a coarse, chunky paste. Add them to the mixing bowl with the sweet potato and oat flour and mix well.
5Mix together the flaxseeds and water in a small bowl to make a flax ‘egg’ and let it sit for 5 minutes to thicken up, then add it to the kidney bean, oat and vegetable mixture and mix well. Stir in the lime juice, tamari, melted coconut oil, smoked paprika and salt and pepper to taste.
6Use the palms of your hands to shape the mixture into 6-8 burger patties, pressing them together to ensure they hold together well. Place each one onto one of the prepared baking trays and bake in the oven for 15-20 minutes. Flip over each burger and continue to bake for another 10-15 minutes, until golden.
7As the burgers bake, place the Portobello mushrooms on the other prepared baking tray and roast them in the oven along with the burgers for 20-25 minutes.
8Make the peanut sauce by adding all the sauce ingredients to a blender or food processor and blending until smooth and creamy. Taste and adjust the seasoning if necessary.
9Serve the burgers sitting on top of the roast mushrooms or in an iceberg lettuce wrap and drizzle with peanut sauce. Store any leftovers in an airtight container in the fridge for three or four days.
Spicy Cauliflower and Corn Cakes
MAKES 6 CAKES | PER CAKE: 88 CALORIES | 3G PROTEIN | 17.2G CARBS | 1.8G FAT
This recipe came about when I didn’t have much more than a tin of sweetcorn in the cupboard and a cauliflower in the fridge, but it turned out to be a really tasty, low-calorie meal. As always, I’ve used plenty of herbs and spices rather than oil to create flavour, and I love the combination of garlic, ginger and cumin seeds.
coconut oil, to grease
½ head of cauliflower, chopped into florets
2 tbsp low-sodium tamari or water
1 small red onion, finely chopped
1 garlic clove, crushed
1 tsp finely chopped or grated fresh ginger
1 tbsp fresh lemon juice
1 tbsp cumin seeds
½ tsp ground turmeric
pinch of cayenne pepper
sea salt and freshly ground black pepper
240g sweetcorn
4 tbsp brown rice flour, buckwheat flour or gluten-free all-purpose flour

1Preheat the oven to 190°C. Line a baking tray with non-stick baking paper or lightly grease with coconut oil.
2Place the cauliflower in a medium saucepan and cover with water. Bring to the boil for 2-3 minutes, then lower the temperature and simmer for 5-6 minutes, until soft. Drain well.
3Heat the tamari or water in a frying pan and add the onion, garlic and ginger. Cook for 4-5 minutes, until the onion softens. Lower the temperature to medium-low and add the lemon juice, cumin seeds, turmeric, cayenne pepper and salt and pepper. Stir gently for 2-3 minutes, then remove from the heat.
4Place the cauliflower and sweetcorn in a medium-sized mixing bowl, then add the warm onion, ginger, garlic and spice mixture. Use a potato masher to mash all the ingredients together well, then stir in the flour to thicken it up and form a dough. Add a little more flour if it’s too wet or sticky.
5Divide the dough into 6 patties, using the palms of your hands to flatten and shape them, then place them on the prepared baking tray.
6Bake in the oven for 20-25 minutes, until golden brown. Serve warm with a big green salad. Any leftovers can be stored in an airtight container in the fridge for three or four days.
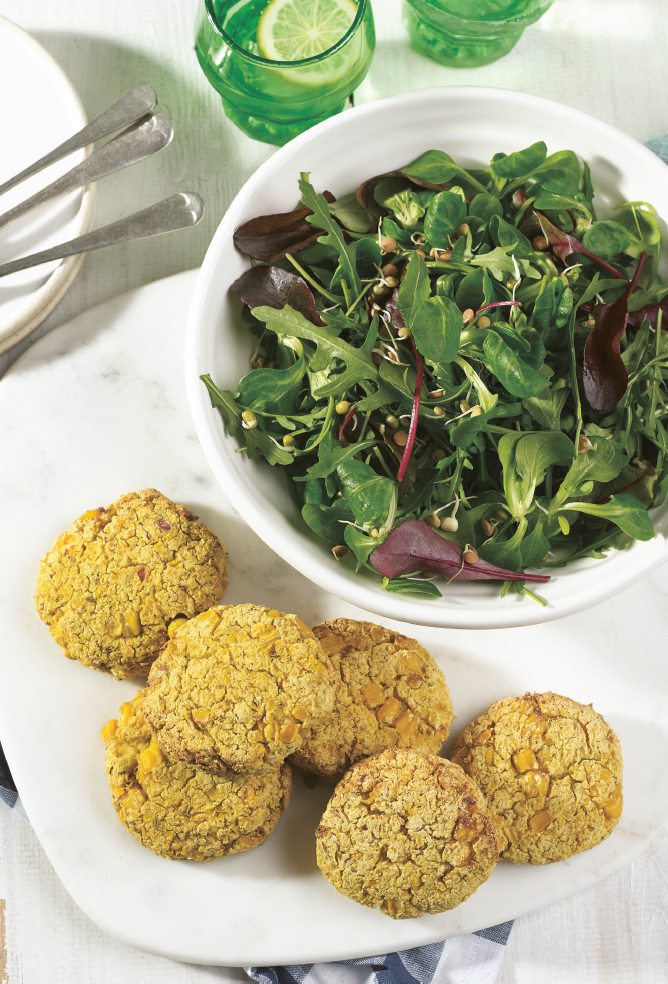
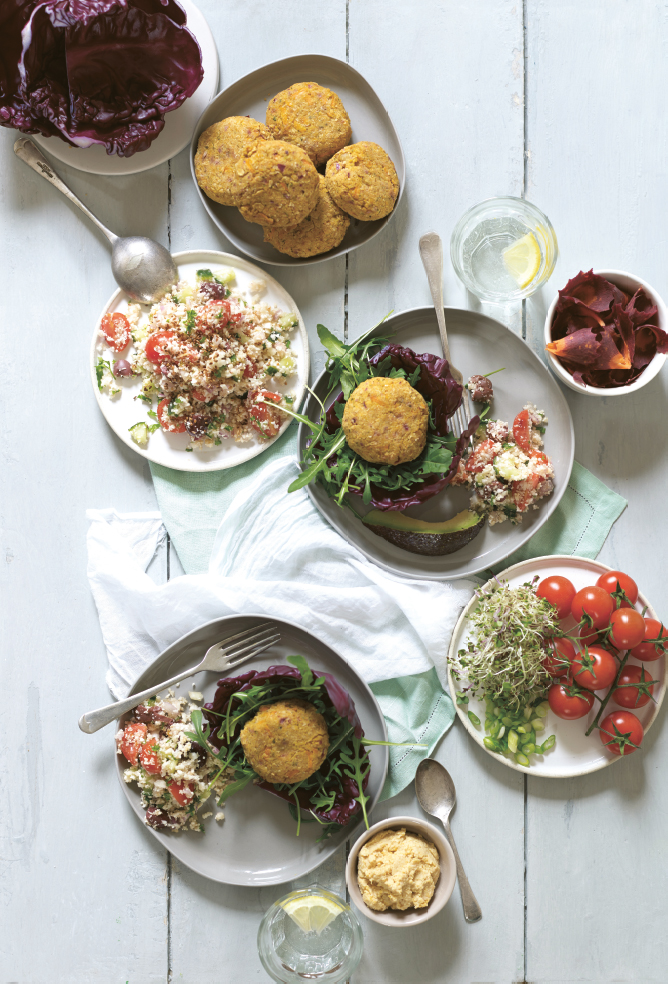
Smoky Falafel Burgers
MAKES 6-8 | PER BURGER: 97 CALORIES | 5.6G PROTEIN | 15.8G CARBS | 1.4G FAT
These healthy falafel-style burgers are delicious with a dollop of sun-dried tomato hummus (see the recipe here) in a pitta bread or in an iceberg lettuce or red cabbage wrap for a lower-carb version. The smoked paprika and metabolism-boosting cayenne pepper deliver a double dose of antioxidants, while the chickpeas, grated carrot and chickpea flour add to this meal’s protein, fibre and slow-energy release. I use chickpea flour, but rice flour, buckwheat flour, oat flour and gluten-free all-purpose flour also work well.
coconut oil, to grease
1 x 400g tin of cooked chickpeas, drained and rinsed
1 medium carrot, roughly chopped
½ red onion, roughly chopped
2 garlic cloves, peeled
1 tsp minced fresh ginger
2 tbsp nutritional yeast (optional)
2 tsp smoked paprika
1 tsp ground cumin
1 tsp ground coriander or a small handful of fresh coriander
pinch of cayenne pepper or dried chilli flakes (optional) sea salt and freshly ground black pepper
4 tbsp chickpea flour (gram flour)
2-3 tbsp unsweetened almond milk or any other plant milk
TO SERVE:
hummus (here)
gluten-free pitta bread, iceberg lettuce or red cabbage leaves

1Preheat the oven to 200°C. Line a baking tray with non-stick baking paper or lightly grease with coconut oil.
2Place the chickpeas in a food processor with the carrot, onion, garlic and ginger. Process until a coarsely ground mixture is formed. Transfer to a bowl and add the nutritional yeast, if using, spices and seasoning. Mix well. Add the flour and almond milk, stirring until the mixture thickens up. Taste and adjust the seasoning as needed.
3Use the palms of your hands to roll the mixture into 6-8 burger patties and place on the baking tray. Bake in the oven for 18-20 minutes, until they begin to crisp up and turn golden brown on the outside. Remove from the oven and allow them to cool.
4Serve with a dollop of hummus in a gluten-free pitta bread or an iceberg lettuce or red cabbage shell.
5Any leftovers can be stored in an airtight container in the fridge for three or four days.
Avocado, Lemon and Basil Pesto Courgetti
SERVES 2 | PER SERVING: 255 CALORIES | 9.4G PROTEIN | 19.9G CARBS | 17.7G FAT
Quick, healthy, fresh and zesty, this is one of my favourite simple and light yet filling meals. During the week I try to eat as cleanly as possible to really maximise the benefits of my workouts, so I always stock up on courgettes for quick courgetti lunches and dinners. The heart-healthy fats, essential minerals and antioxidant vitamins found in the avocado help to build a smooth and soft complexion, while the protein in the hemp seeds goes towards muscle recovery and repair.
2 medium-large courgettes
1 ripe avocado, halved and pitted
1 large garlic clove, peeled
2 large handfuls of fresh basil
1 handful of fresh mint leaves
2 tbsp nutritional yeast
2 tbsp fresh lemon juice
2 tbsp tamari
1 tsp smoked paprika
pinch of dried chilli flakes (optional)
sea salt and freshly ground black pepper
1 tbsp hulled hemp seeds

1Cut the ends off the courgettes and use a spiraliser or vegetable peeler to process them into noodles or ribbons. Place them in a large mixing bowl and set aside.
2Place all the remaining ingredients apart from the hemp seeds into a blender or food processor and blitz until smooth and creamy. Pour the pesto into the bowl with the courgetti and mix together well, until the noodles are well coated.
3Divide between two bowls and top with the hulled hemp seeds. Any leftovers can be stored in an airtight container in the fridge for up to three days.
Chickpea and Sesame Cakes with Spicy Mango Salsa
SERVES 2 | PER SERVING: 508 CALORIES | 20G PROTEIN | 82.7G CARBS | 14.2G FAT
Chunky chickpeas add a hearty bite to these wholesome savoury cakes and I love the juicy, fresh flavours of the spicy mango salsa. Pop a few on top of a big green salad for a healthy and satisfying meal.
1 tbsp ground flaxseeds
2 tbsp cold water
1 x 400g tin of chickpeas, drained and rinsed
25g chickpea flour, rice flour, buckwheat flour or gluten-free all-purpose flour
1 red onion, finely sliced
1 garlic clove, minced
2 tbsp sesame seeds
1 tbsp whole chia seeds
1 tbsp pumpkin seeds
1 tsp ground cumin
1 tsp smoked paprika
pinch of cayenne pepper (optional)
sea salt and freshly ground black pepper
1 tsp coconut oil
FOR THE SPICY MANGO SALSA:
1 mango, peeled, cored and cut into cubes
8 cherry tomatoes, quartered
½ red onion, finely chopped
1 jalapeño, deseeded and finely chopped
2 handfuls of fresh coriander, chopped
1 handful of fresh mint leaves, chopped
2 tbsp fresh lime juice
sea salt and freshly ground black pepper

1In a small bowl, mix together the flaxseeds and water. Set aside for 5 minutes to set into a flax ‘egg’.
2Place the flax ‘egg’ and all the remaining ingredients except the coconut oil into a food processor. Process until a sticky and slightly chunky mixture forms that will stick together when pressed between your fingers. Use the palms of your hands to form the mixture into 4 patties, making them as smooth and even as possible, pressing them firmly together to ensure they won’t break apart.
3In a medium frying pan set over a medium-high heat, heat up the coconut oil and fry the patties for 4-5 minutes, until they’re golden brown on both sides. Place them on a piece of kitchen paper when cooked to soak up any excess oil.
4To make the spicy mango salsa, simply toss all the ingredients together in a mixing bowl and adjust the seasoning as needed.
5Serve the chickpea and sesame cakes warm with the mango salsa and a big green salad. They also work well cold as a packed lunch option. Any leftovers can be stored in an airtight container in the fridge for up to three days.

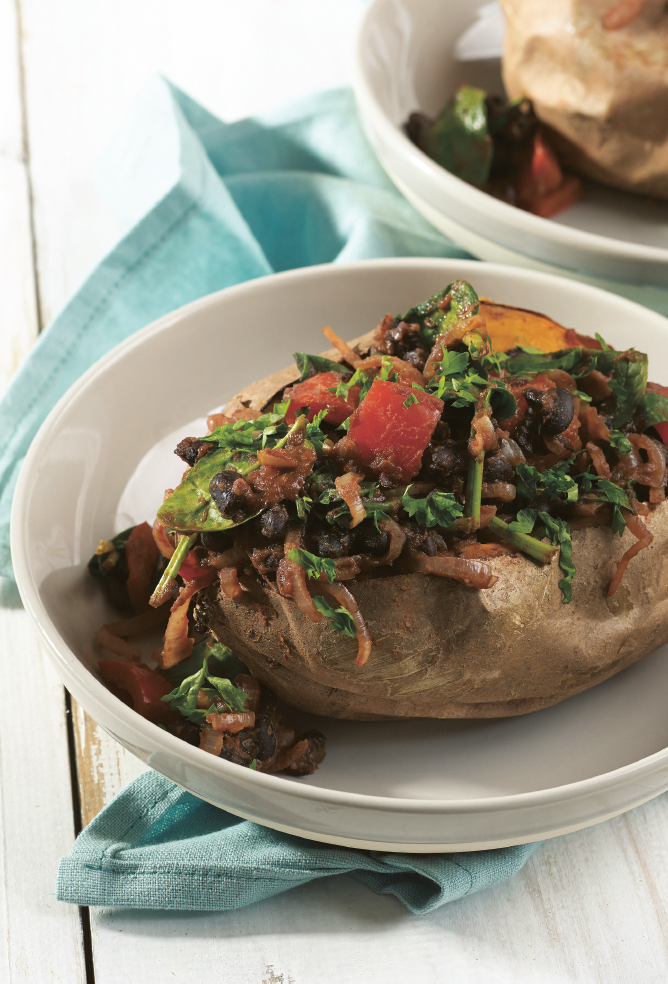
Black Bean and Sweet Potato Chilli
SERVES 2 | PER SERVING: 333 CALORIES | 14.4G PROTEIN | 70G CARBS | 1G FAT
I adore the combination of flavours in this chilli, which include Cajun spices, coriander, cumin, smoked paprika and a pinch of cayenne pepper to give it a little bit of bite. Black beans are a super source of protein, with 10.6g per serving. I love this chilli served hot over a baked sweet potato for a hearty, healthy and filling good mood meal packed with protein, complex carbs and fibre.
coconut oil, to grease
2 medium-large sweet potatoes
2 tbsp low-sodium tamari or water
1 red onion, finely sliced
1 red pepper, chopped
1 garlic clove, minced
1 x 400g tin of black beans, drained and rinsed
160g tomato passata
1 tsp Cajun spices
1 tsp ground coriander
1 tsp smoked paprika
½ tsp ground cumin
pinch of cayenne pepper
sea salt and freshly ground black pepper
1 handful of baby spinach
chopped fresh parsley, to garnish

1Preheat the oven to 200°C. Lightly grease a baking tray with coconut oil or line with non-stick baking paper.
2Place the sweet potatoes on the baking tray and bake in the oven for 35-40 minutes, until they’re soft and easy to slice.
3Meanwhile, heat the tamari or water in a saucepan set over a medium heat and cook the onion, pepper and garlic for 3-4 minutes, until the vegetables soften. Stir in the black beans, tomato passata, spices and seasoning and gently simmer the chilli for another 5 minutes, until heated through. Remove from the heat and mix in the spinach leaves, allowing them to wilt.
4When the sweet potatoes are baked, allow them to cool for 5-10 minutes before slicing them down the middle lengthways, but don’t cut them all the way through. Open them out a bit, then spoon on the chilli and garnish with plenty of chopped fresh parsley.

Chilli san Carne
SERVES 4-6 | PER SERVING: 221 CALORIES | 10.7G PROTEIN | 41G CARBS | 1.3G FAT
The array of spices in this nourishing meal incorporates lots of flavour, and I add kale for its incredible range of antioxidants and minerals. This is a great dish to make in a big batch at the beginning of the week and it works especially well to warm you up on chilly winter nights.
1 medium butternut squash
2 tbsp low-sodium tamari or water
1 red onion, finely chopped
2 garlic cloves, minced
1 x 400g tin of red kidney beans, drained and rinsed
1 x 400g tin of adzuki or black-eyed beans, drained and rinsed
800g tomato passata
250ml low-fat coconut milk or unsweetened almond milk
2 tbsp fresh lemon juice
1 tbsp ground cumin
2-3 tsp smoked paprika
½ tsp dried chilli flakes
sea salt and freshly ground black pepper
65g fresh kale, tough stems removed

1Preheat the oven to 200°C.
2Place the whole butternut squash on a baking tray. Roast for 30-35 minutes, until its skin turns golden brown. Remove from the heat and set aside to cool for 10 minutes. When it has cooled enough to handle, peel the skin off the squash, cut it in half and scoop out the seeds and pulp in the middle, then cut the flesh into bite-sized chunks.
3In a large saucepan set over a medium heat, heat up the tamari or water and cook the onion and garlic for 4-5 minutes, until the onion starts to soften. Add the chopped butternut squash and continue to sauté for another 2-3 minutes. Add the beans, tomato passata, coconut milk, lemon juice, ground cumin, smoked paprika, chilli flakes and seasoning. Bring to the boil for 2-3 minutes, then lower the heat, partly cover with a lid and simmer for about 15 minutes, until the mixture has thickened and heated through. Stir regularly to prevent it from burning and add extra coconut milk or water if you prefer a runnier texture. Remove from the heat and stir in the kale, allowing the leaves to wilt.
4Divide into serving bowls and serve hot. Any leftovers can be stored in an airtight container in the fridge for three or four days.
Spicy Tomato, Chickpea and Courgetti Bolognese
SERVES 2 | PER SERVING: 334 CALORIES | 16.4G PROTEIN | 48G CARBS | 11G FAT
Light, summery, healthy and fresh with a hint of chilli, this dish is so easy to whip up for a light lunch or dinner. It’s ideal for those trying to tone up and lose body fat as chickpeas are a perfect food for anyone watching their weight. They’re low in calories and filled with protein and fibre to help repair torn muscle fibres and stabilise blood sugar levels. I add cubes of avocado for an extra dose of heart-healthy fats and minerals, including potassium and magnesium.
2 medium courgettes
2 tbsp fresh lemon juice
Himalayan pink rock salt and freshly ground black pepper
2 tbsp low-sodium tamari or water
1 red onion, finely sliced
2 garlic cloves, minced
180g cooked or tinned chickpeas, drained and rinsed
125ml tomato passata
2 tbsp nutritional yeast
1 tsp coriander seeds
1 tsp ground cumin
1 tsp smoked paprika, plus extra to garnish
pinch of cayenne pepper
2 handfuls of fresh basil leaves
½ ripe avocado, pitted, peeled and cut into cubes
dash of tamari

1Use a spiraliser or vegetable peeler to create the courgetti noodles. Add the lemon juice and a pinch of salt, toss it all together and set aside.
2In a saucepan set over a medium heat, heat up the tamari or water and cook the onion and garlic for 3-4 minutes, until the onion softens. Add the chickpeas and stir for 1 minute, then add the tomato passata, nutritional yeast, coriander seeds, ground cumin, smoked paprika, cayenne pepper and seasoning. Allow it to simmer gently for about 10 minutes, stirring frequently. Remove the saucepan from the heat and add the basil, stirring to allow it to gently wilt.
3Serve the Bolognese over the courgetti, topped with avocado cubes, a drizzle of tamari and a sprinkle of smoked paprika. Leftovers will keep in a covered container in the fridge for up to two days.

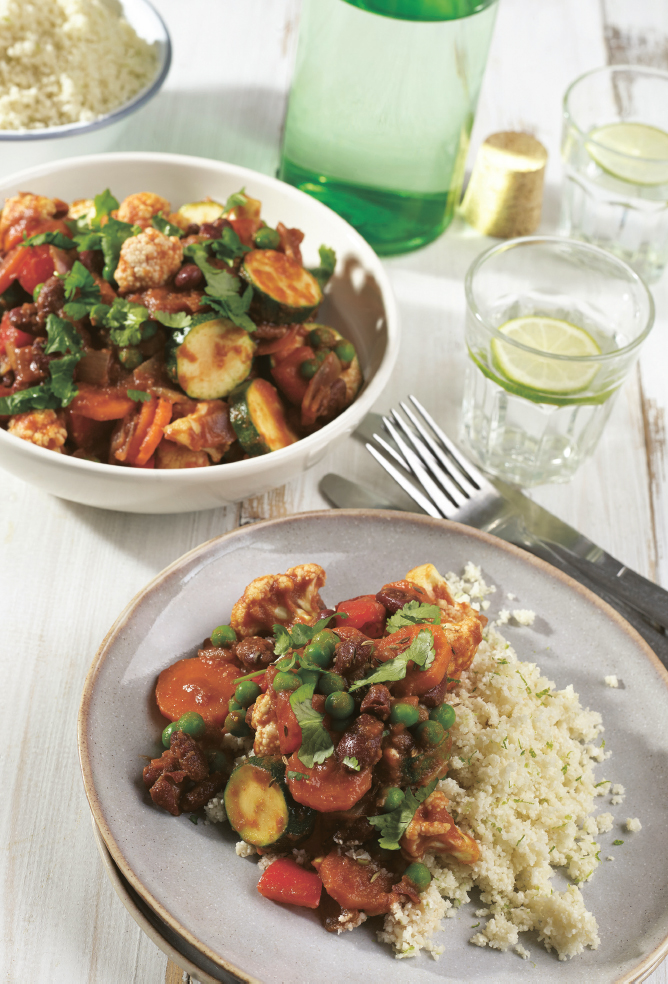
Vindaloo Vegetables with Ginger and Lime Cauliflower Rice
SERVES 4 | PER SERVING: 271 CALORIES | 16.9G PROTEIN | 52G CARBS | 1.5G FAT
This protein-packed, low-carb and oil-free dish is bursting with flavour from the array of herbs and spices used, all of which have health-promoting properties. This filling and fibre-rich dish is ideal for making in a big batch and enjoying over two or three days. It works well as a cold packed lunch or it can be gently reheated in the oven for an evening meal.
2 tbsp low-sodium tamari or water
2 carrots, thinly sliced
1 medium red onion, chopped
1 small to medium head of cauliflower, cut into small florets
2 x 400g tins of red kidney beans, drained and rinsed
170g tomato purée
185ml water
2 small courgettes, cut into 6mm-thick slices
1 green, yellow or red bell pepper, deseeded and diced
sea salt and freshly ground black pepper
135g frozen peas, thawed
FOR THE SPICE PASTE:
3 garlic cloves, peeled
1 tbsp tamari
1 tbsp chopped fresh ginger
1½ tsp ground coriander
1¼ tsp ground cumin
½ tsp ground turmeric
¼ tsp cardamom
pinch of dried chilli flakes
125ml cold water
FOR THE GINGER AND LIME CAULIFLOWER RICE:
1 large cauliflower, roughly chopped
zest and juice of 1 lime
2 tbsp chopped fresh coriander, plus extra to garnish
1 tbsp grated fresh ginger

1To make the spice paste, place the garlic, tamari, ginger, coriander, cumin, turmeric, cardamom, chilli flakes and water in a blender or food processor. Combine until a smooth paste forms and set aside.
2In a large saucepan set over a medium-high heat, heat up the tamari or water. Add the chopped carrots and onion and cook for 4-5 minutes, until the vegetables have softened, stirring frequently to prevent them from burning. Add more water if necessary. Add the spice paste and cook for about 2 minutes, stirring continuously. Add the cauliflower and kidney beans, then cover the saucepan and lower the heat.
3Put the tomato purée and water into the blender and blitz until smooth, then pour this into the vegetables. Cover with a lid and cook for 5 minutes, then add the courgettes and bell pepper. Season with a pinch of sea salt and pepper, cover the saucepan again and continue cooking for 5-10 minutes more, until the vegetables are tender and well combined with the spices. Add the thawed peas and allow them to heat up for 2-3 minutes.
4To make the cauliflower rice, put the roughly chopped cauliflower into a blender or food processor and process for 2-3 minutes, until it forms a rice-like consistency. Heat 1-2 tablespoons of water in a large frying pan, then add the lime zest, coriander and ginger. Stir for 30 seconds, then add the cauliflower rice, 3 more tablespoons of water and the lime juice. Cook for 5 minutes, until fully cooked through.
5Divide the cauliflower rice between four plates and serve the vindaloo vegetables on the side, garnished with chopped fresh coriander.
Coconut Curried Quinoa with Cheesy Roast Cauliflower
SERVES 4 | PER SERVING: 291 CALORIES | 13.3G PROTEIN | 47.3G CARBS | 7.2G FAT
This filling dish is brilliant to make in a bigger batch and eat over a couple of days, as it keeps well in the fridge and even tastes great cold. The cheesy roast cauliflower makes a deliciously satisfying topping for the quinoa and the spices used create a rich flavour.
2 tbsp low-sodium tamari or water
1 medium red onion, finely sliced
1 garlic clove, minced
1 tbsp curry powder
1 tsp grated or finely chopped fresh ginger or ground ginger
1 tsp ground turmeric
400ml low-fat coconut milk
125ml water
170g quinoa, rinsed well under cold water
3 tbsp raisins (optional)
sea salt and freshly ground black pepper
80g fresh rocket leaves
FOR THE CHEESY ROAST CAULIFLOWER:
2 heaped tbsp nutritional yeast
2 tbsp fresh lemon juice
2 tsp coconut oil, melted, plus extra for greasing
1 tsp smoked paprika
pinch of cayenne pepper (optional)
2 small or 1 medium head of cauliflower, cut into bitesized florets

1To cook the cheesy cauliflower, preheat the oven to 190°C. Lightly grease a large baking tray with coconut oil or line with non-stick baking paper.
2In a large mixing bowl, stir together the nutritional yeast, lemon juice, melted coconut oil, smoked paprika, cayenne pepper, if using, and some salt and pepper. Add the cauliflower pieces and toss together well, ensuring that each piece is covered in the mixture.
3Spread the cauliflower out on the tray and roast in the oven for 25-30 minutes, until golden brown and crisp, turning them over halfway through.
4Meanwhile, heat the tamari or water in a large saucepan, then add the onion and garlic. Cook for 4-5 minutes, until the onion begins to soften. Add the curry powder, ginger and turmeric and stir for about 30 seconds, until fragrant. Pour in the coconut milk, water, quinoa and raisins, if using. Bring to the boil for 2-3 minutes, then cover partly with a lid and reduce the heat to a simmer.
5Simmer for 15 minutes, until the quinoa seeds have opened out, then remove the saucepan from the heat and let it sit for 5 minutes so that the quinoa can absorb any remaining liquid. Use a fork to fluff up the quinoa, then season to taste and stir in the rocket leaves.
6To serve, divide the quinoa between four bowls and top with the roasted cauliflower. Any leftovers can be stored in an airtight container in the fridge for three or four days.
Lentil and Cheesy Cumin Sweet Potato Pies
SERVES 2 | PER SERVING: 481 CALORIES | 27.8G PROTEIN | 93.6G CARBS | 2.4G FAT
These steaming hot and hearty pies filled with a lentil and tomato stew and topped with cheesy cumin mash make a wonderfully warming and satisfying meal. Good mood food at its best.
FOR THE CHEESY CUMIN SWEET POTATO CRUST:
2 medium sweet potatoes, peeled and cut into chunks
2 heaped tbsp nutritional yeast
1-2 tsp ground cumin
1 tsp smoked paprika
sea salt and freshly ground black pepper
chopped fresh parsley, to garnish
FOR THE LENTIL FILLING:
2 tbsp low-sodium tamari or water
2 medium red onions, diced
2 garlic cloves, minced
4 medium carrots, diced
1½ x 400g tins of chopped tomatoes
1½ x 400g tins of Puy lentils, drained and rinsed
250ml low-sodium vegetable stock
2 tbsp tomato purée
2 tsp ground cumin
2 tsp ground coriander
1 tsp dried oregano
pinch of dried chilli flakes

1Preheat the oven to 200°C.
2Place the sweet potatoes in a medium saucepan set over a medium-high heat. Cover with water and bring to the boil, then reduce to a simmer and cook for 8-10 minutes, until the potatoes are tender enough to slice with a knife. Drain away the water and place them back in the saucepan with the nutritional yeast, ground cumin, smoked paprika and seasoning and mash well, until fluffy.
3Heat the tamari or water in a large saucepan set over a medium-high heat and cook the onions and garlic for 3-4 minutes, until soft and translucent. Add the carrots and continue to cook until the vegetables have softened, stirring often. Add the chopped tomatoes, lentils, vegetable stock, tomato purée, spices and some salt and pepper and bring the mixture to the boil for 2-3 minutes. Reduce the heat to a simmer, cover the saucepan partly with a lid and cook for another 12-15 minutes, until the mixture has reduced and thickened.
4Divide the lentil and vegetable mixture between two ovenproof serving bowls and top with the mashed sweet potatoes. Bake in the oven for 15-20 minutes, until the tops are golden and crispy. Allow to cool for 5 minutes and serve hot, garnished with fresh parsley. Any leftovers can be stored in an airtight container in the fridge for three or four days.
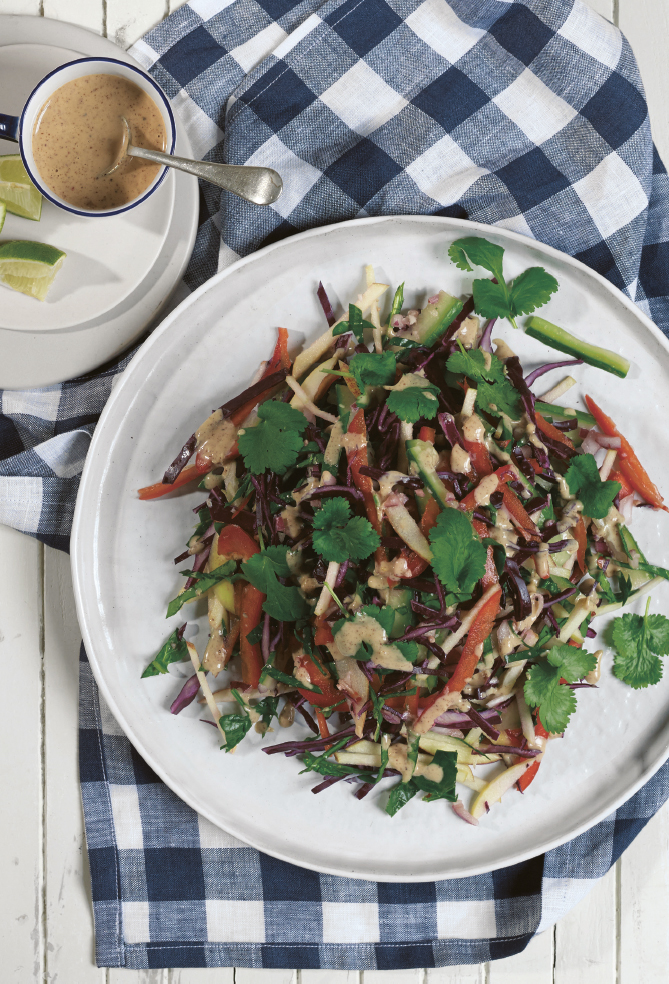
Vegetable Pad Thai with a Spicy Almond Sauce
SERVES 2 | PER SERVING: 388 CALORIES | 12G PROTEIN | 33.9G CARBS | 26.4G FAT
I love the array of flavours in this recipe, based on a range of different veggies, herbs and spices. Drizzle with a generous amount of the spicy almond sauce for a healthy and satisfying meal.
70g red cabbage, shredded or finely chopped
60g baby spinach, shredded or finely chopped
8g fresh coriander leaves
1-2 tbsp fresh lime juice
sea salt and freshly ground black pepper
2 garlic cloves, minced
4 tbsp tamari
1 tbsp red wine vinegar
2 tsp minced or finely chopped fresh ginger
1 tsp coconut oil, melted
pinch of dried chilli flakes (optional)
1 green apple, thinly sliced
1 red bell pepper, cored and thinly sliced
½ red onion, finely sliced
½ medium cucumber, finely sliced
lime wedges, to serve
FOR THE SPICY ALMOND SAUCE:
85g raw unsalted almond butter (use tahini or sunflower seed butter for a nut-free version)
2 garlic cloves, minced
3-4 tbsp water, to blend
2 tbsp fresh lemon juice
1 tbsp grated fresh ginger
1 tbsp tamari
1 tbsp pure maple syrup or honey or 5-6 drops of liquid stevia (optional)
pinch of dried chilli flakes (optional)
sea salt and freshly ground black pepper

1Place the cabbage, spinach, coriander and lime juice in a large mixing bowl. Season and set aside.
2Whisk together the garlic, tamari, vinegar, ginger, melted coconut oil and the chilli flakes, if using, in a smaller bowl and set aside.
3Add the apple, pepper, onion and cucumber to the cabbage, then top with the tamari dressing and mix everything together well.
4Make the spicy almond sauce by placing all the ingredients in a blender or food processor and blitzing until smooth and creamy, using more water if necessary. Taste and adjust the seasoning as needed.
5Serve the pad Thai drizzled with spicy almond sauce and lime wedges on the side. Any leftovers can be stored in an airtight container in the fridge for three or four days.
Roast Aubergine Curry with Basil and Toasted Cashews
SERVES 2 | PER SERVING: 329 CALORIES | 11.4G PROTEIN | 52.5G CARBS | 11.8G FAT
One of my favourite ways to eat aubergine, this is a warming and satisfying curry featuring baked sweet potato and an array of fragrant spices. Toasted cashews add a satisfying crunch, and it’s filing enough to eat by itself or with a side of brown rice.
coconut oil, to grease
1 aubergine, cut into chunks
1 medium-large or 2 small sweet potatoes, peeled and cut into chunks
4 tbsp unsalted raw cashews
2 tbsp low-sodium tamari or water
1 red onion, finely chopped
1 garlic clove, minced
1 tsp chopped fresh ginger
2 tsp curry powder
500g tomato passata
500ml Koko coconut milk
1 tsp ground turmeric
1 tsp ground coriander
pinch of dried chilli flakes
sea salt and freshly ground black pepper
1 large handful of fresh basil, torn

1Preheat the oven to 190°C. Lightly grease a large baking tray with coconut oil.
2Spread out the aubergine and sweet potato on the baking tray. Roast them in the oven for 25-30 minutes, until the potato turns golden brown and crisp. Set aside.
3While the vegetables roast, spread the cashews out on a small baking tray and toast in the oven for 10 minutes, until golden. Set aside.
4In a large saucepan set over a medium heat, heat up the tamari or water and add the onion, garlic and ginger. Cook for 3-4 minutes, until the onion is beginning to soften, then add the curry powder and stir for another 1-2 minutes. Add the roast aubergine and sweet potato chunks and stir for 1 minute, then add the tomato passata and coconut milk.
5Mix well to combine all the ingredients and bring to the boil for 1-2 minutes. Reduce the temperature to a simmer and stir in the turmeric, coriander, chilli flakes and seasoning. Partly cover the saucepan with a lid and simmer for another 10-12 minutes, until heated through. Remove from the heat and stir in the basil leaves, allowing them to gently wilt.
6Serve hot, topped with toasted cashews. Any leftovers can be stored in an airtight container in the fridge for three or four days.
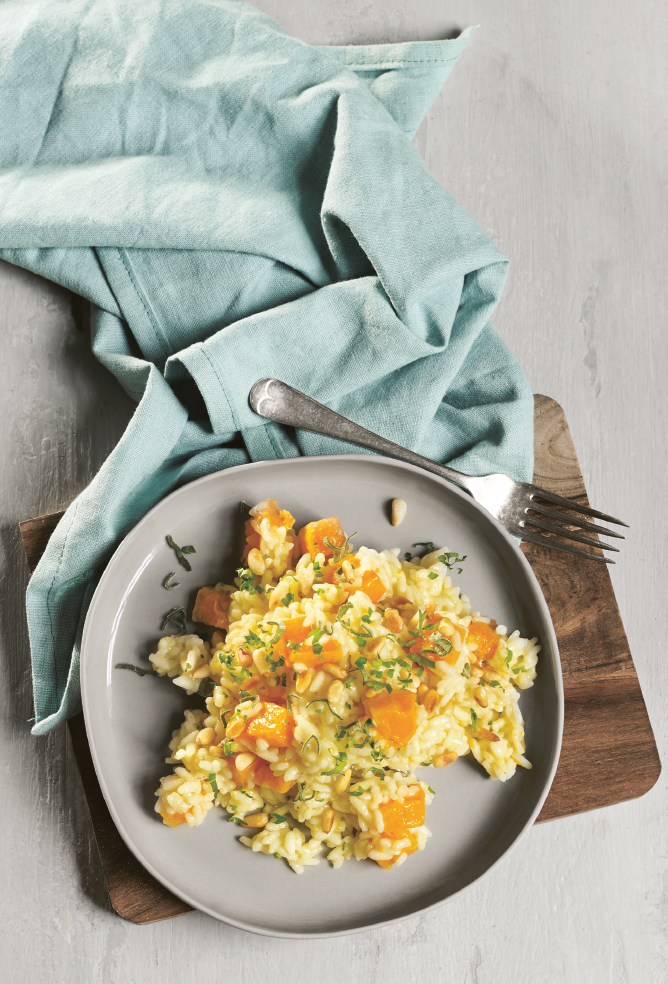
Butternut Squash and Sage Risotto
SERVES 4 | PER SERVING: 288 CALORIES | 8G PROTEIN | 60G CARBS | 3.5G FAT
Hearty, wholesome and seriously satisfying, risotto is a universally popular comfort meal. I’ve combined the natural sweetness of roast butternut squash with sage to pack in plenty of flavour and nutrients. Butternut squash is a superb source of beta-carotene for a healthy and glowing complexion.
coconut oil, to grease
1 butternut squash
4 tbsp low-sodium tamari
2 garlic cloves, minced
sea salt and freshly ground black pepper
200g Arborio rice
1 litre hot vegetable stock
2 tbsp nutritional yeast (optional)
1 tbsp chopped fresh sage or 1 tsp dried sage
2 tbsp toasted pine nuts, to serve
2 tbsp chopped fresh parsley, to garnish

1Preheat the oven to 200°C. Lightly grease a baking tray with coconut oil or line with a sheet of non-stick baking paper.
2Place the whole butternut squash on the tray and roast for 30-35 minutes, until the skin of the squash has turned golden brown. Remove it from the heat and let it cool for 10 minutes. When it’s cool enough to handle, peel off the skin, cut it in half to scoop out the seeds, then cut the flesh into bite-sized cubes.
3In a saucepan set over a medium heat, heat up 2 tablespoons of the tamari (or water) and cook the garlic until it’s golden. Add the butternut squash cubes and season with a pinch of sea salt and black pepper. Continue to sauté over a medium-high heat for a few minutes more, until the squash begins to soften. Reduce to a medium heat, add the rice into the squash and stir for 1-2 minutes, until the rice begins to turn opaque.
4Add the stock to the saucepan 125ml at a time, stirring it in. As it begins to evaporate, add the next 125ml. Keep repeating until the rice has cooked and become smooth and creamy.
5Stir in the nutritional yeast, the remaining 2 tablespoons of tamari and the sage and season with a pinch of salt and pepper as needed. Top with toasted pine nuts and chopped parsley and serve hot. Any leftovers can be stored in an airtight container in the fridge for up to three days.
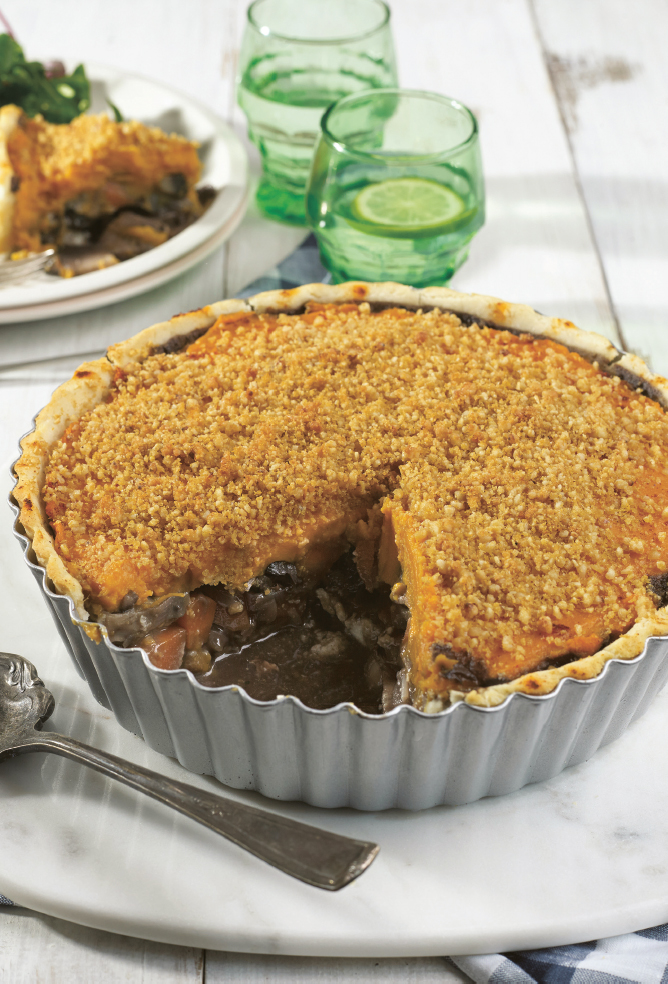
Portobello Mushroom and Sweet Potato Pie with Pine Nut Parmesan
SERVES 6-8 | PER SERVING: 465 CALORIES | 10.7G PROTEIN | 73.2G CARBS | 15G FAT
This wholesome pie is filled with the meaty texture of Portobello mushrooms and topped with a crisp sweet potato mash. Perfect for making as a big family meal on a chilly evening.
FOR THE PIE CRUST:
360g spelt flour or gluten-free all-purpose flour
6 tsp gluten-free baking powder
pinch of sea salt
4 tbsp coconut oil, at room temperature, plus extra for greasing
170ml boiling water
FOR THE SWEET POTATO TOPPING:
6 small or medium sweet potatoes, peeled and chopped into chunks
3 tbsp nutritional yeast (optional)
1 tbsp coconut oil
4 tsp smoked paprika
FOR THE MUSHROOM FILLING:
2 tbsp low-sodium tamari or water
1 red onion, finely sliced
1 garlic clove, minced
1 medium carrot, cut into bite-sized slices
200ml low-sodium vegetable stock
125ml red wine
3 tsp dried thyme
pinch of dried chilli flakes
455g Portobello mushrooms, rinsed well and sliced
3 tbsp nutritional yeast (or 2 tbsp gluten-free all-purpose flour)
sea salt and freshly ground black pepper
FOR THE PINE NUT PARMESAN:
2 tbsp pine nuts, lightly toasted
2 tbsp nutritional yeast
sea salt and freshly ground black pepper

1To make the pie crust, lightly grease a 20cm pie dish with coconut oil. Sift the flour into a large mixing bowl and add the baking powder and salt. Use your fingertips to rub the coconut oil into the flour until it resembles fine breadcrumbs, then add the water and mix together well to form a dough. Use your hands to gently push out the dough and line the pie dish with it. Carefully trim off the excess dough around the edges with a sharp knife. Set the dish aside.
2To make the mushroom filling, heat up the tamari or water in a large saucepan set over a medium heat and add the onion and garlic. Cook for 3-4 minutes, until the onion starts to soften. Add the carrot and cook for 6-8 minutes, stirring occasionally, until it begins to soften. Add the vegetable stock, wine, dried thyme and chilli flakes and bring to the boil for 2-3 minutes. Reduce the heat, then add the mushrooms, nutritional yeast and seasoning. Cover partly with a lid and allow it to simmer gently for another 10-12 minutes, until cooked through. Stir occasionally to prevent it from burning.
3While the mushrooms cook, prepare the sweet potato mash. Place the chopped sweet potatoes in a medium pot, cover with water and bring to the boil over a high heat for 2-3 minutes. Reduce the temperature to a medium heat, partly cover with a lid and simmer for 10-12 minutes, until the sweet potatoes can be easily sliced with a knife.
4Drain the sweet potatoes and place in a blender or food processor. Add the nutritional yeast, if using, coconut oil, smoked paprika and seasoning and blend together until a smooth mash is formed. You may need to use some warm water to help it blend. Alternatively, place the potatoes back into the dry pot and mash thoroughly with a potato masher.
5To make the pine nut Parmesan, place all the ingredients in a blender or food processor and blitz on a high speed until a crumbly mixture forms. Set aside.
6Preheat the oven to 190°C.
7To assemble the pie, pour the mushroom mixture into the pie dish lined with the crust. Top with the sweet potato mash, smoothing it evenly across the top of the mushrooms. Sprinkle the top of the sweet potato with the pine nut Parmesan and bake in the oven for 30-35 minutes, until golden.
8Allow the pie to cool for 5 minutes before serving hot. Any leftovers can be stored in an airtight container in the fridge for three or four days.
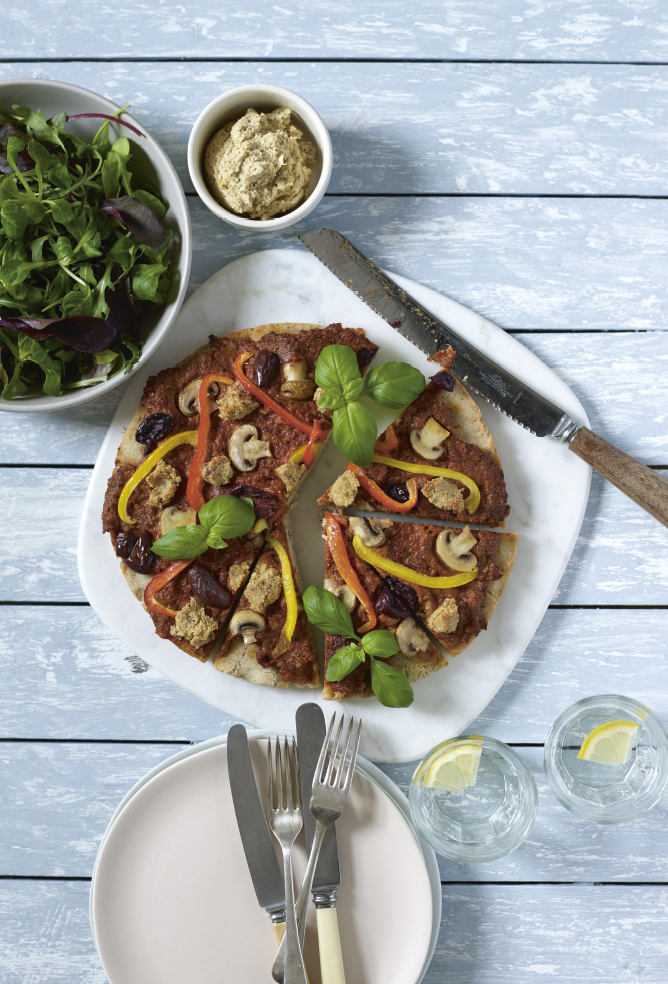
Italian Herb Pizza with Sun-Dried Tomato and Basil Pesto and Cashew Cheese
SERVES 4 | PER SERVING: 639 CALORIES | 19.1G PROTEIN | 78.8G CARBS | 31G FAT
I don’t think I’ve ever met a person who doesn’t like pizza, although traditional pizza doesn’t suit everyone and I certainly find it difficult to digest. This recipe uses rice flour to create a base that’s soft and light on the inside and crispy on the outside. Topped with a sun-dried tomato and basil pesto, a creamy cashew cheese and some of my favourite vegetables, it’s a very satisfying and filling alternative.
FOR THE PIZZA BASE:
250g white rice flour (I recommend the Doves Farm brand)
2 tsp Italian dried herb blend
1 tsp xanthan gum
1 tsp gluten-free baking powder
sea salt and freshly ground black pepper
250ml water
2 tbsp coconut oil, melted, plus extra to grease
FOR THE CASHEW CHEESE:
130g raw unsalted cashews
2 garlic cloves, peeled
60ml water
3 tbsp nutritional yeast
2 tbsp fresh lemon juice
1 tbsp wholegrain mustard
FOR THE SUN-DRIED TOMATO AND BASIL PESTO:
55g sun-dried tomatoes
20g fresh basil leaves
2 garlic cloves, peeled
6-8 tbsp water, to blend
2 tbsp extra virgin olive oil (omit for a lower-calorie pesto)
2 tbsp pine nuts
1 tbsp nutritional yeast (optional)
1 tbsp fresh lemon juice
pinch of dried chilli flakes
PIZZA TOPPINGS:
70g white mushrooms, sliced
8-10 black or green olives, pitted and halved
1 red or yellow bell pepper, deseeded and finely sliced
½ ripe avocado, halved, stoned and sliced

1First soak the cashews in a bowl of cold water for 1 hour, then drain well.
2Preheat the oven to 200°C. Lightly grease a 23cm round baking tin with coconut oil.
3To make the base, sift the flour into a large mixing bowl and add the Italian herbs, xanthan gum, baking powder and seasoning. Mix together well. Add the water and stir to create a thick dough, then add the oil and mix together well. Transfer the dough to the greased baking tin and press it down evenly with your fingertips. Bake in the oven for 25-30 minutes, until the edges are starting to turn crisp and golden.
4While the pizza base cooks, prepare the pesto. First use a sheet of kitchen paper to soak up any excess oil on the sun-dried tomatoes, then place all the ingredients in a blender or food processor and blend until smooth. Season to taste, then pour the pesto into a bowl and set aside.
5Next, to make the cashew cheese, place the soaked and drained cashews into the blender or food processor with the rest of the ingredients and blend until smooth and creamy, stopping to scrape down the sides if necessary. Add extra water to help it blend if needed and season to taste with salt and pepper.
6Remove the pizza base from the oven and spread with a thick layer of pesto, then top with the mushrooms, olives, pepper and avocado (or your choice of toppings). Drizzle on the cashew cheese, then place the pizza back in the oven for another 10-15 minutes, until the cashew cheese begins to turn golden.
7Enjoy the pizza warm or cold. Any leftovers can be stored in a covered container in the fridge for three or four days.