Eat Yourself Fit: Make Your Workout Work Harder - Rosanna Davison (2016)
PART 7. EAT YOURSELF FIT RECIPES
CHEAT CLEAN: DESSERTS AND SWEET TREATS
Fitness tip
It would be crazy to go through life without treats, and I firmly believe that it’s important to reward HARD WORK and HEALTHY LIVING. Although all these desserts and sweet treats are FREE from DAIRY, GLUTEN and REFINED SUGAR, they’re not intended for everyday eating, as many are ENERGY RICH. I love to make one of these delicious desserts when I really feel like I’ve earned it. The best time for indulging is actually straight after a workout, when your body requires QUICK ENERGY and burns up food faster.
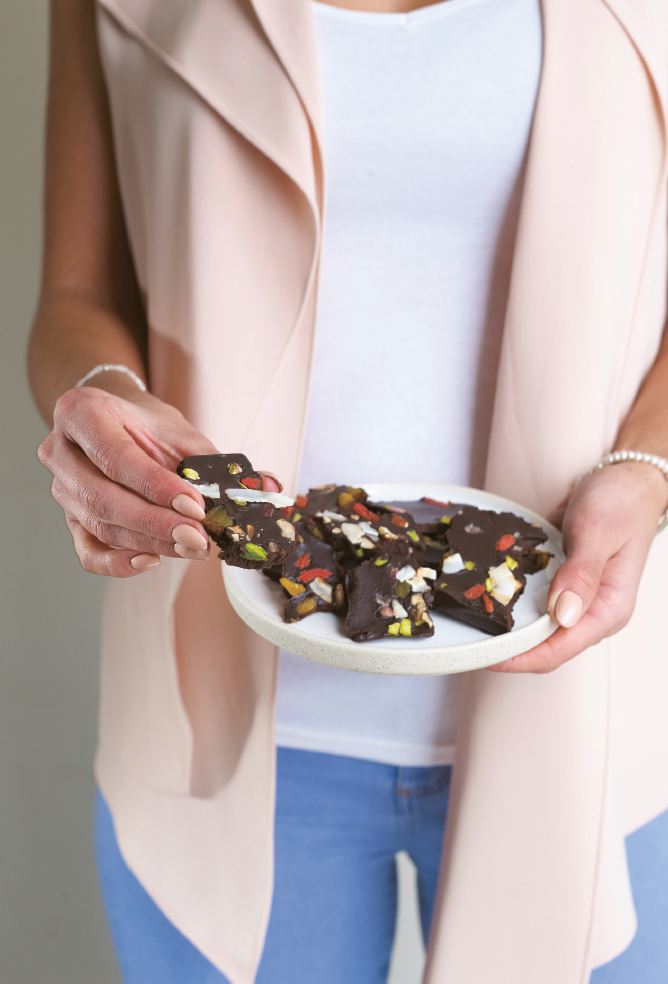
SOS Chocolate Bark
MAKES 20 PIECES | PER SERVING: 140 CALORIES | 3.4G PROTEIN | 11.7G CARBS | 9.5G FAT
I have been struck with a dark chocolate craving on more than one occasion, generally late at night. So what’s a girl to do? I came up with this recipe for simple and quick homemade chocolate bark to make when the shops are closed and only chocolate will do. I thought it would be apt to name it SOS chocolate, as it has saved the day plenty of times. It’s delicious topped with your favourite nuts, seeds and dried fruit. I like to use toasted coconut flakes, slivered almonds, chopped hazelnuts, pistachios, goji berries and dried apricots.
30g raw hazelnuts, skinned and chopped
30g slivered almonds
20g unsweetened coconut flakes
110g coconut oil
80g pure maple syrup or honey
45g raw cacao powder or unsweetened dark cocoa powder
2 tsp vanilla extract or powder
2 tbsp goji berries
2 tbsp dried apricots, chopped
1 tbsp pistachios, chopped

1Preheat the oven to 190°C.
2Spread out the hazelnuts, slivered almonds and coconut flakes on a baking tray. Toast them in the oven for 10 minutes, until golden. Set aside, then line the tray with non-stick baking paper.
3Melt the coconut oil in a saucepan set over a medium heat, then add the maple syrup, cacao and vanilla. Stir until a smooth chocolate sauce forms, then mix in half of the nuts and coconut flakes until well distributed.
4Pour the chocolate mixture into the lined tray and smooth it across the top with a spatula.
5Sprinkle with the remaining toasted nuts and coconut plus the goji berries, apricots and pistachios. Place the tray in the freezer on a flat surface to set for 30 minutes.
6Remove the tray from the freezer and slice or break the chocolate bark into pieces. Serve chilled. The bark is best stored in the fridge or freezer and eaten straightaway, as it begins to melt quite quickly at room temperature.
Salted Caramel Bliss Balls
MAKES 20 BALLS | PER BALL: 156 CALORIES | 2.1G PROTEIN | 25G CARBS | 6.1G FAT
Bliss balls by name and bliss balls by nature! These salted caramel, almond butter and chocolate truffles make a delicious and decadent treat. Make a big batch to keep in the fridge for a sneaky sweet treat or to share with loved ones. Either way, they’re a guaranteed hit.
FOR THE SALTED CARAMEL FILLING:
225g dates, pitted and soaked in hot water for 20 minutes to soften
1 tsp vanilla extract or powder
½ tsp sea salt, plus extra for sprinkling on top
60g smooth almond butter
FOR THE CHOCOLATE SHELL:
260g dark chocolate (at least 70-85% cacao content)
1 tbsp coconut oil
1Line a large baking tray with non-stick baking paper.
2Place the soaked and drained dates in a food processor and blend until they form a sticky dough or thick paste. Use a small splash of warm water to help it blend and stop to scrape down the sides if necessary. Add the vanilla and salt and pulse to combine.
3Use a tablespoon to scoop out the mixture and form it into about 20 small balls. Place the balls on the prepared tray, then put the tray in the freezer for 30 minutes to set. Once the caramel has set, use a teaspoon to drizzle almond butter across the tops of all the truffles. Place back into the freezer for another 15-20 minutes.
4Meanwhile, fill a small or medium saucepan one-third full with water and set a medium bowl on top to form a double boiler, making sure the bottom of the bowl doesn’t touch the water. Bring the water to the boil, then reduce to a simmer and place the chocolate and coconut oil in the bowl, stirring gently as it melts together.
5Remove the tray of truffles from the freezer. Use a fork to quickly immerse each truffle in the chocolate sauce, ensuring it’s covered evenly. Shake off any excess chocolate and place each truffle back on the tray.
6Place the tray back in the freezer to set again for 30 minutes and serve chilled. Store the truffles in an airtight container in the fridge for up to a week.
Pecan Pie Truffles
MAKES 10 TRUFFLES | PER TRUFFLE: 161 CALORIES | 2.5G PROTEIN | 13.8G CARBS | 11.9G FAT
These rich pecan and cacao truffles take just minutes to make and are the perfect way to satisfy a craving for a guilt-free sweet nibble or a late-night chocolate treat when you’re getting cosy on the sofa.
150g raw pecan halves
75g dates, pitted and soaked in hot water for 20 minutes to soften
30g raw cacao powder or unsweetened dark cocoa powder, plus extra for coating
3 tbsp pure maple syrup or honey
1 tbsp smooth unsalted almond butter
1 tsp ground cinnamon
1Preheat the oven to 190°C.
2Spread the pecans out on a baking tray and bake in the oven for 10 minutes, until lightly toasted. Set aside to cool.
3Place the toasted pecans, soaked and drained dates, cacao powder, maple syrup, almond butter and cinnamon in a blender or food processor. Blend until the mixture is well combined into a thick dough.
4Place 3-4 tablespoons of cacao powder in a shallow bowl. Roll the truffle mixture into 10 balls, then roll the balls in the cacao powder until fully covered.
5Place in the fridge to chill until ready to serve. Store in an airtight container in the fridge for four or five days.
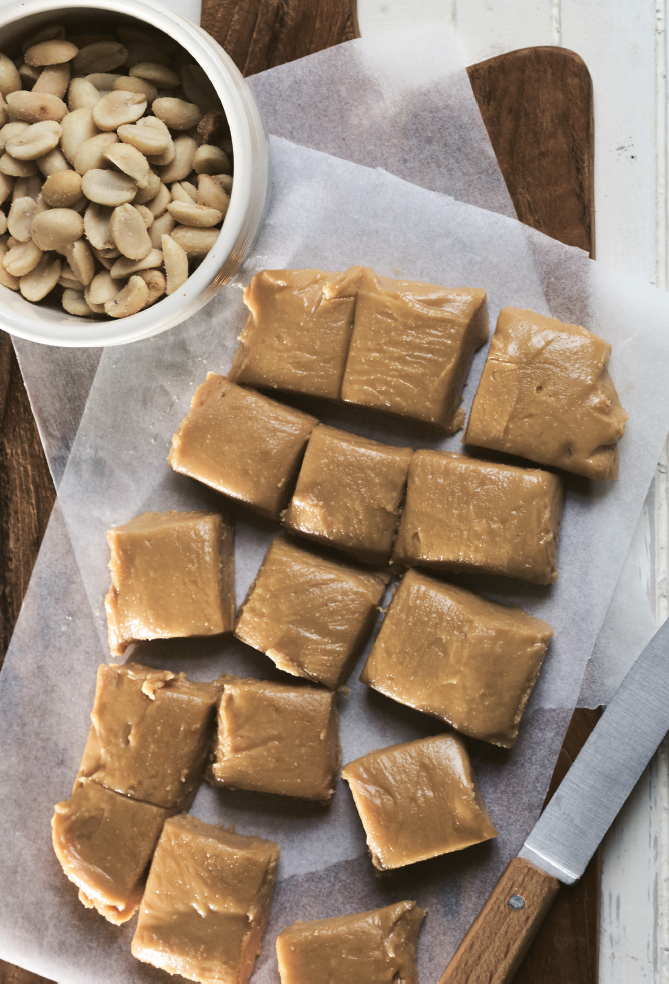
Vanilla Peanut Butter Fudge
MAKES 10 PIECES | PER PIECE: 142 CALORIES | 4.2G PROTEIN | 5.5G CARBS | 12.4G FAT
This is the most deliciously creamy and decadent sweet fudge, made with just five ingredients. I like to make a batch of it when friends are coming over, and nobody believes that it’s free from refined sugar and made from natural ingredients. But be warned, it can be difficult to stop at just one square!
190g smooth peanut butter
2 tbsp coconut oil, softened
1 tbsp pure maple syrup or honey
1 tsp vanilla extract or powder
pinch of sea salt
1Combine all the ingredients in a small bowl and mix until smooth. Transfer the batter to a medium-sized dish lined with non-stick baking paper and smooth the top with a spatula. Place the dish in the freezer and allow to set for 20-30 minutes, or until firm.
2Cut into squares and serve immediately. Always serve chilled. Leftovers can be kept in an airtight container in the fridge for two or three days or in the freezer for up to three months.
Chewy Cranberry and Pecan Cookies
MAKES 8 COOKIES | PER COOKIE: 306 CALORIES | 3.7G PROTEIN | 36G CARBS | 18.8G FAT
Crispy, chewy and lightly spiced, with a pop of sweetness from the cranberries, these wholesome cookies are simple to make and taste delicious. Everything gets mixed together in the food processor and then baked, meaning minimal mess and clearing up afterwards.
180g unsweetened dried cranberries
110g raw pecans
60g gluten-free rolled oats
55g dates, pitted and chopped
40g unsweetened desiccated coconut
4 tbsp milled flaxseeds
2 tbsp coconut oil, melted, plus extra to grease
2 tbsp pure maple syrup or honey
3 tsp ground cinnamon
2 tsp vanilla extract or powder
1Preheat the oven to 190°C. Lightly grease a baking tray with coconut oil or line it with non-stick baking paper.
2Place all the ingredients in a blender or food processor and blend until the mixture forms a sticky dough. Roll into 8 balls and place on the tray, pressing down gently to form a disc. Alternatively, use a cookie cutter to form the shapes.
3Bake in the oven for 15-20 minutes, until golden and firm to touch. Remove from the oven and let the cookies cool for a few minutes before carefully transferring them to a wire cooling rack. Store the cookies in an airtight container in a cool place for three or four days.
Raspberry and Vanilla Shortbread
MAKES 10 SLICES | PER SLICE: 315 CALORIES | 6.2G PROTEIN | 29.5G CARBS | 19.5G FAT
Growing up, classic shortbread was my favourite baked treat to make. I loved the sweet and buttery texture. This version is just as rich and crumbly, thanks to the combination of oats and ground almonds, and the delightful duo of raspberry and vanilla makes these biscuits an absolute must-try.
170g gluten-free rolled oats
120g pure maple syrup
110g coconut oil, melted, plus extra for greasing
85g ground almonds
2 tsp vanilla extract or powder
12 fresh raspberries, chopped
1Preheat the oven to 190°C. Lightly grease a 16cm x 22cm x 5cm baking tin with coconut oil or line with non-stick baking paper.
2Place the oats in a blender or food processor and blend until a fine flour forms. Place the flour in a large mixing bowl with the maple syrup, melted coconut oil, ground almonds and vanilla and stir well until a thick dough forms. Add the chopped raspberries and ensure they’re evenly distributed. Transfer the mixture to the baking tray and press down firmly, making sure it’s smooth and even.
3Bake in the oven for 25-30 minutes, until the shortbread turns golden brown and crisp on top. Remove from the oven and allow to cool on a wire rack for 10 minutes before cutting into slices. The shortbread is best eaten on the day it’s made, but leftovers can be stored in an airtight container in the fridge for two or three days.
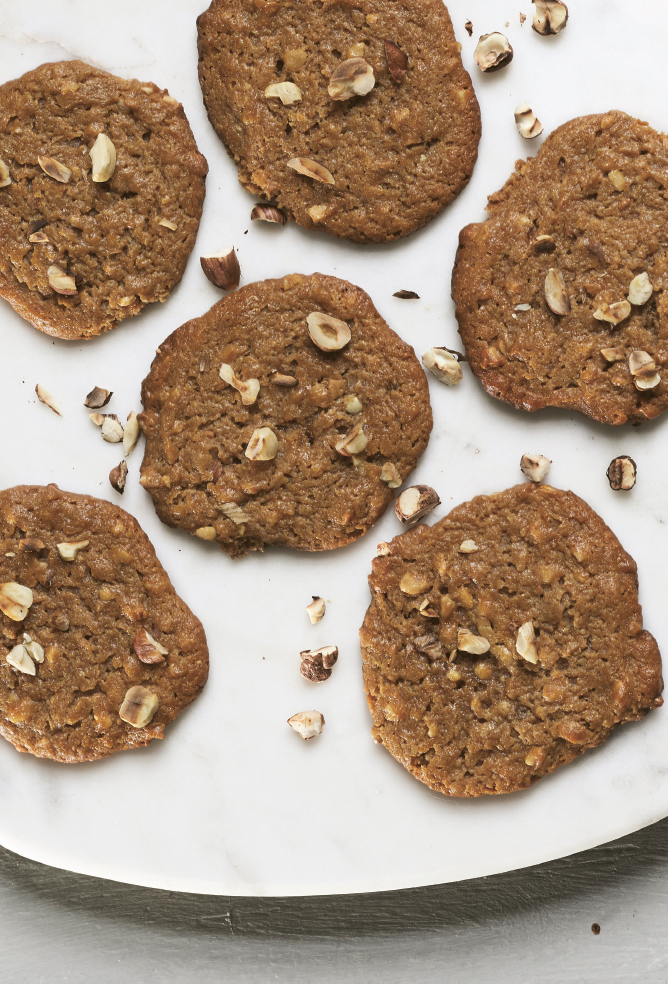
Hazelnut Butter Cookies
MAKES 10 COOKIES | PER COOKIE: 189 CALORIES | 4.1G PROTEIN | 14.9G CARBS | 13.1G FAT
Easy, quick and delicious cookies made with wholesome ingredients and full of fibre, protein and heart-healthy fats. Crisp on the outside and soft and chewy on the inside, I love how simple they are to make and bake.
coconut oil, to grease
2 tbsp milled flaxseeds
4 tbsp cold water
250g crunchy hazelnut butter (almond or peanut butter can also be used)
160g pure maple syrup or honey
2 level tsp gluten-free baking powder
2 tsp ground cinnamon
2 tsp vanilla extract or powder
4 tbsp chopped hazelnuts
1Preheat the oven to 180°C. Lightly grease a baking tray with coconut oil or line with non-stick baking paper.
2First, make the flax ‘egg’ by mixing the milled flaxseeds with the cold water in a small bowl until well combined. Set aside to thicken up for 10 minutes.
3Mix all the remaining ingredients except the chopped hazelnuts in a larger bowl, then add the flax ‘egg’. Stir until the almond butter and maple syrup are well combined and they form a sticky dough. Use a tablespoon to divide out the dough to form the cookies, gently pressing down each one onto the baking tray. The mixture may be too sticky to even roll into balls first, so just smooth them out with the back of the spoon. Scatter the chopped hazelnuts on top, pressing them in slightly.
4Bake in the oven for 20-25 minutes, until they’re firm to touch and turning brown on top. Allow to cool on a wire rack for 10 minutes before serving. The cookies can be kept for up to three days in an airtight container.

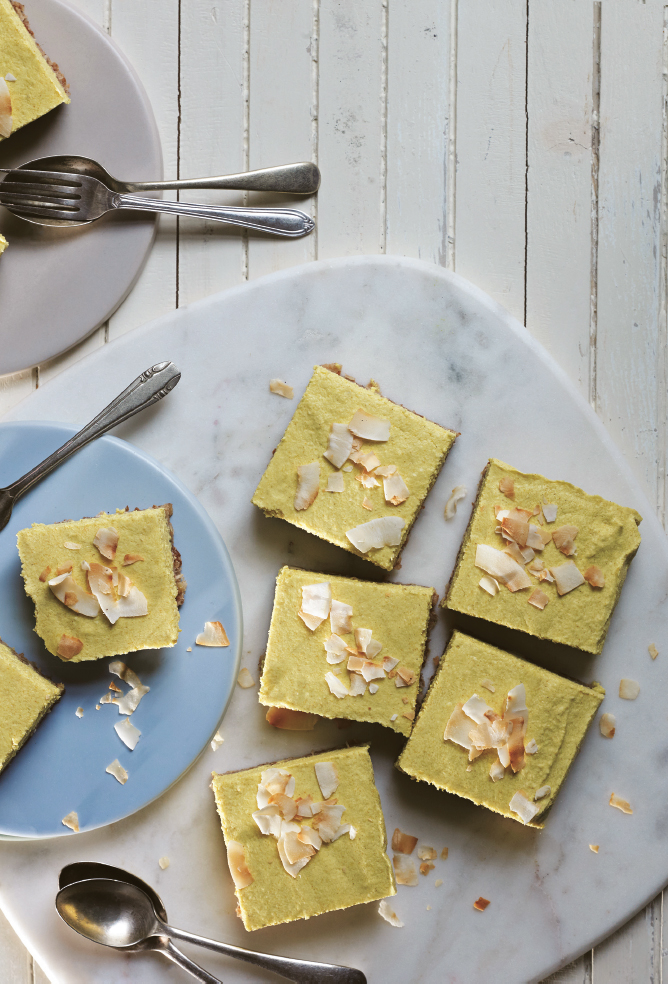
Zesty Lemon and Coconut Cream Slices
MAKES 12 SLICES | PER SLICE: 341 CALORIES | 6.7G PROTEIN | 25.2G CARBS | 26.3G FAT
I’ve always loved citrus desserts, and lemon drizzle cake was a favourite when I was growing up. These lemon and coconut cream slices are a deliciously cool and zesty option for lemon lovers and the perfect treat for warm summer days.
FOR THE CRUST:
150g dates, pitted and soaked in hot water for 20 minutes to soften
130g raw unsalted almonds, chopped
100g raw pecans, chopped
40g unsweetened desiccated coconut
1 tbsp coconut oil, melted
pinch of ground cinnamon
FOR THE FILLING:
1 x 400ml tin of full-fat coconut milk, chilled overnight in the fridge
190g cashews, soaked in water for 30 minutes
100g pure maple syrup or honey
¼ ripe avocado
2 tbsp coconut oil, melted
1 tsp vanilla extract or powder
½ tsp ground turmeric (optional, for a yellow colour)
zest and juice of 2 lemons
toasted coconut flakes, to decorate

1Line a 20cm square baking tin with non-stick baking paper.
2Place the soaked and drained dates, nuts, desiccated coconut, melted coconut oil and cinnamon in a food processor. Blend for 2 minutes, until the mixture is crumbly but sticks together. Use a dash of water to help it blend if necessary. Press the base mixture evenly into the bottom of the lined tin and set aside.
3To make the filling, first carefully open the tin of chilled coconut milk without shaking it and scoop out the hardened coconut cream, which should have separated from the coconut water. Place it in a blender or food processor and add the soaked and drained cashews, maple syrup, avocado, melted coconut oil, vanilla, turmeric and the lemon juice and zest (but set some zest aside for sprinkling over the top later). Blend together until smooth and creamy, using a dash of water to help it blend if necessary.
4Pour the filling evenly across the base and smooth the top with a spatula, then scatter over some toasted coconut flakes. Place the dish in the freezer to set for 30 minutes, until firm to touch.
5Remove from the freezer, top with a sprinkle of lemon zest, cut into slices and serve chilled. Any leftovers can be stored in an airtight container in the fridge for three or four days.
No-Bake Mars Bars
MAKES 4-6 BARS | PER BAR: 369 CALORIES | 4.7G PROTEIN | 44.5G CARBS | 22.3G FAT
These gooey, rich and chocolaty Mars Bars are by far my most popular and most requested recipe. It’s that irresistible combination of a thick, rich base, a squidgy caramel centre and a melt-in-the-mouth chocolate topping. A total crowd pleaser, you simply can’t go wrong with a tray of healthier Mars Bars!
FOR THE BASE:
110g raw pecans, chopped
115g dates, pitted and soaked in warm water for 20 minutes to soften
1 tsp vanilla extract or powder
FOR THE MIDDLE CARAMEL LAYER:
150g dates, pitted and soaked in warm water for 20 minutes to soften
2 tbsp smooth almond butter
2 tbsp pure maple syrup or honey
1 tsp vanilla extract or powder
2-3 tbsp warm water, to blend
FOR THE TOP CHOCOLATE LAYER:
2 tbsp coconut oil
2 tbsp raw cacao powder or unsweetened dark cocoa powder
2 tbsp pure maple syrup or honey
1 tbsp almond butter or tahini
1 tsp vanilla extract or powder
1To make the base, place the pecans, soaked and drained dates and vanilla extract in a food processor or blender and blend until the mixture forms a dough that sticks together. You may need to add the ingredients bit by bit so as not to overwhelm the machine. Press the mixture down firmly in a medium baking tray or silicone tray, ensuring it’s smooth and even.
2Next, make the caramel layer. Place all the ingredients in a food processor or blender, adding the water if necessary to help it blend into a smooth, thick caramel sauce. Spread the caramel layer across the base and place it in the freezer to set for 15-20 minutes.
3To make the chocolate layer, gently melt the coconut oil in a small saucepan set over a low-medium heat and add the cacao powder, maple syrup, almond butter and vanilla extract, stirring well until a thick, smooth chocolate sauce forms. Spread a layer of the chocolate sauce across the top of the caramel layer and place it back in the freezer to set for 25-30 minutes.
4Once set and firm to touch, use a sharp knife to carefully slice the mixture into bars. Keep refrigerated until ready to serve and serve chilled. These bars will keep in the fridge in a covered container for up to three days and can be frozen for up to three months.
Healthier Snickers Bars
MAKES 6 LARGE OR 12 SMALL BARS | PER SMALL BAR: 195 CALORIES | 4G PROTEIN 15.9G CARBS | 13.9G FAT
Love traditional Snickers bars? It’s great to know that you can whip up a healthier version at home whenever you fancy this peanut-packed treat. These homemade bars are naturally sweetened and made from nutrient-rich ingredients.
FOR THE NOUGAT LAYER:
125g smooth almond butter
2 tbsp pure maple syrup or honey
1 tbsp coconut flour
FOR THE CARAMEL FILLING:
110g dates, pitted and soaked in hot water for 20 minutes to soften
80ml water
1 tbsp coconut oil, melted
1 tsp vanilla extract or powder
pinch of sea salt
35g dry-roasted unsalted peanuts
FOR THE DARK CHOCOLATE COATING:
4 tbsp coconut oil
5 tbsp raw cacao powder or unsweetened dark cocoa powder
2 tbsp pure maple syrup or honey
1 tbsp smooth almond butter
1 tsp vanilla extract or powder

1Line a large rectangular baking tray with non-stick baking paper.
2Make the nougat layer by placing the almond butter, maple syrup and coconut flour in a medium bowl and mixing together well to combine. Press the mixture into the baking tray to create a rectangle about 1.25cm thick. Freeze for 30 minutes to set.
3To make the caramel filling, place the soaked and drained dates, water, melted coconut oil, vanilla and salt in a blender or food processor and blend at high speed until smooth and creamy. Use a dash of water to help it blend if necessary and scrape down the sides of the blender a couple of times.
4Take the nougat layer from the freezer and spread about half of the date caramel filling evenly across the top, smoothing it with a spatula. You may have some caramel left over, as a larger batch needs to be made to achieve a smooth caramel, but it works well as a dip for fresh fruit. Distribute the peanuts across the top of the caramel layer and gently press them down into it. Place the tray back into the freezer to set for at least 30 minutes.
5To make the chocolate coating, melt the coconut oil in a medium saucepan set over a low-medium heat, then add the cacao powder, maple syrup, almond butter and vanilla. Stir until smooth.
6Remove the tray from the freezer and slice into 6 full-size bars or 12 smaller bars. Use a tablespoon to spread the chocolate sauce over the tops and sides of each bar, then pick them up to coat the bottom too. Gently place the bars back onto the tray and return them to the freezer to set for another 20 minutes.
7Store the bars in the fridge or freezer, depending on how firm you like them, and always serve chilled, as they begin to melt at room temperature. They can be stored in an airtight container in the fridge for up to a week.
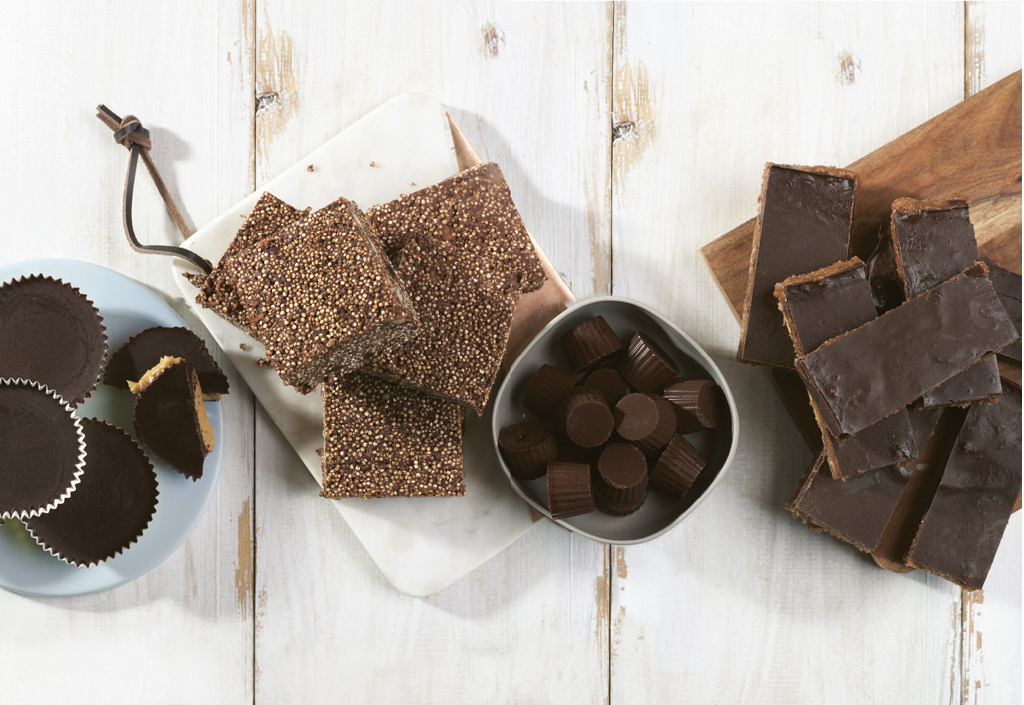
Fruit and Nut Quinoa Pop Bars
MAKES 12 BARS | PER BAR: 268 CALORIES | 5.1G PROTEIN | 23.9G CARBS, | 17.7G FAT
I gently toast dry quinoa to help create these no-bake fruit and nut chocolate bars, as it adds a wonderful crunch and a warm, toasty flavour. They go particularly well with a frothy almond milk cappuccino.
425g quinoa
220g coconut oil, melted
85g raw cacao powder or unsweetened dark cocoa powder
80g pure maple syrup or honey
125ml unsweetened almond milk
1 tsp vanilla extract
55g hazelnuts, raw or toasted, chopped
35g raisins
20g unsweetened desiccated coconut
3 tbsp cacao nibs or unsweetened dark chocolate chips
1First make the quinoa pops. Place a large saucepan over a medium heat and warm it up until it’s hot. Add the quinoa in small amounts, stirring continuously so that it doesn’t burn, until it pops and turns lightly golden brown. Keep adding the quinoa until the whole quantity has been popped and is lightly toasted. The quinoa grains won’t open up or change shape in the way that popcorn does. Once all the quinoa has been toasted, set it aside.
2Pour the melted coconut oil into a large mixing bowl and add the cacao powder, whisking until smooth. Add the maple syrup, followed by the almond milk and vanilla, continuing to whisk until the mixture turns silky and smooth. Stir in the quinoa pops, hazelnuts, raisins, desiccated coconut and cacao nibs and mix together well.
3Pour the mixture onto a large baking tray lined with non-stick baking paper and spread it evenly with a spatula. Place the tray in the freezer to set for 30-40 minutes, then remove and cut into bars or squares. Store the bars in an airtight container in the fridge for six or seven days and always serve chilled.
Chocolate Peanut Butter Cups
MAKES 20 CUPS | PER CUP: 112 CALORIES | 2G PROTEIN | 6.5G CARBS | 9.3G FAT
The most heavenly treat for all the peanut butter aficionados out there, these simple chocolate peanut butter cups are as good as any sweet snack gets. Smooth, rich and melt-in-the-mouth delicious.
FOR THE CHOCOLATE CUPS:
110g coconut oil, melted
45g raw cacao powder or unsweetened dark cocoa powder
100g pure maple syrup
1 tbsp smooth peanut butter (optional)
FOR THE PEANUT BUTTER FILLING:
125g smooth, creamy peanut butter (look for an organic brand free from added sugar and palm oil)
1 tsp vanilla extract or powder
1 tsp ground cinnamon (optional)
1Lay out 20 small cupcake cases on a large tray.
2In a small bowl, combine the melted coconut oil and cacao powder until smooth, then stir in the maple syrup and the peanut butter, if using, until smooth and creamy.
3To make the filling, mix together the peanut butter, vanilla and cinnamon in a separate bowl.
4Pour a thin layer of chocolate sauce into the bottom of each cupcake case. Place in the freezer for 10 minutes to set, then remove from the freezer and divide the peanut butter filling between the cups. Pour the remaining chocolate sauce on top and place back in the freezer to set for 30 minutes.
5Serve chilled and store in the fridge, as these cups will melt quite quickly at room temperature. Keep them in an airtight container in the fridge for up to a week.
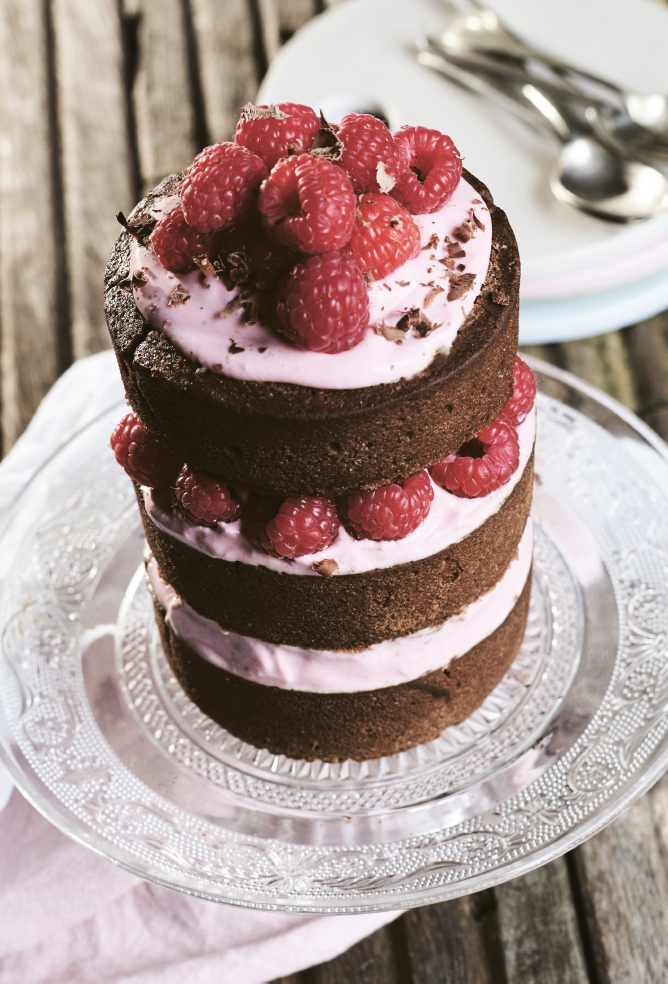
Chocolate Fudge Cake with Raspberry Vanilla Cream
SERVES 6 | PER SERVING: 856 CALORIES | 10.6G PROTEIN | 128.8G CARBS | 36.5G FAT
A soft, rich and indulgent chocolate fudge cake, perfect for birthdays and special occasions. Free from refined sugar, gluten and dairy, it tastes truly decadent with the raspberry vanilla cream. I love to surprise friends and family on their birthday with this cake, created for everyone to enjoy.
320g gluten-free all-purpose white flour
320g coconut sugar
80g raw cacao powder or unsweetened dark cocoa powder
2 tsp gluten-free baking powder
½ tsp salt
375ml warm water
140g coconut oil, melted, plus extra to grease
2 tsp apple cider vinegar
2 tsp vanilla extract or powder
FOR THE RASPBERRY VANILLA CREAM:
3 x 400ml tins of full-fat coconut milk, chilled overnight in the fridge
100g fresh raspberries
1 vanilla pod, split in half lengthways and seeds scraped out, or 3 tsp vanilla extract
6-8 drops of liquid stevia, to sweeten (optional)

1Preheat the oven to 190°C. Lightly grease 2 x 20cm cake tins with coconut oil, or use three small tins to create a three-tier cake, as pictured.
2Sift the flour into a large mixing bowl, then add the coconut sugar, cacao powder, baking powder and salt. Mix it all together, ensuring the ingredients are well blended. Add the warm water, melted coconut oil, apple cider vinegar and vanilla extract, mixing until the wet and dry ingredients are well combined into a cake batter.
3Divide the batter between the greased cake tins and bake in the oven for 25-30 minutes, until a knife comes out clean from the centre of the cake. Remove the cake tins from the oven and leave to cool for a few minutes before gently turning the cakes out onto a wire rack to cool completely.
4Make the raspberry vanilla cream by gently opening the tins of chilled coconut milk without shaking them. The cream should have separated from the coconut water. Spoon the solid coconut cream into a blender and add most of the raspberries (save a handful to decorate the cake), the vanilla and the liquid stevia, if using. Blend until smooth and pink. Taste and add more vanilla or stevia if desired.
5The cake must be fully cooled before you spread on the icing, as it will melt in any warmth. Place one of the cakes on a serving plate and spread a thick layer of icing across the middle, leaving a 2.5cm rim clear from the edges to allow for it to spread out more when you put the second cake on top. Add the top layer of sponge and spread the rest of the icing across the top of the cake.
6Decorate with the reserved raspberries and a sprinkle of cacao powder. Leftovers must be stored in an airtight container in the fridge to keep the icing cool, and it will keep for up to three days.
Almond Swirl Fudge Brownies
MAKES 9 BROWNIES | PER BROWNIE: 243 CALORIES | 2.7G PROTEIN | 36.4G CARBS | 10.6G FAT
These soft, rich fudge brownies are free from gluten and refined sugar and make the most deliciously decadent treat. I love adding in the almond butter swirl for an unusual twist, but you can leave it out if you prefer, as they’re just as tasty without it.
160g gluten-free flour
160g coconut sugar
50g raw cacao powder or unsweetened dark cocoa powder
1 tbsp milled chia seeds or flaxseeds
1 tsp gluten-free baking powder
1 tsp vanilla extract or powder
185ml warm water
70g coconut oil, melted, plus extra for greasing
1 tsp apple cider vinegar
5-6 tsp smooth almond butter

1Preheat the oven to 190°C. Lightly grease an 18cm x 23cm or 20cm square baking tin with coconut oil or line it with non-stick baking paper.
2Sift the flour into a large mixing bowl and add the coconut sugar, cacao powder, chia or flaxseeds, baking powder and vanilla. Mix together to blend the ingredients well. Pour in the warm water and stir to form a thick batter, then add the melted coconut oil and apple cider vinegar and mix together.
3Pour the batter into the prepared baking tin and smooth the top with a spatula. Use a teaspoon to gently swirl the almond butter across the top of the brownie batter.
4Bake in the oven for 25-28 minutes, until it begins to turn crisp around the edges and a knife comes cleanly out of the centre of the mixture. Remove from the oven and allow the brownies to cool for 10-15 minutes before cutting into squares. Serve warm or cool. Any leftovers will keep in an airtight container in the fridge for five or six days.
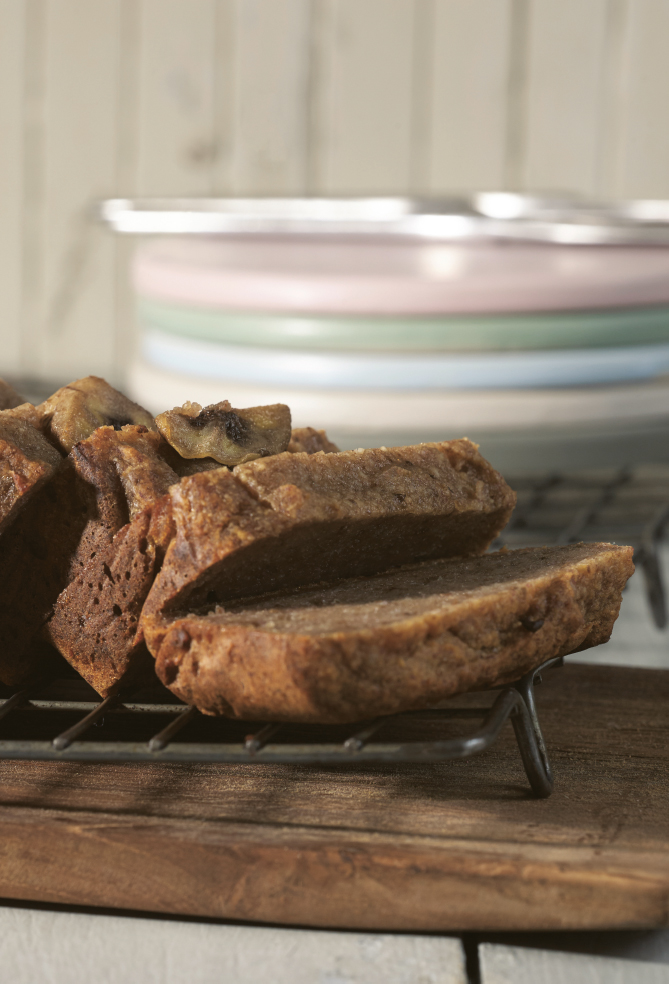
Banana Cake
MAKES 8 SLICES | PER SERVING: 308 CALORIES | 5.6G PROTEIN | 55.3G CARBS | 8.9G FAT
This delicious cake came about because, like many people, I had a bunch of bananas in the house that were a little too soft and ripe for eating, but I couldn’t justify throwing them out. So they helped to make the most fudgy, dense and moist banana cake instead. The bananas act as a fantastic natural sweetener and binder for the mixture along with the chia seeds, which means you don’t need to use any form of oil.
4 tbsp milled chia seeds
8 tbsp cold water
coconut oil, to grease
4½ ripe bananas
240g pure maple syrup or honey
2 tsp vanilla extract or powder
200g white rice flour or gluten-free all-purpose flour
100g ground almonds
2-3 tsp ground cinnamon
1 tsp gluten-free baking powder
1Start by placing the milled chia seeds in a small bowl, adding the water and mixing well. Set aside to allow the mixture to thicken.
2Preheat the oven to 190°C. Lightly grease a loaf tin withd coconut oil or line with non-stick baking paper.
3Place 4 bananas in a blender or food processor with the maple syrup, vanilla extract and chia mixture and blend until smooth. Cut the remaining ½ banana into slices.
4Put the flour, ground almonds, cinnamon and baking powder in a bowl and mix well, then add the banana mixture. Mix everything together until a thick batter forms.
5Transfer the batter to the loaf tin, smoothing the top. Decorate with the sliced banana and bake in the oven for 50-55 minutes, until the banana slices caramelise, the top turns golden brown and a knife comes out clean when inserted into the centre of the loaf.
6Allow the loaf to cool on a wire rack for 10 minutes before slicing and serving. The loaf will keep for two or three days in an airtight container in the fridge.
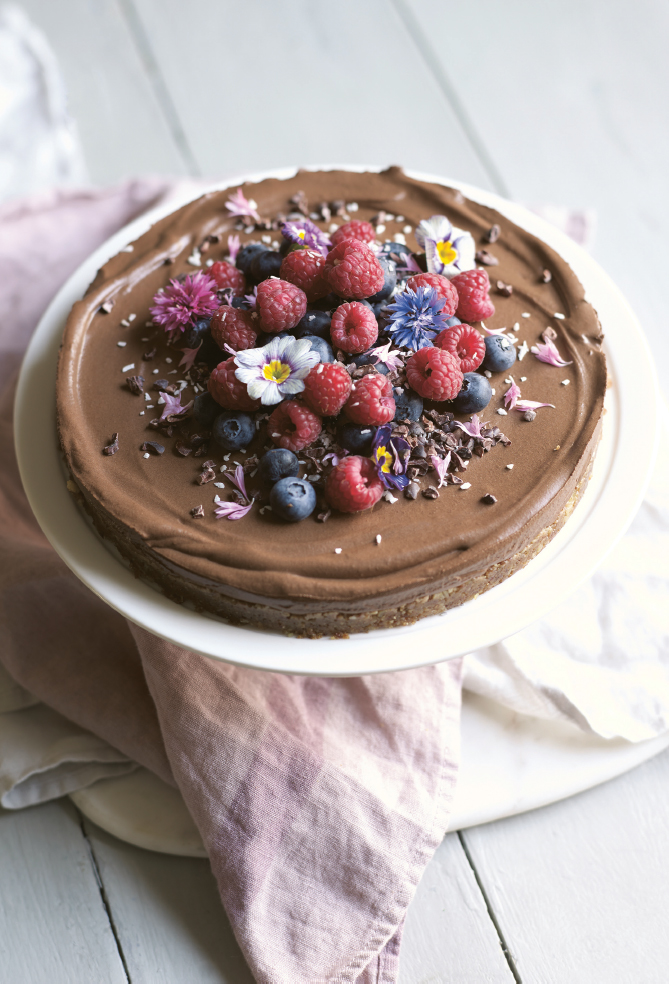
Chocolate Cheesecake
SERVES 6 | PER SERVING: 423 CALORIES | 5.5G PROTEIN | 42.7G CARBS | 28.8G FAT
I made this rich, decadent and creamy chocolate cheesecake for my family on Christmas Day last year and it was a huge hit. It tastes just like the real thing, but uses healthier ingredients, free from refined sugar, gluten and dairy. It’s so easy to make and keeps very well in the fridge.
FOR THE BASE:
150g dates, pitted and soaked for 20 minutes in hot water to soften
100g raw unsalted pecans
2 tbsp unsweetened desiccated coconut
2 tbsp smooth or crunchy almond butter
1 tbsp coconut oil, melted
2 tsp vanilla extract or powder
FOR THE CHEESECAKE FILLING:
2 x 400ml tins of full-fat coconut milk, chilled overnight in the fridge
6 tbsp raw cacao powder or unsweetened dark cocoa powder
6 tbsp pure maple syrup or honey
3 tsp vanilla extract or powder
½ ripe avocado, halved and stoned
1 tbsp coconut oil, melted
1-2 tbsp unsweetened almond milk, to blend
70g mixed fresh berries, to decorate
1To make the base, place the soaked and drained dates, pecans, desiccated coconut, almond butter, melted coconut oil and vanilla in a food processor fitted with an S blade. Process for 2-3 minutes, until a thick, sticky dough has formed. Press the base mixture into the bottom of a 20cm circular springform tin or silicone cake pan, ensuring the top is smooth and even.
2To make the cheesecake filling, carefully open the tins of coconut milk without shaking them. The coconut cream should have separated from the coconut water and set in the fridge. Spoon out 6 tablespoons of thick coconut cream into a blender or food processor. Add the cacao powder, maple syrup, vanilla, avocado and melted coconut oil. Blend into a smooth, thick mixture, using a dash of almond milk to help it blend if needed.
3Pour the cheesecake filling on top of the prepared base and smooth the top with a spatula to ensure it’s even. Place the cheesecake into the freezer to set for 30-45 minutes, then remove from the freezer, top with fresh berries, slice into pieces and serve chilled.
4The cheesecake can be stored in an airtight container in the fridge for three or four days.
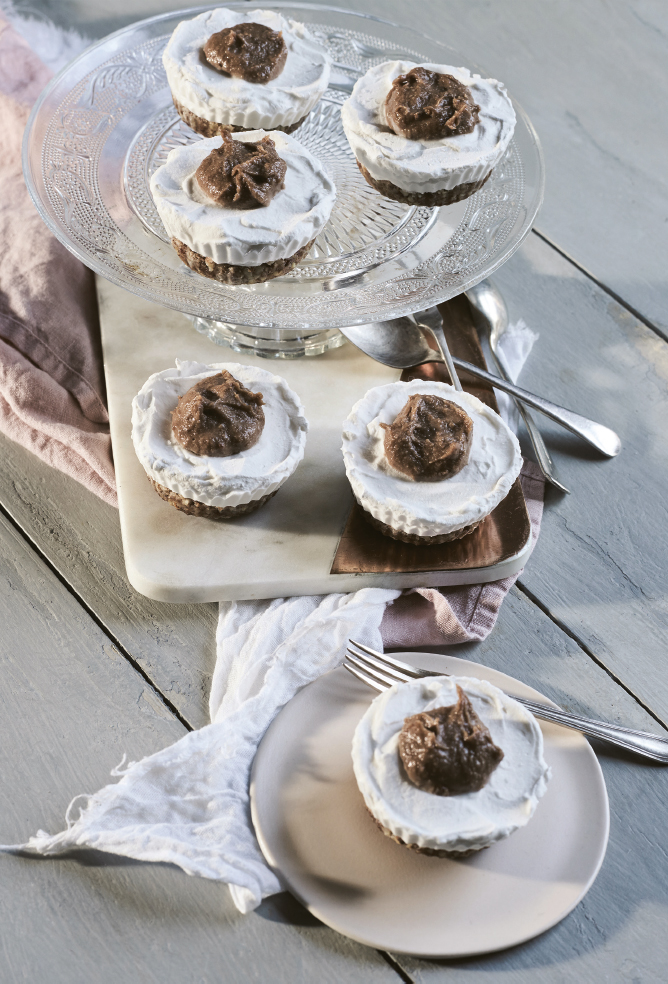
Mini Toffee Cheesecakes
MAKES 7 | PER CHEESECAKE: 516 CALORIES | 11.1G PROTEIN | 46.3G CARBS | 36G FAT
Creamy, silky miniature cheesecakes flavoured with toffee and vanilla, all on top of a chewy base. When I first made these at home to test the recipe, my husband polished them off in well under an hour. Always a good sign of a delicious dessert!
FOR THE BASE:
150g dates, pitted and soaked in hot water for 20 minutes to soften
140g raw unsalted almonds or walnuts
1-2 tsp ground cinnamon
1 tsp vanilla extract or powder
FOR THE CHEESECAKE FILLING:
1 x 400ml tin of full-fat coconut milk, chilled overnight in the fridge
210g raw unsalted cashew nuts, soaked in cold water for 15 minutes and drained
165g pure maple syrup or honey
70g coconut oil, melted
1 tsp vanilla extract or powder
FOR THE TOFFEE SAUCE:
150g dates, pitted and soaked for 20 minutes in hot water to soften
1 tbsp tahini
1 tsp vanilla extract or powder
pinch of sea salt
1To make the base, drain the soaked dates well and place them in a food processor with the almonds, cinnamon and vanilla. Blend them together until a sticky dough forms. You should be able to stick the mixture together between your fingers. Use a tablespoon to divide the mixture evenly between the wells of a muffin tin (you should aim to make around 7 cheesecakes), pressing down gently on the mixture to help it stick together and making sure the tops are smooth and even.
2To make the cheesecake filling, first carefully open the tin of chilled coconut milk without shaking it. The thick coconut cream should have separated from the coconut water. Spoon it out into a blender or food processor. Add the drained cashews, maple syrup, melted coconut oil and vanilla. Blend together until the mixture is smooth and creamy. Divide the filling between the bases in the muffin tray and make sure they’re smooth across the top.
3To make the toffee sauce, drain the soaked dates and place them in a blender with the tahini, vanilla and salt. Use a splash of warm water to help it blend into a smooth sauce. Stop and scrape down the sides of the blender if necessary. Use a teaspoon to place a dollop of toffee sauce on the centre of each cheesecake, smoothing it across the top.
4Place the entire tray into the freezer to set for at least 2 hours. Remove from the freezer when ready to serve and use a blunt knife to ease the edges of the cheesecakes out from the tin, then pop them out. The cheesecakes are best eaten on the day they’re made, but they can be stored in an airtight container in the fridge for up to two days.
Sticky Toffee Pudding
SERVES 6 | PER SERVING: 717 CALORIES | 8.2G PROTEIN | 82.4G CARBS | 43G FAT
An all-time favourite pudding complete with a sticky, sweet toffee sauce, but made with healthier ingredients. I’ve added fragrant spices and crunchy toasted pecans for extra texture.
80g raw pecans
375ml unsweetened almond milk
200g dates, pitted and chopped
½ tsp gluten-free baking soda
75g coconut sugar
55g coconut oil, at room temperature, plus extra to grease
155g white rice flour or gluten-free self-raising flour
1 tsp ground cinnamon
½ tsp ground ginger
pinch of ground nutmeg
FOR THE TOFFEE SAUCE:
160g pure maple syrup
125g smooth unsalted almond butter
70g coconut oil
2 tsp vanilla extract or powder
pinch of sea salt

1Preheat the oven to 190°C. Lightly grease a 23cm pie dish with coconut oil or line with non-stick baking paper.
2Spread out the pecans on a small baking tray and toast them in the oven for 8-10 minutes, until golden. Roughly chop them and set aside.
3In a medium saucepan set over a medium-high heat, bring the almond milk to the boil. Add the chopped dates and reduce the heat to low for 1 minute, then remove from the heat and mix in the baking soda, allowing it to fizz slightly.
4In a large mixing bowl, use a hand-held whisk or electric whisk to whisk together the coconut sugar and coconut oil until they’re as smooth as possible. Add the almond milk and date mixture and combine well, then add the flour, cinnamon, ginger, nutmeg and toasted pecans to the mixing bowl and mix together until combined.
5Transfer the sponge batter to the prepared pie dish, spreading it out evenly. Bake in the oven for 25-30 minutes, until the cake is firm but spongy to touch. Remove from the oven and allow it to cool for 10-15 minutes before slicing and serving.
6While the cake bakes, make the toffee sauce. Add all the ingredients to a small saucepan set over a medium-low heat and whisk together for about 3 minutes, until all the ingredients have melted together into a smooth sauce. To make it even smoother, blend it at high speed in a blender for 30-40 seconds.
7Serve the warm sauce over a slice of sticky toffee sponge. Any leftovers can be stored in an airtight container in the fridge for three or four days.
Apple, Pear and Pecan Crumble with Vanilla Whip
SERVES 10 | PER SERVING WITH VANILLA WHIP: 421 CALORIES 4.1G PROTEIN | 56G CARBS | 22.6G FAT
This cosy and comforting baked crumble is a firm family favourite of mine and the perfect dessert to enjoy with Sunday lunch or any special occasion. It’s so simple to make and bursting with spices and flavour, and the cool, creamy vanilla whip makes it an extra special pudding.
4 medium-large apples, peeled, cored and thinly sliced (I like to use Pink Lady)
4 medium-large ripe pears, peeled, cored and thinly sliced
50g coconut sugar
60ml water
3 tbsp cornstarch or arrowroot starch
2 tbsp fresh lemon juice
2 tsp ground cinnamon
1 tsp grated fresh ginger (optional)
½ tsp ground nutmeg
FOR THE CRUMBLE TOPPING:
145g coconut sugar
120g coconut oil, melted, plus extra to grease
90g gluten-free porridge oats
70g brown or white rice flour
55g ground almonds
50g pecans, chopped
1 tsp ground cinnamon
FOR THE VANILLA WHIP:
2 x 400ml tins of full-fat coconut milk, chilled overnight in the fridge
2 tsp vanilla extract or powder
4-6 drops of liquid stevia, to sweeten (optional)
1Preheat the oven to 180°C. Lightly grease a 23cm x 33cm baking dish with coconut oil.
2In a large mixing bowl, toss together the slices of apple and pear with the coconut sugar, lemon juice, cinnamon, water, starch, ginger, if using, and nutmeg. Transfer to the prepared baking dish.
3In the same mixing bowl, add all the crumble topping ingredients and mix together well. Taste and adjust the amount of sugar or spices, as needed. Pour the topping across the apple and pear mixture in an even layer.
4Bake in the oven for 45-50 minutes, until the topping is golden brown and the filling is bubbling at the edges. Remove from the heat and set aside to cool.
5Meanwhile, to make the vanilla whip, carefully open the tins of chilled coconut milk without shaking them. The coconut cream should have set in a thick layer at the top of the tin. Use a spoon to scoop the cream into a mixing bowl, leaving the coconut water behind. Add the vanilla and liquid stevia, if using, and use a hand-held whisk to whisk the coconut cream for 2-3 minutes, until light and fluffy.
6Serve the warm crumble with a dollop of vanilla whip. Any leftovers can be stored in an airtight container in the fridge for two or three days.
Squidgy Banoffee Pie
SERVES 6 | PER SERVING: 459 CALORIES | 10.3G PROTEIN | 63.5G CARBS | 21.6G FAT
A healthier version of the traditional banoffee pie and free from gluten, dairy and refined sugar, but just as creamy, gooey and delicious. A definite people pleaser, it’s sure to be a hit with everybody at special celebrations. I love to make this pie for summer parties with family and friends, and there’s never anything left to bring home again.
FOR THE BASE:
80g gluten-free rolled oats
150g pitted dates, soaked in hot water for 20 minutes to soften
145g raw unsalted almonds
1 tbsp coconut flour
2 tsp vanilla extract or powder
1 tsp ground cinnamon
FOR THE CARAMEL LAYER:
150g pitted dates, soaked in hot water for 20 minutes to soften
2 tbsp raw unsalted almond butter
2 tbsp pure maple syrup
2 tsp vanilla extract or powder
1 tsp fresh lemon juice
1 large or 2 small ripe bananas, sliced
FOR THE TOP LAYER:
2 x 400ml tins of full-fat coconut milk, chilled overnight in the fridge
2 tsp vanilla extract or powder
pinch of raw cacao powder or unsweetened dark cocoa powder, to decorate
1First make the base. Pour the oats in a food processor or blender and blend for up to 60 seconds, until a fine flour forms. Place the oat flour and the remaining base ingredients in a food processor fitted with the regular S blade and blend until a sticky dough forms. You may want to create a coarse meal or to leave a bit more texture. Press the dough into a 12cm silicone or springform tin, or into three small tins, as pictured, and place in the freezer to set for 20 minutes.
2To make the middle caramel layer, drain the soaked dates and blend all the ingredients except the banana together in a blender or food processor until it becomes a smooth, thick caramel sauce. Use a little water to help it blend if necessary. Smooth the caramel layer on top of the base, then layer the banana slices on top. (Save some bananas to decorate the very top of the pie.) Place the pie back in the freezer to set.
3To make the top cream layer, carefully open up the chilled tins of coconut milk without shaking them. The cream should have separated from the liquid. Spoon out the cream and place it in a mixing bowl. Add the vanilla and use a hand-held electric whisk or a fork to briskly whisk the cream until it’s frothy. Smooth the cream layer on top of the pie, ensuring it’s even.
4Add the remaining banana slices and finish with a sprinkle of cacao powder to decorate. Serve chilled. The banoffee pie can be stored in the fridge in an airtight container for two or three days.
Chocolate Chip Cookie Dough Brownies
MAKES 8 BROWNIES | PER BROWNIE: 288 CALORIES | 5.8G PROTEIN | 37.8G CARBS | 13.1G FAT
If you’re finding it difficult to choose between a chocolate chip cookie or a fudge brownie for your special sweet treat, then you have come to the right place. These brownies are the perfect combination of a chocolate chip cookie and a gooey fudge brownie, made with healthier ingredients and naturally sweetened with coconut sugar and dates. Decision made!
160g gluten-free rolled oats
115g brown rice flour
½ tsp gluten-free baking powder
110g pitted dates, soaked in hot water for 20 minutes to soften
3 tbsp coconut oil, melted, plus extra to grease
3 tbsp raw unsalted almond butter
3 tbsp coconut sugar
1 tsp vanilla extract
50g dark chocolate (at least 80-90% cocoa content), broken into small pieces
1Preheat the oven to 190°C. Lightly grease a medium-sized baking tray with coconut oil or line with non-stick baking paper.
2Place the oats in a blender and blend for 60 seconds, until a fine flour forms. Tip the oats into a large mixing bowl with the brown rice flour and baking powder and mix together.
3Drain the dates and place them in a blender or food processor with the melted coconut oil, almond butter, coconut sugar and vanilla extract. Blend until a smooth caramel forms. Mix the caramel into the dry ingredients until a thick dough forms. Gently fold in the chocolate pieces, ensuring it’s mixed in evenly.
4Press the dough into the tray in an even layer. Bake in the oven for 12-15 minutes, until firm to touch and turning golden brown. Allow to cool for 10 minutes before slicing into squares and serving. The brownies can be stored in an airtight container in a cool, dry place for up to three days.
Raspberry Coconut Ice Cream Brownie Bars
MAKES 6 BARS | PER SERVING: 272 CALORIES | 5G PROTEIN | 24.8G CARBS | 19.3G FAT
Love ice cream? Love brownies? Two of my all-time favourite desserts are combined here in these delicious ice cream brownie bars. They make the best sweet treat on a warm day and they’re fun to eat too. Finger food at its finest.
80g raw unsalted almonds
75g raw pecans
35g raw cacao powder
130g dates, pitted and soaked in hot water for 20 minutes to soften
1 tsp vanilla extract
2½ tbsp coconut oil, melted
FOR THE RASPBERRY COCONUT ICE CREAM:
1 x 400ml tin of full-fat coconut milk, chilled overnight in the fridge
60g fresh raspberries
3 tbsp coconut oil, melted
1 tbsp pure maple syrup or honey
2 tsp vanilla extract or powder
1Place the almonds, pecans and cacao powder in a food processor and blend until a crumbly mixture forms. Transfer to a mixing bowl.
2Place the soaked and drained dates and vanilla in the food processor and blend until smooth. Stop to scrape down the sides and use a splash of warm water to help it blend if necessary. Add the nut and cacao mixture and the melted coconut oil and pulse to combine until the mixture forms a thick, clumpy dough.
3Line two loaf tins with non-stick baking paper. Divide the brownie mixture in half and pack the base of each tin with half of the mixture. Press down firmly to form a thin, even layer. Place the tins in the freezer to set for 20-30 minutes.
4To make the ice cream, carefully open the tin of chilled coconut cream without shaking it. The thick coconut cream should have separated from the water. Spoon the coconut cream into a blender or food processor. Add the raspberries, melted coconut oil, maple syrup and vanilla to the coconut cream and blend on high until a smooth ice cream forms.
5Remove the two brownie tins from the freezer. Spoon the ice cream on top of one of the brownie layers, smoothing it across the top with a spatula. Carefully lift the second layer of brownie out of the tin, peel off the paper and place the brownie on top of the ice cream layer, pressing down very gently.
6Place it back in the freezer to set for 20 minutes, then remove and slice into bars using a sharp knife. Serve chilled. Any leftovers can be stored in an airtight container in the fridge for two days, but the bars are best eaten on the day that they’re made.
Maple and Cinnamon Blondies
MAKES 9 BLONDIES | PER BLONDIE: 254 CALORIES | 6G PROTEIN | 30G CARBS | 12G FAT
These flourless and oil-free blondies use chickpeas as the secret healthy and protein-rich ingredient. They’re gluten free, naturally sweetened and a delicious way to sneak some extra fibre-rich beans into your diet. I love them with a cup of tea as a treat-day snack after a workout.
coconut oil, to grease
1 x 400g tin of chickpeas, drained and rinsed
235g pure maple syrup or honey
130g smooth unsalted almond butter or peanut butter
2 tsp vanilla extract or powder
1 tsp ground cinnamon
1 tsp gluten-free baking powder
100g dark chocolate (70-85% cacao), chopped into chunks, or 50g pecan halves (optional)
1Preheat the oven to 190°C. Lightly grease a 23cm square baking tin with coconut oil or line with non-stick baking paper.
2Place the chickpeas, maple syrup, almond butter, vanilla, cinnamon and baking powder in a food processor and blend on high for 3-5 minutes, scraping down the sides as needed, until the mixture is smooth and well blended. Stir in the dark chocolate chunks or pecan halves, if using.
3Pour the mixture into the prepared baking tin and bake in the oven for 35-40 minutes, until golden brown with crisp, firm edges. Don’t worry if the centre is still soft to touch, as it will gently firm up as they cool. Let the blondies cool before slicing and serving. Store them in an airtight container in the fridge for three or four days.