Eat Yourself Fit: Make Your Workout Work Harder - Rosanna Davison (2016)
PART 7. EAT YOURSELF FIT RECIPES
SNACK SMART
Fitness tip
If you get into the habit of choosing SMART SNACKS to munch on when hunger strikes between meals, a STRONG, lean, HEALTHY BODY becomes so much easier to achieve and maintain. Ditch the sugar and processed foods and whizz up one of the DELICIOUS DIPS in this section to enjoy with veggie sticks and seeded crackers, or impress your family and friends with your own homemade kale crisps.
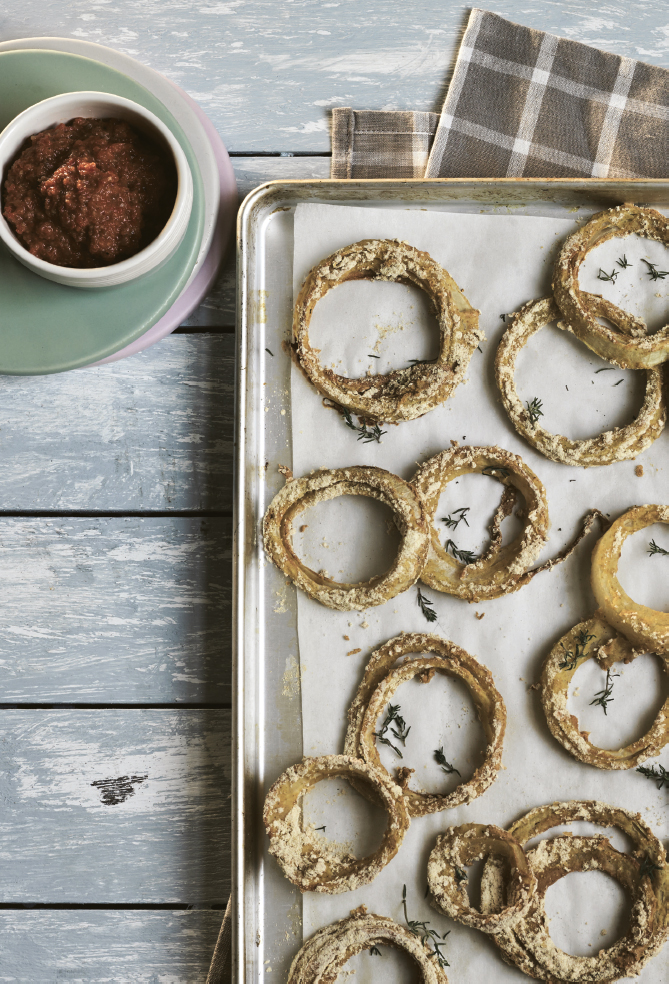
Crispy Baked Onion Rings with Sweet Chilli Sauce
SERVES 4 | PER SERVING: 270 CALORIES | 15.1G PROTEIN | 46.3G CARBS | 3.8G FAT
Crunchy onion rings and sweet chilli sauce get a low-calorie makeover in this healthy snack recipe, which uses chickpea flour and a selection of spices to coat the onion rings. They’re always a big hit with family and friends and are the perfect pairing for this sugar-free sweet chilli sauce.
coconut oil, to grease
125ml water
120g chickpea flour (gram flour)
6 tbsp nutritional yeast
2 tbsp ground cumin
1 tbsp garlic powder
2 tsp smoked paprika
pinch of cayenne pepper
4 medium red or white onions, peeled and sliced into rings
FOR THE SWEET CHILLI SAUCE:
2 red bell peppers, deseeded and roughly chopped
4 dates, pitted and chopped, or 1 tbsp pure maple syrup or honey
1 red chilli, deseeded and chopped
1 garlic clove, peeled
1 tbsp fresh lime juice
1 tsp chopped fresh ginger
sea salt and freshly ground black pepper

1Preheat the oven to 200°C. Lightly grease two large baking trays with coconut oil or line with non-stick baking paper.
2Mix the water and 30g of the chickpea flour in one bowl. Mix the remaining 90g chickpea flour with the nutritional yeast and spices in a separate bowl.
3Submerge the onion rings in the water and flour mixture, then coat them well in the spice mixture. Lay them out on the baking tray and bake in the oven for 20-25 minutes, until golden brown and crisp.
4Meanwhile, place all the ingredients for the sweet chilli sauce in a blender or food processor and blend on high speed for 30-40 seconds, until smooth.
5Serve the onion rings with the sweet chilli sauce on the side. Any leftovers can be stored in a covered container in the fridge for four or five days.
Cheesy Curried Kale Crunchies
SERVES 2 | PER SERVING: 171 CALORIES | 13.7G PROTEIN | 10G CARBS | 5.5G FAT
These cheesy curried kale crunches are the perfect healthy alternative to regular crisps. They’re a crunchy and satisfying snack, low in carbs, fat and calories but high in protein, phytochemicals and essential good mood nutrients.
coconut oil, to grease
150g fresh kale
2 medium tomatoes, roughly chopped
1 garlic clove, peeled
2 tbsp hulled hemp seeds
2 tbsp nutritional yeast
1 tbsp tamari
1 tbsp fresh lemon juice
2 tsp curry powder
2 tsp smoked paprika
1 tsp Cajun spices
pinch of cayenne pepper (optional)
sea salt and freshly ground black pepper

1Preheat the oven to 180°C. Lightly grease two baking trays with coconut oil.
2Prepare the kale by removing the tough stalks, ripping the leaves into smaller pieces and rinsing well. Gently pat dry with kitchen paper, transfer to a large mixing bowl and set aside.
3Place the rest of the ingredients in a blender and blend until a thick, smooth sauce forms. Taste and adjust the seasoning as needed.
4Pour the sauce on top of the kale and mix together well, ensuring the kale is well coated. Spread out the kale on the baking trays and dry it out in the oven with the door left slightly open. This should take 40-45 minutes, but keep an eye on the kale to ensure it doesn’t burn and turn it over after 20 minutes to allow both sides to bake.
5Serve warm or cold. Any leftovers can be stored in an airtight container for up to two days, but the kale is best eaten on the day it’s made.
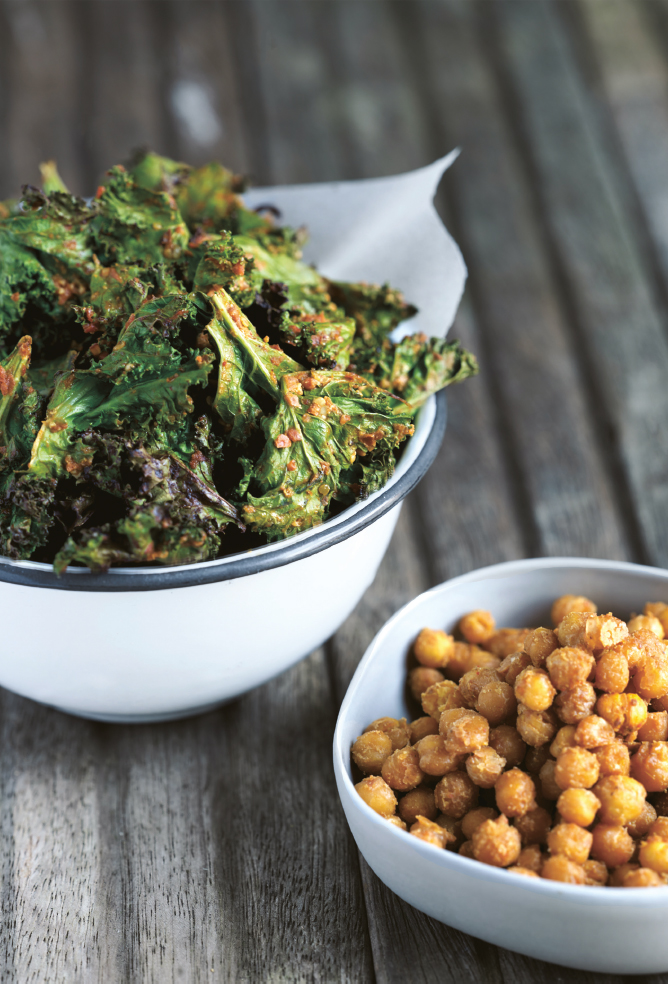
Spicy Roast Chickpea Bites
SERVES 2 | PER SERVING: 258 CALORIES | 13.7G PROTEIN | 34.5G CARBS | 8G FAT
Crispy, spicy and completely addictive, these chickpea bites are a great way to add more fibre and protein to your diet. If a strong and lean body is your goal, this is a super snack to munch on.
1 x 400g tin of chickpeas, drained and rinsed
2 tbsp nutritional yeast
2 tsp coconut oil, melted
1-2 tsp smoked paprika
1 tsp ground cumin
1 tsp garlic powder
pinch of cayenne pepper (optional)
sea salt and freshly ground black pepper

1Preheat the oven to 190°C. Line a large baking tray with non-stick baking paper.
2Pat the rinsed chickpeas dry with kitchen paper and place them in a large mixing bowl. Add the nutritional yeast, melted coconut oil, smoked paprika, cumin, garlic powder, cayenne pepper, if using, and seasoning. Toss together until the chickpeas are well coated.
3Spread the chickpeas out on the baking tray and roast in the oven for 25-30 minutes, until they’re crisp and golden. Stir the chickpeas or shake the tray every 10 minutes. Remove from the oven and allow the chickpeas to cool for 10 minutes to crisp up even more.
4The chickpeas are best enjoyed on the day they’re made, but can be stored in an airtight container in a cool, dry place for two or three days.
Omega-3 Superseed Crackers
SERVES 4-6 | PER SERVING: 287 CALORIES | 10.5G PROTEIN | 20G CARBS | 20.2G FAT
All the fibre and omega-3 goodness of flax and chia seeds packed into a crispy, lightly salted cracker. They’re simple, nutritious and a healthier option than store-bought crackers. I enjoy them dipped into hummus (try my recipes here) or guacamole (here).
170g flaxseeds
160g whole chia seeds
500ml cold water
4 tbsp tamari
1 tsp garlic powder
sea salt and freshly ground black pepper

1Soak the seeds in the cold water and tamari for 1 hour to encourage them to stick together.
2Preheat the oven to 180°C. Line two baking trays with non-stick baking paper.
3Spread the soaked seeds out across the trays and ensure they’re smooth and even, then sprinkle over the garlic powder and salt and pepper. Bake them in the oven for 45-50 minutes, until they are completely dried out.
4Once fully dry, remove from the oven and allow them to cool for 15 minutes, then cut into crackers. Store in an airtight container in a cool, dry place for up to three days.
Garlic and Rosemary Bread
MAKES 1 LOAF | PER SERVING: 209 CALORIES | 3.4G PROTEIN | 43G CARBS | 2.3G FAT
The special key ingredient for creating texture and flavour in this bread is sweet potato. Using it means that you can really reduce the fat and oil content, making it a healthy and fibre-filled bread. I love the flavours of roast garlic and rosemary together in it, and it goes very well with my carrot, coconut and red lentil soup here.
2 garlic cloves, peeled
635g sweet potato, peeled and cut into quarters
475g rice flour, spelt flour or gluten-free all-purpose flour
1 tbsp milled flaxseeds
1 tbsp coconut oil, melted, plus extra for greasing
1 tsp dried rosemary
1 tsp dried parsley
1 tsp onion powder
1 tsp gluten-free baking powder
½ tsp gluten-free baking soda
pinch of sea salt
60ml water
1 tbsp sesame seeds

1Preheat the oven to 190°C. Lightly grease a loaf tin with coconut oil or line with non-stick baking paper.
2Place the garlic cloves in the tin and roast in the oven for 10-12 minutes, until lightly golden. Remove from the oven and set aside, but keep the oven on.
3Steam the sweet potato for 8-10 minutes, until soft and easy to slice with a knife. Place the roast garlic and sweet potato in a blender or food processor and blend together into a smooth purée, using 3-4 tablespoons of water to help it blend if necessary.
4In a large mixing bowl, combine the sweet potato and garlic purée with the flour, flaxseeds, melted coconut oil, rosemary, parsley, onion powder, baking powder, baking soda and a pinch of sea salt. Use your hands to knead the dough until the sweet potatoes are well combined.
5Gradually add the water to the mixture to create a soft dough, which should be soft but not sticky or wet. Add more flour if it’s too wet or more water if it’s too dry and knead for another 3-4 minutes.
6Transfer the dough to the prepared loaf tin and ensure the top is smooth and even without pressing down on it too much. Sprinkle the sesame seeds on top and bake in the oven for 30-35 minutes, until golden or a knife comes out clean when it’s inserted in the middle.
7Remove from the oven and allow the loaf to cool for 5 minutes before transferring to a wire rack and cooling for another 10 minutes. Serve warm with your choice of topping.
8The bread can be stored in an airtight container in a cool, dry place for two or three days and can be frozen for up to three months.
Sun-Dried Tomato and Basil Hummus
SERVES 2-3 | PER SERVING: 198 CALORIES | 11.3G PROTEIN | 29G CARBS | 5.2G FAT
Sun-dried tomatoes always seem to make recipes taste a little bit more special, and they go extremely well with fresh, fragrant basil. This hummus tastes great as a dip, but I also love it on salads, in wraps and even stirred into soups.
1 x 400g tin of chickpeas, drained and rinsed
8-10 sun-dried tomato halves
1 large garlic clove, peeled
2 tbsp nutritional yeast (optional but advised)
1 tbsp fresh lemon juice
1 tbsp tahini
1 tsp smoked paprika
pinch of cayenne pepper or dried chilli flakes
sea salt and freshly ground black pepper
3-4 tbsp unsweetened almond milk
1 handful of fresh basil leaves

1Add the chickpeas to a food processor along with the sun-dried tomatoes, garlic, nutritional yeast, lemon juice, tahini, smoked paprika, cayenne pepper and seasoning. Slowly add the almond milk to help it blend and process until smooth and creamy or pulse to allow some texture to remain, stopping to scrape down the sides of the bowl if necessary. Add the basil and pulse again to combine. Taste and adjust the seasoning as needed.
2Store any leftovers in an airtight container in the fridge for three or four days.
Sweet Potato and Spinach Hummus
SERVES 3-4 | PER SERVING: 164 CALORIES | 8.3G PROTEIN | 25.7G CARBS | 3.8G FAT
A tasty twist on traditional hummus, this low-calorie and oil-free dip is a great way to include more leafy greens in your diet. I love this hummus with raw carrot and cucumber sticks for a healthy snack or as a salad topping in place of creamy, calorific dressings.
1 sweet potato, peeled and chopped into small chunks
1 x 400g tin of chickpeas, drained and rinsed
2 garlic cloves, peeled
juice of ½ lemon
2 tbsp nutritional yeast (optional)
1 tablespoon tahini
1 tsp Cajun spices
1 tsp smoked paprika
pinch of dried chilli flakes dash of tamari
dash of unsweetened almond milk, to blend
sea salt and freshly ground black pepper
30g baby spinach

1In a medium-sized saucepan set over a medium to high heat, boil the sweet potato chunks in plenty of water for 10-12 minutes, until they’re soft enough to slice into with a knife. Drain well and transfer to a blender or food processor. Add the chickpeas, garlic, lemon juice, nutritional yeast, if using, tahini, Cajun spices, smoked paprika, chilli flakes and a dash of tamari. Pulse to combine, using a little almond milk to help it blend if necessary.
2Continue to pulse until the hummus reaches your desired texture, then taste and adjust the seasoning if necessary. Stir in the spinach, allowing it to wilt in the warmth.
3Serve the hummus warm or allow it to chill in the fridge for 30 minutes before serving. The hummus can be stored in an airtight container in the fridge for up to four days.

Roasted Red Pepper and Butter Bean Dip
SERVES 3-4 | PER SERVING: 78 CALORIES | 4.5G PROTEIN | 12.5G CARBS | 1.4G FAT
This low-fat, low-calorie dip packs in a lot of flavour. The sweet roasted pepper and smoked paprika work so well with the mellow, creamy butter beans. I love it as a healthy dip for raw vegetable sticks or my omega-3 superseed crackers here.
1 red pepper, deseeded and quartered
1 x 400g tin of butter beans, drained and rinsed
juice of ½ lemon
2 tbsp nutritional yeast (optional)
2 tsp smoked paprika
1 tsp tahini
dash of tamari
sea salt and freshly ground black pepper

1Preheat the oven to 190°C. Line a small baking tray with non-stick baking paper.
2Place the pepper on the tray and roast in the oven for 15-20 minutes, until its skin turns lightly golden brown.
3Place the roasted pepper in a blender or food processor and add the butter beans, lemon juice, nutritional yeast, if using, smoked paprika, tahini, tamari and seasoning. Blend well until a smooth dip forms, adding a dash of water to help it blend if necessary.
4Transfer to a bowl and serve with fresh vegetable sticks or enjoy on sandwiches, wraps and salads. Any leftovers can be stored in an airtight container in the fridge for three or four days.
Lime and Mint Avocado Salsa Boats
SERVES 2 | PER SERVING: 180 CALORIES | 2.7G PROTEIN | 13.5G CARBS | 14.9G FAT
This makes a great snack, light meal or a simple starter for dinner parties. The zesty lime and refreshing mint work well with the cool creaminess of ripe avocado, and it’s a fun way to enjoy one of the most perfect sources of healthy fat.
1 ripe avocado, halved and stoned
1 medium tomato, chopped
2 spring onions, chopped
1 handful of fresh mint leaves, chopped
1 handful of fresh coriander leaves, chopped
1 tbsp tamari
1 tbsp fresh lime juice
2 tsp brown rice vinegar
1 tsp smoked paprika, plus a pinch to garnish
1 tsp coriander seeds or ground coriander
½ tsp dried chilli flakes, or to taste
sea salt and freshly ground black pepper

1Scoop the flesh out of the avocado, setting the empty half shells aside. Chop the avocado into bite-sized pieces, then place in a mixing bowl with all the remaining ingredients. Mix together well, taking care not to mash the avocado. Taste and adjust the seasoning as needed.
2Divide the filling between the avocado shells, sprinkle with a pinch of smoked paprika and serve. Any leftovers can be stored in a covered container in the fridge for up to two days, but it’s best eaten as soon as possible so that the avocado doesn’t brown.
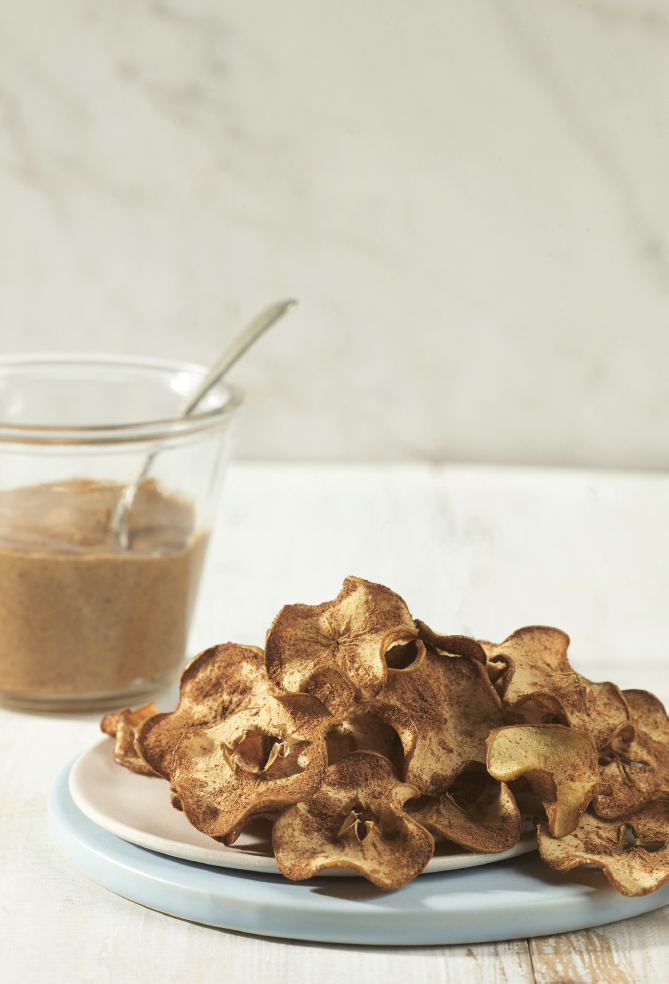
Spiced Apple Crisps
SERVES 2 | PER SERVING: 100 CALORIES | 0.5G PROTEIN | 27.2G CARBS | 0.3G FAT
Free from refined sugar, the natural sweetness of apple is enhanced by the warmth of ground cinnamon. Rich in antioxidants, try them dipped into almond butter for a satisfying snack that’s perfect before bed to encourage restful sleep.
2 firm apples, such as Braeburn or Pink Lady
2 tsp ground cinnamon
¼ tsp ground nutmeg

1Preheat the oven to 125°C. Line one or two baking trays with non-stick baking paper.
2Rinse and dry the apples, then use an apple corer to remove the cores and seeds. Using a mandolin, slice the apples very thinly. Place the apple slices in a large bowl and toss with the cinnamon and nutmeg to coat.
3Spread the apple slices across the baking trays and bake in the oven for approximately 2 hours, until crunchy, flipping the slices halfway through to ensure they’re evenly baked. Remove from the oven and allow the slices to cool before serving. They taste especially good dipped in nut or seed butter.
4Store any leftovers in an airtight container for up to three days.
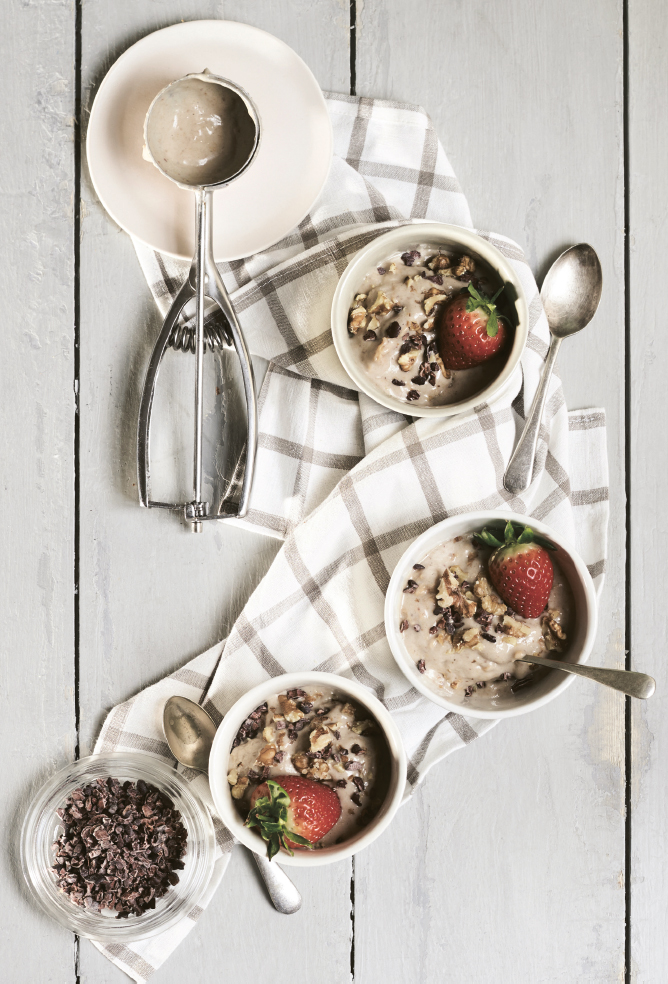
Chunky Monkey Peanut Butter Ice Cream
SERVES 2 | PER SERVING: 303 CALORIES | 6.5G PROTEIN | 42.7G CARBS | 14.6G FAT
I’ve put this ice cream in the snacks section because it makes such a satisfying bite to eat, but it’s so healthy and energy-boosting that you could also enjoy it for breakfast. Packed with natural energy from the dates and frozen banana and the healthy fats and protein of the peanut butter and walnuts, your friends and family won’t believe that this delicious ice cream is so good for you.
65ml unsweetened almond milk or low-fat coconut milk
2 bananas, peeled, cut into chunks and frozen for at least 2 hours or overnight
3 dates, pitted and soaked in hot water for 5-10 minutes to soften
2 tsp vanilla extract, vanilla powder or vanilla bean paste
½ tsp ground cinnamon
½ tsp almond extract pinch of ground nutmeg 6-8 drops of liquid stevia (optional)
2 tbsp smooth or crunchy peanut butter (try to buy an organic brand with no added sugar or palm oil)
TO SERVE:
4 medium-large strawberries, hulled and sliced
1 tbsp cacao nibs or dairy-free dark chocolate chips
1 tbsp raw walnut pieces

1Place the almond milk, frozen banana chunks, soaked and drained dates, vanilla, cinnamon, almond extract, nutmeg and stevia, if using, in a blender or food processor and blend on high for 2-3 minutes, until the mixture becomes smooth and resembles soft-serve ice cream. If it becomes too liquid, place it in the freezer for an hour to set. Transfer to a mixing bowl and use a spoon to swirl in the peanut butter.
2Serve cold, topped with strawberries, cacao nibs or chocolate chips and raw walnut pieces. It can be made 2 hours in advance and stored in the freezer, but it’s best eaten as soon as it’s made.
Chocolate Brownie Superfood Amazeballs
MAKES 16 BALLS | PER BALL: 103 CALORIES | 3G PROTEIN | 11.3G CARBS | 5.9G FAT
Healthy ingredients are blended and rolled into superfood brownie balls for an energising and filling snack. Dates, cinnamon and vanilla add natural sweetness, with some crunch from the raw almonds and heaps of antioxidants from the cacao powder.
145g raw unsalted almonds
25g raw cacao powder or unsweetened cocoa powder
1 tsp ground cinnamon
1 tsp vanilla extract or powder
150g dates, pitted, chopped and soaked in hot water for 20 minutes to soften
2-3 tbsp water, to blend
3 tbsp cacao nibs or unsweetened dark chocolate chips
4-6 drops of liquid stevia (optional)
TO COAT:
4 tbsp raw cacao powder or unsweetened desiccated coconut

1Place the almonds in a food processor and process until coarsely ground. Add the cacao powder, cinnamon and vanilla and pulse again to combine. Add the soaked and drained dates and slowly add the water. Process until a thick, sticky dough has formed. Pulse in the cacao nibs and stevia, if using.
2Roll pieces of the dough into small, tablespoon-sized balls. You can roll them in the cacao powder, coconut or any other toppings of your choice.
3Place your brownie bites in a container in the refrigerator or freezer for at least 30 minutes, then serve chilled. Any leftovers can be stored in an airtight container in the fridge for four or five days.
Fitness Fudge Brownies
MAKES 4-6 BROWNIES | PER BROWNIE (SWEETENED WITH MAPLE SYRUP): 100 CALORIES 2.2G PROTEIN | 22.7G CARBS | 1G FAT
3 ripe medium bananas
45g raw cacao powder or unsweetened dark cocoa powder
2 tbsp pure maple syrup or honey or 3-4 pitted, chopped dates, to sweeten (optional)
1 tsp vanilla extract or powder
½ tsp gluten-free baking powder
These soft and rich chocolate fudge brownies are the perfect post-workout treat to refuel. Puréed banana creates the naturally sweet flavour and soft texture without the need for flour, fat or sugar. Cacao powder is rich in antioxidants and magnesium to help repair and protect your cells after exercise and prevent tight muscles.

1Preheat the oven to 200°C. Line a 20cm square baking tin with non-stick baking paper.
2Place the bananas in a blender or food processor and blend to a smooth purée. Transfer the bananas to a mixing bowl and fold in the cacao powder, then add the sweetener, if using, vanilla and baking powder. Mix together well until a thick batter forms.
3Pour the batter into the prepared tin and bake in the oven for 15-18 minutes, until the top has darkened slightly and is firm to touch. The middle will still look soft. Remove from the oven and allow the brownies to cool for 10 minutes. They will set more in the middle as they cool.
4Slice into brownies and serve. Any leftovers can be stored in an airtight container in the fridge for three or four days.
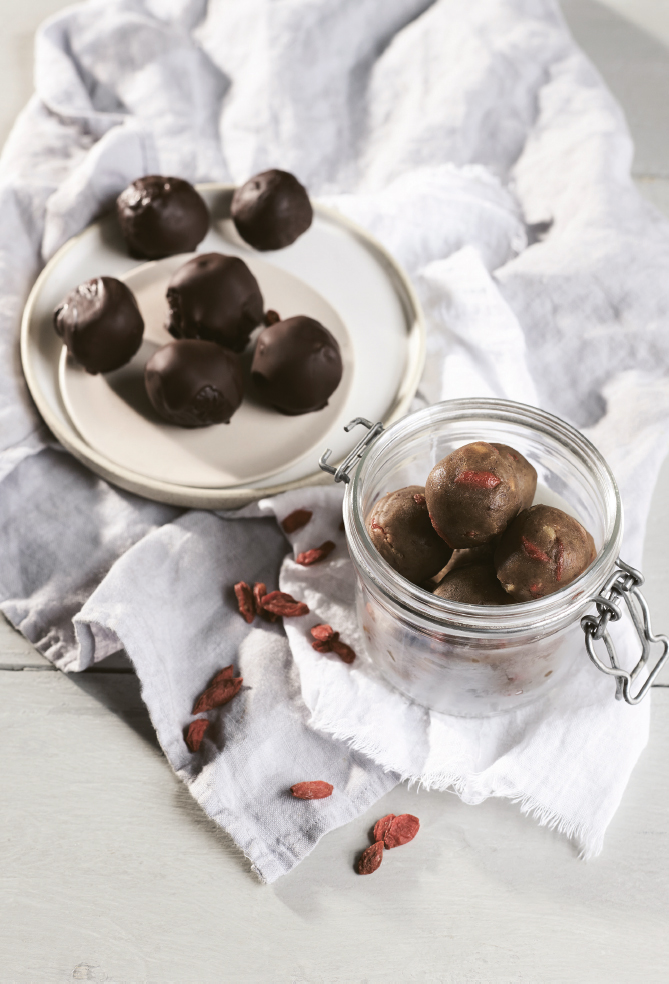
Peanut Butter and Goji Berry Protein Amazeballs
MAKES 15 BALLS | PER BALL: 54 CALORIES | 3.3G PROTEIN | 5.9G CARBS | 2.4G FAT
A great post-workout snack, breakfast on the go or guilt-free sweet treat when you fancy something tasty and satisfying. The goji berries add a pop of crunchy sweetness and help to boost the nutritional value of these balls even more. They’re a rich source of antioxidant vitamins A and C, energy-boosting B vitamins and iron, plus magnesium, potassium and selenium.
75g dates, pitted, chopped and soaked in hot water for 20 minutes to soften
2 scoops of Sunwarrior vanilla protein powder
4 tbsp smooth or crunchy peanut butter (look for organic peanut butter, free from added sugar and palm oil)
2 tbsp goji berries
2 tsp vanilla extract
1 tsp ground cinnamon (optional)

1Drain the soaked dates well and place them in a food processor or blender along with a splash of warm water. Blend until a smooth paste forms, adding more water if necessary.
2Place the protein powder, peanut butter, goji berries, vanilla and cinnamon, if using, into a large mixing bowl and add 2 tablespoons of the date paste. Mix the ingredients together well until a thick dough forms. Taste at this point and add more vanilla or cinnamon if desired.
3Roll the mixture into even-sized balls and lay them out on a piece of non-stick baking paper. Place the balls in the fridge to set for 30 minutes, then serve chilled. Leftovers can be stored in an airtight container in the fridge for up to three days.