Workshop Mastery with Jimmy DiResta: A Guide to Working with Metal, Wood, Plastic, and Leather - Jimmy DiResta, John Baichtal (2016)
Chapter 4. Working with Metal
I love working with metal: bending it, peening it, welding it. There’s still a lot I have left to learn, and I’m always trying out new ways of shaping and cutting it. A lot of my videos came about simply because I wanted to try out a new technique.
In this chapter, I describe four metal projects I worked on recently: a steel box sign that employs a novel assembly method, a machete (seen in Figure 4-1) cut out of a saw blade, a table with aluminum legs milled on a lathe, and finally, a skull belt buckle carved out of wood and then cast in metal.
But first, I’ll share a selection of my favorite metalworking tools, ranging from my trusty Delta band saw to a selection of angle grinders, as well as my all-time favorite drill press.
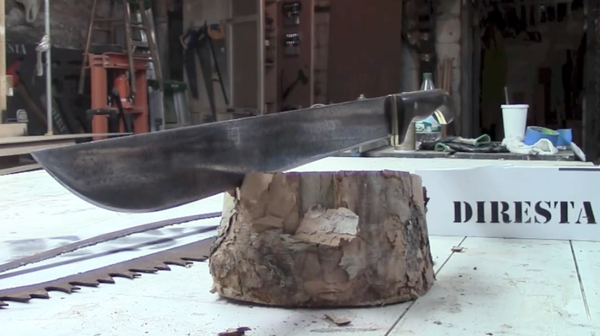
Figure 4-1. In this chapter, you’ll learn how I built this machete
Tools
The following are metalworking tools I use on a daily basis. I left out more commonplace tools you might see all the time, like hammers and screwdrivers, and instead focused on the big-ticket machines I use in my videos.
Beaumont Belt Sander
Sometimes people ask why I’m using a belt sander to sand metal. I reply that the Beaumont is a belt sander made to sand metal—it’s really for knife making—but I use it for everything. It’s got a 2” × 72” belt and a 2 HP, 3-speed motor. You can change the grits, and you can change the speed by jumping the pulleys, making this a versatile tool in my shop. I use it pretty much every day.
I actually have two Beaumonts. One I’ve owned for about a year and a half (you can see it in Figure 4-2), and it’s starting to get a little beat up. I bought it from the manufacturer in Ohio, a small company that makes each sander to order. I got another one recently. One of my fans was moving and couldn’t take it with him, and asked if I wanted to buy it. Now I’ll have one for my shop on the Lower East Side and one for my place in the Catskills.
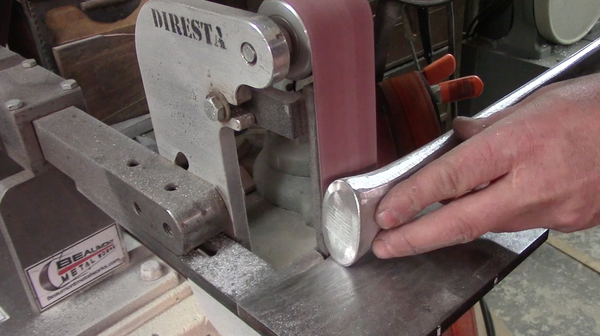
Figure 4-2. The Beaumont belt sander was made as a tool for knife makers
Bridgeport Vertical Mill
Think of the Bridgeport as sort of a big drill press (seen in Figure 4-3) but with a powered X and Y bed, allowing you to precisely mill steel.
According to the serial number, my Bridgeport’s from 1965. A friend of a friend of a friend was moving his shop and basically gave it away. It cost a lot of money to get it to my house in the Catskills from Jersey City. It came with a vise, indexing head, and a bunch of tooling.
I just replaced the motor. The new one is three-phase, and I have a variable-frequency drive (VFD) to control it. This system gives me a finer control over the mill motor’s speed.
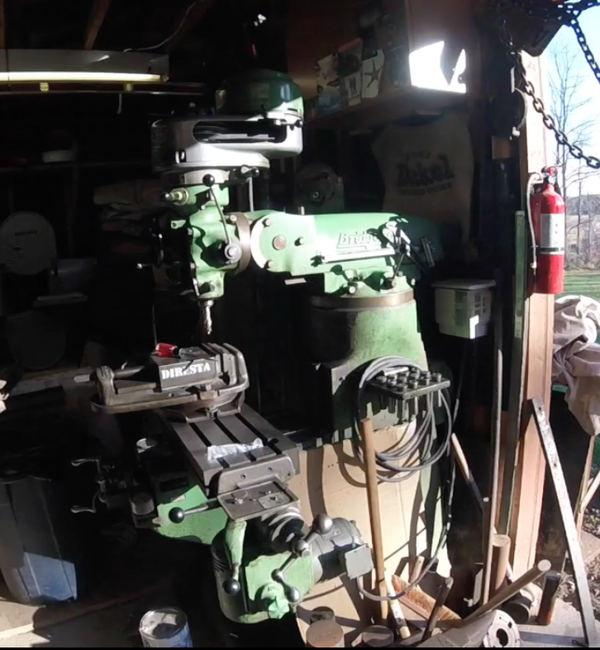
Figure 4-3. The Bridgeport vertical mill precisely carves material out of a block of metal
Chopping Band Saw
I have three chopping band saws. These tools offer the ability to cleanly cut out thick sections of metal—say, a 4” block of brass or steel. Tilt the bed, and it can cut metal at angles.
My main chopping band saw was a gift from Craftsman when I did a TV show called Hammered. It’s not the highest quality, but it works great for me, and the same blade has been on it six years. It features a 72” long by 3/4” wide blade with 6 TPI (tooth per inch), which is pretty aggressive for a metal-cutting band saw.
I also have a Kalamazoo chopping band saw I rescued from the New York City seaport where it was about to get scrapped for metal. I leave it outside because it doesn’t fit in my shop, and mice make nests inside of it. I just put a tarp on it when I’m not cutting on it.
Delta Band Saw
This is my go-to band saw. A lot of time I use it with wood, but if I slow it down with pulley reduction, I can cut metal with it. If you’re going to get the first tool for your workshop, I always tell people to get a band saw. You can cut straights if you put a deep blade on it, you can cut curves, and you can cut metal, wood, plastic, and leather. It’s definitely a great tool to have if you’re just getting started.
I like the classic 14” Delta because it has easily adjustable guides—a lot of band saws require keys to adjust the lower guides, but the Delta has knobs so you can do it by hand. The Delta has the same design from the ’30s through the ’90s. They have the same cast-iron arm—they’re sturdy machines. The controls are all the same, and have always been the same throughout that time period.
I own three Deltas. One I purchased in a whole-shop buyout in 1990, and I paid about $100 for it. I also have one I’ve had since I was five or six years old; my dad got it and now it’s mine. This design is slowly going out of style after all these years, but I like this kind of band saw the best.
Butterfly Die Filer
My die filer is my latest acquisition. It’s like a jigsaw, but it has a file instead of a saw blade. It’s probably from the 1940s. I bought it for $100 from a machine shop that was closing. The machine came with two boxes of files for it; they just swap in and out with a set screw. It was a great acquisition and I’m glad I picked it up.
Die Grinder
I use a variety of die grinders in my workshop. One of my favorites is the pneumatic angle die grinder seen in Figure 4-4. It uses quick-screw-on Scotch-Brite pads that swap in and out in seconds. I also have an inline grinder, which is basically the same except not angled. I also have a DeWalt electric die grinder, which is a heavier and more unwieldy tool but doesn’t need a compressor.
All three of these grinders have a quarter-inch shank, making my tools interchangeable between the three. I also have a smaller, “mini die grinder” with a 1/8” shank, similar to Dremel tools, and it just plugs into the air hose. It’s great for small projects.
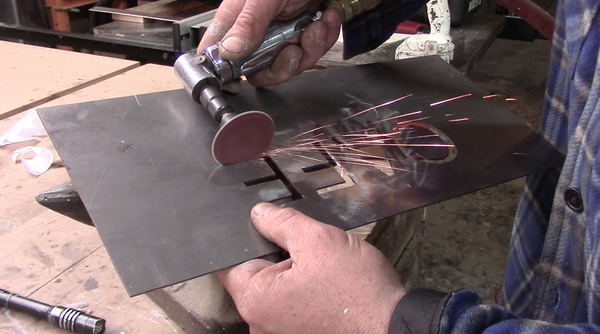
Figure 4-4. Using a die grinder to clean up a project
Walker Turner Drill Press
I love this type of drill press. I use it for both metal and wood, changing the bit and jumping the pulleys depending on the material.
The particular model shown in Figure 4-5 has been in my family for a long time. My dad bought it at least 30 years ago—I guess I was about 17 or 18. It’s a bench top for the shorter pole—the other two Walker-Turners I own are floor models.
I have my second Walker Turner set up with a mortising jig. I bought it off a violin maker here on the Lower East Side about seven years ago—I think I paid $50. The other one I keep up in my place in upstate New York.
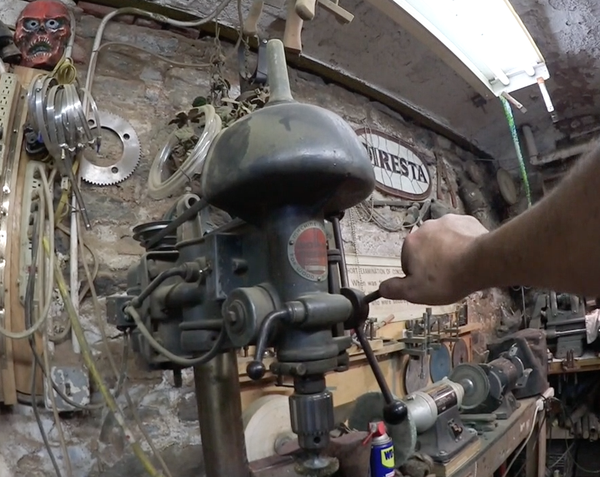
Figure 4-5. The Walker Turner drill press
Gas Forge
I have a gas forge, essentially an electric-start propane burner with an insulated firebox, rapidly heating up whatever goes in there. I got it from a farrier supply store, and it’s meant for people making their own horseshoes.
Grizzly Industrial Drill Press
The Grizzly drill press (Figure 4-6) is sort of a baby milling machine, like the Bridgeport but (relatively) smaller and lighter. This machine I can at least lug through my basement door.
I got the Grizzly for free. A shop was closing, and I happened to be there at the right place at the right time. It’s about an $800 machine, but it’s not the highest of quality. It’s gotten me through some projects, so I have a greater appreciation for it now than when I first got it.
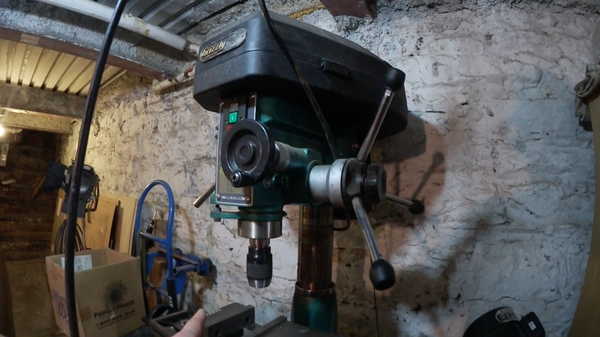
Figure 4-6. The Grizzly drill press has a powered X and Y bed
Plasma Cutter
This handy tool, seen in Figure 4-7, cuts conductive metals with the help of a plasma arc. It’s a great way to cut metal in situations where a saw would be too slow or unwieldy.
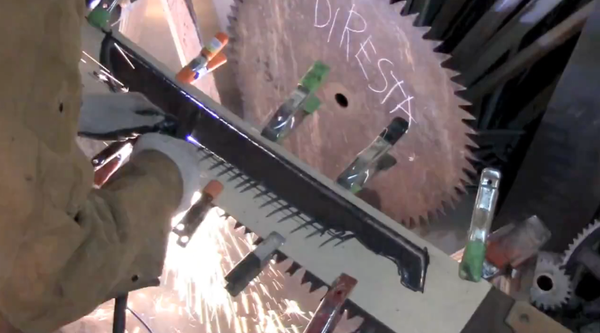
Figure 4-7. The plasma cutter burns through steel in seconds
DeWalt Portable Band Saw
I use this handheld band saw (Figure 4-13) more as a benchtop cutoff tool. I keep it in a vise, and I can swing by and make quick cuts as needed. It doesn’t have a trigger lock, so for bigger jobs I just put a clamp on it.
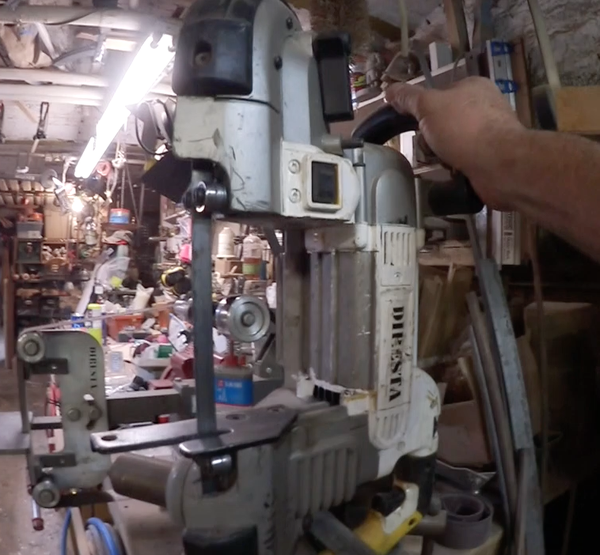
Figure 4-8. The DeWalt portable band saw, clamped to my workbench
Propane Torch
I always keep a few of these torches around. They consist of a small propane tank with an electrical ignition on the burner. If I have two hands free, I like to use two torches for twice as much heat that much faster.
I have the automatic pull trigger on my torches, so whenever I leave the shop I secure the trigger so if it falls down it doesn’t accidentally turn on, and I also make the habit of laying them on their side when not in use.
Riveter and Pop Rivets
I use rivets in situations where I wouldn’t want to use a screw. They fit into a little gun (seen in Figure 4-9) and when the handles on the gun are squeezed, the rivet is set.
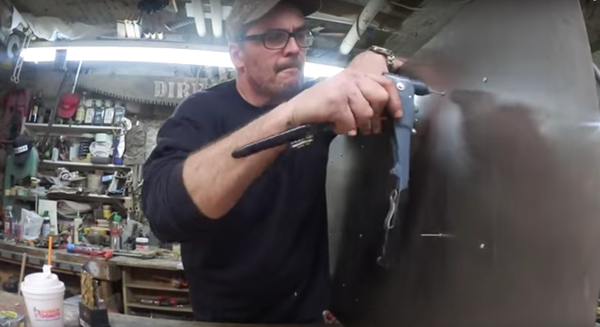
Figure 4-9. Riveting a piece of sheet metal
Sandblasting Box
This tool uses blown sand to clean off small objects, like rust from a piece of iron. The holes in front have protective gloves built into them so you can operate the gun safely. I got mine from Tractor Supply, and I think I paid $70-75 for it.
DeWalt Metal Shears
These shears literally cut sheet metal like it was paper. The shears (seen in Figure 4-10) consist of three blades, and actually make two simultaneous cuts, removing a tiny strip of metal. Because of the way its blades are set up, the shears leave a perfectly flat cut on either side of the line. Sometimes when you use scissors on something, you end up marring both sides of the cut. This one gives you a nice clean cut.
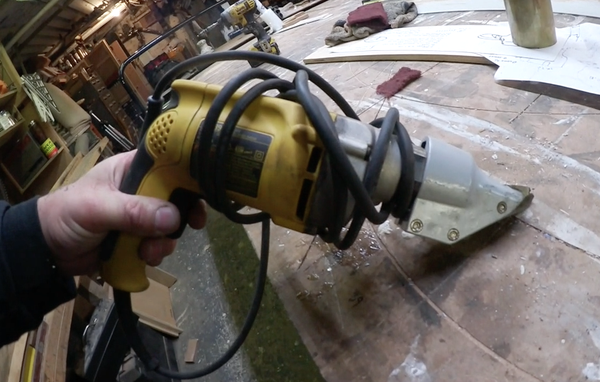
Figure 4-10. My DeWalt metal shears cut metal like paper
South Bend Lathe
I have two South Bend lathes, a 9” and a 16”. The smaller one is from the 1950s. I bought it in Chinatown. It was in the window of an old machine shop. Everything in the block seemed to be closing and being turned into condos, so I walked into the shop and asked if it was for sale. He said he had to think about it. The owner called me back a couple of hours later and sold it to me for $500. I’ve had it in my shop in the Lower East Side. It’s served me well for eight years.
The bigger lathe (seen in Figure 4-11) is new to me but built in 1944. I bought it over the summer and have it up in my place in upstate New York. This lathe does it all, and I turn both wood and metal on it. I bought it from a man who was very meticulous, thankfully, and he kept it in really good shape. Now it’s up to me to maintain it. It cost me $2,300 and I moved it myself from around 160 miles away on a trailer.
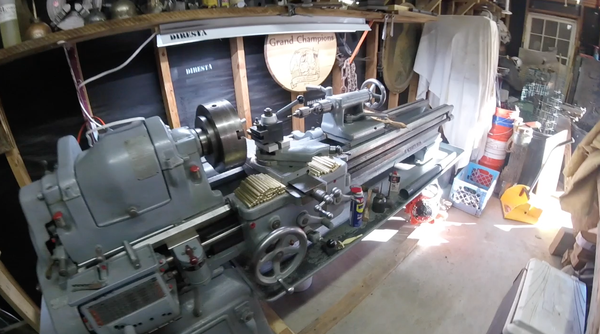
Figure 4-11. My 16” South Bend lathe in my shop in upstate New York
Vulcan Anvil
I’m not into blacksmithing per se, but I do use a variety of anvils for all the reasons you ordinarily would: pounding and shaping metal. I bought my Vulcan anvil off Craigslist before the big blacksmithing boom. It was $100 about 10 years ago. By contrast, I recently got a smaller Vulcan from an antique shop for $100, and it needed a new work surface.
Welders
I use a bunch of welders in my shop, but my go-to machines include a Lincoln Electric precision 225 TIG welder, as well as another pair of machines from Lincoln: a MP210 multipurpose welder that can make TIG, MIG, and stick welds, and a Square Wave TIG 200.
Wilton Bullet Vise
This vise looks great, but that’s because I restored it. I found it at the recycling plant, and it was destined to be thrown into a dumpster and shipped off to Hong Kong for recycling. I cleaned it up and it has been a fixture on my workbench.
Band Saw-Cut Steel Sign
Some time ago, I received a call from Brompton, a company that makes folding bikes. They wanted a light-up steel sign with their logo for their store’s cafe. We designed a box sign (Figure 4-12) that would hang from the ceiling, with a light inside to make it light up. The cafe has sort of a brushed metal look, and I made the sign to match. I cut the letters and logo out of stainless steel, and assembled the rest of the sheet of metal into the sides and back.
Part of the reason I love this project was the challenge of using a band saw to cut letters out of a four-foot sign. Because the neck of the saw rises, it prevented me from rotating a large sheet, so I had to cut it down to a smaller size to work with. Once the parts were cut out, I reassembled the sheets back into a single plate, without anyone knowing the difference.
The reason I used this technique is that the customer wanted the sign quickly. Ordinarily I’d send it out to be CNC’d by a service, but what if they messed it up? I wouldn’t be able to turn it around in time. Instead, I decided to take this route, which was a lot more work, but I knew it would be delivered as promised. This also gave me the chance to try out a new technique. I love the idea of cutting apart and reattaching a sheet of metal and have no one know.
In addition to the low-tech construction technique, I also got old-school with the backlighting, opting for classic fluorescent tubes rather than the LED strips everyone uses now. This sign might have been my last one ever with tubes. Maybe this is the day of CNC-cut signs and LED light strips, but cutting a sign out of a band saw is still a great way of doing it, and the sign ended up fitting in perfectly with the cafe’s decor.
I’m going to show you how to build your own. First, however, let’s explore the tools and supplies you’ll need.
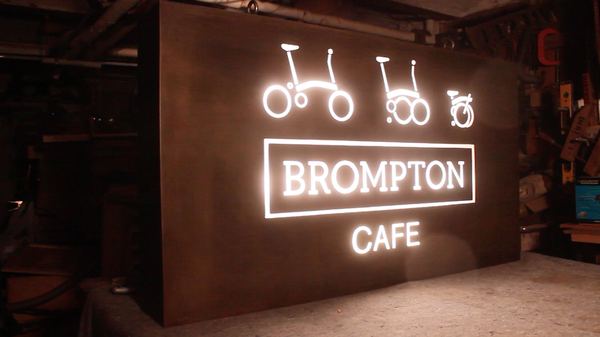
Figure 4-12. This metal box sign took a new metalworking technique to complete
Tools and Materials
You’ll need the following tools to build the sign. You should recognize all of the bigger tools from the beginning of this chapter:
§ DeWalt power shears
§ Delta band saw
§ MIG and TIG welders
§ Pneumatic die grinder
§ 4-1/2” angle grinder with 50-grit sanding disk
§ Circular saw with a metal-cutting blade
§ Riveter and pop rivets
§ 1/4” hand file
You’ll also need assorted materials:
§ 14-gauge steel sheet
§ Spray adhesive
§ Cutting fluid
§ Angle iron
§ Presto Black Gel
§ Permalac lacquer
§ Frosted 1/8” acrylic
§ Lexel silicone caulk adhesive
§ Eyelets
§ Fluorescent light fixtures
§ Clamp connector
Making the Sign
The central technique of this project consists of cutting apart and then welding together a sheet of steel so that no one can tell the difference. The main reason I used this technique is that the band saw has only a small work area—too small for a 44” sign. In order to cut out the letters and other details—even the small part at the top that says Cafe—I needed to cut it into pieces on the band saw so I could move the metal around properly.
Let’s go over what it takes:
1. Cut the material to size
I quickly cut a piece of 14-gauge steel down to the right size, using metal power shears and cutting fluid. It wasn’t super critical to get the edge perfect, because I knew I’d be smoothing down the edges later on when I added the sides.
2. Apply the pattern
I found the center line of the front plate and drew a line to guide placing the pattern. Then I applied spray adhesive onto the metal and laid down the printout. I folded the paper in half to ensure that I centered it properly.
3. Start cutting!
I cut directly into the pattern with my band saw, using a 1/8” blade and cutting fluid. The blade starts getting dull fairly quickly, and its “side capacity,” or its ability to make turns, started to go.
I eventually resorted to pre-drilling holes at locations on the letters where I was going to have to turn the material. Having a hole there gives the blade room to move around.
Because of this, I used the saw blade as more of a shaping instrument, cutting away the steel in small parts. You don’t have to run the blade around the edge of the letter and have a perfect A or F fall out! I took the shortest amount of distance to get from one letter to the other, cutting across the space between the letters, as shown in Figure 4-13. I knew I’d have to go back in and fix those cuts.
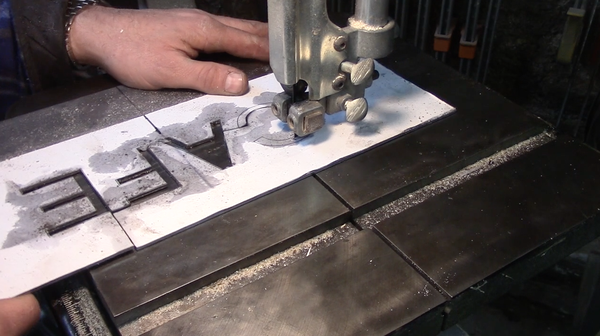
Figure 4-13. Cutting out letters
Finally, I didn’t worry about keeping the letters perfect. For one thing I knew I’d have to smooth them down with a file no matter what. That said, smooth cuts will reduce the amount of elbow grease you’ll need later. Also, when people look at the sign they look at the entirety of it, and no one’s measuring them with a micrometer to ensure perfection. Visually, if it looks right, I feel it is right.
4. Fill in the cuts
I started off using a MIG welder, but switched to a TIG welder. I found it was a little less sparky and more controlled, giving me the ability to seal up the tiny cuts in the letters, as seen in Figure 4-14. I made sure not to focus too much on one area of the design, as sheet metal warps if it gets too hot.

Figure 4-14. Welding up the cuts after I’ve finished with the letters
5. Remove the design
Once I’m done with my main cuts, I’m free to remove the paper and adhesive with some acetone. That said, I always try to keep the graphic lines on the material as long as possible.
6. Clean up the metal
The sign’s steel has to look good. What’s the point of using this technique if my sign looks like Frankenstein’s monster? I began by filling in the cuts where I had to run the saw blade though the piece to get at a letter.
Next I used a grinder to polish down the letters with a 50-grit disk, then grabbed a die grinder (seen in Figure 4-15) to flatten out as many burrs as I could reach. While I was grinding and polishing, I kept an eye out for creases in the metal from the cuts, and went in and filled them in with the welder as needed. After that I worked on the metal with hand files, smoothing down the parts the die grinder couldn’t reach.
Figure 4-15. Grinding and filing the metal to get it looking great
7. Reattach the side plates
Once I was ready to reassemble the front of the sign, I laid the plates out the way I wanted them and secured them with a few tack welds before going in and filling in all the gaps. I moved from part to part to ensure that the metal didn’t overheat.
I had to reinforce the reassembled plates by welding the joints from the back as well. I found that I had ground off so much material on the front that I’d weakened the welds, so I strengthened them from behind.
8. Build the frame
The 14-gauge sheet metal of the signs has a tendency to flex, so I knew I’d need some angle iron (Figure 4-16) for a frame. I cut the angle iron to match the dimensions of the final sign and welded it together with my MIG. Once the frame was done, I welded it onto the face of the sign. I also included a couple of horizontal bars across the center of the sign’s face, because I knew it’d need additional reinforcement.
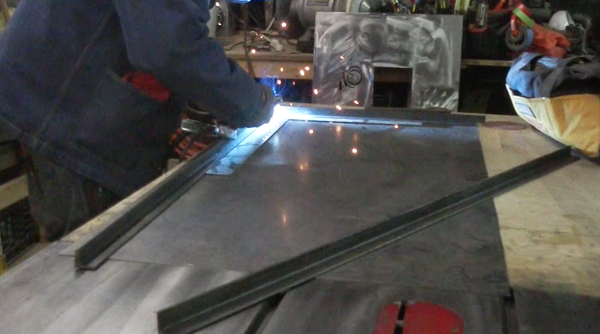
Figure 4-16. Welding angle iron to the edges
9. Build the sides
Once the front panel was done, it was time to work on the sides. I cut four identical strips of the material, using a piece of angle iron to guide my circular saw.
Once they’re cut to size, I clamped the side plates to the frame and welded them into place. I overlapped the front of the sign over the sides by about an eighth of an inch, allowing me to make the edges straight. I simply ground off that excess material to make a perfect corner.
10. Weld on the back frame
I reinforced the back of the box (Figure 4-17) by welding on more angle iron. The basic metal structure of the sign is nearly complete! All that it needs is the back plate installed.

Figure 4-17. Welding on the back frame
11. Tone and protect
Steel is great, but it has a tendency to discolor and rust. I used a blackener called Presto gel. I painted the Presto over the surface with a paintbrush, then rubbed it in with Scotch-Brite pads and #000 steel wool.
I topped it off with a couple coats of Permalac clear lacquer to protect the steel against corrosion. You can see the sign’s progress in Figure 4-18.
Figure 4-18. Spraying down the sign with clear lacquer to protect against rust
12. Add the acrylic
The sign’s letters and logos are backed by frosted acrylic. I recycled some old material from a past project. At $200 a sheet, acrylic can be pretty expensive! I cut out the shapes on the table saw and glued them into place on the inside of the sign’s face.
I used Lexel, a heavy-duty silicone that has a crazy fume to it. Lexel is made to stick dissimilar surfaces together, making it perfect for this application.
13. Attach the eyelets
I drilled two holes in the top of the sign, making sure I cut through small lengths of angle iron I’d welded onto the frame. Then I inserted a pair of heavy-duty eye bolts and secured them with washers and nuts.
14. Install the lights
I’m from an old-school sign making background and I didn’t immediately think of using LEDs. The sign ended up six inches deep, and if I’d gone with an LED strip I probably wouldn’t have needed to have it quite that deep. On the other hand, it does give the sign a lot of presence as well. I placed the light fixtures (seen in Figure 4-19) on the back plate, and drilled the holes to mount them. Working from the underside of the plate, I pop-riveted the fixtures into place. The power cord for the lights comes out of the back of the sign.
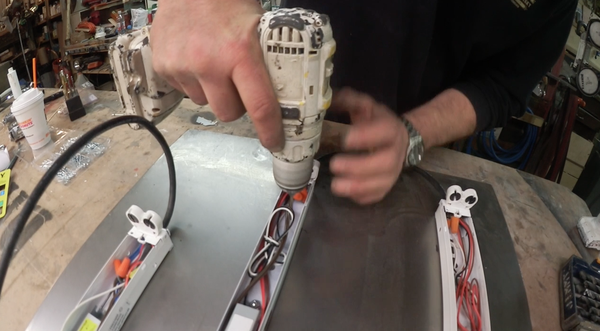
Figure 4-19. Drilling rivet holes in the back of the sign
15. Secure the back
Once the sign was ready to close up, I screwed the back panel in place with self-tapping screws drilled directly into the angle iron.
16. Glue on the details
I used more Lexel silicone to secure the insides of the A’s and O’s, as well as the “Brompton” part of the sign in the middle. The Lexel takes a while to set, so I left the pieces taped until I installed the sign the next day.
17. Install the sign
I was pleasantly surprised that the dark, brownish metal details of the cafe matched those of the sign. I installed a mounting bracket made out of 1” pieces of steel bolted directly into the cafe’s exposed I-beams and plugged it into a handy outlet. Figure 4-20 shows us installing the sign.
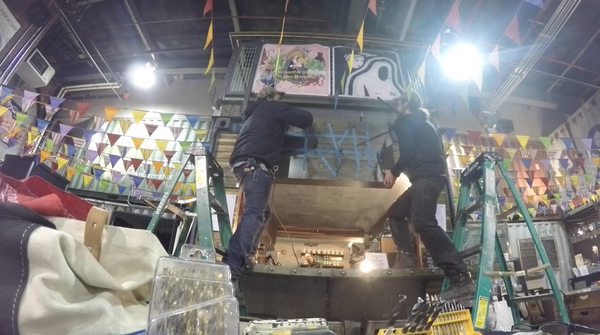
Figure 4-20. David and I install the finished sign in Brompton’s cafe
Summary
This sign was a great challenge for my band saw skills, and extremely satisfying to build because it came together so perfectly, while showing off some classic signmaking techniques.
Vampire Table
I came up with the idea for this project when I found a cool piece of wood in the garbage. It had big old 8” nails stuck into it and I thought, wouldn’t it be cool if they were the legs of a table? Now, six or seven years later, it’s finally coming to fruition—though not necessarily how I first pictured it.
The table consists of a 4” cross-section of maple I bought a few years ago at a sawmill in upstate New York, with a trio of 2”-thick aluminum spikes apparently pounded through the disc, and they serve as the table’s legs. Figure 4-21 shows the finished build. I call it the Vampire Table because the spikes remind me of the silver stakes used to kill cinematic vampires.
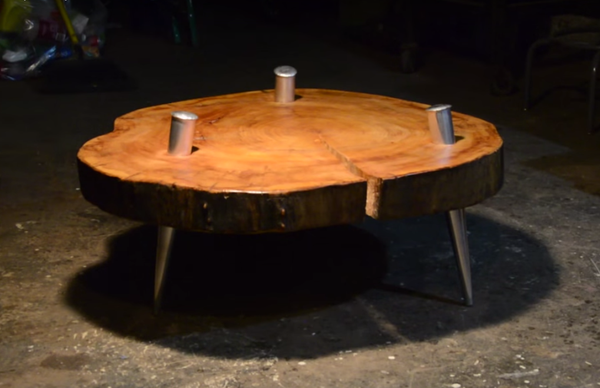
Figure 4-21. I built this table to look like the spikes had been pounded through the wood
Tools and Materials
I used the following tools and materials in this project:
§ Kalamazoo chopping band saw
§ South Bend 16” lathe with a chamfer for securing the material
§ Palm sander
§ Aluminum rod, with three lengths cut from a 5’ length of 2” stock
§ Big piece of wood
§ Polyurethane varnish
Building the Table
I followed these steps to build my table:
1. Cut the aluminum rods
I used my Kalamazoo chopping band saw (seen in Figure 4-22) to cut three 19” lengths of 2”-thick, 6262-T6511 aluminum purchased from onlinemetals.com.

Figure 4-22. Cutting the aluminum rod with a chopping band saw
2. Mill the spikes
I attached the first rod to my South Bend lathe. I began to mill it using a tapering jig to create the sharp-looking appearance of the legs. The South Bend is a great tool with different speed and torque settings depending on what you want to do. In the early stages of milling the spikes I made deep passes with a rough bit, which dug out a lot of material, and I used a back gear on the lathe with a slow speed and a lot of strength. It really helps carve out a lot of material.
When I had the general shape right, I sped up the lathe and made a finishing pass with a finer bit. You can see me partway through the pass in Figure 4-23.
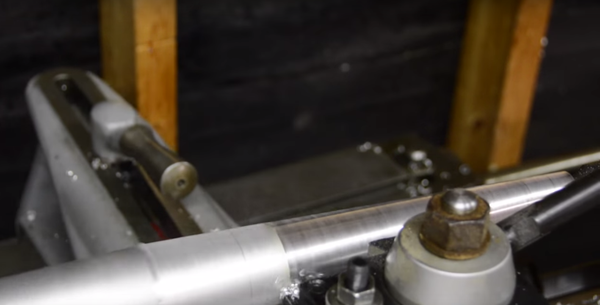
Figure 4-23. The finishing pass smooths down the aluminum considerably
3. Polish the spikes
While the spikes were still spinning on the lathe, I worked them over with a palm sander with a couple of different grits, culminating in a very fine 320 grit to help bring out the polish. I used the palm sander while the spike was spinning to eliminate any lines left over from milling.
Then I ran steel wool over the spikes, polishing them up by increasing the fineness of the wool, starting out fairly rough and then working up to #000.
4. Prepare the tabletop
I found a great piece of maple at a sawmill in upstate New York. I think it was $20 and it had been sitting around my house for the past few years. It’s about four inches thick, end grain, with a giant split cutting into it.
I belt-sanded the piece of maple, then worked on it with the disc sander. There were a lot of deep chain saw marks left by the guy who’d cut it down, and the fact that it was end grain didn’t help either. Figure 4-24 shows me working on the piece of maple with the disc sander.
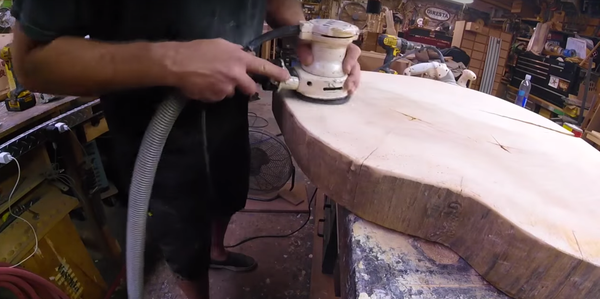
Figure 4-24. Sanding the piece of maple
5. Mark the drill holes
I wanted the three spikes to be equidistant, so I used a compass to measure the distances between them. I marked the wood with drill holes using a permanent marker.
6. Drill the holes
I tried a couple ways of drilling the 2” holes that the spike legs will go through. At first I tried a battery-powered drill using a Forstner bit, but switched to a corded drill for the extra power. However, the main problem was that the bit had a tendency to “walk.” This happens when the bit isn’t drilling into the wood, and instead moves around randomly, making a mess of the wood.
My solution was to start the hole in a two-by-four clamped to the log section, as seen in Figure 4-25. It still walked a little but wasn’t as bad. The angles were random. I didn’t want the legs to look too orderly; I wanted them to look like they had been flung through the wood, not placed there precisely.
Having drilled a hole, I made a test fit with a spike. I wanted the holes to be slightly smaller than the spikes, ensuring the aluminum had a nice tight fit. After that I drilled the other two holes.
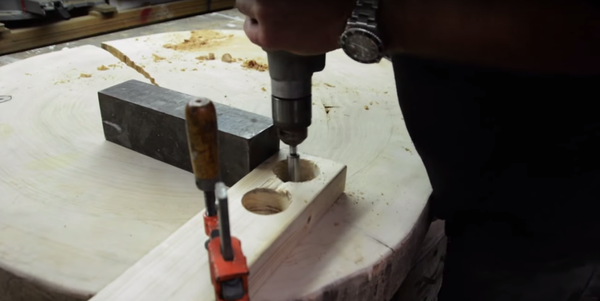
Figure 4-25. Using a two-by-four jig to ensure the Forstner bit didn’t “walk”
7. Finish the spikes
Having got the tabletop to a good stopping point, I worked on the spikes again. I wanted them to look like they were hammered through the surface. I banged on the ends with a hammer to make them look more like nails and to give the ends a little character.
Next, I polished them up on the buffing wheel and brought out as much polish as possible. Having worked my way back from sandpaper to steel wool and finally to the buffing wheel, I had the spikes really looking great.
8. Finish the tabletop
Next, I worked on finishing the table portion. I began by sanding the holes some with the disk sander because the bit’s walking had marred the wood.
Then I worked on polishing the wood. I began with linseed oil but over the course of four or five days I probably poured the entire can of oil into the surface. It just soaked right in, and nothing stayed at the surface. Over the next few days I gave it a few coats of satin polyurethane as well.
When I’d built up enough coats of polyurethane, I palm-sanded it very smooth and gave it a wax finish. You can see how the table looks in Figure 4-26.
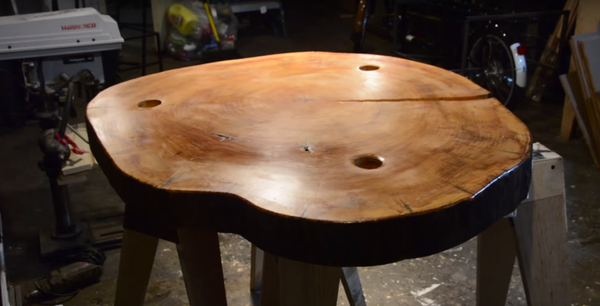
Figure 4-26. The finished tabletop, sanded and waxed
9. Add the spikes
As a final step I inserted the spikes and pounded them into place (Figure 4-27) with a rubber mallet. I periodically measured the length of the legs sticking out to ensure the top of the table remained level.
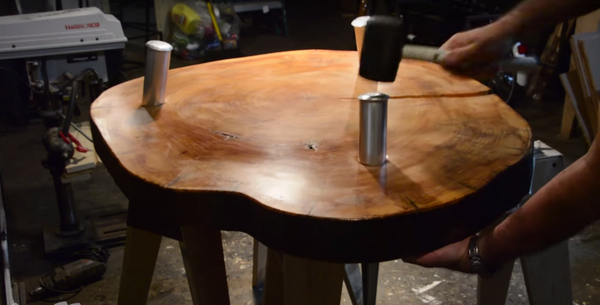
Figure 4-27. Tapping in the legs with a rubber mallet
One thing people ask about is the split in the wood. Everyone’s expecting a bow tie, which keeps this kind of split from getting bigger. I decided against it; it’s a little too cliched and expected. Anyway, the table is for my own use, and not going to a customer’s house, so if the table breaks, I’ll just fix it!
The finished table looks appropriately epic with its gleaming wood and polished metal.
Summary
The Vampire Table has a beautiful wooden top, but it’s the aluminum spikes I milled on the lathe that really give it character. The legs look like they were thrown through the top by Zeus, and that’s what I wanted. It was a fun project and rare for me in that it’s a piece of furniture going into my home.
Cutting a Machete out of a Saw
I wanted to make a machete out of a section of metal saw. I’d bought a crosscut saw from an antique store in Philadelphia for 20 bucks. I cut the machete shape out of the blade using a plasma cutter, then finished the blade on the grinder and sander. I attached the blade to a handle I made out of ziricote wood and bronze. You can see the finished machete in Figure 4-28. Read on to learn how I made it.
Figure 4-28. I made this machete out of a saw blade
Tools and Materials
These are the parts and materials I used in making my machete:
§ An old saw
§ FastCap pattern-marker
§ Band saw
§ Plasma cutter
§ Drill press
§ Step bits
§ Ziricote wood
§ 1/8” bronze plate
§ Brass stock
§ Palm sander
§ Bristle disk
§ Bastard file
§ Rattail file
§ Scotch-Brite
§ Steel wool
§ Buffing wheel
Making the Machete
I followed these steps to assemble and finish the machete:
1. Draw the design
I drew the machete shape I wanted to use with a permanent marker on a piece of particle board, seen in Figure 4-29. I more or less drew it by hand, thinking of the shape of a similar machete that I own. I made a template to help me cut out a machete from the saw blade.
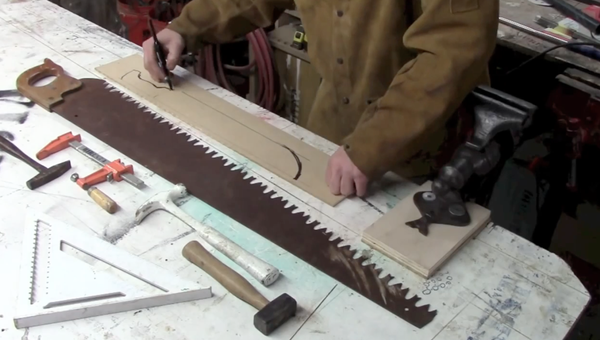
Figure 4-29. Drawing the design on a piece of scrap wood
2. Cut out the template
The next step was to cut out the inside of the template. I ran it through the band saw and cut out the inside, creating a guide for the torch of my plasma cutter.
I laid the template on the saw blade and clamped it into place. A lot of people ask me why I didn’t use the back of the saw as the back of the machete blade. That was because I knew I’d still be able to use the saw afterwards.
3. Cut out the machete
I cut out the shape with the plasma cutter (Figure 4-30), tracing the inside of the wooden template. I didn’t polish up the metal first because I wanted to preserve that corroded texture, though the saw was so rusty the plasma cutter didn’t want to complete a circuit. It took a little longer than I expected, but I finished cutting and popped out the blade.
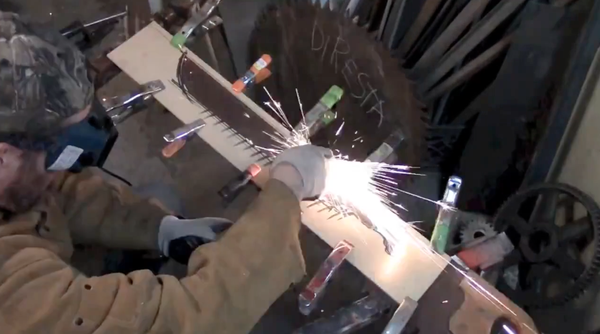
Figure 4-30. Burning through steel with a plasma cutter
4. Clean up the metal
I cleaned up the blade on the belt sander, smoothing down the rough edges left by the plasma cutter. I also sanded a couple of millimeters past the part where the steel lost its temper. I didn’t re-temper it, but it’s not like I’m going to hack through a jungle with it, either.
I caved in and decided to polish up the flat of the blade rather than leaving it rusty. I smoothed it down with the belt sander, then cleaned up the blade with a palm sander (Figure 4-31) with a bristle disc from 3M.
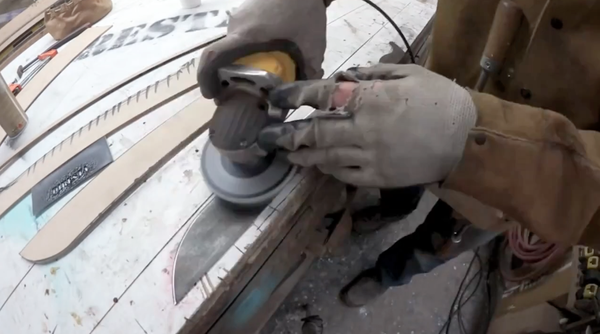
Figure 4-31. The palm sander helps remove corrosion
5. Begin shaping the bevel
While I was sanding, I started working the bevel, seen in Figure 4-32. This is where the metal thins out to form the edge. Of course I didn’t fully sharpen the blade at this point, to save on cuts and nicks.
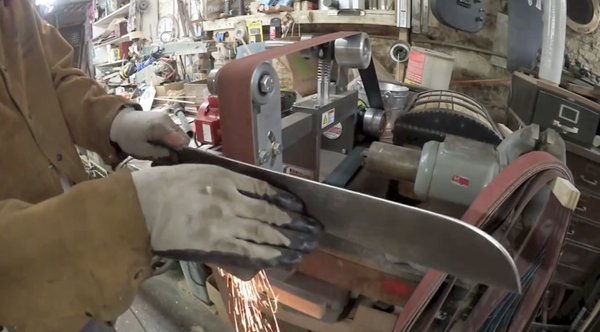
Figure 4-32. Shaping the bevel to bring the metal to an edge
6. Drill the peg holes
Next, I cut the holes in the handle that I’ll use to attach the wood to the metal. I had a really hard time drilling the spring steel, since I didn’t have the right kind of bit in-house. I eventually resorted to step drill bits, and that did the trick.
7. Mill the pegs
Then I made the brass pegs that will keep the handle on. I put a piece of brass stock on the lathe and milled it down to fit the holes in the handle. I didn’t worry about getting the width perfect, because I knew they would be peened over.
8. Cut out the handles
Then I traced the handle (Figure 4-33) on a piece of ziricote wood from Belize. I changed the design a little from the metal, adding a finger tab that will keep the fingers from slipping onto the blade. I made it a little bigger than I wanted, knowing that I’d be sanding and filing it down.
I cut out the handle on the band saw, then traced the handle onto another piece of ziricote using a marker, and then cut that one out too. Together these pieces of wood will form the handle.
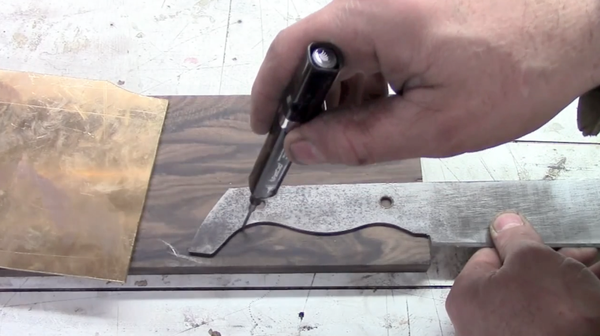
Figure 4-33. Tracing the handles on ziricote wood
9. Add the bronze
Once I had the handles cut out, I traced them onto some 1/8” bronze plate. I’m going to sandwich the knife blade between two layers of bronze, as well as the ziricote.
I drilled the holes in the bronze (Figure 4-34), tapping the hole locations in order to give the drill something to grab onto. The bronze drilled much easier than the saw blade’s spring steel! Then I used the finished plate as a template to drill the other.
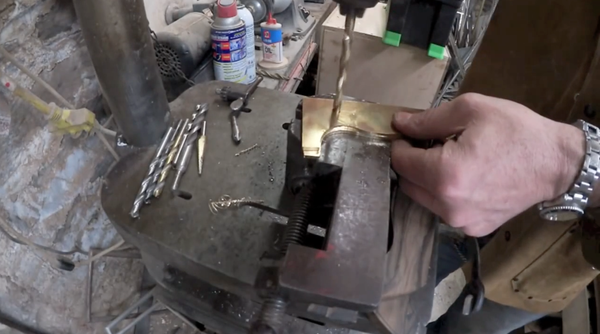
Figure 4-34. Drilling the bronze plates
10. Shape the handle
I began the process of finishing the handle. The goal was to make the handle more comfortable to hold. First, however, I needed to put the handle together temporarily. I used that first bronze plate to drill the peg holes in the wooden handles.
Then I tapped wooden sticks into the peg holes to temporarily stack them together for sanding. I wanted to smooth down and level the part by the blade, which I couldn’t do with the blade in it.
Then I took it back apart, added the blade, and put the sticks back in to secure it. I still used the wooden sticks because I didn’t want to sand those brass pegs until I knew how long they’d need to be. I brought it to the sander (Figure 4-35) and began working on it.
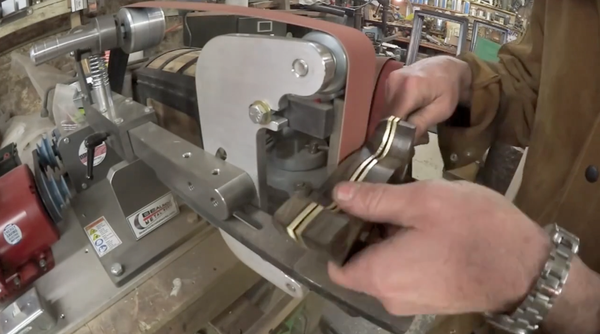
Figure 4-35. Shaping the handle on the belt sander
After sanding it for a while, I realized I had too much material remaining, and brought the handle back to the band saw. Eventually, after going back and forth between the sander and the saw, I got the handle looking the way I wanted it.
11. Assemble the machete
I cut the brass pegs down from the rod I’d milled on the lathe, then mixed up some West System epoxy and glued the handle in place with the pegs keeping everything together.
When the glue had dried, I smoothed down everything on the belt sander, as seen in Figure 4-36.
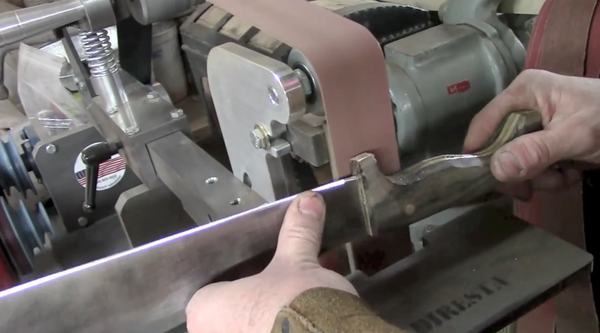
Figure 4-36. Sanding the glued handle
12. Finish the machete
I kept at it with the sander, as well as files, just trying to get that real organic shape that would make the handle comfortable to grip. I worked at it with bastard and rattail files, as well as a strip of an old sanding belt. When I was done sanding, I went to work with Scotch-Brite pads, steel wool, and my buffing wheel to bring out the shine in the wood.
I coated the handle in Briwax to give it a little more polish and protection from dirt. The final step is sharpening the blade with 200- or 300-grit sandpaper.
Summary
I love making my own tools and this machete was no different. I had an idea for a machete and it worked out exactly as I intended.
Skull-and-Crossbones Belt Buckle
I created a skull-and-crossbones belt buckle almost by accident. I had just gotten a GoPro camera and mounted it to a piece of padauk wood, and set it to record—I was mostly playing around to test it, and started sketching a skull motif.
Pretty soon I decided I was going to make a belt buckle. I carved it out of wood, then made a mold of that wooden positive and poured in casting metal to make a metal duplicate. Figure 4-37 shows how it turned out.
Follow along and I’ll show you how I made it.
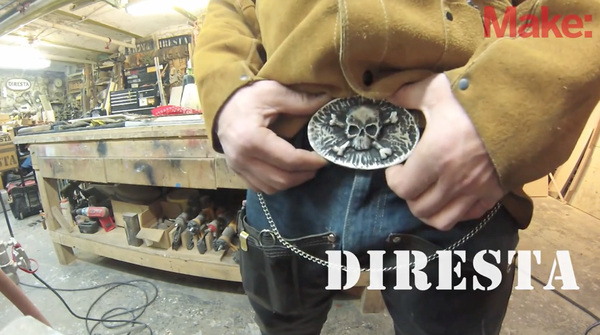
Figure 4-37. I’ll show you how I made this sweet belt buckle
Tools and Supplies
I used these parts and materials to make my buckle:
§ Marker
§ Wood-carving tools
§ Padauk wood
§ Band saw
§ Polyurethane
§ Baby powder
§ Torch
§ Crucible
§ White casting metal, bought from Contenti Jewelry Supply
§ Steel rod
Make the Buckle
I followed these steps to create my belt buckle:
1. Sketch the design
I drew the design on padauk wood using a permanent marker. You can see me working on the skull-and-crossbones design in Figure 4-38.
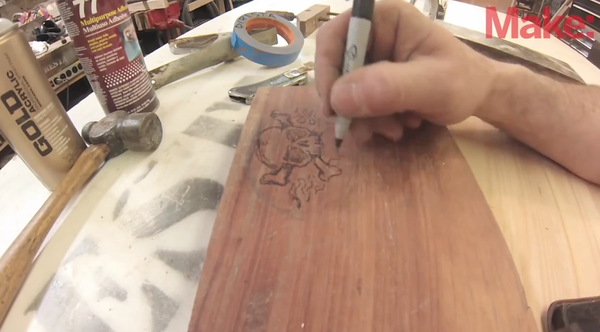
Figure 4-38. Sketching the design on a piece of padauk wood
2. Carve it out
I carved around the edge of the shape with a chisel, defining the main motif of the skull. I try to bring the background down and leave the object forward. Even the crossbones go down a layer, though they’re higher up than the background.
I go back and forth with a chisel and a file. I like to sand and carve until the final shape takes form. Once the drawn design gets carved away, I’m literally freestyling, trying to find what I want in the wood. You can see the carving’s progress in Figure 4-39.
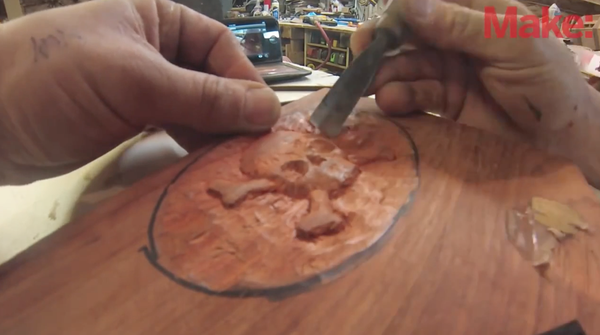
Figure 4-39. The carving continues
3. Cut out the carving
Once I had the carving the way I wanted it, I cut it out on my band saw. I was careful to angle the wood so it cut it out in a taper—the back is wider than the front. This makes it easier to pull it out of the mold. Having cut it out, I cleaned up the edge to define it a little better.
As a final step, I coated the wooden shape in polyurethane, then allowed it to dry. Figure 4-40 shows the buckle ready for casting!
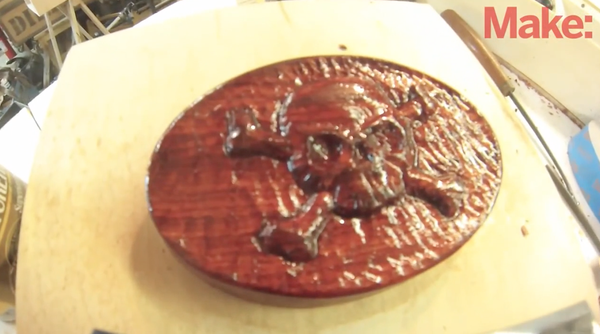
Figure 4-40. Coating the form in polyurethane
4. Make the mold
My mold is just some pieces of wood bolted together. I dusted the buckle in baby powder to help its removal, then put it into the frame, face up.
I packed the frame with delft clay, applying it by hand as shown in Figure 4-41 and then pounding it really tight with a rubber mallet.
Finally, I added a pair of screws in the back to help remove the wooden form. I have my mold!
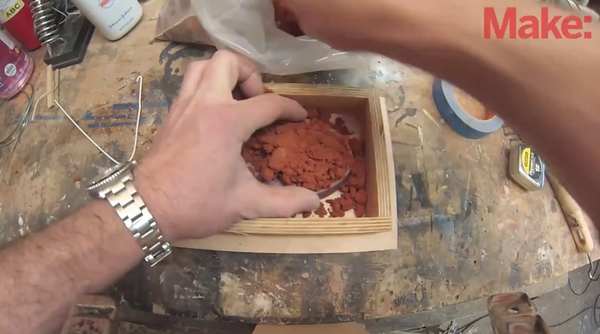
Figure 4-41. Adding delft clay to the mold
5. Bend the buckle’s chape
The chape is the part that attaches the buckle to the belt. I used a torch and bent up a piece of 1/8” steel rod. Figure 4-42 shows the chape in progress. I will put it in with the molten metal to attach it to the front plate of the buckle.

Figure 4-42. Bending up the chape
6. Pour the metal
I’m using a generically named product called white casting metal. It melts at around 400 degrees, making it easy to soften using a crucible and propane torch. When I had the metal good and hot, I poured a bunch of it from my crucible into the mold.
While the metal was still molten, I dropped in the chape and poured a little more casting metal on top of it, melting directly from the ingot of casting metal. Figure 4-43 shows the buckle with the chape securely attached to the back.
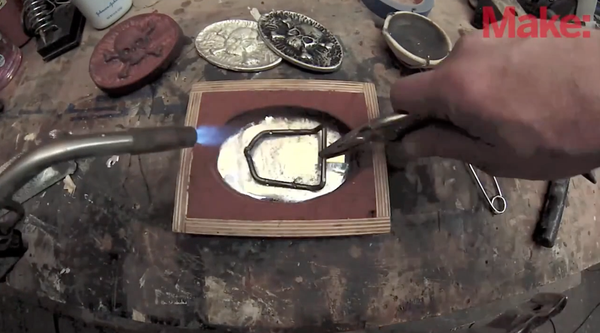
Figure 4-43. Casting the buckle with the chape embedded
7. Finish the buckle
After it had cooled, I pulled the buckle out of the mold, sprayed it with black spray paint, and then rubbed it with steel wool (Figure 4-44) to give it a darker and more aged look.
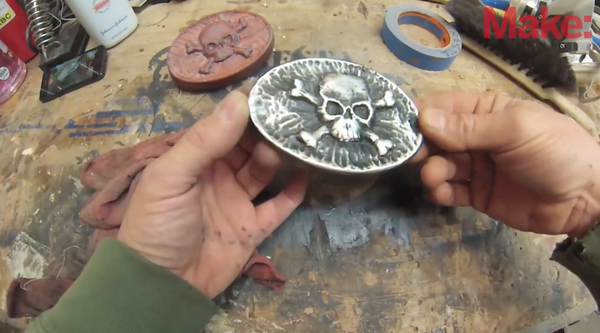
Figure 4-44. The finished buckle. It just needs a belt!
Summary
This chapter went all-out with tons of information, beginning with what tools I reach for first in my metalworking projects, then exploring four very different metal-based projects I’ve worked on recently. In Chapter 5 I share some projects I make with plastic, a very flexible, capable material.