Greenhouse Vegetable Gardening (2015)
PLANTING, PRE-CULTIVATION, POTTING UPAside from being a lot of fun, it’s probably also more economical to use a greenhouse for planting and pre-cultivation. Perennials, annuals, and vegetables can be sown and pre-cultivated in the greenhouse. |
4 |

The text on the seed packet contains important information, so read it carefully before opening it.
The great advantage of a greenhouse is that you can start your plants from seed. Pre-cultivation is another term for starting plants from seed; in gardening terminology, “to cultivate” means “to grow.” Seed starting brings about earlier harvest and blooming for plants in window boxes, pots, and hanging baskets. You can then go on to fill your garden beds and borders with vegetables and flowers.
The time to start your seeds depends not only on what kind of plants you’d like to grow; it also hinges on how long the seedlings need to grow, as well as on how big a hurry you are in to see results. If you wish for plants similar to those sold at garden centers, you need to count on seeding and then potting them up once or twice. If you want a quick and simple way to transplant many plants to flower beds, wide sowing in flats is a good way to go.
Seeds
You can sow seeds very early, from late winter into spring. You don’t need to provide a lot of light during germination, as the flats can stay anywhere it’s sufficiently warm. As soon as the seeds have germinated, however, the addition of a growth light becomes necessary. If you sow early, you need to move the germinated seeds into a heated greenhouse, or keep them in your home, but make sure to provide extra growth light.
The simplest way is to start seeds in your home if you don’t have a properly heated greenhouse—it’s easier to keep an eye on the seedlings. Once the seedlings start to grow, you then move them into a light-filled greenhouse. The later in spring you start the seeds, the simpler this process will be. It gets both warmer and lighter every week, which is better for both seedlings and plants. When the greenhouse starts to warm up you can place the seedlings in there unless the temperature dips during the night (the temperature needs to hold steady around 10ºC (50ºF) during the night).
Seed trays don’t take up a lot of space, so a greenhouse isn’t really necessary to keep them. You can place the trays close together on a kitchen bench and provide direct light from above—see suggestion for lighting on page 33. However, when it’s time to transplant or pot up the seedlings after a few weeks, this space will eventually become overcrowded and will not provide enough light—that’s when it is time to move into the greenhouse. If it’s still too cold at night, you can use a fan heater to warm up the space. You can also place the plants and seedlings in an insulated growing cabinet in the greenhouse (a cabinet doesn’t require as much energy to keep warm as a whole greenhouse). Another solution is to buy a small hotbed: they radiate heat from the bottom up, which is good for the seedlings’ growth; you can easily add a growth light to this bed when needed.
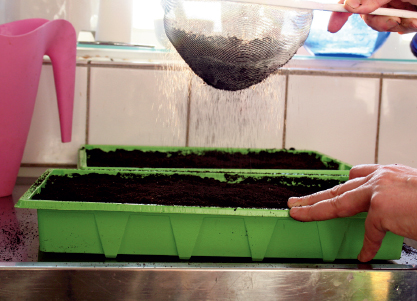
Sieve the top layer of soil when sowing small seeds.
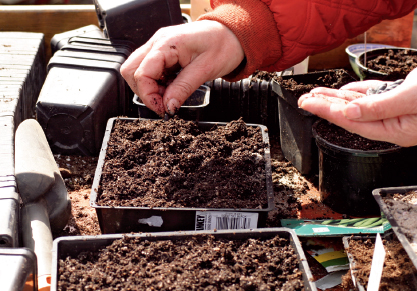
Large seeds can be planted one by one in the flat.
Mini greenhouses with lids are good for seed starting, but use caution when watering.
How to’s—Sowing
♦ Buy the appropriate seed starting mixture. These mixes are sold in well-stocked nurseries and garden centers, and usually contain perlite—small white pellets that keep the soil porous and damp.
✵ Read the instructions on the seed packets. Some seeds, not all, need to be covered.
✵ Sow in shallow containers, or flats, that have been filled with the seed-starting blend. Pour in some of the mixture, then tamp it down lightly so that it’s somewhat compacted. Press more firmly in the corners where the soil has a tendency to sink. You can use a tamping board with a handle to pat down the soil.
✵ Place the container or flat on a level surface and sift over a final thin layer of soil. The easiest way to do this is to use a soil sieve or a larger kitchen sieve.
♦ Sprinkle seeds sparsely over the soil surface. You can seed double the amount of plants you wish to grow, but not more. If you sow too many seeds, the container will become overcrowded with spindly seedlings having to struggle under the growth light or on the windowsill. Better to grow ten healthy seedlings than twenty puny ones.
✵ Sieve a thin soil covering over the seeds. The thickness of the covering will depend on the seed packet instructions, and can range from one millimeter (0.04”) for small seeds, to one centimeter (0.40”) for large seeds.
♦ Mist the surface of a pot without drainage hole, using a misting bottle. A watering can might set the seeds floating around the surface of the soil and then they’ll collect in a clump. The seedlings become too crowded and will grow thin and lanky. The roots grow together and tear apart when it’s time to separate the seedlings for transplanting.
✵ A pot with drainage hole should never be watered from the top down, but should be placed in a water-filled tray instead. The sowing mixture soaks up the water from the bottom until the surface is moist.
♦ Place the seed containers in a mini greenhouse system or on trays. Seeds that are not covered with soil must be kept in a mini greenhouse or be covered by glass, plastic or similar material in order to keep the soil surface damp so the seeds can germinate.
✵ Keep the mini greenhouse at normal room temperature, preferably above a radiator so it’s warmed from below.
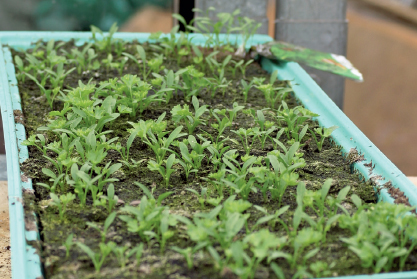
Seed-sowing at different stages. Not all seeds are started at the same time. Some, like geraniums are sown in January; most others in March-April. Below: Marigolds ready for potting up.
♦ As soon as plants emerge, the mini greenhouse needs to be moved into the light, and also to where it’s cooler. Depending on the time of year, the light in the windowsill might suffice. If not, it’ll be necessary to hang cool-white fluorescent bulbs for extra light above the plantings.
✵ Check the plantings every day. Pour or wipe off condensation from the mini greenhouse, plastic bag or glass cover. Mold will grow if water is allowed to drip down onto the plantings.
✵ You can carefully ventilate the plantings once they’re green. Some mini greenhouses have a small vent in the roof that can be opened. If not, lodge something like a matchstick between the cover and the box so air can circulate. You can reduce condensation in this way and reduce the risk of the plant developing rot.
✵ The plantings might dry out if it’s a sunny day. Water, whenever possible, from below.
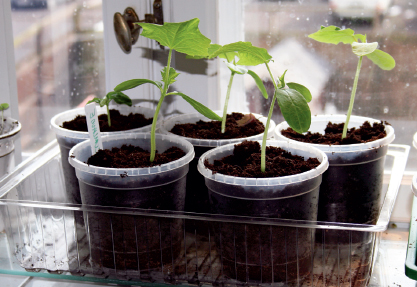
Direct-seeded large seeds (e.g., cucumber), in pots.
Planting in pots
The size of small pots is established by measuring the diameter in centimeters; the size of larger pots is read in liters (quarts). A round pot is measured straight across the top; the most common sizes are between 7 to 20 centimeters (2 3/4” to 8”). Smaller sizes are usually square—approximately 5 x 5 cm (2” x 2”) or 8 x 8 cm (3” x 3”). The pots can, of course, vary in depth: a 3” x 3” pot can be either shallow or deep. Bigger pots are measured in liters (quarts) and can range from 1 to 1.5 liters (1 to 1.5 quarts) to 5 liters (5 quarts) or larger.
When it comes to purchasing plants, the size of the pot is directly related to the price. A plant in a 2” x 2” pot is smaller than a plant in an 8” x 8” pot, and thus the former is cheaper than the latter, as it’s possible to produce more plants per square foot when sowing. The smaller plant occupies less space when transported and less soil is needed for its wellbeing. A grower will often fit a plant into the smallest pot he can get away with to remain competitive in the marketplace. For this reason, a store-bought pot’s size isn’t an adequate reference to go by when choosing your own pot to grow your plant in. Do plant and grow plants in the biggest pots you can afford to make them sturdy and healthy. What you should avoid doing, however, is transplanting a small seedling directly from the seed tray into a much larger container, because it will then expend its energy growing mostly roots, and not very much above ground.
Summer flowers come in 6-section trays called 6-packs, separation-less growing boxes, and specialty pots. By all means save them and reuse them for your own sowing and plantings, but remember that the plants are very tightly spaced. This works fine for the nursery worker who can provide extra growth light and heating, but can be a bit crowded for the hobby greenhouse. As plants grow, it’s customary to separate the pots and to space them out in order to give the plants room to develop evenly all around. This is impossible if they’re clustered, egg-carton style, in 6-packs.
Direct-seeded small seeds (e.g., Lobelia), in plant ready pots.
Few and large seeds
Big seeds from beans, pumpkins, cucumbers and melons are sown singly in their own individual pots. They are covered with at least 1/2” of soil and don’t need a glass or plastic cover or to stay in a mini greenhouse, as they already are covered by the soil. They do need plenty of warmth to germinate, however, and ought to be placed on a tray above a radiator. The seeds are sown in large pots 7 to 8 cm (about 2 3/4” to 3”) in diameter, and they don’t like having their roots disturbed. When they are large enough to be transplanted, you need to be extra careful: lift the whole plant out of the pot, along with the soil and roots in one big clump. The clump is then placed into its new, bigger, 14 to 15 cm (5 1/2” to 6”) pot, without disturbing the roots. Fill up the pot all around the clump with new soil.
Many small seeds
Some seeds are sown a few at a time in a small pot and are not transplanted into another pot. When sowing really small seeds, such as Lobelia, it’s tricky to see how closely they are sown. Lobelia should be sown 5 to 8 seeds per 5 x 5 cm (2” x 2”) pot. One way to sow these types of seeds is to mix them with fine-grain aquarium sand in a bowl and then pat it down. The sand makes it easier to spot what is sown, ensuring that there are not too many seeds in each pot.
Sowing small seeds is a bit of an art form, and there are many different ways to do it. Among these are: placing the sand-mix on the edge of a knife; using a pepper shaker; dabbing with a pencil or fingertip, etc.
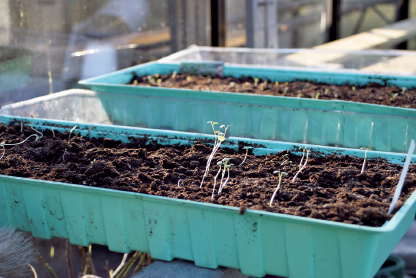
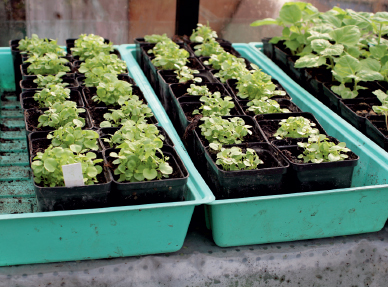
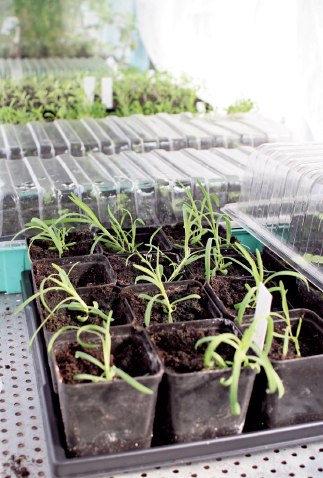
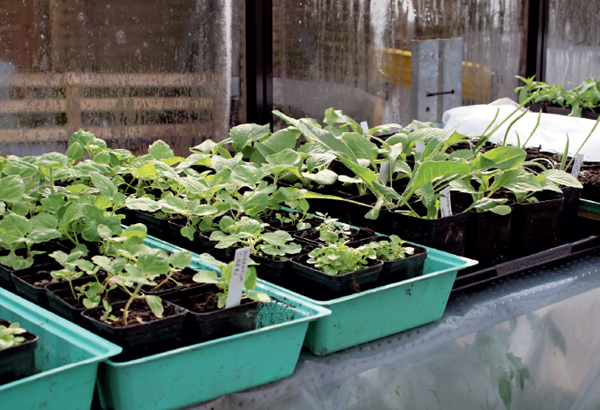
Many small seedlings waiting to be potted up.
Summer geraniums have extremely small seeds. They are sold as pelletized seeds, which means they have been encased in clay. The seeds look like pinhead-sized clay balls, which can be sown one by one. Pelletizing is a costly treatment that is only done to high-quality seeds, but it is well worth the expense for some seeds. Pelletized seeds need extra high moisture to germinate; the clay cover is softened by the dampness and splits open when the seedling emerges.
Seed viability and germination time
Seeds have different germination times, and even variations in seed viability; this information can be found on the seed packet. If the seed has a low germination rate, you’ll sow a bit closer together. Don’t be alarmed if growth takes several weeks to appear, as some seeds are more temperamental than others—but this should be no reason to give up. It shouldn’t be necessary to water the seeds before some green appears, but that too can vary. The sown surface should be damp. If the seeds have long germination times the surface might dry up before the seeds have time to grow. Regardless, never water directly on the sown surface, as the seeds can rot if the conditions are too humid and too crowded.
Growth light
Early seeding requires light for sustained growth. There is a big difference between the quality of daylight in February and that of April. Seeds sown later in the season can catch up with seeds sown earlier, as the earlier seeds have had less light to work with. January, February, and March until the Spring Equinox are the darker months of the year where artificial light is of great assistance. It’s easy to make a temporary light source by hanging fluorescent light tubes above the seeded containers. If you need to light more than seedlings—perhaps you have camellias in bloom in the greenhouse—then you need a more permanent lighting solution, which is shown on page 174.
Fluorescent cold white tubes are, however, perfectly adequate for the plantings inside your house. They are long and narrow and fit over a window bench or similar structure. The tubes should hang approximately 25 to 30 cm (10” to 12”) above the plants. Better yet if you can lower and raise the lights. One way to do this is to attach the light with screws to a movable shelf structure; the desired height of the light source can then be found by raising or lowering the shelf. Saw horses that can be lowered and raised will also work. If the light fixture is not movable, however, the sown flats can be moved up or down. Simply place them onto boxes of a variety of heights to achieve the best distance.
There’s an advantage to keeping the sown flats on trays in order to limit water spillage. There are also special seed boxes with holes in the bottom; two can fit together on a larger, watertight tray. Or they can be placed in a mini greenhouse that always has a watertight base. A light fixture of 2W x 11W, or 2W x 18W, is enough for many seedlings if you practice interval planting and use windowsills. Keep the growth lights on twelve to fourteen hours per day during the light period, in order to mimic true daylight. Remove the protective hood from the fluorescent tubes as it only steals light away from the seedlings, and perhaps add a timer for convenience as well as energy savings.
Right temperature
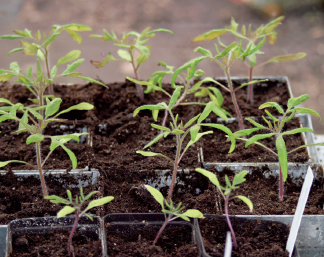
Once the seedlings have emerged, they will spend a short time growing in the seed box. Most plants thrive in temperatures held around 16°C to 18°C (61°F to 64.5°F). How long they stay in the seed box depends on the type of plant, but anywhere between one to five weeks is typical. The seedling in the box needs to grow two slightly rounded leaves—the cotyledons—that come from the seed. Then a second pair of leaves arrives, which are the first set of true leaves characteristic of the plant. At this point it’s time to transplant, (also called potting up or potting on) the seedling into another container. Most, but not all, plants have two cotyledons. Plants from bulbs, such as lilies and grasses, have one leaf that is long and narrow like a blade of grass.
How to’s—Potting up
Fill clean pots with planting mix before starting to pot up. The containers must be thoroughly scoured of all old planting mix that could harbor disease or pests from prior years. The soil should be a commercial, good quality planting mix. Pour this mix up to the pot’s rim and tap it down so the pot is half full, then pour in more soil to fill it up again to the rim. The soil should be firm but not hard, which could hinder the roots’ development. It should allow the seedling and soil to be removed intact from the pot once it’s time to plant out. After watering, the soil will shrink a little, so it will not quite reach the rim. Place the pots on a level surface—preferably on plastic trays—to make them easy to move.
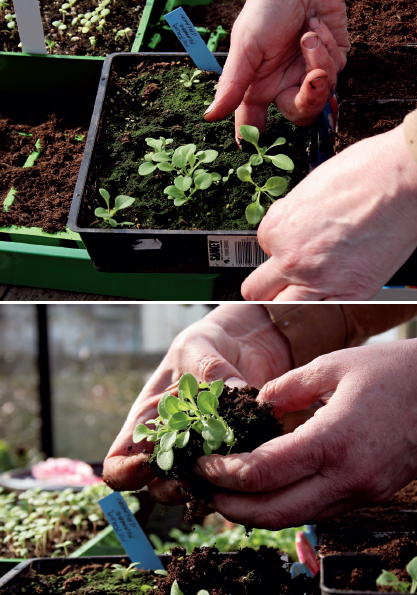
♦ Loosen the seedlings in the seed tray. Soggy or dry soil is a no-no. Soil that is slightly damp is best, so if it’s dry, water and hold off on the transplanting until the following day. Loosen the soil from below, and never pull on the seedling itself. Gently push your fingers, a frying spatula or a wide wooden plant marker under the soil along the bottom of the pot/tray (see top picture). Lift a whole clump of seedlings and soil and set it beside the tray.
♦ Carefully separate the plants by pulling the soil—not the plants—apart, from the middle and out. See center picture. The plants will separate sideways, free of the soil clump.
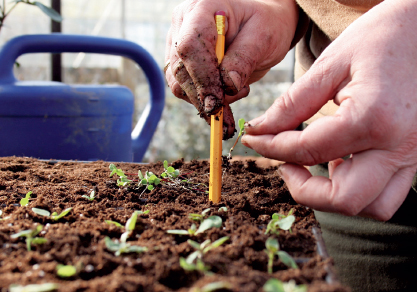
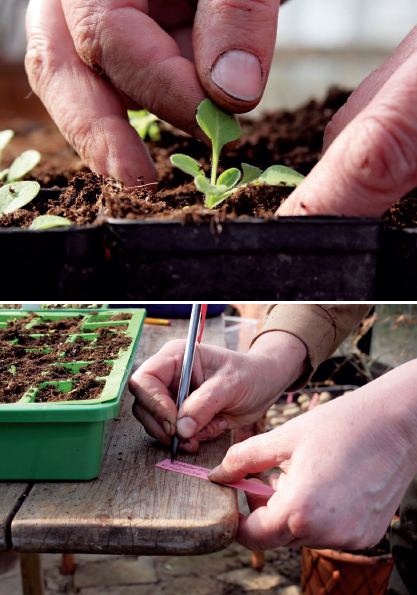
♦ Take hold of the seedling, not by the stem but by one of the cotyledons. Lift the seedling with your left hand if you’re right-handed. Make a deep hole in the new container’s soil with your right hand. Use a finger, a pencil or a special potting pin (poke) and make a hole all the way to the bottom of the container and place the plant roots in the hole. With the right hand tuck some soil around the seedling. When the seedling is nestled in the hole, use left and right fingers to push the soil so there is proper contact between soil and plant roots. See top picture, next page.
♦ The seedling is usually planted deeper than when it was sown in the seed tray to prevent it from becoming tall and leggy. All the roots and part of the stem are placed within the planting hole, and it’s important to tuck the soil snuggly around the roots so there is proper contact. If the hole is not deep enough, or if the roots are very long, trim them a little; never coil the roots so they are doubled up in the bottom of the container—it’s far better to trim the roots to shorter length. That’s why it’s best to sow seeds in shallow trays or pots: it will encourage shorter roots.
♦ Make sure to label your seedlings, as many tend to look alike.
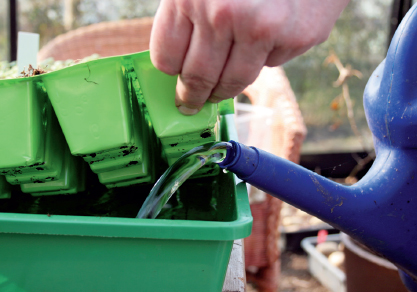
♦ Place the new plantings on a tray and let them draw water from below.
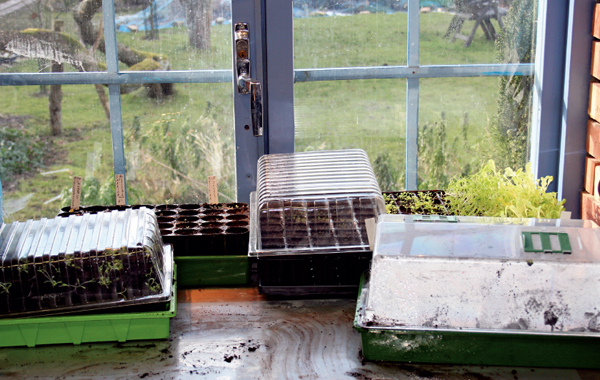
Mini greenhouses
If you have several mini greenhouses, the newly potted-up plants can stay there for a few days until they’ve settled in their new containers. Place them in as much light as possible but in a slightly cooler temperature than before—approximately 15°C to 16°C (59°F to 61°F). The warmer the environment, the taller and leggier the plants will become. Room temperature around 22°C to 24°C (71.6°F to 75°F) is too warm for the plants. At this point you can also put them in a greenhouse, glass-walled balcony or deck, as long as it doesn’t get too cold. It’s often enough to just run a heater overnight, but that all depends on where you live and how early the plants were started. Plants won’t grow if it’s too cold (between 5°C to 7°C (41°F to 44°F) during the day and 0°C (32°F) at night) but they’re not likely to suffer otherwise. An occasional chillier day is not catastrophic, but it is better to wait and not move the plants until daytime temperatures in the greenhouse reach 15°C (59°F) or so. Monitor your max-min thermometer regularly (a must-have in the greenhouse for anyone who wants to grow things reliably). If you must keep plants in the house due to inclement weather, provide them with plenty of light by hanging fluorescent cold-white tubes at about 30 cm to 50 cm (12 to 20 inches) above the plants.
Watering and feeding
Food supplied by high quality, nutrient rich planting soil is enough to hold the plants for several weeks. If you bought a lower-grade planting mix, however, you will need to start watering with a fertilizer mix sooner. The need for extra food depends also on the sort of plant you’re growing. If the plant is to be put in a greenhouse or in a flower bed after three to four weeks, it probably won’t require extra fertilizing. However, if it stays in a pot longer than this or if it’s a vigorous plant such as nicotiana sylvestris (woodland tobacco), Brugmansia (angel’s trumpet) or a large marigold, you will need to start feeding it after three or four weeks. You’ll notice if nutrients are missing because the plant tops turn lighter green or yellowish. This can also happen because the environment is too dry or when there’s a sudden cold snap. If you’re unsure of the cause, try to water the plant with a light fertilizing solution and check to see if it looks greener after a few days.
Fertilizer in the water
Mix 1 ml (milliliter)—or 1/5 teaspoon—Bloomstra fertilizer (for different product follow manufacturer’s instructions) into 1 liter (1 quart) of water, and use this solution each time you water your plants. Plants that grow vigorously and need a lot of food also need a lot of water, so this way they get their added nutrients automatically through the fertilized watering mix. (Plants experiencing growth problems don’t dry out as quickly as healthy plants, and thus get fewer nutrients since they are watered less). The above mixture is suitable for all plants except orchids.
A large 2 1/2 gallon watering pail is not only heavy to hoist, but the water stream is too rough. Measure out the amount of liquid a smaller watering can (with a slim spout) will hold, to help you calculate the correct ratio of fertilizer to water to use in the smaller watering vessel.
Water regularly
Water your plants sparingly without letting them dry out completely. If the plants start to droop, it’s because the soil is too dry, since water keeps the plant upright and engorges the leaves. Refresh drooping plants with plain water until they perk up, and then add fertilized water. While drooping plants will not grow, it’s still necessary to let the soil dry out without becoming tinder dry, as a continuously humid soil encourages fungus gnats to thrive.
Different plants have different watering needs, so it’s necessary to test the soil by poking a finger into it. Some plants become tall and leggy when overwatered. Cucumbers, impatiens, and melons require a lot of moisture, whereas tomatoes and geraniums need less watering. You can’t use drip irrigation during seed starting, but you can water from the bottom up. The most common method is that relied upon by professional growers, using a rimmed table which is covered by a felt mat. Water is set to drip automatically onto the mat, or you can pour water on it manually. The plants absorb water from the mat, which can stay humid for a long time. (You can also use this system to make the felt mat act as a wick, drawing water from a container.)
Both methods make it necessary to check the plants regularly. Due to slight variations in location on the table top, plants along the edges tend dry out quicker than others; some plants will be in a draft, whereas others face a more direct sun; then there are those that are exposed to too much humidity. Tables can be like large rimmed trays, but it’s also common to see plants along single rows in plastic tunnels.

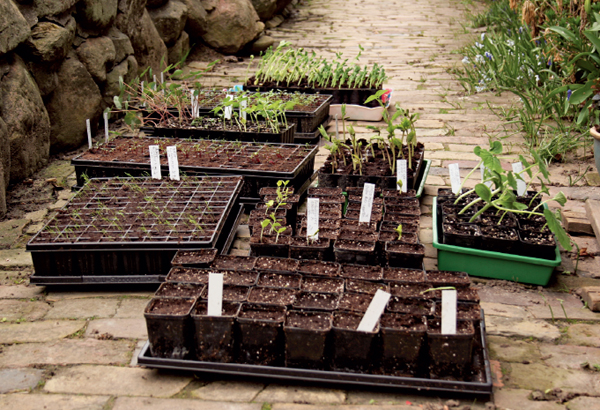
Pinching and spacing
When the time comes to place them in the greenhouse, seedlings are, at this point, small plants in large containers. The pots are kept close together and are protected from the cold. As the plants grow and the weather warms up, the plants will require more space between them. They need to be moved apart so they have room to grow evenly all around (see above picture). If they’re too close together they can only grow vertically, making them tall and leggy. Properly spaced, the empty area between each pot should be the same as the size of one pot. Your planting area should look like a chessboard with full and empty squares when it is finished. It follows that the larger the plant, the bigger space required between the pots so that the plants can grow sturdy. Very large plants such as nicotiana sylvestris (woodland tobacco), giant marigold, as well as tomatoes and cucumbers, need extra large spaces between them.
To encourage your plants’ strong growth, follow tips and tricks from professional growers, one of which being: water sparingly. The pros allow plants to dry out a little between each watering, which means they don’t let them grow too vigorously. Also, temperature is critical: if it’s too hot, the plants will bolt, which is why the ambient temperature should be kept around 15°C to 16°C (59°F to 61°F).
Another important grower trick is pinching. When you pinch—that is, when you cut off the top shoot—the plant usually produces two new shoots and grows to a sturdier size. A plant that has had its top shoot pinched off several times during its growth will become very lush. That said, not all plants benefit from pinching, as it can hamper the flowering cycle. Geranium started from seed is one of the plants that does not do well from pinching.
Many plants grow flower buds early, and these are good candidates for pinching, especially impatiens and small marigolds. Those plants grow more vigorously and sturdier if the flower buds are removed.
Protection against the sun and nighttime frost for young plants.
A 3 cm (1”) high Impatiens in bloom is not pretty, and its growth will be stunted. If the plant is allowed to flower it will produce less shoots and leaves, as all the energy is concentrated towards the flowers.
The seed packet should indicate whether a plant benefits from pinching. Plants such as ageratum (whiteweed), petunia annual dahlia, verbena, and summer phlox need to have their top shoots pinched. The plants will be far more bountiful, even though they will flower a tad later.
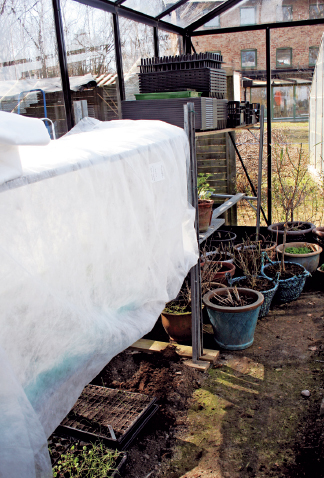
Hardening off in the greenhouse
The seeds you sow and the seedlings you pot up indoors get reduced light in which to grow. If they’re placed in a greenhouse, there’s more daylight and cooler nights—sometimes significantly cooler. This will shock the plants if they aren’t hardened-off first. When seedlings and plants are moved from an indoor climate to a greenhouse environment, they need to adjust to their new surroundings gradually. This process has to be repeated when they’re ready to be moved from the greenhouse and into the garden.
Small plants that can be spaced close together.
The best time to move plants to the greenhouse is when the weather is overcast yet still reasonably warm. During their first few days in the greenhouse plants need to be kept in the shade, because natural sunlight is far stronger than the soft indoor light. A thin fabric cloth can be hung over the plant and used as a shade cover. The cloth is light and can be set up temporarily over some shelving, or more permanently on casters so that it can be moved back and forth.
A mini greenhouse glass or cloche cover offers protection against frigid night temperatures. You can place a thin cloth on top of the cover to guard against the sun and it won’t weigh down the plants.
A move from kitchen to greenhouse. Many small (some a bit leggy) plants will benefit from more growth light, but will still need protection from harsh direct sunlight.
Hardening off and transplanting out
When you start seeds and plantings, it’s very important to harden off the plants for optimal results. When the plants are big enough to move outside it will take at least a week for them to harden and to get used to their new environment. Greenhouse plants have been more protected with humidity, warmth, and filtered sunlight, so they need to be further protected from strong sunlight when they are moved outside. Thus, an overcast, warm and calm day is an ideal time for their move, preferably to a place out of a draft, as even a gusty wind can be detrimental.
Plants will gradually get used to sun but still need a thin protective cloth during the first few days. Their leaves will become more thick-skinned and will therefore cope better with both sun and wind. For example, sun-loving plants such as geraniums develop much darker leaves when they grow in full sun, but they can’t handle being moved directly outside into direct sunlight. They burn in the sun—much like people getting sunburned at the beach. The leaves, which naturally turn towards the sun, are easily fried, which damages their function and compromises the overall health of the plant.
Sturdy greenhouse plants soon ready for transplanting out. They will need a week of hardening-off to get used to their new environment.
Plants also need to get used to lower temperatures, which can be done by placing them outside during daylight hours and moving them back inside at night. They can be left outside during warm nights. During the first few nights the plants should be placed near a wall for protection, perhaps covered by a thin cloth cover. Hardening-off doesn’t work in linear fashion: if there is an unexpected or sudden cold snap, hard frost or freeze, the plants should be moved inside—even those that have already spent a few nights outside. Let your thermometer and the weather forecast be your guides, as they can warn you of falling temperatures, and tell you specifically how cold it is or is going to be. Clear, warm days are often followed by chilly nights, especially when there is a full moon. On the other hand, overcast days followed by overcast nights are often warm, since the cloud cover acts as a barrier preventing the warmth from the earth from dispersing into the atmosphere.
This system can work even for the impatient among us who move all the plants outside without letting them go through a hardening-off period. However, the risk is greater that the plants stop growing and don’t start again until after several weeks. They will come back when they are used to the new environment, but their first leaves will probably turn yellow. Some plants are more sensitive than others, like cucumber, impatiens, beans, morning glory and other plants with large, thin leaves. Marigolds and cabbage, however, are hardier and can cope quite well with sudden environmental changes.