Growing Beautiful Food: A Gardener's Guide to Cultivating Extraordinary Vegetables and Fruit (2015)
GROW
Cut Flowers, Herbs & Edible Blooms
FLOWERS, WITH THEIR LOVELY, CHROMATIC whorls of color, are the divas of the growing season. Glamorous, fragrant, many petaled, they define our aspirations for cultivating beauty. But on the farm, these top models have to work a little harder; they need to be both beautiful and useful—as cut flowers that will hold up in a bouquet, as delicious edible additions to salads, or as indispensable aromatic herbs. “Il buono e il bella” (beautiful and practical), as the Italians say.
Organic flowers and herbs will add season-long beauty and ornament to the farm and are wonderful interplanted among beds as companion plants or just for a splash of color. Some will self-seed, and you’ll have them enthusiastically popping up everywhere the following season, while others will need to be started again in spring. Many can be dried for long-lasting arrangements or mixed into herbal teas and tinctures, but their real virtue is simply to adorn the farm with beauty.
Flowers are harvested early in the morning, after the dew dries but before the heat of the day sets in, and repeat harvests throughout the season encourage more branching, buds, and flowers. Some of the best long-season annuals include zinnias, gomphrena, celosia, statice, snapdragons, sunflower, amaranth, and cosmos—all food for the eyes. Delicate and delicious pansies, nasturtium, calendula, and borage are food for the table, as well.
When I do my walkabout in the early morning at Stonegate—propped up by kitchen clogs and a strong espresso—it’s the flower farm I head to first, not only because it catches the first splinters of light moving through the trees, but also because starting the morning on such beautiful, cultivated ground is a buffer against anything that could possibly come next. This is my wake-up call, and it’s always the most perfect moment of the day.
CUT FLOWERS
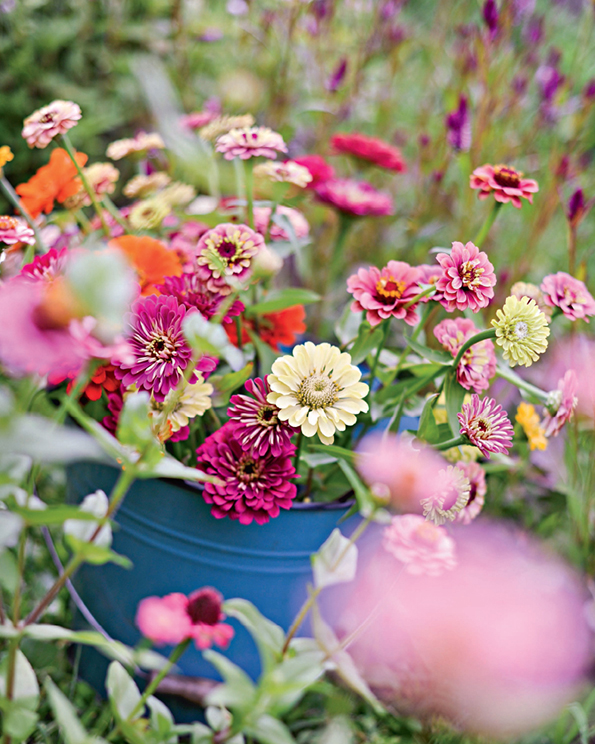
Cut flowers are the heart and soul of the flower farm, and most of our floral space at Stonegate is dedicated to their cultivation. Because this is where you enter the farm when you visit, it needs to be a kind of field of dreams, planted abundantly with all the imaginable, exuberant color and form of annual blooms. Though these are working flowers, meant to be cut and sold for bouquets, they’re also working to make a great first impression.

Amaranth
Amaranthus species
Amaranth’s tall, torchlike spires light up the back of the cutting garden with their dramatic flames of deep purple and red. Besides adding height and boldness to cut flower bouquets, the young, handsome leaves of this vigorous annual are edible, and the seeds are used as a grain in Asia and South America. The deeply hued flowers are also a source of red dye in some cultures. Though the most common variety is known as love-lies-bleeding and has deeply pendulous blooms, we prefer the upright cultivars at Stonegate Farm for their bright, tiki-torch exuberance.
Site and Soil
Amaranths grow well in a sunny location in average soil that’s evenly moist but well drained.
Planting
Start seeds indoors 4 to 6 weeks before the last spring frost date. Barely cover seeds sown in soil blocks or peat pots to minimize disturbance at transplanting. Where there is a long growing season, direct-sow amaranth seeds in prepared garden soil after the last frost date. Seeds germinate within a week at temperatures of 70° to 75°F (21° to 24°C). Transplant seedlings while they are small, but after danger of frost is past, spacing them 12 to 15 inches apart.
Growing
As long as the soil is well drained, amaranths grow easily into dramatic garden specimens 3 to 5 feet tall and 1½ to 2½ feet wide. Flowering amaranths such as love-lies-bleeding may require staking to help the tall stems support their heavy, drooping flower heads. Pinch shoots back to a leaf axil to promote branching. Seed-grown amaranths bloom within 2 to 3 months after sowing.
Harvesting
Cut fresh flowers when approximately three-quarters of the tiny blossoms of the flower head have opened. To harvest for drying, wait until seeds are setting and the flower heads feel firm. Hang in a warm, airy location to finish drying. Young leaves of amaranths are edible and may be pinched off as needed and cooked like spinach. The substantial inf lorescences produce abundant edible seeds that can be threshed when dry and eaten as a grain. Birds may visit ripening seed heads to feast in late summer.
Pests and Diseases
Watch for clusters of aphids where leaves meet stems and for tiny spider mites on leaf undersides. Wash either pest from plants with a strong spray of water.
Amaranths growing in soggy conditions are prone to root rot; otherwise, plants are reasonably trouble-free.
Extraordinary Varieties
‘Autumn’s Touch’, ‘Burgundy’, ‘Four Star Explorer Mix’, ‘Opopeo’, ‘Polish’

Celosia
Celosia species
The upright, cone-shaped bristles of celosia, in shades of lavender, pink, and purple, add a lot of flair to the cut flower bouquet. Some varieties are shaped like small heads of coral or roosters’ combs, but we prefer the narrow, quilled cultivars at the farm. They’re easy to grow and will form a dense and vibrant planting that persists into fall.
Site and Soil
Plant celosia in full sun to partial shade in average to good, evenly moist and well-drained soil.
Planting
Start seeds indoors 6 to 8 weeks before the last spring frost date. Sow in peat pots or soil blocks to minimize root disturbance at transplanting. Where the growing season is long enough, seeds can be sown directly in the garden after the danger of frost is past. Barely cover the seed, which will germinate in 1 to 2 weeks in warm (70° to 80°F/21° to 27°C) soil. Move transplants to the garden 1 to 2 weeks after the last spring frost date, spacing them 6 to 12 inches apart.
Growing
Water regularly and feed plants with liquid seaweed or fish emulsion to help them produce the largest flower heads. Dry or cold soil and disturbances to their roots can slow celosias’ growth and reduce flowering. Apply mulch around them after the soil is warmed, to keep it moist and to block weed growth. Tall crested varieties may need staking to help support their substantial flower heads. Deadhead faded flowers to keep plants blooming.
Harvesting
Cut the flower heads when they are fully opened. Hang in a dark, airy location to dry. Celosias keep their colors fairly well when dried.
Pests and Diseases
Soggy soil invites problems with root rots. Celosia is otherwise easy growing and relatively trouble free.
Extraordinary Varieties
‘Cramer’s Amazon’, ‘Flamingo Feather’, ‘Ruby Parfait’
Cosmos
Cosmos species
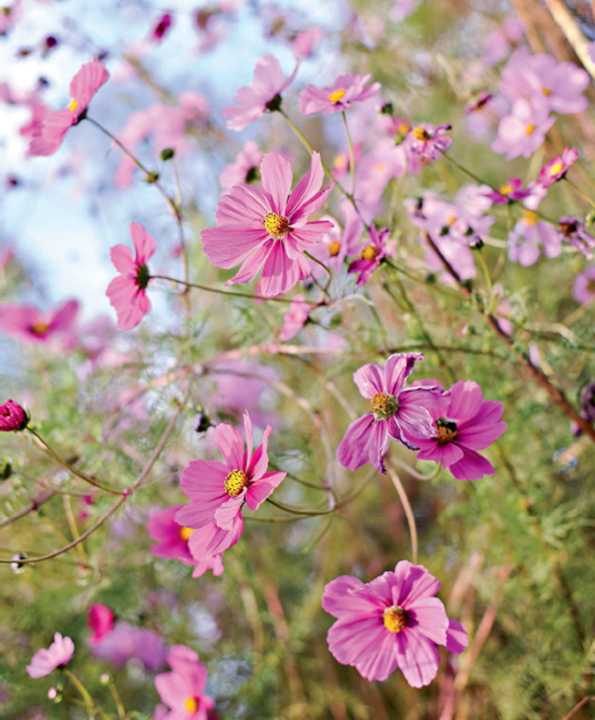
Despite their delicate, asterlike blossoms and lacy foliage, cosmos are tougher than they look and will stand tall in the back of the border all season long, swaying gently, waving their pretty pastel blooms. They come in a variety of colors and in single and double forms, but our favorites are the pale purple, pink, and white varieties. All cosmos are easy to grow.
Site and Soil
Give cosmos a spot in full sun in well-drained soil of just average fertility. Plants grow poorly in soggy conditions. In rich soil, cosmos tends to produce more leaves than flowers and becomes too tall and floppy.
Planting
Sow seeds directly in moistened, prepared soil in the garden after the danger of frost has passed. Keep the soil evenly moist until seeds germinate in about a week’s time. Thin seedlings to about 1 foot apart.
Growing
Cosmos begins blooming about 10 weeks after seeds are sown. They can be started earlier indoors to give them a jump. To keep the flowers coming, deadhead regularly, removing faded flowers and stems down to the next set of leaves. Tall varieties may need staking to keep from flopping over, particularly in humid conditions. Late in the season, let some flowers remain to produce seeds. Birds will enjoy them, and some will likely fall to the ground to become next season’s colorful bed of blooms.
Harvesting
Cut the flowers as the petals are opening but are not fully flattened into their classic daisy display.
Pests and Diseases
Cosmos rarely are bothered by pests or diseases, but can get powdery mildew later in the season. Large stalks should be staked.
Extraordinary Varieties
‘Seashells’, ‘Sensation’, ‘Sonata’, ‘Candy Stripe’, ‘Collarette’ (semi-double), ‘Rose Bonbon’ (double)

Gomphrena
Gomphrena globosa
Gomphrena grows on upright stems topped with lollipop-like blossoms in a profusion of colors that are pretty enough to give you a sweet tooth. Sometimes called globe amaranth, gomphrena is a different plant from its cousins in the amaranth family, delightful in its own right and wonderful for both fresh arrangements and for drying at the end of the season.
Site and Soil
Grow gomphrena in average, well-drained to dry soil in a sunny site.
Planting
Start gomphrena indoors 6 to 8 weeks before the last spring frost date or sow seed outdoors after the danger of frost has passed. Soak seeds overnight in warm water before planting and sow thickly to make up for gomphrena’s typically low germination rate. Use a well-drained soilless mix for indoor seed starting and press the seeds into the surface. Cover the seed flat or put it in a dark location at 70° to 78°F (21° to 26°C) until seeds germinate in 1 to 2 weeks. Transplant seedlings to the garden when the soil is warm and the danger of frost has passed, spacing them 6 to 8 inches apart.
Growing
Pinch young plants to encourage branching and bushy growth. Gomphrena tolerates heat and dry conditions but grows best with regular moisture throughout the season. Tall varieties may need staking.
Harvesting
Cut flowers for fresh use when they display full color but are not completely opened. For drying, gather fully open flowers and hang them in an airy location. Gomphrena’s bright flower heads hold their color well when dried.
Pests and Diseases
In their preferred growing conditions, gomphrenas rarely are bothered by pests or diseases. Humid weather and soggy soil can promote leaf spot diseases and molds. Prune or thin plants to improve air circulation, if necessary. Drought stress can make gomphrena susceptible to powdery mildew; avoid this by keeping the soil evenly moist.
Extraordinary Varieties
‘Bicolor Rose’, ‘QIS Carmine’, ‘QIS Formula Mix’
Nigella
Nigella damascena
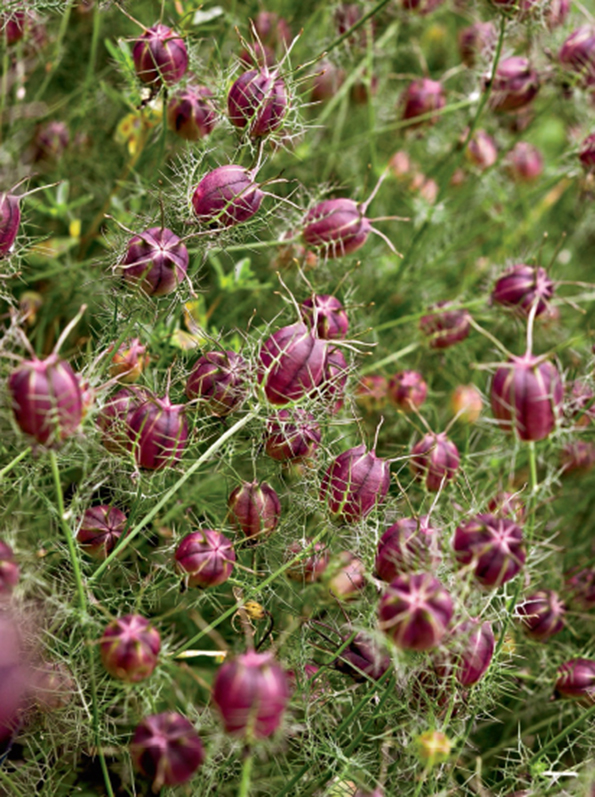
The blossom of nigella, or love-in-a-mist, emerges from a froth of soft, lacy foliage and bracts and forms a delicate sphere with a raised, tangled crown of stamens at the center. This exotic display would be beautiful enough, but the seedpods are what I love most. Like small, pleated lanterns, these pods add plenty of drama and flair to a late-summer bouquet. The pods also dry well and can be used in colorful, long-lasting arrangements.
Site and Soil
Nigella grows easily in average to good, well-drained soil in a sunny location.
Planting
Sow seeds in the garden in early spring as soon as the soil can be worked. Scatter them over the surface of prepared soil and cover them lightly. Germination takes place within 2 weeks as the soil warms up. Plant more seeds at 2- to 3-week intervals until midsummer for ongoing flowers and seedpods. Nigella forms a taproot that makes it difficult to transplant successfully, so starting early in flats can be difficult.
Growing
Water as needed throughout the growing season. Nigella grows best in cool temperatures and may fade in hot summer conditions.
Harvesting
Nigella begins blooming about 2 months after seeds are planted. Cut for fresh use when pods begin to form and most of the flowers on a stem are open. Harvest firm pods for use in dry arrangements.
Pests and Diseases
Easy-to-grow nigella has no noteworthy problems with pests or diseases.
Extraordinary Varieties
‘Cambridge Blue’, ‘Miss Jekyll’, ‘Persian Jewels’
NOTES FROM THE WONDERGROUND
Thank You, You’re Beautiful
“I must have flowers, always, and always,” said Claude Monet, and, like him, Stonegate Farm is under the spell of a kind of wild floral alchemy this season, with organic cut flowers having their magical way with us.
With radiant blooms busting out all over, I think—even in his near blindness—Monet would have fumbled for a fistful of hog bristle brushes and gone at it, particularly the luminous, raveled clumps of nasturtium we have growing along our fencerows. These are the same flowers that still grow so beautifully underneath Monet’s famous allée at Giverny.
There would be more for him to take in, of course: dark-plumed amaranth and velveteen sunflowers towering above it all with watchful Cyclopean eyes; the blue, upright bristle of anise hyssop or the radiant chromatic whorls of long-stemmed zinnias.
All of this color and form goes to my head (have you noticed?), but why not farm for beauty? If you’re looking for earthly transcendence, you’ll find it in flowers.
I’m up early and usually make a beeline (along with the bees) to the flower farm where, even in the half-light before the sun stretches through the trees, the blossoms are filling the air with fragrance. Besides the smell of dark espresso, that’s all I want my nose to know.
The beds of anise hyssop, with their licorice-scented leaves and blue bottlebrush flower heads, are a heady experience, especially for the bees, who make a sweet, fragrant honey from the nectar. Planting for bee forage is important to the health of the farm. The orchard provides ample nectar flow in spring, while summer- and fall-blooming annuals from the flower farm round out the season.
Some of the best forage for bees are common weeds, such as dandelion, clover, and milkweed, and they’re the very ones that we’ve banished from our gardens. With bees in trouble across the globe, it may be time to rethink the humble weed. It’s just a flower in the wrong place, after all.
Flowers in the right place can make all the difference. Harvests from the flower farm always happen in the early morning, before the blossoms fully unfold, so that they’re as fresh as possible for the CSA shares. With shears and buckets, they’re carefully cut just above a new leaf node, with a quiet thank you, you’re beautiful snip, and arranged into the week’s bouquets.
It’s hard to go wrong with any of these, and they all cast a spell, but the neon buttons of pink gomphrena paired with the molten, lava-lamp purples of celosia is one of my favorite combinations.
There is one flower above all that has my heart, however, and that’s my daughter, Daisy. Lovely and sweet, she is all flowers to me.
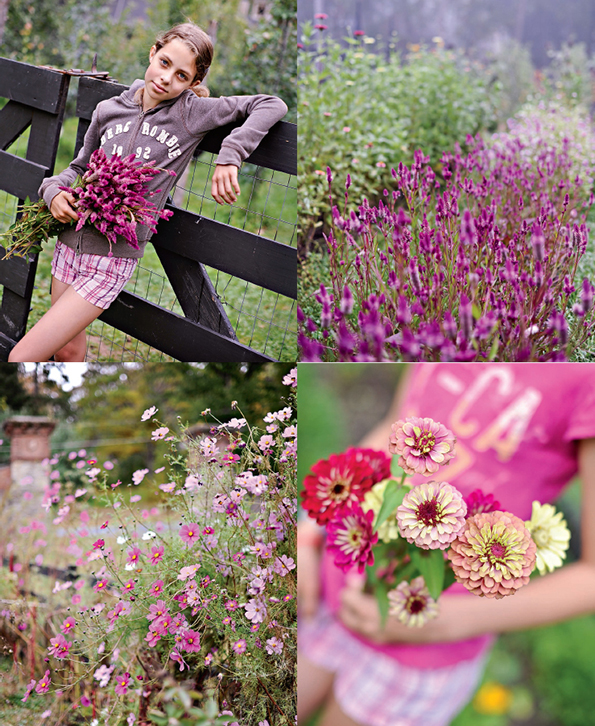
My daughter, Daisy Marlena, with an early morning bouquet of Celosia ‘Ruby Parfait’; upright plantings of celosia; newly picked ‘Benary’s’ zinnias in warm pastel hues; and a scramble of tall and luminous cosmos.
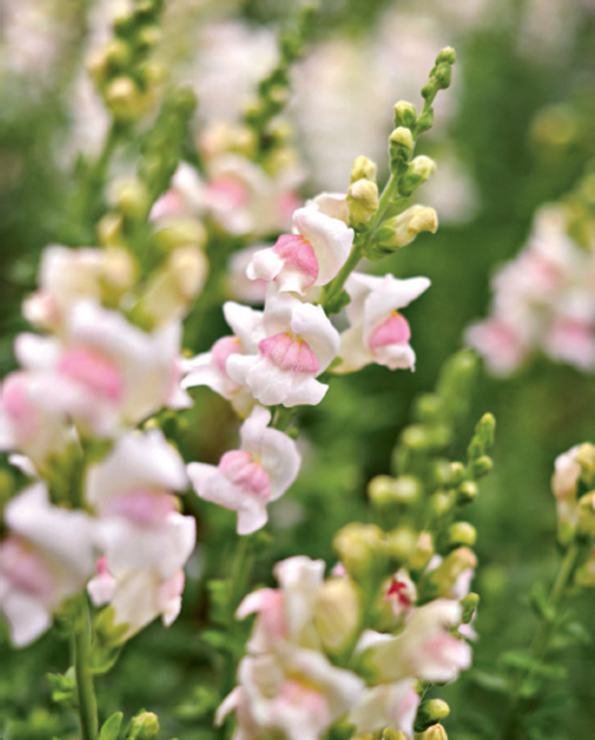
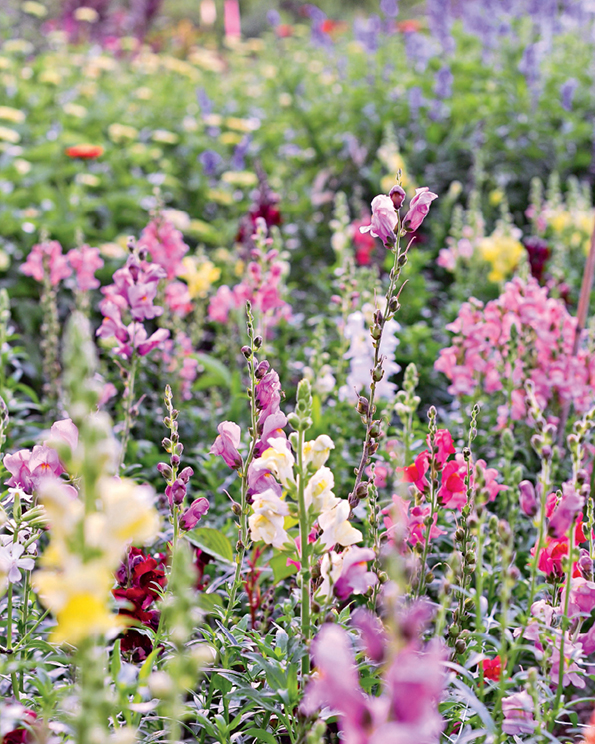
Snapdragon
Antirrhinum majus
The brightly colored multibloomed stalks of snapdragons add a beautiful cottage charm to the cut flower bed and are a favorite in cut flower arrangements. Emerging from the bottom up, the blooms of snapdragons clamber in a skyward whorl on long, elegant stems in almost every color except true blue. Children love snaps because they can pinch the individual blooms and watch the flower—like a dragon’s mouth—snap open and closed.
Site and Soil
Plant snapdragons in a sunny to partially shaded location in light, humus-rich soil that is evenly moist but well drained.
Planting
Start snapdragons indoors 8 to 12 weeks before the last spring frost date. Sprinkle the seeds over the surface of moistened growing medium and press them in gently without covering—snapdragon seeds need light to germinate. Put the container under lights and keep the medium evenly moist until seeds begin sprouting in 2 to 3 weeks. Water seedling trays from below to minimize the risk of rot.
Growing
Pinch the tips of seedlings when they have six leaves to stimulate bushy growth. Snapdragons prefer cool temperatures and can tolerate light frosts. Harden seedlings and transplant them to the garden 2 to 3 weeks before the last frost date, spacing them 8 to 12 inches apart to allow good air circulation around the plants. Water to keep the soil evenly moist and feed with liquid seaweed or fish emulsion every few weeks. Remove faded flower spikes to promote reblooming.
Harvesting
Snapdragons bloom 3 to 4 months after seeds are planted. Harvest spikes of flowers for fresh use when the blossoms on the lower third to half of the stems are open.
Pests and Diseases
Rust disease may show up on snapdragons in wet weather and humid conditions, starting as brown spots on foliage and flowers and eventually killing affected plants. Choose resistant cultivars and maintain good spacing in the garden. Water carefully to keep from wetting the foliage and remove plants showing signs of infection immediately. Plant snapdragons in a different spot in the garden if rust has been a problem in previous seasons.
Extraordinary Varieties
‘Chantilly Bronze’, ‘Costa Mix’, ‘Rocket Mix’, ‘Twinny Appleblossom’
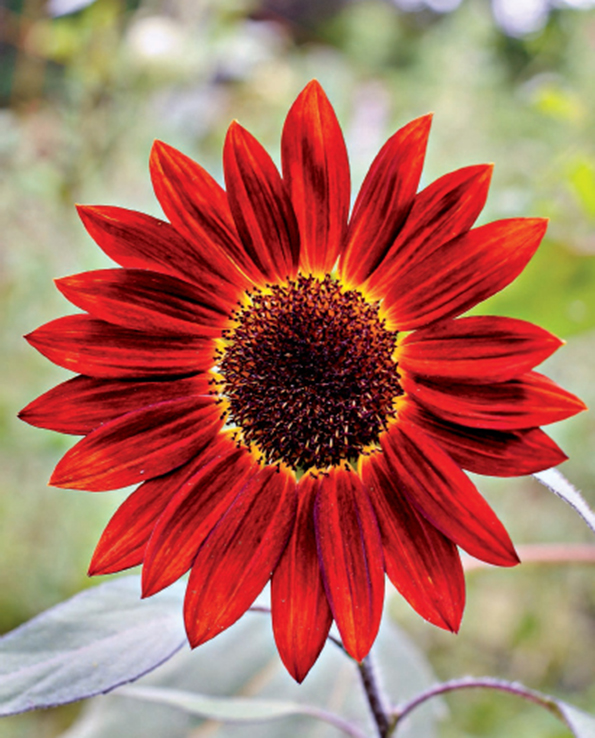
Sunflower
Helianthus annuus
For sheer height and summer drama, not much can top sunflowers. We tend to plant the multibranching, medium-height varieties (4 to 6 feet) at the back of the border, where their warm yellows complement the frothy purple sway of companion-planted amaranth and cosmos. Larger-headed varieties can be grown for their abundant seeds, as bee forage, or for their impressive scale alone. Nothing says summer quite like sunflowers.
Site and Soil
It’s no surprise that sunflowers like a place in the sun in average to rich soil that is evenly moist but well drained. Choose a spot on the north side of the garden to keep towering sunflowers from shading other plants.
Planting
Sow sunflower seeds in prepared, warm soil, after the danger of frost is past. Seeds may be started indoors 2 to 4 weeks before the last frost date, but sunflowers grow quickly and dislike having their roots disturbed, so direct seeding is usually preferable. Plant seeds about ½ inch deep and keep evenly moist while waiting for them to sprout, usually within 1 to 2 weeks. Thin or space seedlings 1 to 2 feet apart, depending on the variety.
Growing
Established sunflowers are reasonably drought tolerant but benefit from supplemental watering in very dry conditions. Feed lightly, if at all, to keep plants from producing abundant foliage at the expense of the flowers. Mulch around sunflowers to limit weeds and root disturbance caused by weeding. Remove fading flowers from multistemmed varieties to encourage more flower production.
Harvesting
Gather flowers for fresh use when they are just starting to open and the ray flowers are not yet flattened around the central disk. Harvest flowers for seeds when the seeds begin to turn brown and the back of the seed head turns yellow. Cut flowers with a length of stem to allow for hanging them upside down in a dry, airy place to dry fully.
Pests and Diseases
Sunflowers rarely are troubled by pests or diseases. Watch for aphids clustering at the bases of flower buds and beneath leaves; wash them from plants with a strong spray of water. Cover flowers with cheesecloth or mesh bags to save seeds from hungry birds. Remove lower leaves if they become infected by leaf spot or mildew diseases. Avoid wetting leaves when watering to limit problems with disease.
Extraordinary Varieties
‘Autumn Beauty’, ‘Buttercream’, ‘Moulin Rouge’, ‘Peach Passion’, ‘Starburst Lemon Aura’
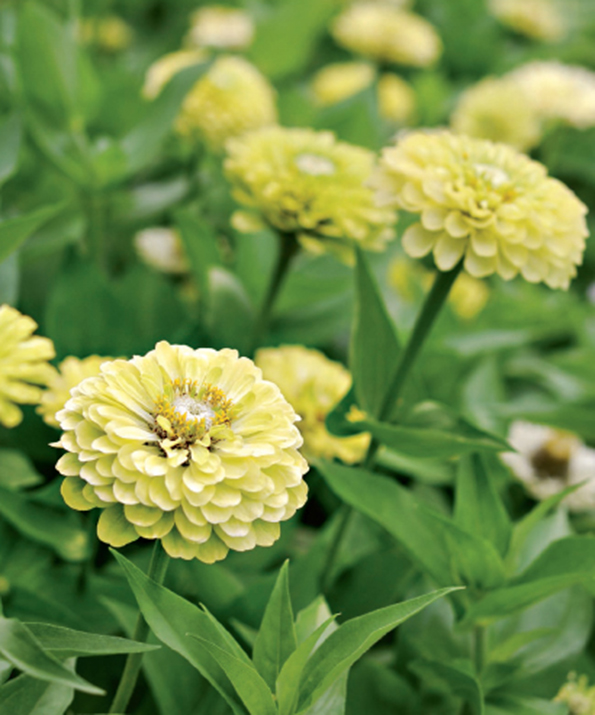
Zinnias
Zinnia species
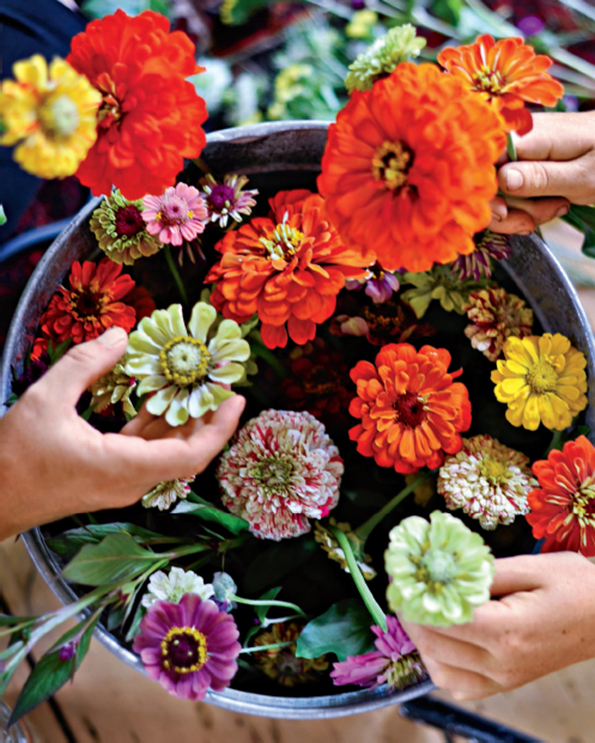
Zinnias are my favorite cut flower at the farm, and I plant more varieties of this flower than any other. There are giant, dahlia-like singles in bright polychromatic shades that yield over a long season and brighten up any bouquet. There are doubles, bicolors, and dwarf groundcover varieties, all heat tolerant and free flowering. For extraordinary, easy beauty over a long season, zinnias are a go-to favorite.
Site and Soil
Give zinnias a place in the sun in average to good, well-drained soil.
Planting
Zinnias are easy to grow from seed sown directly in the garden after the danger of frost is past. To enjoy their cheery blooms a bit earlier in the growing season, start seeds indoors 2 to 3 weeks before the last spring frost date. Sow seeds over prepared, moistened soil or growing medium and cover lightly; germination occurs within 3 to 5 days at 65° to 80°F (18° to 27°C). Use soil blocks, peat pots, or other biodegradable containers for indoor seed starting to minimize root disturbance at transplanting. Move transplants to the garden after the last frost date, when air and soil temperatures are reliably warm.
Growing
Thin zinnia seedlings or space transplants about 12 inches apart to promote good air circulation around the plants. Water only when the soil is dry, taking care to avoid wetting the leaves. Remove spent flowers to keep zinnias blooming until frost.
Harvesting
Cut stems for fresh use before the flowers are completely opened.
Pests and Diseases
Japanese beetles like zinnias and will munch on flowers and foliage when they get the chance. Handpick the metallic bronze pests into soapy water to put a stop to their feasting.
In humid weather, zinnias are prone to powdery mildew, a patchy, white fungus that coats leaves and stems. Resistant varieties are available and are a good idea where summers tend to be warm and sticky. Space zinnias to allow air movement, and water carefully and only when needed to further reduce the risk of powdery mildew. Soggy soil can cause problems with root rot; avoid planting zinnias in poorly drained sites.
Extraordinary Varieties
‘Benary’s Giant Mix’, ‘Giant Dahlia Flowered Mix’, ‘Persian Carpet’, ‘Profusion White’, ‘Queen Red Lime’
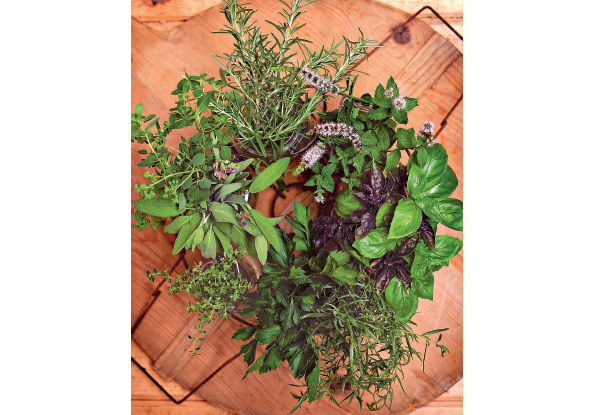
HERBS
All of the flavor and food we grow and eat on the farm would be diminished without herbs. They are almost as essential to preparing a home-harvested meal as the vegetables themselves. We tend to grow more than we’ll need in a season, as they can be dried and stored, and we try novel varieties each year to keep things interesting. There’s nothing like a Thai or lemon basil, variegated thyme, or a pineapple ginger to liven things up.
Basil
Ocimum basilicum
With its aromatic leaves and bristly, plumed flowers, basil is a must for the herb garden. Plucked fresh and tossed into pasta or a seasonal caprese salad with tomatoes, mozzarella, and olive oil, basil screams joyfully of summer. This annual herb comes in dozens of varieties, with flavors ranging from traditional peppery Italian to lemon, cinnamon—even licorice.
Site and Soil
Prepare a sunny spot for basil by digging in compost or composted manure to create rich, moist, well-drained conditions.
Planting
Basil grows easily from seed but requires toasty warm soil for germination (75° to 85°F/24° to 29°C) and reliably warm air temperatures throughout its productive life. Plant seeds a week or two after the last spring frost date, covering them lightly with sand or fine-textured soil about ⅛ inch deep. Or start seeds indoors 4 to 6 weeks before the last frost date and move transplants to the garden once the weather has settled. Thin or space plants 12 to 18 inches apart. Sow more seeds every 2 to 3 weeks until midsummer to keep a steady supply of this versatile herb on hand.
Growing
Basil may suffer cold injury if temperatures dip below 50°F (10°C). Be ready to cover plants if chilly nights are in the forecast. Water regularly and apply mulch to warm soil to conserve soil moisture. Weekly, pinch or snip off stem tips to above a pair of leaves to encourage branching, bushy growth and to forestall flowering. Pinch off flower heads to keep leaves coming.
Harvesting
Begin picking the outermost foliage from basil when plants have formed several pairs of leaves. Handle gently to avoid bruising and wait to wash until just before use. Basil is best when fresh and doesn’t store particularly well—at temperatures below 40°F (4°C), the leaves blacken—so harvest as needed. When a large quantity is needed, gather whole stems or pull entire plants and strip them of their leaves.
Pests and Diseases
Downy mildew and fusarium wilt are fungal diseases that may affect basil. Buy seed from reputable sources and choose resistant varieties when available. Carefully inspect nursery plants before buying. Space plants for good air circulation in the garden and avoid wetting the foliage when watering. Don’t harvest when plants are wet. Remove and destroy entire plants that show disease symptoms. These diseases can persist in the soil for years; do not plant basil in sites where infected plants grew in previous seasons. Clean up and discard all plant debris at the end of the growing season.
Extraordinary Varieties
‘Amethyst Improved’, ‘Ararat’, ‘Genovese’, ‘Thai Magic’
Chives
Allium schoenoprasum
Chives are the first herb to emerge in spring, sending up tall, slender spears topped with purple blue, globe-shaped flowers. In exchange for very little care, perennial chives will return year after year, their onion-infused scapes flavoring almost anything they touch, while their moon-shaped blossoms do their part for edible beauty.
Site and Soil
Dig in compost in a sunny site to prepare it for chives. Like other onions, chives grow best in light soil that is moist but well drained, but they’ll get along fine in any average garden soil.
Planting
Start chives from seed sown indoors in late winter and plant the seedlings in the garden in early spring when they’re about 2 inches high. Or find a gardening friend who is willing to divide his or her chives to supply a few bulbs to get you started in either spring or fall.
Growing
Once they’re settled, chives grow easily with little fuss or attention. The clumps of small bulbs increase gradually over the years. Divide as needed to create smaller clumps to share with friends or to plant in other places in your garden.
Harvesting
Pick rounded pink flower heads in spring to add color and flavor to meals. Remove flowerstalks after blooming; unlike the leaves, they are solid. Snip off a few inches of the slender hollow leaves as needed.
Pests and Diseases
Pests that trouble onions may also go after chives, but they are usually undisturbed by problems of any sort.
Extraordinary Varieties
‘Fine Leaf’, garlic chives (A. tuberosum), ‘Purly’, ‘Staro’
Cilantro
Coriandrum sativum
A versatile plant that—along with its seed (coriander)—is the most widely consumed herb on the planet. But sow it, and you will also sow dissent, as cilantro polarizes people’s tastebuds: Some taste delicious citruslike freshness, other taste metallic soap. Cilantro gives flavor to cuisines from Asia, the Middle East, South America, and Mexico and is easy to grow.
Site and Soil
Plant cilantro in average garden soil that is moist but well drained in sun to partial shade.
Planting
Sow cilantro seeds—which you may recognize as coriander—in warm soil after all danger of frost is past. Space the seeds 2 inches apart and cover with ½ inch of fine soil or sifted compost to provide the darkness necessary for germination. Plant more seeds every 2 weeks through summer for a ready supply of this versatile herb.
Growing
Cilantro seeds are really small fruits that hold two or more seeds. Once plants are 2 inches tall, thin to 4-inch spacing. Weed and water as needed; otherwise, cilantro is relatively carefree.
Harvesting
Plants reach harvestable size about 50 days after planting. Pinch or shear off leaves as they are needed. Young leaves have the best flavor. Leaf quality declines once plants begin blooming, but the flowers are favorites of many beneficial insects and, if left to finish their life cycle, will supply coriander for your kitchen. Cut off whole plants when the leaves and stems turn brown and hang them upside down in paper bags to catch the seeds that fall off as they dry.
Pests and Diseases
Few problems bother cilantro, but it is susceptible to a bacterial leaf spot disease that can disfigure the foliage. Buy seeds from reputable sources and avoid wetting foliage when watering to minimize the risk of disease problems.
Extraordinary Varieties
‘Calypso’, ‘Marino’, ‘Santo’
Dill
Anethum graveolens
Dill’s wispy, fernlike leaves and edible seeds add zest to pickles, soups, and sauces, and its Fourth-of-July bursts of bright yellow flowers on lanky stems are a pleasure for the eye. It’s easy to grow and attractive to beneficial insects.
Site and Soil
Dill grows well in average to good, well-drained garden soil in a sunny location.
Planting
Plant dill seeds in early spring and every few weeks throughout summer. Dill needs light to germinate. Prepare the soil and then moisten it before scattering the seeds evenly over the surface. Gently press the seeds into the soil but don’t cover them. Mark the spot where you plant it—dill may take as long as 3 weeks to sprout.
Growing
Keep the seedbed evenly moist while waiting for seeds to germinate. Thin seedlings to 6 to 12 inches apart, depending on the mature size of the variety being grown. Water regularly to keep the soil from drying out, which can prompt bolting. Dill may be prone to bolting in hot summer weather, but it tolerates light frosts and can be kept growing into fall in a coldframe or other protection from freezing temperatures.
Harvesting
Dill leaves will be ready to harvest starting about 40 days after planting. Snip off what is needed for fresh use; the leaves do not store well in refrigeration. Once dill begins blooming, the quality of the foliage declines. Let seeds mature on the plants until they are light brown, then cut off long flowering stems and hang them upside down in small bunches in an airy location to dry fully. Put the bundles in paper bags or hang them over sheets of newspaper to catch seeds that fall as it dries.
Pests and Diseases
Dill is fairly trouble-free. If you are inclined to share dill with 2- to 3-inch green caterpillars marked with yellow-dotted black bands, you may have the pleasure of watching the caterpillars become elegant black swallowtail butterflies. Usually, it’s worth giving up a bit of dill in exchange for the miracle of metamorphosis, but if the dill is in danger of being overwhelmed, handpick and transfer them to alternate hosts, such as parsley or Queen Anne’s lace.
Extraordinary Varieties
‘Bouquet’, ‘Fernleaf’, ‘Veirling’
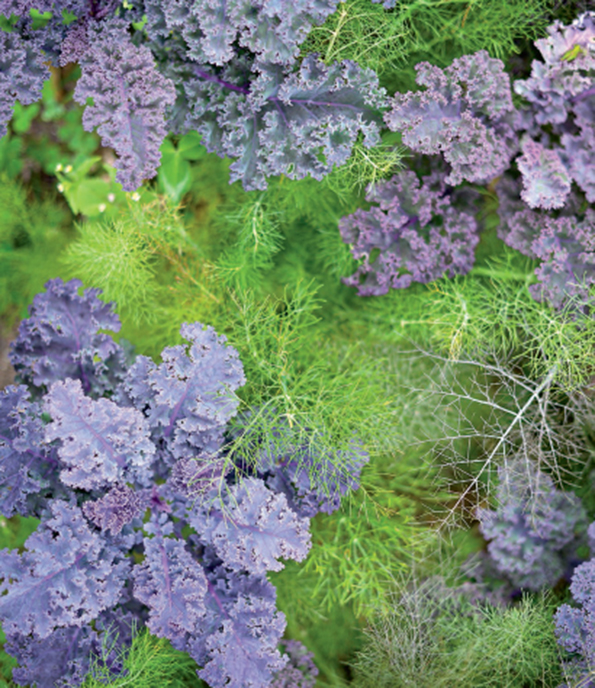
Fennel
Foeniculum vulgare
We grow two kinds of fennel at Stonegate—the bulb-forming type (also called Florence fennel or finocchio) and its leafy, nonbulbous sibling. Both plants produce handsome, feathery foliage in shades of lime green and copper and bring sweet, anise or licorice flavor to the table in all their edible parts.
Site and Soil
Grow fennel in rich, moist, well-drained soil in full sun. Dig in compost or rotted manure ahead of planting. In the garden, choose a spot for fennel away from bush beans, kohlrabi, and tomatoes, all of which can be negatively affected by nearby fennel.
Planting
Sow seeds of common (leafy) fennel early in spring, as soon as the soil can be worked. Florence fennel also may be sown early but is less likely to bolt if planted in midspring to early summer so it reaches maturity in the shorter, cooler days of early fall. Cover seeds lightly and keep the soil evenly moist during germination. Sow more seeds every 2 to 3 weeks to enjoy an abundant harvest of flavorful fennel.
Growing
Thin seedlings to 6 to 12 inches apart. Maintain even moisture throughout the growing season to keep fennel from bolting, which reduces the quality of foliage and bulbs. Weed carefully to avoid disturbing the roots. Mulch around fennel once the soil is warm to conserve moisture and block competition from weeds, but avoid putting organic mulch right up against developing fennel bulbs. Fennel will tolerate light frost. Be prepared to cover plants in fall if heavy frosts are predicted, allowing them to continue producing for a few more weeks.
Harvesting
Begin harvesting feathery leaves about 50 days after planting, starting with the oldest foliage. If leaf fennel plants begin to bolt, let the seed heads mature on the plants until they start to turn brown, then snip off the flowerstalks and hang them upside down in a dry, airy location to finish drying. Put a paper bag over the seed heads while they dry to catch any seeds that fall.
Harvest fennel bulbs, actually swollen leaf stems, when the base of the plant begins to thicken. Use a sharp knife or pruners to cut at soil level, just below the bulb, and snip off the leaves about an inch above the bulb.
Pests and Diseases
Aphids sometimes find fennel foliage tasty. If you notice clusters of these tiny pests on the leaves and stems, wash them from plants with a strong stream of water.
While watering is important, fennel can succumb to root rot in soggy soil conditions. Good drainage is important to keep the deep roots healthy. Some of the same diseases that affect carrots can also afflict fennel, reducing the quality of the foliage. Healthy plants in good growing conditions are the best defense against most disease problems, along with rotation (rotate fennel with related carrots, celery, parsnips, and parsley) and good garden sanitation.
Extraordinary Varieties
‘Giant Bronze’, ‘Grosfruchtiger’, ‘Orion’, ‘Zefa Fino’
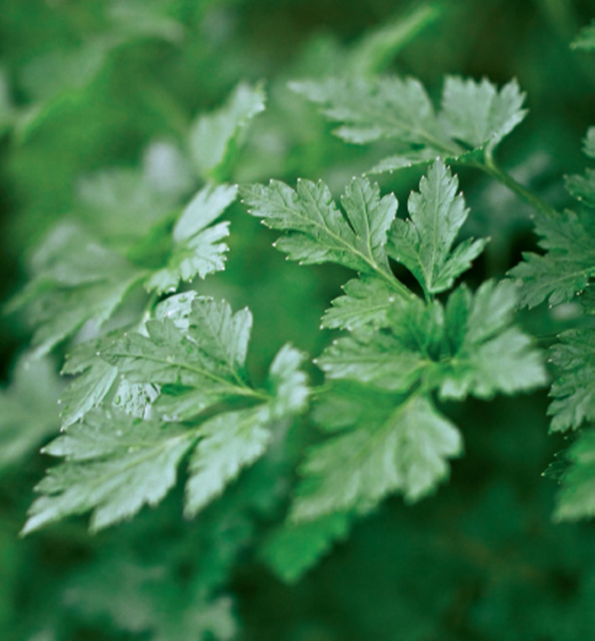
Parsley
Petroselinum crispum
Parsley is so much more than a limp sprig of green on the side of the plate. This mildly bitter, biennial herb makes savory dishes even more savory and is packed with vitamins A and C as well as a host of other nutrients. Parsley is either flat leaved or curly and will lend color and vibrant flavor to salads, pesto, and soups. The flat-leaved varieties are generally better for cooking.
Site and Soil
A sunny to partially shaded bed with good garden soil that is moist but well drained will do just fine for parsley. Dig in compost before planting to prepare the site.
Planting
Start parsley seeds indoors 6 to 8 weeks before the last spring frost date. Parsley is a biennial, and its seeds can be balky about getting going. Soak seeds in warm water overnight before planting them ¼ inch deep in soil blocks or biodegradable pots. Make sure the seeds are covered by moist medium; they need darkness to germinate. Like its deep-rooted relatives, carrots and parsnips, parsley forms a taproot that makes transplanting tricky. The seeds may take up to a month to germinate. Keep the growing medium moist while you wait for plants to appear. When parsley seedlings are a few inches tall, transplant them to prepared, moistened soil in the garden. Space seedlings 8 inches apart.
Growing
Be quick to remove any weeds that encroach on parsley’s space, and maintain even soil moisture. Water at the bases of plants rather than overhead to reduce the risk of disease problems. Mulch around parsley to block weeds and conserve moisture, but pull the mulch a few inches back from the plants’ crowns. Mulching also prevents soil from splashing onto parsley’s leaves. In fall, use heavy-duty row covers to keep parsley growing until freezing temperatures arrive.
If left in the garden over winter, parsley may produce more foliage in spring. Side-dress awakening plants with compost, and snip off flower stalks as they appear. Plants will die once they have bloomed, but they may self-sow and produce small plants that can be potted up and moved indoors to produce tasty leaves during winter.
Harvesting
Use scissors to snip off outer leaves as they are needed. Whole sprigs or chopped leaves can be frozen or dried at the end of the season.
Pests and Diseases
The stripey green, black, and yellow-dotted larvae of black swallowtail butterf lies are often called “parsley worms,” and these dramatic caterpillars may show up amid the foliage, munching away at stalks and stems. If you don’t mind sharing, you can expect to enjoy beautiful butterflies in the garden in exchange for a portion of the parsley harvest. If caterpillars seem to be taking more parsley than you can spare, relocate them to nearby Queen Anne’s lace or dill.
Parsley plants are susceptible to crown rot disease. Avoid overhead watering and keep organic mulch away from the bases of plants to minimize problems.
Extraordinary Varieties
‘Giant of Italy’, ‘Moss Curled’, ‘Titan’
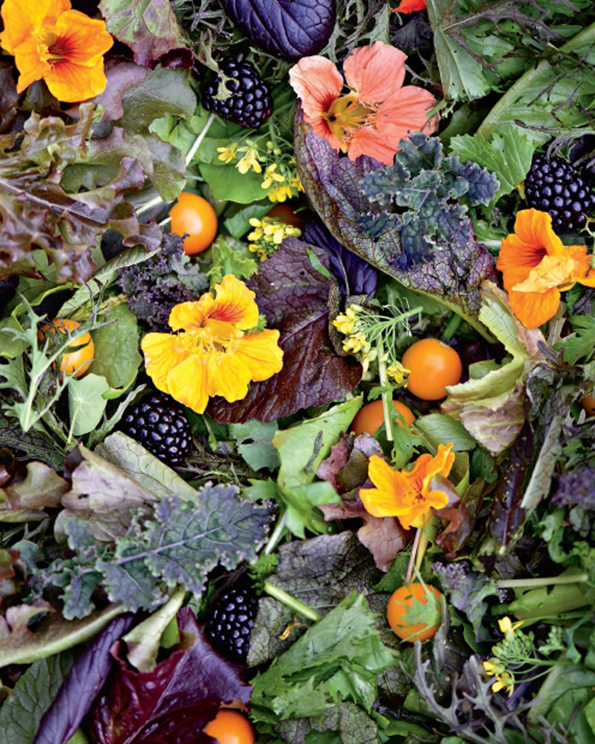
EDIBLE BLOOMS
It was E. E. Cummings who implored us to eat flowers and not be afraid, and we took him at his poetic word. The edible flowers we grow at Stonegate not only beautify any dish they accompany but also add flavors of their own, from the perfumed heat of nasturtium to the celery-like coolness of borage and viola. We add them to all of our salad mixes, desserts, stirfries, and cooling summer cocktails—wherever beauty and flavor meet.
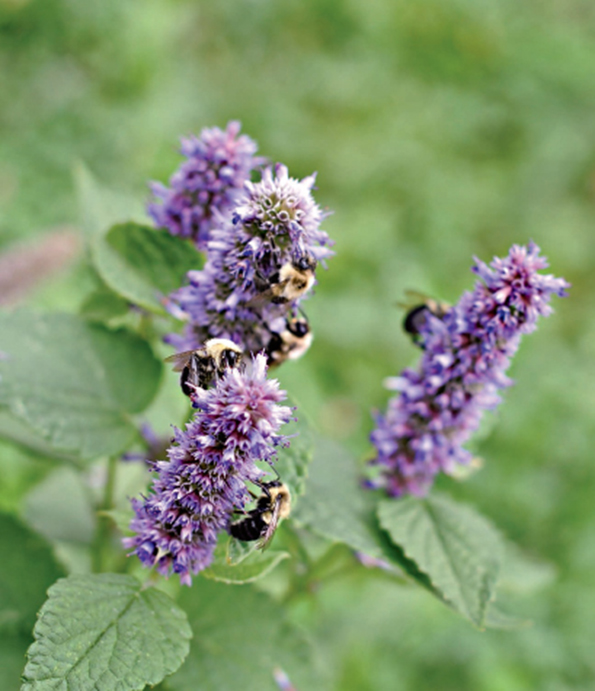
Anise Hyssop
Agastache foeniculum
Anise hyssop’s delicate spires of brushy lavender are as beautiful in the back of the border (where the bees will surely be savoring them) as they are on the plate, sprinkled onto fruit salads or dessert, where their licorice-mint flavor is a delightful complement. The flowers and leaves can also be dried and made into teas.
Site and Soil
Good drainage is critical for the long-term success of perennial anise hyssop. Prepare a site for it in sun to partial shade in neutral to slightly alkaline soil of average fertility.
Planting
Start seeds of anise hyssop indoors in late winter, sowing them on top of moistened growing medium and pressing them gently into the surface. Or sprinkle the seed over a prepared seedbed in the garden in spring or fall, covering lightly with fine soil or vermiculite. Fall-sown seeds will germinate the following spring. Keep things moist while waiting for seeds to germinate, which may take 1 to 2 weeks. Transplant seedlings to the garden when the danger of frost is past, spacing them about 2 feet apart.
Growing
Keep young plants evenly watered during dry weather. Established plants are relatively tolerant of dry conditions. Mulch lightly in late spring to conserve soil moisture and block weeds. In late summer, cut anise hyssop back by no more than a quarter of its height to remove faded flowers and encourage bushy growth. This can also stimulate a second round of blossoms. Anise hyssop will self-sow prolifically if flowers are left to mature on the plant. Although it is perennial in USDA Zones 6 to 9, anise hyssop may live for only a year or two. Take advantage of volunteer seedlings that pop up to replenish your garden.
Harvesting
Pinch or snip off flowers and young leaves as needed for fresh use. Gather leafy flower stems in summer to dry for use in teas.
Pests and Diseases
In a well-drained site, anise hyssop is largely trouble free, but plants growing in soggy conditions are prone to crown and root rots. In humid weather, powdery mildew, rust, and leaf spot diseases may disfigure the foliage. Good cultural conditions—even soil moisture and good drainage, good air circulation, and vigorous plants—help to minimize the risk of these problems.
Extraordinary Varieties
‘Blue Fortune’, ‘Desert Sunrise’ (A. hybrid), ‘Golden Jubilee’

Borage
Borago officinalis
Borage is a large, bushy annual with clusters of delicate, star-shaped blossoms in shades of blue or pink. The flowers and leaves have a mild cucumber-like flavor that goes well with salads and cold soups. Bees love borage flowers, too.
Site and Soil
Plant borage in rich, moist soil in a sunny garden spot.
Planting
Sow seeds in prepared soil in spring when the danger of frost is past. Cover the seeds lightly and keep them moist during germination, which may take 1 to 2 weeks. You can also plant seeds in fall to sprout the following spring.
Growing
Thin seedlings 1 to 2 feet apart. Borage is a sprawling, gangly plant that needs room to grow. Although it’s an annual, borage self-sows prolifically, so it will seem to come back each year. Transplant volunteer seedlings when they are small if they come up in unwanted locations. As borage grows, it becomes less tolerant of transplanting and other root disturbances. Keep young plants well watered but not soggy. Mulch around borage to conserve soil moisture and block weed growth. Established plants are reasonably tolerant of occasional dry spells. Pinching off a few inches of borage’s stem tips—easily done while harvesting flowers—encourages branching and helps keep plants more compact.
Harvesting
Borage begins blooming about 50 days after planting. Pick off clusters of flowers and edible young leaves as needed. Borage plants are covered in fine hairs, and these can be quite stiff on older leaves, making them unpalatable. Borage flowers and leaves are best used fresh from the garden because their cucumbery flavor does not survive freezing or drying.
Pests and Diseases
Borage’s furry foliage deters most pest problems, and it is largely untroubled by diseases, too.
Extraordinary Varieties
‘Alba’, ‘Bianca’, ‘Bill Archer’
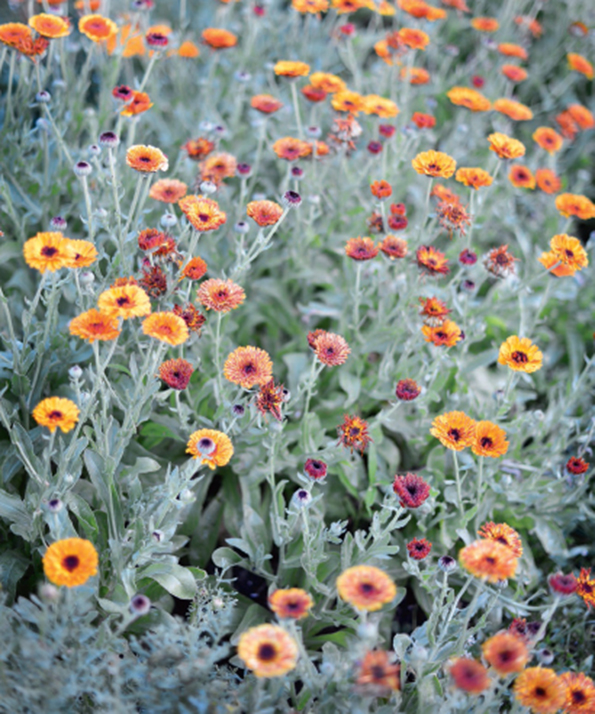
Calendula
Calendula officinalis
Edible calendula blossoms will add a bright and cheerful splash of yellow and orange to your salads, but they go beyond beauty by acting as an insect repellant and a benefit to soil fungi through their roots. Calendula’s other talents (and its curriculum vitae is impressive) include its use in infused oils and lotions to treat rashes, as a substitute for saffron in rice dishes, or even as feed for chickens to darken their egg yolks.
Site and Soil
Any good garden soil in full sun to partial shade will suit calendula’s needs, as long as it is well drained.
Planting
Plant fresh calendula seeds in prepared soil around the time of the last spring frost, or sow seeds indoors 4 weeks before that date. Cover seeds with fine soil or compost to exclude light, which interferes with germination. Keep indoor seed flats in cool conditions to produce sturdy seedlings. Germination takes 1 to 2 weeks. Transplant to the garden after the danger of frost is past, spacing them 6 to 12 inches apart. Make two or three successive sowings in the garden in spring, separated by 2 to 3 weeks, to have continuous blooms from summer into fall.
Growing
Thin direct-sown seedlings to 6- to 12-inch spacing and remove competing weeds. Otherwise, calendula is a carefree annual that will begin blooming about 55 days after planting. Water or foliar feed with liquid seaweed or fish emulsion when seedlings are about 6 inches tall to encourage flower production. Remove spent flowers and pinch back stems to stimulate ongoing blooming and bushy growth. Flowers that remain on the plants will self-sow freely.
Harvesting
Gather fully open flowers as needed for fresh use in salads and soups and as garnishes. Calendula petals may be dried and used as a substitute for saffron.
Pests and Diseases
Aphids, caterpillars, and slugs and snails may pester calendula. Watch for clusters of tiny aphids on leaf undersides and at the bases of blossoms and wash these pests from plants with a strong stream of water. Handpick caterpillars into soapy water. Use ground-level traps baited with beer to lure slugs and snails to their doom.
Leaf spot diseases, powdery mildew, and other fungal woes can infect calendula, disfiguring the foliage and reducing plants’ overall vigor and productivity. Good drainage goes a long way toward preventing disease problems, along with even soil moisture and careful watering to avoid wetting foliage unnecessarily.
Extraordinary Varieties
‘Antares Flashback’, ‘Flashback’, ‘Neon’, ‘Rainbow’, ‘Zeolights’
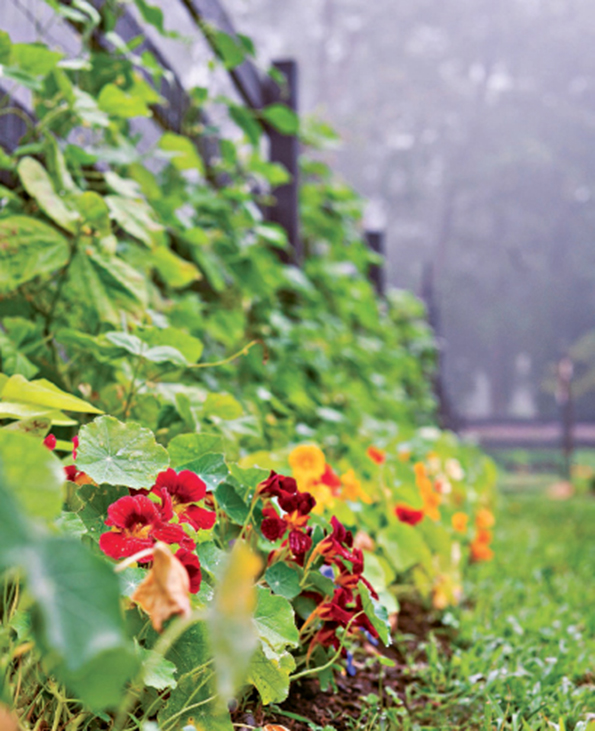
Nasturtium
Tropaeolum majus
One of our favorite flowers at the farm, nasturtium turns salads into edible art. With their glimmering, jewellike inflorescences in shades of deep red velvet, pale yellow, and hot orange, these flowers—and their disk-shaped leaves—add a delicious, peppery heat to salads, and the buds can be pickled like capers. They can be tucked into borders as a colorful base, and some varieties will even climb with support. There’s a whole lot to love.
Site and Soil
Nasturtiums do fine in average, well-drained soil in a sunny location. In rich soil, nasturtiums tend to produce abundant, lush foliage at the expense of flowers. Where summers are very hot, nasturtiums benefit from partial shade in the middle of the day.
Planting
Two weeks before the last spring frost date, direct-sow nasturtium seeds where they will grow. Cover the seeds with ¼ to ½ inch of soil. Nasturtiums respond poorly to transplanting. To start indoors, sow seeds in soil blocks or peat pots 2 to 4 weeks before the last frost date. Germination takes 1 to 2 weeks when soil temperatures are 60° to 65°F (16° to 18°C).
Growing
Pay nasturtiums little attention and they will repay neglect with colorful, spicy flowers. Provide support for trailing types, which will need to be tied up if they are to “climb” a trellis, and water as needed. Keep nasturtiums a bit on the dry side and skip fertilizer applications altogether.
Harvesting
Pinch or snip off flowers, young leaves, flower buds, and green seed capsules as needed for the table. Apart from the buds and seed capsules, which may be pickled, nasturtiums are best enjoyed fresh.
Pests and Diseases
Aphids are overly fond of nasturtiums, especially when the plants are lush from watering and rich soil. In fact, nasturtiums may be used as a trap crop to lure aphids away from other plants in the garden, which is not good news when nasturtiums are the desired crop. Patrol plants regularly for clusters of aphids on the undersides of leaves and below flowers; wash them off plants with a strong spray of water. Be on the lookout, too, for caterpillars, flea beetles, and slugs, and take action as needed to keep pests from disfiguring or damaging flowers and foliage.
Extraordinary Varieties
‘Empress of India’, ‘Lady Bird’, ‘Moonlight’, ‘Vesuvius’
NOTES FROM THE WONDERGROUND
Incredible, Edible
Flowers are the narcissists of the garden, shouting from far above their lanky stems, or twining on high to get our attention: Look at me, aren’t I beautiful! And they are! We take in their self-loving beauty easily with the eyes. But why not experience that splendor in the mouth by feeling a blossom’s strange, pleated silk on the tongue? Birds do it, bees do it, why on earth shouldn’t we do it?
At Stonegate, we’ve been tossing edible flowers into the salad mixes all season long, not only for their loveliness (although here at Fusspot Farm, aesthetics are reason enough to do anything), but also for taste and texture. The taste of most flowers subtly alludes to the flavor of the leaf, so the fragile inflorescence of arugula has a peppery bite, while the golden sprays of mustard flower are a three-alarm blaze of heat. Cucumber and squash blossoms are cool and mild and sweetly vegetal, and the blossoms of Asian greens have a deep mineral warmth.
When greens go to flower and seed, they usually give up their harvestable selves and get bitter, while fruiting vegetables move from flower to flesh. So blossoms are either a beginning or a postmortem in the vegetable garden; a wedding or a funeral.
Flowers have been enjoyed in foods for thousands of years. Romans used to toss mallow, roses, and violets into their pots; daylilies and chrysanthemums have been feasted on by the Chinese and Greeks for centuries. And capers, broccoli, and artichoke are all just unopened flower buds.
There are even flowers from the herbaceous border outside the walls of the vegetable garden that are fine to eat, including bee balm (Monarda didyma), garland chrysanthemum (Chrysanthemum coronarium), cowslips (Primula veris), daylilies (Hemerocallis spp.), English daisy (Bellis perennis), evening primrose (Oenothera biennis), fuchsia (Fuchsia arborescens), gardenia (Gardenia jasminoides), and hibiscus (Hibiscus rosa-sinensis). Forget the vase and get out the platter!
If you are a hapless sensualist, as I am, the more dimensional your experience of the natural world, the better. Why take something in with only one or two senses when they can all be indulged? More is more.
There is something vaguely salacious and decadent about eating flowers, of course. But that has more to do with culture and metaphor than fact. A flower in the mouth is unfamiliar; without the usual crunch of leaf or vegetable, it takes a moment for the tongue’s rough, exploratory curiosity to figure it out. But once you’ve binged on a bouquet or two over the course of a season, as we do, the exotic mouthfeel is a gift.
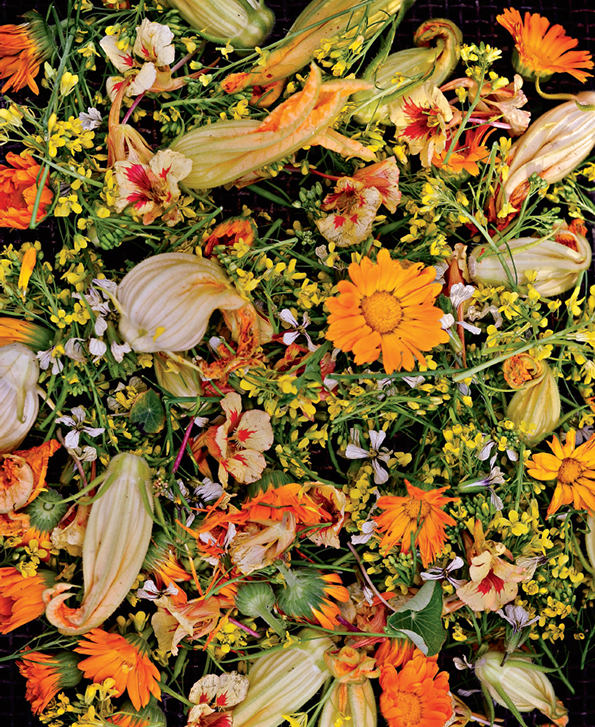
Edible flowers take routine salads to another level of texture, flavor, and beauty. This harvest of nasturtium, calendula, arugula, broccoli rabe, and folded squash blossom will bring visual delight to the table.