Growing Beautiful Food: A Gardener's Guide to Cultivating Extraordinary Vegetables and Fruit (2015)
GROW
Pods, Vines & Fruiting Vegetables
FOR MANY, THESE ARE THE celebrities of the vegetable world, and we wait for them like stalking paparazzi, harvest shears at the ready. They have such star power, in fact, that they are the number one reason people get into growing their own food. When they ripen into glimmering moons and spheres on sprawling, orbital vines, we pounce.
Peppers, eggplant, and tomatoes, all members of a plant family (Solonacea) that includes more than 2,700 species, seduce us hopelessly with their flavor and form, while the skyward reach of pole beans and the lustrous tangle of snap peas, crisp cucumbers, and summer squash add to the exuberant show.
By growing your own fruiting vegetables, you not only get to delight in all the sunripened flavor, but your varietal choices and nutritional values are also sizably boosted. In fact, most tomatoes that are harvested green, gassed with ethylene, and shipped thousands of miles not only have the texture and flavor of wet cardboard, but this premature harvest limits the fruit’s full nutrient potential, as well. Studies have shown that vine-ripened tomatoes and peppers have 30 percent more vitamin C and contain far more antioxidant beta-carotene and lycopene.
Never mind all the arguments for nutrient value and lack of petrochemical meddling: Organic, farm-grown fruiting vegetables are a mouthwatering joy.
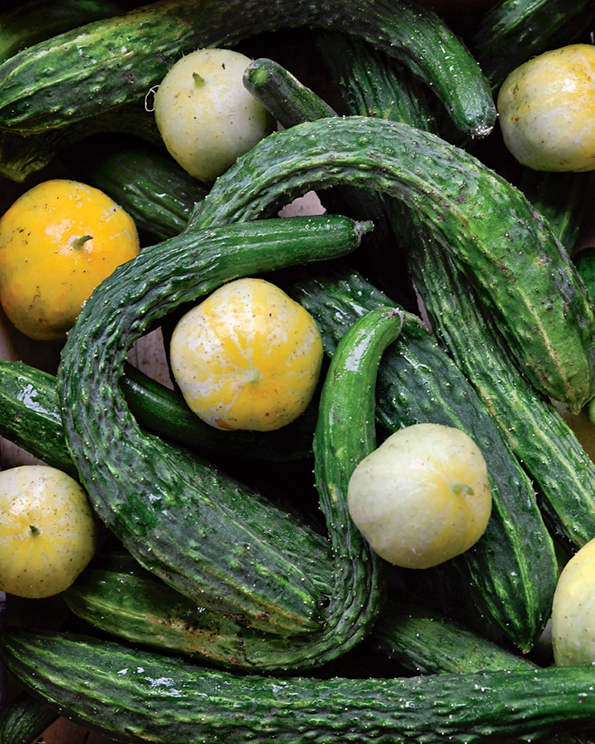
Cucumber
Cucumis sativus
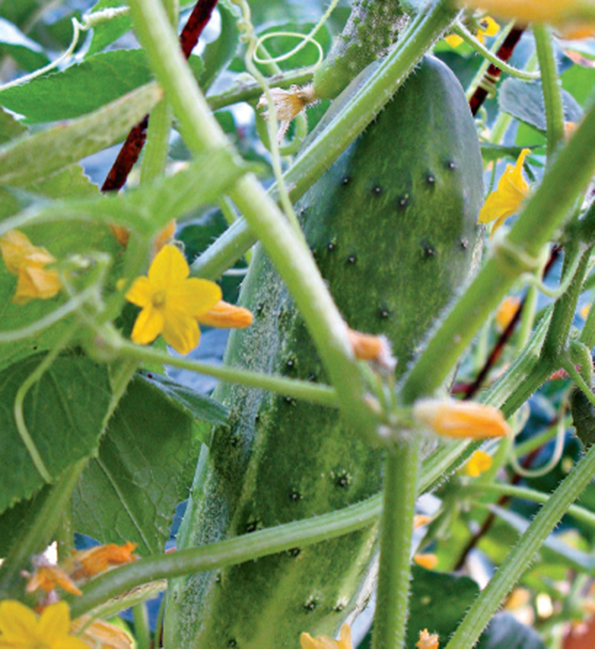
Once you start growing your own cukes, with all the delightful shapes and colors available from seed, the supermarket standard just won’t do. With the long twists of ‘Striped Armenian’, globes of yellow ‘Lemon’, miniature alien-looking whites, spiky Asian, and smooth seedless varieties, cucumbers have come into their own, rivaling summer squash for their varied forms, flavors, and—most important—garden space.
Site and Soil
Cucumbers need lots of sunshine and rich, moist, but well-drained soil.
Planting
Warm soil (70°F/21°C) is essential for starting cucumber seeds; seeds will not germinate in soil temperatures below 50°F (10°C). Cucumbers are very frost sensitive and will struggle in prolonged cool conditions. Plant seeds in warm soil at least 1 week after the last frost date, sowing 1 to 2 inches deep in hills of soil mounded a few inches high. Space hills of standard cukes 2 feet apart; 3 feet for bush varieties. Start seeds indoors 2 to 3 weeks before the last frost date for an earlier start, but use biodegradable pots to avoid disturbing roots at transplanting.
Growing
To keep cucumber vines from gobbling up garden space, put trellises in place at planting time. Use fabric strips or other soft ties to train tender vines to supports. Trellising makes harvesting easier, keeps fruits cleaner, and reduces disease problems. Hand-weed around cucumbers to avoid root disturbance, and mulch well after plants are up to keep the soil moist. Water when needed to keep the soil from drying out; even moisture is critical during fruit development.
Harvesting
Keep up with picking once cukes begin to reach full size. Mature fruits that remain on the vines will prevent others from developing. Harvest daily, snipping or twisting gently to avoid damaging the vines.
Pests and Diseases
Be on the lookout for cucumber beetles, troublesome pests of cukes and other vine crops. Yellow green and either striped or spotted with black, these ¼-inch-long beetles munch on leaves, vines, and blossoms and spread diseases. Put row covers over young plants to block beetles’ access; remove covers when plants begin blooming to let pollinators work. Patrol plants daily and handpick and destroy beetles.
Rotate cucumbers and other vine crops to minimize disease problems. Clean up residues at the end of the growing season to get rid of overwintering pests and pathogens. Choose varieties with resistance to the most common diseases in your area.
Recommended Varieties
‘Lemon’, ‘Miniature White’, ‘Northern Pickling’, ‘Poona Kheera’, ‘Striped Armenian’
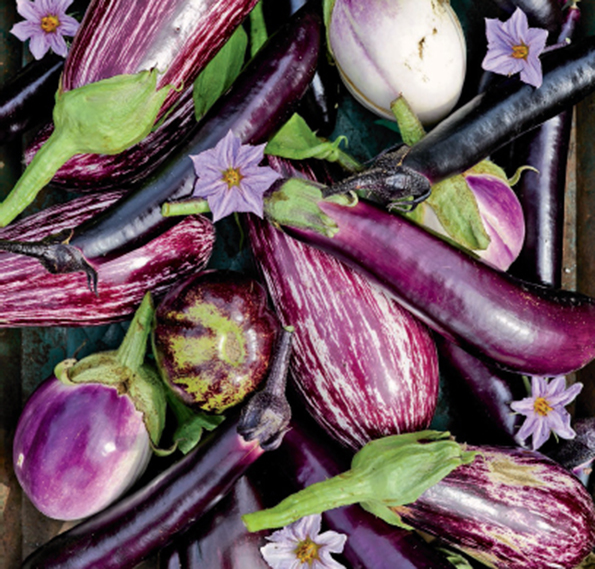
Eggplant
Solanum melongena
When eggplant’s delicate, five-pointed flowers finally transform themselves into spheres of glossy-skinned fruit, it’s a moment to savor, both for the eyes and palate. These tropical plants were named after mostly white 19th-century cultivars that resembled goose eggs. Today’s varieties range far wider in form, from long mauve-colored Asian cultivars to festively striped purples, greens, and deeply warm blacks. They need plenty of heat to ripen to perfection but will reward you with delicious, tender white flesh that will add volume and flavor to countless dishes.
Site and Soil
Choose a sunny site for warmth-loving eggplants where the soil is loose, reasonably fertile, and well drained. Eggplant tolerates a range of conditions but will fare poorly in soggy, dense soil. Dig in compost before planting to improve texture and add nutrients.
Planting
Start eggplant seeds indoors 6 to 9 weeks before the last spring frost date. Soak the seeds overnight in room-temperature water to encourage germination, and use bottom heat to warm the growing medium to 80° to 90°F (27° to 32°C). In warm, moist conditions, seeds sprout in 8 to 10 days. Harden off seedlings by gradually exposing them to outdoor conditions when nighttime temperatures reliably remain above 50°F (10°C). Transplant seedlings to the garden after all danger of frost is past and air and soil temperatures are at least 70°F (21°C), spacing plants at least 2 feet apart. At Stonegate, we plant them in our larger 5 × 25-foot beds, in alternating rows of three and two plants per row, and interplant greens between the rows.
Growing
Apply mulch around eggplants after transplanting to conserve soil moisture and prevent competition from weeds. Water with liquid seaweed at bloom and every 3 to 4 weeks thereafter, and add a little superphosphate around the bases of the plants when they’re starting to fruit. If the weather turns cool, consider covering plants to protect them from low temperatures; plants may languish and stop producing during extended periods of temperatures below 60°F (16°C).
Harvesting
Harvest young fruits as they reach edible size, while their seeds are small and tender and their skins are glossy. Dull-looking fruits are past their prime. Use a sharp knife or shears to cut off fruits, leaving about an inch of stem on each one. Harvest regularly to encourage remaining fruits on the plants to develop.
Pests and Diseases
Practice good rotation habits with eggplant to avoid problems with the soilborne disease verticillium wilt. Put cutworm collars in place when transplanting into the garden to protect seedlings from these nocturnal stem munchers. Cover young plants with floating row cover to shield them from flea beetles that will riddle the leaves with small holes, or spray plants with kaolin clay solution to discourage leaf-eating pests. Patrol plants for black-and-yellow-striped Colorado potato beetles and handpick and destroy them and their yellow egg masses that appear on the undersides of leaves.
Recommended Varieties
‘Casper’, ‘Hansel’, ‘Pingtung Long’, ‘Rosa Bianca’
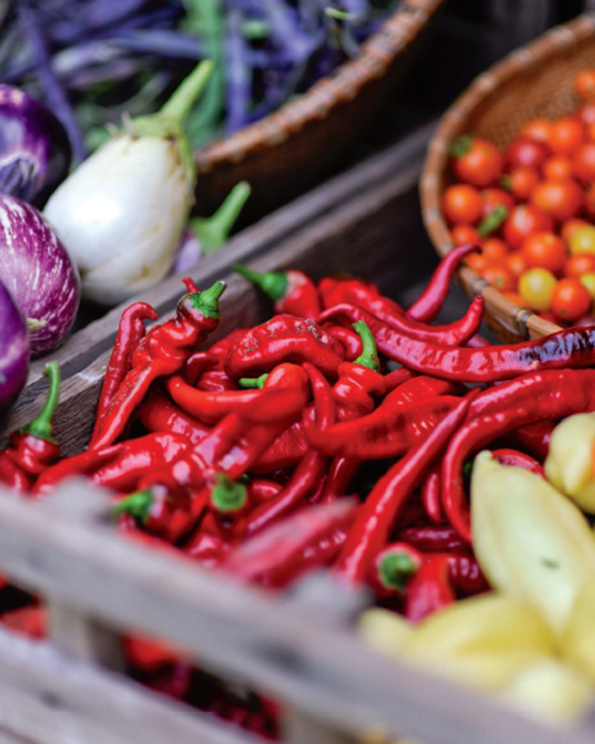
Pepper
Capsicum annuum
I can’t imagine a summer salad, stir-fry, or pasta without fresh, organic peppers. Either sliced fresh or grilled to a smoky sweetness, peppers brighten up the farm—and your food—with their warm, sweet fire. They’re usually rated in seed catalogs by their heat index, or Scoville scale, and we usually grow in the sweet or mildly spicy range, but if you like to get torched, plant a few hot pepper cultivars for excitement.
Site and Soil
Sweet or spicy, peppers like a spot in the sun and warm, loose, well-drained soil to sink their roots into. Even moisture is important for healthy fruit development, but dense, soggy soil will cause plants to grow poorly.
Planting
Start pepper seeds indoors 8 weeks before the last spring frost date, sowing them in moist seed-starting medium in individual pots or soil blocks. Peppers are sensitive to having their roots disturbed, so it’s best to start them in pots roomy enough to hold them until it’s time to transplant them into the garden.
When the soil temperature is at least 60°F (16°C), 2 to 3 weeks after the last spring frost date, set out sturdy 4-to 6-inch transplants that have been hardened off by gradual exposure to outdoor conditions.
Space plants about 18 inches apart. Large-fruited varieties benefit from staking or caging; put supports in place before planting to avoid injuring roots.
Growing
Apply straw mulch after planting to keep the soil moist and block weed growth. Peppers require even moisture throughout the growing season. Water or foliar feed with liquid seaweed or fish emulsion every 2 weeks until plants begin to bloom.
While peppers can’t tolerate frost, they also may suffer if temperatures soar in midsummer, when the plants are blooming. When the mercury climbs above 90°F (32°C), plants may wilt and drop their blossoms. Growing peppers where they receive afternoon shade from taller crops can help prevent problems if the weather heats up.
Harvesting
Gather sweet peppers whenever they reach usable size and hot peppers when they develop their mature color. Pick the first fruits that form a little on the early side to encourage plants to keep producing. Mature fruits that remain on a plant can slow or stop further production. Use a sharp knife or shears to clip off peppers to avoid breaking plants while harvesting. When frost threatens, pick all fruits and bring them indoors to ripen in a cool, dry spot.
Pests and Diseases
Put cutworm collars around peppers at transplanting to shield their stems from nibbling caterpillars. Few pests bother peppers that are healthy and well grown. Keep watch for the same pests that may show up on tomatoes and eggplants and deal with them as needed.
Sidestep common pepper problems by rotating them along with their relatives, tomatoes and eggplants. Ideally, avoid planting any of these crops in the same spot within 4 to 5 years. If space limits lengthy rotation plans, grow peppers in 12- to 18-inch pots for a season or two. As further insurance, choose varieties that are resistant to the most common disease problems in your area.
Recommended Varieties
‘Aurora’, ‘Jimmy Nardello’, ‘Marconi Red’, ‘Tequila Sunrise’
NOTES FROM THE WONDERGROUND
Tomato-Palooza
The slow fruition of all the heat-longing Solonacea, who sulked through June’s cool nights, has finally begun to show promise, as clusters of ‘Sun Gold’, ‘Lemon Drop’, and ‘Black Cherry’ tomatoes have emerged jewellike on sprawling indeterminate vines, and peppers and eggplant are standing tall like fat hat pins above interplanted lettuce.
It’s been quite a star turn for tomatoes in particular on the farm this season. No blight, no gummy end rot, just loose, far-reaching tangles of sweet fruit splattered across the fencerow in the orchard. Their sprawl and vigor has been almost unseemly, shaming the rest of the farm with an insatiable appetite for sun and sweetness.
Tomatoes can make or break a farm season. When you’re left without, like we were a few years ago when late blight was early and pernicious, you almost want to strike the set and start a mushroom farm. Your CSA members, faced with a bleak, tomatoless summer, solemnly line up to collect their brassica shares, like martyrs.
And you end up like an account executive for kale, a huckster of bitter, leafy greens. “Kale salad, kale chips, kale frittata, kale quiche. How many ways can you prepare kale? So many!” you preach to a crowd of circumspect locavores. There’s no doubt kale is the most nutrient-dense leaf out there, with healthy doses of micronutrients, antioxidants, and proteins, but its taste and texture are challenges to some, and no substitute for a ½-pound Brandywine.
Of course, much of the Tuscan kale had to be replanted after being nibbled down to ungainly stumps by a wily and determined woodchuck; powdery mildew did away with my French cucumbers with one sad, moldering puff; and a flock of ravenous starlings ate an entire hedgerow of Aronia melanocarpa berries that were just about to be harvested. Sisyphus, you had it easy!
After last season’s exasperating battle with flea beetles, we shrouded the eggplant and Asian greens with row cover this year: a light, spun fabric made of recycled materials. It foils the beasties by physically blocking their voracious appetites. It seems to have worked. Just when I thought things on Fusspot Farm couldn’t get tidier, I resorted to actually tucking in my beds, minus the hospital corners.
If I were half the farmer I’d like to be, I would be keeping an eye on the heirlooms that are thriving and would be saving their seeds to be planted next year. In theory, Darwinian adaptation can be accelerated a few generations by a little attentive intervention. If I were to put theory into practice, the plants that do well on my parcel would be unnaturally selected, carefully saved, and replanted. Next year.
Small organic farming will continue its metronomic give and take. And given one season of magical tomatoes, like this one, the memory of all the blighted, forsaken fruit that came and went before disappears.
The emergence of sweet, indeterminate cherry tomatoes along the fencerow in the orchard and juice-heavy heirlooms elsewhere makes all the weeks of waiting worthwhile.
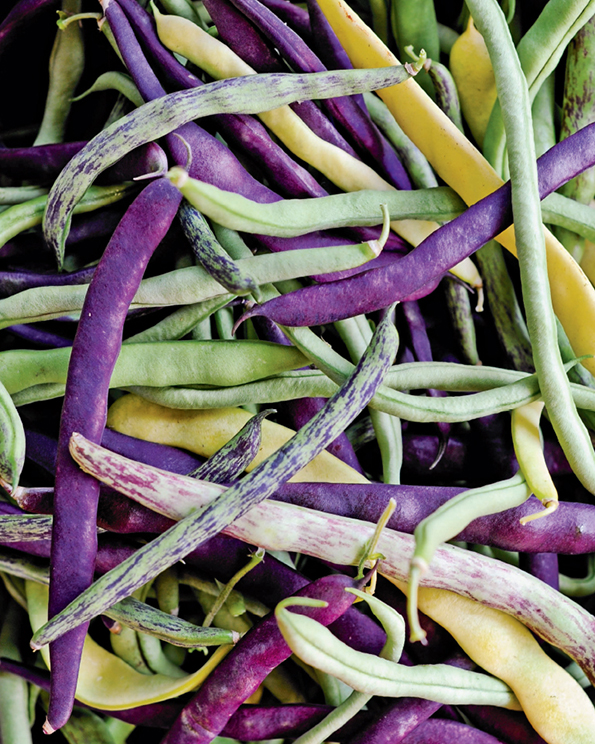
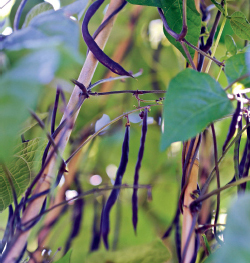
Pole Bean
Phaseolus vulgaris
The great thing about pole beans, besides their incredibly fresh snap and crunch when grown as locally as your own land, is that they bring the farm and garden upward, filling that middle ground between earth and sky. Many varieties can climb beyond 12 feet, so tall structures can be swathed all season in their delicious clambering. There’s nothing quite like the taste of tender, just-picked pole beans right off the trellis, and sometimes you’re lucky if they even make it to the kitchen.
Site and Soil
Prepare a sunny bed for beans in soil that is loose, fertile, and well drained. Beans don’t grow well in heavy, soggy soil conditions. Amend the soil with compost and phosphate before planting.
Planting
Sow beans after danger of frost is past, 1 to 2 weeks after the last spring frost date, when the soil temperature is at least 60°F (16°C). Beans are sensitive to frost and germinate poorly in cold soil, so don’t rush to plant them too early. Plant seeds 2 inches deep and 10 inches apart, firming the soil over them to ensure good contact. Put supporting trellises in place at planting time. Pole beans may take up to 14 days to germinate.
Growing
Water as needed to keep the soil moist but not sodden. Even moisture is especially important during germination and when plants are blooming. Mulch around the bases of plants after they’re up to keep the soil moist and cool and to block weeds.
Harvesting
Begin harvesting green, or snap, beans when the pods are pencil size and before the seeds inside are evident as visible bumps. Keep up with harvesting once production begins; mature pods that remain on plants will suppress the development of more flowers and beans. Pole beans will continue producing until frost brings their season to an end. While most varieties are grown either for snap beans or for dry shell beans, some types can meet both needs. Gather young pods for fresh use for a few weeks, then switch to leaving pods to mature on the plants until they are dry and brown and the seeds are hard. Shell dried beans and store them in airtight containers.
Pests and Diseases
A few insect pests need to be discouraged from munching on bean plants. Cover newly emerged bean seedlings with row cover for a few weeks to block leafhoppers, flea beetles, and bean leaf beetles from nibbling on young plants that can’t afford to lose their foliage. Pole beans will quickly outgrow covers; patrol unprotected plants for Mexican bean beetles (yellowish round beetles with black spots) and their fat yellow grublike larvae. Handpick and toss into soapy water to destroy them.
Avoid problems with diseases by growing resistant varieties and rotating beans to different garden beds. Space beans in the garden to allow air movement around the plants, and don’t pick beans when the leaves are wet. Remove plants that show signs of infection to keep diseases from spreading.
Recommended Varieties
‘Cherokee Trail of Tears’, ‘Chinese Red Noodle’, ‘Kentucky Wonder’, ‘Rattlesnake’
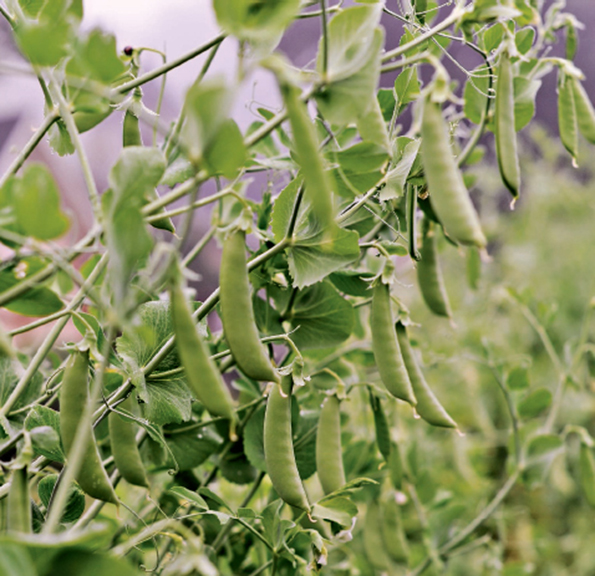
Snap Pea
Pisum sativum
Besides spring greens, snap peas are the first taste of the sweet onset of summer and are some of the earliest seeds to be planted out, usually in the muck and drizzle of mid-March. This initial foray into the muddy garden is full of hope and promise, and in early June snap peas reward with tall and lanky vines dripping with pods, edible leaves, and shoots. I can’t imagine a season without them.
Site and Soil
Going early into the garden, peas need a sunny location and loose, well-drained soil that is mildly acidic and amended with compost.
Planting
Plant peas in cool early spring, 4 to 6 weeks before the last frost date, as soon as the soil can be worked. Stretch the harvest by making successive plantings at 2-week intervals until early May, bearing in mind that peas will grow poorly when temperatures climb above 75°F (24°C). Treat pea seeds with bacterial inoculant before planting to increase their ability to fix nitrogen; apply according to label directions. We wet the seeds first, put them in a mason jar, add the gray inoculant powder, and shake, coating each seed. Plant 1 to 2 inches deep and 4 to 6 inches apart.
Growing
Even snap pea varieties that produce relatively short 2- to 3-foot vines will benefit from a bit of support. Put simple string or wire trellises in place at planting time to give pea vines something to climb. Peas growing on supports are easier to harvest, cleaner, and less prone to disease problems caused by crowded vines and plants in contact with the soil. Mulch peas after they’re up to keep the soil cool and moist. Peas have modest water needs—about ½ inch per week—but avoid letting them dry out during germination, when plants are blooming, and when pods are forming. Healthy peas don’t need any additional fertilizer during the growing season, and excess nitrogen can hinder productivity.
Harvesting
Pick succulent snap peas when the fleshy pods are plump and bright green. Harvest daily to stimulate remaining blossoms and young pods to continue developing. Use scissors to snip pods from the vines to avoid accidentally pulling them out of the soil as you pick.
Pests and Diseases
Peas miss a lot of pest problems by growing in cool, moist, early spring weather. Aphids may appear when things start to warm up, clustering on stems and leaf undersides. Wash them from plants with a strong spray of water.
Diseases are a different story. There are a few common problems that trouble peas and are best avoided by choosing resistant varieties when available and rotating peas to different garden beds.
Recommended Varieties
‘Amish Snap’, ‘Sugar Ann’, ‘Sugar Snap’
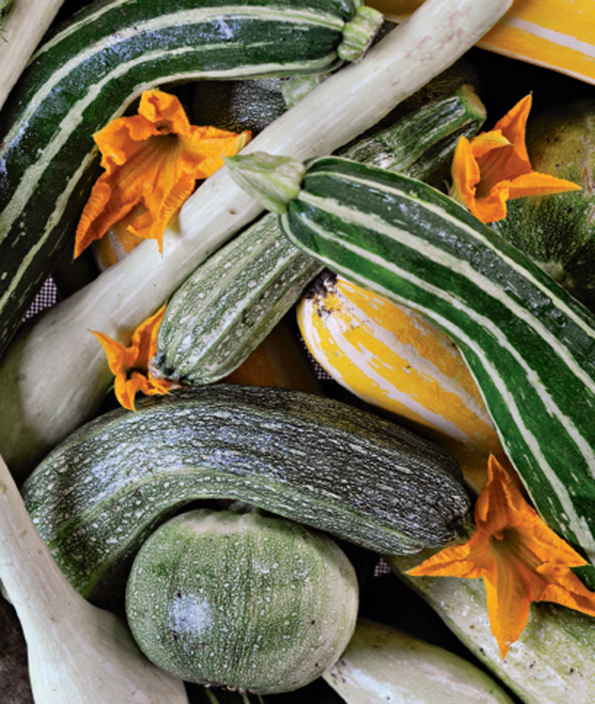
Summer Squash
Cucurbita pepo
Don’t stop ’til you get enough is a mantra lost on summer squash, which—once they kick into high gear in midseason—can pump out more prolific fruit than there are ways to cook them. The good news is that with their diverse shapes and sizes and edible blooms, there are so many ways to put them to use in the kitchen. And if they really don’t stop and you’ve truly had enough, there’s always zucchini philanthropy. Your neighbors will thank you.
Site and Soil
Good, well-drained garden soil and a sunny exposure suit summer squash plants just fine.
Planting
Plant seeds of favorite summer squash varieties in warm (at least 60°F/16°C) soil about 2 weeks after the last spring frost date and up to 8 weeks before the first frost date in fall. Sow seeds 1 inch deep in premoistened hills spaced 2 to 4 feet apart, planting about 6 seeds per hill. Some varieties, such as the Italian ‘Tromba d’Albenga’, can be grown as climbers on a sturdy trellis. Because summer squash are so prolific, resist the temptation to plant too many of any one kind.
Growing
Once seedlings have at least one true leaf, thin to the two strongest plants per hill, snipping off the extras to avoid disturbing the roots of the remaining plants. Put row cover over young seedlings to protect them from squash bugs and cucumber beetles; remove covers when the plants begin to bloom. Squash needs ½ to 1 inch of water weekly. Avoid wetting leaves when watering to reduce the risk of mildew problems.
Harvesting
Pick summer squash when they are young, small, and tender by cutting or gently twisting them from the plants. Harvest blossoms for salads, frying, or stuffing when they are fully open. Focus mainly on male flowers—look for thin stems and no swelling at the base—if you want to enjoy a crop of squash as well as the blossoms; leave a few male blooms to provide pollen for the females.
Pests and Diseases
Elongated shield-shaped, gray brown squash bugs feed on squash foliage, causing the leaves to wilt and turn black. Handpick the ¾-inch-long adults and the smaller, wingless nymphs and drop them into soapy water to destroy them; check the undersides of leaves for clusters of red brown eggs and destroy these as well. Summer squash attracts attention from other pests common to vine crops, including cucumber beetles and squash vine borers, as well as aphids and spider mites.
Sidestep common disease problems by choosing resistant varieties and rotating vine crops to new locations from year to year. Plant at a distance from cucumbers to avoid cross-infestations. Avoid wetting foliage when watering and working amid plants in wet conditions to keep from spreading disease from plant to plant.
Recommended Varieties
‘Costata Romanesco’, ‘Eight Ball’, ‘Geode’, ‘Safari’, ‘Tromba D’Albenga’ (C. moschata)
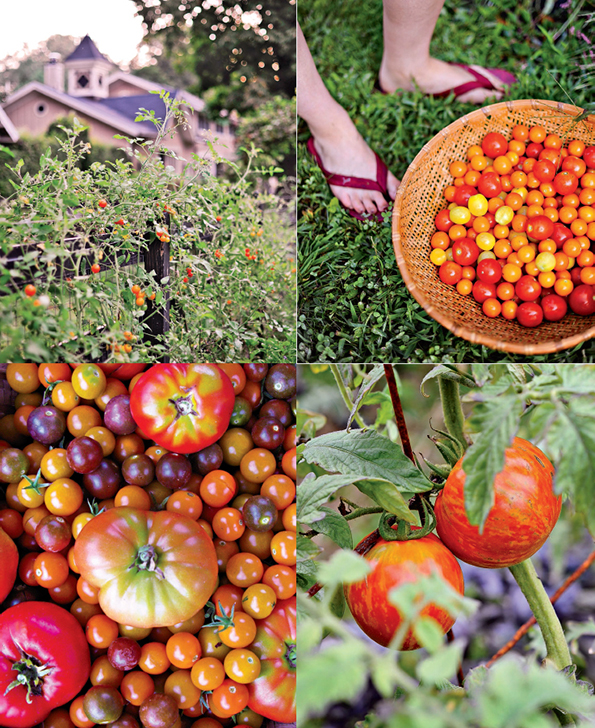
Tomato
Solanum lycopersicum
There’s something so amazing about tomatoes, about the succulent, heat-swollen tangle of color and flavor that they spill out in summer, that it def ines everything we love about growing our own.
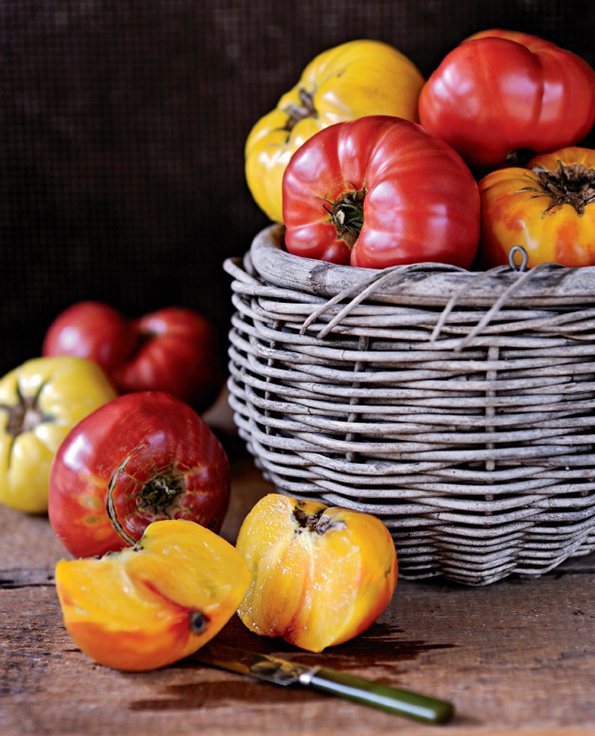
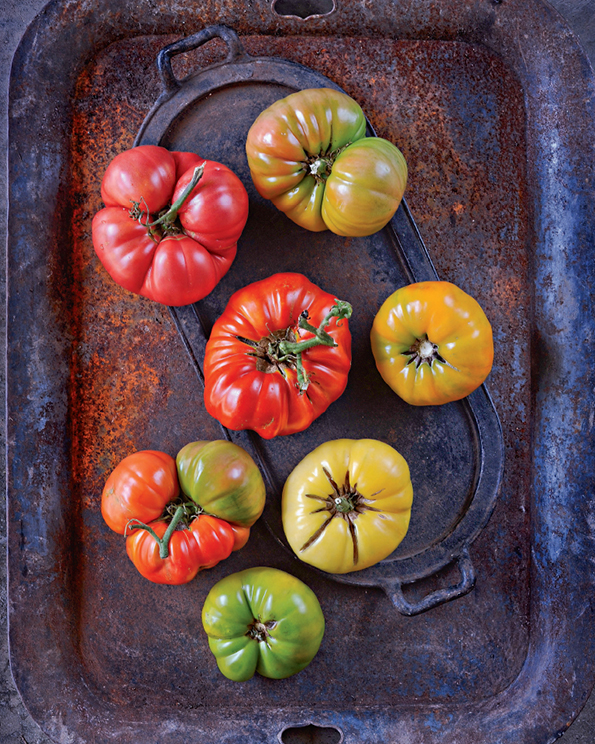
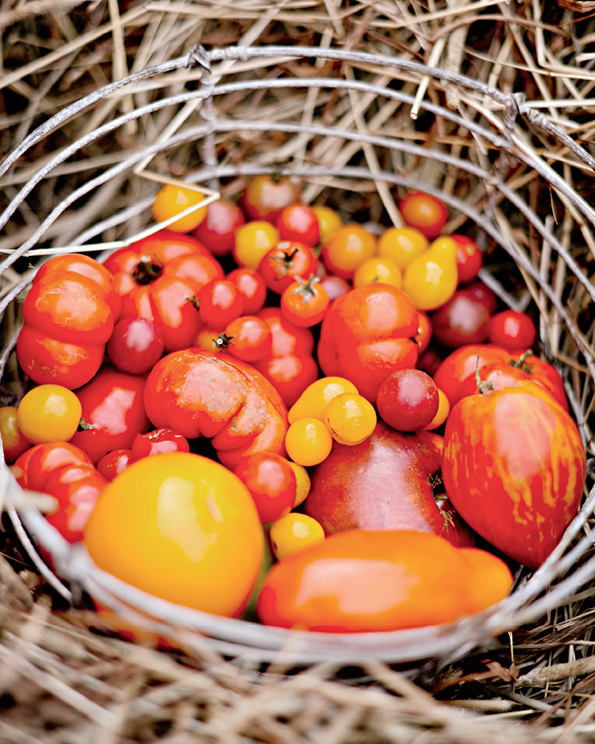
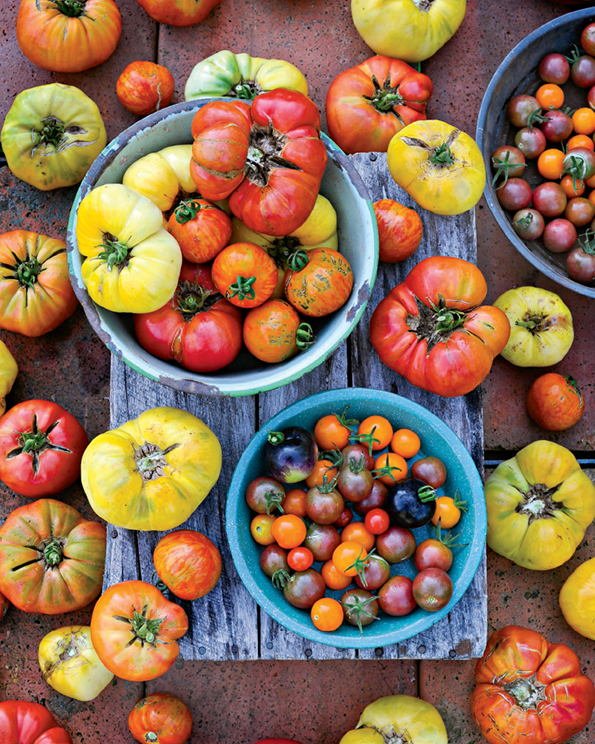
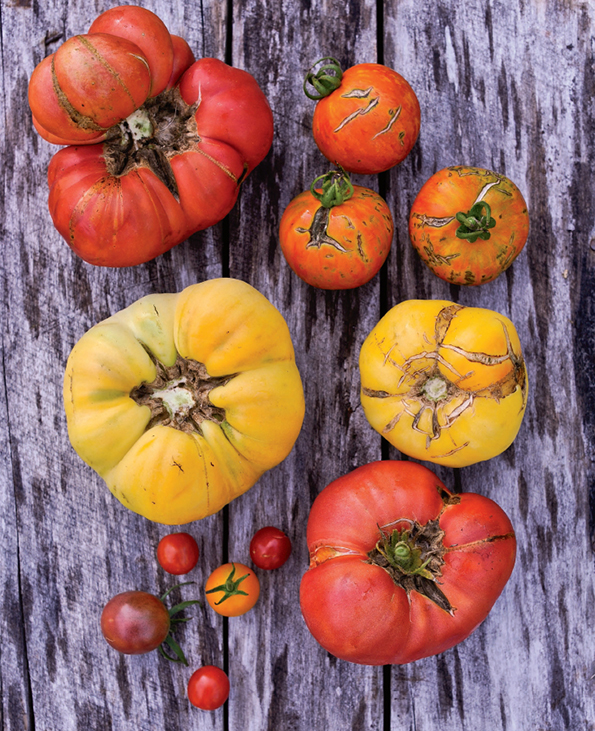
Tomatoes range in size from petite, pop-in-the mouth grape and cherry types to massive, lobed heirlooms that weigh in at a pound or more, and their colors are equally diverse: streaked in orange and yellow or gleaming in deep red, purple, and pink. While there is some nuance involved in successfully producing these delectable fruits, the hardest part may be deciding which of these beauties to grow.
Determinate types grow to mature size and then bloom and set all their fruits at the tips of the main and side stems at around the same time, which is useful when a lot of tomatoes are wanted in a fairly narrow window. Varieties that keep stretching their lanky stems throughout the growing season are called indeterminate, or vining. Indeterminate tomatoes produce clusters of blooms at intervals, and production continues as long as conditions are right for the plants to keep growing. Because they have more leaves relative to their fruits, indeterminate varieties tend to be more flavorful. But they also need more care—sturdy supports for vines that may reach 20 feet long over the course of the season and regular pruning to keep leafy growth from affecting fruit set. Heirloom varieties have seeds that have been passed down for generations, meaning they’re some of the best, and you can save seeds yourself for next season.
Site and Soil
Give these heat lovers a sunny location where the soil is rich in organic matter and well drained. Amend the bed with compost before planting; warm the soil with black landscape fabric a few weeks before transplanting, then tuck in transplants with a shovelful of composted manure. Sandy loam is ideal, but tomatoes will grow in most well-drained soils. Soggy soil conditions promote problems with diseases.
Planting
For access to the most variety, start tomatoes from seeds planted indoors 6 to 8 weeks before the last spring frost date. Prepare the bed and transplant seedlings to the garden when all danger of frost is past, about 2 weeks after the last spring frost date. At Stonegate, we often plant tomatoes in a bed that previously held early spring snap peas, which have fixed nitrogen in the soil for hungry tomatoes. Tomato plants can form roots along the length of their stems, so plant them deeply, with the lowest set of leaves at soil level, adding a cup of kelp meal and a cup of bone-meal to the planting hole. Leggy seedlings may be planted horizontally in a shallow trench. Strip off the leaves from the part of the stem that will be covered and lay the transplant on its side, leaving at least two sets of leaves above the soil. Firm the soil gently around the roots and water thoroughly after planting. Put stakes or cages in place at planting time.
Growing
Cultivate gently around young plants as needed to prevent weeds from cropping up. Once the soil is warm, put a thick layer of straw mulch around the bases of plants to keep the soil moist and block weed growth. Water weekly with liquid seaweed and apply and work in a phosphate fertilizer (0-30-0) around the stems to encourage fruit formation. As stems grow, tie them gently to supports with twine. Prune out suckers—small leafy shoots that sprout at the intersections of main stems and leaf stems—by pinching them off while you are training the plants to their supports.
Harvesting
Begin picking tomatoes when the first fruits change color. Let tomatoes ripen on the plants to enjoy the best flavors. If frost threatens at the end of the growing season, gather any unripe fruit and ripen them indoors at room temperature. Do not refrigerate tomatoes, as cold temperatures adversely affect both flavor and texture.
Pests and Diseases
Pests and fungi love tomatoes as much as we do, but healthy, vigorous plants growing in suitable conditions are rarely bothered. Choose varieties that are resistant to common tomato diseases and practice good tomato culture—keep the soil evenly moist to prevent fluctuations that can cause fruits to crack. Avoid wetting the foliage when watering and don’t work amid wet plants to keep from spreading leaf spot diseases. The healthier and more robust the plant, the more it will be able to fend off disease, so a foliar feeding with liquid seaweed will supply vital nutrients necessary for healthy growth. Patrol plants for hideous tomato hornworms, 2- to 3-inch-long green-striped caterpillars with a prominent horn, which gorge on tomato leaves and stems; handpick and destroy these horrible beasties. Plant dill around tomatoes to support tiny wasps that parasitize hornworms. If you find a caterpillar with white, ricelike cocoons on its back, leave it in the garden—it is host to garden good guys that will control pest caterpillars for you.
Recommended Varieties
Cherry: ‘Black Cherry’, ‘Matt’s Wild Cherry’, ‘Sun Gold’, ‘Supersweet 100’
Heirloom: ‘Brandywine’, ‘Black Krim’, ‘Costoluto Genovese’, ‘Green Zebra’, ‘Moskvich’, ‘Striped German’
NOTES FROM THE WONDERGROUND
Wabi-Sabi
Judging by our lobed and fissured tomatoes and mottled fruit, we grow beautifully imperfect food at Stonegate Farm. Imperfect in the idealized, Apollonian sense, that is, but oh-so-perfect in the fabulous flavor, nutrient-density department.
There is something remarkable about a warm, unruly ravel of locally grown, organic tomatoes, the kind of sensual squalor you don’t get from the neatly marshaled packages found at the supermarket. These are what the French called love apples. (They thought the pomme d’amour was an aphrodisiac.) The Germans also have their Liebesapfel, and the Italians their pomi d’amore. It seems this little fruit gets around.
But grow them organically and their seduction lies deep beneath the skin. Organic is really a euphemism for misshapen beauty, or the Eastern aesthetic philosophy of wabi-sabi, where imperfection, transience, and asymmetry have more value and are “more perfect” than perfection.
In Japan, for example, where the modern CSA movement, called Teikei, began, wabi-sabi is central to their aesthetic philosophy. The more crazed and cracked the teapot, the wonkier the pear, the greater its integrity, beauty, and value.
There is something beautiful in transience, in the faltering impermanence of living things, be it an overripe ‘Shiro’ plum or even us.
Our closest approximation is Virgil’s lacrimae rerum, or “tears of things,” but try and use that (or worse, quote Virgil) when selling anything in the new and improved West. So much of Eastern philosophy is simply lost in a land where the newer, shinier, and more Botoxed, the better.
Organic beauty has always been more than skin deep; in fact, its skin is often deeply flawed. With no toxic petroleum armor to protect it, organic produce must fend for itself, relying on the skilled coddling of its growers.
Much of what we grow wouldn’t pass visual muster at the local Price Chopper, where aisles of pesticide-infused sameness prevail. But our wabi-sabi veggies, greens, and orchard-grown fruit—even the weathered siding of our century-old barns—have a deep and resonant beauty that you can’t get from mass production.
It’s no wonder the Japanese, with their non-Western paradigms, created a partnering system between consumers and organic farmers where they cooperated not only with each other but also with the lovely imperfection of the natural world. They say that when you learn a new language, you acquire a new soul, and the language of organics is about working symbiotically with nature’s quirks and variations, not against them.
Maybe growing local and organic creates not only better food, but also better philosophy.
Organic heirloom tomatoes in all shapes and sizes burst onto the scene in early August, raising the flavor bar at the farm for the rest of the season.