Vegetarian Sushi Secrets: 101 Healthy and Delicious Recipes - Marisa Baggett (2016)
Chapter 3. NIGIRI, GUNKAN-MAKI & INARI
Nigiri sushi, gunkan-maki and inari sushi are different forms of sushi, but they share a common bond. Simplicity is the theme: each features a single or very limited topping and/or filling. Traditionally, these sushi forms are served in pairs.
Nigiri sushi features one topping served over an individual bed of rice. Traditionally, this type of sushi is used to showcase small tastes of the very best seafood, and is often served without an additional garnish. One need not feel that the vegetable version is an inferior substitute. A bite or two of clean-flavored toppings draped over individual nuggets of rice can be just as exciting to the eyes and taste buds when prepared with care and intention. Blanching is often employed to provide the best color and taste. Garnishes and sauces can also be added in judicious amounts to enhance the flavor.
Gunkan-maki (literally “battleship roll”) begins, like nigiri sushi, with an individual bed of rice. This is surrounded with an edible seaweed “wall” that holds in loose toppings. For the vegetarian, sticky natto fermented soybeans and faux roe are excellent options that even meat eaters will enjoy. Very thin cucumber slices can also be used as a fresh-tasting “wall” to enclose a spicy and tangy filling.
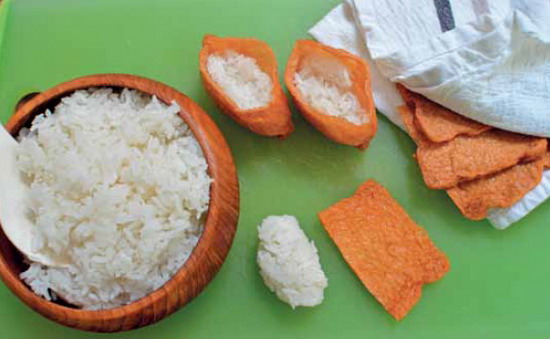
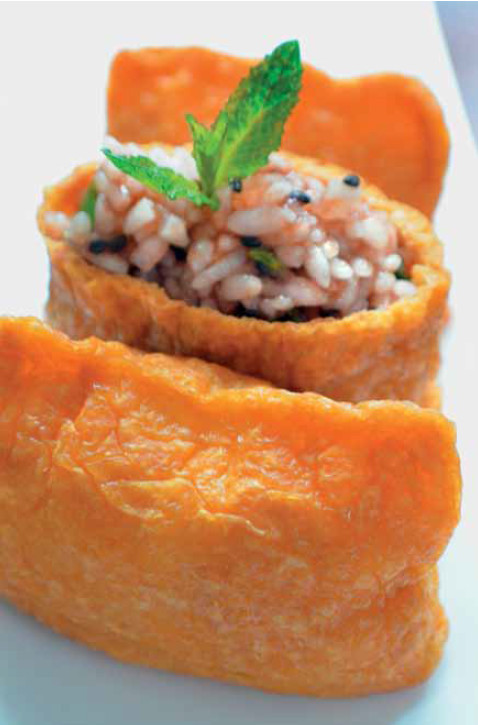
Inari sushi is kind of miraculous in that it does something that almost no other form of sushi can: it survives beautifully after a day or two in the refrigerator. Inari is truly a make-ahead-and-eat-tomorrow kind of sushi. The plump packages are produced by deep-frying tofu to create a crispy skin, which is then simmered in a sweet and savory broth. The result is a deep-brown “envelope” that can be filled with just about anything you can imagine. This tasty skin remains moist, protecting the fillings and sushi rice it encloses from drying out.
HOW TO MAKE SUSHI WITHOUT A ROLLING MAT
Nigiri Sushi
Make the balls of rice a uniform shape and size for the best presentation. Use your fingers to eat nigiri sushi. The toppings, rather than the rice, should be dipped into the sauce—the rice will break apart otherwise. The topping side should be flipped upside down onto the tongue so you taste that first.
1) Dip your fingertips lightly in water and splash the water across your palms. Grab a walnut-sized ball (about 2 tablespoons) of Traditional Sushi Rice (page 21).
2) Lightly squeeze the rice into a flat-bottomed rectangular shape. It is helpful to use your thumb and forefinger to shape the sides.
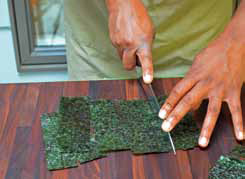
3) Use kitchen shears to cut a 4 x 7-in (10 x 18-cm) sheet of nori into 12 strips.
4) Drape the desired toppings over the bed of rice.
5) Secure the toppings in place by wrapping one nori “seatbelt” around the center.

Wet fingers and form rice into balls.
Cut the nori into thin “seatbelts.”
Drape desired toppings over the rice.
Tuck nori “seatbelts” under the rice.
Gunkan-Maki
Keep the rice balls for gunkan-maki uniform in size, too. Chopsticks can be used for eating gunkan-maki if desired, as they don’t require as much dexterity. Gunkan-maki can be dipped lightly in soy sauce; the nori should keep the pieces bound together.
1) Shape the rice as for nigiri sushi and place on a flat surface.
2) Cut a 4 x 7-in (10 x 18-cm) nori sheet into 1½ x 5-in (4 x 13-cm) strips.
3) Wrap one strip of nori, rough side facing in, around the bed of rice to form a wall. You can use a single grain of rice to “glue” the edges together if necessary.
4) Place the desired fillings inside the wall. Serve immediately.
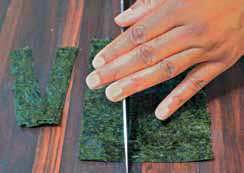
Cut the nori into thick strips.
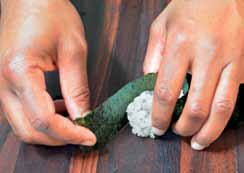
Wrap nori around the bed of rice to form a wall.
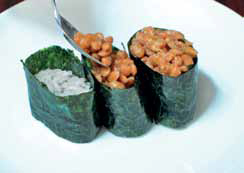
Add desired toppings.
Inari Sushi
Inari sushi is finger food that can be eaten in multiple bites. Dipping sauces are not usually used, as the pouches have been simmered in seasoned broth.
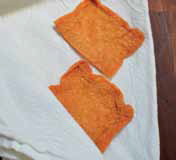
Place inari pouches (seasoned tofu pouches) onto a clean, lint-free dish towel or paper towel. Gently blot to remove the excess liquid. Flip the pouches over and blot again. Gently open each pouch, being careful not to tear it.
Inari Sushi With Toppings
Wet your fingertips with cool water. Shape 6 tablespoons of Traditional Sushi Rice (page 21), Brown Sushi Rice (page 23), Quinoa Sushi “Rice” (page 22) or Multi-Grain Sushi Rice (page 23) into a small, rectangular bed for each pouch.
Gently slide the rice bed into the pouch. It helps to wiggle the rice in rather than push it.
Flatten the bed of rice with wet fingertips or a wet spoon. The filled inari sushi should stand without tipping over. Adjust the rice as needed. Do not fill the pouches to the top.
Stuffed Inari Sushi
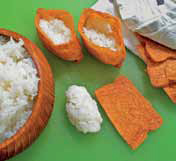
Place desired fillings on top of the rice. Serve immediately.
Place Traditional Sushi Rice (page 21), Brown Sushi Rice (page 23), Quinoa Sushi “Rice” (page 22) or Multi-Grain Sushi Rice (page 22) in a small bowl. Add additional ingredients as desired. Gently toss with a wet spoon.
Fill each inari pouch with 6 tablespoons of the rice mixture. Gently pack the mixture securely into the pouches.
Fold the edges of the pouches over the fillings and turn over. Serve immediately.
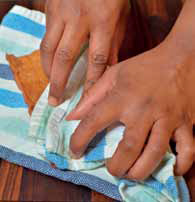
Blot pouches to remove excess liquid.
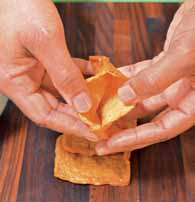
Carefully open pouches.
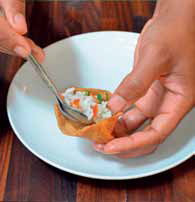
Spoon in the mixed rice.
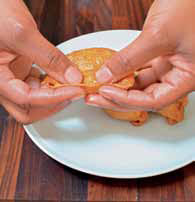
Fold edges over fillings and turn over.
Vegetable Inari Sushi
Most types of sushi do not fare well after a day of refrigeration. These inari pouches are an exception. The sushi rice is mixed with a flavorful sauce, then completely concealed inside moist tofu-skin pouches. This minimizes the usual drying that occurs when sushi rice is refrigerated.
Rice Prep Time: Up to 1½ hours
Sushi Prep Time: 15 minutes
Makes 8 inari-sushi pouches
2 cups (350 ml) Traditional Sushi Rice, Brown Sushi Rice, Quinoa Sushi “Rice” or Multi-Grain Sushi Rice (pages 21-23)
½ cup (125 ml) Black Bean Sauce (page 25)
2 green onions (scallions), thinly sliced
8 snow peas, roughly chopped
1 small carrot, peeled and shredded
8 inari pouches (seasoned tofu pouches)
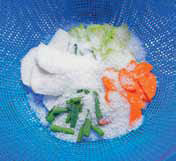
Place the rice in a medium-sized bowl. Add the Black Bean Sauce, green onions, snow peas, and carrots. Mix well.
Lay the inari pouches on a clean, lint-free kitchen towel or paper towel and blot away excess liquid.
Carefully open each pouch. Use a wet spoon to add 6 tablespoons of the rice mixture to each pouch. Pack the mixture securely into each pouch. Fold the edges of the pouches over the rice. Turn over and serve.

Pickled Eggplant Inari Sushi
If you don’t have the time to make Miso-Pickled Eggplant, you can still enjoy this sushi. Roasted or grilled eggplant with neutral seasonings makes a good substitute.
Rice Prep Time: Up to 1½ hours
Sushi Prep Time: 15 minutes
Makes 8 inari-sushi pouches
1 teaspoon wakame
2 cups (350 g) Traditional Sushi Rice, Brown Sushi Rice, Quinoa Sushi “Rice” or Multi-Grain Sushi Rice (pages 21-23)
½ cup (150 ml) Miso Dressing (page 24)
1 cup (140 g) Miso-Pickled Eggplant (page 50), diced
8 inari pouches (seasoned tofu pouches)
Place the wakame in a small bowl covered with cold water. Let stand for 5 minutes, or until the wakame has become soft and pliable. Drain well and chop coarsely.
In a medium-sized bowl, mix together the sushi rice, Miso Dressing, Miso-Pickled Eggplant and chopped wakame.
Lay the inari pouches on a clean, lint-free kitchen towel or paper towel and blot away excess liquid.
Carefully open each pouch. Add 6 tablespoons of the rice mixture to each pouch with a wet spoon. Use the spoon to pack the mixture securely into each pouch. Fold the edges of the pouches over the rice.
Turn over and serve.

Adzuki Bean and Fragrant Herb Inari Sushi
Japanese red bean paste (anko) comes in two forms: koshi-an and tsubu-an. Koshi-an is smooth and free of bean skins. Tsubu-an is chunky and textured. Although both have the same flavor, I recommend the chunkier tsubu-an for this dish.
Rice Prep Time: Up to 1½ hours
Sushi Prep Time: 15 minutes
Makes 8 inari-sushi pouches
2 cups (350 g) Traditional Sushi Rice, Brown Sushi Rice, Quinoa Sushi “Rice” or Multi-Grain Sushi Rice (pages 21-23)
2 tablespoons red bean paste (anko)
4 shiso leaves or large sweet basil leaves, chopped
4 large mint leaves, chopped
4 green onions (scallions), thinly sliced
2 teaspoons toasted white sesame seeds
8 inari pouches (seasoned tofu pouches)
2 teaspoons Basic Furikake Seasoning (page 30), or more, to taste
Place the sushi rice in a medium-sized bowl. Add the red bean paste, shiso or sweet basil, mint, green onions and toasted white sesame seeds.
Lay the inari pouches on a clean, lint-free kitchen towel or paper towel and blot away excess liquid.
Carefully open each pouch. Use a damp spoon to scoop 6 tablespoons of the rice mixture into each pouch, packing the mixture in securely.
Sprinkle ¼ teaspoon of the furikake over the filling in each pouch. Fold the edges of the pouches over the rice.
Turn over and serve.
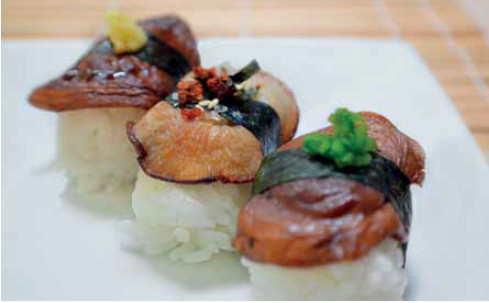
Shiitake Nigiri
Shiitake are just one type of mushroom that works well for these morsels. Try a bundle of delicate enoki mushrooms for a subtler flavor, or robust shimejimushrooms for a stronger flavor.
Rice Prep Time: Up to 1½ hours
Sushi Prep Time: 15 minutes
Makes 8 pieces
8 small shiitake mushrooms, wiped and stems removed
Oil for cooking
One 4 x 7-in (10 x 18-cm) nori sheet
1½ cups (300 g) Traditional Sushi Rice or Brown Sushi Rice (pages 21 and 23)
Tomato Furikake (page 30), to taste
1 teaspoon finely grated fresh ginger
1 green onion (scallion), thinly sliced
Score the top of each mushroom with a knife. Coat the bottom of a large skillet with oil over medium heat. Add the mushrooms and cook just enough to release the fragrance. This should take a couple of minutes. Remove from the skillet and allow to cool.
Cut the sheet of nori crosswise into 8 strips.
Dip your fingertips in water and splash some across your palms. Squeeze a walnut-sized ball of the sushi rice, about 2 tablespoons, in your hand to form a neat rectangular bed of rice. Repeat to make 8 beds of rice in all.
Top each bed of rice with a mushroom. For variety, place half of the mushrooms on the rice beds upside down. Secure the mushrooms in place with a nori strip “seatbelt.”
Arrange the pieces on a serving dish. Top each piece with Tomato Furikake, grated ginger and sliced green onion. Serve immediately.
Sprouts Nigiri
Though not necessary, taking the time to turn all of the sprouts in the same direction makes for the prettiest sushi. To add a little more flavor, tie a chive or piece of green onion (scallion) around the center of the sushi rather than nori to hold the sprouts in place.
Rice Prep Time: Up to 1½ hours
Sushi Prep Time: 15 minutes
Makes 12 pieces
8 oz (250 g) daikon sprouts (kaiware) or pea sprouts
One 4 x 7-in (10 x 18-cm) nori sheet
1½ cups (300 g) Traditional Sushi Rice or Brown Sushi Rice (pages 21 and 23)
Ginger Scallion Oil (page 28), to taste
Bring 4 cups (1 liter) of water to a boil in a medium saucepan. Add the daikon sprouts and blanch for 30 seconds. Drain immediately and place in a bowl of ice water.
Cut the sheet of nori crosswise into 12 strips.
Dip your fingertips in water and splash some across your palms. Squeeze a walnutsized ball of the sushi rice, about 2 tablespoons, in your hand to form a neat rectangular bed of rice. Repeat to make 12 beds of rice in all.
Drain the daikon sprouts and pat dry. Form into 12 small piles.
Top each bed of rice with some of the sprouts. Secure the daikon sprouts in place with a nori strip “seatbelt.”
Drizzle Ginger Scallion Oil over the pieces, to taste.
Spicy Carrot and Tomato Inari Sushi
When preparing a spicy mixture such as the carrots featured in this dish, I like to use two types of chili sauces. The combination of the two makes the mixture balanced with an overall heat profile that doesn’t taste like either of the individual sauces.
Rice Prep Time: Up to 1½ hours
Sushi Prep Time: 15 minutes
Makes 6 pieces
1 carrot, finely diced
1 tablespoon sriracha
1 tablespoon garlic chili paste
1 teaspoon Chia Seed Togarashi (page 28) or shichimi togarashi (seven-flavor pepper), plus more for topping
1 teaspoon toasted sesame seeds
1 green onion (scallion), thinly sliced
½ teaspoon dark sesame oil
½ teaspoon salt
2 cups (350 ml) Traditional Sushi Rice, Brown Sushi Rice, Quinoa Sushi “Rice” or Multi-Grain Sushi Rice (pages 21-23)
8 inari pouches (seasoned tofu pouches)
12 cherry tomatoes, halved
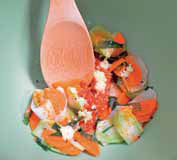
In a bowl, toss together the carrot, sriracha, garlic chili paste, Chia Seed Togarashi, sesame seeds, green onion, dark sesame oil, salt and sushi rice.
Lay the inari pouches on a clean, lint-free kitchen towel or paper towel and blot away excess liquid.
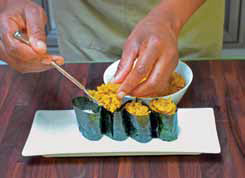
Carefully open each pouch. Use a wet spoon to add 6 tablespoons of the rice mixture to each pouch, packing the mixture in securely.
Arrange the inari pouches on a serving tray. Add four cherry tomato halves and sprinkle with Chia Seed Togarashi, to taste.

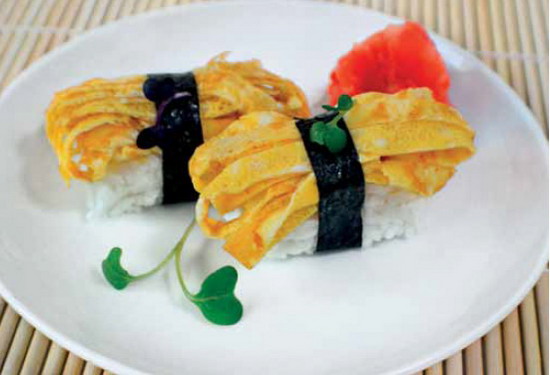
Tamago Nigiri
The use of crepe-like omelette sheets cuts the preparation time in half but delivers the same flavor as that of a traditional Japanese rolled omelette log. Try sprinkling each piece with Basic, Tomato or Curry Furikake Seasoning (page 30).
Rice Prep Time: Up to 1½ hours
Sushi Prep Time: 15 minutes
Makes about 12 pieces
12 Japanese Omelette Sheets
One 4 x 7-in (10 x 18-cm) nori sheet
1½ cups (300 g) Traditional Sushi Rice or Brown Sushi Rice (pages 21 and 23)
Cut each omelette into matchstick-thin strips. Cut the sheet of nori crosswise into 12 strips.
Dip your fingertips in water and splash some across your palms. Squeeze a walnut-sized ball of the sushi rice, about 2 tablespoons, in your hand to form a neat rectangular bed of rice. Repeat to make 12 beds of rice in all.
Divide the omelette into 12 piles.
Top each bed of rice with a heap of the omelette strips. Wrap a strip of nori around each piece of rice to secure the omelette strips in place.
Japanese Omelette Sheets
Prep Time: 5 minutes
Cook Time: 15 minutes
Makes 12 sheets
5 large eggs
4 tablespoons Vegetarian Dashi (page 27) or low-sodium vegetable stock, cooled 1 tablespoon sugar
2 tablespoons soy sauce
½ teaspoon salt
Oil for frying
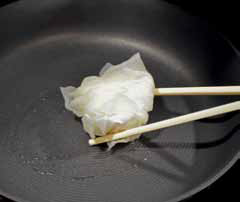
Whisk the eggs, Vegetarian Dashi or vegetable stock, sugar, soy sauce and salt together in a medium bowl. Pass the mixture through a fine-mesh strainer to eliminate small bits. Heat a skillet over medium heat. Wad a large paper towel into a ball and dip it into some cooking oil. Use chopsticks or tongs to rub the paper towel around the skillet.
Add ½ cup (125 ml) of the egg mixture to the oiled skillet. Tilt the skillet to coat the bottom. When the egg has set, loosen the edges with a pair of chopsticks. Flip the omelette onto a plate.
Repeat the steps with the remaining egg mixture. (Place omelettes on separate plates for cooling purposes.)
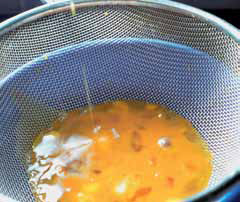
Strain the egg mixture.
Lightly oil the skillet.
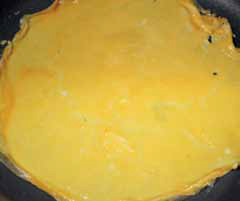
Cook until set and lightly browned underneath.

Transfer the omelette onto a plate to cool.
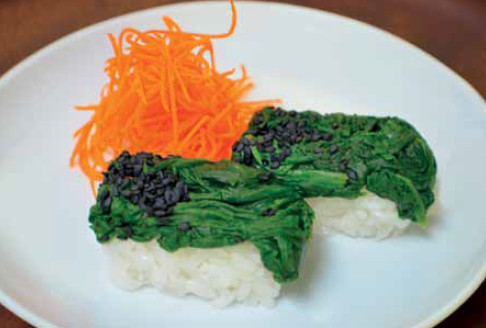
Spinach Nigiri
I prefer bundled spinach to bagged spinach for this preparation. Keep the spinach leaves turned in the same direction when cooking for the prettiest nigiri.
Rice Prep Time: Up to 1½ hours
Sushi Prep Time: 15 minutes
Makes 12 pieces
8 oz (250 g) fresh spinach leaves, trimmed of stems
½ cup (125 ml) water
½ teaspoon dark sesame oil
Pinch of salt
1½ cups (300 g) Traditional Sushi Rice or Brown Sushi Rice (pages 21 and 23)
1 teaspoon black sesame seeds
In a microwave-safe bowl, mix the spinach, water, dark sesame oil and salt. Cover with plastic wrap and microwave on high for 30 seconds. Remove the spinach and give it a good squeeze to remove as much liquid as possible.
Dip your fingertips in water and splash some across your palms. Squeeze a walnut-sized ball of the sushi rice, about 2 tablespoons, in your hand to form a neat rectangular bed of rice. Repeat to make 12 beds of rice in all.
Top each bed of rice with some of the wilted spinach.
Sprinkle with black sesame seeds before serving.
Faux Roe “Boats”
Cooked amaranth has a very similar texture to masago (capelin fish roe). The kombu kelp adds a fresh ocean flavor. Prepare only enough Faux Roe to use in one sushi-making session, as leftovers tend to become gelatinous and unpleasant in texture.
Rice Prep Time: Up to 1½ hours
Sushi Prep Time: 15 minutes
Makes 12 pieces
1½ cups (300 g) Traditional Sushi Rice or Brown Sushi Rice (pages 21 and 23)
Six 4 x 7-in (10 x 18-cm) nori sheets
½ cup (130 g) Faux Roe
Wet your fingertips and palms lightly with water. Grab a walnut-sized amount of the sushi rice (about 2 tablespoons) and mold it into a rectangular mound. The bottom should be flat. Repeat this with the remaining rice to form 12 “beds” in all.
Cut the nori into twelve 1½ x 5-in (4 x 13-cm) strips. (Any remaining nori can be saved and cut into “seatbelts” for nigiri sushi.) Wrap one strip of nori, rough side facing in, around 1 bed of rice to form a wall. If desired, use a single grain of rice to “glue” the edges together. Repeat with remaining nori strips and rice beds.
Arrange the rice beds on a serving tray. Top each with 1 tablespoon of the Faux Roe.

Prepare 12 rice “beds.”
Cut nori into 12 strips.
Wrap 1 strip of nori around each bed of rice.
Place 1 Tbsp Faux Roe on top of each bed of rice.
Faux Roe
A small amount of turmeric adds a vibrant yellow hue without overpowering the flavor.
Prep Time: 5 minutes
Cook Time: 20 minutes
1½ cups (375 ml) Vegetarian Dashi (page 27) or low-sodium vegetable broth
½ cup (100 g) amaranth
½ teaspoon salt
¼ teaspoon turmeric
One ½-in (1.25-cm) piece kombu (kelp), wiped with a damp cloth
Bring the Vegetarian Dashi to a boil in a medium saucepan. Add the amaranth, salt, and turmeric, stirring well to prevent sticking. Add the kombu. Cover the pan and reduce heat to keep at a low simmer. Cook for 20 minutes. There should still be some liquid left in the pan. Strain the amaranth and set aside to cool.
Variation
Wasabi Faux Roe
Omit turmeric. Cook amaranth and drain as described above. Mix 1 teaspoon of wasabi powder in 1 tablespoon of water. Toss the amaranth with the wasabi mixture and 1 or more drops green food coloring (optional). Cool before using.
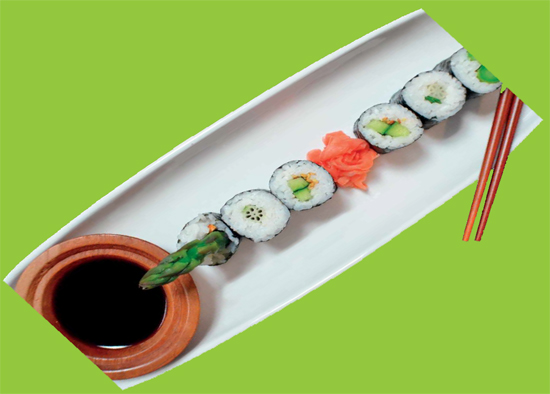
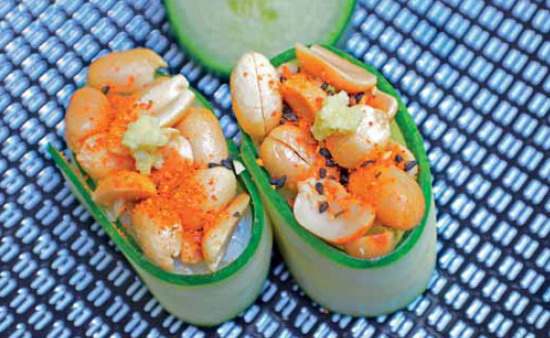
Cucumber and Peanut “Boats”
The use of a mandoline is key for these little boats, as the cucumber needs to be sliced very thin so it wraps easily. If your cucumber is too thick, you can use a length of green onion or chive to “tie” it into place.
Rice Prep Time: 1½ hours
Sushi Prep Time: 15 minutes
Makes 12 pieces
1½ cups (300 g) Traditional Sushi Rice or Brown Sushi Rice (pages 21 and 23)
1 English cucumber
½ cup (40 g) roasted peanuts
1 teaspoon finely grated daikon radish
1 teaspoon grated ginger root
Chia Seed Togarashi (page 28) or shichimi togarashi
One green onion (scallion), thinly sliced
Sweet Chili Sauce (page 25), for dipping
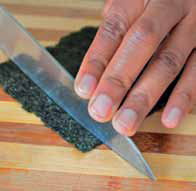
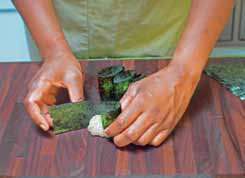
Wet your fingertips and palms lightly with water. Grab a walnut-sized amount of prepared sushi rice (about 2 tablespoons) and mold it into a rectangular mound. The bottom should be flat. Repeat this with the remaining rice to form 12 balls in all.
Use a mandoline to cut the cucumber lengthwise into very thin slices. (Eat the first slice or two, as they will most likely not be long or wide enough.) The slices must be wide enough to extend above the height of the rice balls when wrapped around them like a wall. You should be able to get 6 slices from one side of the cucumber. Avoid using the middle slices that are full of seeds. Turn the cucumber over to get 6 more slices from the other side.
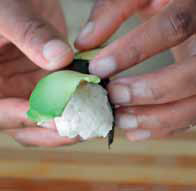
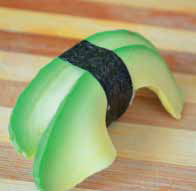
Wrap a cucumber slice snugly around each rice ball to enclose it in a wall. The ends should stick to each other. Place an equal quantity of peanuts on top of each rice ball. Add a tiny dab of grated daikon radish and a tiny dab of grated ginger root on top of the peanuts. Sprinkle with Chia Seed Togarashi or shichimi togarashi and top with green onion.
Dip the bottoms of the little boats in Sweet Chili Sauce before eating.
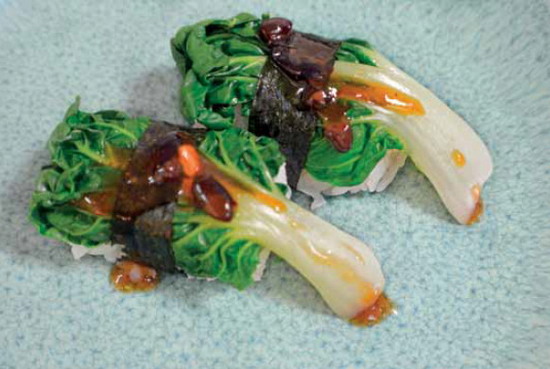
Baby Bok Choy Nigiri with Black Bean Sauce
Select baby bok choy that are finger length or shorter. If baby bok choy are unavailable, cut standard bok choy into 1 x 2-inch (2.5 x 5-cm) pieces.
Rice Prep Time: Up to 1½ hours
Sushi Prep Time: 15 minutes
Makes 12 pieces
6 heads baby bok choy
One 4 x 7-in (10 x 18-cm) sheet of nori
1½ cups (300 g) Traditional Sushi Rice or Brown Sushi Rice (pages 21 and 23)
6 teaspoons Black Bean Sauce (page 25)
2 tablespoons fresh orange zest, or more, to taste
Bring 4 cups (1 liter) of water to a boil in a medium saucepan. Add the baby bok choy and blanch for 1 minute. Drain immediately and rinse in cold water.
Slice the baby bok choy in half lengthwise. Pat dry with a clean, lint-free kitchen towel or paper towel.
Cut the sheet of nori crosswise into 12 strips.
Dip your fingertips in water and splash some across your palms. Squeeze a walnut-sized ball of prepared Sushi Rice, about 2 tablespoons, in your hand to form a neat rectangular bed of rice. Repeat to make 12 beds of rice in all.
Lay one baby bok choy half (cut side down) on each of the rice beds. Secure the boy choy in place with a nori strip “seatbelt.”
To serve, arrange the pieces on a serving dish. Spoon ½ teaspoon of the Black Bean Sauce over each piece and sprinkle with orange zest.
Broccoli-Stem Kimchi Inari
I prefer to use the stems of the broccoli to the florets. These bites are ready in just minutes and can be refrigerated for up to a week.
Rice Prep Time: 1½ hours
Sushi Prep Time: 25 minutes
Makes 8 pieces
8 inari pouches (seasoned tofu pouches)
2 cups (350 g) prepared Traditional Sushi Rice, Brown Sushi Rice, Quinoa Sushi “Rice” or Multi-Grain Sushi Rice (pages 21-23)
1 cup (200 g) Broccoli-Stem Kimchi
Broccoli-Stem Kimchi
One 4-in (10-cm) length broccoli stem, sliced
One 2-in (5-cm) length daikon radish, peeled and thinly sliced
1 carrot, shredded
2 green onions (scallions), roughly chopped
4 tablespoons salt
2 tablespoons garlic chili paste
1 teaspoon grated fresh ginger root
Prepare the Broccoli-Stem Kimchi: Toss the broccoli stem, daikon radish, carrot and green onions in a bowl with the salt. Let stand for 10 minutes, then rinse thoroughly. Squeeze the excess water out.
Mix the vegetables with garlic chili paste and ginger. Let stand for 5 minutes for flavors to develop.
Lay the inari pouches on a clean, lint-free kitchen towel or paper towel and blot away excess liquid.
Carefully open each pouch. Use a wet spoon to scoop 6 tablespoons of sushi rice into each pouch, packing it in securely.
Pour off the excess liquid from the kimchi. You can save the liquid to make more broccoli-stem kimchi or discard it.
Divide the kimchi evenly across the tops of the 6 packets. Serve immediately.

Cover the vegetables with salt.
Toss with chili paste and ginger.
Blot excess liquid from packets.
Fill each packet with sushi rice.

Top each packet with kimchi.