Vegetarian Sushi Secrets: 101 Healthy and Delicious Recipes - Marisa Baggett (2016)
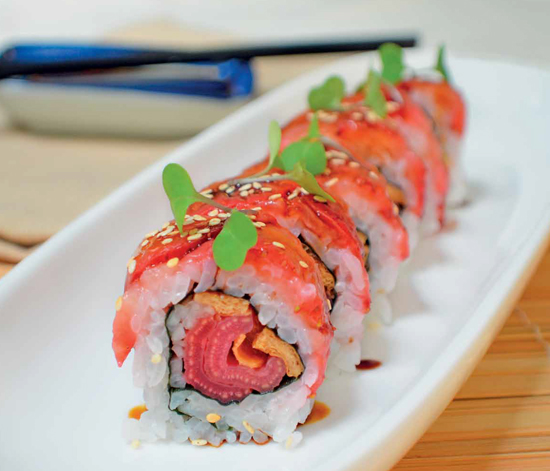
Chapter 5. THICK SUSHI ROLLS
When I teach sushi classes, I always start with futo-maki, or thick rolls. They are the easiest to master within the eager first or second attempt. Using the nori vertically allows a greater number of fillings to be contained in a manageable bite. The hardest part of preparing thick rolls may be deciding when to stop adding fillings. The good news is that even if you get a little carried away, you’ll still end up with good results. And don’t worry about fillings sticking out of the ends. In fact, you’ll achieve better results if your fillings stick out, because they’ll provide valuable structure when cutting the roll into pieces. Like thin sushi rolls, thick sushi rolls should be enjoyed shortly after preparation. Soybean paper can be used if rolls need to be prepared in advance.
Thick sushi rolls like Coconut Tempura Tofu Rolls and Mushroom “Spider” Rolls offer a great way to incorporate crispy fried elements without having to fry the entire roll. The warm and crunchy fried fillings offer a pleasing contrast to the cool vegetables and perfectly cooked sushi rice, enhancing the overall sushi experience.
HOW TO MAKE THICK SUSHI ROLLS
1) Place a 4 x 7-in (10 x 18-cm) sheet of nori vertically on a bamboo rolling mat. Make sure that the short end is parallel to the bottom of the mat and that the rough side is facing upwards.
2) Dip your fingertips lightly in cool water and spread about ¾ cup (150 g) of prepared sushi rice evenly over the bottom ¾ of the nori.
3) Add the desired fillings horizontally across the middle of the rice, making sure that the fillings extend to both edges of the nori. For best results, use at least 3 fillings, but no more than 7.
4) Wet your fingertips again and slide your thumbs underneath the mat while grasping the fillings with all other fingertips. Roll the bottom of the mat just over the fillings, tucking the fillings tightly under the fold. (Do not allow the mat to get stuck inside the roll!)
Lift the edge of the mat. Continue rolling until the roll is complete and the seam is facing down. Gently shape the roll by pressing your forefingers on top of the mat while simultaneously pressing your thumbs and middle fingers on the sides.
5) Allow the roll to rest seam-side down on a cutting board for at least 2 minutes. A loose fold is common with thick rolls, but resist the urge to seal with additional water. The moisture from the sushi rice will be sufficient for the nori to adhere to itself.
6) To cut the roll, dip the blade of a very sharp knife in water. Use a swift sawing motion to cut the roll into 5 pieces.

Place nori vertically on the mat, rough side up.

Spread rice evenly across the bottom ¾ of nori.
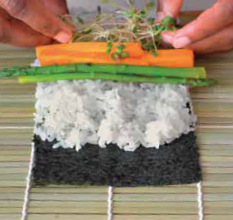
Arrange fillings across the center of the rice.
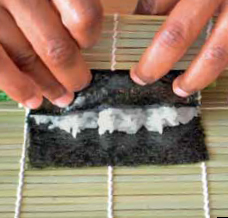
Fold the bottom edge of the nori to cover fillings.
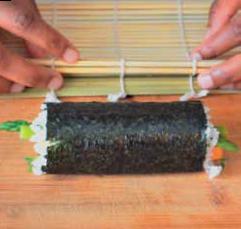
Set roll seam-side down for 2 minutes.
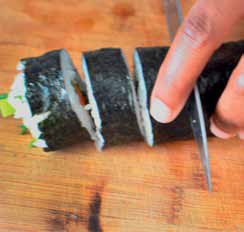
Cut roll into 5 pieces with a water-dipped knife.
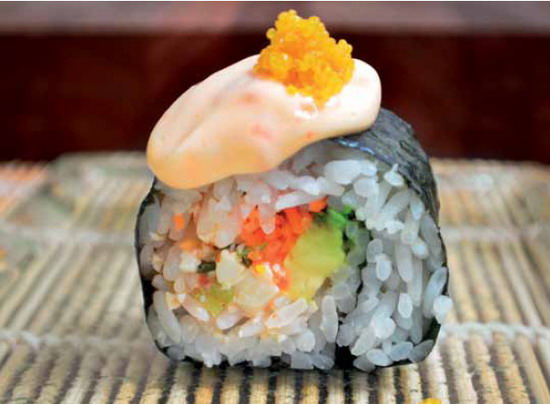
Spicy Tofu Rolls
Many sushi bars like to add spicy mayonnaise to their fillings, but I prefer to add it to the tops of rolls, where it stays tidy. Adding it to the mix makes things messy, as the mayonnaise often oozes out the sides during the rolling process.
Rice Prep Time: Up to 1½ hours
Sushi Prep Time: 20 minutes
Makes 4 rolls (20 pieces)
4 oz (100 g) tofu, drained and cut into tiny cubes
1 green onion (scallion), thinly sliced
1 tablespoon fresh orange juice
½ teaspoon fresh orange zest
1 teaspoon Chia Seed Togarashi (page 28) or shichimi togarashi (Japanese 7-flavor pepper)
1 teaspoon dark sesame oil
1 tablespoon garlic chili paste
Salt, to taste
Four 4 x 7-in (10 x 18-cm) nori sheets
3 cups (600 g) Traditional Sushi Rice, Brown Sushi Rice, Quinoa Sushi “Rice” or Multi-Grain Sushi Rice (pages 21-23)
¼ avocado, cut into 4 wedges
One 4-in (10-cm) length carrot, cut into matchsticks
Curry Mayonnaise (page 29), to taste
Faux Roe (page 68)
Mix together the tofu, green onion, orange juice, fresh orange zest, Chia Seed Togarashi, dark sesame oil, and garlic chili paste. Add salt, to taste.
Place a 4 x 7-in (10 x 18-cm) sheet of nori vertically on a bamboo rolling mat. Make sure that the short end is parallel to the bottom of the mat and that the rough side is facing upwards.
Dip your fingertips lightly in cool water and spread about ¾ cup (150 g) of the sushi rice evenly over the bottom ¾ of the nori.
Spread 2½ tablespoons of the spicy tofu mixture horizontally across the center of the rice. Place 1 avocado wedge on top of the spicy tofu. Top with ¼ of the carrots.
Wet your fingertips again and slide your thumbs underneath the mat while grasping the fillings with all other fingertips. Roll the bottom of the mat just over the fillings, tucking the fillings tightly under the fold. (Do not allow the mat to get stuck inside the roll!)
Lift the edge of the mat. Continue rolling until the roll is complete and the seam is facing down. Gently shape the roll by pressing your forefingers on top of the mat while simultaneously pressing your thumbs and middle fingers on the sides.
Allow the roll to rest seam-side down on a cutting board for at least 2 minutes. Repeat steps to make 3 more rolls.
To cut the rolls, dip the blade of a very sharp knife in water. Use a swift sawing motion to cut each roll into 5 pieces. Dollop Curry Mayonnaise on each piece as desired before serving.
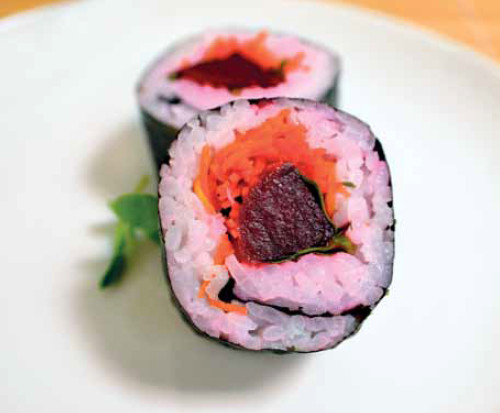
Ginger Beet Rolls
Tossing a bit of grated beet with the sushi rice gives it a pleasant pink hue and prevents your rolls from looking as if they are bleeding. Regardless of the type of beet you use, be sure to mix some of it with your sushi rice before making the rolls for the best presentation.
Rice Prep Time: Up to 1½ hours (note that Ponzu Sauce should be made a day ahead)
Sushi Prep Time: 15 minutes
Makes 4 rolls (20 pieces)
3 cups (600 g) Traditional Sushi Rice, Brown Sushi Rice, Quinoa Sushi “Rice” or Multi-Grain Sushi Rice (pages 21-23)
½ teaspoon grated raw beet
Four 4 x 7-in (10 x 18-cm) nori sheets
2 teaspoons grated fresh ginger
1 teaspoon lemon zest
1 large beet, roasted, peeled and cut into thin strips
½ carrot, peeled and cut into matchsticks
1 bunch watercress, trimmed
Vegetarian Ponzu Sauce (page 26) for dipping
Toss the grated beet and sushi rice together until the mixture turns pink.
Place a 4 x 7-inch (10 x 18-cm) sheet of nori vertically on a bamboo rolling mat. Make sure that the short end is parallel to the bottom of the mat and that the rough side is facing upwards.
Dip your fingertips lightly in cool water and spread about ¾ cup (150 g) of the pinkened sushi rice evenly over the bottom ¾ of the nori.
Smear ½ teaspoon of the grated ginger across the center of the rice. Sprinkle ¼ teaspoon of the lemon zest over the rice. Arrange ¼ of the roasted beet, carrot, and watercress horizontally across the middle of the rice, making sure that the fillings extend to both edges of the nori.
Wet your fingertips again and slide your thumbs underneath the mat while grasping the fillings with all other fingertips. Roll the bottom of the mat just over the fillings, tucking the fillings tightly under the fold. (Do not allow the mat to get stuck inside the roll!)
Lift the edge of the mat. Continue rolling until the roll is complete and the seam is facing down. Gently shape the roll by pressing your forefingers on top of the mat while simultaneously pressing your thumbs and middle fingers on the sides.
Allow the roll to rest seam-side down on a cutting board for at least 2 minutes. Repeat with remaining ingredients to make 3 more rolls.
Dip the blade of a very sharp knife in water. Use a swift sawing motion to cut each roll into 5 pieces. Serve with Ponzu Sauce for dipping.
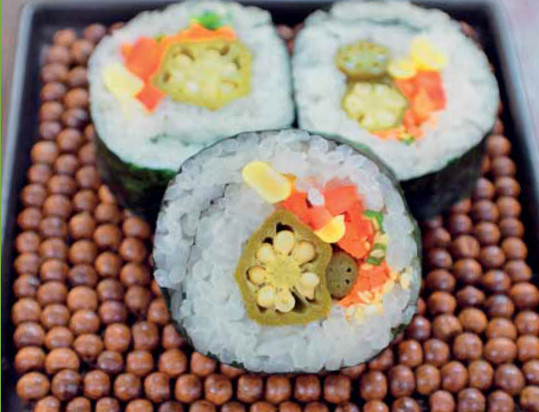
Summer Corn and Pickled Okra Rolls
My use of pickled okra has become somewhat of a “signature” throughout my sushi career. It is a nod to my Southern roots, and I almost always feature it in some form. Here, I like it paired with fresh corn kernels. If the corn is very sweet and fresh, you can forego blanching it.
Rice Prep Time: Up to 1½ hours
Sushi Prep Time: 15 minutes
Makes 4 Rolls (20 pieces)
Four 4 x 7-in (10 x 18-cm) nori sheets
3 cups (600 g) Traditional Sushi Rice, Brown Sushi Rice, Quinoa Sushi “Rice” or Multi-Grain Sushi Rice (pages 21-23)
2 teaspoons toasted sesame seeds
2 green onions (scallions), thinly sliced
8 large pickled okra
½ carrot, peeled and cut into matchsticks
½ red bell pepper, cut into matchsticks
4 tablespoons corn kernels, blanched
Place a 4 x 7-in (10 x 18-cm) sheet of nori vertically on a bamboo rolling mat. Make sure that the short end is parallel to the bottom of the mat and that the rough side is facing upwards.
Dip your fingertips lightly in cool water and spread about ¾ cup (150 g) of the sushi rice evenly over the bottom ¾ of the nori.
Sprinkle ½ teaspoon of the sesame seeds over the rice. Sprinkle ¼ of the green onions over the rice. Arrange 2 pieces of pickled okra end to end across the center of the sushi rice, making sure they extend to both edges of the nori. Lay ¼ of the carrots and red bell peppers in neat lines above the pickled okra. Add 1 tablespoon of the corn kernels in a neat line across the rice.
Wet your fingertips again and slide your thumbs underneath the mat while grasping the fillings with all other fingertips. Roll the bottom of the mat just over the fillings, tucking the fillings tightly under the fold. (Do not allow the mat to get stuck inside the roll!)
Lift the edge of the mat. Continue rolling until the roll is complete and the seam is facing down. Gently shape the roll by pressing your forefingers on top of the mat while simultaneously pressing your thumbs and middle fingers on the sides.
Allow the roll to rest seam-side down on a cutting board for at least 2 minutes. Repeat with remaining ingredients to make 3 more rolls.
To cut the rolls, dip the blade of a very sharp knife in water. Use a swift sawing motion to cut each roll into 5 pieces.
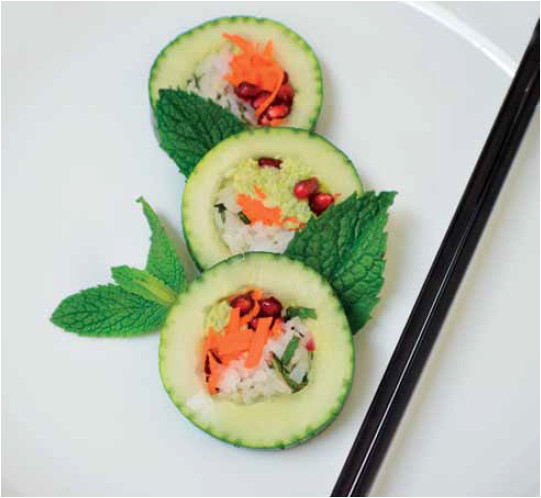
Cucumber-Wrapped Rolls
In sushi school, one of the skills we worked on daily was learning to cut vegetables into long, thin continuous sheets that could be used as wrappers. It requires a special kind of knife as well as a special kind of patience. These cucumber-wrapped rolls offer a similar flavor without all of the headache by using a spoon to hollow out the cucumbers.
Rice Prep Time: Up to 1½ hours (note that Ponzu Sauce should be made a day in advance)
Sushi Prep Time: 20 minutes
Makes 4 Rolls (20 pieces)
Four 7-in (18-cm) lengths whole cucumber
1 cup (200 g) Traditional Sushi Rice, Brown Sushi Rice, Quinoa Sushi “Rice” or Multi-Grain Sushi Rice (pages 21-23)
2 mint sprigs, finely chopped
1 cup (250 g) Edamame Hummus (page 45) or store-bought hummus
One 4-in (10-cm) length carrot, cut into thin matchsticks
½ cup (85 g) pomegranate arils, or more, to taste
Vegetarian Ponzu Sauce (page 26)
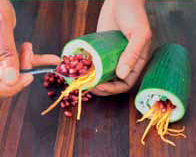
Cut each cucumber length in half crosswise. Use a spoon to hollow out the core of each cucumber.
Mix the sushi rice with the chopped mint. Use a wet spoon to press 2 tablespoons of sushi rice into each cucumber, leaving room for the remaining ingredients.
Spoon the Edamame Hummus into a plastic bag. Snip away one corner of the bag and squeeze some hummus inside each cucumber piece. At this point, turning the cucumbers onto their sides rather than standing them on end will keep the filling from slipping out.
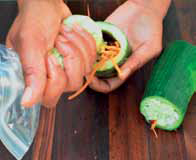
Slide some carrot sticks inside each cucumber. Use a chopstick or spoon to poke several pomegranate arils inside each cucumber. Seal with a dollop of the remaining Edamame Hummus.
Dip the blade of a very sharp knife in water. Use a swift sawing motion to cut each roll into 2 or 3 pieces. Sprinkle more pomegranate arils on top of each piece if desired. Serve with Ponzu Sauce for dipping.
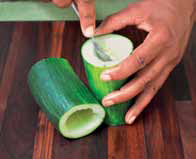
Use a spoon to hollow out cucumbers.
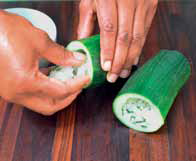
Press rice into each cucumber.
Squeeze Edamame Hummus inside.
Insert pomegranate arils.
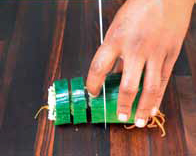
Slice the filled cucumbers.
Sweet Potato and Shiitake Rolls
I enjoy sweet potatoes in almost any form, especially when the flavor is sweet and salty. As an alternative to boiled sweet potatoes, try Soy Glazed Sweet Potatoes (page 44).
Rice Prep Time: Up to 1½ hours
Sushi Prep Time: 30 minutes
Makes 4 rolls (20 pieces)
1½ cups (375 ml) water
1 cup (250 ml) soy sauce
4 tablespoons mirin or sherry
½ small sweet potato, peeled and cut into chopstick-width lengths
4 large shiitake mushrooms, wiped and stems removed
Four 4 x 7-in (10 x 18-cm) nori sheets
3 cups (600 g) Traditional Sushi Rice, Brown Sushi Rice, Quinoa Sushi “Rice” or Multi-Grain Sushi Rice (pages 21-23)
2 oz (60 g) daikon radish sprouts (kaiware) or pea sprouts
4 teaspoons slivered almonds, toasted
Bring the water, soy sauce and mirin to a boil in a saucepan. Add the sweet potato pieces and cook until soft, about 3-4 minutes. Remove and allow to cool and drain on paper towels, reserving the cooking liquid for mushrooms. Add mushrooms to the liquid. Reduce heat and simmer for 5 minutes. Remove mushrooms. Pat dry and allow them to cool, then slice them into thin strips.
Place a 4 x 7-in (10 x 18-cm) sheet of nori vertically on a bamboo rolling mat. Make sure that the short end is parallel to the bottom of the mat and that the rough side is facing upwards.
Dip your fingertips lightly in cool water and spread about ¾ cup (150 g) of the sushi rice evenly over the bottom ¾ of the nori. Arrange ¼ of the sweet potato pieces horizontally across the middle of the rice, making sure that they extend to both edges of the nori. Add ¼ of the mushroom pieces and daikon sprouts. Sprinkle 1 teaspoon of the almonds over the top.
Wet your fingers again and slide your thumbs underneath the mat while grasping the fillings with fingertips. Roll the bottom of the mat just over the fillings, tucking the fillings tightly under the fold. (Do not allow the mat to get stuck inside the roll!)
Lift the edge of the mat. Continue rolling until the roll is complete and the seam is facing down. Gently shape the roll by pressing your forefingers on top of the mat while simultaneously pressing your thumbs and middle fingers on the sides.
Allow the roll to rest seam-side down on a cutting board for at least 2 minutes. Repeat to make 3 more rolls.
To cut the rolls, dip the blade of a very sharp knife in water. Use a swift sawing motion to cut each roll into 5 pieces.
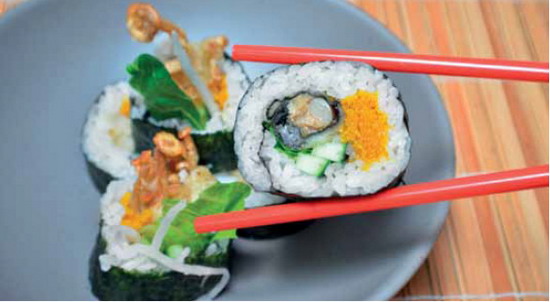
Mushroom “Spider” Rolls
Typically, spider sushi rolls feature a fried soft-shell crab inside a thick roll. The playful name describes how the legs of the crab extend beyond the sides of the roll. Here, fried shimeji and enoki mushrooms provide a similar, vegetarian-friendly effect.
Rice Prep Time: Up to 1½ hours
Sushi Prep Time: 30 minutes
Makes 4 Rolls (20 pieces)
Oil for frying
Five 4 x 7-in (10 x 18-cm) nori sheets
One 4-oz (115-g) package shimeji mushrooms, wiped cleaned and trimmed
One 2-oz (60-g) package enoki mushrooms, wiped clean and trimmed
Potato starch or cornstarch (corn flour) for dusting
½ cup (125 ml) Vegan Tempura Batter (page 34)
3 cups (600 g) Traditional Sushi Rice, Brown Sushi Rice, Quinoa Sushi “Rice” or Multi-Grain Sushi Rice (pages 21-23)
4 tablespoons Faux Roe (page 68)
1 Japanese cucumber, deseeded and cut into matchsticks
2 oz (60 g) daikon radish, cut into matchsticks
2 romaine lettuce leaves, cut in half lengthwise
Heat 1 in (2.5 cm) of oil in a medium skillet over high heat. When the oil reaches 350°F (175°C), reduce the heat to maintain temperature as needed.
Cut 1 sheet of the nori into 4 strips. Divide the mushrooms into 4 equal piles, keeping the caps all in the same direction. For each mushroom “spider,” turn the half the mushrooms in one pile around, then use a nori strip to bind the mushroom bundle in the center. Some caps should be facing outward on both ends. Repeat with remaining mushrooms and nori. Dust each mushroom “spider” with potato starch or corn starch. Shake away the excess before dipping into the tempura batter. Fry the mushroom “spiders” in oil until crisp. Drain on wire rack.
Place a 4 x 7-in (10 x 18-cm) sheet of nori vertically on a bamboo rolling mat. Make sure that the short end is parallel to the bottom of the mat and that the rough side is facing upwards. Dip your fingertips lightly in cool water and spread about ¾ cup (150 g) of the sushi rice evenly over the bottom ¾ of the nori. Smear 1 teaspoon of the Faux Roe across the center of the sushi rice. Place one of the mushroom “spiders” on top and add ¼ of the cucumber and daikon radish. Top with a half lettuce leaf.
Wet your fingertips again and slide your thumbs underneath the mat while grasping the fillings with all other fingertips. Roll the bottom of the mat just over the fillings, tucking the fillings tightly under the fold. (Do not allow the mat to get stuck inside the roll!)
Lift the edge of the mat. Continue rolling until the roll is complete and the seam is facing down. Gently shape the roll by pressing your forefingers on top of the mat while simultaneously pressing your thumbs and middle fingers on the sides.
Allow the roll to rest seam-side down on a cutting board for at least 2 minutes. Repeat with remaining ingredients to make 3 more rolls. To cut the rolls, dip the blade of a very sharp knife in water. Use a swift sawing motion to cut each roll into 5 pieces. Arrange pieces on a serving tray or individual serving plates, prominently displaying the “spider” legs. Serve immediately.
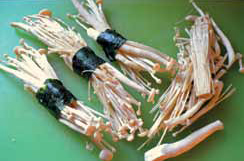
Bind the mushroom bundles with a nori strip.
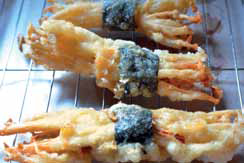
Fry and drain the tempura-dipped mushrooms.
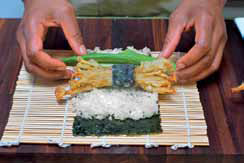
Place nori vertically and top with rice and fillings.
Coconut Tempura Tofu Rolls
The tofu should be pressed so the batter will adhere to it. Place the block between two clean dishtowels or paper towels. Set a bowl holding a few canned items on top. Drain for 10 minutes.
Rice Prep Time: Up to 1½ hours
Sushi Prep Time: 30 minutes
Makes 4 rolls (20 pieces)
Oil for frying
4 tablespoons unsweetened coconut flakes
4 tablespoons panko breadcrumbs
½ cup (125 ml) Vegan Tempura Batter (page 34)
4 oz (115 g) firm tofu, drained
Potato starch or cornstarch (corn flour) for dusting
Four 4 x 7-in (10 x 18-cm) nori sheets
3 cups (600 g) Traditional Sushi Rice or other sushi rice (pages 21-23)
2 oz (60 g) red cabbage, shredded
½ carrot, cut into thin matchsticks
1 green onion (scallion), thinly sliced
4 teaspoons chopped roasted peanuts
Curry Mayonnaise (page 29) for dipping
Heat 1 in (2.5 cm) of oil to 350°F (175°C) in a skillet over medium heat. Adjust heat as needed to maintain temperature.
Stir the coconut flakes and panko breadcrumbs into the tempura batter. Do not overmix.
Pat tofu dry and cut into chopstick-width lengths. Dust lightly with potato starch. Shake off excess, then dip into the coconut batter. Fry the tofu in the oil, turning as necessary until the coating is golden brown, about 2 minutes per side. Drain on a wire rack.
Place a sheet of nori vertically on a bamboo rolling mat. Make sure the short end is parallel to the bottom of the mat and the rough side is facing upwards.
Dip your fingertips lightly in cool water and spread about ¾ cup (150 g) of the sushi rice evenly over the bottom ¾ of the nori.
Lay ¼ of the fried tofu horizontally across the center of the rice, making sure it extends to both edges of the nori. Then add ¼ of the cabbage, carrots and green onions. Sprinkle 1 teaspoon of peanuts over the top.
Wet your fingertips again and slide your thumbs underneath the mat while grasping the fillings with all other fingertips. Roll the bottom of the mat just over the fillings, tucking the fillings tightly under the fold. (Do not allow the mat to get stuck inside the roll!)
Lift the edge of the mat. Continue rolling until the roll is complete and the seam is facing down. Gently shape the roll by pressing your forefingers on top of the mat while simultaneously pressing your thumbs and middle fingers on the sides. Allow the roll to rest seam-side down on a cutting board for at least 2 minutes. Repeat with remaining ingredients to make 3 more rolls.
Dip the blade of a very sharp knife in water. Use a swift sawing motion to cut each roll into 5 pieces. Serve with Curry Mayonnaise for dipping.