K-Food: Korean Home Cooking and Street Food - Da-Hae West, Gareth West (2016)
Chapter 5. Korean Meat & BBQ
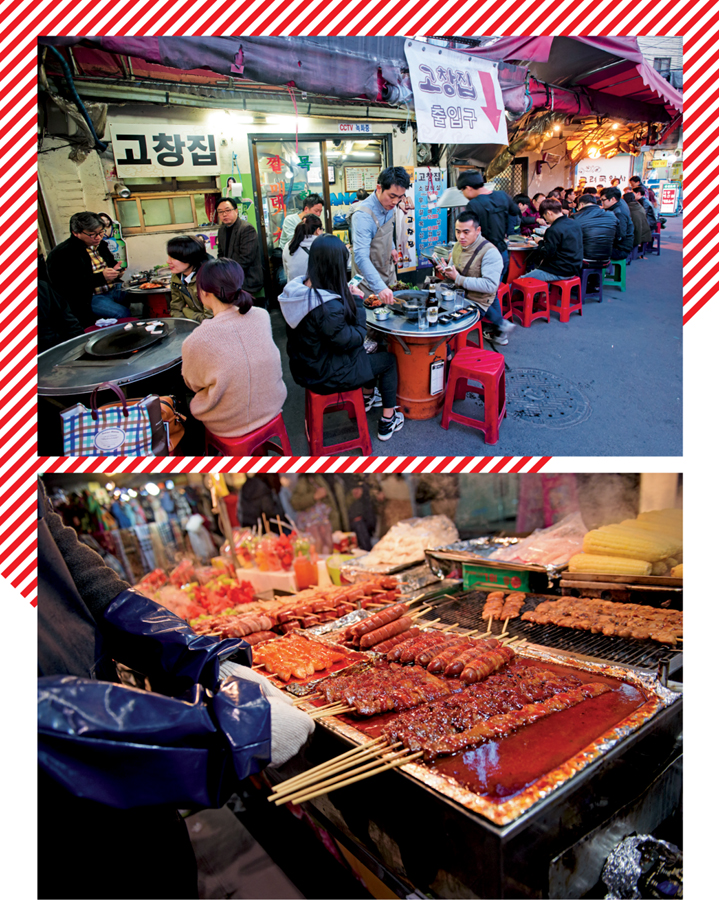
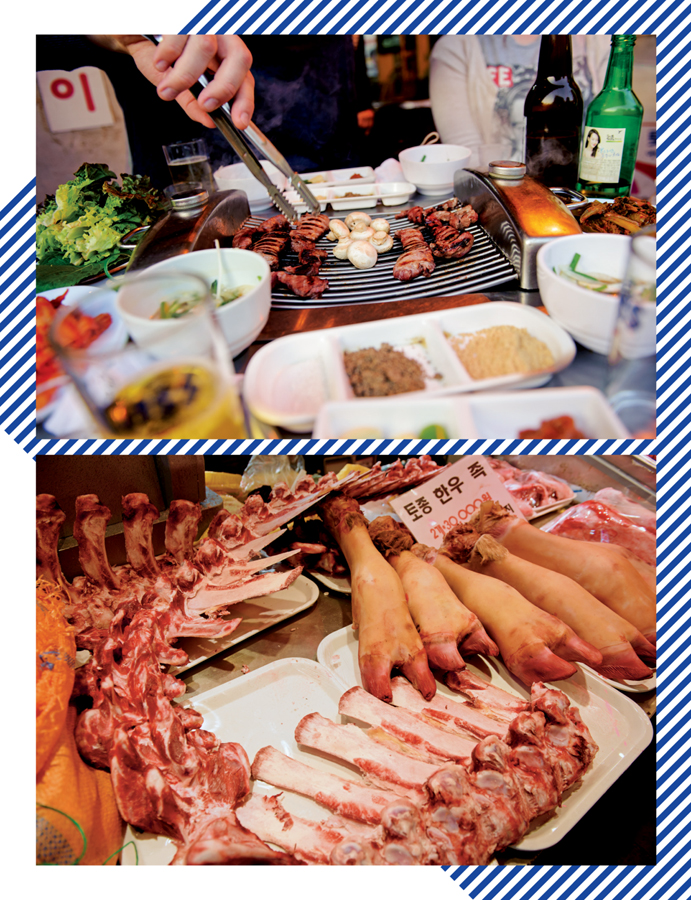
As we mentioned earlier, Korean BBQ is rarely eaten at home, but it’s still a very important part of Korean culture. There are Korean BBQ restaurants lining almost every street in Seoul, and competition is fierce.
Korean BBQ is very much about a shared dining experience and most people will go to eat Korean BBQ in large groups (whether that be with family, friends or with work colleagues), while a lot of restaurants will turn you away if you want Korean BBQ for one. Meat is chosen collectively by the group as it’s shared by the whole table, with most restaurants in Korea specializing in a particular meat or even cut. The meat is either offered plain, seasoned with a little salt or marinated in either a soy-based sauce (such as Bulgogi Sauce, or gochujang. The meat is then served to the table on a large platter, and then it’s down to the youngest in the group (within reason) to be in charge of the grill and make sure that the meat is properly cooked for the rest of the table. This is as a sign of respect, as the person cooking usually has the least chance of getting to eat much meat.
The grill is set in the middle of the table (often with space-age style extractor tubes coming down from the ceiling to get rid of the smoke) and everyone helps themselves once it’s cooked, making their own lettuce wraps and filling them with the meat and their other chosen fillings. Nowadays, some ‘fusion’ BBQ restaurants have adopted special grills for the centre of the barbecue with reservoirs around the edges, for cooking eggs or cheese in the meaty juices. I have to admit, I’m still not used to these quite yet - cheese feels like an unusual addition and I prefer the more authentic restaurants. A lot of our favourite types of Korean BBQ are the simple, unmarinated meats.
Korea has many more cuts of meat compared to the UK, so you might have to ask your butcher to see if they can help you if you’re after a particular Korean cut. Koreans tend to like meats that have a lot of marbling to them for maximum flavour - and often tend to prefer chewier cuts to the ones we’re used to (Gareth calls this ‘the Korean chew’). Korean people have a saying called shibnen mat (literally ‘chewing flavour’) which refers to the flavour you get from chewing your food - as they often like to feel that they’re properly chewing on something when they’re eating. Pork and beef are the most popular meats when it comes to Korean BBQ - other meats such as chicken, duck and sometimes shellfish are also eaten on occasion, but much more rarely.
BEEF
Beef is quite expensive in Korea, much more so than pork. It’s probably for this reason that Korea has so many different cuts of beef - around 120 in total - so that the whole cow can really be appreciated and enjoyed. Some of the most popular cuts include:
Deungshim (Rib Eye)
This juicy cut is a popular choice for barbecue as it’s tender, juicy and has good marbling. The deungshim is sliced very thinly so that it cooks quickly.
Anshim (Tenderloin)
Anshim is an expensive cut of meat, cut from the loin of the cow. This part doesn’t do a lot of work so it’s very tender and mild in flavour.
Chadolbaegi (Brisket)
Chadolbaegi are wafer-thin slices of beef brisket. They are full of marbling, so tend to cause the flames to spark up from underneath as soon as they hit the grill.
Galbi Sal (Rib Meat)
Galbi sal are thin strips of rib meat and are one of the most popular cuts for Korean BBQ as they’re less expensive than the other beef cuts, but still have good flavour.
Galbi (Short Ribs)
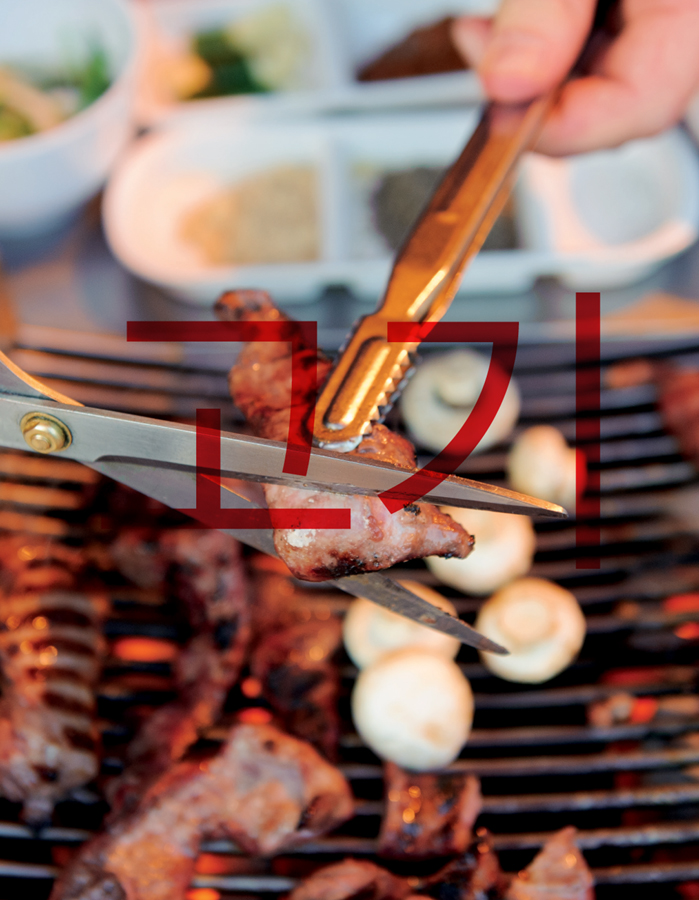
Korean beef ribs are cut differently to the ones you’d normally get in the UK. They take the middle short ribs and cut through the bone, and then open up the meat, without detaching it, so that there’s one long strip of beef attached to a chunk of bone at the end. Often when barbecuing, this chunk of bone is cut using a pair of scissors so that all the meat cooks evenly, and the rib can be enjoyed later as it has a longer cooking time.
LA Galbi (Laterally-cut Beef Ribs)
With LA galbi the beef is cut lengthways through the rib bones to create a long, thin strip of beef with a line of rib bones along the top.
PORK
Pork is the most popular meat in Korea by a long way as it’s much cheaper than beef, and most people prefer the fattier cuts because of their flavour and texture.
Samgyeopsal (Pork Belly)
Samgyeopsal translates as ‘three-layered meat’ (sam means three in Korean), due to the layers of fat. Very thinly sliced, this is the most popular Korean cut, though some people can find it a little too rich.
Ogyeopsal (Pork Belly)
Ogyeopsal translates as ‘five-layered meat,’ (o means five in Korean). It’s cut from the pork belly, just like samgyeopsal, but this part also includes an extra meaty layer with extra pig skin.
Hangjeongsal (Front Neck)
We tried hanjeongsal for the first time on our most recent trip to Korea and wish that we’d had it sooner. Hanjeongsal is cut from the front part of the neck, has lots of marbling and is incredibly tender and juicy.
Galmegisal (Skirt Meat)
Galmegisal is taken from right under the ribs. In the UK, this part would usually be ground up as sausage meat, discarded, or frozen and sent to Asia, which is such a waste as it’s our favourite cut of meat. It could easily be mistaken for beef as it’s a dark meat that’s rich in flavour and quite lean. Galmegisal should be grilled whole over a charcoal barbecue until just cooked through and still a little pink. At this point it should be cut into bite-sized pieces to finish cooking. Gareth’s favourite barbecue place in Seoul suggests dipping each piece into a lemon mustard dipping sauce followed by a little bit of roasted soybean powder, then wrapping it in a lettuce leaf with some ssamjang and a smoky barbecued mushroom. If you can get hold of some galmegisal, you have to try this - it’s so good!
KOREAN BBQ AT HOME
On the occasions that we have Korean BBQ at home, we use a small camping stove that we place in the middle of the table. We then set our table as we would for most other Korean meals, with at least five or six different banchan (which would of course include kimchi), along with a soup or stew (in our house it would be Doenjang Jjigae, and an individual bowl of rice for each person. We then lay out a big plate of assorted leaves (lollo rosso, Korean sesame leaves, baby gems and round lettuce are popular choices) and put some Ssamjang in the middle of the table, along with some hot chillies and raw garlic cloves. Koreans often eat garlic cloves raw as part of Korean BBQ, but you can also fashion a little cup out of aluminium foil, fill it with oil and then gently cook the garlic at the same time as the meat, without risking it burning.
For the barbecue itself, as well as the meat (and garlic), we would often add some other ingredients such as kimchi or mushrooms (usually enoki or king oyster), which take on a really nice, smoky flavour.
When it comes to wrapping and eating, the great thing about the Korean BBQ wrap (called ssam) is that you can really add whatever you like to your leaves. Most people though, would eat it like this:
✵ Take a lettuce leaf in the palm of your hand (I often like to layer a couple of different types of leaves)
✵ Add a small spoonful of rice (optional)
✵ If you’re eating unmarinated meat, dip it in a little sesame oil and salt
✵ If you’re eating marinated meat, put this straight on top of the lettuce leaf or rice
✵ Add a smear of ssamjang
✵ Add a slice of chilli or raw garlic on top (optional)
✵ Add a small pinch of Pa-Jeori or Mustard Pickled Onions
✵ Wrap the lettuce leaf tightly into as small a parcel as you can make it and pop the whole thing in your mouth.
As you have to stuff it in your mouth, Korean BBQ certainly doesn’t make for the most attractive date food, but it’s the best way to taste all the flavours at the same time. There’s more to Korean food than just barbecue though, so we’ve included some other examples in this section. Some are meat dishes that have been inspired by the traditional barbecue marinades, such as our Bulgogi Burger whereas others are just our favourite Korean meat or fish dishes, most of which are designed to share in the middle of the table.
Kimchi Brine
This brine can lift a meat dish from good to amazing. It’s based on the ingredients we use for kimchi, and is packed full of flavour but it also locks in all of the meat’s moisture, so the end result is super-juicy. It’s really easy to mix together, and is definitely worth making.

3 long red chillies, trimmed and halved lengthways
12 garlic cloves, minced
5-cm (2-inch) piece of fresh root ginger, peeled and very finely chopped
1½ tablespoons salt
125ml (4fl oz) fish sauce
1 litre (1¾ pints) water
Mix all the ingredients together in a large bowl.
Bulgogi Sauce
Bulgogi sauce is traditionally used to marinate beef for Korean BBQ, as it really brings out the deep, meaty flavours. Traditional bulgogi sauce recipes usually include Asian pears (or sometimes other fruits), which sweeten the sauce and help to tenderize the meat. We use apple juice here to create the same fruity flavours but make a nice clear sauce, which we use for our burgers and Philly cheesesteaks.

175ml (6fl oz) regular soy sauce
100g (3½oz) golden caster sugar
6 garlic cloves, minced
2-cm (¾-inch) piece of fresh root ginger, peeled and very finely chopped
1 tablespoon sesame oil
3 spring onions, trimmed and thinly sliced
200ml (7fl oz) clear apple juice
Mix all the ingredients together in a large bowl.
TIP: If you’re using this marinade for traditional Korean BBQ, use thin slices of featherblade or sirloin. Marinate the beef for at least 30 minutes before cooking and then grill over a high heat for 3-4 minutes, or until cooked to your liking.
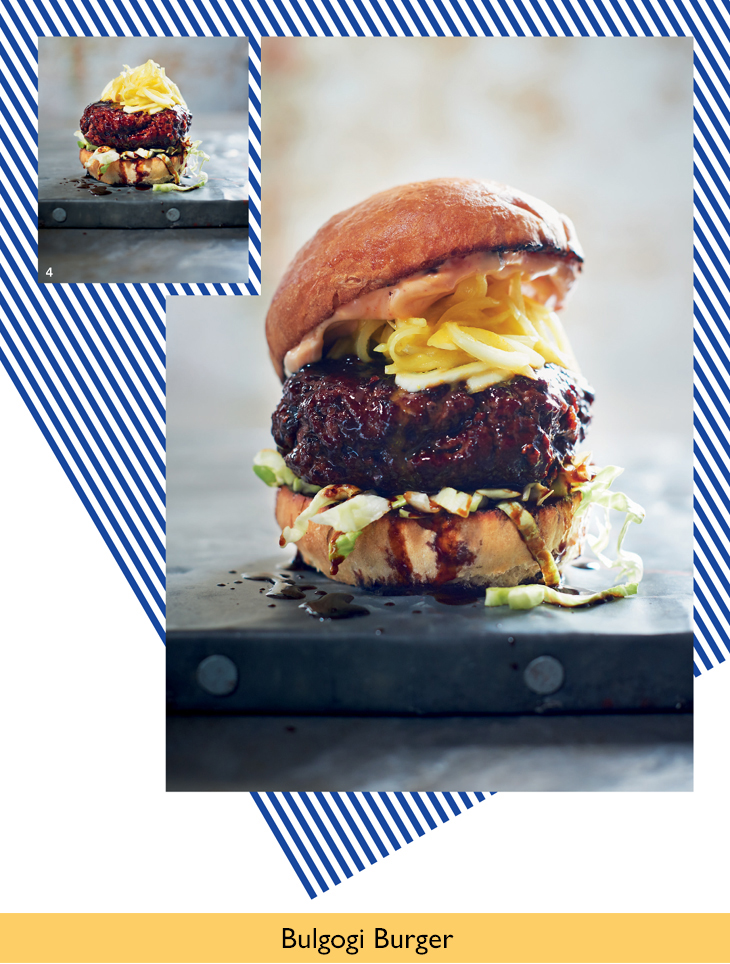
Bulgogi Burger
Our bulgogi burger is one of the bestsellers on our menu and is where it all started for us on our truck. When we first started testing this burger, we quickly found that the traditional bulgogi sauce was too thin to stick to the burger patty, making it difficult to taste the flavour of the sauce. After a lot of experimenting, we found that adding a tiny bit of xanthan gum did the trick. A natural binding agent, xanthan gum doesn’t have any flavour, it just acts to thicken the sauce - if you can’t find any, use a little cornflour mixed with water instead.

600g (1lb 5oz) minced beef (ideally coarse-ground, with 20 per cent fat)
pinch of salt
1 tablespoon vegetable oil
480ml (17fl oz) Bulgogi Sauce
½ tablespoon xanthan gum
4 bread buns
TO ASSEMBLE
4 tablespoons shredded iceberg lettuce
4 tablespoons Mustard Pickled Onions
120ml (4fl oz) Ssamjang Mayo
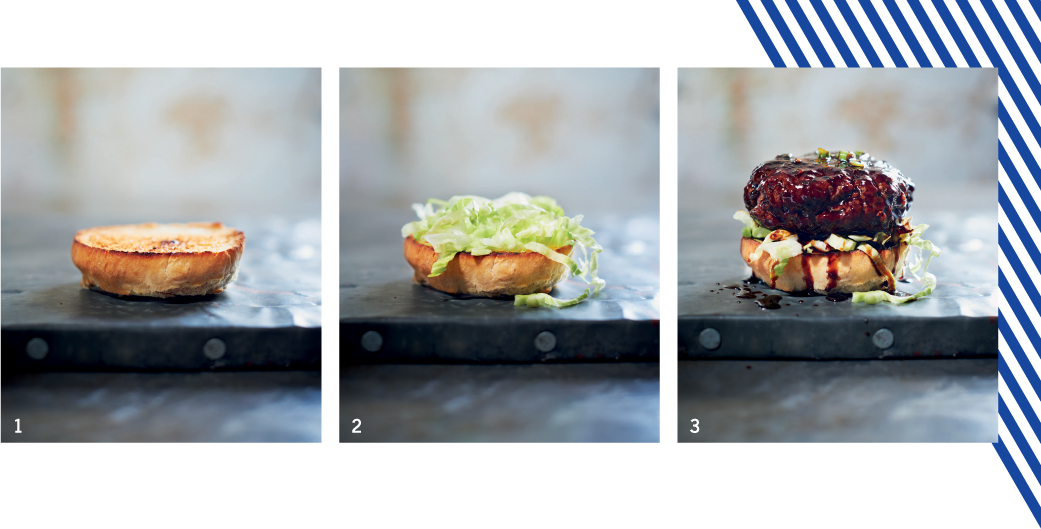
1_ Divide the minced beef into 4 even-sized portions. Being careful not to overwork the mince (otherwise the burgers will become dry), shape the portions into circular patties around 1.5 cm (⅝ inch) thick. Season both sides of each patty with the salt.
2_ Heat the vegetable oil in a large heavy-based frying pan over a medium heat. Add the burger patties and cook for 2-3 minutes on one side without moving or flipping them (you want to try and build a good crust on it for great flavour and texture). Flip the burger over and cook for a further 2 minutes on the other side, again without moving it around the pan.
3_ Put the bulgogi sauce and the xanthan gum into a small saucepan and whisk the xantham gum vigorously into the sauce. Continue whisking for 3-4 minutes until the sauce thickens then set to one side.
4_ Put the saucepan over a medium heat and keep stirring until the sauce thickens. Be careful not to boil otherwise the xanthan gum becomes gloopy.
5_ Slice the buns in half and lay them cut-side down in a large dry frying pan over a high heat, for 30-40 seconds, until warmed through and slightly charred at the edges.
6_ To assemble your burgers, arrange the shredded lettuce on the bottom bun halves. Dip the cooked patties into the warmed bulgogi sauce, then place them carefully on top of the lettuce. Pour over an extra tablespoon of the sauce (to make things really juicy), and spoon over the pickled onions. Smear the mayo over the inside of the top bun halves and pile on top of the burgers to finish.
Enjoy with plenty of napkins!
Bulgogi Philly Cheesesteak
We cooked these cheesesteaks at our very first pop-up on a cold night back in February 2014. At the time we thought they were great, but looking back we had never cooked so many dishes in such a short space of time, so we probably didn’t do them justice. Since then, we’ve been working hard to perfect the recipe and we think this is it - the bulgogi sauce helps to bring out the beefy taste of the meat and the cheese sauce is finger-licking great. It’s really important to use a chewy bread made from potato or rice flour here, as the sandwich has so much sauce that anything soft like a brioche bun will just fall apart (and be too sweet), while a baguette has too much crust. Great bread makes a great sandwich and you’ll want something to soak up all that meaty juice.

2½ tablespoons vegetable oil
generous knob of butter
1 onion, finely sliced
1 red pepper, cored, deseeded and finely sliced
150ml (¼ pint) Bulgogi Sauce
4 x 100g (3½oz) sirloin steaks, each about 1cm (½ inch) thick
4 potato or rice flour rolls, each about 10cm (4 inches) long, halved lengthways
250ml (9fl oz) Really Great Cheese Sauce
salt
TO GARNISH
2 spring onions, trimmed and thinly sliced
1 tablespoon gochugaru (Korean red chilli powder)
1_ Heat the oil and butter in a large frying pan over a medium heat. Add the onion, season with a pinch of salt and fry for 10 minutes, until the onion is silky soft and caramelized (be patient - great onions take time). Add the pepper and cook for 3 minutes until slightly softened, then remove the mix from the pan and set aside.
2_ Gently heat the bulgogi sauce in a small saucepan over a medium heat, being careful not to let it boil as it can make the sauce taste bitter. Meanwhile, heat the cheese sauce in a separate small saucepan over a medium heat, adding a little extra milk if it needs thinning. Set both aside.
3_ Place the frying pan over a very high heat until smoking. Add the steaks and cook for about 40 seconds on each side until cooked to your liking (you may need to do this in batches). Remove from the pan and leave to rest for 1 minute.
4_ While the steaks are resting, warm the bread roll halves by putting them cut-side down in the pan and heating them through for 30 seconds. Transfer the rolls to plates and spread the onion and pepper mixture over each half.
5_ Cut the steaks into 5-mm (¼-in) thick strips, add them to the saucepan with the bulgogi sauce and stir to coat evenly. Place the beef strips into the roll then spoon over the cheese sauce. Serve scattered with the spring onion slices and sprinkled with the gochugaru to garnish.

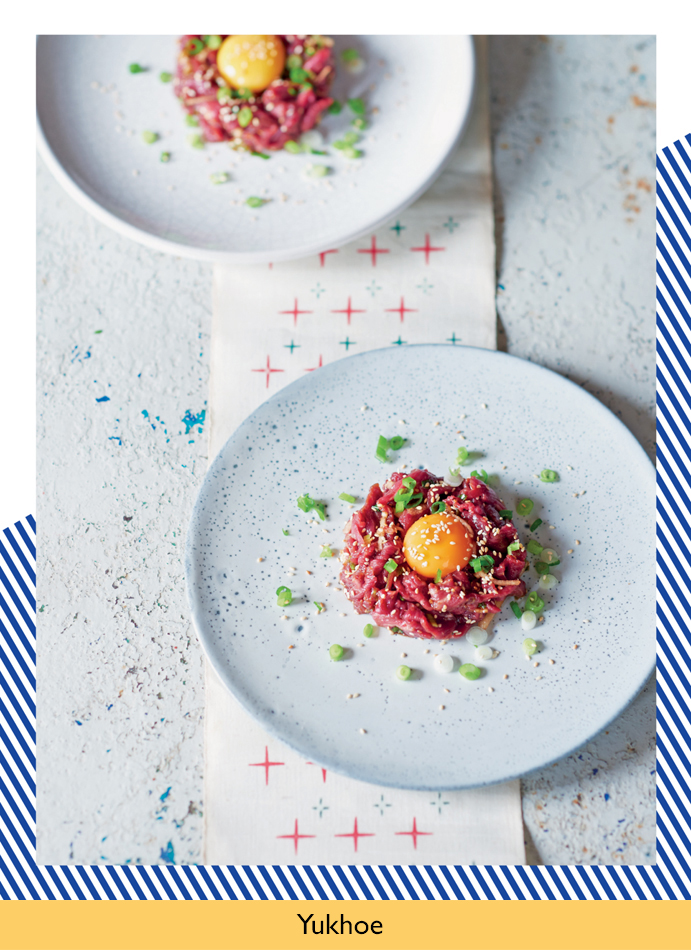
Yukhoe
KOREAN STEAK TARTARE
Though we might be a little biased, this is definitely our favourite way of eating raw beef. Basically a Korean steak tartare, yukhoe is made from raw fillet steak that has been lightly marinated to become soft and tender. Flavoured with soy and sesame, this dish is very delicate, with the egg yolk acting as a sauce that binds everything together and the lovely balance of sweet and salty really bringing out the beef’s natural flavours.

1 x 200g (7oz) fillet steak
¼ Asian pear, peeled, cored and cut into fine matchsticks
1 egg yolk
½ teaspoon sesame seeds
½ teaspoon spring onion, trimmed and finely sliced
MARINADE
1 tablespoon regular soy sauce
½ tablespoon sesame oil
1 tablespoon roasted sesame seeds
½ tablespoon clear, runny honey
1 garlic clove, minced
½ spring onion, trimmed and finely sliced
pinch of salt
1_ For the marinade, mix together all the ingredients in a bowl. Set aside.
2_ Trim the beef fillet of any fat or sinew and cut it into wafer-thin slices using a sharp knife.
3_ Add the beef slices to the marinade bowl and mix them around with your fingertips to make sure they are completely coated. Add the pear and mix together.
4_ Place a large cookie cutter or chef’s ring onto the centre of a plate. Spoon the beef mixture into the cutter or ring, pressing down on the edges. Carefully place the egg yolk in the middle.
5_ Remove the cutter or ring and serve scattered with the sesame seeds and spring onion.
LA Galbi
KOREAN-STYLE SHORT RIBS
There’s a bit of contention as to where the ‘LA’ in ‘LA Galbi’ comes from. Some say that it’s proof that the dish originated among the Korean-American population of Los Angeles, others say it comes from the word ‘lateral’, because of the way the ribs are cut. Whichever is true, this dish is a popular choice for Korean BBQ and it’s one we ate a lot as I was growing up.

1.5kg (3lb 5oz) beef ribs, cut into LA galbi-style strips (see Tip)
1 tablespoon vegetable oil
MARINADE
2 spring onions, trimmed and finely chopped
½ Asian pear, peeled, cored and finely chopped
½ onion, finely chopped
12 garlic cloves, minced
5-cm (2-inch) piece of fresh root ginger, peeled and very finely chopped
pinch of pepper
200ml (7fl oz) regular soy sauce
2 tablespoons sesame oil
3 tablespoons soft brown sugar
1_ For the marinade, mix together all the ingredients in a bowl.
2_ Place the beef rib strips in a large dish. Pour over the marinade and mix together to ensure the ribs are evenly coated. Cover with clingfilm, transfer to the refrigerator and leave to marinate for at least 4 hours, preferably overnight.
3_ When you are ready to cook, heat a cast-iron griddle pan over a medium-high heat and brush it with the vegetable oil.
4_ Using a pair of tongs, lift the strips of beef out of the marinade, shaking off any excess. Lay the strips flat on the griddle and cook for 2-3 minutes on each side until slightly charred (you may need to do this in batches).
5_ Remove the rib strips from the pan and leave to cool slightly. Cut the strips at every second bone into smaller pieces to make them easier to pick up and eat.
TIP: For LA galbi-style ribs, ask your butcher to cut them thinly across the bone. This will give you long strips of beef with small discs of bone at the top - you can use these bones later as little handles to pick the galbi up and eat them by hand.

Donkasu
CRISPY PORK ESCALOPE
There are many overlaps between Korean and Japanese cooking, and donkasu is just one example. Coming from the Japanese word tonkatsu, this hot, crispy, breaded pork escalope is served with a sticky brown sauce that tastes and looks a bit like a thicker version of Worcestershire sauce. The first time I tried it was during a summer in Jeju when I lived with my cousin Jisoo. She was about 12 at the time, and I remember her making me this dish for breakfast one morning. Admittedly, I was a little worried that she’d burn herself on the hot oil, or that the pork wouldn’t be cooked through (it was the first time I’d ever seen her cook anything) but the donkasu she made was perfectly crispy and delicious and I remember her smiling with pride as she served it up. I’ve never seen Jisoo cook anything since, so she’s either secretly a great cook, or this dish really is just that easy!

2 x 150g (5½oz) pork escalopes
1 egg, beaten
5 tablespoons plain flour
5 tablespoons panko breadcrumbs
pinch of salt
pinch of ground white pepper
200ml (7fl oz) vegetable oil
SAUCE
3 tablespoons tomato ketchup
2 tablespoons caster sugar
1 tablespoon apple vinegar
2 tablespoons regular soy sauce
2 garlic cloves, minced
½ apple, puréed
TO SERVE
¼ white cabbage, shredded
160g (5¾oz) cooked short-grain rice
1_ For the sauce, put all the ingredients in a saucepan over a medium heat, bring to a simmer and cook, stirring occasionally, for 5-6 minutes until the sauce has thickened and easily coats the back of a wooden spoon. Remove from the heat and set aside.
2_ Using a rolling pin, pound the pork escalopes until they are about 1cm (½ inch) thick.
3_ Pour the beaten egg onto a large plate. Put the flour on a separate plate, smoothing it flat, then do the same with the breadcrumbs on a third plate.
4_ Season the pork escalopes on both sides with the salt and pepper. Take an escalope and dip it in the flour, then turn over to coat both sides. Shake off any excess flour, then repeat the process with the beaten egg and, lastly, the breadcrumbs, pressing the crumbs into the escalope with your fingertips to ensure they stick to the meat. Repeat with the second escalope.
5_ Heat the oil in a large frying pan over a medium heat to the point where a few breadcrumbs dropped into the pan will cause the oil to start to bubble. Gently lay the pork escalopes into the frying pan (to avoid overcrowding the pan you may need to do this in batches) and fry for 6-8 minutes, turning carefully halfway through cooking, until golden brown all over. Carefully remove the escalopes from the pan, transfer to a plate lined with kitchen paper to soak up any excess oil and leave to cool for 2 minutes.
6_ To serve, gently heat the sauce and spoon the rice into bowls. Cut the escalopes diagonally into 1-cm (½-inch) pieces, pushing the knife directly down on top of the pork escalope rather than sliding it back and forth to avoid knocking off any of the crispy breadcrumbs, and lay over the cooked rice. Pour over the sauce and accompany with the shredded cabbage.
TIP: Panko breadcrumbs can be found in most Asian supermarkets or easily online. If you can’t get hold of them, you can use regular dried breadcrumbs instead, though you won’t get quite the same crunch.
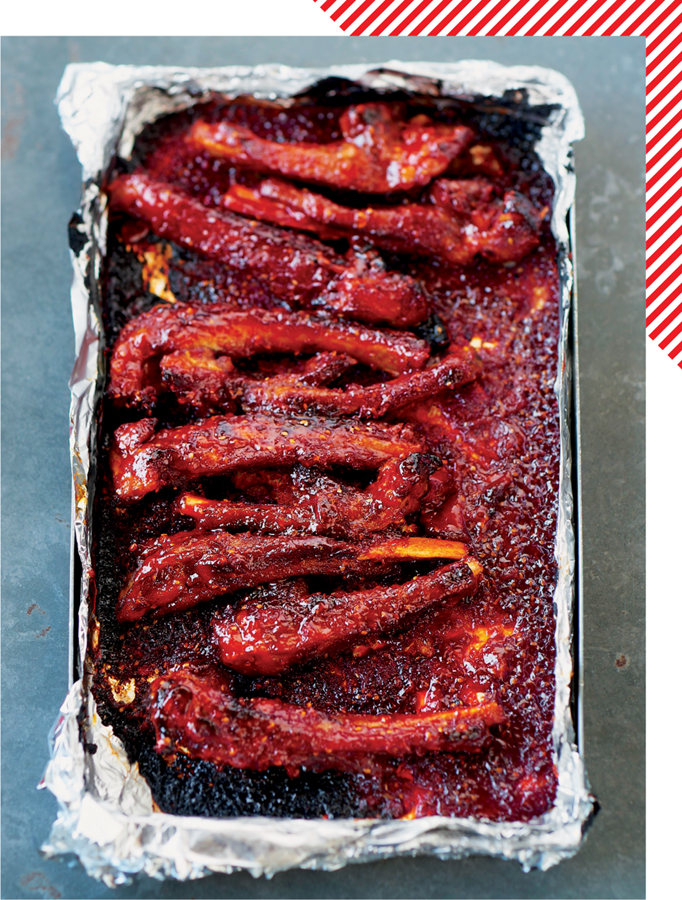
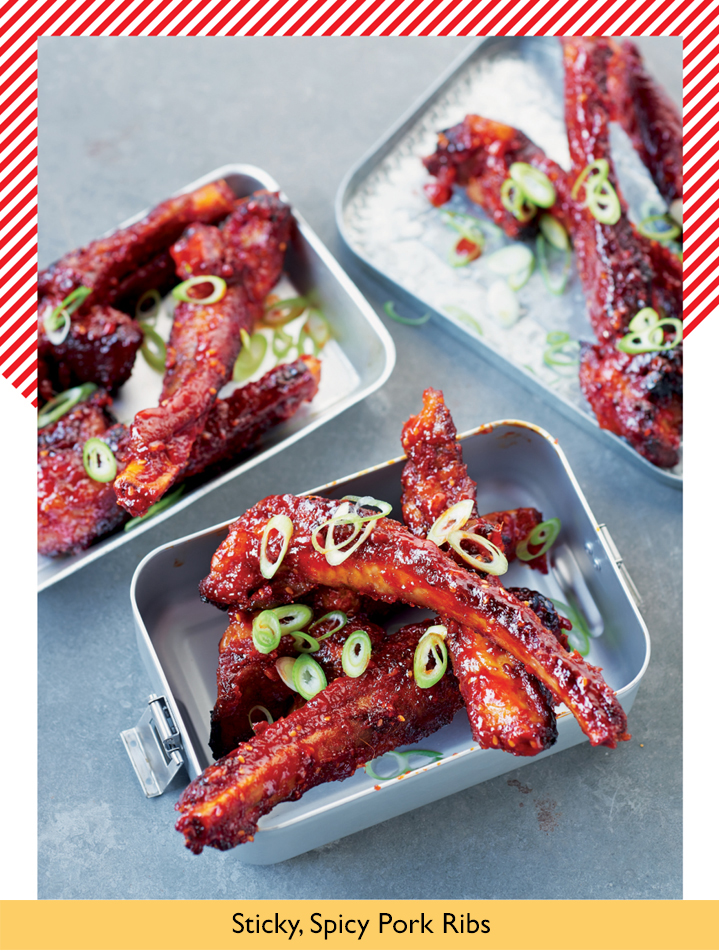
Sticky, Spicy Pork Ribs
These ribs are a tender, juicy, joy to eat. In fact, they’re so good, we’ve even managed to convince our friends to help us move house on the promise of payment with them a couple of times. If you want to use these ribs as a new form of currency like this, just boil them up and pop them in a ziplock bag full of the sauce the night before, then finish them in your new oven as you kick back and enjoy a well-deserved beer the following day.

500g (1lb 2oz) pork spare ribs
50g (1¾oz) fresh root ginger, roughly chopped
5 whole garlic cloves, peeled
125ml (4fl oz) light soy sauce
2 spring onions, trimmed and finely chopped, to garnish
SAUCE
1 tablespoon sesame oil
4 tablespoons gochujang (Korean red chilli paste)
4 tablespoons apricot jam
1 tablespoon regular soy sauce
1 tablespoon honey
1 tablespoon roasted sesame seeds
1 tablespoon white rice vinegar
8 garlic cloves, minced
5-cm (2-inch) piece of fresh root ginger, peeled and very finely chopped
1_ Put the ribs in a large saucepan or stockpot with the ginger, garlic, soy sauce and enough water to cover. Bring to the boil, reduce the heat to a simmer and leave to cook gently for 1½ hours, until the ribs are tender and cooked through.
2_ Meanwhile, combine all the sauce ingredients in a bowl and mix together well. Line an oven tray with foil (this will make everything a lot easier to wash up later) and preheat the oven to 200°C (400°F), Gas Mark 6.
3_ Arrange the cooked ribs on the prepared tray and brush with the sauce to coat evenly. Roast in the oven for 20 minutes, turning and basting the ribs with more sauce halfway through cooking.
4_ Remove the tray from the oven and put the grill on to high. Brush the ribs once again with the remaining sauce, then grill for 2-3 minutes until the sauce is sticky and is just beginning to char at the edges. Scatter over the spring onions and serve.
Jeyuk Bokkeum
SWEET AND SPICY PORK BELLY BUNS
We sell this classic Korean spicy stir-fried pork dish on our trailer but make a few small changes to turn it into street food. Firstly we cut the pork much finer, into thin matchsticks, so that the fat melts away and it’s easier to eat from a bread bun. We also remove the veg, so that the bun is all about the pork, and then we top each bun with a good handful of Mooli Slaw.

1kg (2lb 4oz) pork belly, cut into 5-mm (½-inch) slices
1 tablespoon vegetable oil
1 carrot, thinly sliced
¼ white cabbage, thinly sliced
½ onion, thinly sliced
MARINADE
280g (10oz) gochujang (Korean red chilli paste)
6 garlic cloves, minced
1-cm (½-inch) piece of fresh root ginger, peeled and very finely chopped
4 teaspoons sesame oil
270g (9¾oz) golden caster sugar
6 tablespoons regular soy sauce
TO SERVE
6 white burger buns, halved
1_ For the marinade, mix together the gochujang, garlic, ginger, sesame oil and sugar in a large bowl, then stir in the soy sauce to loosen and thin the mixture out.
2_ Cut the pork belly slices into pieces approximately 10cm (4 inches) long,
3_ Add the pork pieces to the marinade bowl and mix together with your hands to ensure they are evenly coated in the marinade (it may be easiest to do this a little at a time).
4_ Heat the vegetable oil in a large frying pan over a high heat, add the carrot, cabbage and onion and cook, stirring, for 3-4 minutes until softened. Reduce the heat to medium, then add the pork and marinade mixture to the pan. Cook, stirring continuously to prevent the marinade from catching on the bottom of the pan, for 15-20 minutes or until the pork is cooked through. Share between the burger buns and serve immediately.
Twice-cooked Crispy Pork Belly
This recipe makes the ultimate Sunday roast - think juicy, tender meat, lightly flavoured with doenjang and honey, alongside loads of crispy, crunchy crackling. It works brilliantly eaten wrapped inside a lettuce leaf, Korean-style, or (Gareth’s favourite) piled on top of creamy mash with lots of Zingy Green Sauce. Whichever way you choose, it’s a real crowd-pleaser.

1 x 1kg (2lb 4oz) pork belly piece
1 tablespoon vegetable oil
1 tablespoon salt
STOCK
150g (5½oz) fresh root ginger, roughly sliced
10 whole garlic cloves
2 tablespoons light soy sauce
2 tablespoons doenjang (Korean soybean paste)
2 long red chillies, trimmed and sliced in half lengthways
1 onion
1 tablespoon black peppercorns
MARINADE
1½ tablespoons doenjang (Korean soybean paste)
8 garlic cloves, minced
1-cm (½-inch) piece of fresh root ginger, peeled and very finely chopped
1½ tablespoons honey
1 tablespoon apple vinegar
1_ Put the pork belly piece in a large heavy-based saucepan or stockpot with all the stock ingredients and enough water to cover. Bring to the boil and simmer for 30 minutes, then remove the pork from the stock and leave to drain. Pat dry thoroughly with kitchen paper.
2_ Using the tip of a sharp knife score the skin of the pork belly in a crisscross pattern, being careful not to cut through to the meat. Transfer to the refrigerator and leave for 4-6 hours or preferably overnight to rest.
3_ When ready to cook, preheat the oven to 220°C (425°F), Gas Mark 7.
4_ Mix together the marinade ingredients in a small bowl. Place the pork belly skin-side up on a large sheet of aluminium foil and, using a pastry brush, coat the sides and the bottom of the meat only with marinade (be careful not to get any on the skin as it burns easily). Mix the vegetable oil and salt together in a small bowl and brush over the skin.
5_ Fold the aluminium foil around the pork belly to cover the marinated sides, leaving the skin uncovered. Place in the oven on the highest shelf and roast for 30 minutes, then reduce the heat to 180°C (350°F), Gas Mark 4 and roast for a further 30 minutes.
6_ To make really crispy crackling, the pork needs a final blast of heat, so turn the temperature back up to 220°C (425°F), Gas Mark 7 and cook for 40 minutes more, until the skin is golden brown and crunchy all the way through.
7_ Remove the pork from the oven and leave to rest for 30 minutes before serving.
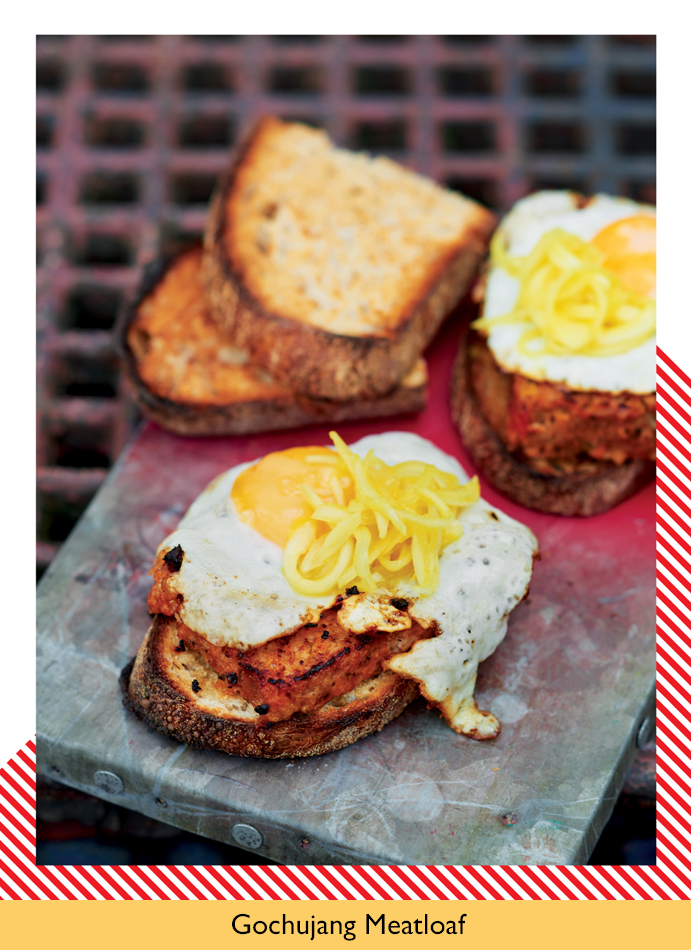
Gochujang Meatloaf
I’m a little ashamed to admit that the first time we made this meatloaf, I ate it almost in its entirety, all by myself. It’s one of those dishes that is incredibly versatile and can be enjoyed either hot or cold, while the mix also makes great meatballs or sausages too. My favourite way to eat it is straight out of the refrigerator, cut into thick slices with a pile of our Mustard Pickled Onions, though it is also great seared quickly in a pan for crispy edges, then eaten in a bread bun with a runny fried egg. Make it on a weekend and you’ve got breakfast, lunch and dinner sorted for the next few days.

500g (1lb 2oz) minced pork
3 spring onions, trimmed and finely chopped
6 garlic cloves, minced
1 teaspoon salt
1½ tablespoons gochujang (Korean red chilli paste)
pinch of pepper
50g (1¾oz) fresh breadcrumbs
½ onion, finely chopped
1 egg
GLAZE
1½ tablespoons apricot jam
1 tablespoon gochujang (Korean red chilli paste)
½ tablespoon honey
1 teaspoon regular soy sauce
1 garlic clove, minced
¼ teaspoon sesame oil
½ tablespoon apple vinegar
1_ Preheat the oven to 180ºC (350ºF), Gas Mark 4. Grease a 450g (1lb) loaf tin.
2_ For the glaze, mix together all the ingredients in a small bowl. Set aside.
3_ Put all the meatloaf ingredients in a large bowl, then stir together with a wooden spoon until well combined. Tip the meatloaf mix into the loaf tin, pressing it down into the corners and using a knife to smooth out and even the top. Bake for 45 minutes, until the meatloaf starts to shrink from the edges of the tin.
4_ Remove the meatloaf from the oven and, using a skewer, poke holes all over the top. Pour over the glaze (this will sink into and flavour the meat as well as forming a lovely topping) and put it back in the oven for a further 20 minutes, until the glaze becomes nice and sticky. Serve hot or cold (this will keep in the fridge, covered, for 3 days.
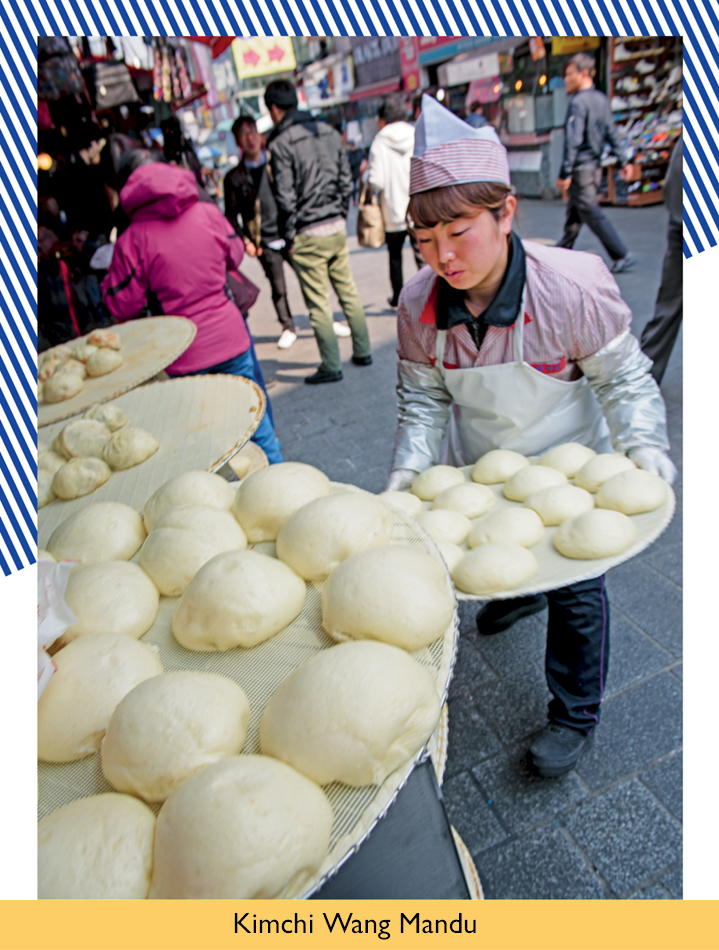
Kimchi Wang Mandu
KIMCHI AND PORK STEAMED BUNS
There’s something a little magical about watching steamed buns being made in the market - the way that they’re hidden from sight until they’re just cooked, and then revealed in clouds of billowing steam as the lids are lifted from the steamers. These buns can be filled with anything, sweet or savoury, although kimchi and pork has always been my favourite choice as the salty, spicy filling is the perfect contrast to the plain, soft, pillowy buns.

vegetable oil, for greasing
DOUGH
250ml (9fl oz) warm water
2½ teaspoons active dried yeast
3 tablespoons caster sugar
420g (15oz) plain flour
1½ teaspoons baking powder
FILLING
40g (1½oz) dangmyeon sweet potato noodles
1 tablespoon vegetable oil
300g (10½oz) minced pork
pinch of salt
pinch of pepper
150g (5½oz) matured Baechu Kimchi, drained and finely chopped
1 garlic clove, minced
2 spring onions, trimmed and finely chopped
1 long red chilli, trimmed and finely chopped
1 tablespoon regular soy sauce
170g (6oz) firm tofu
1_ To make the dough, in a small bowl, stir together the water, yeast and 1 tablespoon of the sugar. Set aside for 10 minutes to allow the yeast to activate.
2_ In a large bowl, mix together the flour, baking powder, salt and remaining 2 tablespoons of sugar. Slowly add the yeast mixture to the bowl and stir together with a wooden spoon to form a dough.
3_ Tip the dough out onto a lightly floured surface and knead for 10 minutes until smooth and elastic. Brush the inside of a mixing bowl with oil and add the dough. Brush the dough lightly with oil, cover loosely with clingfilm and leave in a warm place for 1 hour to prove until doubled in size.
4_ While the dough is proving, make the filling. Soak the sweet potato noodles in enough boiling water to cover for 10 minutes. Drain and rinse under cold water to cool, then cut into 5-mm (¼-inch) lengths. Heat the vegetable oil in a large frying pan over a medium-high heat, add the minced pork and fry for 2-3 minutes, stirring occasionally, until browned all over. Add the salt, pepper, kimchi and garlic to the pan, cook for 2 minutes more, then add the spring onions, chilli and soy sauce. Crumble over the tofu and cook for a further 2 minutes, using the back of a wooden spoon to break up any large lumps of tofu, then add the sweet potato noodles and mix everything together well. Set aside to cool.
5_ Once proved, gently tip the risen dough onto a lightly floured surface and knead for 5 minutes to knock back any air bubbles. Brush the inside of the bowl with some more oil and return the dough to the bowl, then brush the top of the dough with a little more oil and cover it again loosely with clingfilm. Leave to prove for another 15 minutes.
6_ Once the dough has proved for the second time, tip it back onto the floured surface and knead for 5 minutes to loosen it up again. Shape the dough into a long sausage, then divide it into eight equal-sized pieces. Roll each piece out into a thin circle about 12cm (4½ inches) in diameter.
7_ Flour your hands and take a piece of dough so it lies flat across your palm. Place 2-3 tablespoons of your cooled filling into the middle of the dough, then pull one edge of your dough to the centre and brush the outside edge with water. Continue pulling the edges of the dough into the centre, working around your bun, dabbing it with a little more water each time to stick the dough down. Once all the edges are at the centre, twist the middle of the bun to seal.
8_ Cut a sheet of greaseproof paper into eight 7-cm (2¾-inch) squares and brush each with a little vegetable oil. Lay these on the base of a bamboo or metal steamer, then place a bun (seal-side up) on top of each square, ensuring there is plenty of room between them to allow for expansion while cooking. Steam for 15 minutes, then turn off the heat, remove the lid and leave to stand for 5 minutes to allow the excess steam to dissipate.
Serve with Cho Ganjang for dipping.
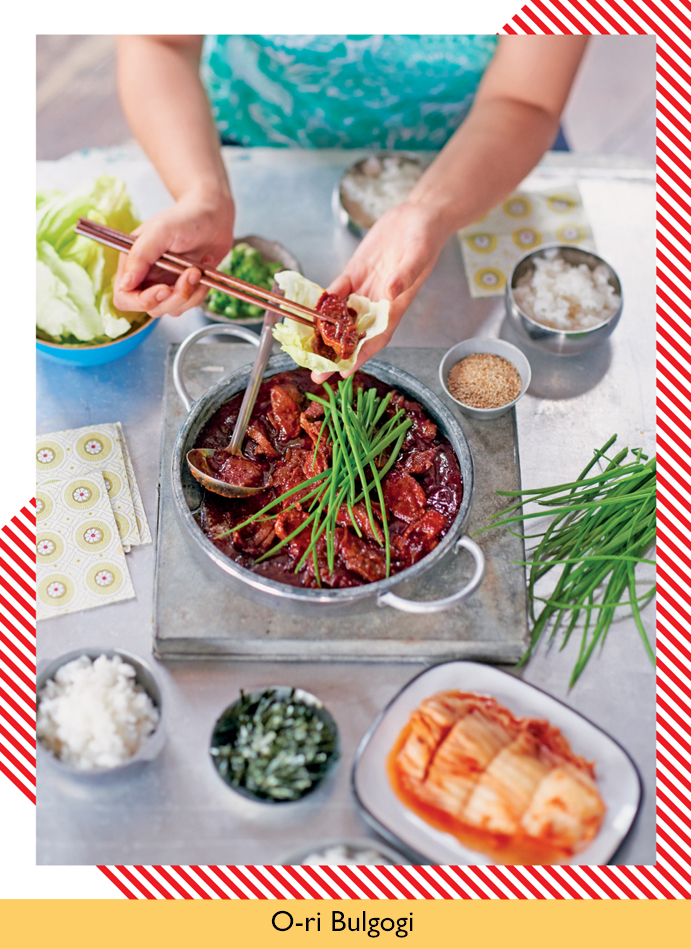
O-ri Bulgogi
SPICY SHARING DUCK WITH FRIED RICE
This dish will always be pretty special to us. We were introduced to it on Gareth’s first trip to Busan by my uncle. We were in a restaurant, sitting on the floor, on low tables with the duck simmering in a huge dish in the middle of the table. My family is pretty loud when we all get together, so Gareth was just sitting eating, taking in the cacophony of noise around him, when all of sudden and much to his surprise, his bowl of rice was whisked away from him. In fact, all the rice bowls around the table were collected and thrown into the remaining duck sauce, along with a handful of dried seaweed. The little bits of leftover duck, the sauce, rice and seaweed were all fried together until the rice began to catch and become a little crispy, before being served back in the original rice bowls. This is the best part of this dish - the rice soaks up all the flavours from the duck and also gets a slightly smoky flavour, as the sauce begins to catch - it’ll be the best fried rice you’ll ever have and it’s the reason that O-ri Bulgogi became Gareth’s favourite Korean dish.

450g (1lb) skin-on duck breast, cut into 5-mm (¼-inch) thick slices
1 onion, finely sliced
1 tablespoon vegetable oil
30g (1oz) chives, roughly chopped
200g (7oz) cooked short-grain rice, plus extra to serve
1 tablespoon sesame oil
2 dried gim (nori) seaweed sheets, sliced into fine matchsticks
2 spring onions, trimmed and finely sliced
MARINADE
12 garlic cloves, minced
3 tablespoons gochujang (Korean red chilli paste)
1 tablespoon gochugaru (Korean red chilli powder)
2 tablespoons apricot jam or maesil (Korean plum extract)
3 tablespoons regular soy sauce
1 teaspoon sesame oil
1_ Mix the marinade ingredients together in a large bowl. Add the duck slices and onion to the bowl and mix together well so that everything is evenly coated in the marinade. Cover with clingfilm, transfer to the refrigerator and leave to marinate for at least 2 hours, preferably overnight.
2_ When you are ready to cook, pour the vegetable oil into a heavy-based frying pan over a medium heat. Add the marinated duck mixture to the pan, and fry for 4 minutes, stirring and turning the duck pieces as you go, until the duck is just cooked through and the sauce has reduced slightly and become sticky. Stir through the chives until just wilted, then transfer the still-sizzling pan to a heatproof stand in the middle of the table. Serve with rice.
3_ Once you have worked your way through most of the duck and are left with the sticky remains of the sauce and just a few small pieces in the pan, return it to the stove over a medium heat. Add the rice, sesame oil, seaweed and spring onions, stir everything together well, then press the mix against the bottom of the pan with the back of a wooden spoon to create an even layer. Leave for 2-3 minutes to crisp (and catch a little) on the bottom, then return the pan to the table and enjoy.
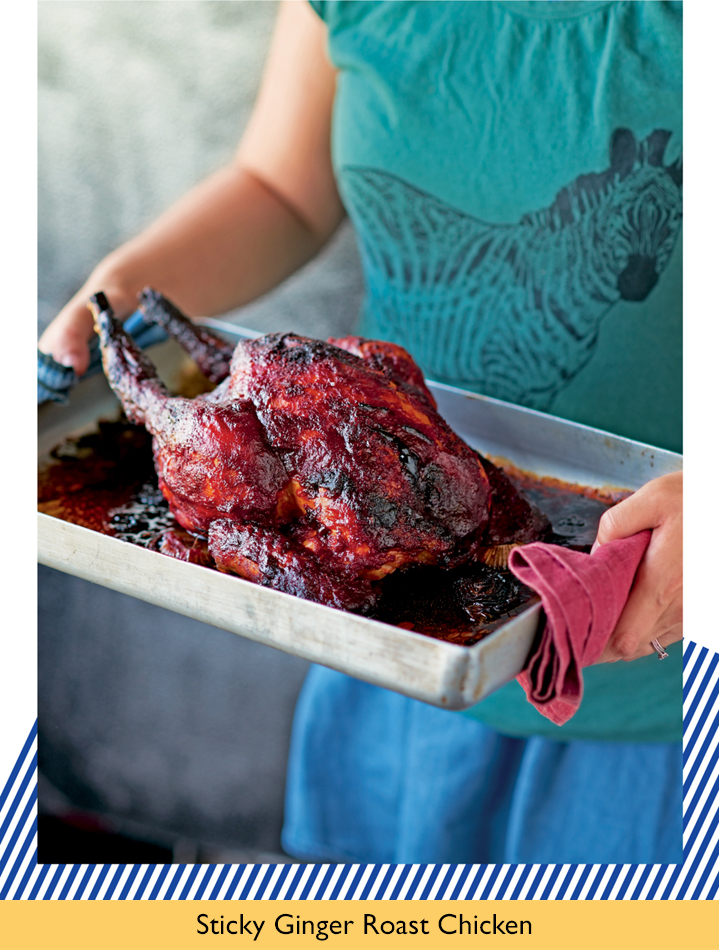
Sticky Ginger Roast Chicken
When I think of this roast chicken, I always picture it as a real weekend treat, but it’s so simple you could really just as easily have it as a mid-week dinner. Just remember to marinate it and leave it in the refrigerator the night before to keep things quick. You’ll be rewarded with super-juicy chicken, slippery sweet onions and a spicy ginger sauce - all you’ll need to finish it will be a simple bowl of steamed rice or veg. Workdays can feel long, so it’s nice to know you’ll have something delicious for dinner, just waiting to be popped in the oven when you get home.

2 onions
1 whole chicken, about 1.5kg (3lb 5oz)
50g (1¾oz) fresh root ginger, roughly sliced
4 whole garlic cloves
2 spring onions, trimmed and cut into thirds
MARINADE
5 tablespoons gochujang (Korean red chilli paste)
1-cm (½-inch) piece of fresh root ginger, peeled and very finely chopped
6 garlic cloves, minced
150ml (¼ pint) ginger beer
2 tablespoons clear runny honey
2 tablespoons light soy sauce
½ tablespoon salt
1_ Combine all the marinade ingredients in a small bowl. Slice the onions into 1-cm (½-inch) rounds and lay them on the bottom of a roasting tin.
2_ Loosely stuff the cavity of the chicken with the ginger slices, garlic cloves and spring onions. Place the chicken in a large roasting tray and pour over half the marinade to cover, making sure to rub it into the creases of the wings and legs as well as the underside of the chicken. Then place the chicken into the roasting tin with the onions and transfer to the refrigerator to marinate for at least 1 hour.
3_ When you are ready to cook, preheat the oven to 190°C (375°F), Gas Mark 5. Place the chicken tray on the middle shelf and roast for 1¼ hours, brushing it with a little of the remaining marinade every 10 minutes or so.
4_ Remove the chicken from the oven and pour over any leftover marinade. Turn the oven up to 220°C (425°F), Gas Mark 7, return the chicken to the oven and roast for a further 10-15 minutes, until the skin is nicely golden and sticky and the chicken is cooked through (if it looks like it might be getting a bit too brown at any point, cover it loosely with aluminium foil and continue cooking).
5_ Leave the chicken to rest for half an hour before carving. Serve with the onions, spooning a little of the sweet juices from the bottom of the roasting tin over each portion.
Ramyun Chicken Buns
Using instant noodles here to create a coating for the fried chicken not only gives these buns extra crunch, it also helps to lock in all that moisture. The result is really juicy, crispy chicken that’s the perfect contrast to a soft bread bun. I’ve eaten the Shin brand of Ramyun instant noodles - which is known for being pretty spicy - for as long as I can remember. A few Koreans I know call the little sachet of spice mix they come with ‘magic dust’, and add it to their cooking of other dishes for an extra kick. If you’re a chilli lover, sprinkle a little of it over the cooked chicken thighs for extra heat when serving.

6 boneless, skinless chicken thighs
1 litre (1¾ pints) Kimchi Brine
2 x 120g (4½oz) ramyun Korean instant noodle packets
2 eggs
vegetable oil, for deep-frying
TO SERVE
6 burger buns
¼ iceberg lettuce, shredded
6 tablespoons mayonnaise, either shop-bought or homemade
6 tablespoons Korean Sweet Chilli Sauce
1_ Put the chicken thighs in a large bowl and pour over the brine. Transfer to the refrigerator and leave to brine for 1 hour.
2_ After 1 hour, drain the chicken thighs and rinse them under cold running water to remove the excess salt from the brine, then pat dry with kitchen paper.
3_ Break the instant noodles into small chunks and put in a food processor. Pulse until the noodles are fully broken down and are a similar size to breadcrumbs, then tip the noodle ‘crumbs’ onto a large plate. Crack the eggs into a small bowl and whisk together.
4_ Half-fill a large saucepan or deep-fryer with vegetable oil and preheat to 180°C (350°F), or until a cube of bread browns in 30 seconds.
5_ Dip a chicken thigh first in the egg and then in the noodle ‘crumbs’, ensuring it is completed coated. Shake off any excess noodle coating, then repeat with the remaining thighs.
6_ Lower the chicken thighs carefully into the hot oil and cook for 6-7 minutes. Lift the chicken out of the oil and leave to rest for 5 minutes, then carefully lower back into the oil and fry for a further 3-4 minutes, until the noodle coating is golden brown and crunchy. Drain the chicken on kitchen paper to get rid of the excess oil.
7_ Slice the buns in half and lay them cut-side down in a large dry frying pan over a high heat, for 30-40 seconds, until warmed through and slightly charred at the edges.
8_ To assemble, arrange the shredded lettuce on the bottom bun halves. Spoon over the mayo, then top each bun half with a chicken thigh. Dollop over the chilli sauce, sandwich together with the bun lid and enjoy in big, messy mouthfuls.

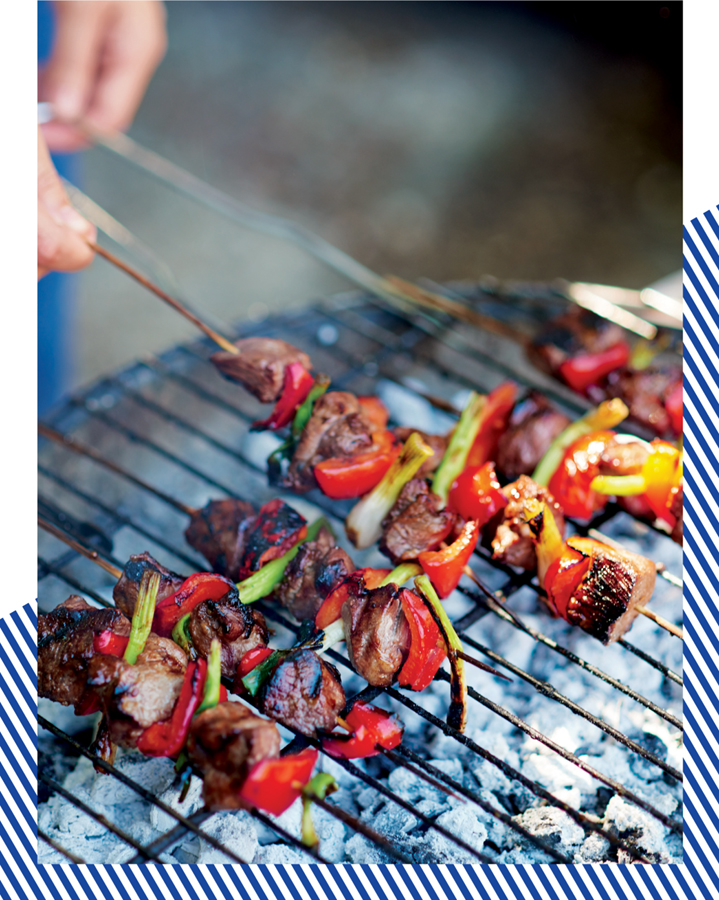
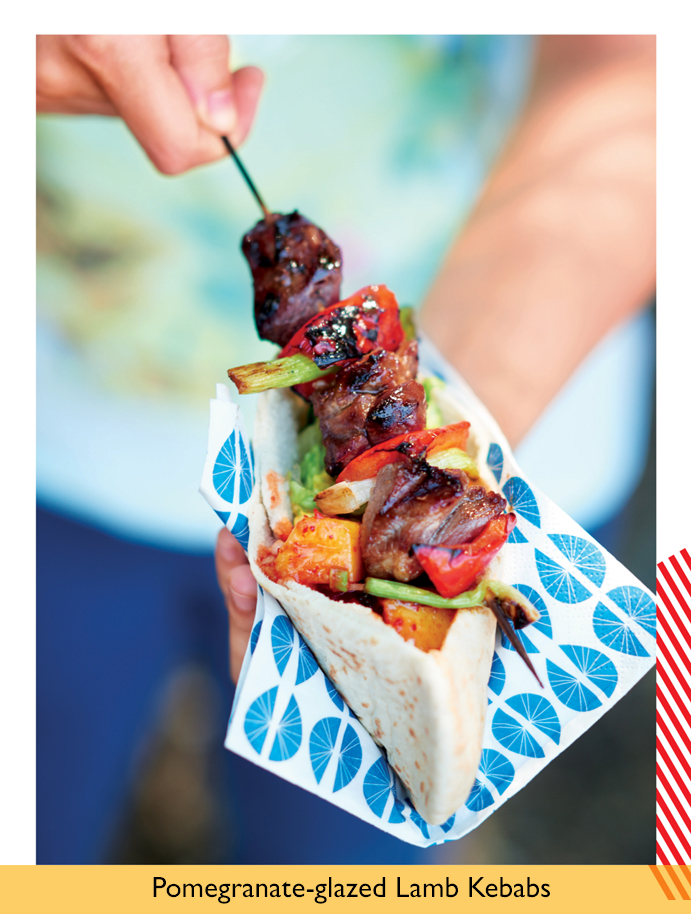
Pomegranate-glazed Lamb Kebabs
Kebabs have become increasingly popular in Seoul. We’d noticed a few kebab shops popping up in the expat district of Itaewon some years back and now, as street food, kebabs have started to make their way into mainstream areas such as Myeong Dong too. This isn’t much of surprise - as kebabs are essentially just grilled meats they work really well with all the typical Korean accompaniments. The pomegranate juice here gives this marinade a tart fruitiness, while the mango kimchi brings a really nice sweetness to the lamb. It’s the kind of messy food that feels like it should be really bad for you, though as fast food goes, it’s actually a pretty healthy option.

625g (1lb 6oz) boneless lamb leg, cut into 3-cm (1¼-inch) cubes
4 spring onions, trimmed and cut into thirds
1 red pepper, cored, deseeded and cut into 3-cm (1¼-inch) cubes
12 garlic cloves, minced
4 tablespoons regular soy sauce
125ml pomegranate juice
4 tablespoons clear runny honey
2 teaspoons apple vinegar
1 tablespoon vegetable oil
4 bamboo skewers, soaked in water for at least 10 minutes
TO SERVE
4 pitta breads
¼ iceberg lettuce, shredded
125g (4½oz) Mango Kimchi
250ml (9fl oz) natural yogurt
1_ Mix all the ingredients except the vegetable oil together in a large bowl, cover with clingfilm and leave in the refrigerator to marinate for at least 30 minutes.
2_ When you are ready to cook, thread the pepper, lamb and spring onion pieces onto the skewers in an alternating pattern, leaving about 5cm (2 inches) empty at either end (this will give you something to hold onto as you turn them during cooking). Set the remaining marinade to one side.
3_ Brush a cast-iron griddle pan with the vegetable oil and place over a medium-high heat.
4_ Carefully lay the kebabs on the griddle and cook for 3-4 minutes on each of the four sides, brushing occasionally with the marinade, until the lamb is nicely browned and cooked to your liking. Remove from the heat and set aside for 2 minutes to rest.
5_ While the kebabs are resting, add the pitta breads to the pan to heat through for 30 seconds on each side.
6_ To serve, split the pitta breads open and stuff each with a handful of lettuce. Slide the kebab pieces off the skewers and pile into the pitta breads along with the mango kimchi and yogurt.

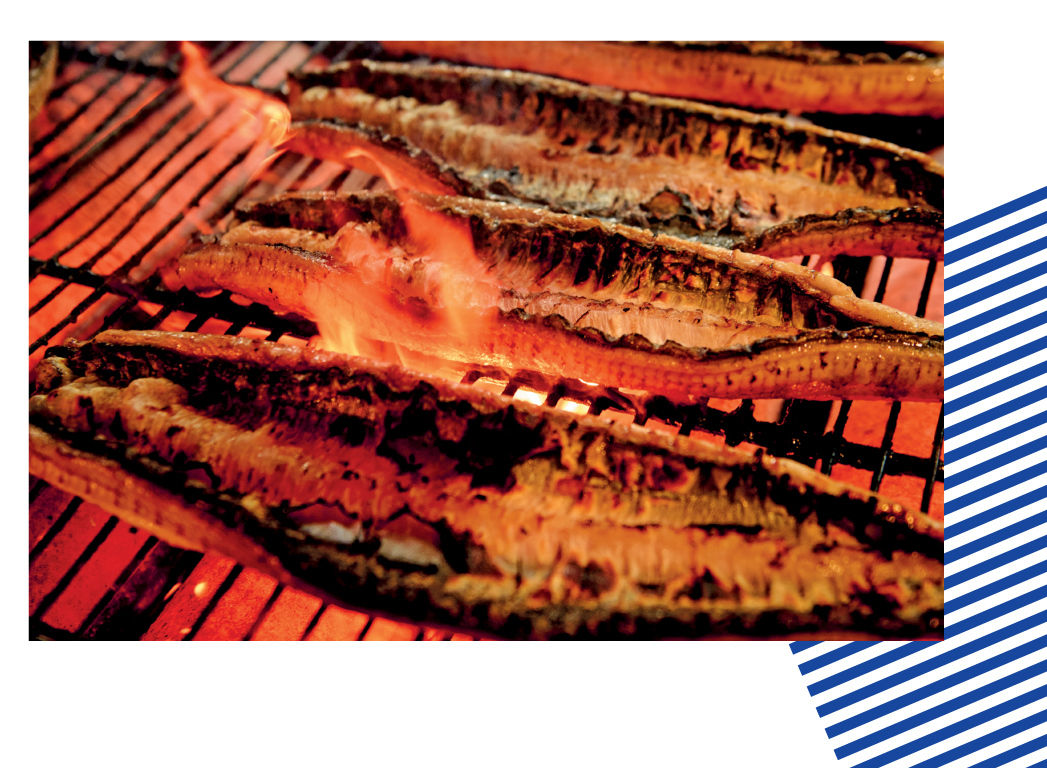
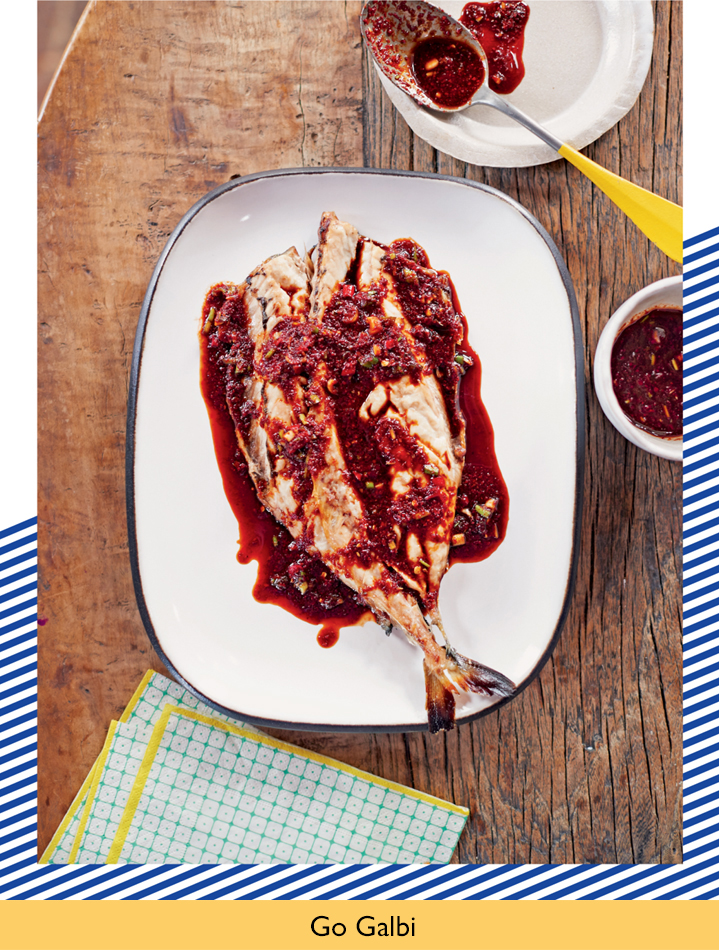
Go Galbi
GRILLED MACKEREL
Translating as ‘mackerel ribs’, this is a typical Busan dish, where the mackerel goes really crispy, so you can pick the fish up by the spines and eat the flesh as you would a meat rib. Though not for the faint-hearted, when the bones are really crispy like this you can even eat them whole.

1 mackerel, about 375g (13oz)
pinch of salt
2 tablespoons Yangnyum Jang, to serve
1_ Cut along the belly of the mackerel with a sharp knife or scissors, remove the guts and wash the cavity clean. Remove the head and fins.
2_ Working from the inside of the mackerel belly, run a knife down either side of the spine until you reach the tail, then pull the fish open like the pages of a book, keeping the spine intact.
3_ Cover a large baking sheet with aluminium foil and preheat the grill to high.
4_ Place the mackerel on the foil skin-side down and sprinkle over the salt. Grill for 5 minutes, then flip the mackerel over and grill flesh-side down for a further 5 minutes until the skin is browned and the fish is cooked through.
5_ Transfer to a large plate and serve with the yangnyum jang spooned over.
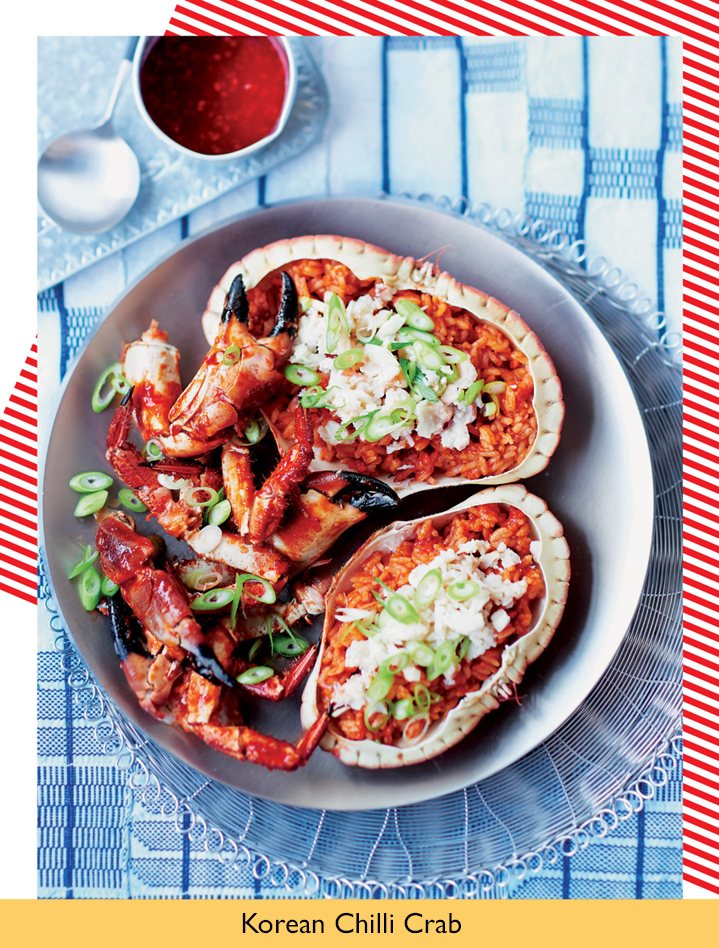
Korean Chilli Crab
My family have been going to Jin Go Gae, a Korean restaurant in south-west London’s New Malden, for the past five or six years. It’s not particularly conveniently located and it’s pretty far from any station, but it’s always full, as it’s known to be one of the best and most authentic Korean restaurants around. In fact, my parents still travel up from Portsmouth to visit it almost every month. One of my favourite dishes there is a spicy marinated raw crab dish called yangnyum gejang - in Korea, this dish is nicknamed ‘the rice thief,’ because the sauce is so good that you keep going back for more rice to mop it up. Though I love it, raw crab isn’t for everyone, so this is our version. It’s addictive, messy and delicious.

1 large whole brown crab, or 2 small crabs, about 1.5kg (3lb 5oz) in total
100g (3½oz) cooked short-grain rice
2 spring onions, trimmed and thinly sliced, to garnish
SAUCE
2 tablespoons regular soy sauce
4 tablespoons gochugaru (Korean red chilli powder)
1 tablespoon corn syrup
5-mm (¼-inch) piece of fresh root ginger, peeled and very finely chopped
1 tablespoon sesame oil
1 tablespoon mirin
4 garlic cloves, minced
1 tablespoon fish sauce
1 tablespoon apricot jam
1 tablespoon white rice vinegar
1 tablespoon roasted sesame seeds
1_ If you’re cooking a live crab, put it in the freezer for 20 minutes to numb it prior to cooking.
2_ Fill a large pot with water and bring it to a vigorous boil. Lower in the crab, making sure that it is fully submerged and cook for 12 minutes. Remove the crab from the water and set aside to cool.
3_ While the crab is cooling, make the sauce by mixing together all the ingredients in a bowl.
4_ Once the crab is cooled, remove the legs and claws by gently twisting them off from where they meet the body. Set aside 3 tablespoons of the sauce and put the remaining sauce in a large bowl. Crack each of the legs and claws with a nutcracker or by hitting them swiftly with a large knife and then put these into the bowl with the sauce.
5_ Lay the crab on its back and carefully push a knife between the shell and central body part or ‘purse’ of the crab to prise it open. Set the purse aside. Drain away any water left in the shell, then remove and discard the circle of grey feathery gills (‘dead man’s fingers’).
6_ Using a teaspoon, scoop out the remaining brown crabmeat from the inside of the shell and spoon it into a small bowl. Mash the crabmeat with a fork, add the rice and the remaining sauce and mix together thoroughly. Set aside.
7_ Rinse the shell out under running water and dry thoroughly.
8_ Cut the crab purse into quarters using a large knife. Pick out the white crabmeat and put it in a small bowl.
9_ Lay the cleaned shell on a serving dish and fill it with the brown crabmeat and rice mix. Spoon over the white crabmeat and garnish with the spring onions.
10_ Pile the spicy claws and legs around the dressed crab and serve. Be sure to eat this with plenty of napkins - it’s a messy one.
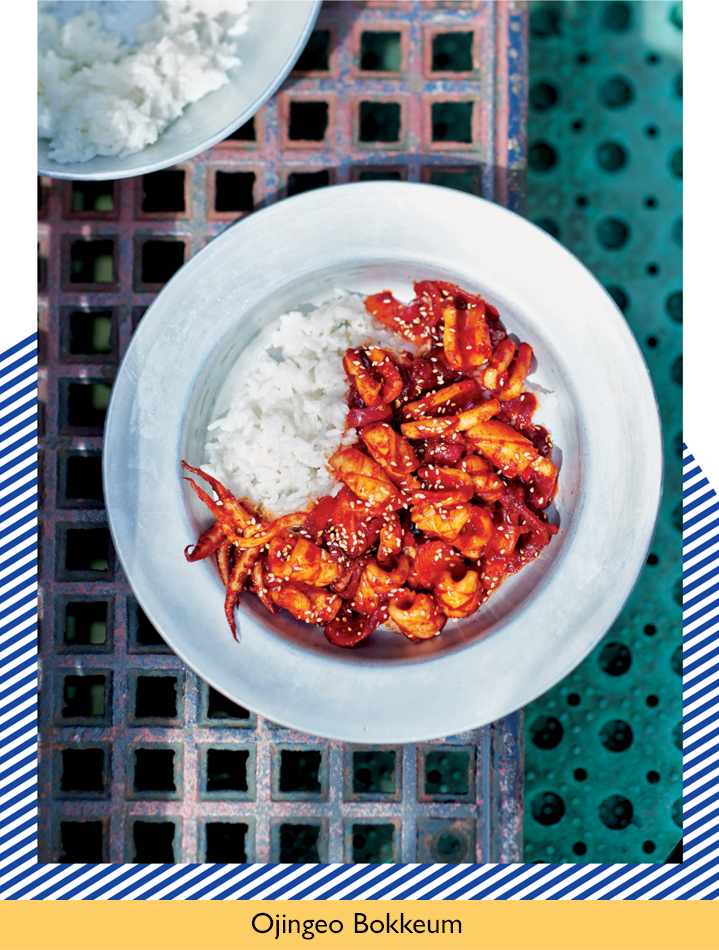
Ojingeo Bokkeum
STIR-FRIED SPICY SQUID
With its addictively spicy sauce and tender, soft squid, ojingeo bokkeum is one of Korea’s most popular squid dishes. It can be found on the menus of snack houses, served as a simple lunch with a side of rice, or in the middle of the table to share as a banchan.

1 whole squid, about 175g (6oz), cleaned and quill removed (ask the fishmonger to do this for you)
1 tablespoon vegetable oil
1 onion, finely sliced
½ carrot, cut into thin diagonal strips
1 spring onion, trimmed and roughly chopped
1 long red chilli, trimmed and roughly chopped
1 teaspoon roasted sesame seeds, to garnish
SAUCE
1 tablespoon gochujang (Korean red chilli paste)
2 tablespoons gochugaru (Korean red chilli powder)
3 garlic cloves, minced
1 tablespoon mirin
1 tablespoon regular soy sauce
1 tablespoon caster sugar
2 tablespoons water, plus extra if needed
1_ Slice the squid tube open to lay it flat, then run the tip of your knife along the squid lightly in a diagonal criss-cross pattern (this will help the squid curl up nicely while cooking). Cut the squid into 2.5-cm (1-inch) squares.
2_ For the sauce, mix all the ingredients together in a bowl.
3_ Heat the oil in a frying pan over a medium heat. Add the onion and carrot and fry for 3-4 minutes, stirring occasionally, until softened.
4_ Add the squid, spring onion, chilli and sauce to the pan. Fry for 2-3 minutes, stirring, until the squid is tender and cooked through, adding another tablespoon or two of water if the sauce looks like it is getting too sticky and reduced. Scatter over the sesame seeds and serve.
Prawn Po’ Boy with Yuja Mayo
Gareth had always wanted to add a take on a po’ boy to our menu as he’s a big fan of this style of American sandwich, but it took us a while to decide on the filling. The breakthrough came when we were hosting a pop-up one summer at Old Bengal Bar in East London and were able to dedicate some time to testing lots of different ideas. Stuffed full of juicy prawns, fresh crispy lettuce and lots of bright, citrussy mayo, this is Gareth’s idea of the perfect sandwich.

24 large raw whole prawns, about 650g (1lb 7oz)
vegetable oil, for deep-frying
4 hoagie or firm submarine rolls
½ iceberg lettuce, shredded
2 tomatoes, thinly sliced
YUJA MAYO
2 egg yolks
¼ teaspoon English mustard
1 tablespoon yuja (yuzu) juice
2 teaspoons lemon juice
pinch of salt
½ tablespoon apple vinegar
100ml (3½fl oz) vegetable oil
COATING
60g (2¼oz) self-raising flour
80g (3oz) potato starch
40g (1½oz) cornmeal
pinch of salt
1 teaspoon baking powder
¼ teaspoon garlic granules
2 tablespoons gochugaru (Korean red chilli powder)
1_ For the yuja mayo, put the egg yolks, mustard, yuja juice, lemon juice, salt and apple vinegar in a food processor and blend together. With the motor running, pour in the vegetable oil in a thin, stready stream until you have a thick, creamy mayonnaise. Set aside.
2_ Peel the prawns and remove the heads. Using a small, sharp knife, make a shallow cut along the back of each prawn, then lift out the dark vein with the tip of a knife. Rinse under cold running water and drain.
3_ Half-fill a large pot or deep-fryer with vegetable oil and preheat to 180°C (350°F), or until a cube of bread browns in 30 seconds.
4_ Mix all the coating ingredients together in a large bowl. Add the prawns and toss together to ensure they are thoroughly coated, then lower them gently into the hot oil and fry for 1½ minutes. Remove the prawns from the oil, season with salt and leave to drain on kitchen paper.
5_ Slice the bread rolls open and slather with the mayo, then pile in the lettuce, tomato and prawns. Enjoy.
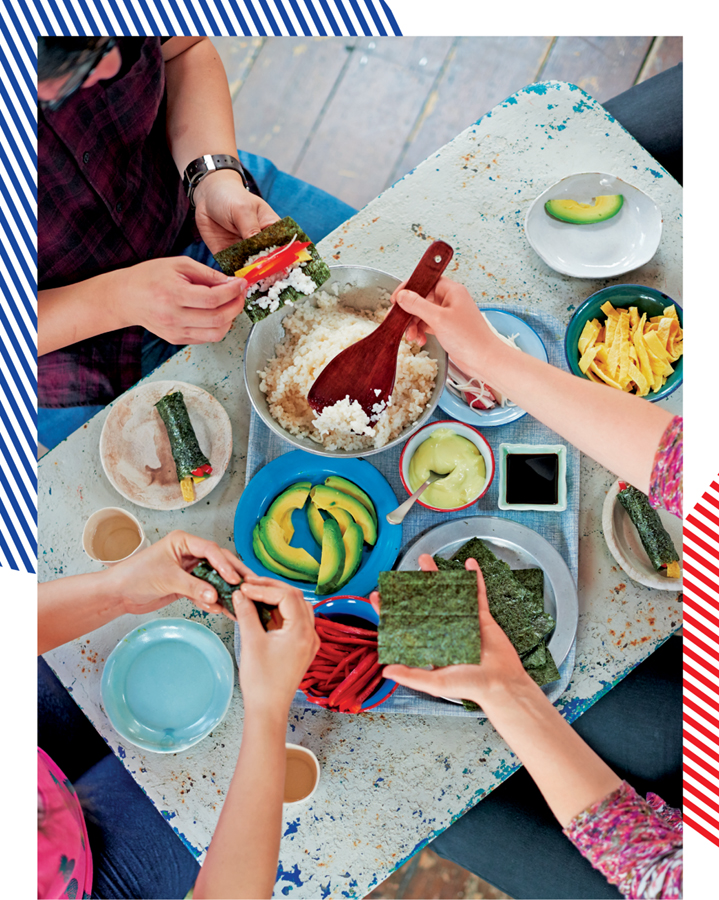
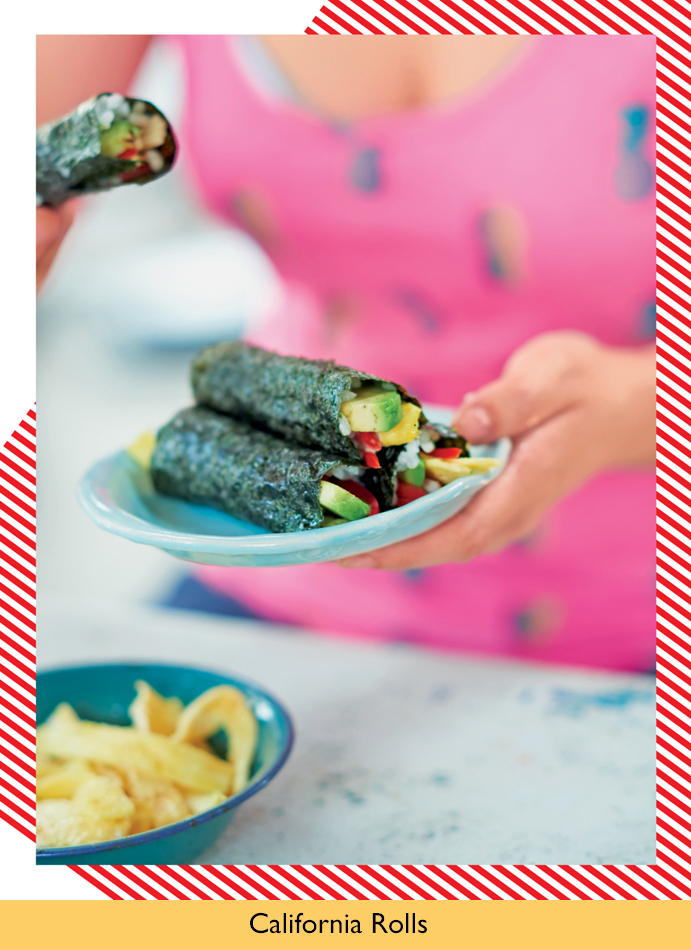
California Rolls
While now I’m a complete convert, I’d never been that big a fan of California rolls - and definitely never really considered them particularly Korean - until I started working at Korea Foods. There the girls in the office would almost always eat lunch together and, on special occasions, we’d always have California rolls. Mrs Kim (the mother hen of the group), would make sure to organize it the day before and everyone would bring in one of the roll elements, then on roll day itself all the different ingredients would be heaped in piles in the middle of the table, and everyone would dive in and make their own. I loved how everyone could assemble the rolls to their own tastes and, most importantly, how this great sharing dish really brought everyone together.

4 eggs
pinch of salt
½ tablespoon vegetable oil
250g (9oz) seafood sticks
4 teaspoons wasabi (or English mustard)
8 tablespoons mayonnaise, either shop-bought or homemade
1kg (2lb 4oz) cooked short-grain rice
2 red peppers, cored, deseeded and finely sliced
4 ripe avocados, stoned and sliced lengthways
24 dried gim (nori) seaweed sheets, cut into quarters
250ml (9fl oz) regular soy sauce, to serve
1_ Whisk together the eggs with the salt in a bowl.
2_ Heat the vegetable oil in a heavy-based frying pan over a medium heat and pour in half the egg mix. Tip the pan so that the eggs are spread evenly to create a large, thin omelette, then fry for 30 seconds on each side. Remove the omelette from the pan and set aside to cool, then repeat with the remaining beaten egg to create a second omelette. Once cool, slice the omelettes into 1-cm (½-inch) thick strips.
3_ Shred the seafood sticks into fine strands, put in a bowl with the wasabi and mayonnaise and mix everything together well.
4_ Tip the rice into a large bowl. Arrange the omelette slices, seafood stick mix and all the other ingredients on a large tray and serve in the middle of the table alongside the rice for everyone to assemble their own rolls. To make one, lay a seaweed quarter in the palm of your hand and spread a tablespoon or so of the rice in the middle, then arrange any combination of your assembled ingredients on top. Roll up, dip in the soy sauce and enjoy!
TIP: I’ve only listed my favourite fillings here, though you can really add whatever you like - cucumbers, stir-fried eomuk (Korean fishcakes), tinned tuna and pickled mooli were all popular fillings on California roll day. If you’re not a fan of avocado (I’m not), I’d really encourage you to try it here anyway - it gives the rolls a really great creamy texture and with all the other flavours, you won’t really taste it in any case.