Everyday Cook - Alton Brown (2016)
NOON
No-Can Tomato Soup
MAKES 1 QUART SOUP, FEEDS 4
Yes, I too have fond flavor memories of the soup that Andy Warhol made famous. But now I have a soup can of my own called the pressure cooker, which can make soup just about as fast as a can opener.
2 small red onions, chopped
4 large garlic cloves, smashed
6 tablespoons olive oil
2 28-ounce cans diced tomatoes
1 cup fresh orange juice
2 teaspoons kosher salt
½ teaspoon ground cinnamon*
2 teaspoons sherry vinegar
SPECIAL EQUIPMENT
Pressure cooker H
1. Sweat the red onions and garlic in 3 tablespoons of the olive oil in a pressure cooker over medium-low heat until translucent.
2. Add the tomatoes, orange juice, salt and cinnamon and affix the lid (according, of course, to the manufacturer’s instructions). Increase the heat to high. Once the cooker comes to pressure (a constant, loud hissing or even whistling will alert you), reduce the heat to low and maintain an even, low “hiss” for 6 minutes.
3. Kill the heat and release the pressure on the cooker (see M for a few notes on relieving pressure).
4. Remove the lid and add the sherry vinegar.** Puree with an immersion blender while adding tablespoons of the remaining olive oil in a steady stream.
Freeze the extra in a zip-top bag; laying the bag flat to freeze saves space and leads to faster thawing.
* The cinnamon brings more aromatics to the party than spice—trust me on this one.
** Because acidic flavors tend to get the smack-down from pressure cooking, I typically add vinegars, citrus juice and such after the fact. So why add the orange juice earlier? Because I’m more after sweetness and fruitiness than citric acid, that’s why.

Grilled Cheese Grilled Sandwich
FEEDS 2
99.997 percent of the world’s grilled cheese sandwich recipes flat-out lie. Why? Because they’re griddled rather than “grilled.” Well, the lies die right here, people. Not only is this sandwich cooked on a grill, the cheese that goes in it is cooked on a grill. It’s double freakin’ grilled! (Drops spatula, walks out.)
1 ounce (¼ stick) unsalted butter, at room temperature
4 hearty country bread slices, about ⅓ inch thick
3 ounces grated extra sharp Cheddar cheese (Cabot is my go-to)
3 ounces grated Gruyère cheese
1 teaspoon dry mustard powder
½ teaspoon smoked paprika P
¼ teaspoon freshly ground black pepper
SPECIAL EQUIPMENT
You’ll need a charcoal starter M, a grill, a spritz bottle of vegetable oil and two grill spatulas, which, let’s face it, you should have anyway.
1. Spritz a couple pieces of newspaper with vegetable oil, wad them loosely, and stick them into the bottom of a charcoal chimney starter.* Fill the chimney with 2 to 3 pounds of natural chunk charcoal and set on the charcoal grate of a kettle grill. Light the paper and allow it to burn for 15 to 20 minutes, until the charcoal is hot and ashy. (If you hold your hand 6 inches over the chimney and it bursts into flames, you’ll know the fire is hot enough.)
2. Meanwhile, butter both sides of the bread. Combine the Cheddar, Gruyère, mustard, paprika and pepper in a small bowl.
3. Fold a 24-inch-long piece of heavy-duty aluminum foil H in half, short end to short end. Set a large metal griddle spatula in the center and fold the sides up around the spatula, forming a tray. Spritz the spatula tray with a small amount of vegetable oil, then repeat with the second spatula.
4. Divide the cheese mixture evenly between the spatula trays and set aside. Set aside two additional 15-inch sheets of heavy-duty aluminum foil.
5. Carefully distribute the hot charcoal onto one side of the charcoal grate. Set the cooking grate in place and heat for 2 to 3 minutes.
6. Set the cheese-filled spatula trays on the grill over indirect heat. Cook for 6 to 9 minutes, until the cheese melts and bubbles around the edges. You may have to adjust the placement of the spatula trays to ensure even melting and keep the cheese from overheating and breaking.
7. Grill the bread for 1 to 2 minutes per side over direct heat.
8. Place 1 slice of bread on each of the reserved sheets of aluminum foil. Use a pair of tongs H to open up the end of the foil on one spatula, pour off any accumulated fat, and then slide the cheese onto 1 slice of bread. Top with a second slice, then fold the foil around the sandwich.
9. Repeat with the remaining cheese and bread and return the sandwich packets to the grill over indirect heat for 1 to 2 minutes.
10. Unwrap and savor slowly. Now that’s a GRILLED cheese sandwich.
* The oil will considerably extend the burn time of the paper…kind of like the oil in a lantern.

BBQ Potato Chips
FEEDS 4
For years I’ve been trying to make BBQ chips that are as good as what you can get in a bag. The trick? Smoke the potatoes. If you don’t have an honest-to-goodness exhaust hood, you should either do this outdoors (I keep a butane cooktop on hand for just such occasions) or pull the battery out of your smoke detector.*
1 tablespoon smoked paprika P
1 tablespoon dark brown sugar
1 teaspoon onion powder
1 teaspoon kosher salt
½ teaspoon chili powder**
½ teaspoon garlic powder
1 pound russet potatoes (4 medium), scrubbed and rinsed
2 quarts peanut oil
SPECIAL EQUIPMENT
Heavy pot
Collapsible steamer basket or Steel Lotus H
1 cup hardwood chips
1. Soak 1 cup wood chips in water for 30 minutes.
2. Combine the paprika, brown sugar, onion powder, salt, chili powder and garlic powder in a food processor or a small coffee grinder reserved for spices. Pulse to a uniform powder. Set aside.
3. Slice the potatoes into 1⁄16-inch-thick rounds using a mandoline H or other slicer. Place half of the potatoes in a steamer basket.
4. Line an 8-quart stockpot (tall and narrow) with heavy-duty aluminum foil H and set the drained wood chips in the bottom. Set the collapsible steamer basket in the pot above the wooden chips, cover and set over high heat. “Smoke” the potato slices for 10 minutes (you may want to turn on your fan or hood vent), then remove the pot from the heat and let rest, covered, while you prepare the oil.
5. Heat the peanut oil in a 4-quart cast-iron Dutch oven H M over medium-high heat, to 325˚F.
6. While the oil heats, line a large mixing bowl with paper towels.
7. Carefully add the potato slices, one at a time, to the hot oil. Using a spider H, constantly move the slices in the hot oil for 3 to 4 minutes, until golden brown and crisp. Remove the chips with the spider and hold over the oil to drain as much excess oil as possible.
8. Move the finished chips to the lined bowl and shake to remove additional oil. Adjust the heat as necessary to maintain 325˚F and continue frying the potatoes in small batches.
9. When the final batch has finished frying, move the chips to a large brown paper bag. Sprinkle the chips with the spice mixture, fold the top of the bag over to seal and shake. Serve immediately.
* My smoke alarm is really hard to disable, so I tend to cover it with foil when I know I’m going to smoke up the place. (But I always leave a note on the counter to remind me to take it off.)
** “Chile” powder and “chili” powder aren’t quite the same. Chile powder is nothing but ground chile peppers. “Chili” powder, which is meant for use in chili (the dish) is typically composed of “chile” powder and spices such as cumin, black pepper and salt.
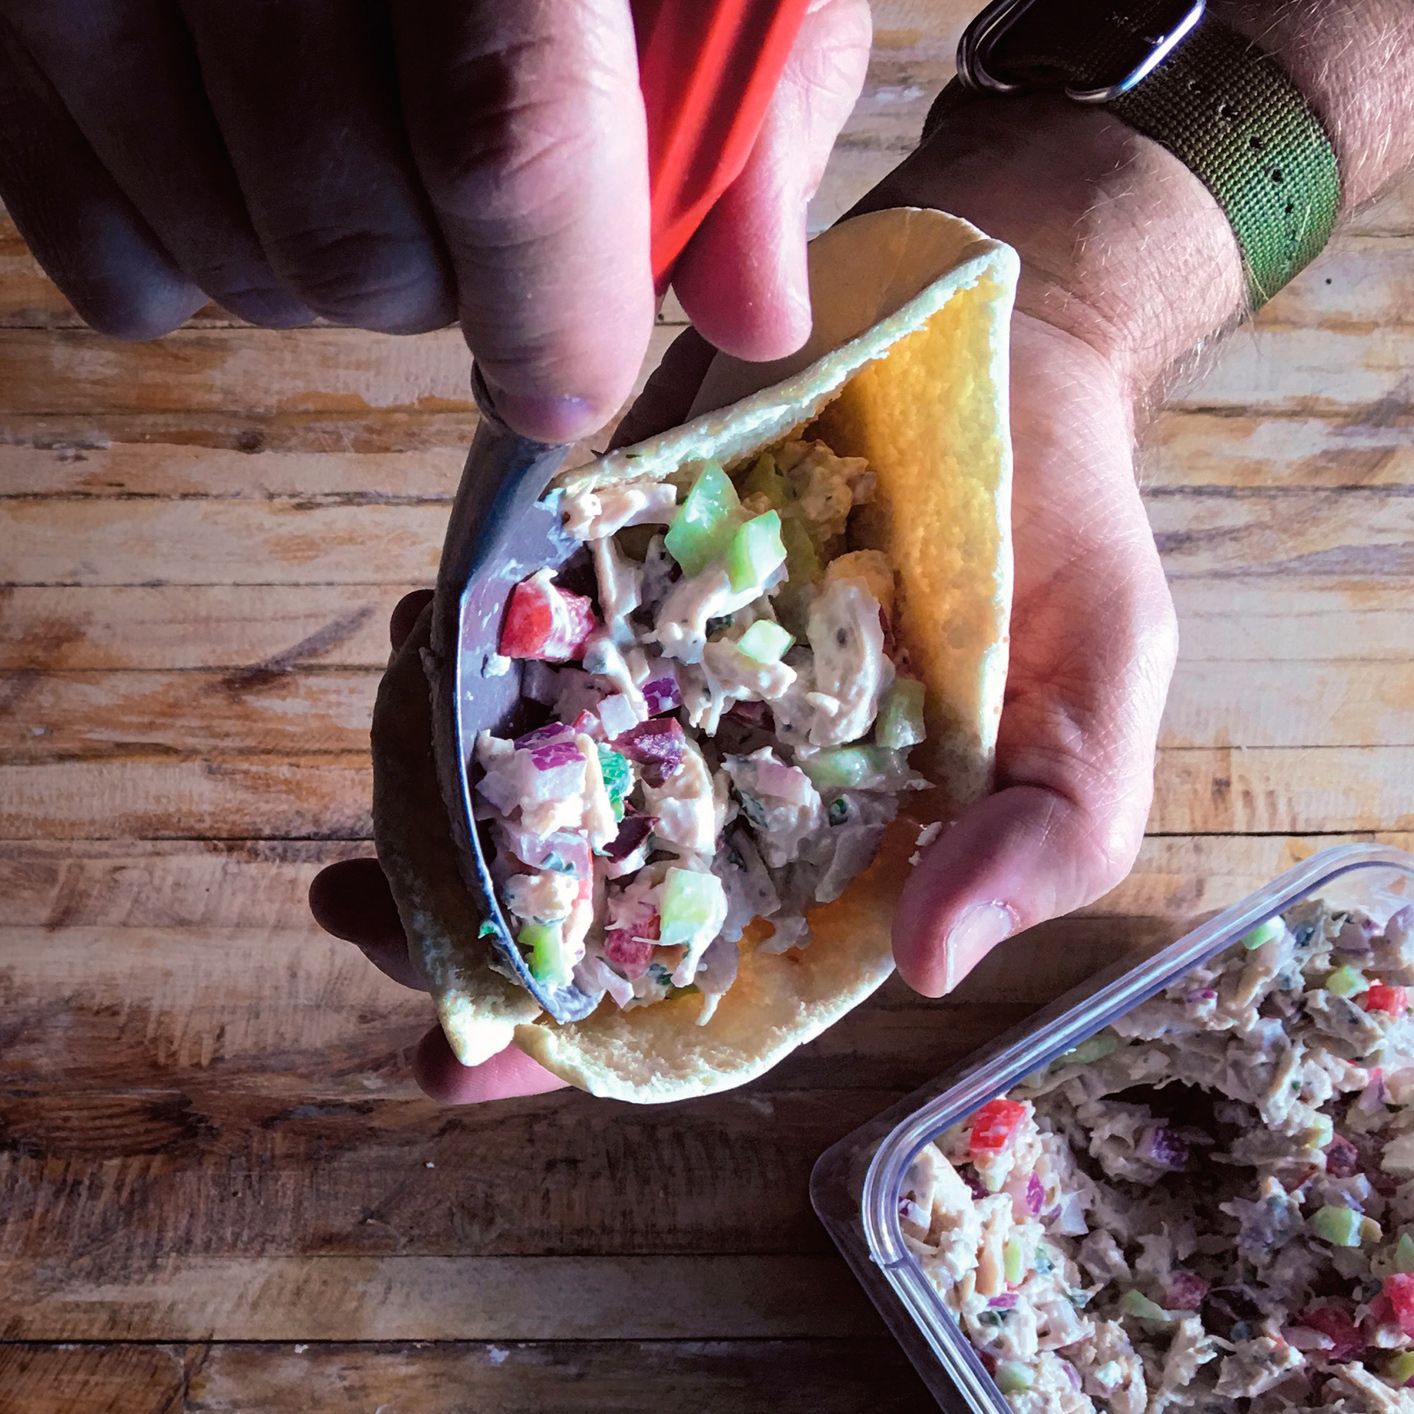
My Big Fat Greek Chicken Salad
FEEDS 4 TO 6
This is my favorite use of leftover grilled chicken, or my One Pot Chicken, though in a pinch a store-bought rotisserie bird will do. And I should add, this dish is just as good with turkey. But I wasn’t sure about mixing Greece and Turkey in the same title since they don’t always get along.
½ cup plain Greek yogurt (either whole or low-fat works here)
2 tablespoons fresh lemon juice
2 tablespoons chopped fresh flat-leaf parsley
½ teaspoon kosher salt
Freshly ground black pepper
1 pound cooked chicken breasts or thighs, torn and roughly chopped
1 small cucumber, peeled, seeded, and chopped
1 Roma tomato, chopped
½ small red onion, finely chopped
½ cup crumbled feta cheese
¼ cup pitted kalamata olives, roughly chopped
1. Whisk the yogurt, lemon juice, parsley, salt and pepper to taste together in a medium bowl. Add the chicken, cucumber, tomato, red onion, feta and olives and stir.
2. Refrigerate for at least 1 hour before serving nestled down in a warm pita. Will keep, covered, in the fridge for 3 days.
Tossed Beet Salad
FEEDS 6
I remember sitting around the kiddie table at Thanksgiving and listening to my cousins griping about how gross beets were. One year we actually revolted en masse, refusing to so much as touch the plate of pickled spheres placed in the center of our table. Held sway by the bonding power of food, I went along. Later, I volunteered to clear the table, absconded with said dish, and ate the entire thing in the shower of my aunt’s guest bathroom, the chintz curtain concealing my shame like the screen of a confessional. I don’t hide anymore. And, I don’t really talk to those cousins anymore, now that I think of it.
Note: As much as I love beets, there’s no way I’d make this without a fixed-blade slicer or mandoline H. All of the slicing and dicing for this salad can be done efficiently on a mandoline or other fixed-blade slicer. If it were me, I’d start by thinly slicing the onion, fennel and pear, then add the mandoline’s matchstick blade and slice the jicama followed by the roasted beets.
VINAIGRETTE
¼ cup dry red wine vinegar
2 tablespoons fresh lemon juice
2 tablespoons honey
½ teaspoon freshly ground black pepper
¼ teaspoon kosher salt
¼ cup olive oil
SALAD
1 small red onion, thinly sliced
1 large head fennel, cored, halved and sliced wafer thin (say, 3 millimeters)
1 Asian pear, halved, cored and sliced wafer thin
1 large jicama, peeled and cut into matchsticks
2 large beets, cooked,* peeled and cut into matchsticks
6 ounces goat cheese, crumbled
1. To make the vinaigrette, whisk the vinegar, lemon juice, honey, pepper and salt together in a large bowl. Keep whisking and slowly drizzle in the olive oil so that the mixture emulsifies.
2. To prepare the salad, add the red onion and fennel to the bowl and toss to combine.
3. Add the pear and jicama, toss to coat and set aside for 10 minutes.
4. Finally, add the beets and goat cheese and gently toss before serving.
* To oven-steam the beets, wrap them in a pouch of heavy-duty aluminum foil H and bake in a 400˚F oven until tender, about 40 minutes.
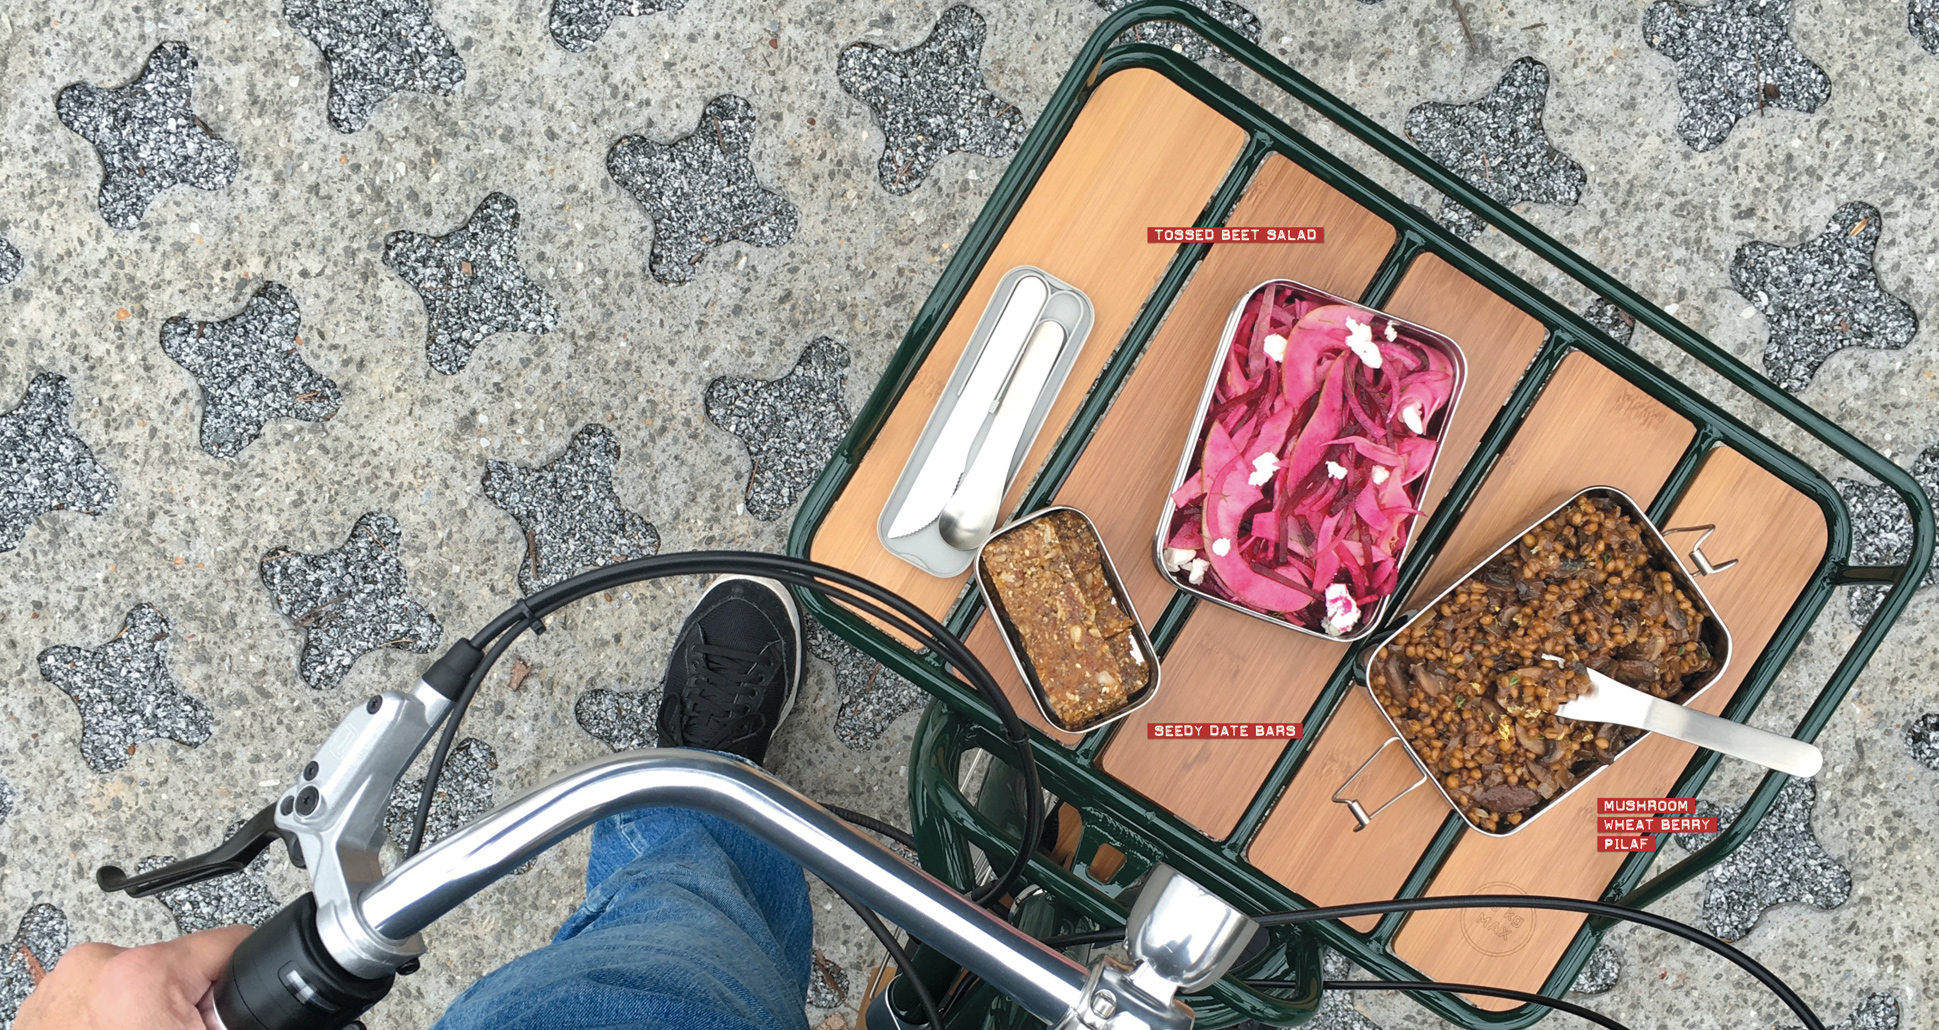
Mushroom Wheat Berry Pilaf
FEEDS 6 AS A SIDE DISH OR 2 TO 3 AS A MAIN
Whole wheat kernels, or wheat “berries,” are as whole grain as whole grain gets. This is wheat with all the great stuff that we generally strip away during processing intact. Cooking pilaf-style brings out the grains’ nutty flavor and chewy texture…and I mean chewy in the best possible way. The key is either very slow cooking or…a pressure cooker, my very favorite culinary time machine.
1 cup wheat berries P
1 teaspoon kosher salt, plus more for seasoning
2 teaspoons olive oil
1½ cups chopped onions
5 large garlic cloves, minced
1 tablespoon unsalted butter
1 pound mushrooms, sliced*
1 tablespoon soy sauce
¼ cup dry red wine blend
¼ cup chicken broth
½ teaspoon fresh thyme leaves, chopped
1 teaspoon fresh rosemary leaves, chopped
1 teaspoon lemon zest, finely chopped
SPECIAL EQUIPMENT
Pressure cooker H
1. Toast the wheat berries in a dry heavy skillet over medium-high heat for 5 to 6 minutes, until the berries smell nutty. Keep them moving as they cook.
2. Transfer the toasted berries into your pressure cooker, add 3 cups water and the salt, attach the lid and put over high heat until the hissing begins and the pressure indicator rises.
3. Lower the heat to maintain a low hiss and full pressure, and cook for 45 minutes. Release the pressure using the manufacturer’s instructions (or by running the pressure cooker under cool water for a couple of minutes). The berries should have a toothy texture. Drain excess water, if necessary. This can be done several days ahead of time and the berries kept in the refrigerator. Just bring them to room temp to complete the dish.
4. To prepare the pilaf, heat the olive oil in a large sauté pan over low heat. Add the onions and a pinch of salt and sweat until soft, about 10 minutes.
5. Add the garlic and continue cooking for 5 minutes.
6. Add the butter to the pan and melt. Then add the mushrooms and soy sauce. Increase the heat to medium and continue cooking for 5 to 10 minutes, until the mushrooms release their liquid.
7. Add the red wine and chicken broth and simmer for 5 minutes.
8. Add the wheat berries, thyme, rosemary and lemon zest and heat through. Adjust salt to taste.
* This is open-ended because so many different fungi can be used. I’ve made this with just about everything short of enoki, which would be creepy. As a default, brown cremini do just fine.
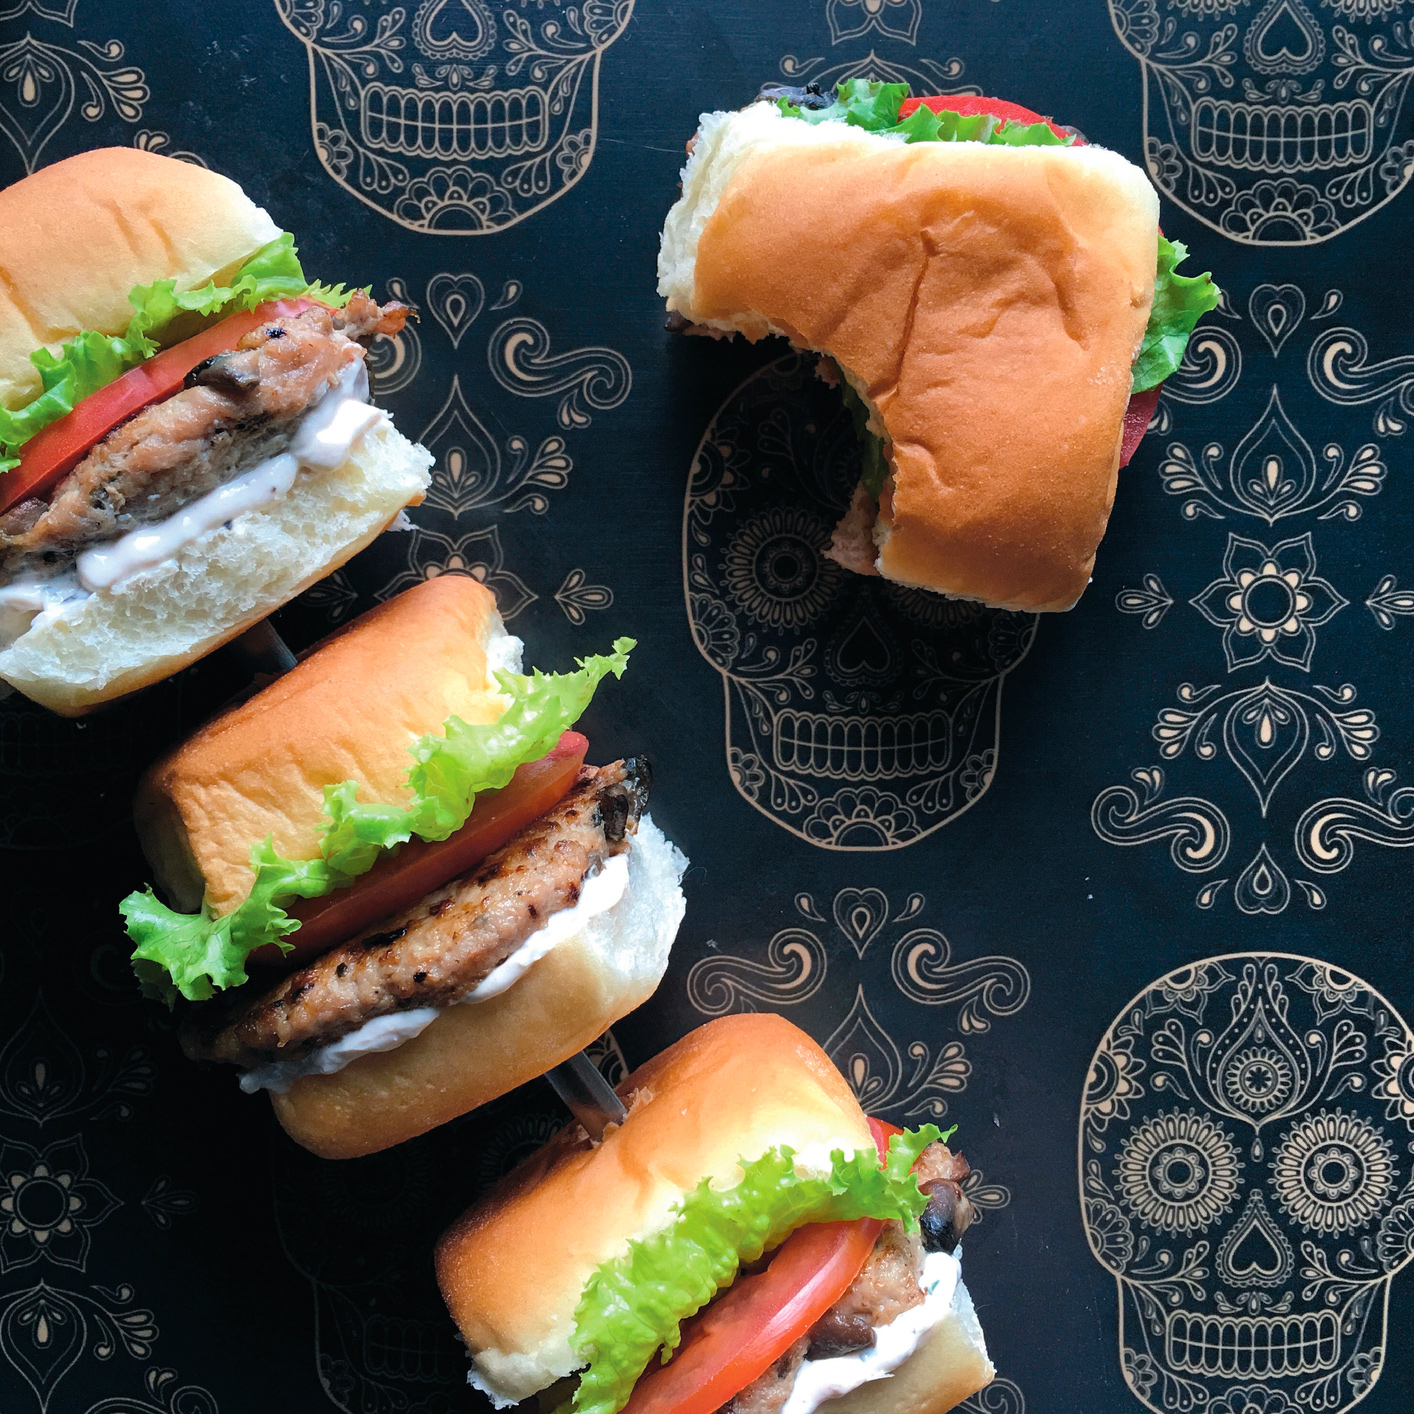
Turkey Sliders
MAKES 12 MINI BURGERS, FEEDS 6
Turkey is probably the most American of meats, but when it comes to that most American sandwich, the burger, beef trumps turkey due to the presence of umami, the flavor associated with glutamic acid. By adding three umami-centric ingredients—Parmesan cheese, mushrooms, and miso—you can make ground turkey into a burger you’ll actually want to eat.*
1 tablespoon olive oil
2 large portobello mushrooms, stems and gills removed, finely chopped
½ teaspoon kosher salt
1 pound dark turkey meat, ground
2 tablespoons finely grated Parmesan cheese
1 tablespoon brown miso paste, at room temperature
1 dozen dinner rolls, sliced
Savory Greek Yogurt Dip
Lettuce
Tomato slices
1. Heat a 10-inch cast-iron skillet H M over high heat, then add the olive oil, mushrooms and salt. Sauté for 5 minutes, or until the mushrooms are soft and golden. Remove from the heat and let cool.
2. Thoroughly combine the turkey, Parmesan, miso and cooled mushrooms using a potato masher or, better yet, your fingers. Divide the mixture into balls a little bigger than the size of a ping-pong ball. Cover and refrigerate for at least 30 minutes.
3. Return the skillet to medium heat. Flatten the turkey balls so that they’re quite thin, about 2½ inches in diameter. Arrange the patties in the skillet, making sure they aren’t touching. Cook for 2 minutes, or until browned, then flip and cook for another 2 minutes. Flip again for 1 minute and one final time for 1 minute, for a total of 6 minutes of cooking time.
4. Transfer the patties to a platter. Place the buns, cut-side down, in the skillet. Cover and cook for 2 minutes, or until brown. Dress a bun bottom with the Savory Greek Yogurt Dip; top with a patty, then lettuce, a tomato slice and a bun top.
* There’s been a considerable amount of debate over the last few years questioning whether or not turkey is actually better for you than beef from both calorie and fat composition standpoints. My reason for including this recipe has nothing to do with health. I just like ground turkey. And considering the amount of beef Americans consume, I don’t see anything wrong with mixing up my meaty menu a bit.
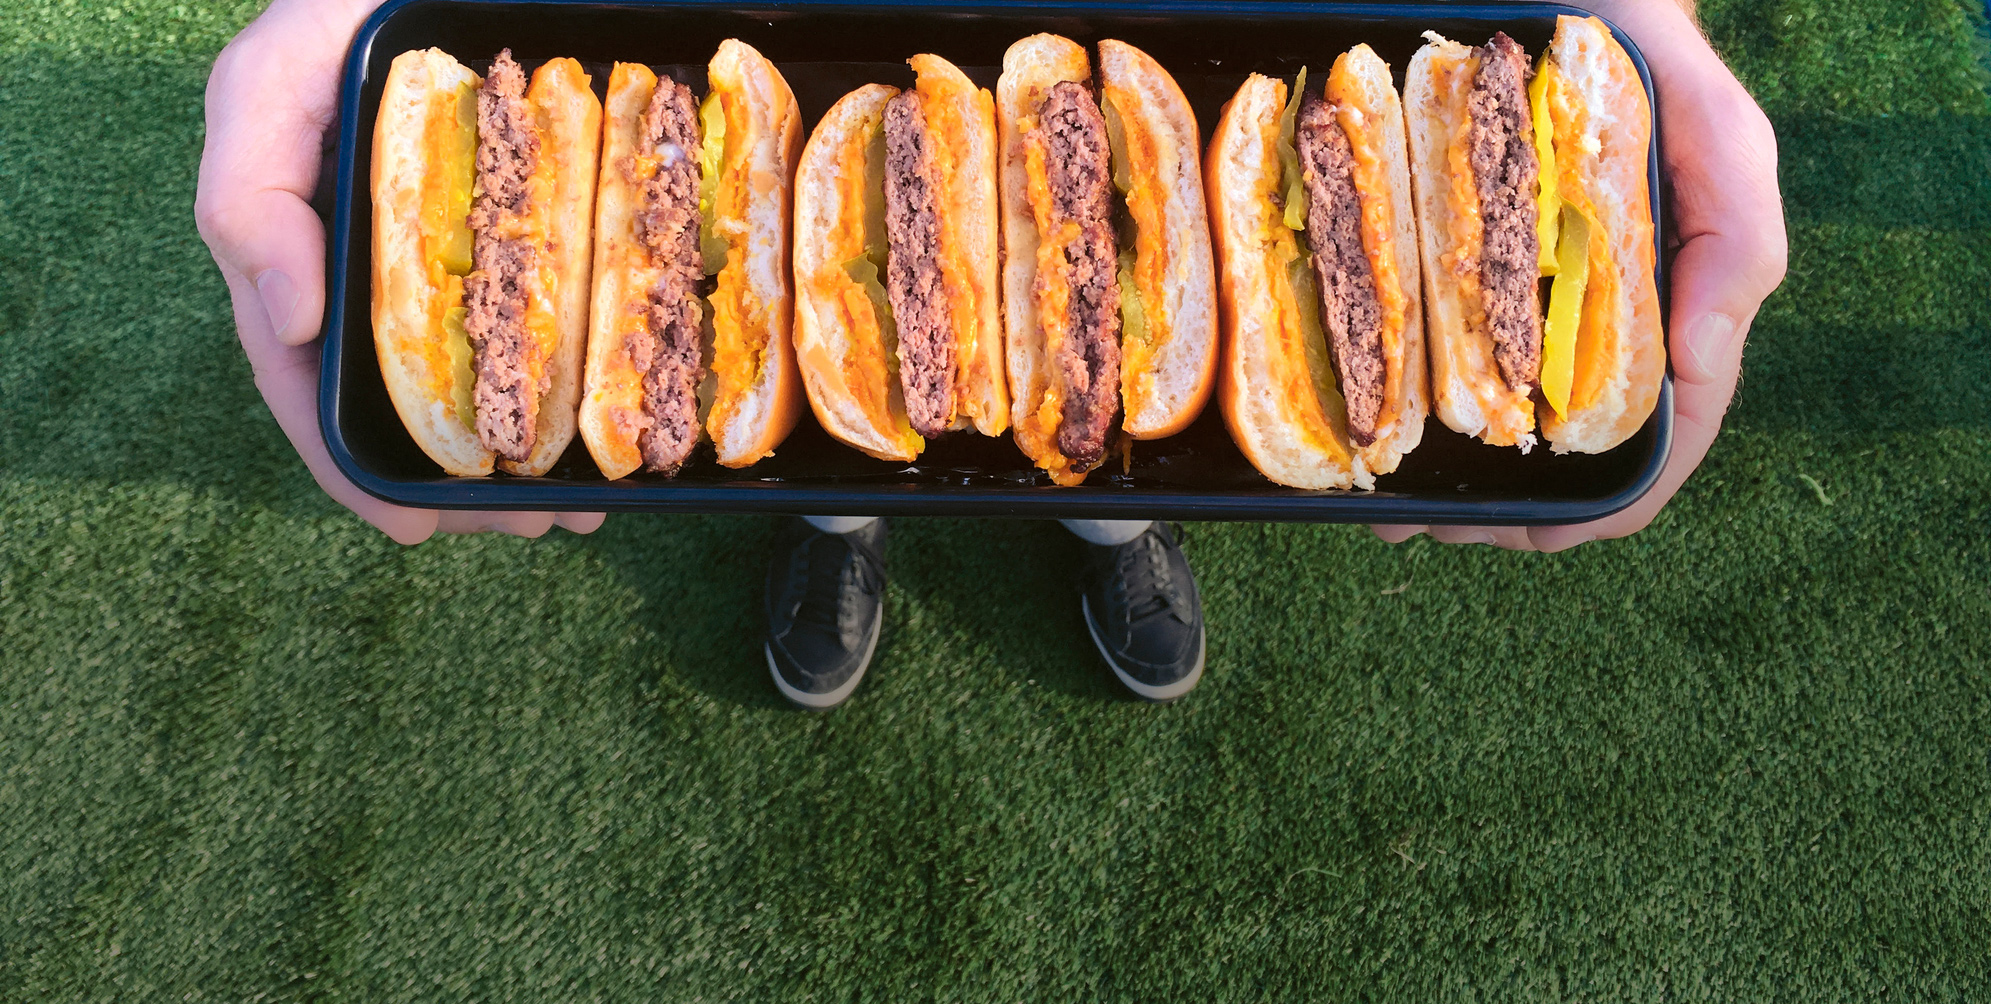
Beale Street Cheeseburger
MAKES 4 CHEESEBURGERS
While touring with my road show I spent a day chowing in Memphis. Everyone urged me to try the burger at Dyer’s on Beale Street, where they don’t grill their burgers. They deep fry them in a grease that supposedly hasn’t been changed since they opened. You watch the burger being fried and think it’ll be a “one bite then good-bye” taste. Then, you try a bite. Here’s my take.
2 quarts peanut oil, for frying…Yeah, what I said…frying.*
12 ounces ground beef
1¼ ounces grated Cheddar cheese
1 teaspoon smoked paprika P
1 teaspoon garlic powder
Mayo and mustard
4 hamburger buns or (soft) kaiser rolls, split
12 to 15 dill pickle slices or “chips”
1. Get a nice big Dutch oven and add enough peanut oil or shortening to be 2 inches deep. Install your candy/fry thermometer H to the side of the pot and crank the heat to medium-high. Your thermal destination is 320ºF (see Fry Station Setup M).
2. Place an oven rack in the top position and heat your broiler. This is a perfect time to use your toaster oven if you have one.
Meanwhile…
3. Weigh out the meat into four 3-ounce portions. Roll into balls and set aside. Do not refrigerate.
4. Grate the Cheddar. Toss the grated cheese with the paprika and garlic powder until all the powder has stuck to the cheese.
5. Place a thin layer of mayo on the bottom half of the buns. Place half of the cheese mixture on top of this. Spread mustard on the bun tops and place the rest of the cheese on this. So you have half the cheese on the bottoms (on mayo) and half on the tops (on mustard). Place these under the broiler so that the cheese melts as you cook the burgers.
6. When the oil hits 320°F, place one of the meat balls on an upside-down sheet pan. Dip a wide metal grill spatula into the hot fat, then use it to smash and spread the meat ball out into a 5- to 6-inch-wide disk. It will be irregular around the circumference and that’s good, as all those irregularities will become crunchy goodness. The meat will also shrink by a couple of inches.
7. Gently scrape the patties/wafers off the sheet pan with the spatula and gently drop into the fat. Cook for 1 minute—no more, no less. You can cook up to 3 patties at a time…but watch the fat temp and don’t let it drop to under 300ºF.
8. Remove the fried meat to a paper towel to drain briefly, then move right away to the bun bottom. Place the pickles on top, then the bun top. The goal: bread/mayo/cheese/meat/pickles/cheese/mustard/bread.
9. Consume or wrap in aluminum foil H and hold for up to 30 minutes.
* Believe it or not, as long as you keep the oil between 300° and 325°F, this will be the most un-greasy burger you’ve ever enjoyed.
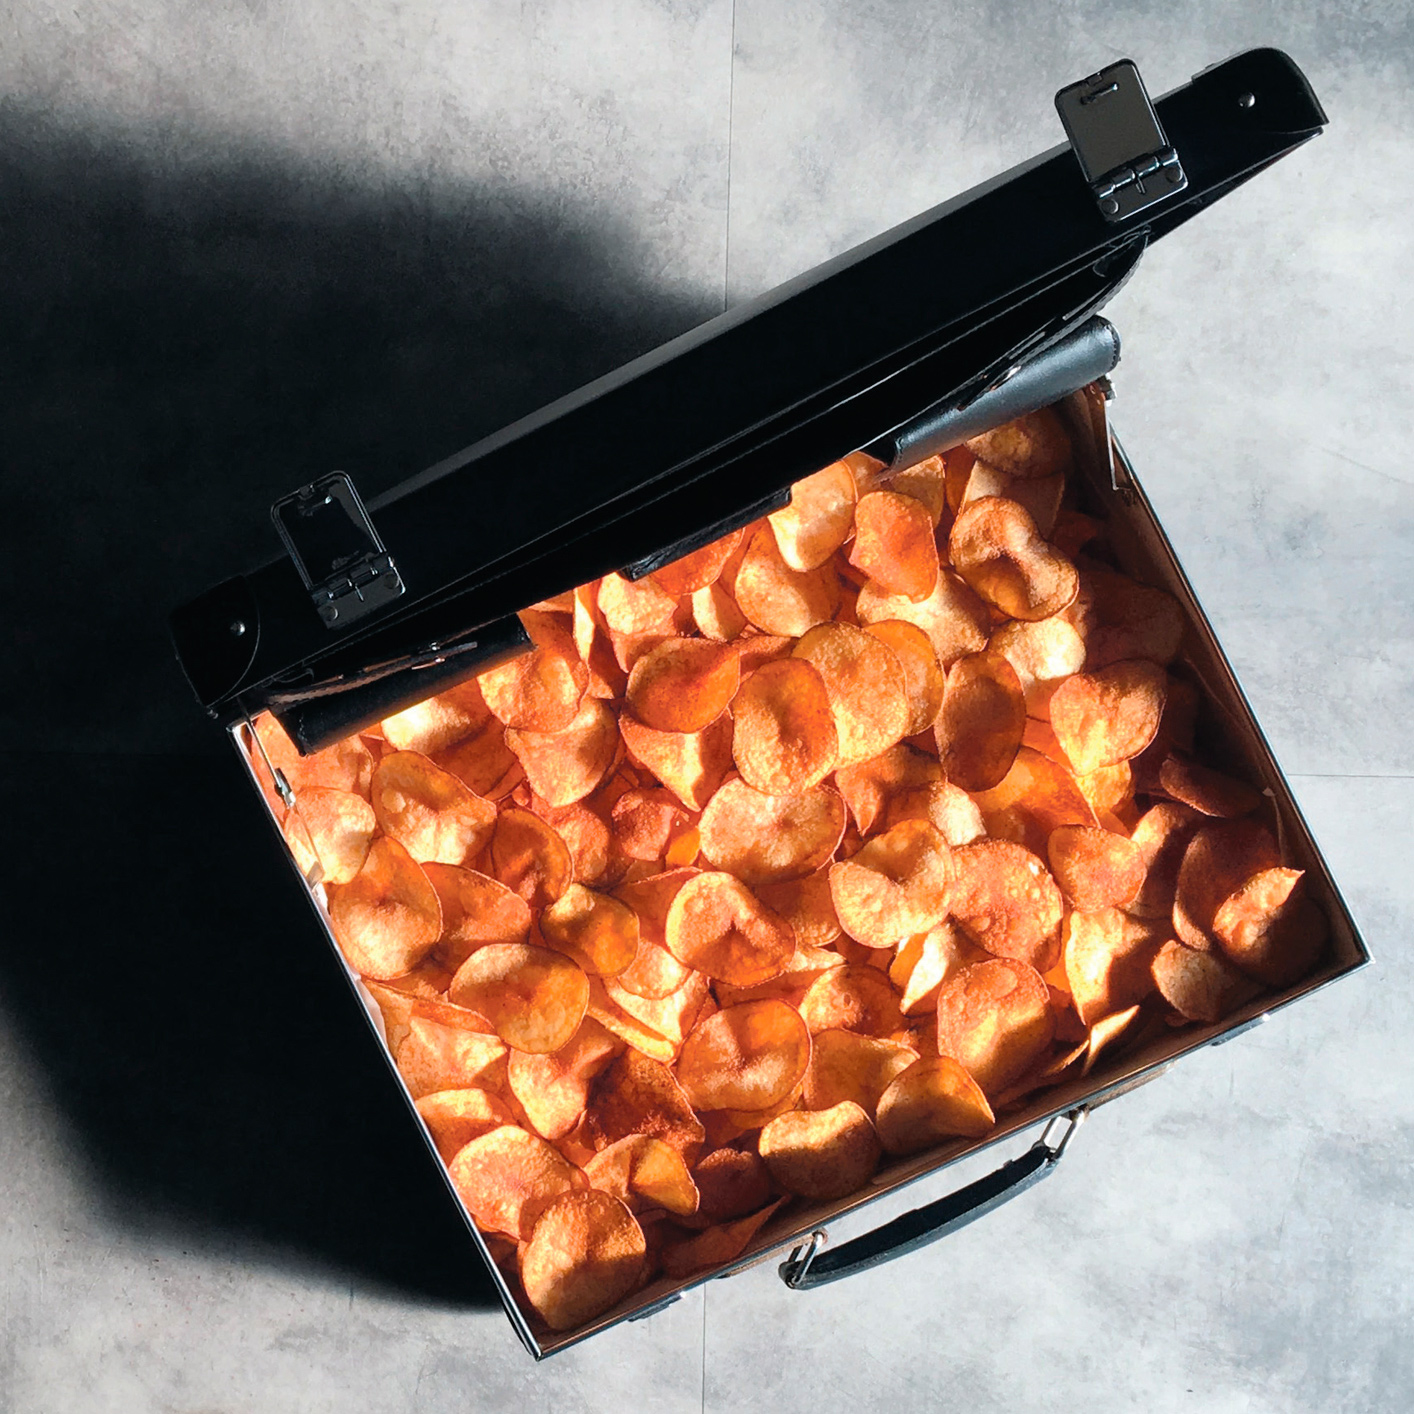
Smoky the Meat Loaf
FEEDS 12
I’ve been tinkering with this ever since I put an early version on the Interwebs a few years ago. I’m happy to report that I’m finally finished. By the way, if you don’t have a smoker, you can roast this loaf on a broiler pan in the oven. But it won’t be the same.
½ cup ketchup
¼ cup tomato paste
1 tablespoon dark brown sugar
1 teaspoon garlic powder
2 canned chipotle chiles P in adobo sauce, chopped fine, plus 1 tablespoon sauce they’re packed in
1 teaspoon dark cocoa powder
6 ounces ruffled kettle-style barbecue potato chips
1 medium onion, quartered
1 medium carrot, quartered
1 whole Fresno chile, stemmed and seeded
1 tablespoon olive oil
1 teaspoon kosher salt
1 teaspoon dried sage
1 teaspoon dried oregano
1 pound ground chuck*
1 pound ground sirloin
1 pound ground pork
3 large eggs, beaten
SPECIAL EQUIPMENT
Smoker
1. Combine the ketchup, tomato paste, brown sugar, garlic powder, chipotles, adobo sauce and cocoa powder in a small bowl.
2. Pulse the potato chips in a food processor until they are a coarse bread crumb consistency. Move them to a medium mixing bowl.
3. Next, place the onion, carrot and Fresno chile into the work bowl of the food processor and process until finely chopped.
4. Place a small sauté pan over medium heat and add the olive oil. Once the oil shimmers, add the onion mixture, salt, sage and oregano, and cook, stirring frequently, until the vegetables soften and begin to brown, about 5 minutes. Stir them into the potato chips and cool for 2 to 3 minutes.
5. Add the chuck, sirloin, pork, eggs, and two thirds of the ketchup mixture to the vegetables and use your hands to combine, then move the mixture to a large piece of heavy-duty aluminum foil H and shape it into a loaf about 12 × 3½ × 2 inches.
6. Tightly wrap the loaf in heavy-duty aluminum foil. Set aside and leave at room temperature for 1 hour. After 30 minutes, heat your smoker to 250°F.
7. When the hour is up, flip over the meat loaf and poke about 10 holes in the underside of the foil (a metal skewer or paring knife will do) to allow fat to drain out. Flip the loaf back upright and transfer to the smoker, placing a drip pan on the rack immediately below. Load the smoker with one or two chunks of hardwood and cook for 45 minutes.**
8. Open the pack and fold the foil back to create a shallow pan around the meat loaf. Brush with the remaining ketchup mixture and continue smoking until the internal temperature reaches 130°F, about 40 minutes. If the smoke has dissipated, feel free to add another chunk of wood.
9. Remove the meat loaf from the smoker and let rest for 20 minutes before slicing and serving.
* Just in case you’re asking your butcher to grind this on the spot, ask for a medium or fine grind.
** Okay, if you just can’t get to a smoker, go ahead and do this in a 250°F oven. You might also want to add a teaspoon of liquid smoke P to the remaining ketchup mixture to glaze with later. Or you could buy a smoker. Just sayin’.

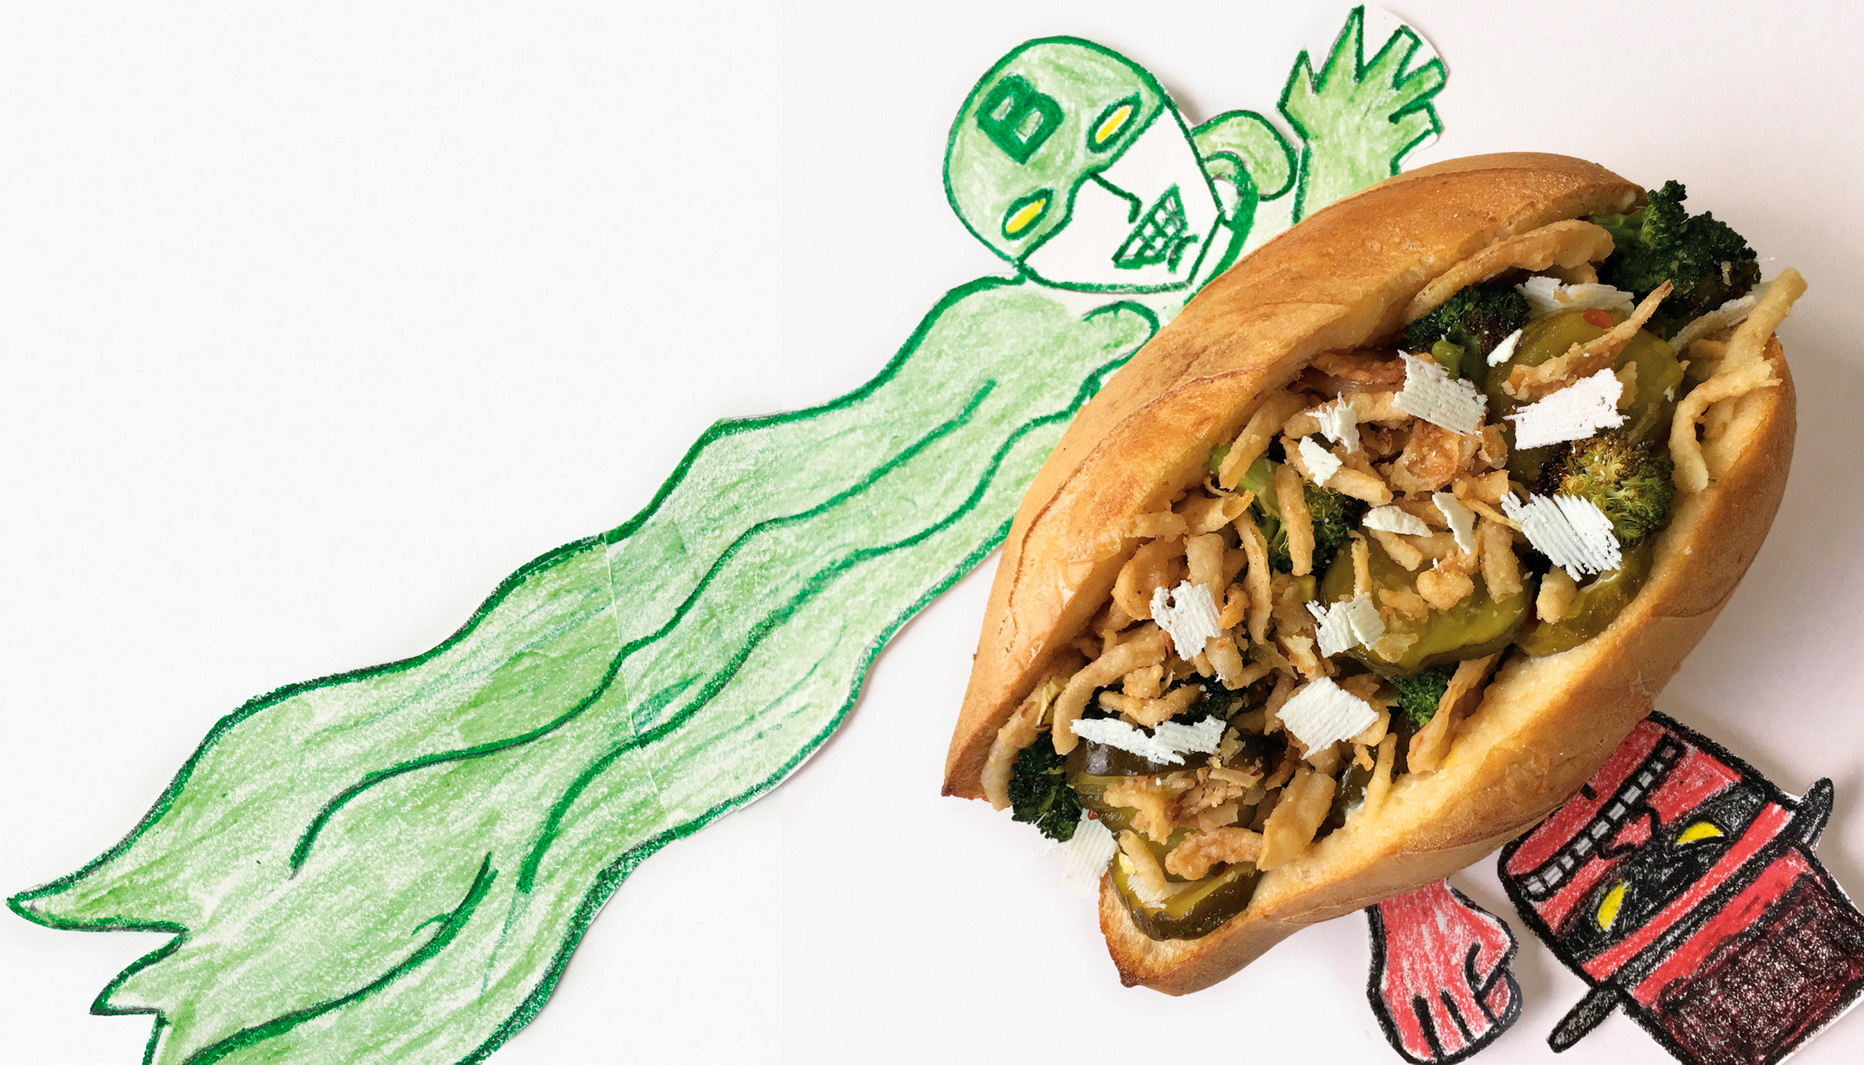
Roast Broccoli Hero
FEEDS 4
When I first saw the description of the roasted broccoli sub at No. 7 Sub in NYC, I thought it was crazy talk…the rantings of a hipster sandwichteer. But seeing as it was the specialty of the house, I tried it. Now I have one every time I’m in the city. That version includes a funky Korean salad called muchim with pickled lychee, which isn’t that easy to find at the average megamart. So, I replace it here with bread-and-butter pickles. The feta that No. 7 uses I “sub” with ricotta salata, and instead of frying shallots, I crack open a can of an American classic: French’s Crispy Fried Onions…you know, what your aunt puts on her green bean casserole. Sorry, but I love that stuff and it turns the crunch up to eleven.
1 cup sliced bread and butter pickles
½ cup pickle brine (from the bread and butter pickles)
1 garlic clove, minced
1 tablespoon minced fresh ginger
2 tablespoons chili sauce
1 teaspoon sesame oil
1 large head broccoli (about 1 pound), chopped into florets, stalk thinly sliced into rounds
2 tablespoons olive oil
1 teaspoon kosher salt
4 6- to 8-inch French bread rolls
¼ cup mayonnaise*
1 cup prepared fried onions
4 ounces ricotta salata, grated
1. Heat the oven to 400°F.
2. Combine the pickles, pickle brine, garlic, ginger, chili sauce and sesame oil in a small bowl. Allow the pickles to marinate while you deal with the broccoli.
3. Toss the broccoli with the olive oil and salt in a large bowl, spread into an even layer on a half sheet pan and roast for 15 minutes. Toss and roast for another 15 minutes. When you remove the broccoli from the oven, move a rack under your broiler and heat the broiler to high.
4. Split and lightly toast the rolls under the broiler for 1 to 2 minutes.
5. For each sandwich: Lightly spread mayonnaise on each side of the rolls then evenly distribute the pickles. Next, layer on the broccoli, then the fried onions and top with the ricotta salata.
* If you want to spice things up a bit, mix a teaspoon or two of the pickle marinade into the mayo. Add a little more and you’ve got a pretty terrific salad dressing.
Roasted Thanksgiving Salad
FEEDS 4 AS A MAIN, FEEDS 6 AS A SIDE
This may be the most nutritiously sound recipe in this book. In fact, if I had to pick one recipe from this book to live on for say a month, it would be…Chocolate Chess Pie! Just kidding. It would be this. After all, quinoa delivers a complete protein, and sweet potatoes and parsnips deliver just about everything else. And then there are the pepitas, which are packed full of micronutrients, and as you know, doctors hate apples.
By the way…this is what Thanksgiving tastes like.
1½ pounds sweet potatoes, peeled and cut into ¼-inch pieces
1 pound parsnips,* peeled and cut into ¼-inch pieces
1 small red onion, diced
¼ cup plus 2 tablespoons olive oil
2 teaspoons kosher salt
1 cup quinoa P, rinsed in cool water and drained**
¼ teaspoon ground cinnamon
3 tablespoons apple cider vinegar
2 tablespoons maple syrup
1 tablespoon Dijon mustard
2 tablespoons fresh thyme leaves
1 teaspoon finely chopped fresh sage (about 4 medium leaves)
1 small apple, preferably Gala or Honeycrisp, cut into ¼-inch pieces
3 ounces roasted pepitas P
1. Heat the oven to 425°F.
2. Toss the sweet potatoes, parsnips and red onion with 2 tablespoons of the olive oil and 1 teaspoon of the salt, and spread evenly onto two half sheet pans. Roast for 15 minutes, then toss the vegetables, rotate the pans and roast for another 10 minutes, or until the vegetables are tender and golden brown. While the vegetables are roasting, prepare the quinoa.
3. Bring 2 cups water and ½ teaspoon of the salt to a boil in a 2-quart saucepan. Whisk the rinsed quinoa into the boiling water, add the cinnamon, cover, reduce the heat to low and simmer for 15 minutes. Remove from the heat and cool, covered, for 5 minutes. Fluff with a fork.
4. Combine the remaining ¼ cup olive oil, the vinegar, maple syrup, mustard and the remaining ½ teaspoon salt in a small canning jar. Cover and shake the dressing like a martini to emulsify.
5. Toss the warm vegetables, quinoa, thyme, sage and dressing together in a large bowl. Add the apple and pepitas just before serving warm or at room temperature.
* Larger parsnips can have a tough woody core toward their top end, which is not ideal for roasting. Chop the skinny root end into rounds, then cut around the core and chop the remaining sides into ¼-inch cubes.
** Rinsing the quinoa before cooking removes the grain’s natural coating (saponin) that would otherwise leave the stuff tasting bitter or soapy. So, don’t skip that part!

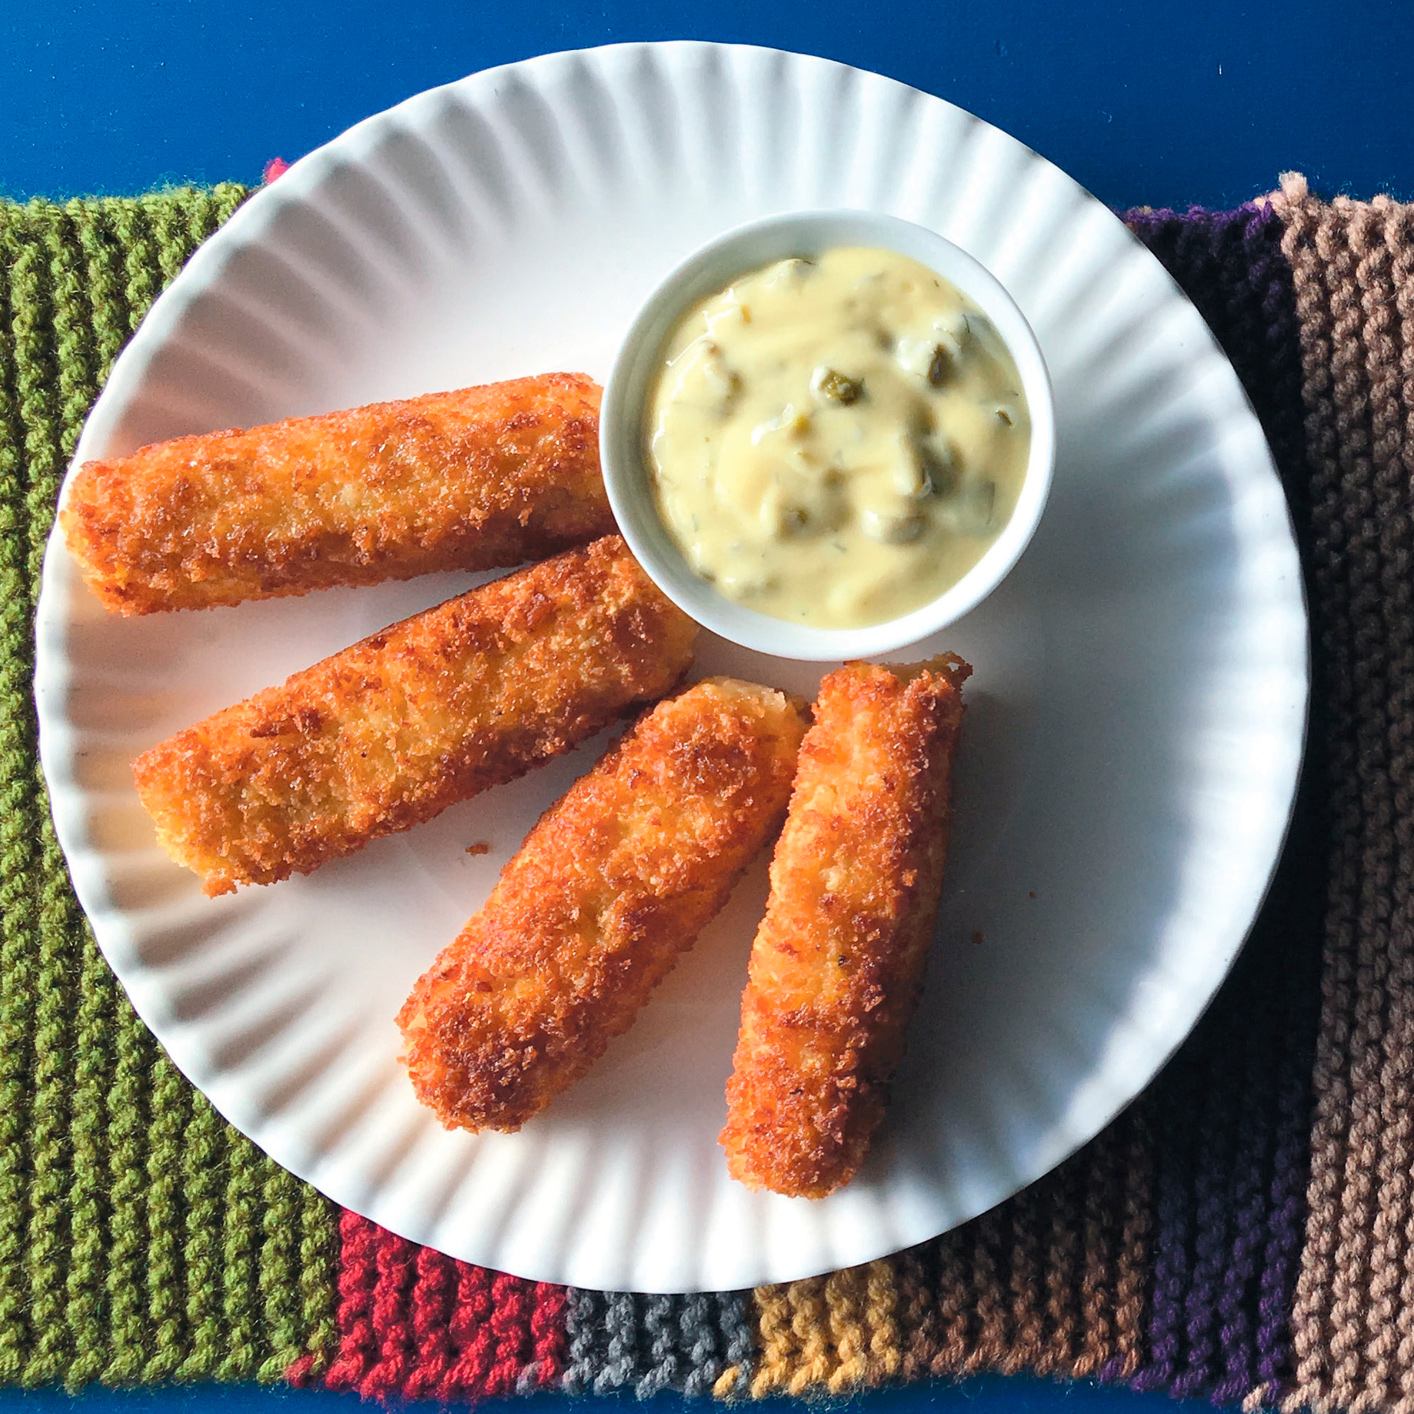
Fish Sticks and Custard
FEEDS 4
I don’t have to explain the significance of this dish to Whovians who remember well the first meal of the regenerated Eleventh Doctor. My version is different in that it’s actually tasty…even if you don’t have two hearts and live in a blue box.
FISH STICKS
1 pound haddock or pollock fillets
1¾ cups panko bread crumbs
3 large eggs
1 tablespoon mayonnaise
1 tablespoon Dijon mustard
½ teaspoon onion powder
½ teaspoon kosher salt
¼ teaspoon cayenne pepper
½ cup all-purpose flour
¼ cup canola oil
CUSTARD
1 large egg yolk
1 cup whole milk
1 tablespoon cornstarch
1 teaspoon Dijon mustard
1 teaspoon fresh lemon juice
½ teaspoon kosher salt
¼ cup finely chopped sour pickles (gherkins)
1 teaspoon chopped fresh dill
Ground white pepper
1. Freeze the fish fillets for 30 minutes, or until firm, or if you bought them frozen, thaw for 30 minutes at room temperature. Finely chop the fish and transfer to a bowl with ¾ cup of the panko, 1 of the eggs, the mayonnaise, mustard, onion powder, salt and cayenne pepper. Use your hands or a large spoon to combine. Shape the fish mixture into 1½-ounce finger-shaped sticks. Arrange on a half sheet pan and refrigerate for 30 minutes.
2. Set up your breading station with the flour in a pie pan, the remaining 2 beaten eggs in a second pie pan and the remaining 1 cup panko in pie pan number three. Roll each fish stick in the flour, then the eggs, followed by the panko. Place on a cooling rack set over a sheet pan.
3. Heat the canola oil in a wide nonstick skillet over medium heat (or an electric skillet to medium-high) until it shimmers. Add the fish sticks and cook for 2 to 3 minutes per side, until golden brown. Remove to paper towels to cool.
4. To prepare the custard, beat the egg yolk in a medium bowl and set aside.
5. Combine the milk, cornstarch, mustard, lemon juice and salt in a 1-quart saucepan and whisk until no lumps remain. Cook, stirring constantly, over medium-low heat until the mixture just starts to boil.
6. Remove from the heat and oh so slowly whisk about half of the hot mixture into the egg yolk, then whisk the now “tempered” egg yolk mixture back into the saucepan.* Cook over low heat, whisking constantly, until the mixture thickens enough to coat the back of a spoon.
7. Remove from the heat, stir in the pickles, dill and white pepper to taste. Cool slightly before serving with the fish sticks.**
* Slowly heating the proteins in the egg yolk will help prevent it from overcoagulating and curdling the sauce.
** If you take a look at the composition of this sauce, it’s very close to a tartar sauce, only it’s actually a…that’s right, TARDIS sauce.
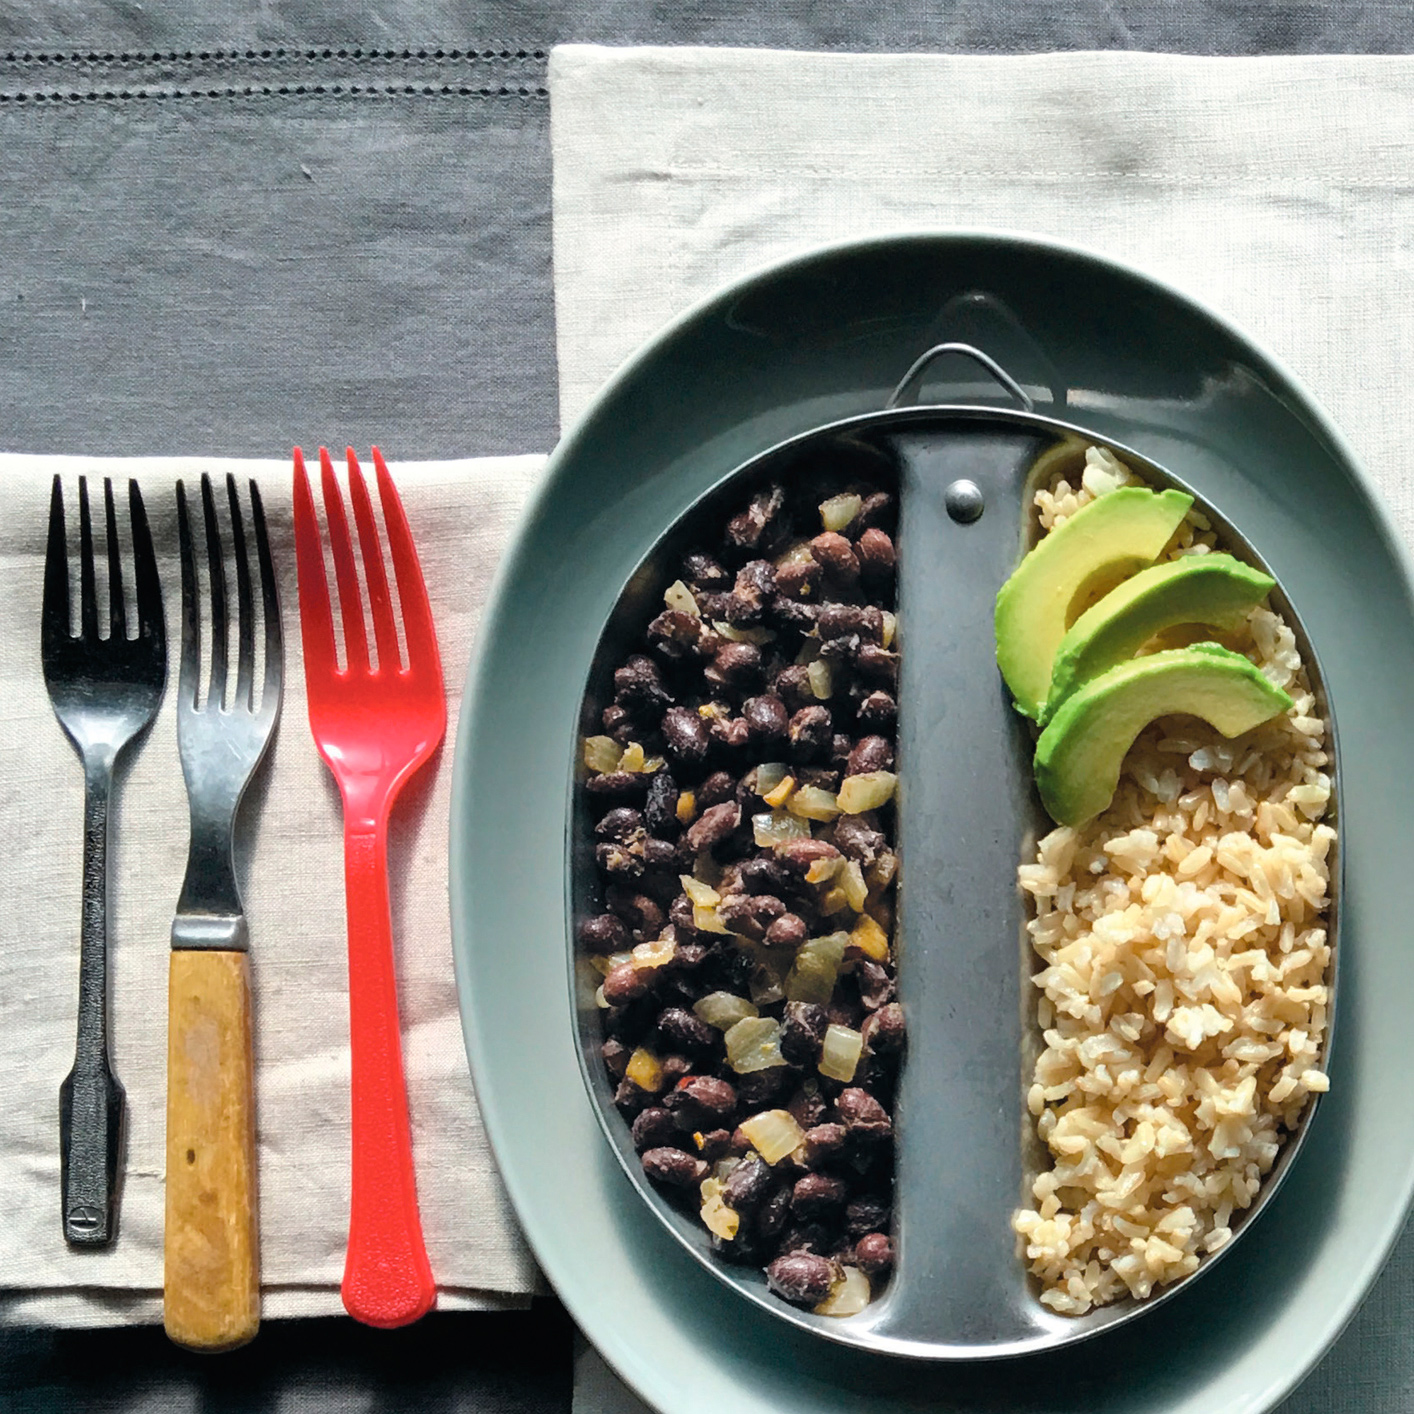
Black Beans/Brown Rice
FEEDS 4
I try to eat vegetarian at least three or four days a week, and this is a midweek staple. The key is going with brown rice over white, a move that ups the flavor, texture and nutrition.*
1½ cups medium-grain brown rice
¼ cup olive oil
1½ teaspoons kosher salt
4 large garlic cloves, smashed
¼ teaspoon red pepper flakes P
1 small onion, chopped
1 15-ounce can “no salt added” black beans, drained and rinsed
1 teaspoon dried oregano
½ teaspoon freshly ground black pepper
1 avocado, pitted, peeled and diced**
1. Heat the oven to 375°F.
2. Spread the rice into an 8-inch square glass baking dish. Stir in 1 tablespoon of the olive oil and 1 teaspoon of the salt.
3. Bring 2½ cups water to a boil in an electric kettle and pour over the rice.*** Cover tightly with heavy-duty aluminum foil H and bake on the middle rack of the oven for 1 hour.****
4. Meanwhile, place a 12-inch sauté pan over medium heat. When the pan is hot, add the remaining 3 tablespoons oil to cover the bottom of the pan and add the garlic and red pepper flakes. Cook, stirring frequently, until the garlic is golden brown, 3 to 5 minutes.
5. Add the onion and the remaining ½ teaspoon salt and cook for 1 to 2 minutes, stirring often, until the onion starts to color. Then add the black beans, oregano and black pepper. Cook, stirring frequently, for 6 to 8 minutes.
6. Remove the cover from the rice, fluff with a fork and allow to “steam out” for 2 minutes. Then, serve the beans over the rice, garnished with avocado.
Note: If you want to jazz this dish up, top with a little of the crema (BCLT Tacos). By the way, you could also just grab a big flour tortilla and roll this into a burrito!
* Take a rice grain out of its husk and you basically have brown rice, that is, white rice wearing a coat of bran…and that coat contains most of the nutrients (vitamins, minerals, micronutrients) that rice has to offer. Everything under the coat is just fuel in the form of starch. To make white rice, you simply buff the coat off. The results are pretty, but the nutrition is gone. And that’s just sad.
** When ripe, an avocado’s flesh will easily separate and can be scooped out of the skin. And by the way, avocados do ripen off the tree. In fact, that’s the only way they’ll ripen. So store at room temp until they give when squeezed, then move them to the fridge.
*** Obviously there are other ways to boil water; this just happens to be my favored method.
**** That bran coat we were talking about.
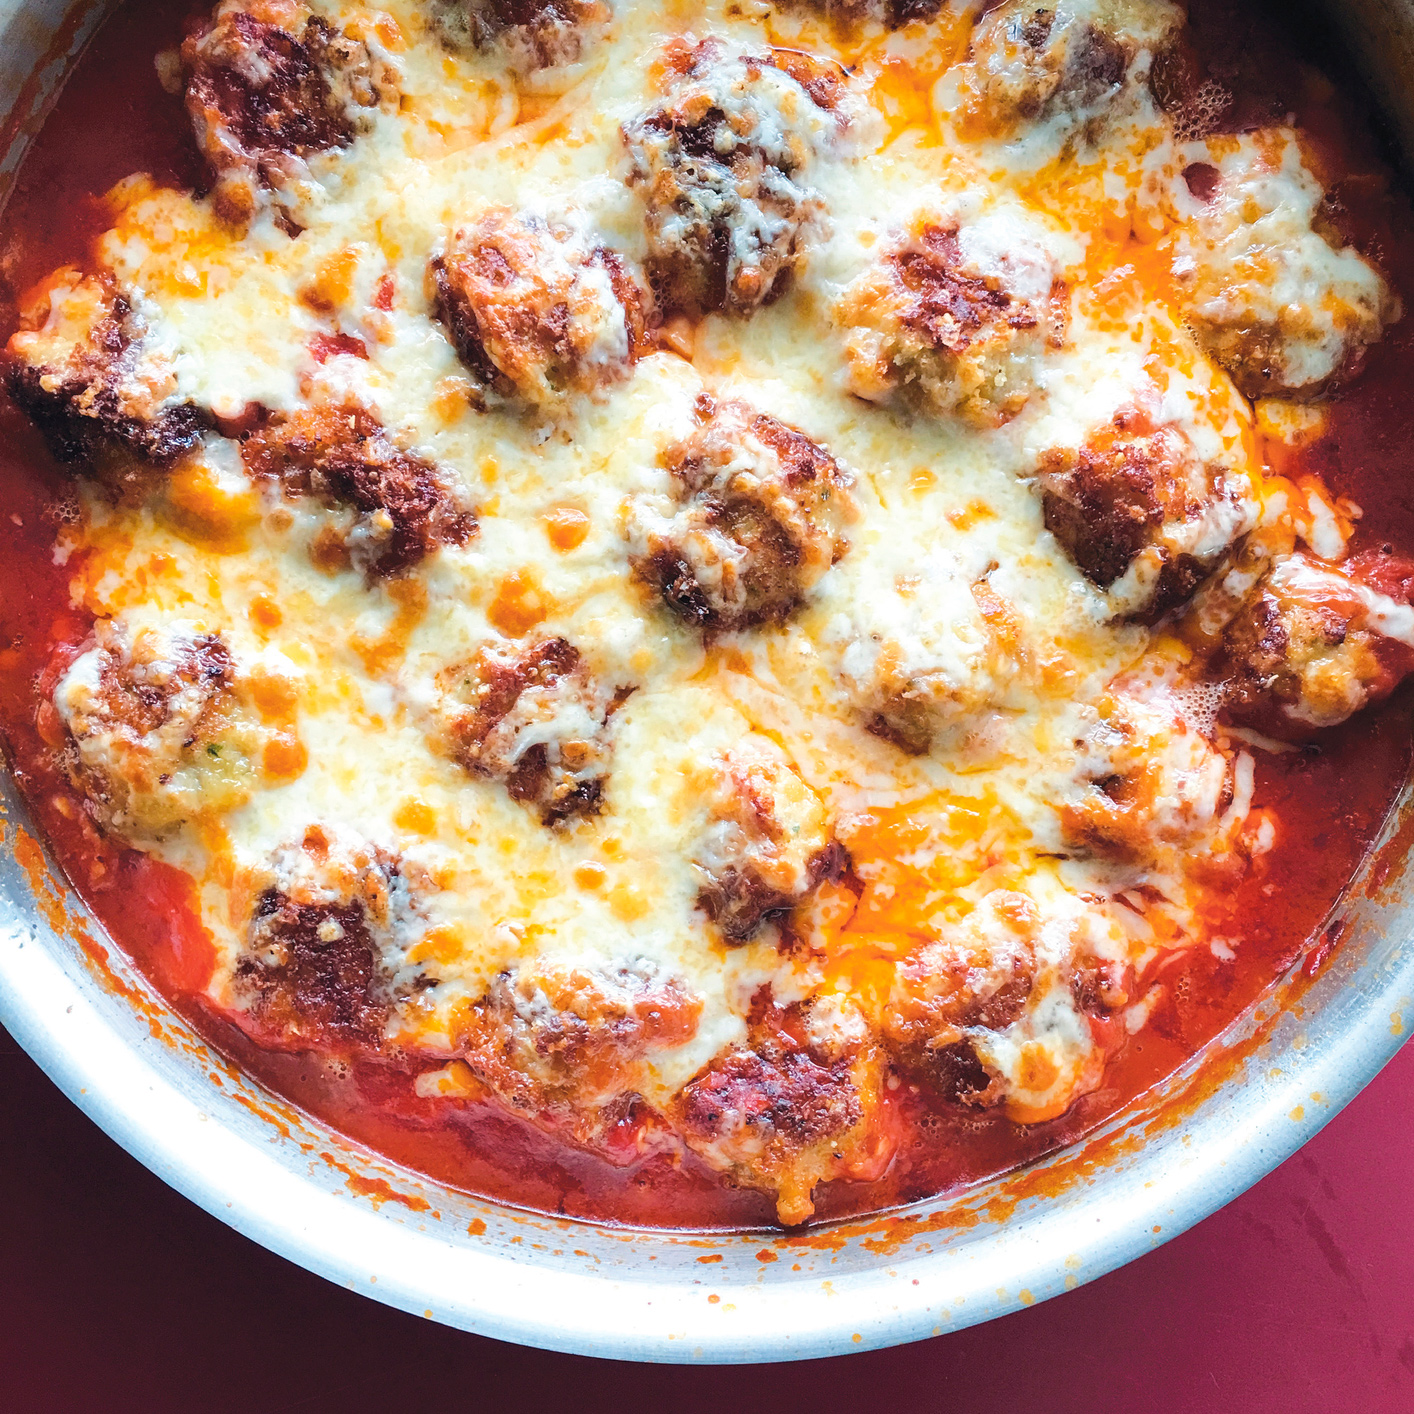
Chicken Parmesan Balls
FEEDS 4
When you’re in my line of work, personal cuisine can be born on the job. One day we were sitting around the lab and Sarah, my director of digital ops, says, “I want chicken Parmesan.” Then I say, “Well, I want meatballs.” Then my director of culinary ops looks up and says, “Chicken Parmesan Balls.” Then there was a knock on the door, and it was humanity dropping by to say thanks.
3 ounces panko bread crumbs
4 ounces Parmesan cheese, grated
1½ pounds ground chicken
1 large egg, lightly beaten
2 tablespoons herb oil* (see herb oil)
1 tablespoon dried basil
2 teaspoons garlic powder
2 teaspoons dried parsley
1 teaspoon dried oregano
1 teaspoon kosher salt
Weeknight Spaghetti sauce
4 ounces low-moisture mozzarella cheese, grated
1. Heat the oven to 400°F.
2. Mix together ½ ounce of the panko with 1 ounce of the Parmesan in a small bowl. Set aside.
3. Combine the chicken, egg, 1 tablespoon of the herb oil, the remaining 2½ ounces panko, the remaining 3 ounces Parmesan, the basil, garlic powder, parsley, oregano and salt in a large bowl. Using your hands, gently combine until just incorporated, trying not to overwork the meat.
4. Divide the meatball mixture into 28 golf ball-size rounds (1 ounce each) and roll them in the panko mixture.
5. Heat the remaining 1 tablespoon herb oil over medium heat in a 12-inch oven-safe skillet. Brown the meatballs in the herb oil, about 30 seconds on each side, working in batches if needed to avoid crowding the pan. Remove the browned meatballs from the pan and make the spaghetti sauce beginning with step 1, but without cooking the spaghetti.
6. Add the meatballs back to the pan, cover with the grated mozzarella and bake until the meatballs are cooked through, about 10 minutes, and the cheese is melted. Serve over cooked pasta or on top of crispy bread.
Game over, man…game over.
* If the meatballs are browned in two batches, another tablespoon of oil may be required.
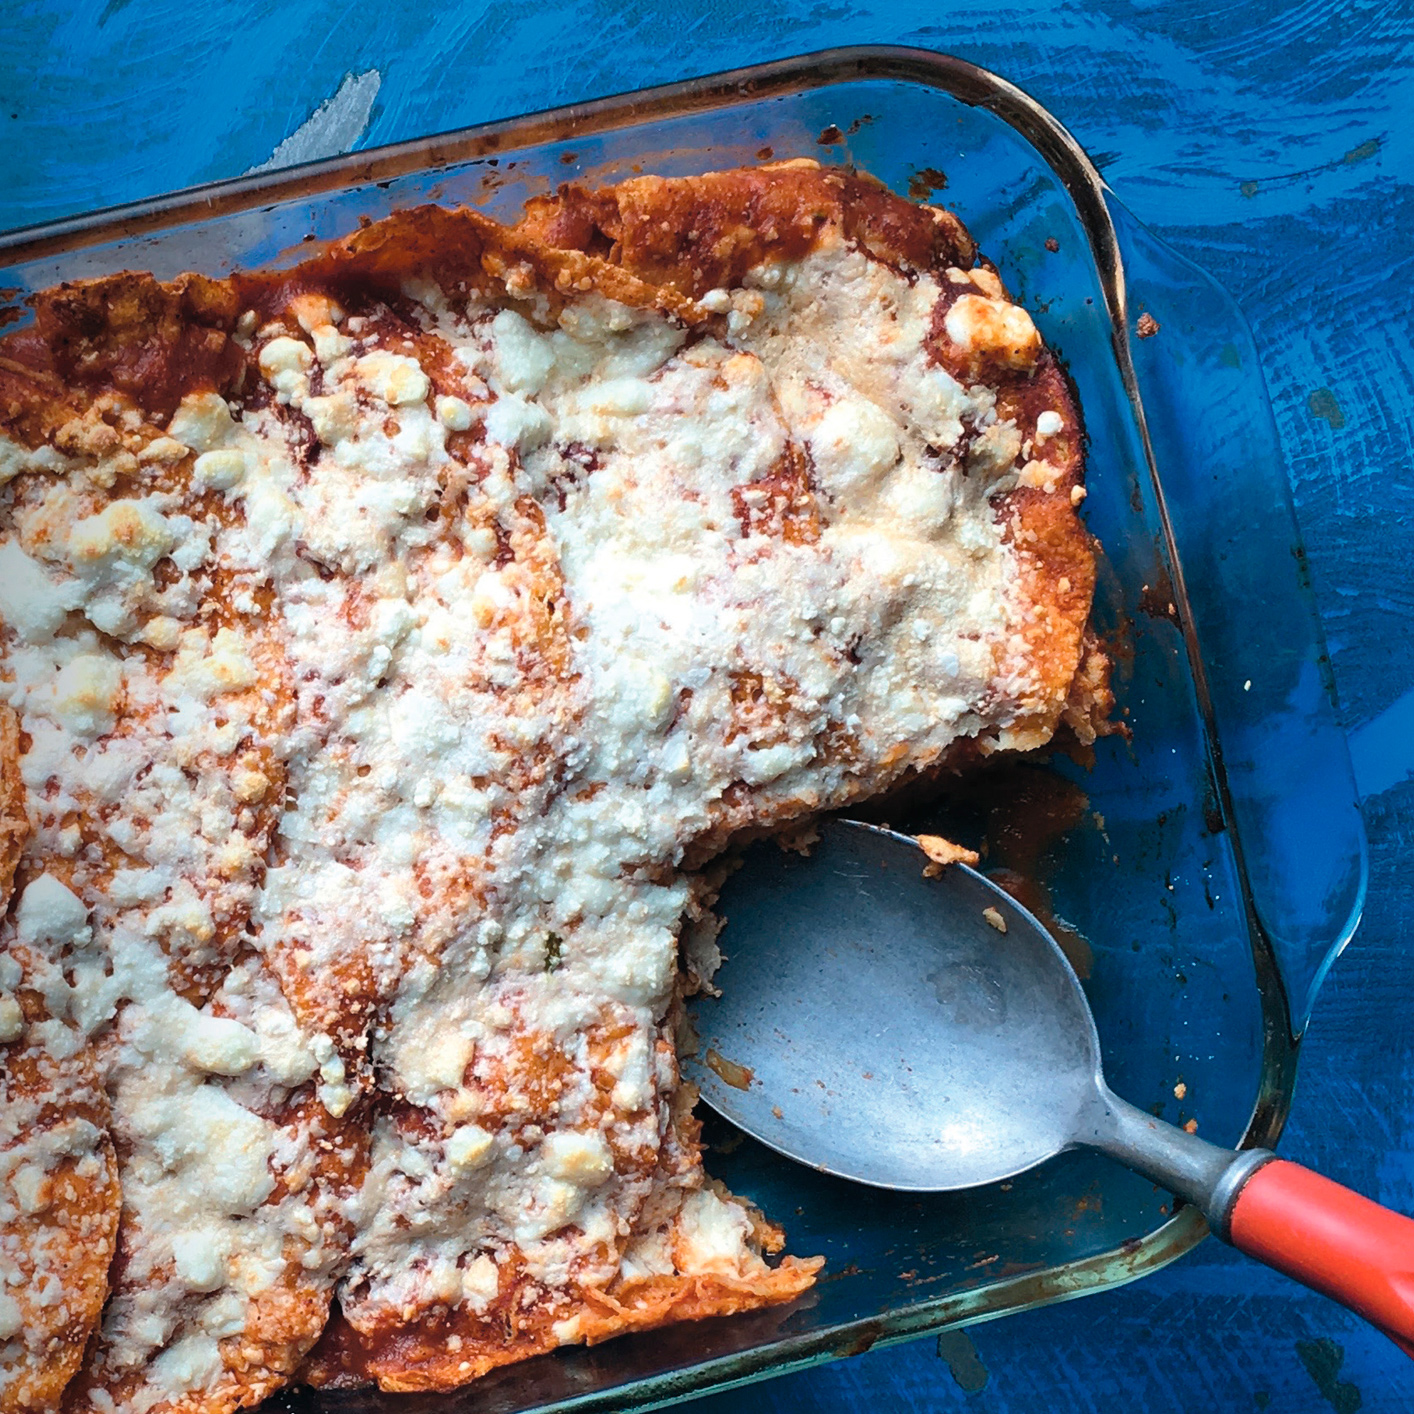
“EnchiLasagna” or “Lasagnalada”
FEEDS 6 TO 8
Doesn’t matter how you spell it, it’s what happens when you Frankenstein a plate of enchiladas to a lasagna. SCIENCE!
2 dried chipotle chiles P, stems and seeds removed, diced
3 large garlic cloves, minced
2½ teaspoons chili powder
1½ teaspoons toasted cumin seeds, freshly ground
2 cups chicken broth
3 cups tomato sauce
½ teaspoon kosher salt
¼ teaspoon freshly ground black pepper
FILLING
1 tablespoon canola oil
1 pound boneless, skinless chicken breasts or thighs, cubed
1½ cups diced onions
Pinch of kosher salt
1 large garlic clove, minced
1 teaspoon dried oregano
Nonstick cooking spray
18 6-inch corn tortillas
3 cups shredded queso fresco
1. Heat the oven to 350°F.
2. To make the sauce, bring the chiles, garlic, chili powder, cumin, chicken broth, tomato sauce, salt and pepper to a boil in a medium saucepan over high heat. When the mixture bubbles, drop the heat to low and simmer for 15 minutes, or until the chiles are just soft.
3. To make the filling, heat the canola oil in a large skillet over medium-high heat and sauté the chicken for 7 to 9 minutes, until cooked through. Transfer to a plate. Add the onions and salt to the same pan, drop the heat to medium-low, and sweat for 4 to 6 minutes. Add the garlic and oregano and cook for 2 to 3 minutes, until the onions are tender. Add the chicken back to the pan and stir to combine. Then, kill the heat.

4. Lube a 13 × 9-inch glass baking dish with nonstick cooking spray, then spread ½ cup of the sauce across the bottom of the dish. Cut the tortillas in half. Dip 12 tortilla halves into the sauce. Arrange the halves on the bottom of the pan in a single layer, with the straight-cut edges aligned with the width of the baking dish. Top with half of the chicken mixture and 1 cup of the queso fresco. Repeat the layering, then finish the top with any remaining sauce and the remaining 1 cup queso fresco.
5. Cover the dish with heavy-duty aluminum foil H and bake for 30 minutes. Remove the foil and bake for another 10 minutes, or until the queso fresco on top is bubbly and irresistible.
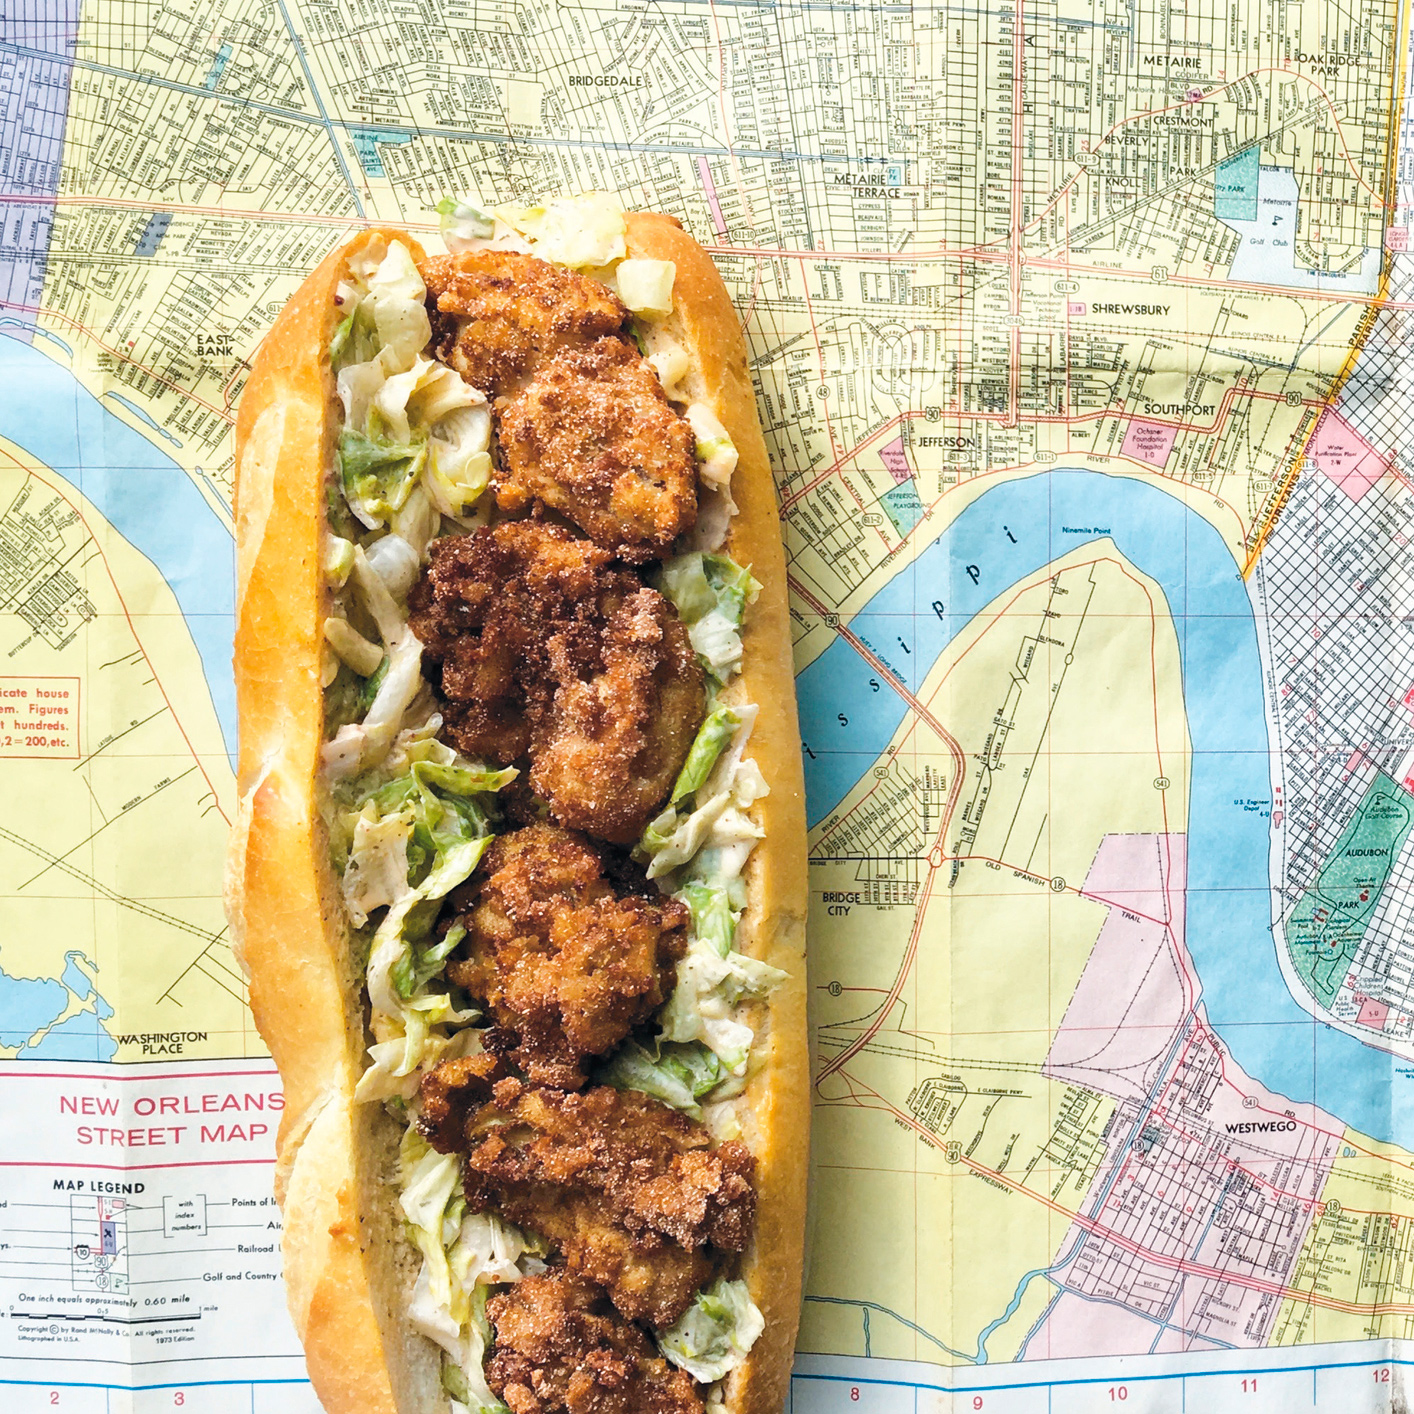
Oyster Po’boy
MAKES 4 SANDWICHES
Apparently, at some point in my late twenties I ate too many oysters and my body developed an intolerance, which is not the same as an allergy. But it might as well have been because one day I could eat all I wanted and the next day, just one oyster sent me to the hospital. Then, the last time I was in New Orleans, I was at the Parkway Bakery & Tavern and I saw an oyster po’boy go by and my mouth started watering. I decided it was time to roll the dice again and I’m happy to say everyone’s doing just fine.
If there’s a secret to this sandwich it’s using lettuce instead of cabbage in the slaw, which I always make before frying the oysters.
ICEBERG SLAW
Makes approximately 2 cups
A slaw for cabbage haters.
½ cup mayonnaise
4 teaspoons fresh lemon juice (about 1 lemon’s worth)
1 tablespoon Dijon mustard
1 tablespoon hot sauce
2 teaspoons dill pickle brine
½ teaspoon kosher salt
½ teaspoon dried parsley
¼ teaspoon garlic powder
¼ teaspoon black pepper
¼ teaspoon sumac P
¼ teaspoon cayenne pepper
1 small head iceberg lettuce, shredded
FRIED OYSTERS
½ cup buttermilk
2 teaspoons hot sauce
24 U.S. farm-raised oysters, shucked
1 quart peanut oil
¾ cup fine ground white cornmeal P
¾ cup panko bread crumbs
1½ teaspoons kosher salt
1 teaspoon freshly grated nutmeg P
Freshly ground black pepper
TO ASSEMBLE EACH SANDWICH
4 6- to 8-inch French bread rolls
6 fried oysters
Iceberg Slaw
1. Whisk the mayonnaise, lemon juice and the remaining dressing ingredients together in a mixing bowl. Add the iceberg and toss to coat. Cover and refrigerate for 30 minutes.
2. Combine the buttermilk and hot sauce in a small bowl. Add the oysters and soak for 30 minutes to 1 hour.
3. Heat the peanut oil in a 5-quart Dutch oven over medium-high heat until it reaches 370° to 375°F on a deep-fry thermometer H.
4. Combine the cornmeal, panko, salt and nutmeg in a medium mixing bowl M.
5. Remove the oysters, 1 at a time, from the marinade and shake off the extra moisture. Dredge in the cornmeal mixture, then move to a cooling rack set over a half sheet pan.
6. Once all of the oysters are coated, transfer, 6 at a time, to the hot oil. Fry for 1½ to 2 minutes, until the oysters are golden brown. (Watch your thermometer because the introduction of cold foods will likely pull the temp down a bit.)
7. Carefully transport the fried oysters to a cooling rack inverted over a half sheet pan lined with paper towels. Sprinkle with freshly ground pepper. Bring the oil back to 370° to 375°F and repeat with the remaining oysters.
8. Split the rolls in half lengthwise. Tear out a bit of the bread from the center of each roll, creating a trough. Set 6 oysters on one side. Top with ½ cup of the slaw and the top of the roll.
9. Consume. Notice how the slaw is kinda gooshy (in a good way) and how that contrasts with the crunch of the oysters. Pulling some of the bread out of the middle will help the sandwich stay together, but you’re still going to need a roll of paper towels to eat this thing.
The Final Turkey
FEEDS 8 TO 10
I have arrived at my final turkey.
It may not be your final turkey, but after years of searching, this is where I get off. The procedure is Zen-simple, and yet when followed, it produces perfectly cooked meat—meaning breast meat at 158°F and dark meat at 178°F. It is flavorful, it is juicy, it is, well…I refuse to use the word “perfect,” but there it is. There is, however, one catch. A large Dutch oven is required, specifically a Lodge 12- or 14-inch-deep camp oven; a Dutch oven with three legs and a lid that’s made for stacking charcoal on. Should you own one of these anyway? Heck yeah you should. And don’t be freaked by the legs; most of the time I’m using this right on the floor of the oven. But even if you don’t make up big pots of chili or campfire biscuits or beans for fifty on a regular basis, you’ll want to own this hulking fallout shelter for hamsters for no reason other than turkey.
Speaking of, notice the weight of said bird. I don’t mess with the big birds anymore because they take too long to cook, they tend to dry out by the time they hit safe temperatures, and besides, who the heck has an oven that big anyway. I keep to medium birds in the 12- to 14-pound range, which are plenty big for 8 to 10 people. If you have more guests, heck, cook two.
1. Place 1 cup kosher salt in a cooler and dissolve in 2 liters hot water. When you’re certain the very last crystal has vanished, add 4 liters cold water.
2. Unwrap a frozen turkey and place it, breast-side down, in your vessel. Close the vessel and leave it at room temperature for 36 hours.* After about 8 you should be able to remove the neck and giblet bag. If you like giblet gravy, save them; if not…you know what to do.
3. After 36 hours, drain the bird and let sit at room temp for about 1 hour.
4. Place the Dutch oven (lid on) either on the floor of the oven or position the legs so that it can sit on the bottom rack.**
5. Heat the oven to 500°F a good 45 minutes prior to cooking so that the Dutch oven is fully loaded, thermally speaking.
6. Cross the ends of the turkey’s legs and secure them with a short piece of butcher’s twine tied preferably with a surgeon’s knot, though I suppose a locking clove hitch would work if you prefer.
7. Lightly oil the bird (canola is fine) and sprinkle with 2 teaspoons kosher salt.
8. When both inner and outer ovens are scorching hot, quickly remove the lid of the Dutch oven, being careful to avoid any smoke that may billow out.***
9. Drop the bird, spine down, into the Dutch oven and replace the lid. If the bird is so big that the lid doesn’t quite close all the way, don’t worry about it. As long as the gap isn’t more than a quarter of an inch it won’t matter. Just smack that sucker down.
10. Close the oven door and cook for 20 minutes.
11. Open the oven door, remove the Dutch oven lid, close the oven door and cook for another 20 minutes.
12. Remove the pot to the cooktop or other safe surface and replace the lid. If your bird was a little big for the lid to start, just cover with a couple layers of heavy-duty aluminum foil H, then use a kitchen towel to crimp the foil onto the sides of the Dutch oven. Spread the towel on top of this to hold the foil down and add some insulation. Wait another 20 minutes.
13. Insert the stem of an instant-read thermometer H into the deepest part of the breast. It should read 158°F.****
14. Remove the lid or foil and let the turkey rest in the pot for 5 minutes.
15. Insert the big end of a large wooden spoon into the turkey cavity and use that to carefully lift the bird out to a cutting board.
16. Carve and consume.
* Oh jeeze, I can hear the helicopters now coming in low out of the sunset full of worrywarts and lawyers and (shudder) bloggers to harp in perfect harmony about how I’m ignoring the very fundamentals of food sanitation. Well, riddle me this: A frozen bird that size goes into a cold salt brine in the cooler; how long will it take for the solution to rise above 40°F and into the dread “danger zone”? That’s right…about 24 hours. Besides, how many bacteria can thrive in a salt solution? On this planet, not many. So if you want to refrigerate your turkey as it brines, fine by me, but this is how I do it, and it’s my book and that’s that.
** In this instance, the rack is a good option because it will help facilitate loading and unloading the bird.
*** Okay, “billow” is probably a bit dramatic. But odds are there will be a little because a well-cared-for Dutch oven always has some oil on its surface, and at this temperature, some of that will become vapor, That is, smoke.
**** Yes, I know that 165°F is the instant-kill temp for salmonella, but those suckers die at lower temperatures as well, as long as the exposure is long enough. If you’re deeply concerned, add 5 minutes to the first cooking phase…but I wouldn’t.

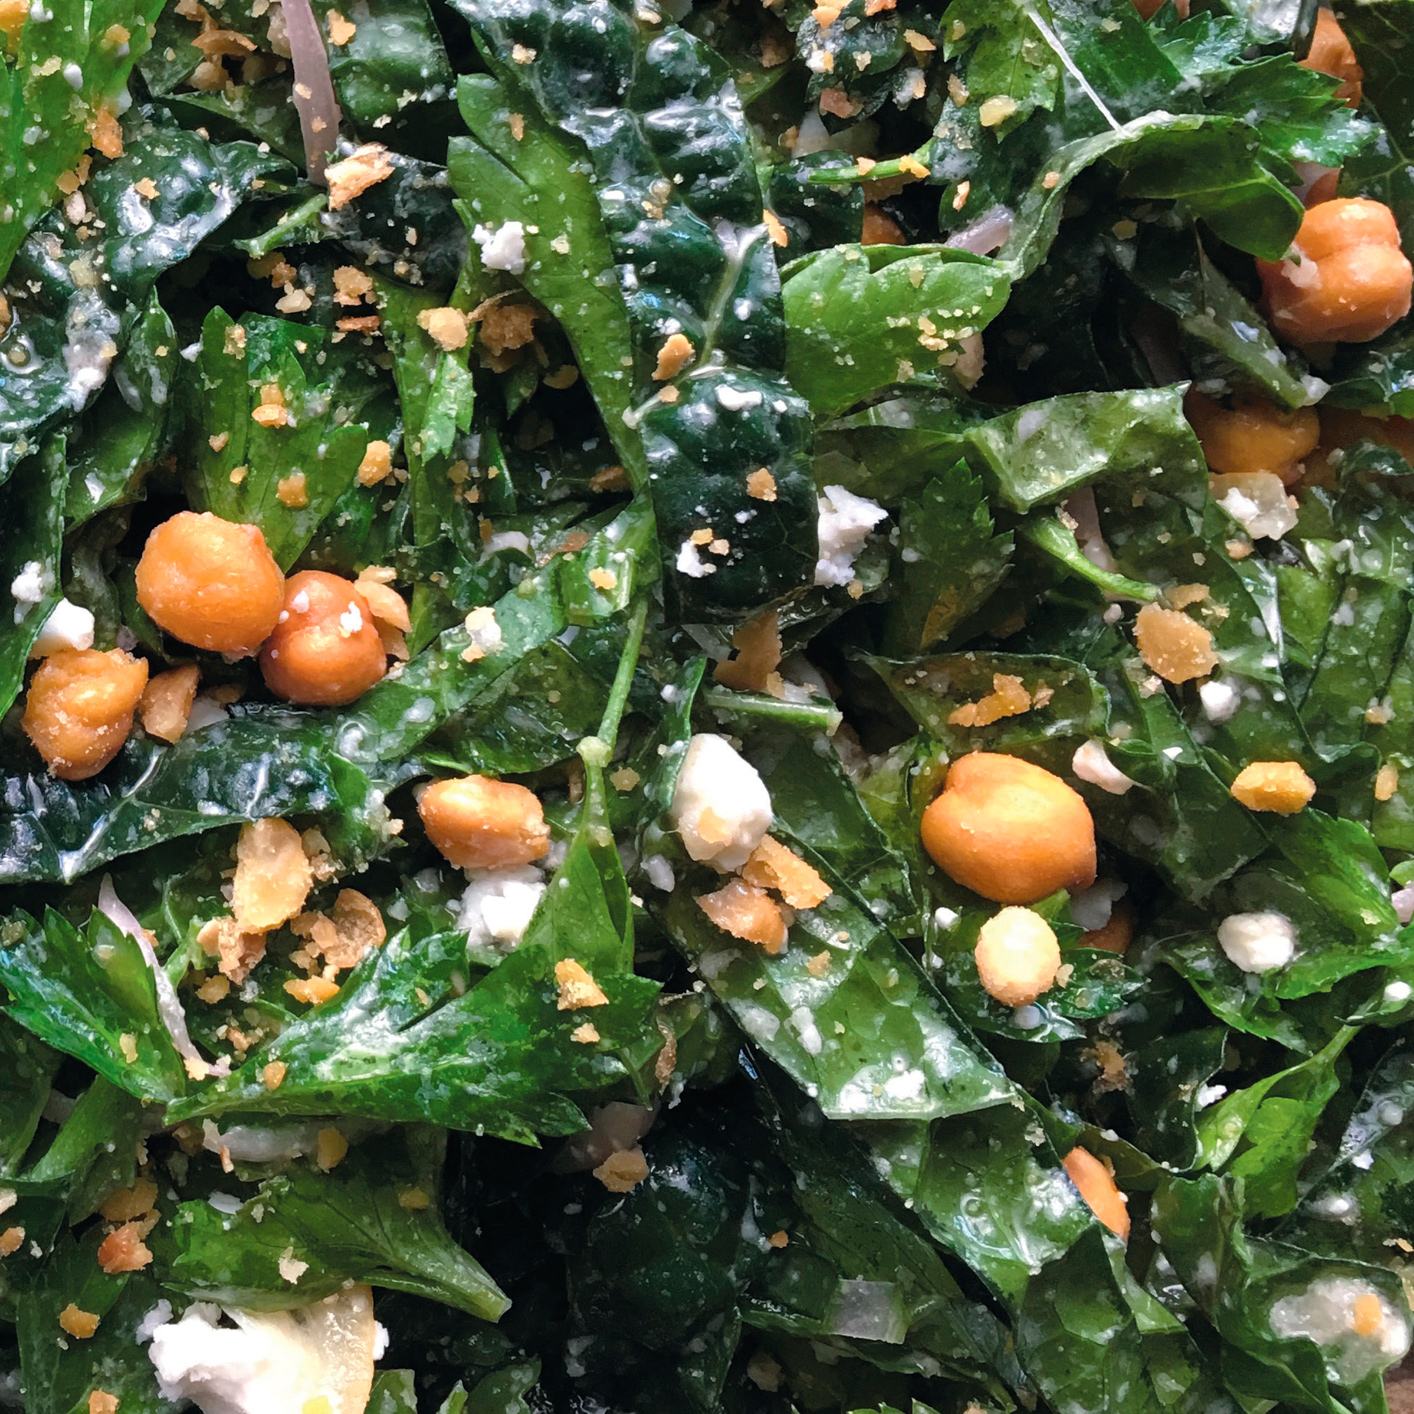
Not Just Another Kale Salad
FEEDS 4
Kale is a unique dark leafy green that can stand up to heavy dressings and yet is tender enough to be eaten raw, hence its popularity in salads. This member of the cabbage family comes in three common market forms: curly, red (also curly), and lacinato, aka Tuscan, aka cavolo nero, aka “dinosaur” kale. This latter specimen has long, relatively flat leaves and is my preferred kale for this application.
1 bunch lacinato kale, stems removed, cut into ribbons
1 bunch fresh flat-leaf parsley, stems removed, roughly chopped
1 small shallot, frenched M
4 tablespoons extra-virgin olive oil
2 tablespoons fresh lemon juice
2 large garlic cloves, minced
2 ounces anchovies P in olive oil, approximately ½ 4.25-ounce can, finely chopped*
3 ounces firm feta cheese
2 tablespoons finely chopped Quick Preserved Lemons
1 cup Crispy Chickpeas, crushed
Freshly ground black pepper
1. Toss the kale, parsley and shallot with 2 tablespoons of the olive oil and let sit for 10 minutes.
2. Meanwhile, puree the remaining 2 tablespoons olive oil, the lemon juice, garlic, anchovies and 1 ounce of the feta in a food processor. Pour the dressing over the kale, then toss in the preserved lemon, chickpeas and the remaining 2 ounces feta.
3. Marinate at room temp for 1 hour before serving with freshly ground pepper. **
* Stop it! I know what you’re thinking, and yes, you need them and no, the salad won’t taste fishy and you must trust me on this.
** If you want to make it ahead, just hold out the chickpeas and refrigerate the salad for up to 4 hours. I’d still give it time to come to room temp before serving, though.