Everyday Cook - Alton Brown (2016)
METHODS (A FEW OF MY FAVORITE WAYS)

BREAD CRUMBS
I use bread crumbs quite a bit and I flat-out refuse to buy them. So, let’s say you’ve got half of a baguette left over from dinner. You know that no matter what you do it’s going to be stale by morning. That’s because it’s made from a lean dough and doesn’t contain enough fat or sugar to hold on to any moisture. So tear it into 1-inch chunks. Place these on a pan and roast for 5 minutes at 300°F. Then remove the pan from the oven and pulse to coarse crumbs in a blender or food processor. Return the crumbs to the oven for another 5 minutes, or until just lightly browned. Cool thoroughly and seal in airtight containment for up to a month.
PREPPING A BUNDT OR TUBE PAN
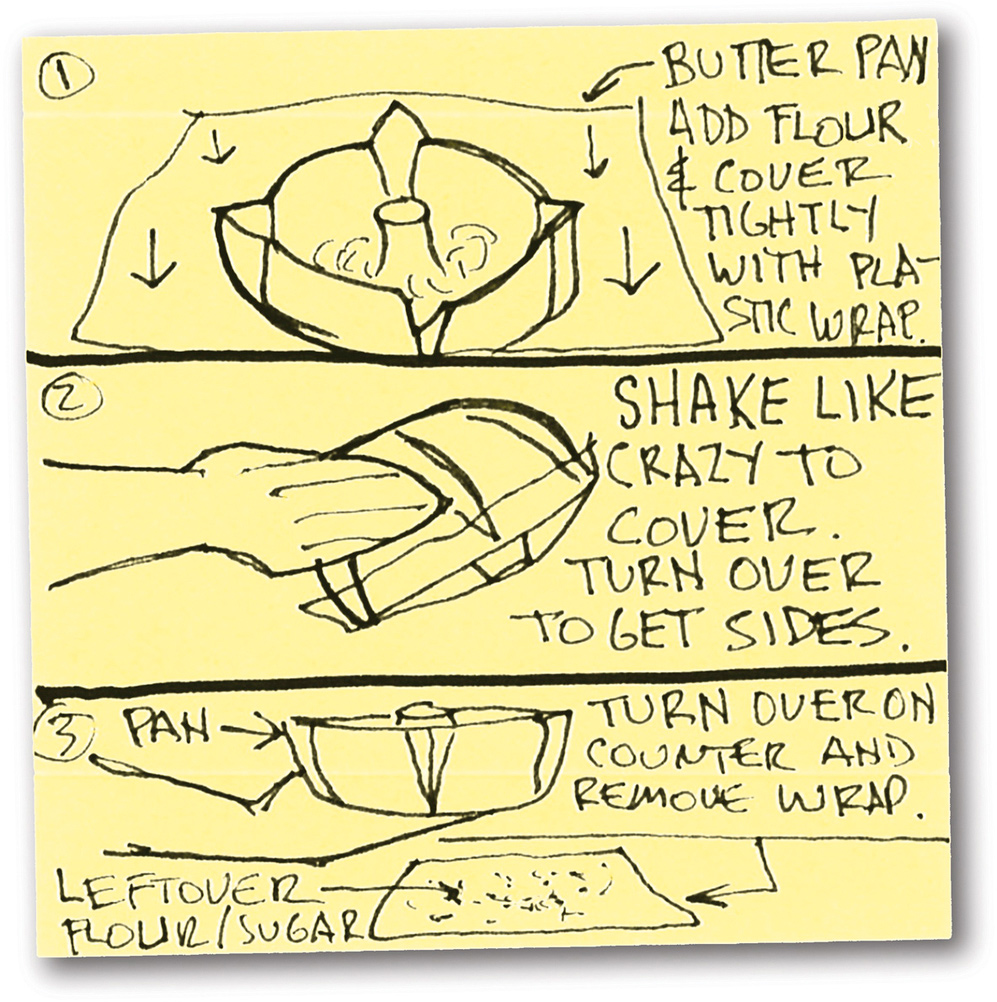
Freeing a cake from a pan with lots of nooks and crannies can be a pain, especially if the pan is older and has a fairly scratched-up surface. So, lube the pan lightly with shortening or butter (I prefer shortening as it doesn’t contain water, which can complicate things), then dump in about 3 tablespoons of either flour or sugar, depending on what the recipe calls for, and cover with plastic wrap. Next, use a rubber band (like the ones they put around broccoli and asparagus) to secure the plastic around the pan’s center tube before stretching the wrap around the outside of the pan. Now shake the heck out of it, turning it upside down several times to make sure the edges are coated. Remove the plastic and dump out the excess powder.
CHARCOAL PREP
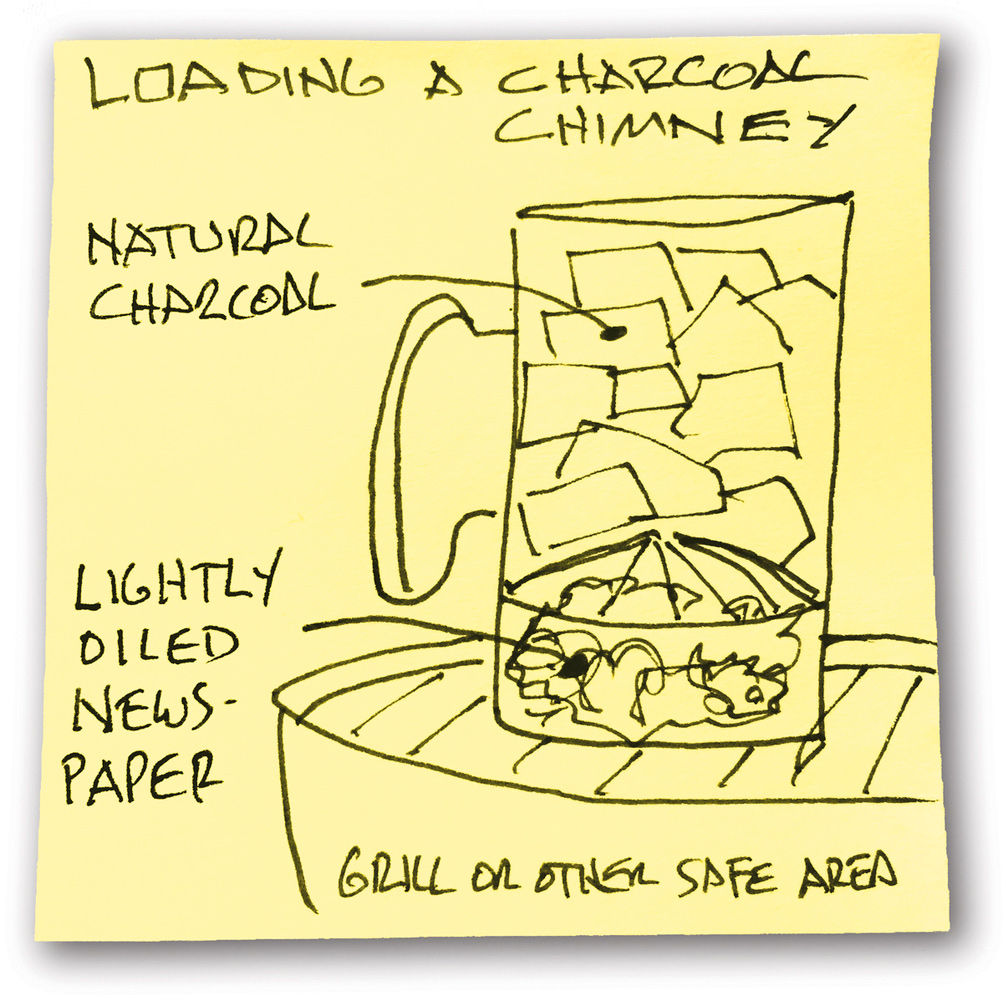
All you need to buy is a chimney-style charcoal starter, which basically looks like a big metal tube with a well-insulated handle on it. You can buy one pretty much anywhere grills are sold. When you’re ready to use it, fill the chimney with natural chunk charcoal (mine holds about 5 quarts), then lightly spritz a full page of newspaper with cooking oil or spray with nonstick cooking spray (about a 5-second blast should do it). Loosely wad the paper and place it in the bottom of the chimney, under the wire rack. Place this on your grill and light the paper. The oil will essentially turn the paper into an oil lamp that will burn about ten times longer than the paper alone, though I should point out that the nonstick cooking spray won’t burn quite as long. Either fuel, however, will provide the charcoal with enough heat and time to kindle.
CLARIFIED BUTTER
This is one of my secret weapons. Not only does clarifying convert butter into a sauté-capable fat, the flavor is unlike anything, and I do mean anything, in the kitchen. Oh, and once the process is complete, the stuff will keep in a jar in the fridge for up to six months and up to a year in the freezer. That means you’ll be able to make the crackers on this page any dang time you like. So, melt a pound of butter (that’s four standard sticks) in a narrow, heavy saucepan over low heat until all the bubbles dissipate (that is, until the water has cooked out) and the liquid clears, 30 to 40 minutes. Strain through a fine-mesh strainer, being careful to leave any solids at the bottom of the pan. Always keep tightly covered as fat is notorious for absorbing flavors from both fridge and freezer.
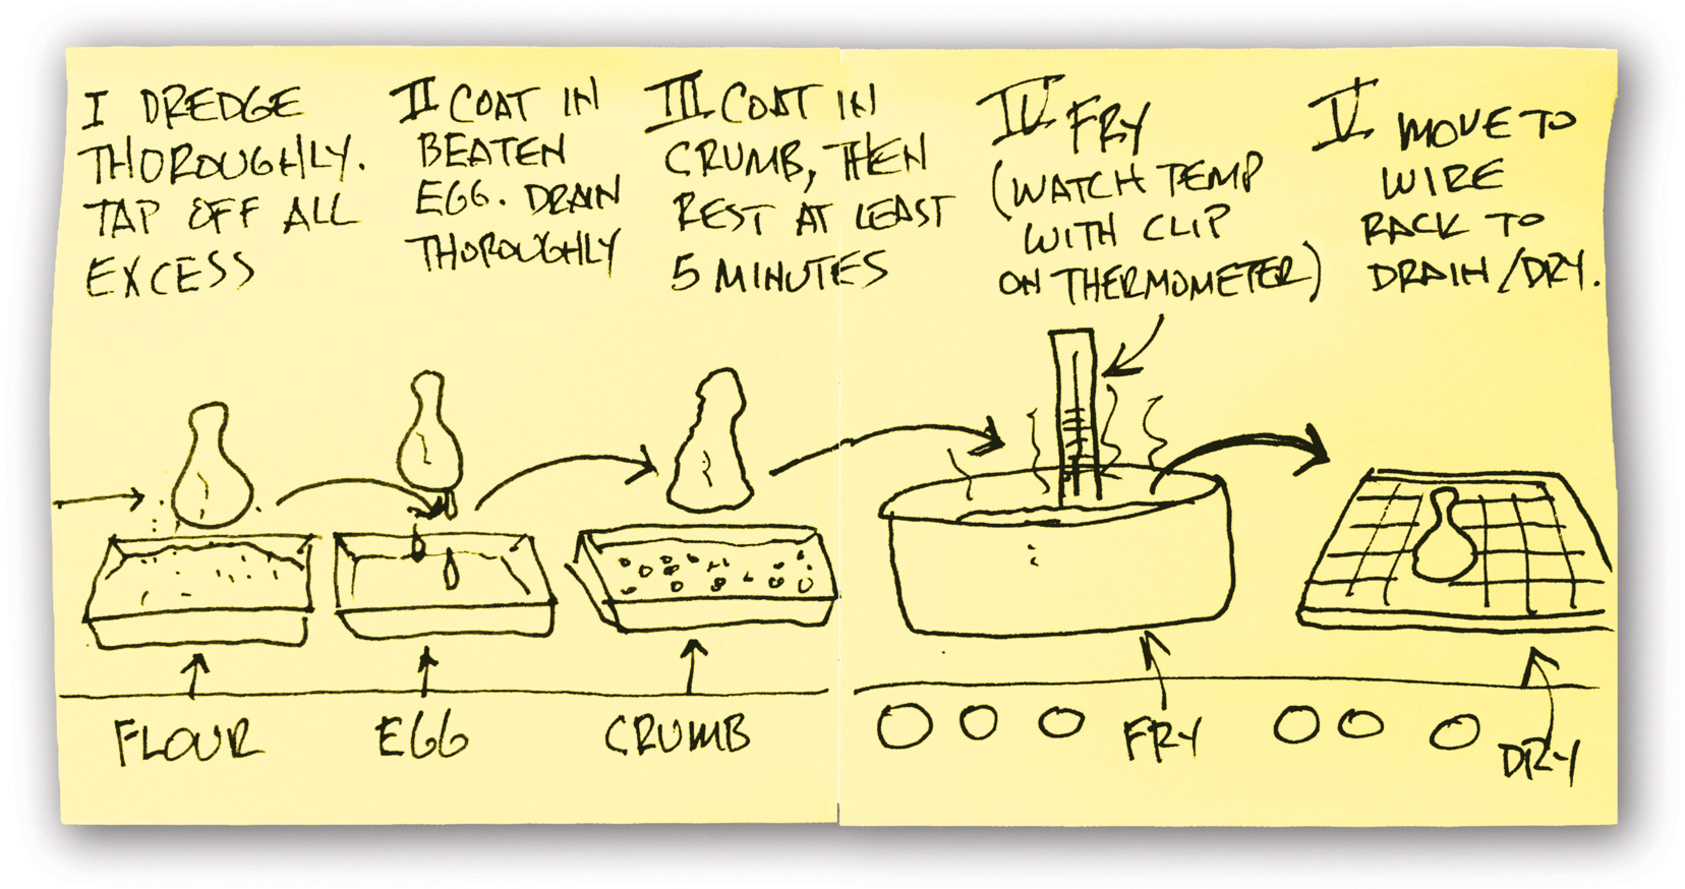
FRY STATION SETUP
Remember, the food to be fried moves in this sequence:
I.Flour (to provide a kind of primer coat for the egg). Tap to remove excess (or egg will fall off).
II.Egg (for color and protein and adhesion of heavier crumb layer). Drain excess (or crust can fall off as much of the egg converts to steam during cooking).
III.Crumb coat (bread crumbs, cereal crumbs, stale doughnut crumbs, cracker crumbs…crumbs to provide flavor, color, and crunch).
IV.The fry pot (self-explanatory).
V.The drain rig (provides a place to cool and for excess oil to drain away).
If you want your fried foods extra crispy, try resting after the primary crumb coat, then re-egg and add a second crumb coat. I’d tell you to try a third, but that’s just crazy.
COLD WATER PASTA METHOD
So, it turns out that despite what TV chefs have said in the past (including, me) dry pasta doesn’t actually need a lot of water to cook, and that water doesn’t have to be boiling when the pasta goes in. In fact, all you have to do is cover the noodles with cold water by, say, an inch (long strands will require a wide, shallow pot), bring the water to a boil, stirring often, then drop the heat and simmer for about 2 minutes. Not only is this faster, it wastes a lot less water and energy and I’m not sure that the quality of the pasta isn’t actually better. Oh, and use a hand sieve or strainer to scoop the pasta out of the water rather than dumping the pasta into a colander. That starchy water is perfect for adjusting sauces.
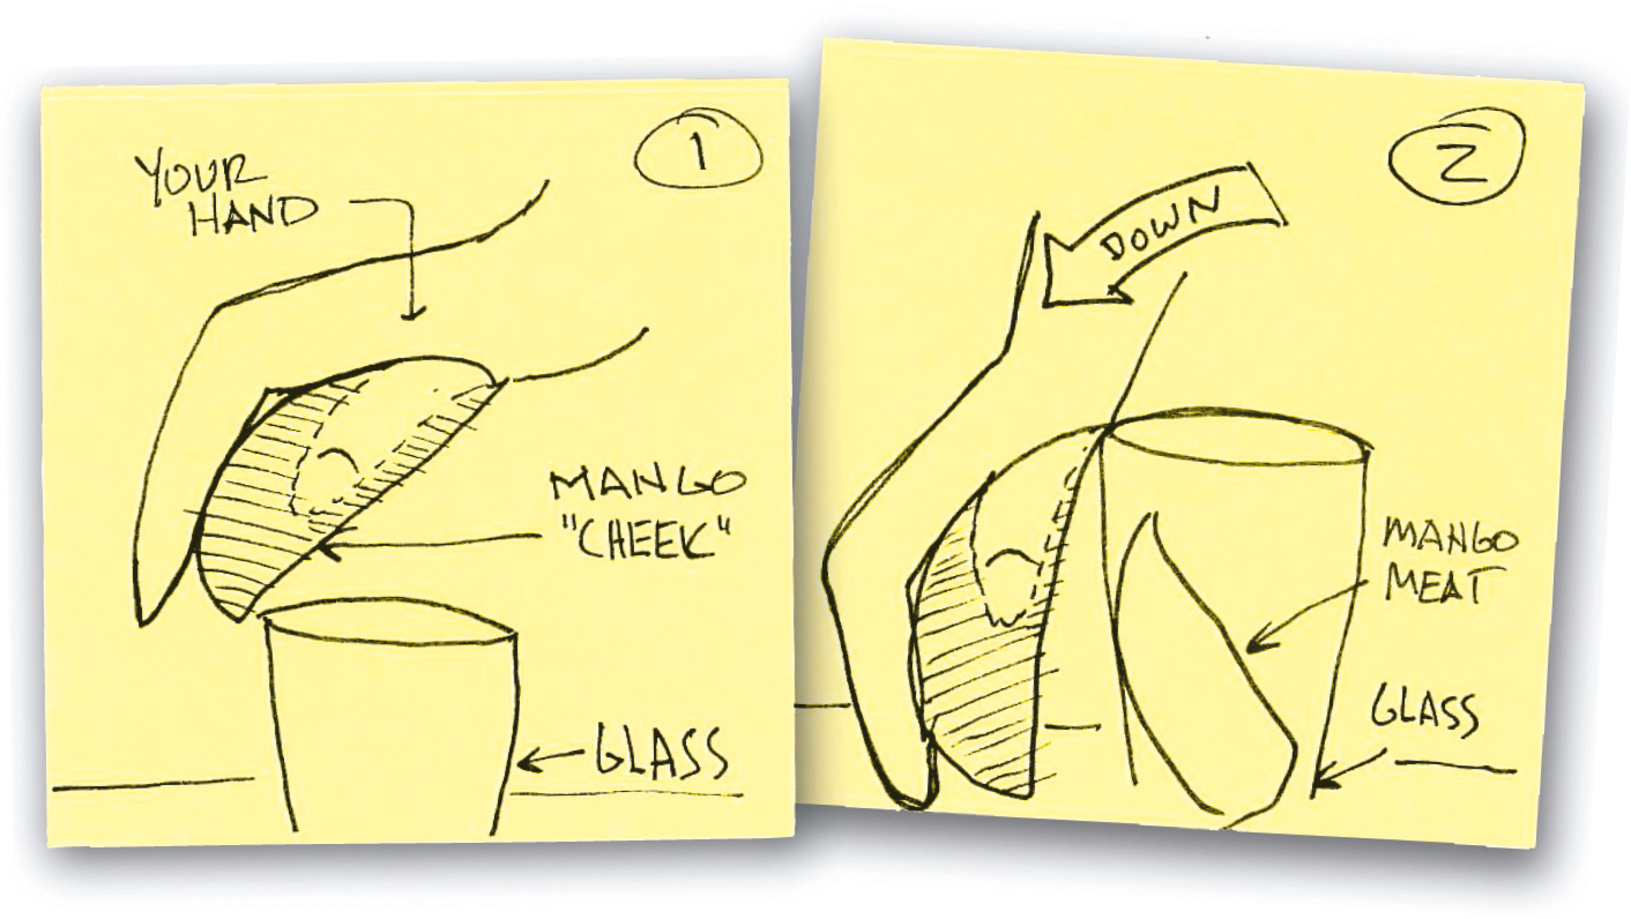
SKINNING A MANGO
I say “skinning” because mangoes are like cats—there are a lot of ways to separate them from their…outer selves, so to speak. The fastest is to simply cut the two fleshy cheeks off the flat seed, then position skin up in the palm of your hand. Place the end over the edge of a drinking glass (see the sketch) and push so that the skin goes over and the flesh goes in. It’s a great method if the mango is ripe, but since the glass isn’t knife-sharp (unless you’ve got some really dangerous glasses), you tend to smush a good bit of the flesh. However, if you’re blender bound, this is definitely the way to go. Otherwise, I go with the crosscut method: Remove the cheeks, hold the flesh up on a kitchen towel (for cut protection), and use a sharp paring knife to cut through the flesh in a grid pattern, without breaching the skin. Then, turn the cheek inside out and scoop off the squares with a spoon. This takes a little longer, but the yield will be neater and higher.
EVERYDAY CLEANING OF CAST IRON
Every time I cook in cast iron, I clean the vessel the same way:
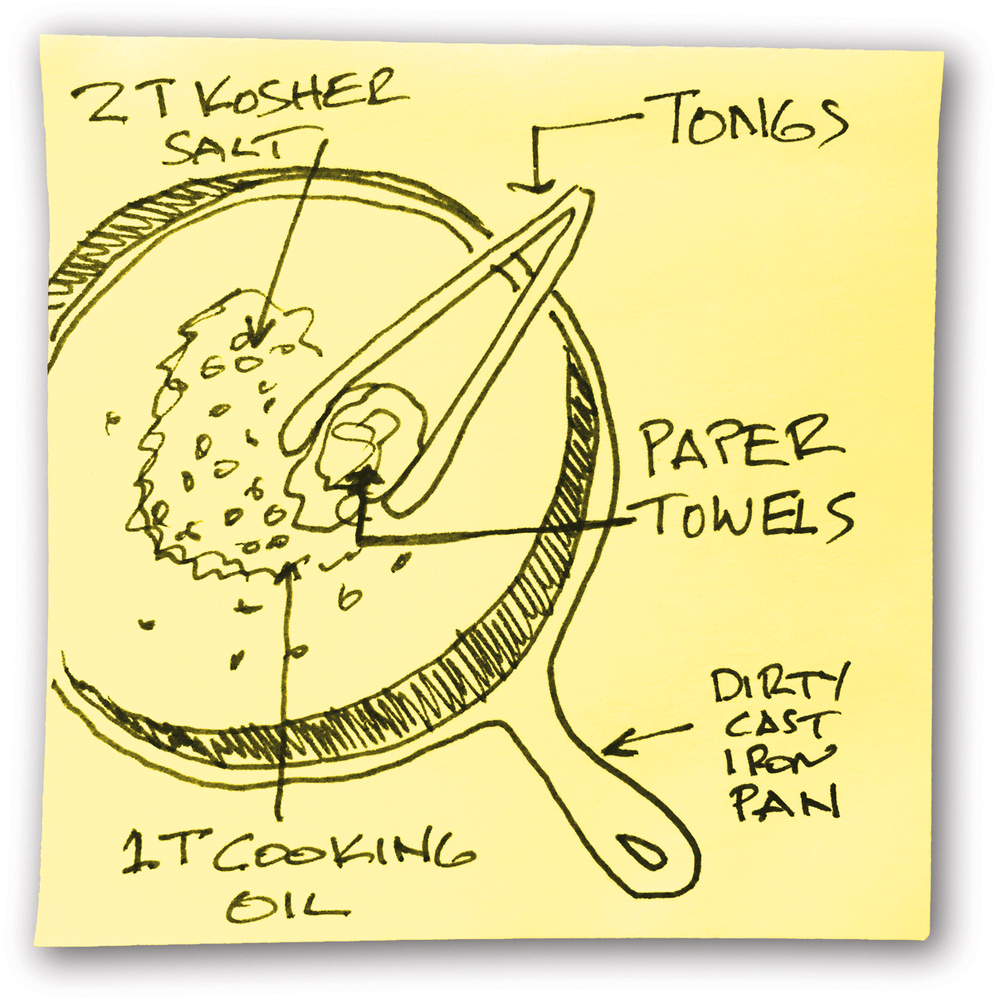
1.Wipe it out.
2.Return it to medium to high heat.
3.Add 1 to 2 tablespoons oil.
4.Add 1 to 2 tablespoons kosher salt.
5.Wad up some paper towels and grab with tongs.
6.Scrub till the vessel is clean and the salt is dark brown/gray.
7.Dump out the salt.
8.Wipe with oil.
9.Cool.
10.Store.
If the skillet is really hot and stuff is really stuck to the bottom (which isn’t very often), I’ll quickly deglaze it with water so that the goo boils off first. Then I dump the water and proceed with my normal MO.
FRENCHING
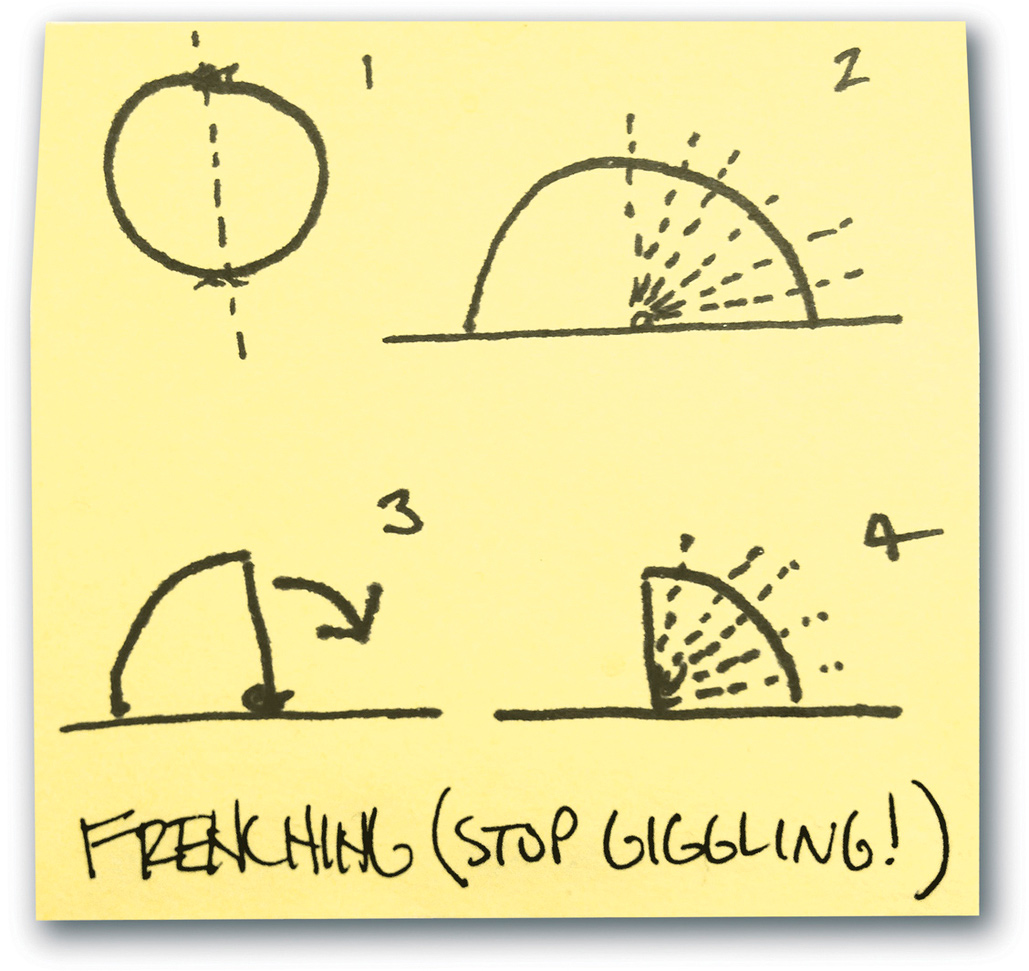
“Frenching” an onion (stop snickering) means to slice it radially from end to end. Think of it this way: Let’s say you want to French a globe (seriously, enough with the snickering already). Start by halving it from pole to pole (1). Next, lay it flat and cut along the lines of longitude from right to left (2). When you’ve sliced a quarter away, roll it over 90 degrees (3) and start again. You’ll end up with a bunch of narrow wedges.
COOKING UNDER PRESSURE
Contrary to popular opinion, water does not boil (that is, convert from liquid to vapor) when it reaches 212°F. Simply put, it boils when the molecular energy inside the water surpasses the atmospheric pressure holding it in liquid form. We say that water boils at 212°F because that is what happens at sea level, aka “standard pressure,” which is quantified by 29.92 inches of mercury (Hg) in a barometer, or 14.7 pounds of pressure per square inch (psi). This means that on an average day at the beach, you have 14.7 pounds of sky pushing on you from every direction. Now, if the atmospheric pressure decreases or the altitude increases, the boiling point drops, which is why water boils on Mount Everest at around 160°F. On the other hand, if you increase the pressure above 29.92 inches of mercury, the boiling point rises. And that’s what a pressure cooker does.
Here’s what happens:
✵You load the pot with food and liquid.
✵You lock the lid into place, which then seals the vessel via a silicone or rubber ring in the lid.
✵You place the pressure cooker over heat and, depending on the make and model, the pressure inside rises to 10 to 15 pounds per square inch (20.36 to 30.54 inches Hg, respectively). A small hole fitted with either a spring-loaded or weighted valve allows excess pressure to vent out. Typically, this creates a whistling sound, which lets you know that maximum pressure has been attained. At this point, the heat should be reduced until the cooker barely hisses.
✵At 10 to 15 psi, the boiling point elevates to 237° to 250°F, cooking foods much faster than they would at 212°F. This is especially true regarding the conversion of connective tissues in meat to gelatin. This translates to saved time and energy.
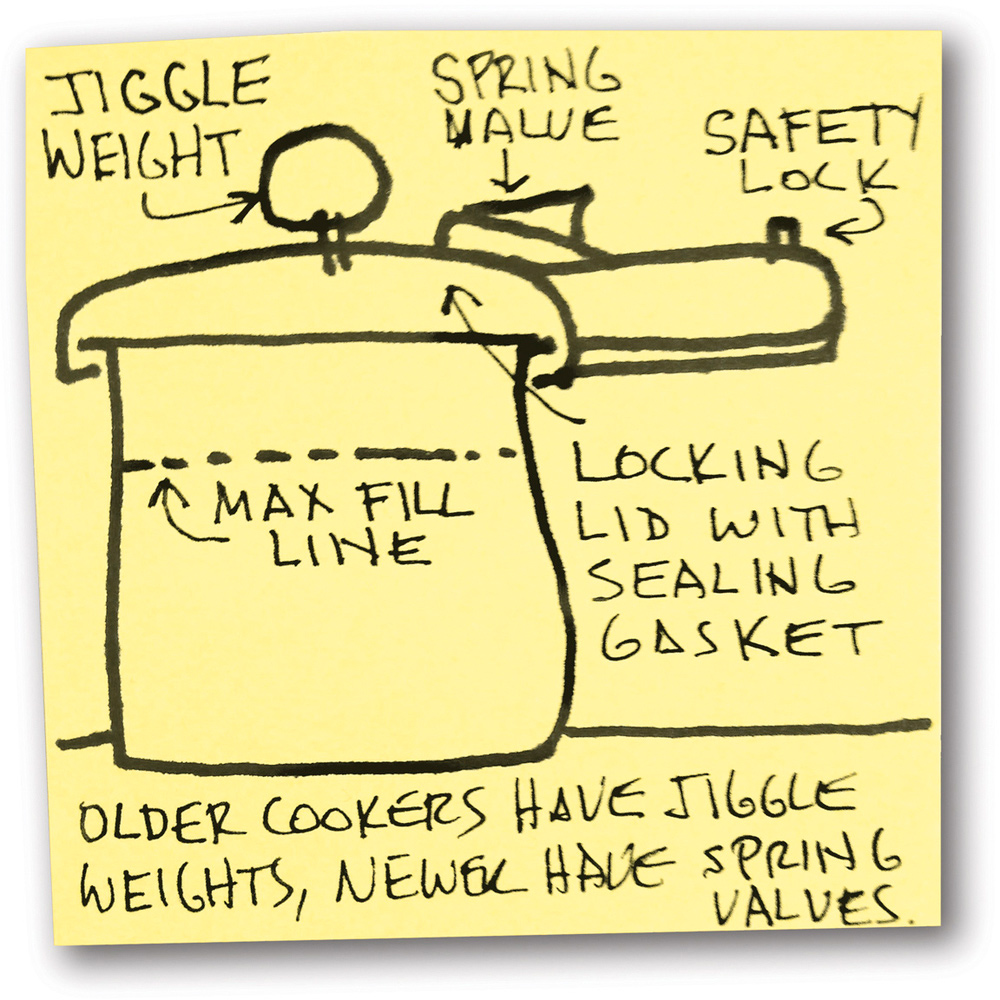
Note: All modern pressure cookers have an emergency “burst disk” that will release the pressure should the primary become jammed or clogged. What’s critical is that you don’t fill the pot beyond the max-fill line, which should be clearly marked either on the inside or outside of the pot. Filling beyond this point will reduce the “head space” required for pressure to build.
Another note: I have two favorite brands—Kuhn Rikon and WMF. They’re both pricey, but in this case, price really does reflect performance and durability.
One last note: Some pressure cookers are also pressure canners, meaning that jars of home-packed foods can be processed inside them for shelf stability. Those machines are more complex, and I don’t recommend them for day-to-day cooking.