Mastering Basic Cheesemaking: The Fun and Fundamentals of Making Cheese at Home - Gianaclis Caldwell (2015)
Part 2. THE FUN OF MAKING CHEESE
Chapter 6. FRESH AND VERSATILE CHEESES
THUS FAR WE HAVE USED TWO METHODS to make products, first a combination of heat and added acid to curdle milk, and second, added starter culture to cause bacteria to produce acid and curdle milk. Now we are ready for the next steps in the process, using a tiny amount of rennet to help coagulate the milk, and draining of the curds. These steps take a while as the added bacteria must be given time to produce enough acid to form a curd. With the addition of a touch of rennet, the milk will achieve a much thicker consistency than any of the products in the last chapter. This is also the first time that calcium chloride is used in the recipes, since it is only helpful if you are using rennet. All of the cheeses that we will make in this chapter are tender, soft, and meant to be used fresh.
As with the other cheese and milk products we have made so far, there is a huge variety made throughout the world that go by many different names — so many, in fact, that I could make this chapter about four times longer. But you wouldn’t learn any more, other than that there is little difference between these recipes.
STEPS FOR MAKING FRESH AND VERSATILE CHEESES
The method for making fresh and versatile cheeses is essentially the same as the one for making cultured milks and creams (see Steps for Making Cultured Milks and Creams, chapter 5, pages 57-59) only with a few additional steps after the milk is heated and the culture is added. This method yields about 2-2.5 pounds of cheese per gallon of milk (0.9-1.1 kg per 4 L), depending on how long it the cheese is drained.
Follow the steps for heating the milk and adding the culture, then continue with the following steps:
Add Calcium Chloride
If calcium chloride is to be used (it is usually optional, but sometimes helpful), it is always diluted and added at least 5 minutes before the rennet; it is never added afterwards or the coagulation will be erratic and broken. The recommended dose of calcium chloride is approximately equal to the amount of single-strength rennet used, or about ⅛ tsp. (0.7 ml) per gallon of milk. It should be diluted in cool tap water before it is added to the milk. Use ⅛ cup (30 ml) water for every ⅛ teaspoon (0.7 ml) of calcium chloride.
Add Rennet
Before adding rennet, it should be measured very carefully; too little will not provide enough enzymes to properly coagulate the milk, and too much will add odd flavors and bitterness. All rennet types must be diluted or dissolved in cool, non-chlorinated water before adding to the milk. If only chlorinated water is available, it can be easily dechlorinated by adding a drop or two of milk, just enough to add a touch of milkiness. (The presence of the milk inactivates the chlorine.)
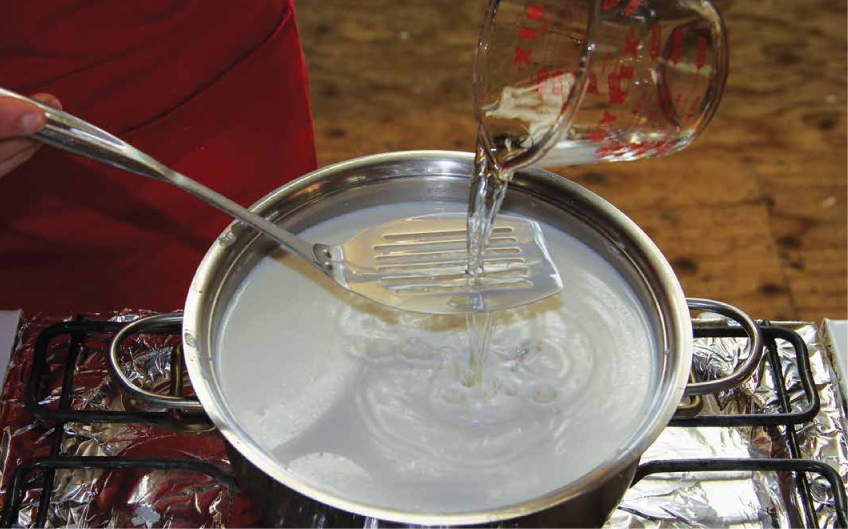
Diluted rennet is added by pouring it over a slotted utensil so that it disperses evenly across the milk and can be stirred efficiently.
Before adding the rennet, start stirring the milk using an up-and-down motion with a ladle or spoon; this gets the milk moving so that the rennet mixes in as quickly as possible. Stop stirring briefly and pour the diluted rennet over the flat part of the ladle so that it splatters across the surface of the milk, and then continue stirring with that up-and-down motion for about ten strokes. Hold the flat part of the ladle to the top of the milk in several spots to help still the milk. As soon as the rennet is added, it starts doing its invisible work. By stirring well, but not in a swirling motion, you are able to mix it in thoroughly and get it to stop moving quickly. This helps ensure that it coagulates as evenly as possible.
Ripen and Coagulate
After the rennet has been added, the milk must sit very still and not be bumped or stirred. Even vibrations from a counter or floor can cause tiny breaks in the coagulation. The coagulation period will usually last about 20-60 minutes, depending on the type of cheese.
Drain
Once the curd has thickened to the desired texture and tanginess, some of the whey is removed by draining the curd in a bag, cloth or form. These cheeses are too soft and mushy to be pressed or drained in a loosely woven cloth, so you must use a fabric that is fairly tightly woven. The bag or cloth is usually hung or suspended in some manner allowing gravity to do the work of whey removal; the handle of a ladle, or other sturdy utensil, set across a pot works nicely for this. Once the desired texture is achieved, the curd is stirred, salted, and refrigerated — or devoured!
Store and Use
Cultured fresh cheeses will last several weeks in the fridge as long as they aren’t exposed to yeasts and molds. They are high in moisture, like the quick and simple cheeses produced in chapter 4, but lower in moisture than the cultured milks and cream of chapter 5. Since they are loaded with good bacteria and are quite acidic, they have a long shelf life, and some can even be frozen with very little change in texture upon thawing.
WHAT TO DO WITH THE WHEY FROM FRESH AND VERSATILE CHEESES
The cheeses in this chapter will create whey that contains some milk sugar, acid, a bit of fat, and some protein. There isn’t much nutrition in it, especially compared to the whey we’ll collect in chapters 7 and 8, so it isn’t good for as many uses. You can use it to water acid-loving plants (such as evergreen trees, azaleas, and most berries), or pour it on compost or down the drain.
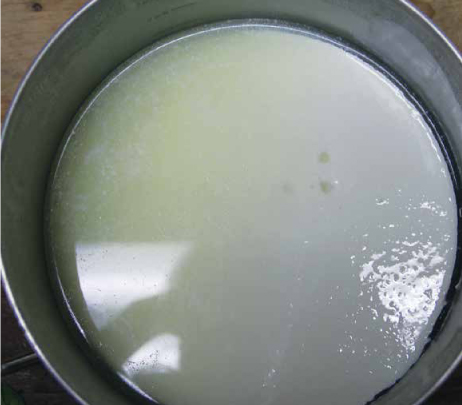
When the milk has fully coagulated and ripened, it will pull away from the sides of the pot and a thin layer of whey will cover the surface.

Chèvre or fromage blanc curds can be hung to drain over a pot.

These are examples of three cheeses by different names that are all made by the same method. All of them involve the same precise steps, but each is made with different milk. Quark (from Germany) and fromage blanc (from France) are both made with cow’s milk, but quark is traditionally made with lower-fat or skimmed milk. Chèvre (chev-ruh) literally means goat, but in the United States, it has come to mean fresh goat’s milk cheese. Don’t be fooled by diverse recipes and a variety of prepackaged starter cultures labeled for each; they can all be used interchangeably. Most of the prepackaged cultures for these cheeses include the rennet in the culture powder, but since my goal in this chapter is to teach you how to use rennet, we will be mixing ours in separately. I always advise starting this type of cheese in the evening so it will be ready to drain in the morning and finished by midday. If you are a night owl and don’t mind tending the cheese around midnight, go ahead and start it in the morning.
What You’ll Need
Milk: 1gal. (4 L) whole milk
Culture: ⅛ tsp. (0.2 g) Flora Danica
Calcium Chloride (optional): ⅛ tsp. (0.7 ml) calcium chloride diluted in ⅛ cup (30 ml) cool water
Rennet: 2 drops (0.1 ml) double-strength vegetarian rennet diluted in ⅛ cup (30 ml) cool, non-chlorinated water
Salt: ¼-½ tsp. (1.5-3 g) pure salt
Equipment: Pot, thermometer, ladle, cheesecloth or organdy fabric, colander, spatula, bowl
Process in a Nutshell
Time: 30 min. active, 16 hr. inactive
Steps: Heat milk, add culture, add calcium chloride (if using), add rennet, ripen and coagulate, drain, salt, store and use
Step by Step
Heat Milk: Pour the milk into the pot, and place the pot over medium-low heat or over another pot of water on the stovetop. Heat the milk until the temperature reaches 86oF (30oC). Remove from heat.
Add Culture: Sprinkle the culture on top of the milk and let it set for 3-5 minutes. Using the ladle, stir gently for 2-5 minutes.
Add Calcium Chloride (optional): Stir in the diluted calcium chloride, if using, and let set for 5 minutes.
Add Rennet: Stir the milk using an up-and-down motion with the ladle. Stop stirring briefly and pour the diluted rennet over the top of the ladle. Begin stirring again for 1 minute. Hold the ladle to the top of the milk in several spots to help still the milk.
Ripen and Coagulate: Let the mixture sit at room temperature, 68oF-72oF (20oC-22oC), until the curd is just pulling away from the sides of the pot and the top of the curd is covered with about ½ inch of whey, about 12 hours.
Cut and Drain Curd: Cut the curd into ½-inch (1.3 cm) vertical columns. Line the colander with a double layer of cheesecloth or a single layer of organdy. Position the lined colander or draining bag over another pot. Carefully ladle most of the curds from the pot into the colander or a draining bag. Gently pour the rest of the curds and whey into the colander or bag. Tie the corners of the cheesecloth together and hang from handle of the ladle and set across the top of the pot. Allow the curds to drain at room temperature, 68oF-72oF (20oC-22oC), until the desired texture is achieved, 4-6 hours. (Drain for longer in a cooler room or shorter in warmer room.)
Salt: Using the spatula, scrape the cheese into the bowl. Add ¼ tsp. salt and stir gently but thoroughly until the salt is dissolved and dispersed. Taste and add the remaining salt, if desired. You can use the cheese right away, but it will improve in flavor if allowed to chill for a day or two.
Store and Use: Tightly cover and store in the refrigerator for up to 3 weeks or in the freezer for up to 8 months.
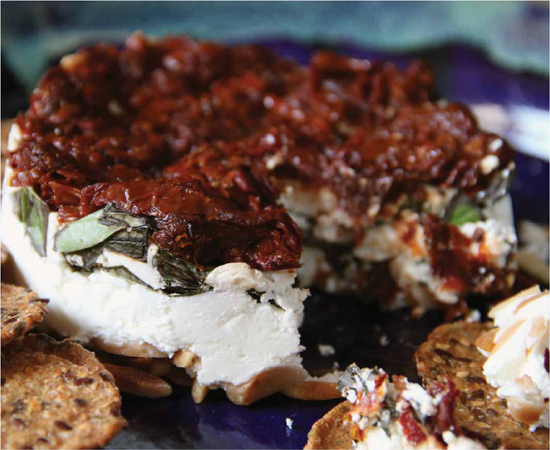
Soft, fresh cheeses can be layered along with ingredients such as herbs, nuts, and dried tomatoes to make crowd-pleasing tortas. This one was made using fresh goat’s milk cheese made at Crush Pad Creamery in Oregon.
Shaped cheeses: To form the cheese into logs or rounds, the curd can be partly drained in a bag, salted, and then spooned into well-perforated basket forms and drained overnight. Alternatively, the shapes can be salted after draining. Formed cheeses can be sprinkled with herbs, spices, and so on. They can also be formed in layers, with seasonings and other ingredients alternating with layers of cheese. These are often marketed as “tortas” here in the United States.
Troubleshooting
Bubbly, frothy curd: This is called early blowing and is a sign of contamination by coliform bacteria. Coliforms are from the environment and can be harmless, but may also include some extremely dangerous, disease-causing germs. They can contaminate raw milk or be introduced into pasteurized milk after it is heat treated. Throw the batch out and review your equipment sanitation. If you are using raw milk, consider choosing a different source (see chapter 2).
Too sour: The curd fermented too quickly and became too acidic. Try lowering the ripening temperature by a few degrees and/or adding less starter culture.
Not tangy enough: Let the curd ripen for an hour or so longer or raise the ripening temperature by a few degrees.
Off or odd taste: The milk contained bacteria or yeasts that caused unwanted fermentation during ripening. Consider a different source of milk or try pasteurizing if the milk is raw. Milk can also get off flavors from the overzealous use of cleaners and chemicals such as bleach that leave an unseen residue on surfaces that taints the milk.
Not thick enough: Try adding an additional drop of rennet and add calcium chloride if you haven’t already.
Recap
Compare this cheese to our cultured buttermilk from the last chapter. The cultures, ripening temperature, and time are all the same, but the tiny bit of rennet used in this lesson caused a stronger curd to form that made this product capable of being drained. If you tried to drain buttermilk, it would go right through the cheesecloth. Yogurt can be drained because of the higher milk temperature that helps the proteins clump together better. Kefir cheese will drain because it is allowed to become extremely acidic, which leads to a heavier curd. Now let’s see how a big difference in milk fat changes the same type of recipe — not unlike what we did when comparing ricotta to mascarpone and buttermilk to crème fraîche.
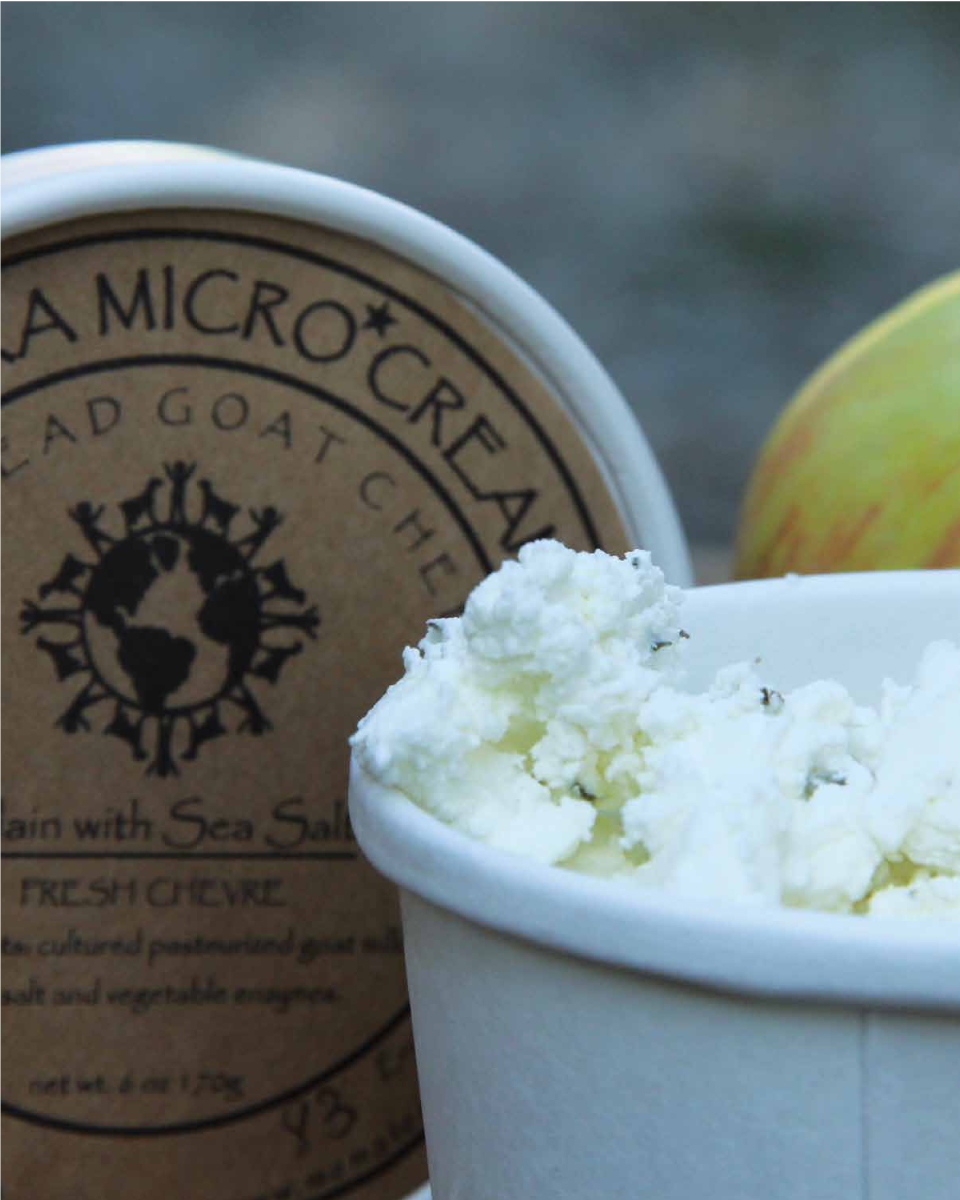
Soft fresh cheeses lend themselves to many flavor and presentation possibilities including this lavender chèvre by Mama Terra Micro Creamery in Oregon.

Cream cheese has become ubiquitous on American grocery store shelves. Foil-wrapped — industrial-produced cream cheese and its slightly lower-fat cousin Neufchâtel (which by no means resembles the soft ripened French cheese with the same name) are staples for use on bagels, in dips, and to make celery sticks a bit more appealing. Homemade cream cheese is quite a bit different. When made with grass-fed cow’s milk, the gorgeous yellow color will remind you more of butter than of the Philadelphia brand. It is slightly more of a challenge to make this cheese with goat’s milk since goat’s milk cream is pretty hard to come by, but you can try using a combination of goat’s milk and cow’s cream with great results.
In the United States, cream cheese (like many cheeses listed and described by the FDA) has set levels of fat and moisture. The main difference between cream cheese and Neufchâtel is that cream cheese must be at least 33% fat while Neufchâtel must be 20-32% fat. While these cheeses are definitely not the kind to pair with any wine of note, they are useful and desirable in many kitchens. As we learned in the last chapter, this recipe shows again how extra fat changes what happens during cheesemaking. It is an important lesson in your cheesemaking progression.
What You’ll Need
Cream: 2 qt. (2 L) half-and-half or light cream (12-20% fat)
Culture: ![]() tsp. (0.1 g) Flora Danica
tsp. (0.1 g) Flora Danica
Rennet: 1 tbsp. (15 ml) of this mixture: 1 drop (0.05 ml) double-strength vegetarian rennet in ⅛ cup (30 ml) cool, non-chlorinated water
Salt: ¼ tsp (1.5 g) pure salt
Equipment: Pot with lid, thermometer, ladle, cheesecloth or organdy, spatuala, colander, bowl.
Process in a Nutshell
Time: 30 min. active, 16-28 hr. inactive
Steps: Heat cream, add culture, add rennet, ripen and coagulate, drain, salt, store and use
Step by Step
Heat Cream: Pour the cream into a pot, and set the pot into a warm-water bath or directly on the burner at low heat. Warm the cream until it reaches room temperature, 68oF-72oF (20oC-22oC). Remove from the heat.
Add Culture: Sprinkle the culture on top of the milk and let it set for 3-5 minutes. Using the ladle, stir gently for 1 minute.
Add Rennet: Stir the milk using an up-and-down motion with the ladle. Stop stirring briefly and pour the diluted rennet over the top of the ladle. Begin stirring again for one minute. Hold the ladle to the top of the milk in several spots to help still the milk. (If you are using a fresh non-homogenized cream and milk, don’t add the rennet now or the cream will separate before the coagulation occurs. Wait 2-3 hours after the culture is added. You may need to adjust this time depending on how much cream to milk is in the mixture. Try to add it just before the mixture starts to thicken from the starter culture.)
Ripen and Coagulate: Let the mixture sit at room temperature, 68oF-72oF (20oC-22oC), until the curd is just pulling away from the sides of the pot, 12-24 hours.
Drain: Position the lined colander over the sink or another pot. Carefully ladle most of the curds from the pot into the colander. Gently pour the rest of the curds and whey into the colander. Tie the corners of the cloth together and tie the bundle to the handle of the ladle. Set the ladle across the top of the pot. Cover the pot with the lid to keep it warm. Every 2-3 hours, place the bundle in the bowl, open it up, and scrape the thickened sides so that they recombine a bit and don’t block drainage. After 12 hours, it should be the texture of thick pudding, if not, continue draining until the cheese is the desired texture.
Salt: Using the spatula, scrape the cheese into the bowl and stir in the salt.
Store and Use: Use the cream cheese right away, or tightly cover and store in the refrigerator.
Troubleshooting
See Troubleshooting Lesson 9, page 78.
Recap
You might recall that our first two recipe chapters were great examples of how differently cream, high-fat milk, and low-fat milk coagulate. The more protein in the milk, the more texture you get in the curd. This same science applies to the comparison of the quark and the cream cheese recipes. If you have the results on hand, compare their textures side by side. The more fat present in the milk, the creamier the results. You could never slice a full-fat cream cheese, at least not cleanly, while a well-drained chèvre log is sliceable. Now that you know this, you can manipulate any of these types of recipes to the desired outcome and you can anticipate the results based on your knowledge of the fat content of the milk — there are no rules! And, remember, it doesn’t matter what you call the final cheese, be it Bob’s Best or Siri’s Spreadable.
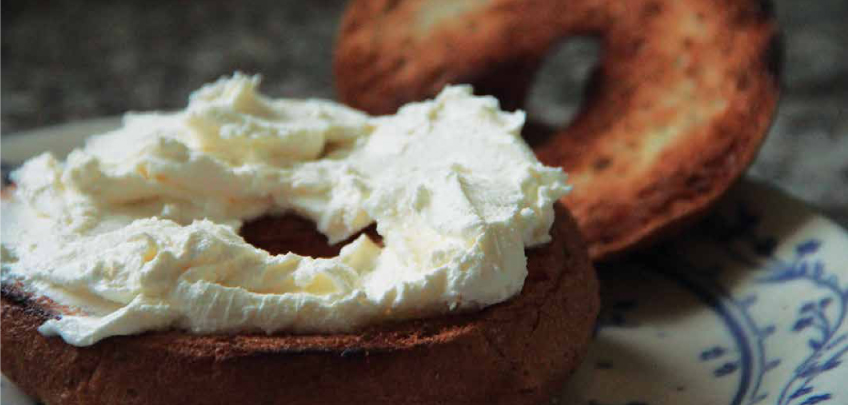
Homemade cream cheese — always great on a bagel!

Now you are ready for another set of skills (notice I didn’t say another layer of difficulty). Most of us equate curd cottage cheese — either small-curd or large-curd — as a dieter’s option on menus and a common salad bar choice. We think of it as industrial and inexpensive. The making of cottage cheese, however, is fairly time-consuming, and when made at home, surprisingly will not be so different than the mass-produced kind. I have always been a fan of cottage cheese — I love its simple creamy consistency and tender texture.
The term “cottage cheese” is rather undefined. It originated from the fact that it is easy to make over a few hours while other house chores are also being performed, and so perfect for the farm cottage wife and dairymaid. In the old days, fresh, warm raw milk with a touch of added rennet would have been allowed to sour or ripen for a few hours before the rest of the steps of cutting, stirring, and heating were performed. If you look up cottage cheese recipes, you will most likely find that the majority of them more closely resemble well-drained ricotta with added cream. This recipe, on the other hand, is closer to a European-style cottage cheese, which is also made from naturally soured milk, but instead of adding rennet and stirring, the ripened milk is heated until it curdled (shades of chapter 4).
So just what is this next set of skills you are about to learn? The first is cutting and stirring the curd while heating it, and the second is patience at the vat. This, and most of the recipes that follow, require the cheesemaker to stay put and stir the curd for periods of time ranging from 30 to 60 minutes. For this recipe, I will give you two options: one that allows you to step away for a bit but takes longer, and a quicker method that requires you to stay and stir.
What You’ll Need
Milk: 1 gal. (4 L) whole to partly skimmed milk
Culture: ¼ tsp. (0.2 g) Flora Danica
Calcium Chloride (optional): ⅛ tsp. (0.7 ml) calcium chloride diluted in ⅛ cup (30 ml) cool water
Rennet: 5 drops (0.25 ml) double-strength vegetarian rennet diluted in ⅛ cup (30 ml) cool, non-chlorinated water
Salt: ¼ tsp. (1.5 g) pure salt
Cream or Buttermilk (optional): 2 tbsp. (60 ml) heavy cream (about 36% fat) or buttermilk
Equipment: Pot with lid, thermometer, ladle, cheesecloth, colander, bowl
Process in a Nutshell
Time: 2-3 hr. active, 2 hr. 30 min.-4 hr. 30 min. inactive
Steps: Heat milk, add culture, add calcium chloride (if using), add rennet, ripen and coagulate, cut curd, heat and stir curd, rinse and drain curd, store and use
Step by step
Heat Milk: Pour the milk into the pot, and place the pot over another pot of water on the stovetop or place pot directly on low heat. Heat the milk until the temperature reaches 86oF (30oC). Remove from heat.
Add Culture: Sprinkle the culture on top of milk and let set for 3-5 minutes. Using the ladle, stir gently for 2-5 minutes.
Add Calcium Chloride (optional): Stir in the diluted calcium chloride, if using, and let set for 5 minutes.
Add Rennet: Stir the milk using an up-and-down motion with the ladle. Stop stirring briefly and pour the diluted rennet over the top of the ladle. Begin stirring again for 1 minute. Hold the ladle to the top of the milk in several spots to help still the milk.
Ripen and Coagulate: Cover the pot with the lid and maintain the temperature of the milk at 86oF (30oC) until the curd is just pulling away from the sides of the pot, 2-4 hours.
Cut Curd: Cut the curd into ½-inch (13 mm) cubes, and let rest at 86oF (30oC) for 10 minutes.
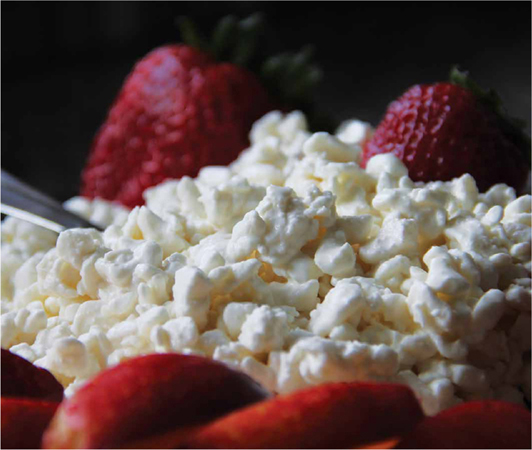
Fresh homemade cottage cheese and summer fruits.
Heat and Stir Curd: Heat the curds very gradually, stirring very gently, to 115oF (46oC) over 60 minutes until they are springy but still tender; increase the temperature a bit more slowly in the beginning. If the curds are too fragile and start breaking when you stir them, shake the pot gently instead of stirring until they are firm enough to stir. Remove the pot from the heat and let the curds settle in the pot for 5 minutes.
Rinse and Drain Curd: Pour off the excess whey and add cool water to the pot. Rinse and drain the curds four times with cold water. Pour the curds into the lined colander. Stir in ⅛ tsp. of the salt. Let drain for 30 minutes. Taste and add the remaining ⅛ tsp. salt, if desired.
Store and Use: Dress with the heavy cream or buttermilk, if desired. Tightly cover and store in the refrigerator for up to 2 weeks.
Recap
Think about the amount of rennet you used in this recipe compared to the quark and cream cheese recipes. The combination of more culture, more rennet, and a bit higher ripening temperature is what made the milk coagulate in only a couple of hours as compared to the 12 hours needed to coagulate the quark recipe. The quark-type cheese relies on much more acid to help with the coagulation than does the cottage cheese. If we let the cottage cheese ripen for 12 hours, we would have a really grainy soft cheese that we could never make into tender curds. Now you have learned a third important tenet: that the final texture of any cheese relies on the combination of culture amount, rennet amount, temperature of ripening, and time. Don’t forget this lesson, because in the next chapter we are going to take everything up another notch.
THE INTERMITTENT METHOD
If you can’t stir continuously for 60 minutes, try this approach: over 90 minutes, raise the temperature in 2-3 degree increments while stirring. Cover and let rest for 5 minutes as each temperature increment is reached. Repeat this step until the goal temperature of 115oF (46oC) is reached and the curds are springy but tender. Continue with remaining steps.