Mastering Basic Cheesemaking: The Fun and Fundamentals of Making Cheese at Home - Gianaclis Caldwell (2015)
Part 2. THE FUN OF MAKING CHEESE
Chapter 5. CULTURED MILKS AND CREAMS
NOW IT’S TIME FOR US TO START PLAYING with microbes, those little microscopic life forms that are responsible for creating every delicious fermented food we eat, from sourdough to sauerkraut. Well, not playing really, but putting them to work for us and with us in our cheese kitchens. Unlike the cheeses in the last chapter — that were rapidly thickened by heating the milk and adding acid — the tasty milk products in this chapter are thickened slowly by the bacteria that make acid. Luckily for us, these bacteria also provide many health benefits and help transform the milk into a grand variety of delicious cheeses, beverages, and spreads.
Cultured, fermented milks and creams occupy the oldest branch of the family tree of cheese; they were created spontaneously whenever fresh milk was left to sit in a vessel at room temperature. Most of these fermented milks were never given unique names or the secrets of how they were made have been lost along with other ancient food ways.
STEPS FOR MAKING CULTURED MILKS AND CREAMS
The processes used in this chapter include the addition of cultures and rennet and a long ripening process. This produces a family of cultures products with two subgroups, depending on the amount of whey in the final product. In this chapter, we’ll cover the first group, cultured milks and creams, which retain their entire watery, or whey, portion; they are not drained after the curd is formed the way cheeses are. In contrast, the true cheeses in the next chapter are drained of a good portion of their whey. Most dairy products in this family take several hours to make — but don’t worry, you don’t have to do much during most of the process! The long ripening process of this method allows for the good bacteria that have been added to the milk to grow and produce acid. The acid eventually thickens the milk into a custard-like curd or a tangy, thickened milk or cream. Drained versions, such as yogurt cheese, will yield about 2-2.5 pounds of cheese per gallon of milk (0.9-1.1 kg per 4 L).
Heat Milk
Milk for many of these recipes is usually only warmed to room temperature, 68-72oF (20-22oC). (The exception is yogurt, which is ripened at a higher temperature of 110-122oF [43-50oC], providing an inviting environment for the desirable yogurt bacteria to grow.) In our last chapter, we heated the milk quickly by setting the pot directly on the burner, but for this chapter’s lessons, you may choose to use a double-boiler type setup, setting the pot with the milk onto a larger pot or into a sink filled with hot water to create a warm-water bath. The water will warm the milk gently and evenly.
Add Culture
Once the milk is at its optimum temperature, a small amount of starter culture is added. Sprinkle the culture powder on top of the milk, let sit for a few minutes, and then stir well. This helps prevent the culture from clumping when it is stirred into the milk. Some freeze-dried cultures come in a fine powder and others in tiny pellets. The finer the texture, the more likely clumping will occur. These clumps of culture may never completely dissolve into the milk and, thus, will not help produce acid and may even cause flavor problems in the cheese.
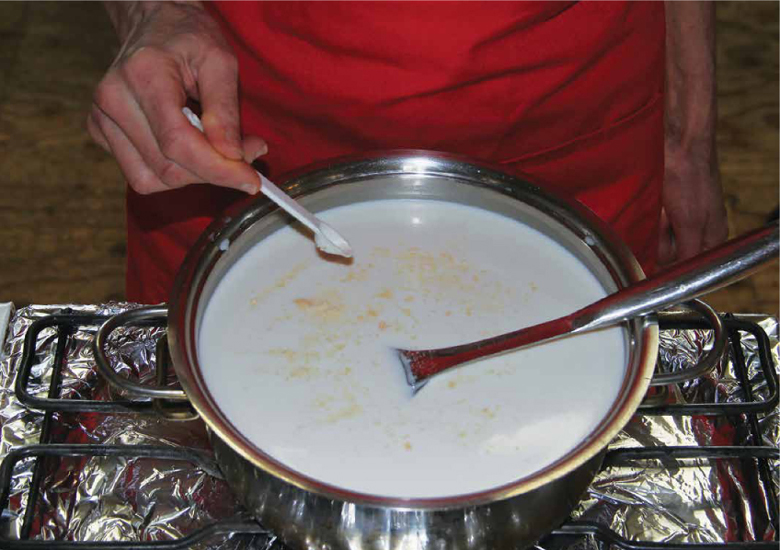
Cultures are sprinkled on top of the warm milk and then allowed to sit and hydrate for a few minutes before being stirred.
Ripen
In order for the desirable bacteria to grow, the cultured milk must be kept at a specific temperature for a period of time, usually between 4 and 24 hours, depending on the cheese. This time period is called ripening or incubation. Before you make any of the cheeses in this group, you will need to figure out a good place to incubate them. (See chapter 3 for more on ripening spaces.)
Store and Use
Cultured milks and creams will last several weeks in the fridge as long as they aren’t exposed to yeasts and molds. They are high in moisture, like the quick and simple cheeses produced in the previous chapter, but since they are packed with good bacteria and are quite acidic, they have a longer shelf life.
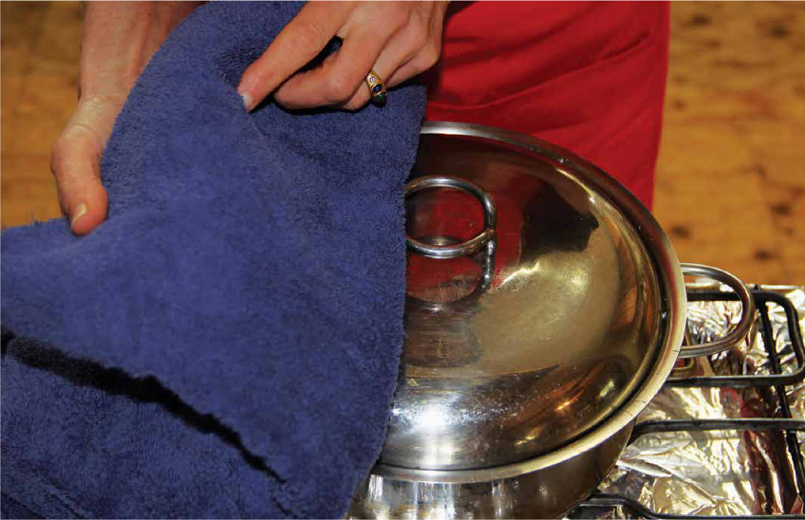
The cultured milk must be kept warm for several hours while coagulation and ripening occur. The pot may be covered, or it might have to be moved to another ripening space where the temperature is stable.
WHAT TO DO WITH THE WHEY FROM CULTURED MILKS AND CREAMS
Most of the products you will make in this chapter won’t result in any leftover whey, but if you make drained yogurt, yogurt cheese, or kefir cheese, you will end up with some. This whey will be quite acidic and contain some protein and bacteria. Because it is so tart, it isn’t the right choice to use for animals, but you can use it to water acid-loving plants (such as evergreen trees, azaleas, and most berries) or pour it on compost or down the drain.

Ah buttermilk, the tonic for the upset tummy and the secret to fluffy pancakes, but with a name whose original meaning no longer properly describes the product. Today’s commonly available buttermilk stole its name from the liquid drained from newly made butter. Raw milk butter, as all butters used to be, contained many good, acid-producing bacteria. After the butter was churned, the extra liquid was pressed from the solids and saved. This true buttermilk was flavorful and slightly tart, thanks to the bacteria, and also contained tiny clumps of butter. When most butter is made today, the milk is pasteurized and the liquid that is removed is bland and has few uses. The buttermilk most Westerners are familiar with is simply milk that has been thickened by flavorful fermentation.
Some of the more ancient fermented milks are still made and enjoyed today. Koumiss (also kumis) from Central Asia and western China is made from the milk of mares. It is known for being quite tart and having a bit of an alcoholic kick due to the higher sugar content of mare’s milk that leads to additional fermentation. In Scandinavia and the Netherlands, milk fermented with bacteria that produce slime compounds lends their character to drinks called ropy milks. Modern versions of drinkable milk ferments include cultured buttermilk, acidophilus milk, and Bulgarian buttermilk.
Now let’s see what happens when you allow microbes to make the acid that is needed to thicken milk.
What You’ll Need
Milk: 2 qt. (2 L) whole to partly skimmed milk
Culture: ¼ tsp. (4 g) Flora Danica, ¼ cup (60 ml) cultured buttermilk from a previous batch, or ¼ cup (60 ml) grocery store buttermilk with live active cultures
Equipment: 1 pot, thermometer, 2 qt. glass jar with lid, spoon
Process in a Nutshell
Time: 15-30 min. active, 8 hr. inactive
Steps: Heat milk, add culture, ripen, chill, store and use
Step by Step
Heat Milk: Pour the milk into the pot, and set the pot into a warm-water bath. Heat the milk until it reaches room temperature, 68-72oF (20-22oC). (You can use it straight from the milking parlor if you like.)
Add Culture: If using, sprinkle the culture on top of the milk, let it set for 3-5 minutes, and stir gently with a spoon for 2-5 minutes. Or, stir in the buttermilk until evenly mixed.
Ripen: Pour into the jar, cover with lid, and let the mixture sit at 72oF (22oC) until slightly thickened about 8-12 hours.
Chill: Refrigerate the buttermilk until cold. It will thicken a bit more as it chills.
Store and Use: Store in the refrigerator for up to 2 weeks.
Troubleshooting
Too tart: Decrease the temperature by 2-5oF (10-13oC) during ripening or decrease the ripening time by 1-2 hours.
Too thin or too sweet: Increase the temperature 2-5oF (10-13oC) or increase the ripening time by 1-2 hours.
Buttermilk is frothy or bubbly: The milk is likely contaminated with yeasts or coliforms from contamination during milking; throw it out. If this problem occurs frequently, address milking hygiene and consider heat-treating the milk (see sidebar, chapter 2) for safety’s sake and the quality of your products.
Note: The starter culture Flora Danica can produce some effervescence, but I have not seen that happen if the ripening occurs within the time suggested.
Recap
You’ve made the most basic example of fermented milks: You converted fresh milk that would normally spoil quickly into something that will last much longer, have a pleasing flavor, can be used in untold number of recipes, and make things more tasty and fluffy (think salad dressing and pancakes). In our next lesson, we’ll repeat almost the same steps, but with cream, and see how the fat content changes the results.
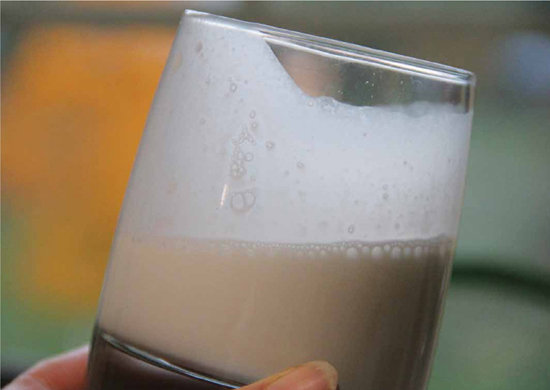
Fresh, homemade buttermilk is healthy, refreshing, and delicious.

Before pasteurization became a widespread practice, cream left at room temperature would have fermented spontaneously and naturally just like the fermented milks we covered in the last lesson. These thickened, slightly tart products were used in cooking without necessarily having names. When raw cream became rare, commercially created cultured creams such as sour cream and crème fraîche became popular in recipes and cookbooks. Mexican cuisine has its own version called crema, and in Russia you will find a sour cream called smetana.
When you first make homemade sour cream, you might be surprised at how different it is from its grocery-store cousin. It is important to remember that commercially produced sour cream is highly processed, often with added thickeners and ingredients, and its fat content is strictly regulated by the government. Crème fraîche, on the other hand, does not have its fat content decided upon by regulators, but rather by the cheesemaker. It is often much richer than sour cream. When it has more fat, it naturally has less protein; this makes it less vulnerable to curdling when added to hot dishes. (Remember from the last chapter that high heat and acid cause milk proteins to clump.) It is therefore a nice alternative to sour cream when adding to hot soups and the like.
What You’ll Need
Milk: 2 cups (500 ml) heavy cream (about 36% fat) for crème or light cream (about 20% fat) for sour cream
Culture: ¼ teaspoon (0.8 g) Flora Danica OR 3 tablespoons (90 ml) buttermilk with live active cultures (try using some of the buttermilk you made in lesson 4)
Equipment: Saucepan, thermometer, 1 qt. glass jar with lid
Process in a Nutshell
Time: 15-30 min. active, 12 hr. inactive Steps: Heat cream, add culture, ripen, chill, store and use
Step by Step
Heat Cream: Pour the cream into the saucepan, and place the pan over medium heat. Heat the cream, stirring constantly, until the temperature reaches 86oF (30oC); remove the pan from the heat.
Add Culture: If using, sprinkle the culture on top of the milk and let it set for 3-5 minutes. Stir gently for 2-5 minutes. Or, stir in the buttermilk until evenly mixed.
Ripen: Pour the mixture into the jar and cover with the lid. Let sit at room temperature, 68-72oF (20-22oC), tasting it periodically, until it has a gravy-like consistency and a tangy taste, usually about 12 hours.
Chill: Cover and refrigerate the cultured cream for 24 hours; it will continue thickening as it chills.
Store and Use: Store in the refrigerator for up to 3 weeks.
Variations
If you prefer your crème fraîche a bit fluffier, simply pour it into a bowl and whisk to thick peaks. You can sweeten or flavor it as well: try adding a touch of maple syrup, honey, or fresh fruit.
Recap
If you have the chance, compare the flavor and texture of the mascarpone from the last chapter with the results of this recipe. They look quite similar and have similar uses, but the method and science behind them are different: high heat and added acid versus low temperature, added culture, and a long ripening time. Now let’s move on to a recipe that combines a long ripening of cream with its agitation to force the fat globules to clump.
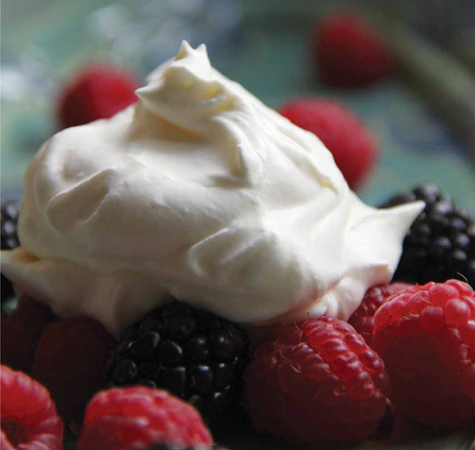
Crème fraiche can be whipped and used as a surprising and more complex alternative to whipped cream.

Most of today’s butter is made from pasteurized cream with no added culture. But in earlier times, a more flavorful variation was created using high-quality raw cream that contained natural wild bacteria that produced acid and flavor. You can mimic this product today by adding a touch of culture to pasteurized or raw cream. Only a small amount of acid results in the butter, but there is an added layer of flavor and complexity. It can be hard to find good-quality cream in the grocery store; most of it has been ultra-pasteurized and often has added thickeners and sweeteners. You can make butter from this type of processed cream, but if you can get your hands on pure cream, your butter will be remarkably better.
Butter can be churned from any high-fat milk. You don’t have to separate out the cream, but doing so will concentrate the fat globules so that they can cluster more easily, and, thus, make your process much more efficient. When slightly cool milk or cream is heavily agitated, the fat globules smash and collide with each other and start clumping. Once the clumping starts, it finishes very rapidly. Then the remaining “butter milk” is drained and rinsed from the clump of butterfat, leaving you with butter.
What You’ll Need
Cream: 1 qt. (250 ml) light cream (about 20% fat)
Culture: ⅙ tsp. (1g) Flora Danica or 1 tbsp. (15 ml) cultured buttermilk with live active cultures
Salt: Pure salt to taste
Equipment: 2 qt. glass jar with lid and/or butter churn, spoon, 2 bowls, ice, fine-mesh sieve or organdy (optional), 2 pairs of spoons or butter paddles (Scotch hands)
Process in a Nutshell
Time: 12 hr. inactive, 30 min. active
Steps: Heat cream, add culture, ripen, chill, churn, drain, salt, chill, store and use
Step by Step
Heat Cream: Pour the cream into the jar cover with the lid and let it sit until it warms to room temperature, 68-72oF (20-22oC) Alternately, you can quickly warm the cream in a pan over low heat.
Add Culture: If using, sprinkle the culture on top of the cream, let it set for 3-5 minutes, and stir gently with a spoon for 2-5 minutes. Or stir in the buttermilk until evenly mixed.
Ripen: Cover with the lid and let the cultured cream sit at room temperature, 68-72oF (20-22oC), for 12 hours.
Chill: Place the jar in a bowl or pot of cold tap water and stir the cream until the temperature reaches 50oF (12oC); this will only take a minute or so.
Churn: Pour the cultured cream into the churn or leave it in the jar. Churn or vigorously shake the jar using an up-and-down motion.
After about 5-10 minutes, flecks of butter will become visible on the sides of the jar. Continue shaking until the fat globules cluster, usually just a minute or two more; you will hear a distinctive change in the sound and feel and see an obvious glob of butter forming.
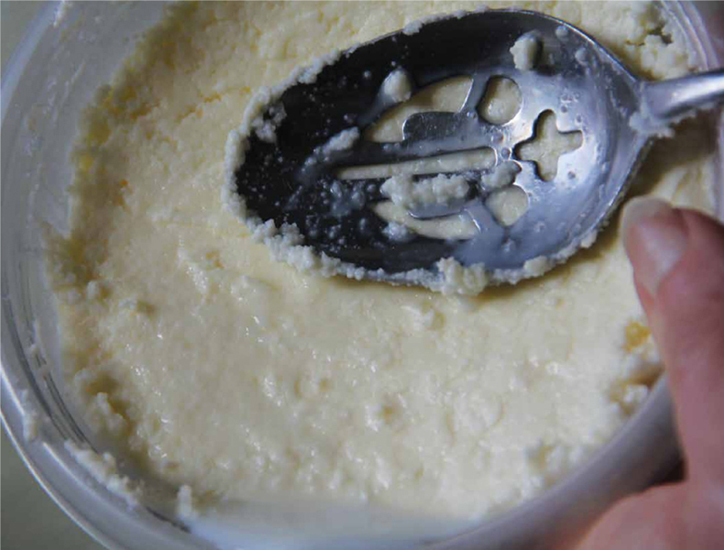
Drain: Pour off the liquid (this is true buttermilk!). If desired, you can strain it through a sieve or a piece of organdy. Rinse the collected butter bits with cold water; this helps remove more buttermilk and encourages the fat to firm up.
Fill 2 bowls with ice and a cup with ice water; place two pair of spoons or paddles in the cup. Empty one of the bowls and transfer the butter to it. Set the bowl with the butter into the bowl with ice. Using a pair of the cold spoons, gently press and work the butter into a ball; pour off any buttermilk as it is pressed from the mass. (Alternate between the pairs of cold spoons to prevent the butter from sticking)
Salt: When the butter reaches the desired consistency and very little moisture remains, stir in salt to taste.
Chill: Press the butter into a tub or form, tightly cover, and place in the refrigerator until completely chilled.
Store and Use: Store in the refrigerator or in the freezer. Use the buttermilk right away or refrigerate for up to 5 days.
Pressing the buttermilk from freshly churned butter.
Troubleshooting
No butter forms: If butter doesn’t form and you end up with whipped cream, the cream was too cold.
Butter forms but is greasy and soft: If butter forms but it is too whipped in texture and doesn’t separate well, the cream was too warm and churned for too long. Chill the cultured milk a few degrees colder next time, as it will warm up a bit during churning.
Recap
Making cultured butter is a much longer process than making sweet cream butter. It may not be worth the time for each butter-making session, especially if you have a constant supply of cream, but it is worth doing as a way to compare the results and to try making another fermented dairy product. Think about the similarity between this recipe and the one for sour cream; they are almost the same with the exception of churning. It’s pretty amazing what a little shaking up will do!
BONUS RECIPE: GHEE
How to make Indian Clarified Butter: Ghee
Ghee made with cultured butter is not only delicious, but allows you to use your homemade butter in place of any oil for cooking — even at high temperatures. The process of making ghee removes all of the water and the milk solids from the butter so that high temperatures do not cause the oil to burn or splatter.
1.Place cultured butter in a heavy bottomed saucepan. Place on low heat and warm the butter at no higher than 110oF (43oC) until it is fully melted, about 5 minutes.
2.Increase the heat a bit until the butter begins to gently simmer. If the milk-solids bubble up, stir the foam back in. Cook on simmer till all the moisture is gone (the sputtering will stop). The butter oil should be golden yellow and you will see milk-solids sunk to the bottom or clinging to the sides of the pan. This will take about 15-20 minutes.
3.Increase heat to medium. During this step (about 30 minutes) the milk-solids will gradually turn light brown. The butter oil will turn yellowish brown. It should not turn dark brown or it will be bitter. As soon as the milk-solids turn a light brown color, turn off the heat.
4.Let it cool slightly and filter the ghee using multi-layered cheese cloth to remove the brown milk-solids.
5.Store in an opaque jar or container at room temperature or in the refrigerator.

Kefir is distinctive fermented milk — people usually either love it or hate it. A bit bubbly and yeasty, kefir contains an incredible dose of probiotics due to the microbes in the kefir grains. The knobby, gelatinous “grains” are more properly called a SCOBY (symbiotic colony, or community, of bacteria and yeasts). Many kefirs produced commercially resemble thin, drinkable yogurt. Very few of these are made using a fresh, living SCOBY. Once you obtain a kefir SCOBY, it is relatively easy to maintain, but it is a bit of a responsibility (about the level of owning a goldfish). Dehydrated grains can also be used, with more consistent but likely less interesting results.
Kefir (also keefir or kephir), which originated in the mountains of Georgia in the Caucasus region of Eurasia, is quite likely as ancient as its more well-known kin, yogurt. It is growing in popularity with the recent awareness of the benefits of probiotic bacteria.
What You’ll Need
Milk: 1 qt. (1 L) whole to partly skimmed milk Culture: 2 tbsp. (30 ml) fresh or dehydrated kefir grains
Equipment: Pot, thermometer, 2 qt. Mason-type jar with lid, spoon, fine-mesh sieve
Process in a Nutshell
Time: 24-25 hr.
Steps: Heat milk, add culture, ripen, strain, chill, store and use.
Step by Step
Heat Milk: Pour the milk into the pot, and set the pot directly on the burner on medium low heat. Stir constantly and heat the milk until the temperature reaches 65-85oF (18-29oC).
Add Culture: Spoon the kefir grains into the jar and pour in the warm milk. Screw the lid on the jar and gently swirl the grains around in the milk. Loosen the lid slightly to allow gas to escape.
Ripen: Let the cultured milk sit at room temperature, 68-72oF (20-22oC), tasting it periodically, until it is slightly thickened and a tartness that you find appealing, usually, about 24 hours.
Strain: Position the sieve over another jar. Strain the kefir through the sieve; reserve the fresh grains, if using.
Chill: Cover and refrigerate the kefir until it is cold.
Store and Use: Store in the refrigerator.
Variations
Kefir Cheese: Follow the steps above, but allow the kefir to ripen an additional 24 hours (48 hours total). Position a lined colander over another pot or in the sink. Pour the kefir into the colander and let drain until it stops dripping, about 2-3 hours. Stir in salt to taste. Chill the kefir cheese until it is the texture of cream cheese, about 8 hours. Store in the refrigerator for up to three weeks.
Flavored: Many people flavor kefir to balance the sourness. Fresh fruit, honey, vanilla, and maple syrup are all great additions.
Troubleshooting
Kefir-making is quite forgiving and trouble-free. The main problem is when yeasts from the environment or raw milk contaminate the kefir, leading to an overly yeasty flavor. If the overall flavor is not appealing, try a different source for your SCOBY (they each have their own character) or try using dehydrated grains.
Recap
Think about the similarities and differences between kefir and cultured buttermilk. They might use the same milk and take the same amount of time, but the vastly different microbes involved produce different by-products. Even different kefir grains will impart a different flavor profile to the kefir as will different starter cultures used in buttermilk and cheese. There is a whole world of possibilities just waiting for the opportunity to help you make cheese.
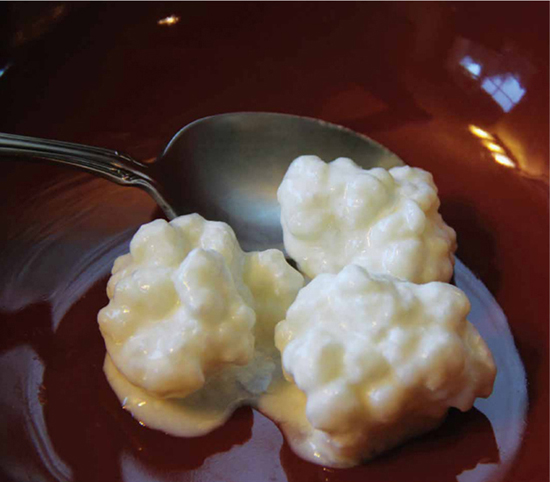
Kefir “grains” are gelatinous clumps of beneficial microbes that sour and flavor the milk.

Igrew up eating lots of yogurt. Our family cow, Buttercup, a beautiful and stately Golden Guernsey, produced buckets of rich milk that my mother crafted into a variety of dairy products. We drained and made what is now called Greek yogurt.
Yogurt (also yoghurt) is an ancient food that originated in Central Asia. It evolved in places where the climate promoted the natural growth of microbes that do well in temperatures over 100oF (38oC). This natural process can be helped along by heating the milk to a high temperature, which helps create a thicker product and clears the milk of other competitive bacteria. The heat-loving bacteria that give yogurt its distinctive flavor also have incredible health benefits as probiotics. Yogurt’s popularity as a health food began in the early part of the twentieth century and has continued to grow.
Once you get comfortable making yogurt, it takes almost no thought, and you will find that there is great forgiveness and room for deviation in the instructions — especially if you don’t mind a variety of outcomes!
What You’ll Need
Milk: 1 gal. (4 L) whole to partly skimmed milk
Culture: ¼ cup (60 ml) plain yogurt (choose one whose flavor you particularly enjoy) or ½ tsp. (1.6 g) freeze-dried yogurt culture
Equipment: Pot, spatula, thermometer, bowl, whisk, 1 gal. (4 L) glass jar with lid
Process in a Nutshell
Time: 30 min. active, 4-5 hr. inactive
Steps: Heat milk, chill, add culture, ripen, chill, store and use
Step by Step
Heat Milk: Pour the milk into the pot, and place directly on the burner on medium high heat. Heat, stirring constantly, and scraping the bottom of the pot with the spatula, until the temperature of the milk reaches 185-190oF (85-88oC). (If you want an even thicker, higher-protein yogurt, you can increase the temperature to just below boiling.)
Chill: Remove the pot from the heat and place into a sink. Stir the milk until it cools to 115-125oF (46-52oC) usually about 5 minutes.
Add Culture: If using yogurt, spoon the yogurt into the bowl and add 1 cup (250 ml) of the warm milk, whisk until blended, and pour back into the milk. If using freeze dried yogurt culture, sprinkle directly on top of the milk and whisk until blended.
Ripen: Pour the cultured milk into the jar. Cover with lid and ripen at 110-122oF (43-50oC) for 4-8 hours until thickened and slightly tart.
Chill: Refrigerate the yogurt until cold; it will continue thickening as it chills.
Store and Use: Store in the refrigerator. (The yogurt may grow a bit more tart over time, and the probiotic benefits will decrease as the bacteria die off.)
Variations
Greek-Style Yogurt: Follow the steps above until the yogurt has ripened and set. Position a lined colander over another pot; the colander should sit up away from the bottom of the pot by several inches. Stir the yogurt gently and pour into the colander. Cover with a cloth or lid and let drain, at room temperature, stirring occasionally, until it thickens to the desired texture, about 2-4 hours. Refrigerate until cold. Store in the refrigerator. (Unlike regular yogurt, it will not become much more tart over time.)
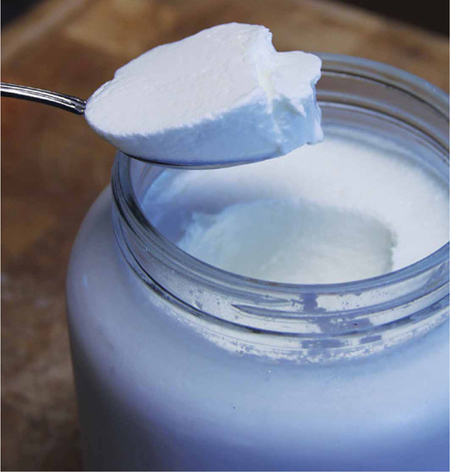
This homemade yogurt is extra-thick naturally, thanks to the creaminess and high protein content of Nigerian Dwarf goat’s milk.
Yogurt Cheese: As in the kefir recipe above, yogurt can be drained to a thick, spreadable paste much like cream cheese. Follow the steps above for Greek-style yogurt, but let the yogurt drain until it is about the texture of cream cheese, usually about 4 more hours. A touch of salt added during the beginning of draining will help speed draining and help keep the yogurt from growing more tart.
“Rawgurt”: You can also make a yogurt-like cultured product using high-quality raw milk, but out of respect for the long history of yogurt, I would encourage you not to call it by the same name. Follow the steps above but only heat the milk to 115-120oF (46-49oC). This method is likely to make a much thinner, drinkable product almost like a buttermilk-yogurt hybrid. It won’t have quite the number of probiotic bacteria as the original because of the competitive growth of the bacteria already present in the raw milk (some of which may be probiotic).
Troubleshooting
Too thin: Some types of milk (especially from some of the large, heavy-milk producing breeds of dairy goats) don’t have enough of the right type of protein to make a really thick yogurt. You can try heating it to a higher temperature of 190-200oF (88-93oC) and maintaining it at that temperature for about 15 minutes as a way to help capture more of the whey proteins. Another way to thicken the yogurt — and this is the way that it is done industrially — is by adding thickeners such as powdered milk or gelatin, but I am not a fan of that approach. If heating it higher doesn’t work, I suggest either draining it or considering it a drinkable yogurt.
Too tart: Decrease the ripening time by 30 to 60 minutes and chill it more rapidly by placing in the freezer for an hour or so or in an ice water bath.
Flavor is “cooked”: Decrease the temperature of the milk during the heating stage by 5-10oF, but hold it for longer. For example, instead of heating it to 185oF (85oC), heat it to 180oF (82oC) and maintaining it for 15-30 minutes.
Recap
Think about the huge difference in flavor and texture when you compare yogurt to buttermilk. Consider how you used heat to work some of the magic that also occurred when making ricotta (there changing the whey proteins to create curd). You have now learned how to manipulate temperature to both nurture the desired bacteria AND to manipulate the milk chemistry. As you work with different milk types, you can start tweaking your process to adapt to the innate differences in the milk. For example, some goat’s milk has a lot of whey protein and not as much cheese protein. It benefits from a longer heating process and higher temperature, so that there is time to change all of the whey proteins and make a thicker curd. You won’t always be able to anticipate what you should do with any given milk, but if your yogurt doesn’t come out the way you had hoped, you can make some changes during the next batch. Remember, milk is always changing, and the successful cheesemaker must be ready to change too!