Slow Dough: Real Bread: Bakers' secrets for making amazing long-rise loaves at home - Chris Young (2016)
Terms and Techniques
I’ve tried to keep professional baker speak to a minimum but here are brief explanations of some of the instructions in the book and why you’re following them.
Autolyse
This is a word adopted by the late baking expert professor Raymond Calvel for a process of mixing together flour and water and leaving it to rest before adding any other ingredients. Some bakers find it makes mixing and kneading easier and shorter, and improves the structure of their bread. Some bakers wrongly include yeast, but the essential point is not to add the salt until afterward.
Baking times
Baking times depend in part on the weight and type of bread you’re making and the oven temperature. For example, if an 800g/1lb 12oz loaf baked at 230°C/210°C fan/450°F/gas 8 takes about 30 minutes, then a 400g/14oz loaf of the same dough might take 22-25 minutes, and 100g/3½oz rolls 15-18 minutes. An enriched dough will require a lower oven temperature as sugars, fruit, butter, milk and some other ingredients colour and burn easily.
Shape will also affect baking time. For example, even if a baguette weighs 400g/14oz, its high surface area to volume ratio would mean the baking time would be less than if baked in a loaf tin or as a cob/boule. Times given are for guidance and you may find a loaf is baking more quickly or slowly, so keep an eye on it and tweak as appropriate. You might also have to adjust the baking time and/or temperature if you go off-piste and make adjustments to a recipe.
Burst
In the first few minutes of baking, loaves swell rapidly (this is called “oven spring”) and can rupture, which is known as a burst. Bursting can be useful in helping to have an open (rather than tight or close) crumb structure, but it can happen at random and not necessarily in an attractive way. For a note on controlling bursting, see Slashing on pages 21-22.
Cleared
A term sometimes used in commercial bakeries, this means that ingredients have been mixed together fully with no dry bits in the bowl or within the dough itself.
Cooling
I’ve yet to see any evidence to support the notion that bread is more digestible once it has cooled after baking, but there are good reasons for leaving a loaf on a wire rack to cool before slicing. One is that the crumb of newly-baked bread tends not to hold its shape very well and can even be gummy if it is cut before it has cooled. Another is that the loaf will lose a greater amount of moisture as steam if sliced when hot, which can speed drying out and staling.
Cover
This instruction is given several times in every recipe and what you use depends on the situation. If you’re proving or resting dough at room temperature, one option is simply to leave it on the work surface and cover with a large mixing bowl. Another is to put the dough into a large bowl and cover with a damp, clean dish towel, large elasticated bowl cover or shower cap. Alternatively, you can slip the bowl into a reusable plastic bag that’s large enough to be sealed around it. I try to avoid anything that’s single-use, such as cling film/plastic wrap.
Another option is a large plastic container with a sealable lid, which is particularly handy when retarding dough in the fridge. If you’re getting more serious and making bread or pizza dough in quantity, stackable dough trays or boxes are the way forward.
Dividing and scaling
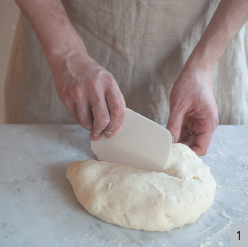
If a recipe is for more than one loaf, or is formed from more than one piece (e.g. a plait) you will need to divide the dough. This is best done with your trusty dough scraper (see fig. 1), with the aim of getting it right first time, rather than nibbling bits off one piece to add to the other to even them up.
Ideally, you should check the weight of each piece using electronic scales. Equal weights helps ensure they bake at the same speed, are aesthetically pleasing and, for professional bakers, it is important (or even legally required) that each weighs the same.
Legal Bread Weights
The references to “large” and “small” loaves in this book are just for guidance and don’t refer to any standard legal loaf weights. If baking loaves for sale, please check with the relevant authorities in your area for definitive advice on this and for their recommendations on scaling dough to weights that will ensure your baked loaves are within legal limits.
Fermentation
Commonly used to refer to the yeast (and by association, the dough) getting on and doing its thing. Without getting too scientific, yeast cells produce an enzyme that breaks some of the starch in flour down into simpler sugars, which they then metabolize in order to grow and reproduce. One by-product of this is the carbon dioxide that makes dough rise.
Fold
Doing a fold (or a turn, as some bakers call it) has several functions. The two main ones that enthusiastic amateurs need to know are that it helps to develop the gluten in a way that allows for a more open-textured bread; and it redistributes carbon dioxide without totally knocking out those lovely bubbles you’ve nurtured.
One way to do a fold is to lift the side of the dough furthest from you, gently stretch it upward and then fold it toward you over the rest of the dough. Rotate the dough (or whole bowl, if it’s in one) a half turn and repeat the stretch and fold with the side that is now opposite and then do the same for the remaining two sides.
For a double fold, simply repeat this folding process once more.
Heating the oven
Real Bread needs to be baked in an oven that’s already hot. If you put it into an oven that’s cold or only warm, the dough will have skinned over by the time it gets up to the right temperature, and your loaf will be far from perfect. To give dough baked in a domestic oven the best chance of getting heat not only by convection from rising hot air, but also radiant heat from the oven walls and heat conducted directly from a baking stone, you should turn the oven on 20-30 minutes (or whatever the oven’s manufacturer suggests) before you intend to start baking.
Hydration
This is the amount of liquid (usually water) in relation to flour. A starter or dough using 1kg/2lb 4oz of flour and 700g/1lb 9oz of water would be 70% hydration (I find it much easier to be accurate using metric weights). The lower the percentage, the stiffer the dough (for a bagel or tin loaf, for example) and the higher the percentage, the slacker the dough (great for a ciabatta or crumpet). Very high-hydration doughs can be referred to as batters, though there is no set cut-off point between the two.
Kneading
The process of working the dough to speed the formation and development of the gluten network (see page 26). Like folding, it also helps to even out the bubbles in the dough and redistribute the yeast and - for want of a better analogy - give it a new portion of starch to graze on.
Kneading isn’t actually essential. As can be seen from the no-knead recipes in this book, given enough time and water, the proteins in wheat flour will form gluten of their own accord. Kneading is simply a mechanical means of speeding up this biochemical process.
How Do I Knead?
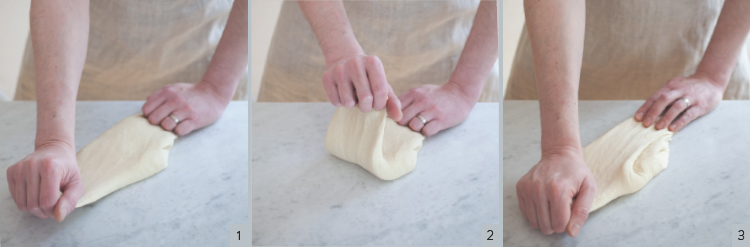
If you have chosen the kneading route (which can be very therapeutic, after all) please be assured that there’s no right or wrong way of doing it. You can turn the mass of dough out onto the work surface, pin down an end with one hand, push the other end away from you with the heel of the other hand (see fig. 1). Bring the dough back together (fig. 2) and repeat (fig. 3). Another way, particularly for softer doughs, is to slap the dough onto the work surface so that one end sticks, pull the other end toward you, fold the dough over on itself, unstick from the work surface and repeat. Just one more of many methods is to take the dough in both hands in the air, stretch it, bring both ends back together and while holding them in one hand take what was the middle of the dough (but is now the other end) in the other and repeat.
In all cases, you’ll note that you are repeatedly stretching the dough, folding it over on itself and stretching again.
For How Long Should I Knead?
Until the gluten is fully developed. Sorry I can’t just say “for X minutes”, but that’s how it is. This is because it depends on a range of factors, including the hydration level (i.e. the water-to-flour ratio), temperature and type of dough, as well as how quickly and vigorously you knead - five minutes of a body builder going at it hammer and tongs might be worth ten of someone else’s efforts. (See also page 24, on using a mixer.)
So How Do I Know When the Gluten is Properly Developed?
In the early stages, dough tends to be shaggy and sticky, but as it develops it becomes smooth and glossy, with the sticky feeling turning to something that can be described as silky.
An instruction found in some baking books to give an indication of dough development is to do the gluten window or windowpane test. The idea is you knead or work the dough until you can stretch a small section of it out until it is a thin film that you can see light through. This is easiest with a dough made from white wheat strong (bread) flour, harder with higher extraction (i.e. browner), weaker (e.g. plain/all-purpose) or non-wheat flours. A word of caution: a gluten window might not help you to distinguish between a dough that is developed and one that is overdeveloped.
Proving
Proving (some bakers say “proofing”) has two meanings in bread making. The less common one is to test that yeast is still active and capable of leavening dough. This is done by either dissolving it in plain water, or in water with a spoonful of sugar or a little flour, to see signs of gas being produced, appearing as bubbles pricking the surface of the mixture after 10-15 minutes. The more common use is to refer to the dough rising, where it sits with several other terms such as “bulk fermentation” (to refer to a large quantity of dough, typically in a commercial bakery, undergoing its first rise after mixing), “second rise” after kneading or being left unkneaded to fully hydrate, and “final proving” (after shaping and just before being baked).
Finger Poke Test
When is dough fully proved? This is such a hard question to answer: even if you think you’ve been precise with every measurement of ingredients, the temperature of the dough and room it’s in, time etc., the answer is another case of “when it’s done”.
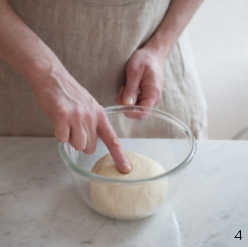
One test is pressing gently with a finger or the pad at the base of your thumb (fig. 4). If the dough springs back quickly, it’s not ready; if it collapses totally, you’ve probably left it too long. What you want to see is the dough slowly pushing back to repair the dent you have made. It’s one of those things that as you get really serious about your baking, you might want to sidle up to a tame, genuine artisan baker who’ll let you poke his or her dough and say “that’s what it should feel like”.
Release agents
Not always in an ingredients list, but needed more often than not. These are simply things that stop dough sticking, depending on what you are doing:
✵ During proving: more of whatever flour you’re baking with.
✵ When transferring dough to the oven: professional bakers usually use something more gritty and less absorbent than flour, generally semolina, polenta/ cornmeal (although this can burn easily in a very hot oven), or rice cones, which is very coarsely ground rice.
✵ For preparing tins and trays: professional bakers are split between those that prefer hard fats (lard or hardened vegetable fat - in the quantities they use, butter would get expensive) that can be smeared, or oils (usually a cheap, flavourless vegetable oil) that can be brushed or sprayed.
Recipes in this book generally avoid asking you to throw flour all over work surfaces, as it can change the ingredient ratios, making dough stiffer than it should be, and lead to streaks or unwanted large air pockets in the finished bread. It also makes shaping harder, as you need a slight tackiness, rather than the dough skating around on the surface and against your hands.
Baker’s Tip: Use your dough scraper to collect up the semolina, flour etc. you use, sieve it and keep it for dusting in future.
Retarding
Coming from Latin, via French, this means to delay or hold back. Bakers may slow ferment by deliberately proving dough at a lower temperature. In many professional bakeries, this is done in a retarder, but a home baker can use a refrigerator or very cool room. The longer proving time caused by retardation allows for extra flavour development and has an effect on other characteristics of the bread. It also gives the baker greater control over when the dough is ready to be baked.
Room temperature
As this falls into the “how long is a piece of string?” category, let’s say ideally it would be about 20°C/68°F. Dough kept below that range will simply prove more slowly, and warmer dough will ferment more quickly.
NB: For consistency, and because they need to stick to a timetable for when loaves need to be baked and ready for sale, professional bakers control the temperature of the dough more carefully. You can read more about this in the Real Bread Campaign’s book Knead to Know, in professional baking manuals, or by searching online, e.g. for desired dough temperature.
Seam
This is the point at which two or more edges of the dough meet. Typically, you will need to seal them together well by applying pressure, and in some cases use something like water, milk or egg as an adhesive, so that the join doesn’t come apart during proving or baking. Most of the recipes in this book also instruct you to bake loaves seam-side down to keep this untidy bit out of sight.
Shape
A key reason for shaping dough carefully, rather than just rolling it into a ragged ball or sausage shape, is to help control its form when proving and baking. This gives you a better chance of avoiding unexpected bursts, or ruptures, which can have a negative impact on the look and even texture of your Real Bread. This is all much easier if the dough is slightly tacky, so don’t add flour or your hands will slip and the loose ends of the dough won’t knit together so easily. You also need to try to minimize contact time with the dough at each movement, as the longer your hands are in contact with the dough, the more chance it has to stick to them.
The best way to improve your technique is practice. As you get more serious with your baking, it’s also great to take a course with, or work alongside, an experienced baker, so that you can see what they do, copy them, and feel what the dough is doing. He or she will also be able to put you straight if you’ve not quite got it right.
Many of the loaves in this book are shaped into a ball (to make a boule or cob loaf ), or a roughly cylindrical baton, which might end up as a freestanding loaf or in a tin.
Shaping a Ball
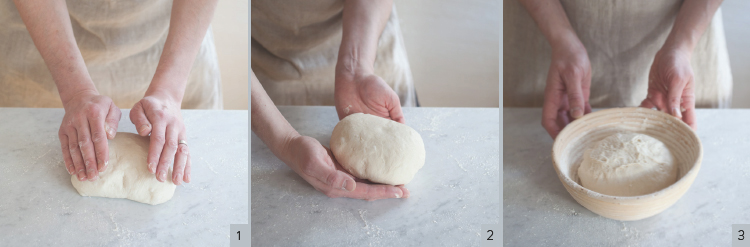
Press and stretch the dough out until it’s roughly square. Fold the four corners into the centre of the square, and then fold the four new corners into the centre again (fig. 1).
Turn the dough over so that it is seam-side (i.e. the messy bit) down. Starting with your hands side by side and palms down on top of the dough, slide them down round under it, maintaining contact with the dough to create tension in the outer surface of the dough in the direction your hands are moving. Your hands need to meet underneath the dough, palms up, pinching the dough together between their sides to seal the dough (fig. 2).
Move your hands back to the start position, giving the dough a quarter turn as you do, and repeat. You need to do this several times until you can feel tightness in the dough (if it tears you’ve overdone it) and the messy bit underneath has sealed together. Place the boule seam-side-up in a floured proving basket (fig. 3), or seam-side-down on a tray.
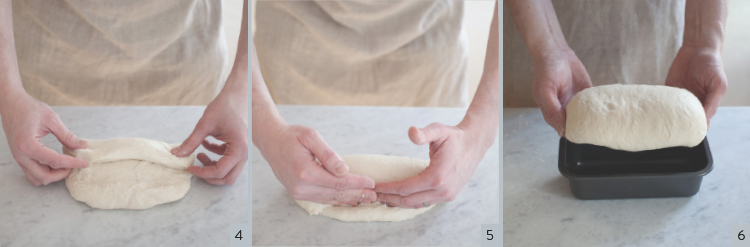
Shaping a Tin Loaf
Press and stretch the dough out to form a rectangle about the same length of your loaf tin, with the long side closest to you. Hold your hands flat, palms facing towards you, with the fingers touching. Put them under the edge furthest from you to lift and fold about a quarter of the dough towards you (fig. 4).
As you fold the far edge over, use the lower side of your hands to push the dough from you slightly to create tension on the outer surface and pinch it down (fig. 5). Return your hands behind the dough and repeat these steps once or twice more to pinch the seam closed. Carefully place the dough, seam-side down, into the greased bread tin (fig. 6).
Slashing
As well as looking pretty, at one time acting as a baker’s (or dough owner’s, in the case of communal ovens) signature and helping to distinguish between different types of bread baked in the same shape, scoring the dough serves technical functions. One is to control where the dough bursts (splits) during the rapid expansion in the first stage of baking. Encouraging and controlling this burst also leads to a better, less tight, texture of the finished loaf.
Slashing should be done in a swift, clean, decisive stroke with a very sharp blade, just before you put a loaf into the oven. Using a blunt knife, sawing back and forth, snagging the dough, stabbing away aggressively, having multiple attempts, barely breaking the surface, or doing any of this before the end of the final proof won’t get you anywhere.
Steam
Unless otherwise stated, the Real Breads in this book will benefit from steam in the first 5-10 minutes of baking. Steam turns the outer surface of the dough into a flexible gel, which allows it to expand more easily than if a dry crust starts forming straight away. Later in the dry heat stage of baking this gel sets to form a shiny, and in some cases crackly, crust.
In a fully-loaded traditional bread oven, steam is generated by evaporation from the dough and many professional bread ovens allow the baker to inject steam. At home it can be a struggle as domestic ovens are rarely airtight and may even have a fan to extract the steamy air. Still, you can give it a go by putting a tray in the bottom of the oven and pouring a small amount of boiling water from the kettle into it shortly before loading the dough in. Some bakers suggest squirting a mist of water into the oven immediately before you close the door. Try one of those trigger spray bottles you can buy in garden centres - a new one, not one that’s been used for plant food or pesticide …
Testing that a loaf is fully baked
I’m afraid that the old “knock on the bottom and if it sounds hollow, it’s done” trick, doesn’t really work. A more scientific method is to use a temperature probe - the general rule is that it should be 95°C/205°F at the centre.
Turn
Most ovens have spots that are hotter than others. It’s a good idea to turn loaves through 180 degrees at least once during baking to ensure even browning. For another meaning of “turn”, see Fold on page 17.
Weighing and measuring
You’ll notice that everything in this book is measured first by weight, and secondarily by volume. This is for accuracy and consistency. Depending on how much it is compacted, quantities of flour and other dry ingredients can vary hugely from cup to cup, and a jug at a slight tilt can lead to the amount of liquid you think it contains being way out. The cup measure of a starter will also vary depending on how active and bubbly it is. I suggest buying electronic kitchen scales and getting comfortable with metric weights.
That said, if you are comfortable and experienced in baking using ounces or cups, by all means continue to do what feels right to you. And remember: bakers often have to make slight adjustments to recipes (to account for the absorbency of different flours, for example) and when you’ve tried baking something once, you might want to tweak relative amounts of ingredients to make it your own. Still, weighing in grams is a useful fixed point of reference from which you can then go exploring.
All recipes in this book were written and tested using metric measurements. Conversions to ounces or cups are rounded and may be approximate: for example, in a list of ingredients, 500g will convert to 1lb 2oz, but when equipment is being discussed, the convention is to refer to a 500g/1lb loaf tin.