Biscuits: Sweet and Savory Southern Recipes for the All-American Kitchen (2015)
Biscuits in Bakery Shops
![]()
The good Lord knows that we Southerners love our sweets. We’re famous for grand layer cakes such as Red Velvet, Coconut, Lane, Hummingbird, Blackberry Jam, 1-2-3-4, Italian Cream, Carrot, and Caramel. We make endless varieties of Pound Cake, any kind of cobbler and pie imaginable, and sheet cakes to beat the band. Our cookie jars are always filled and we make candy at Christmas like it’s going to be the last Christmas. To say we have an affinity for sugar is like saying fish prefer to stay a little damp. When it comes to sugar, we just can’t help ourselves. It’s only right that a cookbook about biscuits contain a chapter on dessert.
Double-decker Strawberry Shortcake
Maple Cinnamon Rolls with Buttermilk Maple Icing
Chocolate Toffee Monkey Bread
Biscuit Doughnuts
Chocolate Chip Biscuits with Strawberry Cream Cheese Filling
Strawberries and Cream Biscuits
Strawberry Banana Nut Biscuit Bread with Buttermilk Orange Glaze
King Cake
Chocolate-Covered Cream-Filled Whole Wheat Biscuits
Buttermilk Blueberry Tassies
Resurrection Biscuits

My hand mixer is forty years old. It keeps on ticking.
Strawberry Fields
Strawberry Shortcake was always a favorite childhood dessert. Neither the shortcake nor the whipped cream was ever homemade. My mother and grandmother opted for store-bought pound cake or the little sponge cake cups, the latter of which we all thought was a spectacular and amazing product. A can of Reddi-Whip was ready when we needed it for the whipped cream topping.
The process leading up to strawberry shortcake added to the special nature of the dessert. The best container of strawberries was handpicked from the sea of containers in the grocery store produce section. The strawberries were washed, hulled, and sliced into a large bowl. A discussion would ensue regarding the right quantity of sugar needed to “sugar them down.” The strawberries were sugared, stirred, and placed in the refrigerator. They were checked and stirred frequently to determine if the sugar had melted and berries had released enough juice to make a sufficient amount of syrup. Finally, we were dished out plates of strawberry shortcake with just the right amount of juice, but never enough whipped topping. Those cans of Reddi-Whip don’t hold much and there was always fear we’d run out. So, the whipped topping was doled out scantily, which never made sense to me because the can was always found the next day in the door of the refrigerator and it still had whipped topping in it.
Because of this special dessert, I dreamed of walking in a strawberry field and plucking strawberries from the plant. I imagined a strawberry field at the peak of the season must be the most beautiful sight in the world. Apparently, I sealed my fate with those recurring dreams. My husband and I moved to the Tampa, Florida, suburbs in 1985, which happens to be the Winter Strawberry Capital of the World. Roadside strawberry stands serve up all sorts of strawberry desserts during the harvest season. Our favorite spot has tables and chairs set up outside next to the strawberry fields. Not only do you get a spectacular strawberry dessert, like strawberry shortcake, but you sit outside and overlook the beautiful strawberry fields bursting with gorgeous red jewels. A visit to the strawberry shortcake stand is truly one of life’s simple pleasures.
I make Strawberry Shortcake quite a bit and enjoy trying out different recipes for shortcake. Sweet biscuits are the best for flavor and texture. They hold up to the strawberry syrup better than pound cake and have just the right of sweetness. I almost always make fresh whipped cream. It’s so easy and doesn’t take more than a couple of minutes. Plus, I love to pull out my forty-year-old General Electric hand mixer to make the whipped cream. I’ve had the mixer, a wedding shower gift, longer than I’ve had my husband. Imagine buying a mixer now and expecting to have it in working condition in the year 2054.
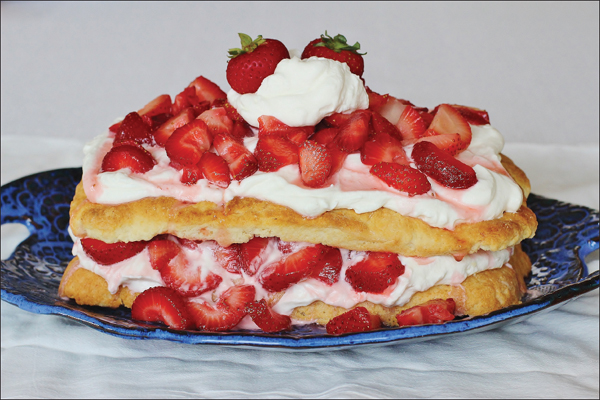
Double-decker Strawberry Shortcake
Yield: 12 servings
Preheat oven to 400°
I use cream cheese to make the cake sturdy and able to hold up to thick layers of whipped cream and strawberries. In addition to the leavening in the flour, the dough gets an added boost from a carbonated beverage. Unlike traditional shortcake, which adds the strawberries and syrup directly on top of the shortcake and can’t be assembled until serving time, this shortcake may be assembled ahead of time. The whipped cream adds a layer of protection to the cake and keeps it from absorbing too much liquid. For best results, spoon on the berries with a slotted spoon and save the reserved syrup to drizzle over the shortcake just prior to serving. Because the whipped cream is a barrier, the extra syrup would simply run down the sides of the shortcake and puddle under it.
Strawberry topping:
5 cups fresh strawberries, hulled and sliced—approximately 1½ (16 ounces) containers
½ cup sugar
Biscuit shortcake:
2 cups winter wheat self-rising flour
2 tablespoons sugar
½ cup unsalted butter, cubed and chilled
4 ounces full fat cream cheese, cubed
½-¾ cup lemon-lime flavored carbonated beverage
1 tablespoon unsalted butter, melted
Whipped cream:
16 ounces heavy whipping cream
¼ to ½ cup granulated sugar, depending on your taste preference
1 teaspoon vanilla extract
For strawberry topping:
Stir strawberries and sugar together in a large bowl. Place in refrigerator until sugar has dissolved and formed syrup.
For biscuit shortcake:
Add flour and sugar to a large mixing bowl and stir.
Rub or cut in butter until all the butter has been coated in flour. Large chunks may remain.
Rub or cut in cream cheese until all the cream cheese has been coated with butter and all the flour has been incorporated.
Stir in enough carbonated beverage until the dough is wet.
Turn out onto a well-floured surface. Sprinkle top of dough with flour. Gently knead, working in the flour and adding more as necessary until the dough is no longer sticky and holds its shape.
Divide the dough in half. Gently roll out the dough until it’s the approximate dimensions of your baking dish. Grease the dish well. I used a 10x7 dish but 8x8 or 9x9 would work, too.
Place the dough in the baking dish and pat it out to cover the bottom. Brush top of dough with melted butter.
Roll out second half of dough to the approximate dimensions of the baking dish. Gently press the dough to fit over the dough in the baking dish.
Lightly brush the top with melted butter, if desired. I used the butter left on the pastry brush and in the cup where I melted the butter.
Bake at 400° for 20 minutes or until the top is golden brown. Remove from the oven and let cool in pan for 10 minutes. Then, remove to a cooling rack and let cool completely before attempting to separate the layers.
For whipped cream:
Combine all ingredients and beat with an electric mixer until stiff peaks form. Don’t overbeat or you’ll wind up with sweetened vanilla butter.
To assemble:
Place 1 layer of shortcake on a serving platter. Spread half the whipped cream. Spoon half the berries with a slotted spoon onto the whipped cream. Top with remaining layer of shortcake. Spread the remaining whipped cream over the shortcake. Spoon on remaining berries with a slotted spoon. Reserve syrup to drizzle over the individual servings of shortcake just before serving.
Full fat whipped cream will keep the shortcake from getting soggy. However, reserving the extra syrup is better than pouring it all on top of the whipped cream because it will only run down the sides and puddle under the cake.
Maple Cinnamon Rolls
with Buttermilk Maple Icing
Yield: 12 rolls
Preheat oven to 450°
Our church hosted a dinner in conjunction with a dessert auction to raise money for our mission projects. When asked to contribute a dessert for the auction, I said yes. I don’t have the skills to decorate an elaborate dessert and create a work of art. However, I can bake something tasty and visually appealing. Our friends, Parker and Shari Keen, bid on and won the cinnamon rolls. The name of the baker/contributor for each dessert wasn’t disclosed. Upon winning, Shari contacted me immediately to tell me they won cinnamon rolls that looked like mine. She asked me to confirm their eager anticipation that I had, indeed, made the cinnamon rolls. I was happy to be able to contribute to our fundraising efforts and equally happy to share a goody from my kitchen with cherished friends.
Dough:
1 batch of buttermilk biscuit dough (see page 29)
Roll out dough to a rectangle ¼ inch thick.
Icing:
2 cups powdered sugar
2 tablespoons melted butter
2 tablespoons grade B maple syrup
1 teaspoon vanilla extract
4 tablespoons buttermilk
Stir all ingredients together and whisk until smooth.
Filling:
2 sticks (1 cup) unsalted butter, softened
2 tablespoons grade B maple syrup
2 teaspoons cinnamon
Whip all ingredients together using an electric mixer until light and fluffy.
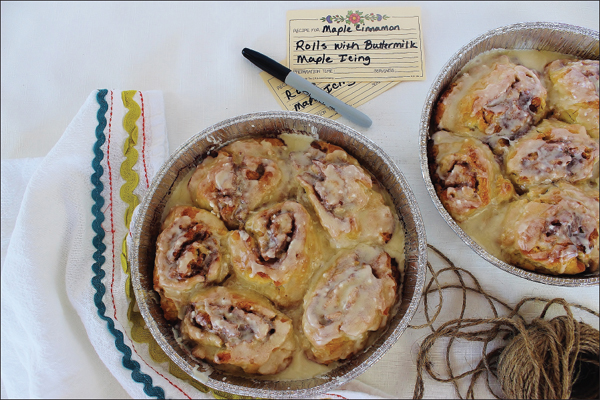
To assemble:
Spread filling evenly on dough rectangle. Make sure to get as close to the edge of the dough as possible.
Starting with the edge of the dough farthest away from you, roll up in jellyroll fashion and form a log. When complete, pinch the seams together. Even out the thickness of the log by running your hands up and down the length.
Divide dough into 12 equal pieces. Place on a greased baking sheet or divide between 2 (8-inch) round pans that have been greased.
Bake in a preheated 450° oven for 18 minutes or until tops are brown.
Remove from oven. Pour icing over rolls while they are still in the pan and warm.
Let cool slightly and serve.
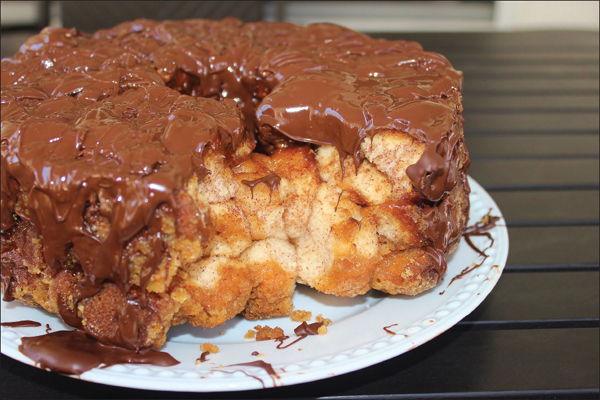
Chocolate Toffee Monkey Bread
Yield: 1 (9-inch) round loaf
Preheat oven to 350°
Monkey Bread is a familiar kid-friendly dessert that I remember making in Girl Scouts. I gussied it up a bit by adding toffee bits to the bread and a generous helping of chocolate glaze.
4 (7.5-ounce) cans buttermilk biscuits, divided
¾ cup granulated sugar
2½ teaspoons ground cinnamon
1 cup toffee bits, divided
½ cup butter
¾ cup brown sugar, packed
12 ounces semi-sweet chocolate chips
Cut 2 cans of biscuits into fourths.
Place granulated sugar and cinnamon into gallon-sized disposable bag. Shake to mix. In batches, add quartered biscuits to sugar mixture, shake well to coat, and place them in a tube pan that has been sprayed with non-stick spray.
After 2 cans of sugared biscuits quarters have been layered in a tube pan, sprinkle on ½ cup of toffee bits.
Repeat with remaining biscuits and toffee bits.
Put butter and brown sugar in a small saucepan. Heat until butter is melted and mixture is pourable. Pour over top of biscuits and toffee bits in tube pan.
Bake in a 350° preheated oven for 45 minutes or until biscuits are brown. Remove from oven. Let sit in tube pan for 5 minutes. Invert onto a plate.
Melt chocolate chips in the microwave for 90 seconds. Stir. Heat for 30 seconds and stir. Continue heating and stirring in 30 second increments until the chips are about 75 percent melted. Then, stir until completely melted. Drizzle over monkey bread.

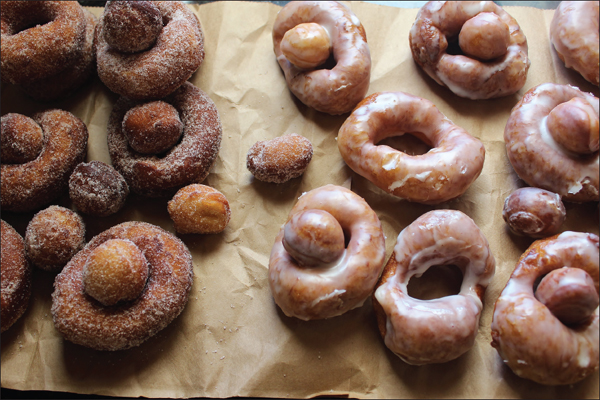
Makin’ Doughnuts
Iwas quite young when my grandmother introduced me to canned biscuits doughnuts. She made the hole with her thumb initially. When two-liter soft drinks came on the market, she delighted in teaching me that the bottle cap made the perfect-sized hole and the somewhat jagged edge helped to cut through the dough. Her excitement at this discovery was sweet and innocence like a child. Coca-Cola can never appreciate the joy they bestowed upon a simple, down-home country woman who discovered a clever use for a bottle cap. I can never thank Coca-Cola enough for the memory.
Granny’s secret to the success of her biscuit doughnuts, in her estimation, is to use “the least little doughnuts you can find.” I strayed from her training and tried using jumbo biscuits, thinking big doughnuts would be better than little doughnuts. That little experiment taught me, once again, that Granny was right. Jumbo biscuits browned too much on the outside before the insides finished. Granny was always right.
Biscuit Doughnuts
Yield: 20 doughnuts and 20 holes
Heat oil to 350°
Fresh hot doughnuts fry up quick and easy. Get kids in the kitchen with you when you make these. They love to cut out the holes and roll the doughnuts in sugar or dip them in glaze. Don’t get distracted while they’re frying or you will be disappointed to find you’ve got burned biscuits.
Doughnuts:
2 (7.5-ounce) cans buttermilk biscuits
Cooking oil
Remove biscuits from package. Using an object that’s about 1 inch in diameter, such as a bottle top, cut a hole from the center of each biscuit.
Place enough cooking oil in a heavy pot or skillet that it comes up 1 to 2 inches on the side. Heat to 350°.
Fry doughnuts and holes in batches, careful not to crowd. In my 10-inch cast-iron pan, I fry 4 biscuits and 4 holes at once.
Fry for 30 to 45 seconds on one side until golden brown. Flip and do the same with the other side. Remove and drain on a brown paper sack.
As soon as they are cool enough to handle, dip in glaze or cover in cinnamon sugar.
Serve warm.
Orange Buttermilk Glaze
2 cups powdered sugar
3 tablespoons buttermilk
1 teaspoon orange extract
½ teaspoon vanilla extract
Whisk together all ingredients.
Cinnamon Sugar
½ cup granulated sugar
1 teaspoon ground cinnamon
Place both ingredients in a quart-sized plastic bag. Shake to mix.
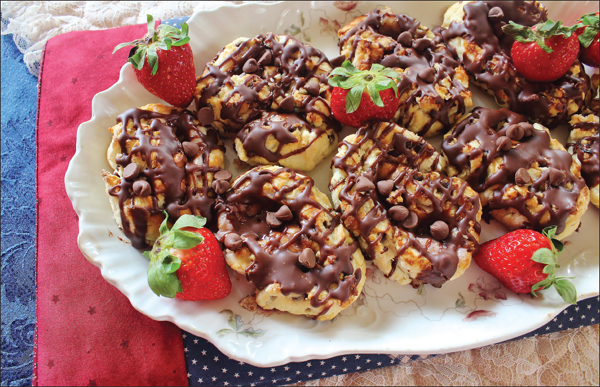
Chocolate Chip Biscuits
with Strawberry Cream Cheese Filling

Yield: 16
Preheat oven to 450°
Chocolate and strawberry is a winning flavor combination and doesn’t disappoint in the jelly roll style dessert. I surprised the ladies in my Bible study class with a batch of these and one of them remarked, “These are the best biscuits I’ve ever eaten in my life.” Not only are these good biscuits, they’re award-winning biscuits. This little biscuit won second place in the International Biscuit Festival 2014.
Filling:
8 ounces cream cheese, softened
½ cup strawberry jam
Biscuits:
2 cups soft winter wheat self-rising flour
½ cup unsalted butter, cubed and chilled
1 cup milk chocolate chips
1 cup buttermilk
For filling:
Mix with an electric mixer until smooth. Set aside
For biscuits:
Place flour in bowl and rub in butter until flour resembles coarse meal. Add in chocolate chips.
Stir in buttermilk until dough is sticky.
Turn out dough onto a floured surface. Sprinkle flour on dough and work it in the dough until it’s no longer sticky. Form a ball from the dough.
Roll out to ½ inch thick.
Spread filling over dough. You might have a little filling left over.
Starting with the long edge farthest away, loosely roll toward you in jelly roll fashion, finishing with seam down. Even out the thickness of the dough by rubbing your hands up and down the roll.
Cut crosswise into 16 equal pieces. Place on a large baking sheet sprayed with non-stick spray or covered with a baking mat.
Bake in a 450° preheated oven for 15 minutes or until biscuits are lightly brown.
Remove from oven. Cool completely and drizzle with chocolate glaze.
Chocolate Glaze
1 cup milk chocolate chips
1 tablespoon half-and-half
Place chocolate chips and half-and-half in the top of a double boiler. Stir occasionally. When chips are about 75 percent melted, remove from heat and stir until completely melted. Drizzle over biscuits.
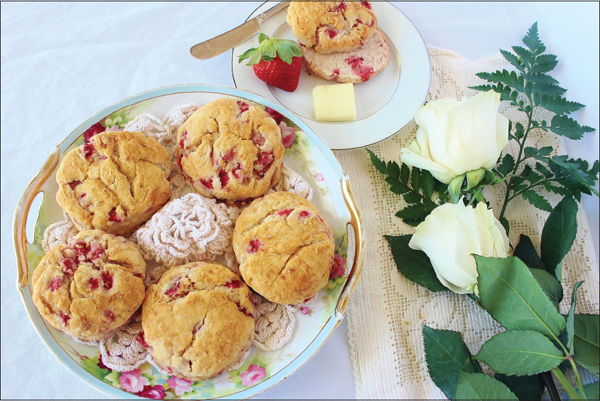
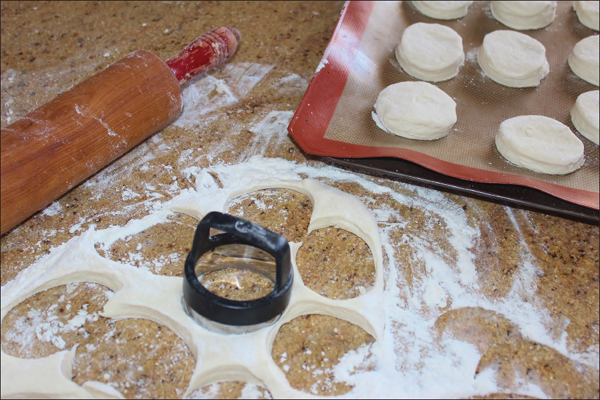
Strawberries and Cream Biscuits
Yield: 12 to 15 biscuits
Preheat oven to 450°
Baking fresh strawberries into dough can be tricky. They give off a lot of water and can easily make the dough gummy and seemingly undercooked, resulting in an undesirable texture. My friend, Shari, was with me in the kitchen the day I made these. She was happy to take on the job of Chief Quality Control Inspector. The biscuits passed Shari’s approval and she gave the texture high marks.
2 cups soft winter wheat self-rising four
1 tablespoon sugar
½ cup unsalted butter
1 cup fresh strawberries, diced
1 cup plus 1 tablespoon heavy cream
Cooking oil and granulated sugar for tops
Place flour and sugar in a large bowl. Cut or rub in butter until flour resembles coarse meal.
Add strawberries and heavy cream. Stir until dough is wet and sticky.
Turn out onto a well-floured surface. Sprinkle dough with flour and gently knead, adding additional flour as needed until dough is no longer sticky.
Roll out to 1 inch thick. Cut with a 2½-inch biscuit cutter dipped in flour. Place on a baking sheet oiled or covered in a baking mat.
Brush tops of biscuits with cooking oil. Sprinkle with granulated sugar.
Bake in a preheated 450° oven for 15 minutes or until tops are golden brown.
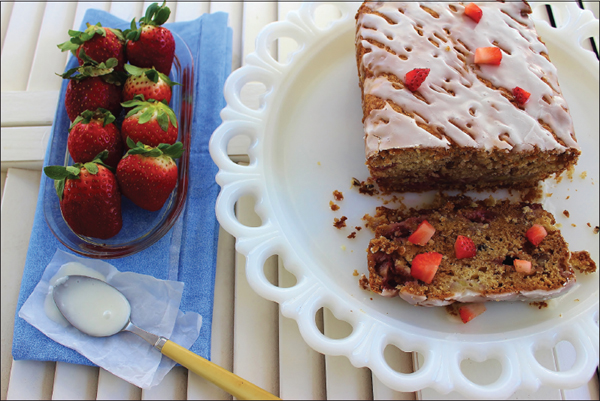
Strawberry Banana Nut Biscuit Bread
with Buttermilk Orange Glaze
Yield: one loaf
Preheat oven to 350°
I participate in a fun social media group that’s all about food. It’s spearheaded by the food editor of one of our local newspapers. Using Twitter as our platform, we gather once a week to discuss a preselected food topic. Additionally, we’re presented a recipe and challenged to cook it, photograph it, and comment on it. You’re encouraged to be as creative as you’d like or follow the recipe closely. It’s your choice. One of the challenge recipes was Strawberry Bread with Honey Butter. After adding my twists and turns to the recipe, I wound up with a slightly different version. Using my standard biscuit recipe, I substituted sour cream for buttermilk, added baking soda to the sour cream for more lift, and put in a little sugar, flavorings, nuts, strawberries, and bananas. Instead of honey butter for a smear, I made a buttermilk orange glaze.
½ cup unsalted butter, softened
¾ cup granulated sugar
8 ounces sour cream
1 teaspoon baking soda
1 cup diced strawberries
½ medium banana, diced
1 cup chopped pecans
½ teaspoon vanilla extract
½ teaspoon orange extract
2 cups soft winter wheat self-rising flour
Using an electric mixer, cream together butter and sugar until light in texture and pale yellow in appearance. Add vanilla and orange extracts and mix.
Stir together sour cream and baking soda in a bowl. Set aside. If the mixture expands, you will know that your baking soda is active. If it doesn’t expand, discard your baking soda and make a trip to the store.
Mix together strawberries, banana, and pecans. Set aside.
Add a small amount, about ⅓ or less of the flour to the creamed butter mixture in the mixing bowl. Pulse until flour is mixed in. Mix in half the sour cream mixture. Continue alternating until flour and sour cream are mixed into the dough.
Gently fold in fruits and nuts.
Spread dough evenly in a 9x5-inch loaf pan prepared with a nonstick baking spray.
Bake in a 350° preheated oven for 60 minutes or until toothpick inserted comes out clean. Cool in pan on a wire rack for 30 minutes.
Buttermilk Orange Glaze
1 cup powdered sugar
2 tablespoons buttermilk
1 teaspoon orange extract
Mix together with spoon until smooth. Drizzle over bread as soon as it’s taken out of the loaf pan.
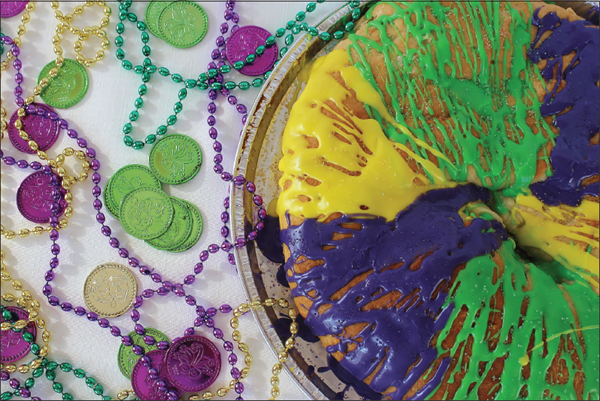
King Cake
Yield: one cake
Preheat oven to 350°
King Cake is more like a pastry than a cake. It’s a tradition tied to Mardi Gras that dates back to early Christianity. The colors of the icing are the colors of Mardi Gras, and each have significance: purple for justice, green for faith, and gold for power. Baby Jesus, the King, is hidden in the cake. Tradition holds that the one who finds the baby Jesus will have good luck throughout the year. Frozen bread dough can be used for a shortcut. Following the spiritual theme of King Cake, I thought there was only one logical choice for a biscuit dough: angel biscuits.
Dough:
One batch of Angel Biscuit dough
Filling:
8 ounces cream cheese, softened
1 cup powdered sugar
Zest of one lemon
Juice of ½ lemon
Prepare angel biscuit dough (see page 35). Place in a well-greased bowl and let rise for one hour in a warm place free from drafts. After one hour, turn dough out onto a well-floured surface. Sprinkle with flour and gently knead, adding flour as needed, until dough is no longer sticky.
Roll out dough to a rectangle ½-inch thick.
Prepare filling by mixing all ingredients with an electric mixer until smooth. Spread evenly over dough.
Starting at the long edge, roll dough toward center and form a log. Pinch seams together and form a circle or oval with the log. Move to a baking sheet been sprayed with a nonstick spray or covered with a baking mat. Let rise in a warm draft-free area for 1 hour.
Bake in a 350° oven for 30 minutes or until golden brown.
Let cool before icing.
Insert baby Jesus into the loaf in an inconspicuous space.
Make icing by adding extract to powdered sugar. Add buttermilk, a little at the time, until the icing is thick but pourable.
Divide among 3 small bowls. Color 1 bowl purple, 1 green, and 1 gold.
Drizzle over cake. Add sprinkles.
Icing:
2 cups powdered sugar
4-5 tablespoons buttermilk
½ teaspoon almond or orange extract
Gel coloring and sprinkles
Small plastic baby
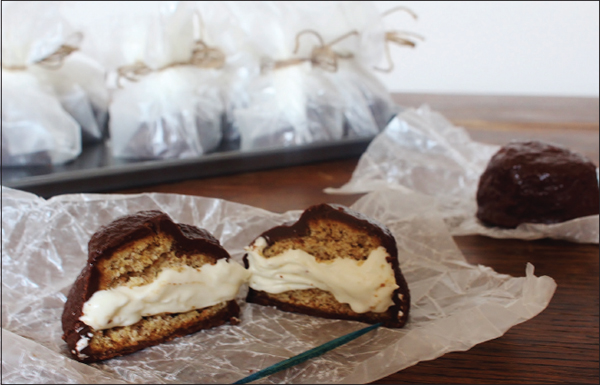
Chocolate-Covered Cream-Filled Whole Wheat Biscuits
Yield: 12
Preheat oven to 450°
When I tasted the first batch of Honey Whole Wheat biscuits (see page 39), I was surprised by how closely the taste resembled graham crackers. I had never given much thought to the ingredients in graham crackers but, when I researched it, I discovered that the honey whole wheat biscuits I just made were essentially fluffy graham crackers. Composing a cream-filled sandwich with the graham cracker-like biscuits seemed the perfect course to take. Something reminiscent of MoonPies would be delightful and give me an opportunity to pay homage to a wonderful Southern company, Chattanooga Bakery, and their product, MoonPie, that has been a part of our culture for generations. My earliest memory of MoonPie, was its daily inclusion in my granddaddy’s sack lunch that he carried to work at the cotton mill in Geneva, Alabama. Fast forward to the early 1960s when my family moved to Mobile, Alabama, the original Mardi Gras city in the United States. Then, as it still is today, MoonPie is a favorite Mardi Gras throw. Paradegoers of all ages yell to the revelers, “Hey Mister, throw me a MoonPie!”
I experimented with different recipes for cream filling before settling on the plain store-bought version. My marshmallow recipe, which I use each year at Christmas, makes beautiful marshmallows that everyone enjoys, but the texture is a little too firm for a cream filling. The next try was using store-bought marshmallow cream and embellishing it with powdered sugar, butter, and vanilla extract. The flavor was good and the texture creamy, but it didn’t hold up at room temperature. So, the best version is the marshmallow cream straight from the jar.
Biscuit:
12 Honey Whole Wheat biscuits no larger than 2 inches across. (See recipe page 39)
Filling:
7 ounces jar marshmallow crème
Chocolate coating:
16 ounces milk chocolate
½ bar paraffin wax
1 tablespoon heavy cream
Split biscuits in half. Spread a teaspoon of filling on the inside half of the biscuit and top with the other half. Secure with a toothpick. Repeat until all biscuits are filled. You may have more filling than you need. Place filled biscuits on a baking sheet and freeze for 1 hour. Do not remove toothpick yet.
For chocolate coating, melt all ingredients over a double boiler.
To assemble:
Remove 2 or 3 biscuits at the time from the freezer. Working quickly, dip biscuit in chocolate and coat well. If your pot is shallow, hold the biscuit over the pot of melted chocolate and spoon chocolate over it. Place chocolate-covered biscuit on waxed paper. Repeat until all are covered.
Let dry.
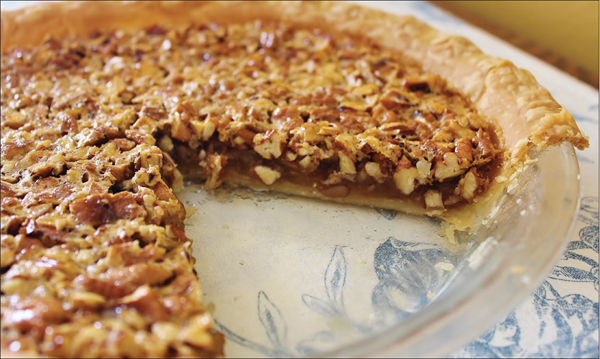
My grandmother would consider tassies a waste of time. She would have made a pecan pie and be done with it.
Tassies and Pecan Pies
The first I heard of Tassies was in Nathalie Dupree’s cookbook, Southern Memories. She recounts a luncheon she prepared for the mother of the gentleman she was seeing. She used her good linen, china, and flower vases to ensure beauty and charm throughout the meal. The woman was delighted by the Pecan Tassies (miniature pecan pies) Nathalie had chosen for dessert. Nathalie’s description of the setting was dreamy and sophisticated. I had no doubt her social circles were very different from those of my family. My mother lacked confidence in her ability to entertain gracefully. In reality, she possessed a great deal of charm and social graces. My grandmother was much too practical to entertain in a way she described as “putting on the dog.” She was never fortunate enough to own fine china and linens. Besides, all the work that went into Pecan Tassies would be deemed unnecessary in her eyes. She would make a whole Pecan Pie and be done with it. Two different worlds entirely, and I’m fortunate to have lived in both.
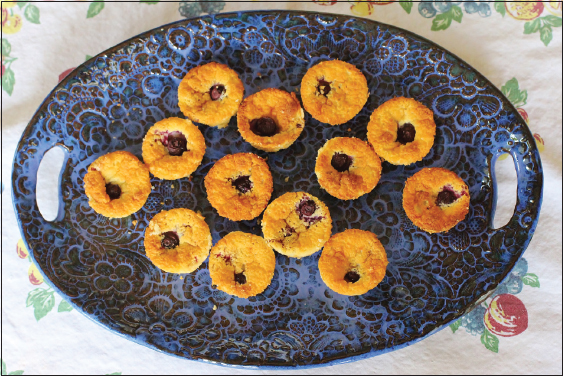
Buttermilk Blueberry Tassies
Yield: 24
Preheat oven to 350°
The crust for Tassies had the necessary ingredients for biscuits: flour, fat, and dairy. The dairy is in the form of cream cheese. The inspiration for the filling came from an article my daughter sent me highlighting a recipe for Buttermilk Blueberry Pie. Our blueberry bushes were producing a bumper crop, and Buttermilk Pie is something I make frequently. I think that was her way of telling me she’d like me to make her a Buttermilk Pie and throw in some of our freshly picked blueberries. So, I whittled down my buttermilk pie recipe to the amount of filling I thought I needed for the 24 Tassies and used some of our freshly picked blueberries.
Crust:
½ cup unsalted butter, room temperature
4 ounces cream cheese, room temperature
1 cup all-purpose flour
Filling
2 eggs, separated
½ cup sugar
1½ tablespoons self-rising flour
2 tablespoons unsalted butter, melted
1 cup buttermilk
72 uncooked blueberries
For crust:
Spray a 24-cup mini muffin pan with nonstick spray.
Using an electric mixer, cream butter and cream cheese until smooth. Add in flour and beat until combined.
Turn out the dough onto a lightly floured surface. Shape into a ball. Sprinkle with a little flour if the dough is sticky. Divide the dough in half. Roll each half into a 6-inch log. Divide each log into 12 pieces and shape each piece into a small ball. Place one ball in each cup of the muffin tin. Press the dough evenly on the bottom and sides of each cup.
Repeat process with the remaining dough.
Chill the dough in the muffin cup for at least 1 hour.
For filling:
Add egg yolks to a large mixer bowl and beat until fluffy.
Mix together flour and sugar.
Add flour mixture to egg yolks and beat with electric mixer until mixed well.
Add buttermilk and melted butter to egg mixture and beat until mixed well.
Beat egg whites until fluffy and fold into filling.
To assemble:
Place two blueberries into each muffin cup.
Fill muffin cups with custard filling, approximately 1 tablespoon per cup.
Top the filling in each cup with the remaining blueberries.
Bake at 350° for 40 minutes or until the tops are browned and the filling is set.
Remove from oven. Let cool 10 minutes.
The tassies need some gentle coaxing to come out of the tins. Gently run a knife along the edge of each cup and then carefully remove each tassie. They are dainty little things and must be handled as such.
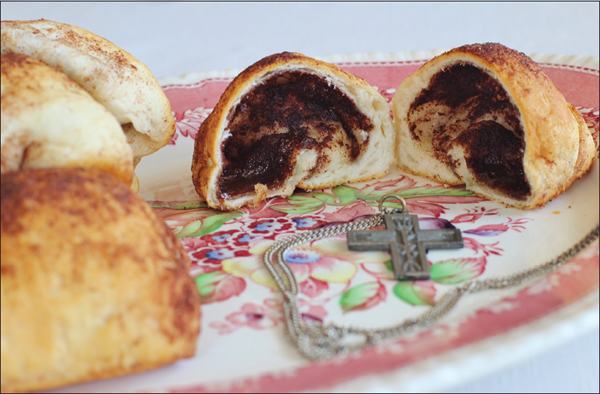
Resurrection Biscuits
Yield: 8
Preheat oven to 400°
Make a dessert with your kids and teach them the Resurrection story at the same time. Using canned biscuits and large marshmallows, this is a cooking project that will remind you of Vacation Bible School. I still remember some of the fun crafts I made as a child in VBS. Plan this activity for Easter and let the Resurrection story come alive for your child. This activity explains the miracle of the resurrection as well as a sermon. I first became aware of this recipe when a typewritten copy was mistakenly mixed in with some of my work papers. I had forgotten about it until my friend, Dawn, asked me if I had ever heard of it. I researched online and found the recipe all over creation with no attribution to the original source. The copy I received used canned crescent rolls, as do most of the recipes online. Canned biscuits work just as well. Brushing the tops of the biscuits with melted butter and sprinkling with cinnamon sugar is my addition and isn’t symbolic of the story. It simply makes the biscuits taste better.
1 tablespoon granulated sugar
2 teaspoons ground cinnamon
8 large canned biscuits
8 large marshmallows
2 tablespoons melted butter, cooled
Mix sugar and cinnamon in a small bowl.
Make 1 biscuit at the time. Press a biscuit as flat as you can get it with the back of your hand.
Dip 1 marshmallow in melted butter and coat well. Then, roll the marshmallow in the cinnamon sugar mixture until well coated.
Place the coated marshmallow on the inside of the biscuit near the edge. Roll the biscuit up and around the marshmallow 1 half turn. Fold in the edges of the biscuit. Finish rolling. Pinch seams and place seam-side down on a baking sheet that has been greased or covered in a baking mat. Make sure seams are pinched together well or the marshmallow will leak out.
Repeat the process with the other 7 biscuits.
Brush tops of the biscuits with the remaining butter and sprinkle with cinnamon sugar.
Bake in a 400° preheat oven for 12 minutes or until the biscuit is golden brown.
Remove from the oven and let cool about 5 minutes.
Cut into the biscuit and you’ll find the marshmallow has disappeared!
Here’s the symbolism:
Biscuit - the cloth they wrapped Jesus in when they buried him
Marshmallow - Jesus’s body
Butter - embalming oils
Cinnamon sugar - spices used to prepare Jesus’s body for burial
Baked biscuit - empty tomb
For scripture reference, read John 20:1-8 while the biscuits are baking.