Franklin Barbecue: A Meat-Smoking Manifesto (2015)
✵ Chapter Six
At long last, it’s finally time to get cooking. You’ve gotten to know your smoker and you’ve sourced or seasoned the best wood you can possibly find. You’ve considered building and tending a fire, generating the good smoke that makes food tasty, and you went to the store and bought some nice meat, whose quality you can really stand behind.
Now it’s time to put all of this information to use. Now it’s time to put the meat in the cooker!
In this chapter, I’m going to walk you through four separate cooks: brisket, pork ribs, beef ribs, and turkey. You’ll notice that the steps for each are quite similar—nearly identical, in fact. And now I’ve got a confession for you: almost everything we cook in the smoker is done in a comparable way. There’s really no secret. Let your meat—whatever it is—smoke at a consistent temperature until it has absorbed enough smoke. Determine this by the color it has turned and by the quality of the bark that has formed on the outside. When it’s reached this condition, wrap it and let it keep cooking. It’s that simple.
You might balk when you see that there are only four recipes in this chapter. But I swear it’s not because I’m being lazy, secretive, or anything like that. I don’t include tons and tons of “recipes” here because at the end of the day, the method for smoking pretty much any meat is the same. I can give you rough guidelines for the time it takes to cook things, but, as always with barbecue, it’s done when it’s done. You can’t rush it; you can’t cut corners. The trickiest parts are knowing when to wrap and when something’s done. Although I can do my best to describe how and under what conditions you should make these decisions, ultimately you just have to cook a few times and learn from your mistakes. So read through this chapter carefully, practice, and take note of what went right and what went wrong. In the end, you’ll be able to cook incredible meat with great consistency in all conditions.
AN IMPORTANT BARBECUE FABLE
But before I send you off on your brisket- or rib-cooking way, I want to share one more story—an important one, I think, for anyone who is nervous about screwing up their first brisket cook. Let me preface this by saying that this story has a happy ending. It also touches on many of the topics I’ve discussed in the preceding chapters, making it a good summation leading into the all-important cook. And there’s a moral at the end: even when everything is going against you, never quit and never stop trying!
Braun, our kitchen manager and one of our longest and most trusted pitmasters (and Stacy’s cousin), and I were in New York to cook at a big event. There were bands, cooking demos, and renowned chefs from all over the country. This was going to be a big event, so we had to be on top of our game.
We showed up at noon the day before the event to meet the wood supplier, to receive our meat, and to see the cooker arrive. Turns out the cooker they had arranged for us was actually a grill—not gonna work. So I reached out to a buddy of mine on Long Island—we like to call him Long Island Phil—who found us an actual smoker so we could cook all of the meat.
The festival was on an island, so there we were, on the island, waiting for the trucks to bring our stuff. We’re waiting and waiting, and they keep telling us the trucks are on their way with our stuff, so we stick around to receive the goods. Eventually the cooker arrives from Long Island Phil. It was a reverse-flow Lang; I think it was a dual 84, a huge cooker. Supposedly this thing was big enough to cook all of the meat they wanted us to prepare, but, alas, it was not. And it was reverse flow, which, you will recall, I do not like because it has this plate running through it to redirect the smoke and heat. It’s also got more baffles and levers than I know what to do with.
It’s a sunny day, just beautiful, except for the fact that our meat never shows up. We were expecting all of these great briskets to arrive and they do … super-duper late. Late and brisket is never a great combination. And then the firewood was supposed to be there. We were supposed to be getting oak that was not kiln dried, which was going to be a feat, because in New York it all has to be kiln dried. Supposedly we were getting some under-the-radar oak, more like what we were accustomed to using at home.
The meat finally shows up at about 7 p.m. We were supposed to start cooking at 6, because we had planned to cook them most of the way, go to bed, and finally finish them off in the morning. By the way, the festival organizers’ initial emails said they were expecting us to feed thirty-five hundred people. That’s so impossible, I don’t even know what to say. But I promised to cook as much of the meat they gave us as I could.
So it’s starting to get dark now, well past the time we wanted to begin our work. I’m wandering around looking for the hand-washing facilities (clean hands and sanitary conditions are of extreme importance to me). No luck. No water. No hand-washing facilities. And it turns out … no lights! The crew had turned off all the lights and left because no one was cooking overnight except for us and a couple of other guys. So our meat shows up late and by the time we start trimming, it was dark. We’re trimming it as fast as we can by moonlight, just hacking the briskets up in the middle of a field in the dark on an island.
Finally at 10 p.m. our firewood shows up. And it’s nothing like what we wanted. It is kiln dried, no life to it, and it’s also not even close to the amount I’d asked for. It’s going to burn fast, hot, and with absolutely no smoke at all. And that’s to say nothing about the quantity. We have to do a 15-hour cook and then keep stuff warm. We’re looking to burn this pit for 20 to 24 hours. And they bring us a single wheelbarrow full of wood.
So we finally start cooking 4 to 5 hours too late. I spent much of the night playing the part of the barbecue panhandler—calling everyone I knew, bugging them to please bring us more wood. We beg drinking water and even more wood from some other cooks who had turned up. Compared to us, they’re like wealthy aristocrats. I remember one group shows up with ten or twelve people to cook a single pig. They have a huge cooler full of beer. They have cars because they live around here. Another team shows up with a car service—a driver in a black van just waiting around for them.
By about 3 a.m., more wood shows up. Braun’s getting a little worried because we haven’t opened up the lid once (trying to retain every degree of heat due to our limited wood supply). So we open up the lid, and these briskets look horrible. They’re splotchy from weird airflow. They’ve got no color. They’re yellowed, and their fat hasn’t even started to render. They look as if we’d put them on an hour ago.
Then, of course, a huge storm blows through. Turns out there’s a tornado warning; we get word that one has just touched down not far from us in Queens. When the lightning starts, we’re standing in water up to our ankles, with water also submerging electrical outlets that are hooked up to a generator. I start thinking this will be the cook that breaks us.
As I stand in a puddle of water, I smell something distinctive that sets off an alarm in my head. “Oh, no,” I yell. “Grease fire!”
This Lang cooker is not really meant for this kind of use because of that reverse-flow plate onto which our brisket fat, finally rendering, is dripping. I crack the lid and spy a little tiny flame about the size of a quarter on the plate over the firebox. It’s not really much at all. But as soon as I open the lid, it becomes a scene from Backdraft. A sheet of fire erupts across the whole cooker. I try to shut the fire down by closing every vent and pipe on the cooker, but it doesn’t work. So I just start pulling out briskets in the rain, throwing them to soaking-wet Braun who puts them down, steaming, on our little soaking-wet table. In the back of the cooker a couple of briskets have caught on fire.
Then my buddy and super chef Adam Perry Lang comes running over. Not actually running—I remember it being more like in the movie Crouching Tiger, Hidden Dragon: he came skipping over the tops of the tents like a ninja. He pulls this giant knife out of its sheath and uses it to stab and toss each burning brisket from the cooker. The grease fire is out of control now and flames are licking at his arms, which I’m trying to cover with wet towels as he heroically helps pull the briskets off.
Finally we get the last brisket out and shut the lid. The fire goes out. The briskets and the three of us are just sitting there in the rain, thinking about how awful things are. But we still have to serve these fatty, hard-as-a-rock, nowhere-near-done briskets … and now the whole place smells like burned arm hair.
We get the meat back on and the fire under control about 4 hours before service. Braun takes a piece of cardboard and goes and sleeps under a tree for about 30 minutes. Then it starts raining again. The only good thing is that it’s wetting our balsa wood, which at least slowed down the burn rate and ironically may have helped us not run out.
We’re pushing the briskets really hard, just trying to get them done. It’s light outside, and I’ve cranked the cooker to push these briskets through. I can smell that they’re cooking too fast, but I have no choice. At last, around 11 a.m., we get some color and wrap them. About a half hour before service, I pull off one brisket that feels about right. I set it on the table. About 20 minutes later I pull another three, then all of the briskets right before the gates are opened.
I unwrap the meat, which has just started to get tender. I can feel from the briskets’ form that they just might be okay, despite coming off too soon and not having nearly enough rest time. I slice one end and show it to Braun, as a wave of irrepressible joy shoots through us—it’s rendered, it’s tender, it actually looks pretty good. There was maybe a bit of a crispy char on the bottoms, but it was definitely better than we ever could have hoped for. Then the gate opens and the hordes of people bum-rush from the gate directly to our tent. There are TV cameras, and they record a literal stampede heading toward the Franklin tent. For the next three hours, we have a long, snaking line to the counter until we run out of meat. Somehow we’ve pulled it off. Worst. Cook. Ever.
A moral of this incredibly long story of brisket woe? Is it that brisket is more forgiving than you think? Is it to plan even further in advance than you think is more than enough? No. The moral of the story—and for every cook you ever do—is this: never give up.
Brisket can test you, but you just have to persevere. The other moral is that there are many paths to cooking a good brisket. Things can go wrong—hopelessly, horribly wrong—but at the end of the day, there are multiple ways to pull it together. Also, have a portable espresso maker, which, luckily, I did.
GETTING READY FOR THE ACTUAL COOK
It seems somewhat artificial to divide the book into all of these chapters, as I have, since smoking meat is in many ways inseparable from choosing wood and tending a fire. People ask me what the secret to my success with brisket is, and I always tell them the same thing: attention to detail. In this case, attention to detail means sweating the little things that others may not even notice. It means being vigilant and present throughout a cook that can last 10 to 15 hours or longer. It means paying individual attention to each piece of meat you’re cooking and giving it the specific care that it needs.
So on the one hand, barbecue appears relaxing and simple—the kind of cooking that allows you to pull up a lawn chair and prop your feet on your cooler full of beer and settle in for a long, easygoing afternoon. On the other hand, you have to pay regular, if not constant, attention to the fire and to your temperature gauges. So, I guess you could call the required state of the pitmaster a stance of relaxed focus. Enjoy your beers, but don’t have so many that your concentration lapses.
SAFETY CONCERNS
I’m a real stickler when it comes to food safety, not only at the restaurant but also wherever it is that I’m cooking. Of course, at the restaurant, one mistake on this front could mean the end of everything we’ve worked so hard to build. So we don’t mess around or cut corners. But at home too, it’s just as vital. The last thing you want is anyone getting sick or worse because you were simply lazy about the handling of meats.
Here, I won’t go into the science of meat safety. Instead, I’d recommend you go over the information offered at www.foodsafety.gov, which includes a thorough discussion of grilling and barbecuing safety issues. The most common and serious issue is cross contamination, which is what happens when germs from raw meats or tainted items spread to foods that are ready-to-eat. Proper cooking will kill dangerous microbes, but carelessness can allow them to spread onto foods that we’re going to put directly into our bodies.
The number one thing you can do to prevent cross contamination is to wash your hands. A lot. When I work a shift, I probably wash my hands twenty-five times or more. And this is thorough washing: with soap under a full stream of warm water for at least twenty seconds. We also put on sterile, disposable, nitrile food-service gloves every time we handle meat (I don’t like vinyl). We keep boxes of these in the kitchen and a box at every smoker. Before I open the smoker and handle the meat, I always put on a new sterile glove. This is as ingrained a habit as throwing another piece of wood on the fire.
At home, wearing sterile gloves may seem a bit excessive to you. At the very least you need to train yourself to handle raw meats with only one hand. Your clean hand holds the knife when trimming and holds the shaker when applying rub. It never touches the meat. Your gloved hand flips the meats and turns them as needed. That way you’ll never get the knife handle or the spice shaker dirty. And then, of course, wash your hands every time you handle raw meat.
We also thoroughly wash down every knife and cutting board we use to trim and rub the meats, as cutting boards are one of the prime culprits when contamination breaks out. In food safety courses, you’re instructed to keep cold foods cold and hot foods hot. We follow that to the letter, never letting cold meats warm up until they’re about to be cooked. And after they’ve been cooked, we hold them at 140°F until they’re going to be served.
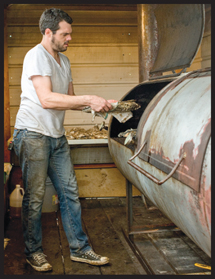
Lastly, there’s one other safety issue I care deeply about: the pitmaster’s. If you work around smoke as often as I do, you are going to be smelling a lot of smoke. If you’re smelling it, you’re inhaling it on some level. So, it’s of prime importance to minimize smoke inhalation as much as possible. For me, this means turning my head and holding my breath every time I have to go into a cooker. This is not hard to do, since all you get when you open a smoker is a big face full of smoke anyway, but think about it every time you open the chamber door and consciously try to form this good habit.
And while the cooking itself is easy, there are several steps along the way that need to be done right. Now, these are steps that all good pitmasters will take, but I have particular methods that I follow every time I cook and that I teach to all of the people who come and work at Franklin Barbecue. In Brisket to Step 9: The Realities of Your Backyard Smoker, I share precisely how I do it, but you are more than welcome to come up with your own methods too. There are many ways to get to the same, delicious end, but as I said, you’ve got to have a way and follow it precisely each time.
PRINCIPLES OF SMOKING MEAT
The art of long-smoking meat is about cooking it to an extreme form of tenderness while capturing smoke for flavor. To that end, we want to expose the meat to a constant supply of fresh, good smoke and also keep it at a consistent temperature that will allow it to cook slowly, gradually, without drying out. At the same time we want to generate a flavorful crust or “bark,” which is the result of regulating the surface temperature and texture of the meat to facilitate smoke adhesion. Luckily, in a properly controlled cooking environment, all of these processes happen in a well-choreographed procession.
As always, I believe a rudimentary understanding of what’s actually happening is a key to success. The more you understand why a brisket cooks the way it does, the better you’ll be able to control the finished product.
Many of our favorite meats are in fact muscles, which are in turn made up of bundles of fibers that are interwoven with thin wrappers of connective tissue. This connective tissue is largely composed of collagen, a very tough substance. The toughness of muscles is determined by the woven fabric of muscle fiber and collagen. Muscles like brisket, pork shoulder, and ribs have plenty of collagen, making them ornery and tough.
Lucky for us, collagen can be broken down into gelatin, that soft and silky substance that makes sauces thick and glossy. In its melted form, gelatin provides the meat with texture and richness. Our goal, then, is to break down that collagen into supple goodness, which will render the meat tender and flavorful. But the fascinating thing about collagen is that it requires specific conditions to break down in the way we want it to.
At the most basic level, all you need to break down collagen is heat and water, a process called hydrolysis. There’s ample water in the meat to fuel this reaction. We supply the heat, which starts to be adequate when the internal temperature of the meat gets above 122°F and happens faster as the temperature increases. The more collagen, the longer a piece of muscle takes to break down (which is why a finer-grained piece of meat is more tender). So that’s great, you think to yourself, but then what’s the deal with all this “low and slow” stuff? Why not just cook things faster and avoid all of this endless fire tending? That’s because of a confounding trait in collagen’s nature. Push temperature too hard, and it doesn’t break down well. The action is sort of like one of those Chinese finger prisons. You stick a finger from each hand into either end. The faster you try to pull your fingers out, the more it contracts and binds them. Only the very slow and relaxed withdrawal of your fingers allows them to escape the prison. Collagen, when heated quickly, begins to shrink. Just like squeezing out a washcloth, the shrinking of this connective tissue squeezes the moisture right out of the muscle fibers, causing them to be tough and dry. (And if you heat things up way too much, all of the moisture will evaporate and hydrolysis will not occur, leaving behind solid collagen and an unfortunate mess of dried-out, chewy muscle fibers—no good.)
This is why even meat submerged in liquid (that is, a braise or stew) can be dry and tough if heated too high and too quickly. But at long, slow cooking temperatures, the collagen slowly melts away, and the fibers of the meat just fall apart. What about all of the moisture that we’ve lost, you ask? Well, even though the long cooking and shrinking of the collagen has caused the meat to lose water, there is ample gelatin and melted fat to lubricate the meat and make it succulent.
Fat is also important. As Harold McGee explains, “Fat contributes to the apparent tenderness of meat in three ways: fat cells interrupt and weaken the sheet of connective tissue and the mass of muscle fibers; fat melts when heated rather than drying out and stiffening as the fibers do; and it lubricates the tissue, helping to separate fiber from fiber.”
Fat is also richness. Fat starts to melt early on in the cooking process, well before the collagen breaks down. Because it’s right there, interwoven between strands of collagen and muscle fiber, it brings moistness and a glossy richness, basically basting the meat internally. A good amount of intramuscular fat aids the cooking process immensely, another great argument for using Prime- or Choice-grade beef.
Furthermore, fat contributes flavor. “Meat flavor,” McGee writes, “has two aspects: what might be called generic meatiness, and the special aromas that characterize meats from different animals. Meatiness is largely provided by the muscle fibers, character aromas by the fat tissue.”
Meanwhile, Back on the Surface …
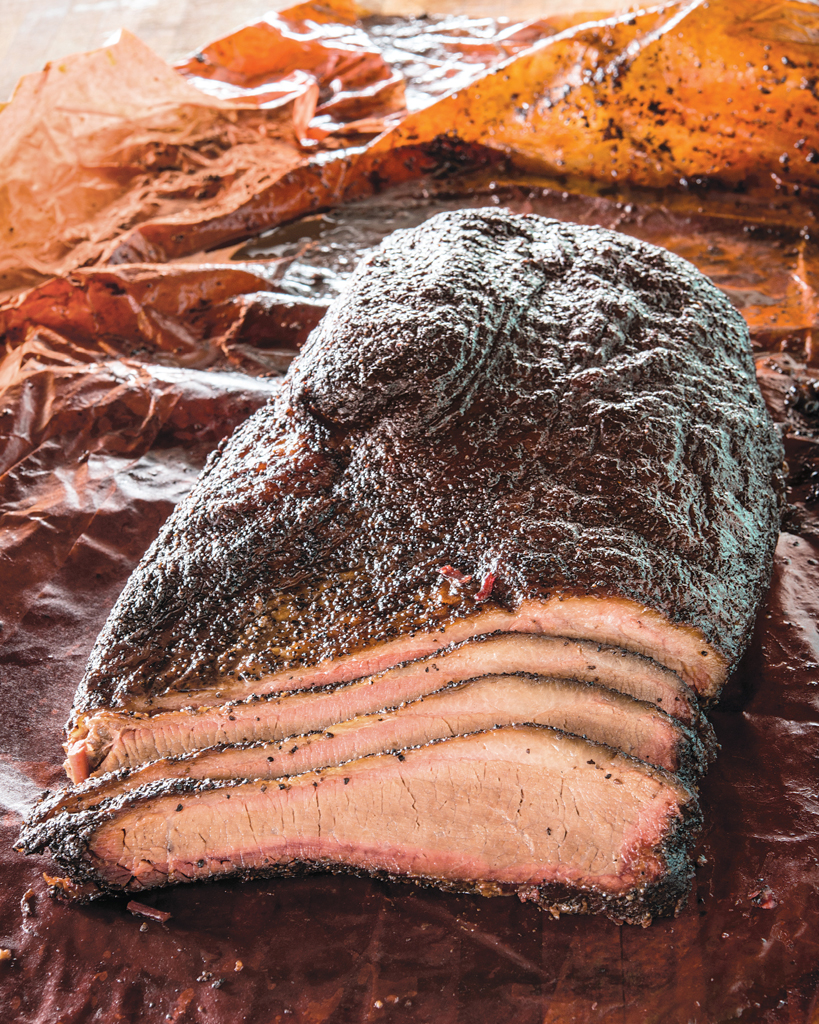
Now that we have a picture of the internal transformations of the meat, let’s briefly talk about what’s happening outside. Over the course of the time the meat is in the cooker, its color will evolve from a rosy pink to a crusty golden brown to almost black (in the case of brisket), if you do it right. And while it might initially appear burned, this crust, which is called the bark, is not overcooked at all. Rather, it’s deeply, deeply smoked and caramelized.
Two different things are occurring on the surface of the meat. One is that the meat is browning due to classic browning reactions, in particular the very famous (at least in cooking circles) Maillard reaction. My barbecue science friends at Texas A&M describe the Maillard reaction as “when the amino acids in foods react with reducing sugars to form the characteristic brown cooked color of foods.” But we laypeople know it as the sweet, irresistible flavors that come from searing steak in a pan, toasting bread in the oven, roasting coffee, or, yes, cooking brisket in a smoker.
But the Maillard reaction flavors are subtle, and of course with brisket we get a great deal of flavor from the smoke (not to mention the rub). For this reason, one of the pitmaster’s primary tasks is to expose the meat to smoke and maintain the meat’s ability to capture smoke for as long as necessary. This may seem simple: Just leave the meat on the grate and keep the smoke going, right? Well, not exactly. If you want the smoke to both adhere to the surface and deeply penetrate the meat, the conditions have to be just right.
Smoke is composed of many—as in, hundreds—of chemical compounds, some liquid, some gaseous. As Modernist Cuisine describes, “Capturing the flavor of smoke … involves two challenges. The first is making sure the flavor compounds you want are gases, not liquid droplets, when they reach the food. That requires keeping tight control of the temperature of the smoke in the chamber. The second challenge is keeping the food just wet enough to allow the volatile organics in those vapors to stick to the food, form a film on the surface, and then diffuse deep inside.” In other words, we need to keep the temperature of the cook chamber just so, to maximize the amount of gas particles in the smoke. But at the same time, we have to make sure that we don’t get things too hot, lest the surface of the meat dry out and the smoke’s gas particles have nothing to adhere to. It’s a delicate dance.
To achieve the proper bark, we need to have a humid atmosphere inside the smoker. A humid environment both encourages the penetration of smoke and slows the drying of the exterior of the meat, allowing it to smoke for longer. As the meat’s exterior dries out, it becomes harder and harder for the smoke to penetrate. Yet it’s also difficult for smoke to adhere to the dried crust. That’s why it’s crucial to keep a water pan in the smoker at all times, which ensures ambient humidity thanks to the slow evaporation of the water.
I also directly moisten the surface of the meat further into the cooking process, using a spray bottle filled with practically anything wet. Common liquids sprayed onto meats are water, vinegar, and apple juice. But it could be wine, marinade, anything. I often spray the surface of the meats in the last half hour to hour before they get wrapped. Your goal is to keep the surface of the meat from getting hard and dried, but you don’t want it to be wet either. The surface needs to have a tacky, glistening sheen. That’s when you know you’ve gotten it right.
At a certain point, the meat will have absorbed enough smoke. You’ll know when this is happening by looking at the darkness of the bark. I provide color cues for each of the different meats featured later in this chapter (brisket, ribs, turkey), and as with everything else, you’ll get better at figuring out the ideal smoke saturation point the more you practice. If you’re unsure about the color, you should observe the drying rate: eventually it will become harder and harder to keep the meat moist, even as you spray it. That’s when it’s time to wrap.
THE BASIC STEPS FOR SMOKING MEAT—ANY MEAT
Before we dive into the recipes themselves I want to explain the fundamental steps of pretty much any and every cook. When I talk about “attention to detail,” in many ways, these are the details I’m talking about: how you apply the rub, when you wrap, whether or not you recognize and account for the stall, if and how you maintain the temperature of the cook chamber. These are the elements that are at the heart of all barbecue—and how well you master each technique will decide whether your finished product is pretty good or great.
The Rub
The spice mixtures called rubs are important to barbecue for two reasons. One, they help meat taste and look delicious and they’re crucial to the formation of a tasty, crusty bark. Two, they help meat attract and adhere smoke, because smoke is attracted to tacky, uneven surfaces, and rubs typically contain salt, which draws moisture to the surface.
Aside from the presence of salt, what exactly is in the rub is of debatable importance. Although people niggle about their rubs and guard their secret spice mixtures with the zeal of a Colonel Sanders or Coca-Cola, the role of a rub in smoke attraction and bark formation is arguably more important than its composition. Ultimately, the flavor the rub contributes is subtle when compared to all of the other flavors contained in meat and smoke. So, by all means, get a good rub recipe. But even better, come up with a spice mixture that works for you.
Here in Central Texas, the standard issue for German- or Czech-style barbecue is just salt and pepper. On this point, I agree with tradition wholeheartedly! A mixture of salt and pepper is by far the simplest and most magnificent seasoning; it complements the natural flavors of any nice piece of meat. But sometimes you’re in the mood for a little something extra. And that’s good too. One great thing about Franklin Barbecue is that we haven’t been around for a hundred years. We’ve got no tradition to uphold! No family recipes to stick to for fear of insulting centuries of ancestors. The only thing we’ve got is the dedication to make the best food we can make and to keep it consistently the same every day (which itself is the biggest challenge). It’s that dedication that keeps us evolving as cooks and constantly thinking about new ways to do old things. With a solid foundation of traditional Central Texas barbecue and a desire to keep everything as pure and simple as it should be, we’re left with a lot of room to refine our technique and experiment with the five meats we cook every day.
As you build a rub, first think about what it is you are cooking. How do you want it to taste? How long is it going to cook? How big is it? How hot will you cook it? All of these questions play into how I go about making a rub.
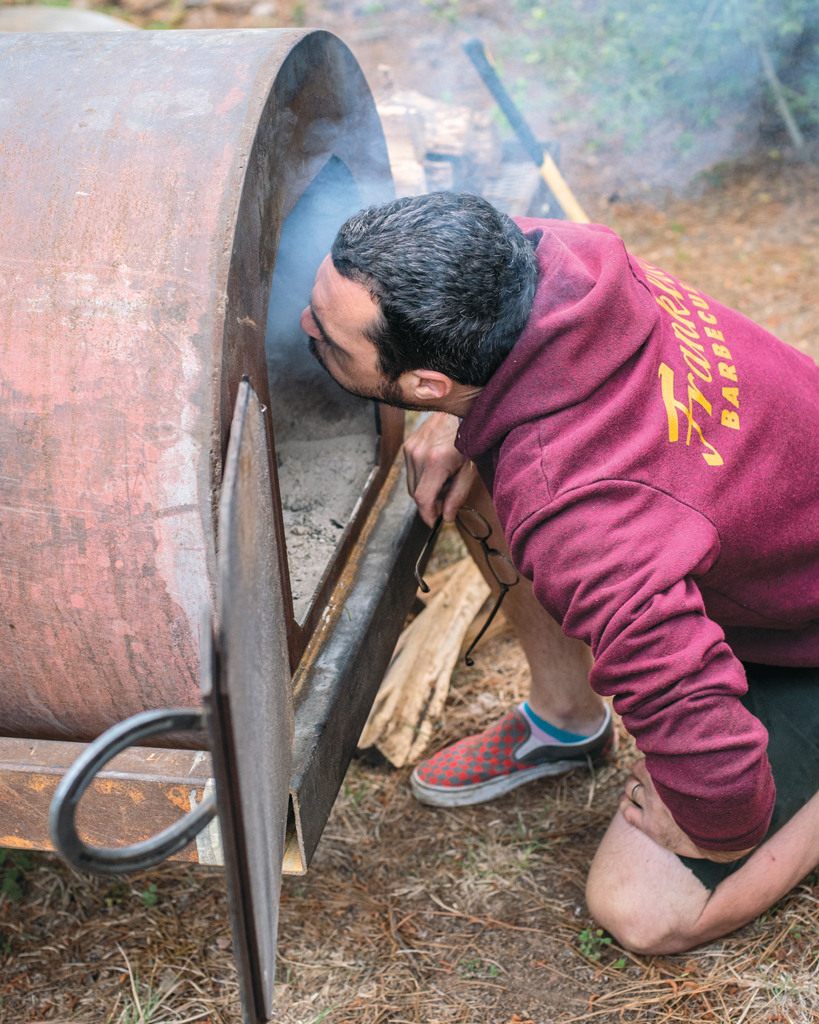
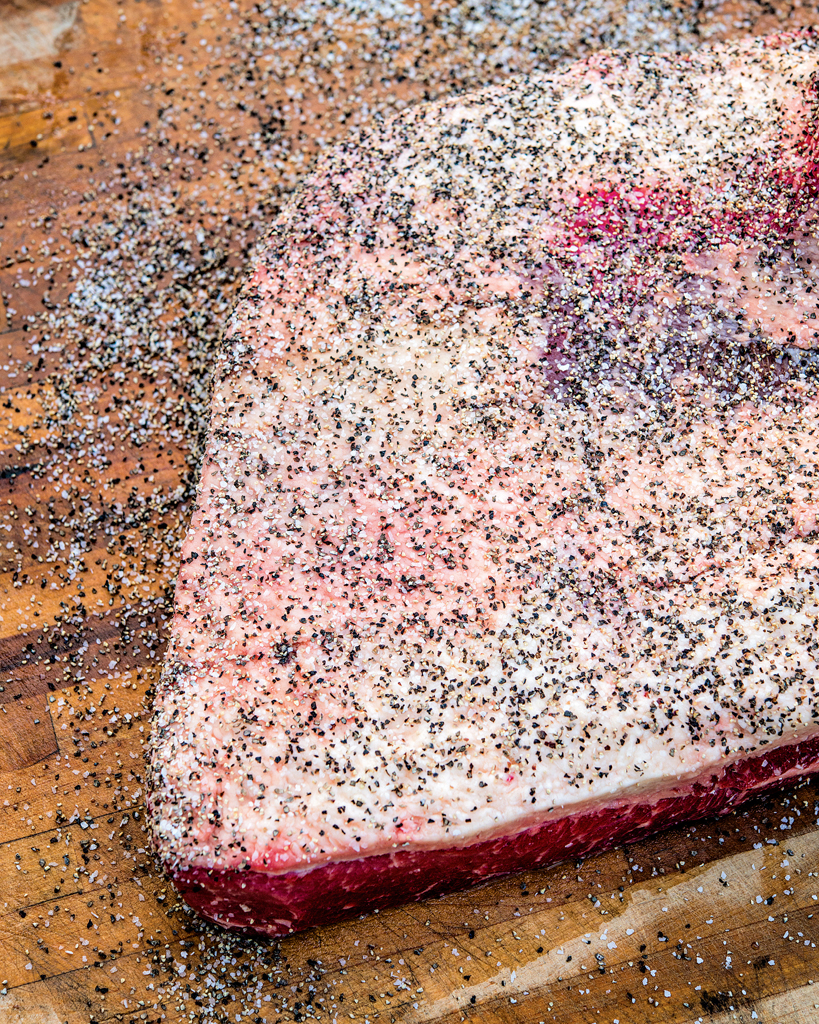
Take a brisket, for example: It is large and will take a long time. It will need a good natural bark and will take a lot of flavor from the wood. For that, I like a lot of black pepper. It melts into fat nicely. It provides a coarse surface to promote smoke adhesion and, in my opinion, should be the dominant ingredient for a brisket rub. Next is the salt. Brisket is a huge hunk of meat, so I think it needs a good bit of salt. Since I use good-quality beef, the beef’s natural flavors make me want to build a rub that is as transparent as possible, with nothing to conflict with the smoke and confuse the palate. So salt and pepper it is!
That’s not to say that playing with seasoning salts, garlic powder, onion powder, or any of the hundreds of other spices and seasonings that are available at most grocery stores would be wrong. I’m just saying that you don’t have to have a complicated rub to make great barbecue … but sometimes it’s fun to add something special.
What follows is a short list of common rub ingredients and some notes on each, where applicable. There are far too many possible ingredients to list, and since each one opens a door to another, I’m just digging in to the more common elements of a basic rub.
Standard Rub Ingredients
Salt ✵ I use only Morton brand kosher salt. I like it because all the granules are consistently the same size. The thicker the meat, the more salt you’ll use. The amount you’ll use will always depend on the size of the brisket, so when it comes to quantity, you should trust your instincts. I use roughly ¼ cup (which is about 2 ounces with Morton brand) per brisket.
Black pepper ✵ I like 16 mesh. The mesh number refers to the size of the pepper particles. The pepper has been sifted through a screen that has 1⁄16 by 1⁄16-inch openings. It ends up being the right size to mix with its companion, kosher salt. Really coarse pepper would be 10 mesh, where as the finer stuff is more like 20 or 30 mesh. Most people prefer a fresh grind, but I like pepper that’s been ground for at least a few days. I want a lot of pepper for texture and appearance, so the fresh stuff is just too strong. The toned-down older version works best for me. (I’m not talking about going into your mother’s spice cabinet and pulling out pepper from the 1970s. But I do like it to have been ground for a few days to a few weeks.)
Seasoning salt ✵ There are many seasoning salts available, and they are typically comprised of all of the usual suspects: salt, sugar, onion, and garlic for flavor and paprika and turmeric mostly for color. You should expect to find countless assortments of ingredients that someone, somewhere thought tasted good on something. Seasoning salt is an easy way to add complex flavors to a rub without having dozens of spices sitting around. Even though I don’t think sugar should be involved in a long cook (see “Sugars,” right), very small amounts contained in the finished rub don’t seem to have an adverse effect on bark formation.
Granulated garlic and granulated onion ✵ Both of these are great! Try to use granulated garlic and granulated onion instead of powdered, as the granulated stuff is close in size to the kosher salt and your 16-mesh black pepper, so texturally it just mixes and disperses much better than a fine powder. Do not try to get fancy and use fresh ingredients. Fresh aromatics don’t work for rubs; they’re too strong and will completely dominate the meat and they will burn.
Paprika ✵ Big fan! Paprika is made from ground dried chile. It can come from many different countries and in various varieties, such as smoked, sweet, and hot. I like plain ole Hungarian paprika, just to keep it simple. If you cannot find it at your local grocery store, check for it at a gourmet grocery. The more common and cheaper Mexican variety is great for adding color but doesn’t add much flavor. The Hungarian is a nice dark red and has a complex flavor that is mild and savory.
Chile powders ✵ Many ground dried chiles don’t end up under the paprika header, and since Texas is so far south, most of the chile powders I use are from Mexican peppers. I don’t use them in rubs at the restaurant, but they certainly lend a wonderfully “Texasy” flavor to meat if I’m playing around or cooking something for friends. The generic type of chili powder will have a Texas-chili kind of taste and won’t specify which chiles are used to make it, but others can be chile specific. Some of my favorites are made from dried poblanos (ancho powder) smoke-dried jalapeños (chipotle powder), or dried cayennes (cayenne pepper).
Sugars ✵ Almost every commercial rub has a high level of sugar. I like sweets plenty, but not on my barbecue. There, I’ve said it. Sugary rubs burn and turn bitter when exposed to high heat for too long and are a way to cheat the acquisition of bark over a long cook. There are many sugars to choose from, some more processed than others. Use them all with caution.
Other (More Questionable) Rub Ingredients
Hickory or mesquite flavor ✵ I use real fire to get my smoke and wood notes, so these seem silly to me.
Beef or chicken flavoring ✵ Useful only if you’re seeking a high concentration of flavor. Seems like a cheat to me, but I suppose it could help you get an edge in a competition. I’d much rather use flavorful, high-quality meat than some sort of processed flavoring, however.
Worcestershire powder and soy powder ✵ These are good if you want to bolster the umami quotient, the so-called fifth taste, which is best defined as a sense of savory deliciousness. Umami is said to be caused by glutamic acid and is typically in fermented and aged proteins. Its most common application has been in MSG. Yes, soy and Worcestershire taste good, but many commercial rubs just use MSG for that type of flavor enhancement.
Building the Rub
Every rub I make starts with a base of salt and pepper. Then I add other spices to complement the meat that I am cooking. The goal of any rub is to complement a nice piece of meat, not to obscure a crappy piece of meat. All spices should react well with one another. No one spice should stand out or be too recognizable, so add just enough to taste. It would be a shame to buy a nice piece of meat, spend a ton of time prepping and cooking it, and have it taste like an overzealous mixture of flavors. Restraint is the name of the game when using seasonings other than just salt and pepper.
RUB RECIPES
Brisket and Beef Rib Rub
INGREDIENTS Equal parts 16-mesh ground black pepper and kosher salt.
QUANTITY A rough guideline is that you’ll need about ½ cup (4 ounces) of rub, total, for each 12-pound brisket. A 3- to 5-pound rack of beef ribs will require just a bit less rub, maybe ⅓ to ½ cup, total.
Pork Rib and Turkey Rub
INGREDIENTS 2 parts 16-mesh ground black pepper and 1 part kosher salt.
QUANTITY A rough guideline is that you’ll need about ¼ cup (2 ounces) rub, total, for each rack of ribs or turkey breast.
Optional Add-ons
GRANULATED GARLIC
GRANULATED ONION
PAPRIKA Add for color and savory aspect.
SEASONING SALT However much you add, subtract the same amount of salt from your rub.
I mix my salt and pepper in a large 16-ounce shaker, which is actually a spice container from a restaurant supply store. It’s got a top with three openings: one large opening with a sliding lid for pouring and two sets of different-size circular holes for sprinkling. This is the vessel I use to apply the rub. I start by pouring one layer atop the other as a form of measurement, using my eyes to ensure that the thickness of the layers is equal to the proportions I want. Then I shake them all up until thoroughly mixed. (Remember to close off the lid.)
Applying the Rub
Always apply the rub to meat about 1 hour before cooking and let the meat warm up to room temperature. That will let the seasoning “sweat” into the meat, and the warmer meat will shave off hours of cook time.
The following directions might seem trivial. But again, the devil is in the details. And I’m not joking when I say that every new kitchen employee at Franklin Barbecue gets a lesson in how to properly apply the rub. The goal is to get it evenly distributed with the right concentration over the entire surface of the meat. If you apply the rub more densely or more sparsely in certain areas, patches of the meat will cook unevenly, yielding splotchiness, dry patches, and general mayhem over the course of a multihour cook.
To apply the rub evenly, you’ve got to keep things loose—in the elbow, in the wrist, and in the mind, with a relaxed but focused attitude. First, keep the shaker about a foot or two over the surface of the meat, or however high you feel comfortable. (Of course if you’re aiming for a specific spot, you can bring the shaker down lower.) Sprinkling it from a height allows it to spread out and apply more evenly than if you’re trying to direct it from up close.
Once you start sprinkling the rub, you’ve got to keep the shaker moving. This is accomplished with two separate but related gestures. With the elbow and forearm, gently get the shaker moving in small circles to get the rub flowing out of it. At the same time, allow the wrist to swivel a bit to keep the granules inside jumping around. Being heavier than pepper, salt tends to quickly congregate at the bottom of the shaker, making for an uneven mix if you don’t properly jumble it all up.
Slathers
Slathers are a liquid or paste applied to the meat before the rub goes on. They act as a kind of glue to help rubs stick to the meat and can be anything from yellow mustard to hot sauce to plain ole water. Slathers are also a neat way to sneak in very subtle flavors and can be quite useful in some situations. Things to remember when using a slather:
✵ Due to the solubility of certain types of smoke, I prefer to use a water-based rather than an oil-based slather.
✵ Keep a very low sugar content. Too much sugar will harden and can seal off the surface of the meat, inhibiting flavor penetration.
✵ Apply a very conservative amount, just enough to create a tacky environment for rub and smoke adhesion. Too much and you run the risk of building an impermeable barrier between the meat and the pending flavors. Too heavy a slather can also give you a premature crust that has the potential for flaking off, taking most of the smoke and seasonings with it.
Wrapping
Most of what I cook gets wrapped at some point in the cooking process. Ribs and pork butts get wrapped in foil; brisket gets wrapped in butcher paper.
Wrapping a brisket in foil has been derisively referred to as “the Texas crutch,” because it helps a long-cooked brisket turn out better and keep from drying out in the last stage of cooking. Strangely, in the serious barbecue community it’s looked down upon almost as cheating, despite the fact that it helps many people make better brisket than they would otherwise. Even some pros use it on a regular basis, so I don’t exactly see the evil in it.
The idea is that at a certain point, the meat has absorbed all of the smoke it’s going to or all of the smoke it needs, but it’s not yet done cooking. This is the moment when I wrap. The meat then continues cooking in a sealed environment until it’s done internally. Technically, at this point you could remove the meat from the smoker and continue cooking it in a conventional gas or electric oven, but we just throw it back on the smoker, which is already at the proper temperature. (We don’t have oven space for sixty briskets anyway—that’s cheating!)
How do you know when to wrap? I judge by color. The meat’s already to temperature. It’s looking fine; I just want to make sure that I get a really dark color on there. Some of the color will actually wash off as the meat steams in its wrapper, which is why you want to make sure that you have a good, authentic dark color before you wrap. Toward the end of the smoking process—particularly if you’re using fairly dirty smoke—it’s possible that you’re just layering ashy smoke on the outside, so I hit brisket and ribs with a spray of water to gauge the true color of the meat or bark. If the color washes off easily, I’ll give the meat more time in the smoke. If it seems dark enough, I’ll wrap immediately.
Early on in my career, I found that I liked the way a brisket cooked in butcher paper better than in foil. Whereas foil creates a fairly hermetic pocket, the butcher paper still allows a bit of interchange with the outside environment. Because of this breathing, using butcher paper is a blend of using foil and not wrapping at all, a happy compromise that works really well for me.
There’s a time and a place for foil, however. If you have to cook something that’s really lean or you need to speed something up, use foil with caution. It’s a trick to have up your sleeve. I might wrap a brisket in foil if it’s an especially lean one. A lesser grade with little marbling needs every bit of its moisture conserved, so I’d wrap that in foil and probably wrap it quite early. For richer cuts, it’s not as important to seal it up as soon, as they have ample moisture, thanks to all of the intramuscular fat of the marbling.

Maintaining Temperature
If I have a favorite temperature—other than 98.6°F and 75°F and sunny—it’s got to be 275°F. This is my reference point, my safe place, when it comes to the ideal temperature for a cook.
Now I’ve said in several places in this book that the pitmaster needs to be flexible, read each situation, and adapt depending on the circumstances. That said, if I’m using equipment other than my own (which I feel very comfortable with), I’ll always try to get the temperature of the cook chamber (at grill level, remember—where the meat is actually sitting) to 275°F. It’s my default, and you can cook just about everything, from brisket and ribs to sausage and turkey, at this temperature. It’s basically right in the middle—not super low, not too high. Some people are more comfortable cooking brisket really low and slow, which is around 225°F. But it’s not just that that’s a little too slow for me (which it is). Keeping things at 275°F is ideal because it allows brisket to form a good bark while still rendering properly on the inside.
COOKING IN WEATHER
One thing that professional pitmasters and home cooks have in common is that at some point or another, we all have to cook in crappy weather. If you’re working at a restaurant, you can’t just close down because it looks like rain. And if you’ve planned a backyard fiesta for weeks and guests are showing up at 3 p.m. no matter what, you can’t not cook because a cold front blows through.
Every kind of atmospheric condition requires its own set of responses, though no matter what you’re doing, you’re trying to counter factors you can’t control. There are no easy answers, but here are a few things I’ve found.
High wind High wind can wreak havoc with fires and airflow. Although it’s good to keep your firebox door open as much as possible, when it’s windy, especially if the wind is blowing into your fire, you’ve got to close the door to shield the fire. Position your cooker so that the firebox door faces away from a prevailing wind that will whip the fire and stoke things up too wildly. In the case of crosswinds, try pushing your fire up in the box, away from the door.
Rain Nothing is worse than cooking in the rain. Both you and your cooker will inevitably be miserable for having to get soaked while trying to keep your temperatures up. Just make sure to keep your wood dry (cover it with a tarp or move it under shelter) and push through it.
Cold Wood selection changes for different weather. I’ll be sure to use drier wood that burns hotter on cold days. I’ll also probably cook a little hotter than usual to compensate for the low ambient temperature outside. I’ll rake the coal bed too, so that it’s a little longer than normal and goes all the way to the firebox door. That way, the air crossing it gets preheated before it hits the fire.
Heat You have to be careful on really hot days not to let your temperatures get away from you. I might cook lower—at, say, 265°F instead of 275°F—knowing that the smoker is not fighting the ambient temperature outside.
This is yet another reason why when I’m on the road, I always take my handy ThermoWorks probe with me. I’ll take an onion or a potato, cut it in half, and turn it into a little stand for the thermometer, which I then prop in the cooker because I don’t trust other people’s gauges. I even take four Tel-Tru temperature gauges in my travel kit and have been known to unscrew the existing thermometers and substitute these just to get a better sense of the hot and cool spots along the cook surface.
Sometimes I might go up from 275°F but not usually higher than 315°F or so. I know people who start it on 350°F and then slow it down as the cook moves along. I don’t agree with that. I find it impractical and risky to pull temperatures back if things start cooking too fast. I’d much rather nudge it forward with gradual temperature increases until I find just the right place. Too hot is more dangerous than too low. You can always cook something longer, but you can’t unburn it. Also, the slow progression upward along the temperature scale, I believe, allows me to get the depth of flavor and layers of smoke that I’m looking for. Balance is key. At the end of the day, yes, it should taste like smoke and salt and pepper. But you also want to taste the flavor of the beef. And 275°F is the safest way to get there.
THE WATER PAN
Always cook with a water pan. If you don’t, you’ll dry out the meat and it won’t cook at a proper rate. You need a very humid environment, as it slows down the rate of moisture evaporation, collagen breakdown, and fat melt so that they all happen in concert. The slower rate of cooking also allows the interior of the meat to keep pace with the cooking of the exterior. Finally, the humid environment helps preserve the moist, tacky surface of the meat, which is desirable to attract smoke.
Now, to be clear, 275°F is not the word of God for the temperature for brisket, because every brisket is different. If you showed up at Franklin Barbecue on any given day and took the temperature of our smokers at grill level, odds are you’d get a reading of 285°F. But that’s on our cookers, cookers we know well, so we can afford to go a bit hotter and faster. Every cooker is different. Every brisket is different. With briskets containing more marbling, you can cook at a lower temperature and still get the rendering you need. But if it’s a low-grade, commodity brisket with a lot of hard, waxy fat, you’re going to want to cook higher to break that stuff down. The big takeaway? A temp of 275°F is always a good place to start; just pay attention and go up or down as needed.
The Stall
I often get emails that all say the same thing: “I cooked a brisket, and it looked great and tasted great, but it was tough. What did I do wrong?” Inevitably, I’ll write back, “Let me guess the temperature you pulled it off at. Was it in the 160°F to 165°F range? You pulled it off during the stall!”
THE STALL

What is the stall? Similar somewhat to the way a prop plane might stall before restarting its engine and continuing through the air—and far more heart-stopping—a big piece of meat cooking in the smoker hits a patch in its progress where cooking appears to stop. You can chart it with a meat thermometer. At first, the temperature goes up and up, just as anything we cook always does. And then, gosh darn it, it levels off. This is usually between 160°F and 170°F. And it stays leveled off. And it stays. And it stays at the same temperature until you think it’s not going to get any higher. This freaks people out. It sure did me when I first encountered it.
What do freaked-out people do with meat that’s been stuck at the same temperature for hours? They’re not stupid—they pull it off. After all, at 160°F or thereabouts, it easily satisfies the FDA guideline for when beef is done (ahem, 145°F). And then they cut into it only to find the brisket is as tough as a sneaker.
Anyone can be forgiven for doing this, because the stall defies logic. Not only does the meat hold the same low temperatures for hours in an ovenlike environment, sometimes it can actually be observed dropping in temperature. So what gives?
The stall happens as a result of something called “evaporative cooling.” It’s the same mechanism that allows sweat to cool down the body. Sweat works like this: when moisture sits on the surface of the skin, it’s evaporated by heat energy given off by the body. So when the water changes from liquid to gas form, it absorbs a significant amount of heat energy from the skin, creating a cooling effect on the surface it’s leaving. Basically, your sweat is sucking up radiant heat from your body, getting converted into gas, and then evaporating away. This happens more easily in a dry heat than a humid one, which is why a hot and dry day feels cooler than a hot and humid one. Your sweat evaporates much more easily when there’s less moisture already in the air. In high humidity, it doesn’t evaporate well or at all and we feel warmer, even if the actual air temperature is not high.
This is why we often refer to “dry bulb” and “wet bulb” temperatures. Dry bulb measures the actual air temperature, whereas wet bulb measures the temperature of the air but adjusts for the cooling that occurs as moisture dries from a surface. Therefore, wet bulb temperature is lower than dry bulb, except in an environment of 100 percent relative humidity, in which case the two temperatures are the same. (In 100 percent humidity, there’s no room in the molecules of air to absorb any more moisture, so there can be no cooling from evaporation.)
Inside a cooker, the piece of meat is sort of sweating too. It’s losing moisture to the air in the form of evaporation. Interestingly, air turbulence and humidity have a greater impact on evaporation than actual temperature—and since there’s a huge amount of air movement in a smoker (thanks, convection), the evaporation is quite significant. This means that a lot of evaporative cooling is happening, that is, the surface of the meat is cooler than the air around it in the cooker. Therefore a wet bulb thermometer would give a more accurate reading of the temperature than the dry bulb ones everyone uses.
Evaporative cooling of the brisket continues until the humidity inside the cooker rises or until the surface of the meat has no more moisture to give. (This is a big part of the reason why a water pan is so important, as maintaining the humidity means that the stall won’t happen too early in the cook.) A stall will happen when the temperature of the meat reaches equilibrium with the wet bulb temperature inside the cooker—to the meat, it can get no hotter in there. Of course, this is not the case. The dry bulb temperature inside the cooker is much warmer. As the humidity inside the smoker decreases because of the vanishing moisture in the meat, so does the wet bulb temperature, and the meat might even experience a temporary reduction in temperature.
Finally, the temperature will resume climbing when the accessible moisture in the meat has evaporated and the meat becomes just a dry hunk. But nobody actually wants that—a sad, dried-out piece of brisket! Here’s what you do instead: add some humidity to the equation by wrapping the meat before all of that moisture is gone. And this is what I do: I cook it exposed long enough for it to pick up smoke and lose just the right amount of moisture, then I wrap it to preserve what is left and let the collagen continue to render.
THE SMOKE RING
If you eat at Franklin Barbecue, you might notice that our barbecue doesn’t always have that classic pink “smoke ring” underneath the bark that some people love to hold up as the surefire indication of great barbecue. That’s because the smoke ring, in fact, has nothing to do with the way great barbecue tastes, how well it was smoked, and so on. In fact, research has shown that smoke isn’t even necessarily required to make a smoke ring. That said, it often will occur in meats smoked under certain conditions.
The first thing that you should know is that the smoke ring—and the red color of your steaks and the juice that comes out of rare-cooked meat—has nothing to do with blood. Instead, it’s caused by myoglobin, a red-colored protein that carries and stores oxygen in muscle cells. When it’s heated, myoglobin loses its pink color and turns the dull, gray color of well-done meat. So rare steaks aren’t red because they’re still bloody—they’re red because the internal temperature has not gotten high enough to turn that myoglobin brown.
It makes sense then that the interior of meat would stay pink. So how is it that the smoke ring on some briskets is on the outside, which presumably gets even hotter than the interior, which has turned gray? The answer involves complicated chemistry, but let’s just say that carbon monoxide and nitrogen monoxide in the smoke react with the myoglobin in meat to keep it pink. The depth of the smoke ring indicates how far the smoke has penetrated the meat before it contacts meat whose internal temperature has already risen enough to turn gray.
Thus it’s logical that if you start with cold brisket—say, straight from the freezer—you can get a wider smoke ring, as the smoke can penetrate further before the interior of the meat heats up. And, surprise, that’s a popular technique in competition barbecue to get that luscious-looking ring.
But smoke rings don’t contribute anything whatsoever to flavor or texture, so we’re not too concerned with them. And if we were to make an effort to put especially cold briskets on the smoker, it would take them even longer than the 16 hours they already require to finish.

BRISKET
Brisket is a big, dumb hunk of meat, but it turns into something heavenly when done just right. Cooking a brisket intimidates a lot of people, probably because it’s a big investment in money and time. If something goes wrong, there’s not a lot you can do. Well, I have two things to say to that: Don’t mess it up, as it’s not that hard. And if it’s not perfect, don’t fret—you’ve still got smoky meat to serve, and most people are pretty forgiving about that.
There aren’t many steps in making a brisket. First, I’ll outline the entire process, then I’ll go into greater detail about each part.
Ingredients and Tools
✵ 1 (12- to 14-pound) brisket, packer cut
✵ About ½ cup Brisket and Beef Rib Rub
✵ Desired slather ingredients, optional
✵ Spray bottle of water, vinegar, or other liquid
✵ 2 sheets of 18 by 30-inch unfinished butcher paper
✵ Seasoned firewood (preferably oak)
Overview
1 ✵ Trim the brisket.
2 ✵ Apply the slather, if using, and the rub (equal parts salt and pepper), then let the brisket warm up to room temperature (1 hour).
3 ✵ In the meantime, start your fire and check that the water pan is full. Get a feel for the wood you will be using—how quickly it burns, how clean the smoke is, and so on. Build a nice coal bed.
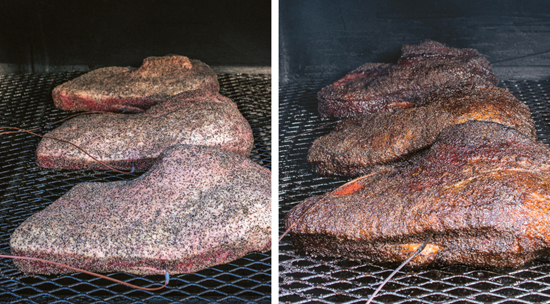
4 ✵ When the smoker is reading at the desired temperature (in the 275°F range, depending on preference), place the brisket on the cooker. I prefer fat side up and the brisket point facing toward the fire. Gently close the lid. Maintain a clean fire at or around 275°F for the duration of the 8- to 10-hour cook (timing depends on brisket size and cooker temperature and efficiency).
5 ✵ Keep the lid closed for the first 3 hours. After 3 hours, start periodically (roughly every 20 to 30 minutes) checking the color. Start spritzing occasionally with water or vinegar if the brisket surface starts looking dry.
6 ✵ At 6 hours, the internal temperature should be getting through the stall. Start paying attention to the bark formation and whether the fat cap is rendering. Think about wrapping soon. If the temperature is stalling but you don’t have a sufficiently colored bark, or the fat cap is still very hard and solid, consider bumping up the cooker’s temperature to push through the stall. When the bark is getting nice and crusty and the color is looking even, remove the brisket from the cooker, spritz, and wrap it in butcher paper.
7 ✵ Return the wrapped brisket to the cooker and maintain the fire.
8 ✵ About 10 hours in, start “feeling” the brisket with a thin towel. Take note of how it starts to feel soft and pliable under the point and the flat. As the brisket gets closer to doneness, the whole piece will begin to feel tender. If you must, check the internal temperature of the brisket in the middle of the flat. It may read anywhere from 190°F to 203°F when it is done. But keep in mind, feel trumps all. If it’s tender, it’s done!
9 ✵ Take the brisket out of the smoker and let it rest fully wrapped until the internal temperature comes down to 140°F to 145°F (1 to 2 hours, depending, of course, on the ambient air temperature).
Step 1 TRIM THE BRISKET.
The bad news is that there’s an art to trimming a brisket. The good news is that it is not a very hard art to learn. What you should know is that trimming the brisket is really important and does factor in to the way the brisket cooks. Basically, trimming well is an opportunity to set yourself up for an easy, successful cook.
A lot of what I’ve talked about in this book regards feel. I’ve said that you should let the fire burn at the rate it wants to. I’ve talked about envisioning the way smoke flows through a cooker. Well, trimming a brisket falls into that category too. As you prepare to trim, imagine the way smoke and heat will travel across the brisket’s surface, borne by airflow. You want to make the surface of the meat streamlined and smooth so that it cooks evenly and thoroughly, removing any odd bits of fat or flesh that might dry out and burn. Basically, you want one harmonious piece of meat. So here’s what I do.
First, I put on my nitrile gloves with the idea of keeping one hand clean and one hand that will touch the meat. I will touch the meat only with the dirty hand, while my clean, right hand will handle the knife. The knife I use is a well-sharpened curved, stiff 8-inch boning knife that cuts through the brisket with grace and ease.
It’s good to start with a cold brisket, as it’s easier to cut into. The brisket will most likely be wrapped in plastic. I put the brisket down on the cutting board, fat side up, and cut through the center of the plastic with my knife, making sure not to touch the meat. Next, I cut open the bag at the end, lift the end of the brisket with my left hand, and use my knife to pull the bag out from under from the brisket. I’ll then toss the bag into the trash can that I’ve conveniently located under or to the side of the table.
Now let’s orient ourselves around the brisket. I’m going to call the fat cap side the top of the brisket, because I cook that side up (even though technically it faces downward on the animal). This is the side where the point protrudes upward with a knobby shape. The underside of the brisket, the bottom, is flat.
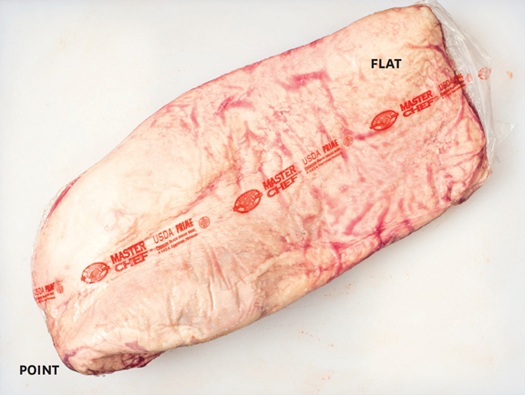
Top of brisket (fat cap side)
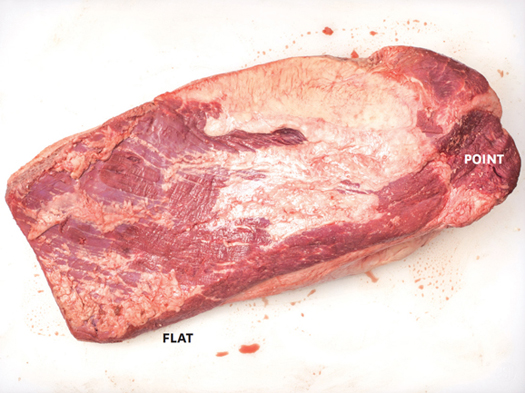
Bottom of brisket
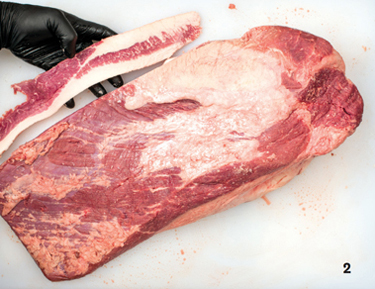
Place the brisket before you on the table, with the point facing down. I first look at the long sides of the brisket, where I like to make smooth, graceful edges. I’ll usually trim off a thin strip from the edge, all the way from the top of the point to the end of the flat (see PHOTO 1). Make a clean, consistent cut, following the line where the seam fat terminates, and you’ll have nice sides to the brisket, with meat showing underneath and fat on top.
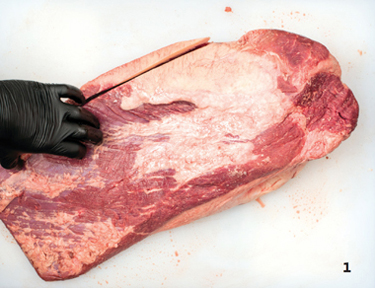
One thing to understand about my trimming method is that I cut a lot away (see PHOTO 2)—more than most, I’ve been told. That means I’m pretty ruthless, and whereas a lot of people will trim away only fatty bits, I’ll cut away both fat and some meat in order to get the shape I want. How do I know what shape I want? I envision the final product after cooking. When looking at the raw hunk of brisket in front of you, try to imagine how it’s going to cook down—how the fat cap will reduce into the bark, and how each outward-facing side will render. When you imagine how you’re going to slice the cooked brisket, you’ll start to see how to trim it. You’ll take certain edges and points off, even if they contain some meat, because that surface that you’ve just revealed will ultimately cook better and offer a better slice of meat.
Take a look at the bottom of the brisket: you’ll note a big hunk of fat right where the point and the flat connect. I always think of this big nub almost like a handle you can grip, a fist-size piece that I cut off, because it won’t render and won’t add anything to the final product. If you make a few entry cuts on one side of it, it’s really easy to pull the whole thing back (while cutting it away with the knife) until you can remove the entire chunk and throw it away (see PHOTOS 3 AND 4).
Now trim off bigger pieces of fatty membrane that are inevitably clinging to this side (see PHOTO 5). This is just a superficial trim, but those thin strands of fat will only disrupt the bark formation as it cooks. Now you’re done with the underside. Flip the brisket over so you can get to work on the fat-cap side (see PHOTO 6).
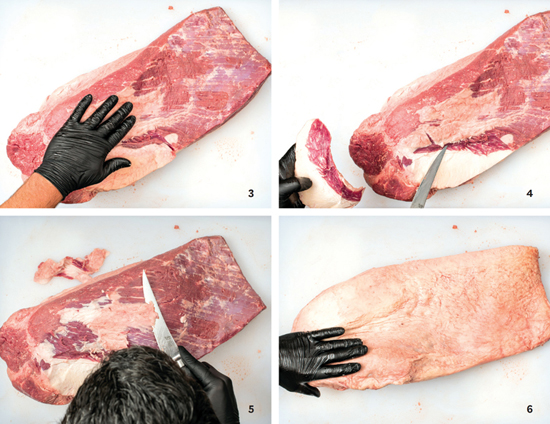
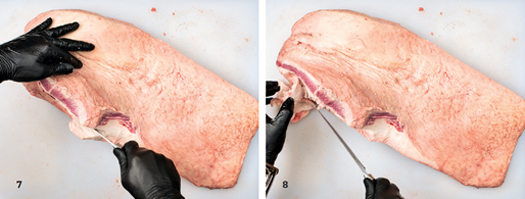
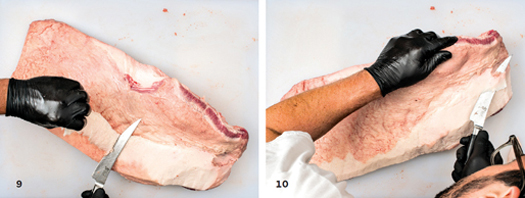
Your next step is to trim the fat cap to ¼- to ½-inch thickness. The general goal is to trim it and then to excise any pieces that will burn or cook unevenly. Note where the brisket flops down over the side of the point. Trim this down a bit so that the point will cook more thoroughly (see PHOTOS 7 AND 8). If you don’t, the fat that’s under the fold won’t render and turn to bark.
I also like to strip away hard or bad-looking fat that sort of hardens in sheets (affectionately called “Ally Sheety” at the restaurant). I use two general cuts for this. One is a thin horizontal slice up near the point, which I then continue as I peel the slice back while gently cutting underneath it with the knife (see PHOTOS 9 AND 10). This allows you to cut a long, thin strip off the top. Then I’ll go in with shorter slices to get the height I want and a generally smooth surface. You may have to cut away some pretty gnarly chunks of fat. Don’t be afraid to do that.
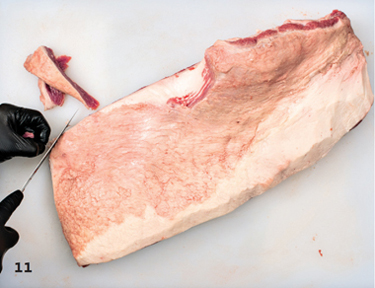
The last step is to round off the edges because corners that stick out might have a tendency to burn and dry out before the rest of the meat (see PHOTO 11). You want to remove any little pieces of fat or flesh protruding from the mass, as they can dry out and burn.
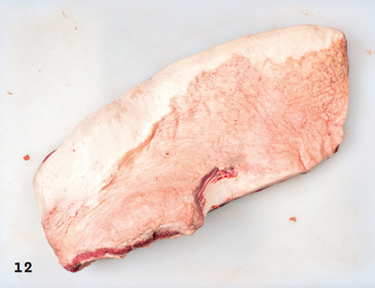
Although all of this sounds complicated and precise, it really isn’t. Don’t get too OCD over this, or you’ll find yourself spending 30 minutes doing something that should take no more than 10, and your brisket will warm up and you’ll find that your back aches from hunching over it. As I said, turn the brisket into a nice, clean shape with a ¼-inch fat cap and no bits hanging off the edges (see PHOTO 12).
Step 2 APPLY THE SLATHER AND THE RUB.
If you wish to apply a slather, do so before adding the rub. Again, it’s your choice whether or not to slather. It can help the rub stick to the surface of the meat, but usually the meat’s tacky enough that it’s not necessary. Feel free to use water, hot sauce, mustard, whatever you want. I’ve seen it all.
As I said in The Rub, you can get as complicated with the rub as you want—chile powder, cumin, granulated garlic, all the classic spices can be good in there. But in Central Texas the classic formulation is just salt and pepper: equal parts of each. A lot of people tend to go pretty heavy with the rub. I think that’s a mistake. I like a fairly light, even coating, so the flavor of the rub doesn’t detract from the flavor of the meat.
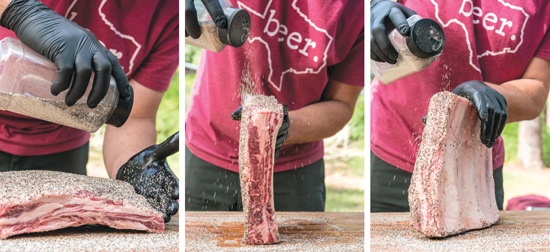
Mix the salt and pepper in a large shaker. (Use the quantity in the ingredients list only as a rough guideline; every brisket is different and you may find you need a little more or less. When in doubt, I think it’s better to under- than overseason.) Your goal is to get an even coating of rub on the entire exposed surface of the meat. Then, with the shaker high enough over the brisket to get a good, even mix (1 to 2 feet), get the hand moving and gently shower the rub down on the brisket. To get the rub on the vertical sides of the brisket, I hold my open, flat hand just to the side and use it to deflect the rub onto the meat, gently patting it in every few seconds to get every facet of the brisket covered. Make sure you do both sides and all of the edges: the fat cap and the underside. Now you’re ready to throw it in the cooker.
Step 3 START THE FIRE.
Following the instructions beginning with The Realities of Your Backyard Smoker, start your fire and get your smoker preheated to the desired temperature. Again, 275°F is a good starting point. The smoker should also contain a full water pan.
Step 4 PLACE THE BRISKET IN THE SMOKER.
Open the door and place your brisket inside. There are two kinds of people in the world: those who cook brisket fat side up and those who cook it fat side down. I’m very much a member of the former group. This is not necessarily because of any sort of orthodox philosophy; it’s just my judgment call for the way briskets cook on my smokers. I cook fat side up because I have more top heat than bottom heat. If it were the opposite, I might cook fat side down, as you need to make sure that the fat renders before the bottom gets overdone. Remember this one very important point: every cooker is different, and you need to understand intimately the particulars of your own device.
Find a good place in the middle of your smoker and position the brisket on the grill with the point facing toward the firebox. I orient the brisket this way because the point is covered in a big fat cap and is the most marbled part of the brisket. All that fat will help protect the meat from the brunt of the heat coming directly out of the firebox. I like the middle of the grill because that’s where I’m getting the most even temperature. You don’t want to put it too close to the firebox opening, as it will likely be too hot there. But you should know what your temp reads up and down your cook surface (if it’s long enough) because you’ve installed gauges to take the temp at grate level (see “Modifying a Cheap Store-Bought Smoker”). With your hands, firm up the brisket and sort of nestle it into its shape, then close the door. Now you’re ready to settle in and watch the fire for a long time. This is a good time to open a beer.
Step 5 CHECK … OCCASIONALLY.
There’s a saying in barbecue that “If you’re looking, you ain’t cooking.” This is very true. Avoid opening the lid to check on the progress of the meat, especially during the first 3 hours of cooking. Every time you open the lid, you’re releasing smoke and heat and adding time to your cook. It takes a smoker a while to regain that heat, so it’s best just to trust that your meat is cooking. As the meat starts to dry out and darken (around hour 3 or 4), spritz it with your spray bottle once or twice an hour, just to help the bark stay moist and continue to attract smoke.
Step 6 WATCH FOR THE STALL, THEN WRAP.
If you surmise that a brisket will cook in 8 to 10 hours, you can gauge that after about 4 hours, you’ll be in the stall (depending on how hot you’re cooking), and after about 6 hours, the brisket will be pushing through the stall and starting its eventual climb to doneness. One thing to remember is this: don’t wrap during the stall. You’ll lose all the momentum if you open the lid and take out and wrap the brisket while it’s trying to sweat off the last of its moisture. Just like an athlete might find it difficult to cool down and then get back up to full speed in a game, so too with a brisket. Better to let it come out of the stall and then wrap.
Conventionally, at home, if you’re just cooking one or two briskets, this may be around 6 hours into a cook. But again, this decision should be based on color and bark formation more than any sort of time parameters. I can’t really offer an exact accounting for time in a brisket recipe because every smoker, every piece of wood, and every piece of meat is different. Not to mention weather conditions vary. All I can say is that as the crust of the meat starts to darken into a deep mahogany, almost blackish color, I’ll open the lid briefly to spray the meat with a spray bottle. You can fill it with water, marinade, vinegar, apple juice, or whatever you want. I don’t think it adds a ton of flavor, but it allows me to spray off any dark, clinging smoke to assess the true color of the meat and also wets the surface to prevent burning. I use the spray bottle to stretch out the smoke gathering and bark formation as long as I need to before I wrap.
When the color is right—that is, when I spray the bark to remove any ash and see that the true color of the bark is dark, nearly black—I pull the meat out and wrap it.
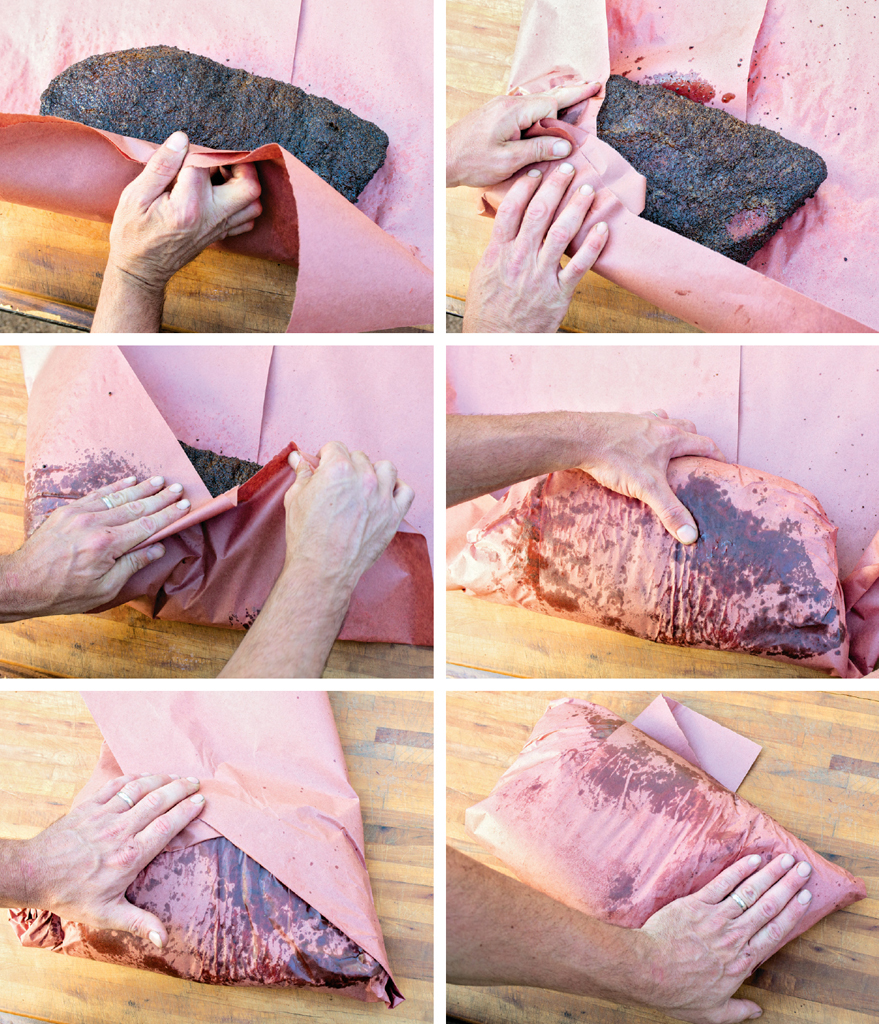
To wrap the brisket, I prepare two sheets of my pink butcher paper. It’s 18 inches wide and “unfinished,” meaning that it has no wax coating. I tear off two sheets each about 30 inches long and place one vertically on the table and the other just overlapping it and veering off at a slight oblique angle. Then I hit the spot where I’m going to lay the brisket on the papers with a quick spray from the bottle.
Next, using towels, I pick up the brisket and lay it down at the bottom of the two sheets of paper, 3 to 4 inches from the base of the sheets. The point is facing up and on the left side. I simply fold the edges of the paper over the brisket, as you’d wrap anything in paper, and then roll the brisket over once, keeping the pocket really nice and neat and as tight as I possibly can. Next, I take the wings of the paper, fold them over again, and once more roll the brisket over, keeping the wrap nice and tight. Now, just a little edge of paper is left, which I fold in a bit and leave. The brisket is in the same position it was when I took it off the smoker, only wrapped tightly in butcher paper.
Step 7 CONTINUE COOKING THE WRAPPED BRISKET.
Put the brisket back in the smoker or even in an oven (set to the same temperature as your cook chamber) to finish cooking. I have to say that I think using an oven is cheating. But realistically, once you wrap the brisket, it’s really absorbed all the smoke it’s going to. If you want to save wood, or just head inside, finishing the brisket in the oven is a possibility … even if I don’t really condone it.
Step 8 CHECK FOR DONENESS.
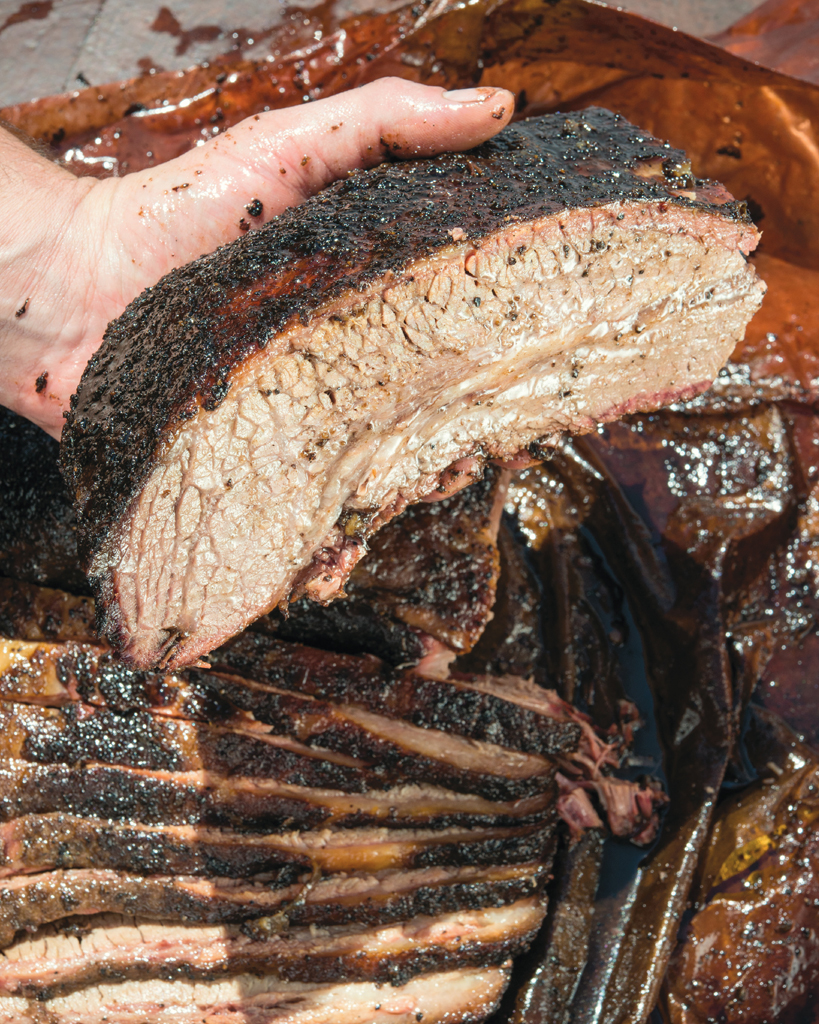
How do you know when the brisket’s done? It’s a great question, because every brisket is different. Taking the internal temperature is a good indicator of how the cook is going, but is unreliable for calculating doneness. The only true way to know is to use your hands. If the fibers pull apart with the slightest force, it’s tender! Too tough to pull? Keep cooking. Crumbly? Overdone.
Of course, I don’t want to cut into briskets before we serve them, so I determine doneness by feel. To do this, I pick it up off the grill and test it for pliability. (Yes, hot! I’ve long since killed all the nerve endings in my fingers. If you can still feel with your fingers, consider wearing gloves.) I’m looking for looseness and some flexibility. If it’s pliable and soft in my hands, it’s done.
You can also unwrap it a little bit (do so carefully, as the sticky rendered fat can sometimes stick to the paper) and give the brisket a feel. If it’s soft and jiggly, you’ve cooked it perfectly, and you’ll find tender, beautifully moist meat inside. Pull it off at this time, because it’s done. If you keep cooking it because you’re unsure, you’re just going to dry it out and make it tough.
Now, if you really have no idea if it’s done or not, you can check the temperature. A brisket may be finished cooking in the wide range of 200°F to 210°F. Although I don’t recommend using this specific temperature as your guide, I often find that briskets are done at 203°F. Why 203°F? Only because after smoking many thousands of briskets, that temperature seems to come up more often than not. So, if you’re really flying blind, that would be my magic number. But, remember, a brisket’s done when it’s done.
Step 9 REST THE BRISKET, THEN SERVE.
When a piece of meat is cooking, it goes through many changes: it starts as a cool, well-seasoned piece of meat (that can absorb characteristics from its heat source), then its moisture evaporates and it forms a nice crusty bark, and finally it becomes the tender, buttery, glistening end product we’ve been waiting for. But there’s still one last step before we are ready to hunker down and enjoy a meal with our little edible slow-cooked morsel of delightfulness: letting it rest.
You’ll probably notice the internal temperate of your brisket will continue to climb after you remove the meat from the cooker—that’s called “carry-over.” It occurs because of conductive heat. If the outside of the meat is cooked by the heat carried in the air and smoke of the cooker, the inside of the meat is cooked by the heat contained in those outer layers. It takes time for that heat to penetrate to the inside of the meat and do its work there (hence, the long cooking time of brisket). The deep internal temperature of any piece of meat can continue to rise even after it’s been removed from the heat source because of this simple effect.
Yet resting after cooking is also incredibly important. It allows meat muscles to relax and reabsorb some of the juices that were squeezed out. If you cut it open right after it’s been pulled, you will lose a lot of important liquid, and you will see a great brisket dry up in no time after hours of meticulous cooking.
Judging carry-over and resting times is like trying to predict the future. Carry-over can be tricky on a large piece of meat, as you don’t want it to continue cooking so much that it becomes overdone as it rests. The idea is to think about how much momentum the meat has. Did you cook it hot and fast? If you did, carry-over will go further than it will if you were cooking low and slow, in which case there may be very little continuation.
Important to consider is where the meat will rest. On a hot table out in the sun on a Central Texas summer day? Or on a cool marble countertop inside an air-conditioned kitchen with an overachieving ceiling fan? If it’s the former, you may not want to cook the meat as long, given the resting conditions. Many factors play into calculating resting time and carry-over. So use your best judgment and remember, just because you pull something at 203°F doesn’t mean that that’s your actual finished temperature.
Let a brisket rest until the internal temperature is between 140°F and 145°F. At this point you can serve the brisket or continue to let it rest for a couple of hours without losing any of its character. Indeed, a good, solid rest for a couple of hours may actually improve the meat.
After that, it’s time to cut and serve the meat. I’m of the mind that cutting brisket properly is of the utmost importance, which is why I’ve devoted several pages to it (see How to Slice a Brisket to Pull Test). I suggest you read them before sinking your knife into that beautiful piece of meat you just spent hours preparing.
SPARE RIBS
At the restaurant, a rib shift starts at about 1 a.m. That’s mighty early. But what’s nice about the ribs, unlike briskets, is that one person can see them all the way through. It starts with trimming and rubbing the ribs, and ends with them coming off somewhere between 8:30 and 10 a.m. Then they’ll rest and be ready for service when we open the doors at 11.
Ribs are delicate and have a small window of doneness, but once you figure out when to wrap and when they’re done, you’ve basically mastered the art of cooking them.
Ingredients and Tools
✵ 1 full rack of pork spare ribs
✵ Oil, fat, water, vinegar, or other liquid, for slather, optional
✵ About ¼ cup Pork Rib and Turkey Rub
✵ Whatever other rub ingredients you choose
✵ Spray bottle of water, vinegar, or other liquid
✵ About ⅓ cup barbecue sauce
✵ Heavy-duty aluminum foil
✵ Seasoned firewood (preferably oak or hickory)
Overview
1 ✵ Trim the ribs of excess fat, breastbone, and skirt.
2 ✵ Apply the slather, if using, and the rub (2 parts black pepper to 1 part salt, plus whatever other rub ingredients you choose).
3 ✵ Start the fire and bring the smoker to 275°F.
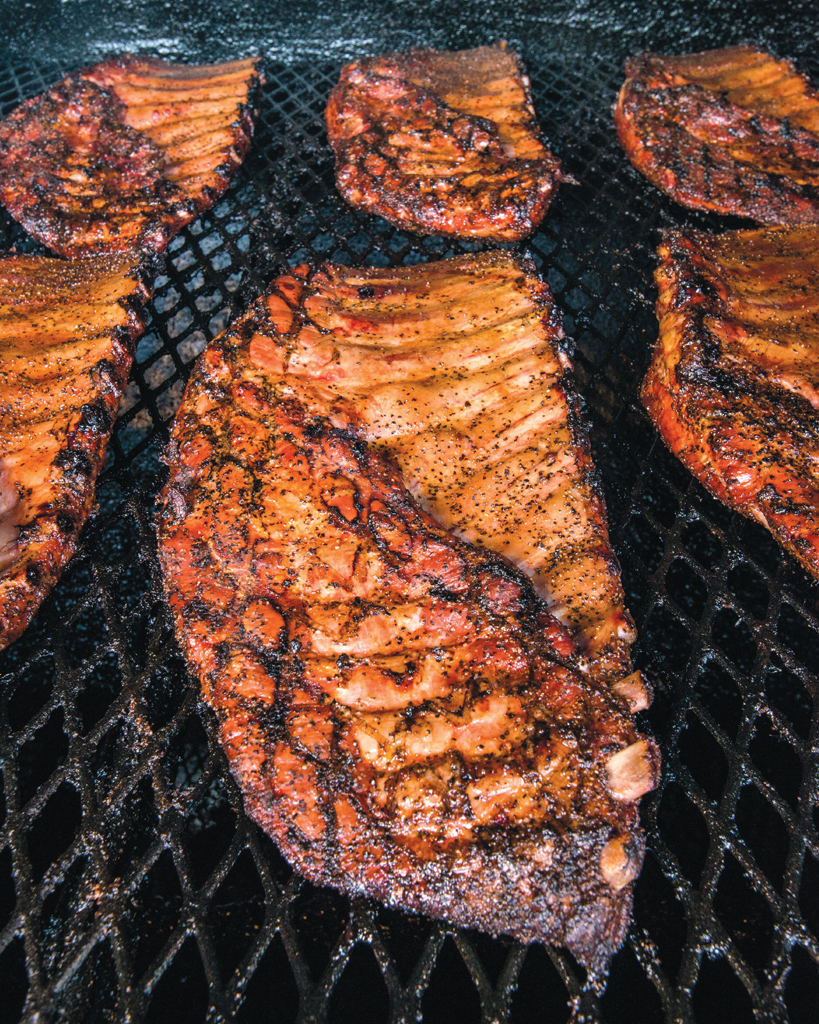
4 ✵ Cook the ribs, meat side up, at 275°F.
5 ✵ Occasionally check the color and spritz.
6 ✵ When the ribs get to the desired color (after about 3 hours), spray them with vinegar, then coat them lightly on both sides with the sauce.
7 ✵ Tear off enough aluminum foil to comfortably wrap the ribs. Spritz the foil, then lightly coat it with the sauce. Place the ribs meat side down on the foil and wrap tightly.
8 ✵ Return the ribs, meat side down, to the cooker and cook until tender. (Start checking after about 2 hours.)
9 ✵ Let the ribs rest, then serve.
Step 1 TRIM THE RIBS.
If you get a “full spare” of pork ribs, which is what we serve at the restaurant, there’s a little trimming to do to get them into optimal cooking shape. It’s also possible that you’ll see pretrimmed ribs at your store or your butcher. They might be advertised as St. Louis cut, which means they’ve already been trimmed and are ready to cook. I like the full spare because we leave more meat on the rack than the St. Louis cut, which is squared off and looks real nice but is a bit smaller than what I prefer.
The good news is that trimming the ribs is easier and requires less time than trimming a brisket. There are just a few simple, automatic cuts that I make on every rack and a few quick snips. At 2 a.m. when I’m trimming the sixty or so racks we cook a day, it takes me only about 20 seconds to trim each rack.
As usual, as a right-hander, I use my left hand to handle the meat and my right hand to hold the knife, which is a German-made chef’s knife with a 10-inch blade. I use this heavier knife instead of the lighter boning knife I use for brisket because I usually have to cut through some cartilage when trimming ribs, whereas with the brisket I’m cutting only fat and meat.
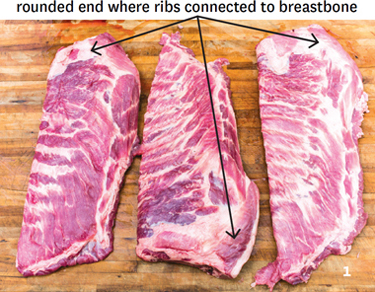
Each rack of ribs has two flat faces, one showing the meat and the other showing the bones, which are covered in a thin membrane. And then there are two long edges. One edge is the straight edge of the bones where the processor sawed off the ribs. The other is a slightly arcing, rounded edge where the ribs were connected to the breastbone. One end of the ribs narrows down into a point. This is the small end. The opposite end is much broader. This is where the rack was connected to the breast plate. These are important references for trimming the ribs (see PHOTO 1).
To begin, I place the ribs meat side down, with the straight edge of the bone side facing me. The narrow, small end will be on my left, and the broad end on my right. With my left hand, I smooth and spread out the whole piece so all of its little imperfect edges are easy to see.
My first cut is to remove the breastbone fragment, if it’s still attached. (The ribs we get always have this little bit of the breastbone, connected by cartilage to the rack, but pre-trimmed ones from the store probably won’t.) Across from the longest bones is the section that needs to be removed; it’s a cartilaginous piece where the rib connects to the breastbone. If your ribs are already trimmed into a St. Louis cut, this part has been removed. But if not, you can see this section, as it’s usually covered in a little fat and membrane and separated by an exposed section of meat from the main part of the rack. At about the fourth rib, feel with your hand where the hardness of the rib bones give way to a soft bit of cartilage. Grip the breastbone section with your left hand (if you’re right-handed) and, cutting toward yourself with the knife, slide in the knife (see PHOTO 2). You’ll quickly hit something harder than the meat. This is the cartilage. Find the line it takes in connecting to ribs 1-3 and simply cut through this with a chop by applying pressure to the knife (see PHOTO 3). I usually press down on the top of the blade with my left hand to cut through the cartilage. It should sound (and feel) like chopping through fingers in a grisly action movie. Once you’ve chopped off this section, you can throw it away, use it in stock or beans, or cut the meat off it for sausage making.
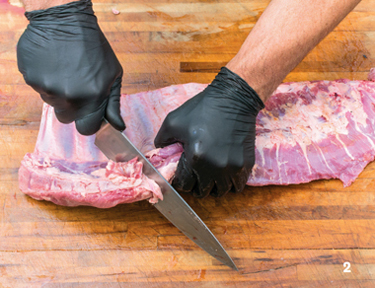
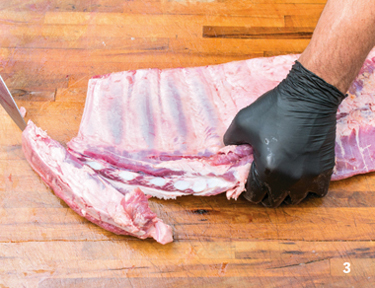
The next cut I make is down at that narrow end of the rack. If you feel the end with your hand, you’ll notice at the very edge a little baby rib bone surrounded by a thin portion of meat. Using a nice, quick slice, cut out all of this bone, squaring off the end of the rack (see PHOTO 4). This bone is unattached and you’ll end up losing it anyway after the rack is cooked. Plus, the meat it’s attached to is so thin that it will burn and might get crusty enough to tear the aluminum foil in which the whole rack will be wrapped. So it’s better just to lose this bone now.

We’re almost done. With the ribs still meat side down, locate the skirt—a flap of meat hanging off the right side of the rack toward the narrow end. Sometimes butchers will remove the skirt, but often it, or a part of it, is there. Simply slice through it close to the rack to remove it (see PHOTO 5). It’s a nice piece of meat and should be used for something, but for the purposes of barbecued ribs, it’s likely to burn up when you’re cooking it anyway. It will also pull up and away from the rest of the rack when cooking and create a bald patch underneath it, which won’t cook as evenly as the rest.
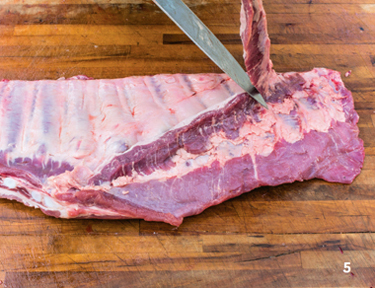
Now I flip the entire rack over to the other face—meat side up, bone side down. Once again I spread or fan out all of the edges flat onto the board so that I can see what the thin, curved edge of the meat looks like. It’s always uneven with little shaggy bits sticking out, so I just cut cleanly around the edge, preserving as much meat as possible to create a neat, consistent line on the meat side for even cooking (see PHOTO 6).
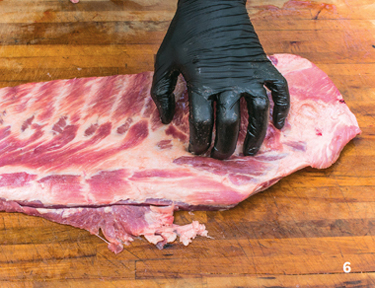
Lastly, I feel around on the ribs for any bits of hard or stringy fat that might be hanging off. This is easily removed with a quick slice of the knife (see PHOTO 7). I also run my fingers across the straight edge of the bones to feel for any sharp or jagged bone ends (see PHOTO 8). This is where the processor has used a band saw to separate the ribs, but sometimes it splinters or makes for a prickly edge, which I smooth up with the knife.
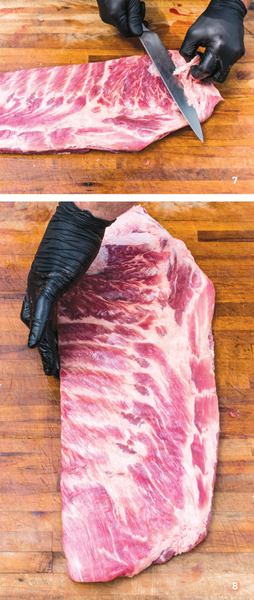
You’ll notice that a fine, shiny membrane covers the entire bone face side of the rack. There’s a debate about whether to remove this or not. Most competition barbecuers do, but most restaurateurs don’t. Members of the membrane-off camp say that it hinders smoke absorption into the meat, but I’ve found that it doesn’t make a lick of difference as to how the meat cooks or tastes and, by the end, is barely noticeable at the level of tenderness to which we cook the ribs. So I leave it on, as removing it is both time-consuming and a little bit tricky because the membrane is slick and hard to grip. But if you want to remove it, the technique is to grip it with a paper towel and then slowly peel it off the ribs. You can use the knife to gently loosen it as you peel it back in one long piece. But, again, I don’t bother with it. And now you’re ready to cook!
Step 2 APPLY THE SLATHER AND THE RUB.
Salt and pepper make a great rub for ribs, but typically we augment this to include “something red.” That redness could come from any number of conventional spices, such as paprika, chile powder, or cayenne pepper. My only real goal here is to bring a little bit of reddish hue to the already pink color of the ribs. Once again, you should use the salt and pepper quantities listed in the ingredients list only as rough guidelines; I generally shoot for ¼ cup of rub for each rack of ribs.
Once you’ve made your rub, you may want to coat the ribs with something to help it stick, though it is not necessary. People slather on oil, fat, water, mustard—anything that will make the surface of the meat tacky so that the rub will adhere to it.
Now, sprinkle on the rub much the same way you would for a brisket or any hunk of meat. Get that wrist and elbow moving and, anywhere from 1 to 2 feet above the ribs, gently shake the rub onto both sides, lightly covering the surface. Again, remember to keep the shaker itself moving in a nice rotation, as the heavier salt crystals tend to sink to the bottom of the mix, making the whole thing uneven when you put it on.
Also remember that it’s really easy to apply too much rub, a mistake that a lot of people make. They feel they haven’t gotten enough on one section, so they go over that part twice, which then inevitably appears to have a denser layering of rub than the rest of the meat. So they go over the rest again, and suddenly they have too much rub over the entire rack. There are worse things that can happen, but if you’re using good meat (which I hope you are), you want the taste of it to be central, with the other flavors of rub and smoke supporting it. So, apply your rub with restraint and consistency the first time, and you’re sure to get it right.
Step 3 START THE FIRE.
The process here is the same as for brisket, so turn to The Realities of Your Backyard Smoker for tips on getting a good fire going. The smoker should contain a full water pan.
Step 4 PLACE THE RIBS IN THE SMOKER.
Now it’s time to throw your ribs in the smoker. Ribs are the most finicky things to cook, and temperature matters a lot. They’re just really sensitive. As always, use trial and error to find the best temperature for your cooker. But a good place to start is 275°F, which often seems to cook them neither too fast nor too slow. Some recommend cooking them as low as 225°F, but I think that’s too cool, and it will take forever for them to be ready. I generally prefer to cook between 275°F and 300°F, depending on the quality of the meat’s marbling (leaner meat I cook at a higher temperature). With ribs, temperature matters a lot. Too hot, and you might crisp the edges and dry the ribs out. Too low, and they’ll never get tender.
People debate on how to position them on the grate: meat side up or down. I’m a meat-side-up guy because, just as with the briskets, the heat in my smokers is greater above the cook surface than below, so I want to have the part of the ribs with the most fat and meat exposed to that heat so they’ll cook evenly. But if your heat is greater below the grate, by all means, cook the ribs meat side down.
The ribs can go for several hours without you needing to open the lid to check on them. Rather, keep track of your fire and your temperature gauge, which is placed to read the temperature of the smoker at grill height.
Step 5 CHECK THE COLOR AND SPRITZ.
About 2 hours in, I take a look to see how the ribs are doing. Hopefully, they’re getting the deep color I’m looking for. I cook sixty racks at a time and inspect every one of them to determine how it’s cooking. To do this, I take a spray bottle filled with cider vinegar and liberally spray the top of the meat. I don’t do this to add flavor but rather to gauge the true color of the ribs and apply moisture. The spray washes off any of the heavier smoke particles that make the ribs look darker than they actually are. Use whatever liquid you want—vinegar, apple juice, orange juice, or water. Or you can dilute a liquid half and half with water.
The color I’m looking for is a deep reddish brown, and I want it to cover the surface fully. The enemy here is splotchiness, which can result from any number of things, but is generally due to some inconsistency in the meat, fat, or rub. This results in the edges becoming dry while the center stays moist, which in turn means there is an uneven surface for smoke penetration. If I see splotches of lighter color on the ribs, I just let them keep going until they’ve all come to be the same color.
Step 6 ADD THE SAUCE.
When the ribs have achieved that lovely, burnished red color, it’s time to give them a little coating of sauce to prepare them for wrapping. I use our straight-up barbecue sauce for this purpose. Feel free to use whatever kind of sauce you want, though I recommend it not be too thick or sugary, which will result in it clumping as it cooks. If you have a thicker sauce, you can dilute it with water, vinegar, apple juice, or white grape juice to get a good, fluid consistency. I put the sauce in a plastic squeeze bottle for easy application. (Note: If it’s cold outside, you’ll want to warm your sauce, as cold sauce is also prone to clumping and cooling down the meat.)
Before I add the sauce, I hit the ribs again with another couple of sprays from the spray bottle, just to get them wet. This helps the sauce spread evenly when I apply it. Next, I lightly squirt the sauce from the squeeze bottle onto the ribs, using a back and forth motion. Then I usually spread the sauce out evenly with a (gloved) hand, but you could use a brush. I mist the ribs one more time with the vinegar to help spread out the sauce, and then I close the lid and cook the ribs for about 15 minutes to allow the sauce to set. I flip the ribs over and cook for another 15 minutes to set the sauce on the second side. Now it is time to wrap.
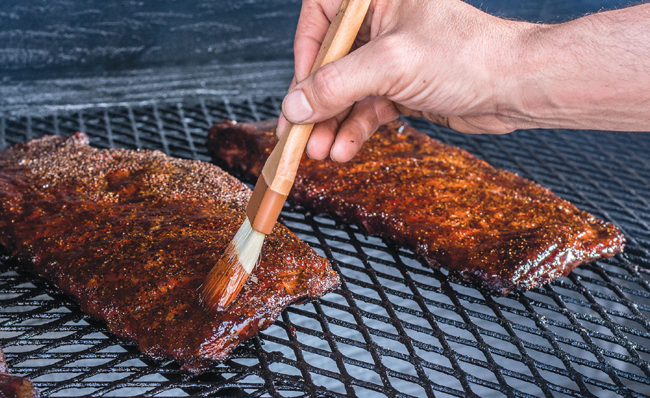
Step 7 WRAP.
I wrap ribs in aluminum foil, not butcher paper. Each rack gets its own little foil packet. There’s nothing special about the technique for wrapping ribs; it’s pretty much common sense. You’ll need a table or other work surface near your cooker. Cut one piece of foil that’s a little longer than twice the length of each rack you’re going to wrap and stack it on the table. In preparation for wrapping, hit the foil with a few spritzes from your spray bottle and then give it a quick few streaks of sauce from your squeeze bottle.
Use a towel, not tongs, to pull the ribs off the grill gently with your hands. The last thing you want is hard or jagged metal cutting into and shredding all that nice bark and good color you’ve worked so hard to get. Gently lay the rack, meat side down, on your spritzed and sauced piece of foil. Then spritz and sauce the backside of the ribs. On the ends of the rack, look for any bones that might be sticking out, gently wriggle them free of the meat, and discard them. Jagged bones can easily pierce the foil, allowing all the juices and moisture you’re aiming to preserve to leak out.
To wrap, simply fold over the sides of the foil horizontally first and then flip the ribs over again until you’ve created a neat, tight packet. At this point, you can do as we do at the restaurant and put the ribs back on the smoker to finish cooking for another couple of hours. But, as with the brisket, they’re not going to absorb any more smoke once they’re wrapped. So, if you’re doing this at home, you can also stick them into an oven preheated to 275°F for another 2 hours or so, until they’re done.
Step 8 CHECK FOR DONENESS.
The single biggest question mark for a lot of people with regard to cooking ribs is determining when they’re done. Unlike briskets, this isn’t accomplished with a thermometer for three reasons: the ribs on a rack are of varying thickness and thus will be at different temperatures; the meat is so thin that it’s hard to get an accurate reading; and the many bones that are close to the meat will absorb and radiate heat differently from the meat.
The best way to tell when ribs are ready is by feel. This is especially important because these ribs are wrapped in foil, and you don’t want to have to go and unwrap every rack to figure out if it’s ready or not. It takes practice, but do it a few times, and you’ll get the hang of it.
Ribs can be overcooked. The meat shouldn’t be falling off the bone, which will happen if the ribs cooked too long. The meat will also be dried out. Rather, the meat should be tender and juicy but still require a minimal bit of pull to get it off the bone.
To determine the moment to pull the ribs, I pick up every foil-wrapped rack in my hands with the towel and check its pliability. I grab it with my left hand, placing the tips of my fingers under the ribs in the middle portion. It’s these thicker, straighter ribs in the middle that are the last to get done, which is why I check there. Holding a rack in my hand, I let it flex in that hand, allowing it to flop over those fingers with its own weight. If it’s too floppy and bendable, it’s probably overdone. If it’s too stiff, it might need more time. I’m looking for just a nice, easy lever of flexibility that shows that it’s perfectly done. There are some ways you can check your work. Some people twist a rib bone in the middle of the rack to see how loose it is. If it starts to break free of the meat, it’s ready to eat. Other people might poke into the meat with a toothpick at that midpoint to check the consistency. If it effortlessly punctures the meat with little to no resistance, the meat is done. Generally, you’re looking for looseness and a willingness to pull apart without falling apart.
Step 9 LET IT REST, THEN SERVE.
When you’ve figured out the ribs are done, leave them in their foil packets to rest. You can do this at room temperature for 20 to 30 minutes, and the ribs will still be nice and warm when it’s time to serve.
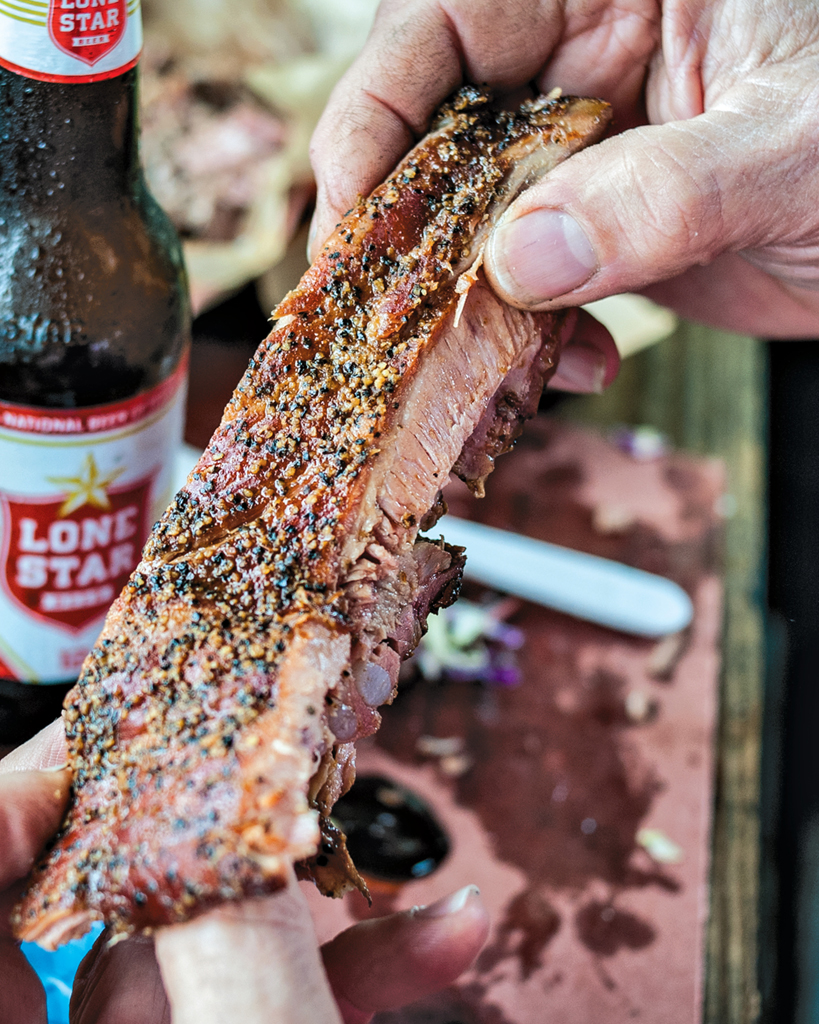
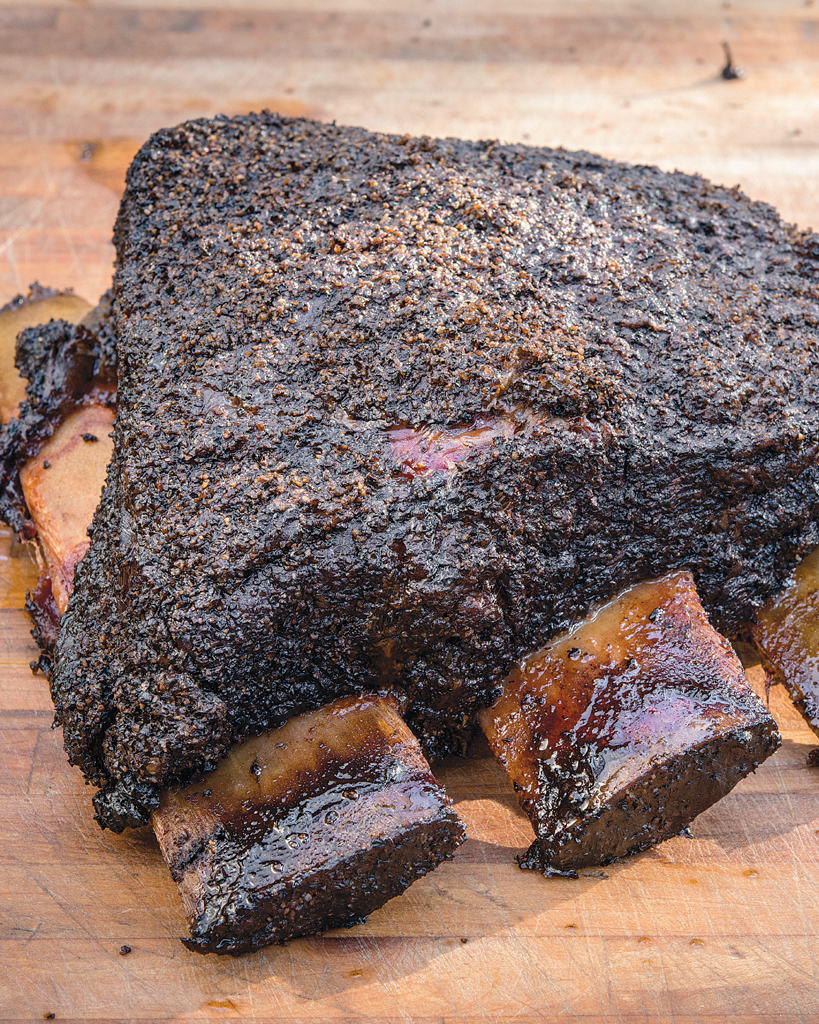
BEEF RIBS
If I had to name my own personal favorite cut of barbecue, it would probably be beef ribs. They are the richest and the most decadent, succulent, and flavorful cut of beef you can put on a smoker. That’s also why I don’t eat them much—too rich, too hedonistic. We only cook beef ribs on Saturdays at the restaurant: they’re a special treat, made all the more special because we do them only once a week.
That said, beef ribs are pretty easy to cook. In this recipe, I include a light slather of hot sauce. We don’t cook them this way at the restaurant because not everyone likes spicy food, but it’s my preference for sure. I rub heavily because there’s so much fat, and the extra rub really melts into it well. Beef ribs don’t get wrapped. You’ll know they’re done when they feel jiggly and soft.
Ingredients and Tools
✵ 1 (3- to 5-pound) rack of beef short ribs (from the plate, not the chuck)
✵ 1 tablespoon hot sauce, such as Cajun Chef or Crystal
✵ About ⅓ cup to ½ cup Brisket and Beef Rib Rub
✵ Spray bottle of water, vinegar, or other liquid
✵ Seasoned firewood (preferably oak or hickory)
Overview
1 ✵ Heat the smoker to 285°F and check that the water pan is full.
2 ✵ Trim the ribs if needed.
3 ✵ Slather the ribs with a very light coating of hot sauce.
4 ✵ Apply the rub (equal parts salt and black pepper).
5 ✵ Cook the ribs, meat side up, at 285°F, for about 8 to 9 hours.
6 ✵ Spritz during the final 2 to 3 hours.
7 ✵ Check for doneness by poking the ribs; when they feel like melted butter (about 203°F between the bones), serve.
Step 1 START THE FIRE.
Following the instructions beginning on The Realities of Your Backyard Smoker, get a fire going and heat the smoker so it’s about 285°F at grate level.
Step 2 TRIM THE RIBS.
Beef ribs usually come quite clean and well trimmed, unlike pork ribs and briskets, so there’s not much to do. If you see any big chunks or flaps of fat, trim them away. Apart from that, I don’t trim beef ribs.
Step 3 APPLY THE SLATHER.
When I’m cooking for myself, I like to slather the ribs with a bit of hot sauce. Of course, you can slather with anything you like—from water to mustard to vinegar. The slather is mainly there to help the rub adhere to the surface of the meat. I just think a little hint of earthy spiciness from a bottle of hot sauce is a fun addition to beef ribs. You can’t really taste it in the final product, but it helps build interior layers of flavor.
Step 4 APPLY THE RUB.
Using a shaker, and holding it 1 to 2 feet above the ribs, generously apply the rub—a little heavier than you would on a brisket. This is because, as rich as brisket is, beef ribs are even richer. The extra rub ends up forming a bark that balances out that richness just a little bit. I generally use somewhere around ⅓ to ½ cup of rub for each rack of beef ribs.
Step 5 COOK THE RIBS.
Place the ribs, meat side up, in the smoker. As usual, I cook meat side up because I’ve determined that my smokers have more topside heat and the meat and fat cap can handle that. If you’ve got more heat coming from below, you might consider going meat side down. Again, it’s up to you—the ribs can come out well either way. Cook for 8 to 9 hours, until done.
Step 6 SPRITZ.
During the final 5 hours or so, spritz pretty frequently with water or other liquid to keep the ends from burning.
Step 7 FINISH, THEN SERVE.
Check for doneness by gently inserting a toothpick between two membranes: the one outside the bones and the one that separates the bones from the meat. Inside, the meat should be extremely tender. Alternatively, take an internal temperature reading: the ribs should be done when they reach 203°F. Let them rest for at least 30 minutes before serving. Beef ribs are served on the bone, but great for sharing.
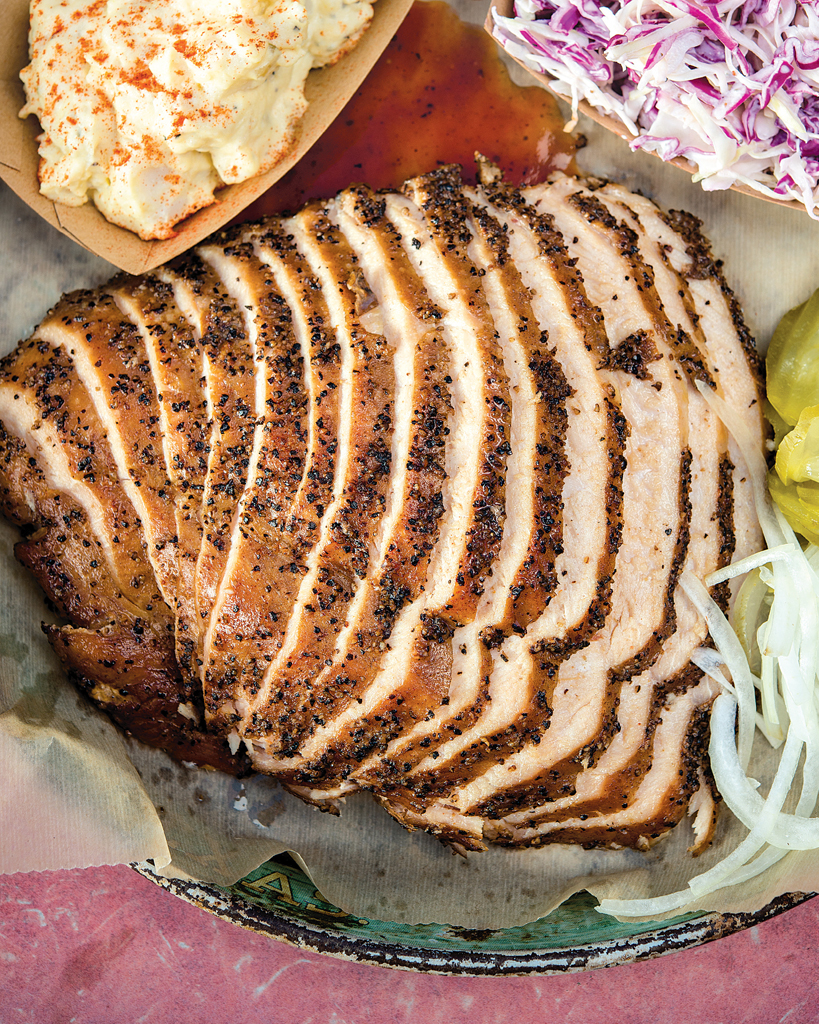
TURKEY BREAST
We’re not exactly known for our turkey, but it does come out real nice, and I even know some people for whom it’s the favorite of all of the things we cook. That’s fine, because it’s also the easiest thing to cook. We don’t bother with the whole turkey, just as we don’t bother with whole cows or pigs. We get nice, plump turkey breasts and try to keep them moist. For this recipe (and in general, in my opinion), it’s important to buy turkey breasts that have not been prebrined or injected with any sort of solution. If you’re anything like me, you want to be in complete control over what goes into or is sprayed on your bird, and you never know with commercially brined turkey.
Ingredients and Tools
✵ 1 (3- to 4-pound) skin-on, nonsolution turkey breast
✵ 1 cup butter
✵ Heavy-duty aluminum foil
✵ Seasoned firewood (preferably oak)
✵ Generous ¼ cup Pork Ribs and Turkey Rub
Overview
1 ✵ Start the fire and heat the smoker to 265°F.
2 ✵ Trim the turkey breast and apply the rub (2 parts black pepper to 1 part salt).
3 ✵ Cook the turkey for 2½ to 3 hours, then wrap.
4 ✵ Continue cooking until the internal temperature reaches 160°F (about 1 hour).
5 ✵ Let rest for 30 minutes, then serve.
Step 1 START THE FIRE.
Following the instructions beginning in The Realities of Your Backyard Smoker, get a fire going and heat the smoker so it’s about 265°F at grate level.
Step 2 TRIM THE BREAST AND APPLY THE RUB.
If the skin is on the turkey breast, remove it. We just tear off the skin and throw it away. I use the same rub for turkey as pork spare ribs, so 2 parts black pepper to 1 part salt. Use your judgement, but I think a bit more than ¼ cup rub per turkey breast is a good guideline.
Step 3 COOK THE TURKEY UNTIL GOLDEN, THEN WRAP.
Place the turkey, skin side up (meaning, the side that formerly had skin), in the smoker and cook until golden brown (typically 2½ to 3 hours). Remove the turkey from the smoker, place the butter on top of the turkey, and wrap tightly in two layers of heavy-duty aluminum foil, dull side out. The turkey breast ends up braising in quite a lot of melted butter and its own juices and the double layer of foil ensures against leakage. Return the turkey to the cooker, this time flipping it so it’s skin side down.
Step 4 FINISH THE COOK.
Continue to cook the turkey breast until the internal temperature registers 160°F. This should take about 1 additional hour.
Step 5 LET REST, THEN SERVE.
Let the turkey rest until the internal temperature drops to 140°F, then slice thinly against the grain and enjoy.