Alternative Baker: Reinventing Dessert with Gluten-Free Grains and Flours - Alanna Taylor-Tobin (2016)
DESSERT FOR BREAKFAST
“When you wake up in the morning, Pooh,” said Piglet at last, “what’s the first thing you say to yourself?”
“What’s for breakfast?” said Pooh. “What do you say, Piglet?”
“I say, I wonder what’s going to happen exciting today?” said Piglet.
Pooh nodded thoughtfully. “It’s the same thing,” he said.
—A. A. Milne
Breakfast is my favorite meal of the day because it’s the one where you’re allowed to eat dessert. Muffins are essentially cake in individual form. Oven pancakes resembling clafoutis puff around gently sweetened fruit. Scones are doused with honey, and glazed biscuits wrap around berries. In the case of chocolate-topped oat bars, you can even eat cookies for breakfast and none will be the wiser. There’s a reason why bitter beverages like coffee and black tea star at breakfast—they’re the perfect thing to wash down these sweet breakfast treats.
Alternative grains have the power to create breakfast snacks and pastries that taste good in addition to being good for you. I’ve kept most of the recipes in this section on the less-sweet side, using alternative grains and flours to add nutritional value and a bit of staying power to some favorite breakfast treats that are worth getting out of bed for any day of the week.
Sorghum adds sweet nuttiness to a custardy oven pancake encasing honey-roasted peaches. Melt-in-your-mouth cream scones get their tender texture from millet and oat flours, as well as amaranth and chestnut flours in the variations. Teff flour makes wildly flavorful roasted banana scones slathered in a butterscotchy glaze. Buckwheat stars in buttery poppy seed muffins as well as blintzes filled with sweet cheese and huckleberries. Don’t miss the pumpkin cranberry loaf, which is barely sweet and made from a host of nuts, seeds and oats. With unique tastes and textures, these breakfast treats are sure to add a bit of excitement to your day, too.
LEMON RICOTTA BISCUITS
{OAT, MILLET}
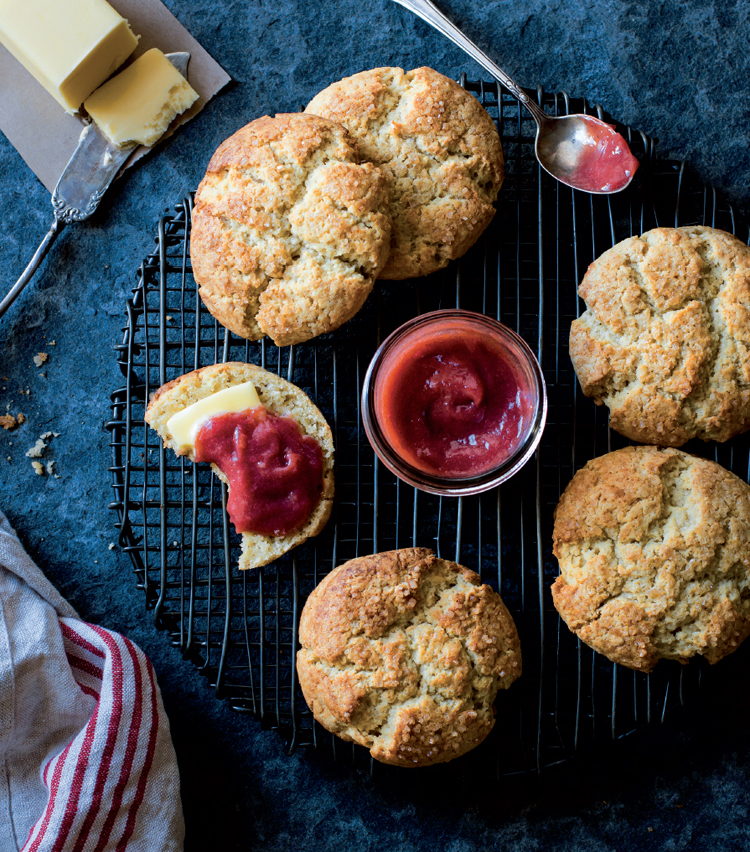
These craggy biscuits are rich with butter, whole-milk ricotta and a touch of cream, and they get sweetness from sugar and a scraping of lemon zest. When warm from the oven, their delicate crumb positively melts in your mouth; cooled, they have a slightly chewy texture from the ricotta. Oat and millet flours combined with cornstarch for crispness and tapioca for extensibility give them a wheaten texture and delicate taste. They tend to spread a bit more than conventional biscuits, but it’s the extra moisture that causes them to bake up light and crisp. These hold their shape best when chilled prior to baking, but you can bake them right away when you need biscuits in a hurry; they’ll just sit a bit flatter.
Spread them with some softened butter and Rhubarb Preserves for breakfast, or top them with ricotta cream, strawberries and tarragon for a sensational shortcake. Leftovers can be baked into a berry-filled bread pudding drizzled with honey.
MAKES 6 BISCUITS
½ cup (55 g) GF oat flour, plus extra for dusting the surface
¼ cup plus 2 tbsp (50 g) millet flour
2 tbsp (13 g) tapioca flour
2 tbsp (15 g) cornstarch
2 tbsp (25 g) organic granulated cane sugar
1½ tsp (8 g) baking powder
¼ tsp fine sea salt
Finely grated zest from ½ large lemon
3 tbsp (42 g) cold, unsalted butter, diced
½ cup (120 g) whole-milk ricotta cheese
3 tbsp (45 ml) cold heavy cream, plus 2 tsp (10 ml) for brushing the biscuits
Coarse sugar such as turbinado or demerara, for sprinkling
In a large bowl, whisk together the oat, millet and tapioca flours with the cornstarch, sugar, baking powder, salt and lemon zest. Add the butter pieces, and work with a pastry blender or your fingertips until the butter is broken down into the size of small peas. Chill the mixture until cold, 20-30 minutes.
Position a rack in the upper third of the oven and preheat to 425°F (220°C). Stack a rimmed baking sheet atop a second rimmed baking sheet and line with parchment paper (this will keep the bottoms from over-browning).
Remove the flour mixture from the refrigerator, add the ricotta and 3 tablespoons (45 ml) cream, and stir and/or knead with your hands until the dough comes together in a rough ball. The dough should feel fairly firm, but evenly moistened.
Working quickly to keep the dough cold, turn the dough out onto a surface dusted lightly with oat flour and form it into a disk. Cut the disk into 6 equal pieces. Shape each piece into a ball, place on the sheet pan spaced well apart, and flatten slightly. Brush the tops of each biscuit with the remaining 2 teaspoons (10 ml) cream and sprinkle with a bit of coarse sugar. (Optionally for taller biscuits: chill the biscuits until firm, 30-60 minutes.)
Bake the biscuits on the upper rack of the oven until golden on top, 15-20 minutes. Let cool for at least 15 minutes; they are still cooking from residual heat. The biscuits are best the day of baking, but they will keep at room temperature for a day or two. Toast before serving.
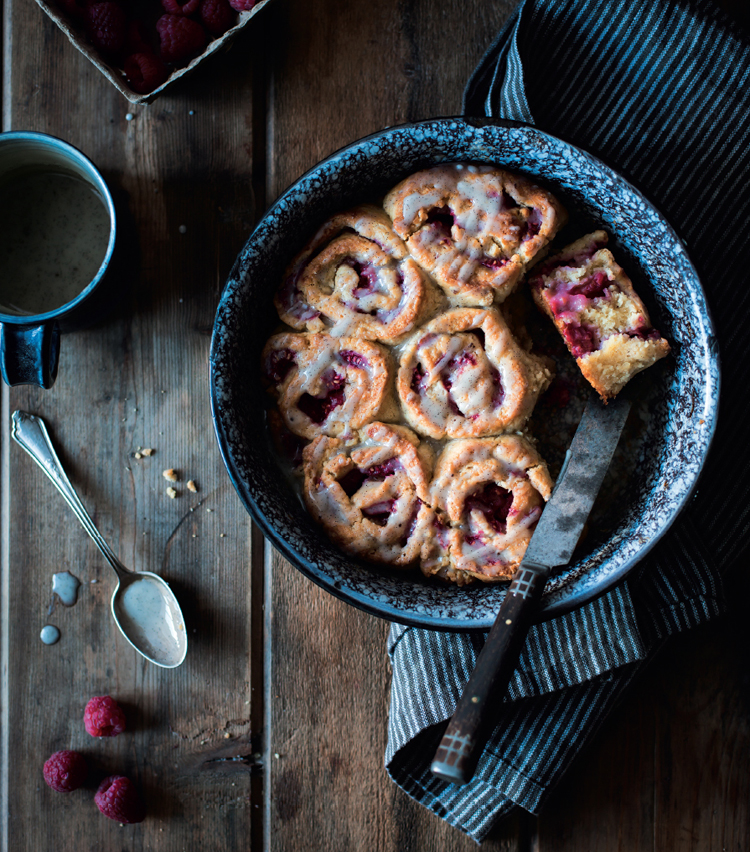
RASPBERRY SWIRL BISCUITS
{SWEET RICE, MILLET, OAT}
These swirled biscuits stuffed with fresh raspberries and drizzled with vanilla bean glaze fall somewhere between a muffin and a biscuit. The edges get crisp in the oven while the middles stay tender. Bright raspberries play off the sweet richness of the buttery biscuits, enhanced with nutty millet and oat flours, and the pretty presentation makes these perfect for a brunch or potluck. As you work, the dough will feel more fragile than wheat biscuits, but don’t worry—the sweet rice flour provides enough stickiness to hold these together as they bake. Just be sure to use sweet rice flour (such as Mochiko) rather than regular rice flour. Feel free to skip the glaze for a less sweet breakfast treat. And don’t miss the variations on. Do give yourself 2 hours to complete these biscuits as the dough requires some chill time.
MAKES 8 OR 9 BISCUITS
BISCUITS
1 cup (155 g) sweet white rice flour
½ cup (65 g) millet flour
½ cup (50 g) oat flour, plus extra for dusting the surface
¼ cup (50 g) organic granulated cane sugar, plus 1 tbsp (10 g) for sprinkling
1 tbsp (12 g) baking powder
½ tsp fine sea salt
6 tbsp (85 g) cold, unsalted butter, sliced, plus 1 tsp, softened, for greasing the pan
6 tbsp (90 ml) whole milk, plus up to 4 tbsp (60 ml) more as needed
1 large egg
1 tsp vanilla extract
1½ cups fresh raspberries (about a 6-oz [170-g] package)
FOR BRUSHING BISCUITS
1 tbsp (15 ml) whole milk
1 tsp organic granulated cane sugar
VANILLA BUTTERMILK GLAZE
Seeds from ½ vanilla bean
½ cup (40 g) powdered sugar
1 tbsp (15 ml) well-shaken buttermilk or milk, or enough to make a pourable glaze
To make the biscuits, in a large bowl, combine the sweet rice, millet and oat flours with the ¼ cup (50 g) sugar, baking powder and salt. Add the 6 tablespoons (85 g) butter and blend with a pastry cutter or your fingertips until the butter is broken down into the size of small peas. Chill this mixture until cold, 10-20 minutes.
Meanwhile, whisk together the 6 tablespoons (90 ml) milk, the egg and the vanilla extract in a measuring pitcher. Chill until needed.
Remove the flour mixture from the refrigerator. Gradually add the milk mixture, working with a flexible silicone spatula until the dough holds together when you give it a squeeze. Stop adding liquid if the dough seems overly wet; we want it to be firm enough to roll out. Conversely, if the dough is dry or floury, work in 1-4 more tablespoons (15-60 ml) milk until it comes together. The amount of liquid needed will vary depending on the temperature and humidity of your kitchen, so add as little or as much as you need to make a firm but hydrated dough. Knead the dough about 20 times in the bowl to bring it together in a ball (unlike wheat biscuits, these gluten-free biscuits require more kneading to bring the dough together, so don’t be shy). Cover and chill the dough for 15 minutes or up to several hours.
While the dough chills, rinse, dry and slice the berries in half.
When ready to bake, position a rack in the upper third of the oven and preheat to 350°F (175°C). Grease the bottom and sides of an 8-inch (20-cm) round or square cake pan with the remaining 1 teaspoon softened butter and line with parchment paper.
Remove the dough from the refrigerator and place on a large piece of parchment paper dusted lightly with oat flour. Use your hands and a rolling pin to pat and roll the dough out into roughly a 10 by 14-inch (25 by 35-cm) rectangle, dusting the dough as needed to prevent sticking. If the dough cracks or breaks at any point, don’t worry, just pinch and squish it back together. When the dough begins to stick to the parchment, top with a second sheet of parchment and, grasping both pieces of parchment and the dough, bravely flip the whole thing over. Gently peel away the top piece of parchment and continue rolling out the dough.
Sprinkle the halved berries evenly over the dough, use your palms to press them gently into the dough and sprinkle with the remaining 1 tablespoon (10 g) sugar. Starting with a long end, use the parchment to help roll the dough into a log, rolling it as tightly as possible and ending with the seam side down. Use a sharp chef’s knife to cut the log into 8 equal pieces (if using a round pan) or 9 pieces (if using a square pan), cutting straight down in an assertive manner. Place each round with a cut side up in the prepared pan, using a thin spatula to help transfer the biscuits if needed. Gently press the tops of the biscuits to flatten them slightly. Brush the tops of the biscuits with the 1 tablespoon (15 ml) milk and sprinkle with 1 teaspoon sugar to encourage browning.
Bake the biscuits until golden and cooked through, 40-55 minutes. Remove from the oven and let cool completely, 1 hour; their texture improves upon cooling.
To make the glaze, whisk together the vanilla seeds, powdered sugar and enough buttermilk or milk to make a pourable glaze until smooth. When the biscuits have cooled, drizzle with the glaze. Use a knife or small offset spatula to coax the biscuits out of the pan.
The biscuits are best within a few hours of baking, but extras will keep, airtight at room temperature, for an additional day.
VARIATIONS
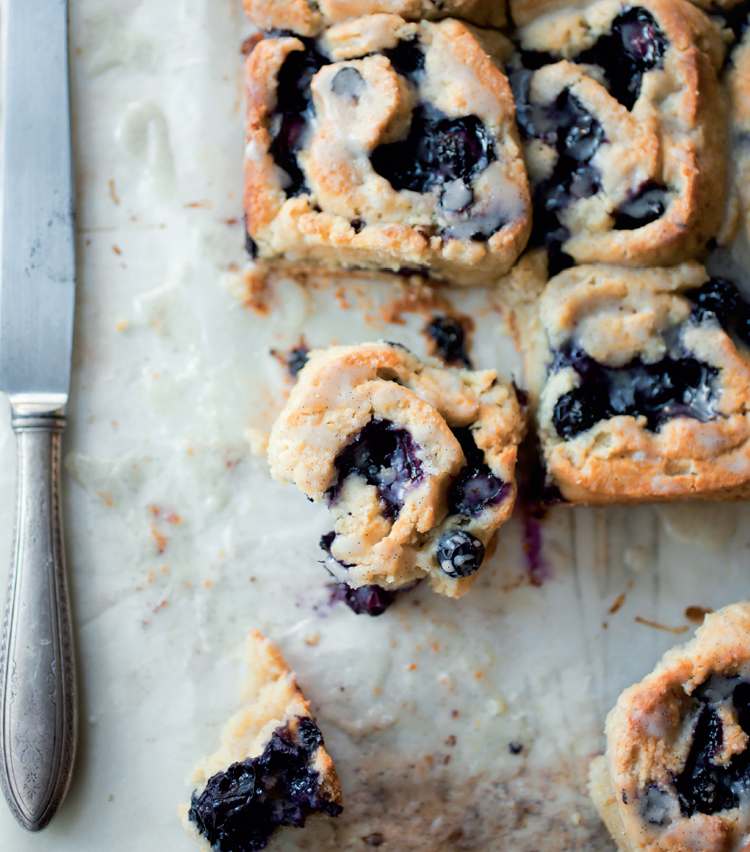
BLUEBERRY CARDAMOM SWIRL BISCUITS
Use 1½ cups (170 g) whole fresh blueberries (or huckleberries or wild blueberries) in place of the raspberries.
Add ½ teaspoon ground cardamom to the sugar sprinkled over the berries, and ⅛ teaspoon ground cardamom to the glaze. Pictured here.
CINNAMON SWIRL BISCUITS WITH CREAM CHEESE ICING
Omit the raspberries and additional tablespoon (10 g) of granulated sugar. In a small bowl, stir together ⅓ cup (70 g) packed organic dark brown sugar or muscovado sugar, 1 teaspoon ground cinnamon, a good grating of fresh nutmeg and ⅛ teaspoon fine sea salt. Brush the rolled-out dough all over with 2 tablespoons (30 ml) melted and cooled butter, sprinkle with ⅓ cup (45 g) dried currants, raisins or golden raisins and sprinkle all over with the brown sugar mixture. Pat down the filling mixture into the dough and proceed with the recipe. For a simple cream cheese glaze, use the back of a spoon to mash 2 tablespoons (30 g) softened cream cheese with ½ cup (40 g) powdered sugar. Beat in 1 tablespoon (15 ml) milk or buttermilk, a few drops of vanilla extract and a pinch of fine sea salt, adding more liquid if needed to make a thick but pourable glaze. Drizzle the glaze over the biscuits.
NOTE: Making biscuit and scone doughs by hand gives you the best control over the finished product, since it’s easier to overprocess the butter if using a machine. However, once you’ve gotten the hang of how to handle these doughs, feel free to give them a whirl using a stand mixer fitted with the paddle attachment to work in the butter, add the liquid and knead the dough. Alternatively, use a food processor to pulse the butter into the flour mixture, dump the mixture into a bowl and add the liquid ingredients by hand. If your kitchen is cool and you work quickly, you can also skip the additional step of chilling the flour/butter mixture; I list it as an extra precaution for newer bakers and/or warm kitchens.
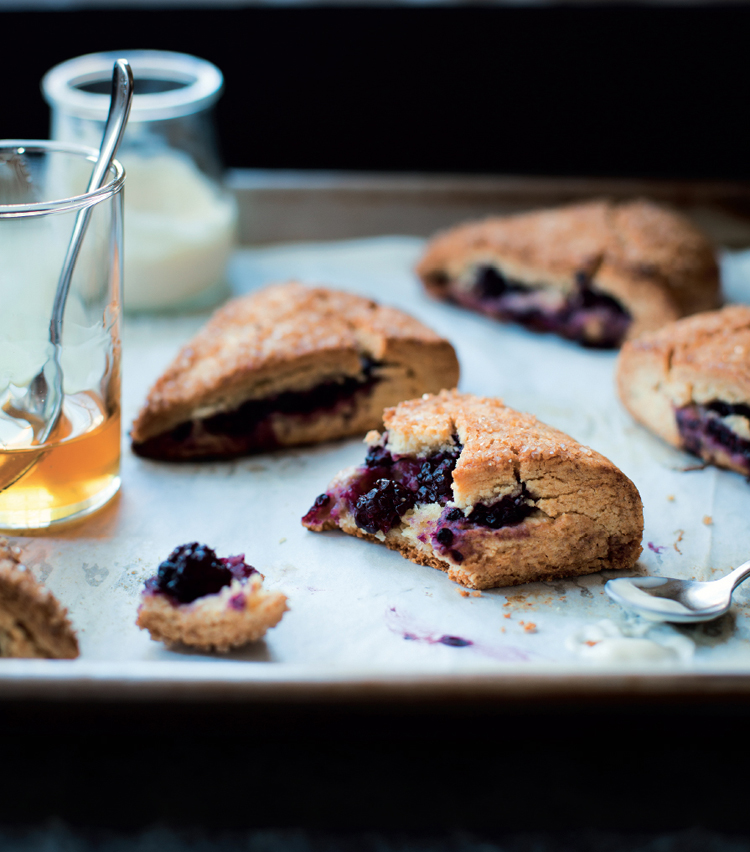
BLACKBERRY CREAM SCONES
{SWEET RICE, MILLET, OAT}
Gluten-free scones are one of the hardest pastries to get right, texture-wise, and it took me a dozen or so tries to settle on this combination of ingredients and techniques. Sandwiching the tender berries between two layers of dough keeps things neat and tidy, and the berries bake into a chunky jam of sorts. (I love blackberries, but any summer berry, or a combination, will work here.) Cream makes for the most lusciously tender scones, and an egg helps the dough hold together. Sweet rice, millet and oat flours give the dough a mild flavor with a bit of nuttiness and textural interest. On the day of baking, the scones are crisp on the outside with tender middles; after a day they soften from the moisture in the fruit and gain a slightly cakey texture.
Do give yourself 2 hours to make these scones; most of the time is inactive, and the extra chilling steps ensure tender scones that hold their shape as they bake.
MAKES 8 MEDIUM-SIZED SCONES
1 cup (155 g) sweet white rice flour
½ cup (65 g) millet flour
½ cup (50 g) oat flour
¼ cup (50 g) organic granulated cane sugar, plus 1 tsp for the berries
1 tbsp (12 g) baking powder
½ tsp fine sea salt
5 tbsp (70 g) cold, unsalted butter, sliced
6 tbsp (90 ml) heavy cream, more as needed, plus 1 tbsp (15 ml) for brushing the scones
1 large egg
1 tsp vanilla extract
1 cup (130 g) fresh blackberries, halved
1 tbsp (10 g) coarse sugar such as demerara or turbinado, for sprinkling
FOR SERVING (OPTIONAL)
Crème Fraîche
Honey
In a large bowl, combine the sweet rice, millet and oat flours with the ¼ cup (50 g) sugar, baking powder and salt. Add the butter and blend with a pastry cutter or your fingertips until the butter is broken down into the size of small peas. Chill this mixture until cold, 15-30 minutes.
Meanwhile, whisk together the 6 tablespoons (90 ml) cream, egg and vanilla in a measuring pitcher. Chill until needed.
Remove the flour mixture from the refrigerator. Gradually add the cream mixture, working with a flexible silicone spatula until the dough holds together when you give it a squeeze; you may need to add 1-6 tablespoons (15-90 ml) of cream to properly hydrate the dough and the amount will vary depending on the temperature and humidity of your kitchen and how much you’ve worked in your butter. Knead the dough 20 or so times in the bowl to bring it together in a ball; unlike wheat scones, these gluten-free scones require more kneading to bring the dough together, so don’t be shy. Cover and chill the dough for 15 minutes or up to several hours.
While the dough chills, rinse, dry and slice the berries in half, and set aside until needed.
Remove the dough from the refrigerator and place on a surface dusted lightly with oat flour. Divide the dough into 2 equal portions (they will weigh about 10 ounces [285 g] each) and flatten each into a 6-inch (15-cm) diameter round a scant ½-inch (1.3-cm) thick. Place the berries atop one of the rounds in an even layer, leaving a ½-inch (1.3-cm) border. Sprinkle with the remaining 1 teaspoon cane sugar and top with the second dough round. Squish the edges together to seal and smooth into an even round.
Wrap the scone in plastic wrap and chill until firm, 30 minutes or up to overnight.
When ready to bake, position a rack in the upper third of the oven and preheat to 400°F (200°C). Stack a rimmed baking sheet atop a second rimmed baking sheet and line with parchment paper (this will keep the bottoms from over-browning).
Remove the scone from the refrigerator, unwrap and place on a cutting board. Brush the scone with the remaining 1 tablespoon (15 ml) cream and sprinkle with the 1 tablespoon (10 g) coarse sugar. Use a large, sharp chef’s knife to cut the scone into 8 wedges and place the wedges on the prepared baking sheet, spaced well apart.
Bake the scones until golden on top and cooked through, 20-30 minutes. Remove from the oven and let cool until warm, 20 minutes; they are still baking from residual heat. The scones are best the day of baking but will keep, airtight at room temperature, for a day or two.
VARIATIONS
CHESTNUT FIG SCONES
The earthy flavor and jammy fig filling of this variation reminds me a bit of really delicious Fig Newtons. Chestnut flour creates a softer, cakier texture than the originals.
Omit the millet and oat flours and replace with 1 cup (105 g) chestnut flour. In place of the berries, use ¾ cup (130 g) sliced fresh figs (about 3 medium figs). To slice the figs, trim away the stems, halve, place cut side down and slice ¼-inch (6-mm) thick. Pictured on.
CINNAMON AMARANTH PEACH SCONES
This version has a strong amaranth flavor when hot, but when cool, the scones taste complex and nutty.
Omit the millet flour and substitute ½ cup (65 g) amaranth flour, adding 1 teaspoon ground cinnamon along with the flours. In place of the berries, use 1 cup (150 g) sliced ripe but firm peaches or nectarines. Sprinkle the tops of the cream-brushed scones with 1 tablespoon (10 g) organic granulated cane sugar mixed with ¼ teaspoon ground cinnamon.
ORANGE CURRANT CREAM SCONES
Classic, with a bit of brightness. Serve these with a bit of clotted cream, honey and a pot of Earl Grey.
Add the finely grated zest from 1 small orange to the dough along with the butter. When the butter is worked in, add in ⅓ cup (55 g) lightly packed, plump dried currants. Omit the vanilla, berries and additional sugar, form the dough into one 6-inch (15-cm) diameter round rather than two and proceed with the recipe.
A FEW TIPS FOR SCONE SUCCESS
✵ When making scones, keep your ingredients and dough cool. Scone dough is similar to pie dough in that small pebbles of butter not fully incorporated into the dough add flake to the finished product. Make sure your butter is cold to start with, work quickly and chill the dough as directed and more often if your kitchen is on the warm side.
✵ How much cream you add is dependent on several factors: how much you’ve worked in the butter, how warm it is in your kitchen (i.e., how soft the butter has become), the humidity in the air and the way you’ve measured your flours. I always need the full ¾ cup (180 ml), but other testers needed only a scant ½ cup (120 ml). Add the cream mixture slowly, tossing with a spatula as you go, and stop when the dough holds together when you grab a handful and squeeze, and there are no dry, floury bits in the bottom of the bowl.
✵ Wheat scones need barely a squeeze to bring the dough together, but this gluten-free dough likes a bit of assertive kneading in the bowl to help it adhere due to the absence of sticky glutens or gums. Once the dough is properly saturated, give it a good firm kneading in the bowl until it forms a sturdy ball.
✵ Scones’ bottoms tend to darken rapidly when baking, so always stack two baking sheets on top of each other, line with parchment and bake in the upper third of the oven.
✵ Do ahead: The dough can be made, shaped and refrigerated airtight overnight. Cut, unbaked scones can be frozen for longer storage and baked to order from frozen at 375°F (190°C) for about 20 minutes.
BLUEBERRY CORN FLOUR MUFFINS

{SWEET RICE, CORN, OAT}
These pillow-soft muffins are threaded with the warm flavor of corn flour, which soaks up moisture from juicy blueberries while keeping the batter delicate and tender. They’re easy to throw together and even easier to love: sweet and cakelike, with some whole-grain oomph from nutty oat and corn flours. Be sure to use powder-fine corn flour and not cornmeal or polenta. If you come across fresh huckleberries (or wild blueberries), their tart flavor and small size make these even more addictive. In this case, decrease the amount of this intense fruit to 1 cup (170 g).
MAKES 12 MUFFINS
8 tbsp (113 g) unsalted butter, at room temperature
½ cup (100 g) organic granulated cane sugar
2 large eggs, at room temperature
½ cup plus 2 tbsp (95 g) sweet white rice flour
½ cup plus 2 tbsp (75 g) corn flour
½ cup (55 g) GF oat flour
1½ tsp (6 g) baking powder
½ tsp baking soda
½ tsp fine sea salt
½ cup (120 ml) well-shaken buttermilk
1 tsp vanilla extract
1½ cups (215 g) fresh blueberries, plus a handful for the tops
Coarse sugar such as turbinado or demerara, for sprinkling
Position a rack in the upper third of the oven and preheat to 350°F (175°C). Line a standard muffin pan with 12 paper liners. (Alternatively, skip the liners and grease the pans well with softened butter.)
In the bowl of a stand mixer fitted with the paddle attachment (or in a large bowl with a wooden spoon), beat together the butter and sugar until light and fluffy, scraping down the sides of the bowl occasionally, 2-3 minutes. Beat in the eggs one at a time; it’s okay if the mixture looks broken at this point.
Meanwhile, in a medium bowl, sift together the sweet rice, corn and oat flours with the baking powder, baking soda and salt. Stir together the buttermilk and vanilla in another small measuring pitcher or bowl.
With the mixer on low, stir in one-third of the flour mixture, stirring until just combined, then stir in half of the buttermilk mixture, stirring just until combined and scraping the bowl as needed. Continue until you’ve used up all the ingredients.
Remove the bowl from the mixer and use a flexible silicone spatula to gently fold in the berries. Divide the batter among the muffin cups, filling them nearly to the top (a #25 spring-loaded ice cream scoop makes this a snap). Sprinkle the tops with the coarse sugar and dot with a few extra berries.
Bake the muffins until their tops are golden and a toothpick inserted into the center of one comes out mostly clean with a few moist crumbs, 22-28 minutes, rotating the pan after 15 minutes for even baking. Let the muffins cool in their pan for 5-10 minutes, then remove to a cooling rack. Serve warm or at room temperature.
The muffins are best the day of baking but will keep, airtight at room temperature, for up to 2 days.
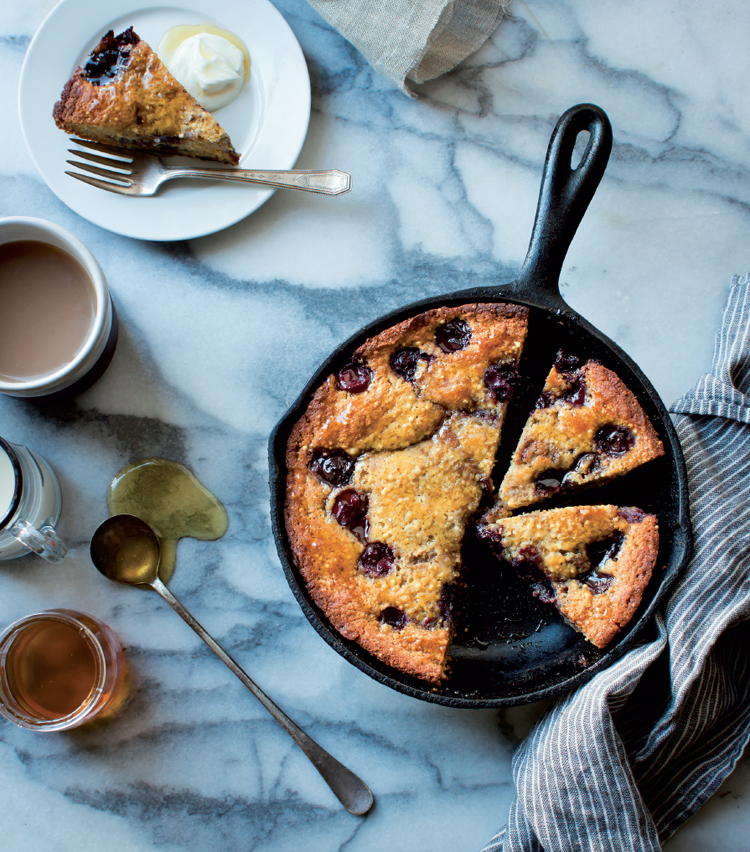
MILLET SKILLET CORNBREAD WITH CHERRIES AND HONEY
{CORN, SWEET RICE, OAT, MILLET}
This cornbread was inspired by a millet muffin from the best breakfast place I know of, Plow on Potrero Hill in San Francisco. If you’re lucky enough to grab a millet muffin, you’ll find it packed with whole millet seed kissed with butter and honey. For days when a simpler, homemade breakfast is in order, I stir together this easy batter studded with toasted millet seed and juicy sweet cherries. When cherries aren’t about, make this with 1 cup (115 g) blackberries in their place.
This recipe fits perfectly into an 8-inch (20-cm) cast-iron skillet, and the hot, buttered skillet makes the edges extra crisp and golden. However, it’s essential that you turn the bread out of the pan shortly after baking lest it pick up the metallic-tasting seasoning from the pan. You can also bake this in an 8-inch (20-cm) round cake pan; in this case, skip the pan-heating step, grease the pan with 1 teaspoon room-temperature butter and line the bottom with a round of parchment paper cut to fit. See the variation below for baking a double batch of this cornbread.
MAKES ONE 8-INCH (20-CM) BREAD, 6 SERVINGS
2 tbsp (20 g) uncooked whole millet seed
3 tbsp (42 g) unsalted butter
½ cup (80 g) yellow cornmeal (NOT polenta; preferably Arrowhead Mills GF Yellow Cornmeal)
¼ cup (40 g) sweet white rice flour
¼ cup (25 g) GF oat flour
2 tbsp (25 g) organic granulated cane sugar
½ tsp baking powder
½ tsp baking soda
⅜ tsp fine sea salt
1 large egg
2 tbsp (30 ml) honey, plus more for serving
½ cup (120 ml) well-shaken buttermilk
4 oz (115 g) pitted sweet cherries (1 cup) (frozen and not defrosted works, too)
Position a rack in the center of the oven and preheat to 375°F (190°C).
Place the millet seed in a small, dry skillet set over medium heat, and toast, shuffling the pan frequently, until the millet smells fragrant, pops a bit and takes on a bit of color, 2-4 minutes. Tip the millet into a large heatproof bowl to stop the cooking.
Place the butter in an 8-inch (20-cm) ovenproof skillet and place in the oven to melt while you prepare the batter, taking care not to let the butter burn.
In the large bowl containing the millet, whisk together the cornmeal, sweet rice and oat flours, sugar, baking powder, baking soda and salt to combine and eradicate clumps. Make a well in the flour mixture, crack in the egg and add the honey and buttermilk. Remove the hot pan from the oven, swirl the butter around the sides of the pan and pour the rest into the batter, whisking the batter vigorously just until well combined. Scrape the batter into the hot pan, spread into an even layer and dot the cherries evenly over the top; they will sink into the batter as it bakes. Bake the cornbread until golden on top and a tester inserted near the center comes out clean or with a few moist crumbs, 20-30 minutes.
Let the cornbread cool for a minute or two, then turn out of the pan and onto a plate or cutting board, invert again onto another serving board or plate, and let cool for at least 20 minutes and up to several hours; it is still baking from residual heat. Serve the cornbread warm or at room temperature. The cornbread is best the day of baking but will keep, airtight at room temperature, for up to 2 days.
VARIATION: MILLET SKILLET CORNBREAD {DOUBLE BATCH}
To feed a crowd, double all of the ingredients and bake the batter in a 9-inch (23-cm) square baking pan greased with 1 teaspoon room-temperature butter or a 10-inch (25-cm) cast-iron skillet, increasing the bake time to 30-40 minutes.
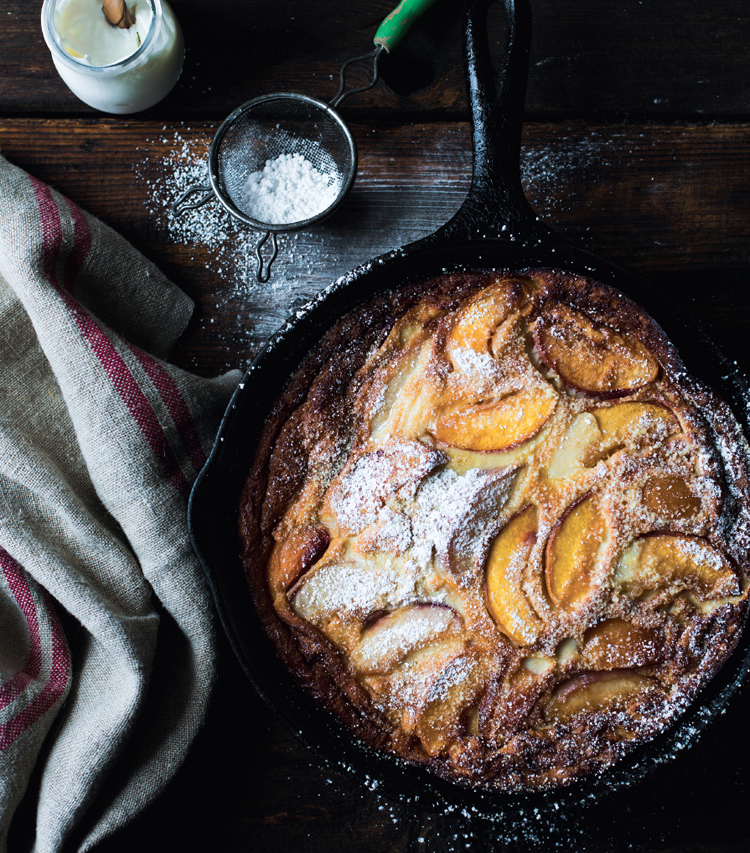
SORGHUM PEACH OYEN PANCAKE
{SORGHUM, SWEET RICE}
I call this an oven pancake, but the batter is really closer to a crepe, with a higher ratio of milk and eggs to flour that gives this baked breakfast a custardy texture not unlike the clafoutis on here and here. Sorghum flour has a mild, nutty flavor that pairs beautifully with floral honey and peaches, and it retains a bit of texture in the finished product that reminds me of the cream of wheat cereal my dad would make on cool mornings when I was growing up. You can either top slices with an extra drizzle of honey or go all out and sprinkle the whole thing with powdered sugar for a dramatic presentation. Mine always sticks to the bottom a bit, so don’t be alarmed if the first slice is difficult to get out of the pan; a thin metal spatula will unstick subsequent slices. If the batter separates a bit during baking, this is normal and doesn’t detract from the deliciosity of this pancake. For a quicker breakfast, make the batter the night before and refrigerate overnight; whisk to combine in the morning and proceed with the recipe. And feel free to trade in apricots, pitted cherries or nectarines for the peaches.
MAKES 4 SERVINGS
PEACHES
2 tbsp (28 g) unsalted butter
2 large peaches (about 14 oz [400 g] total), cut into ½-inch (1.3-cm) thick wedges (enough for a single layer in the skillet)
2 tbsp (30 ml) honey
PANCAKE
½ cup (60 g) sorghum flour
½ cup (80 g) sweet white rice flour
¼ tsp fine sea salt
3 large eggs
1 tbsp (15 ml) honey
1 tsp vanilla extract
1¼ cups (295 ml) whole milk
FOR SERVING (OPTIONAL)
Powdered sugar or honey
Whipped Cream, Crème Fraîche or plain Greek yogurt
Position a rack in the center of the oven and preheat to 400°F (200°C).
For the peaches, place the butter in a 10-inch (25-cm) ovenproof skillet with 2-inch (5-cm) high sides and place in the oven to melt, 2-3 minutes. Remove from the oven and swirl or brush the butter over the sides of the pan. Carefully add the peaches in a single layer to the buttery skillet and drizzle with the honey. Return to the oven and roast until the juices bubble thickly, about 15 minutes, turning the peaches once or twice.
Meanwhile, to make the pancake, in a large bowl, whisk together the sorghum and sweet rice flours with the salt. Add the eggs, honey, vanilla and a splash of the milk and whisk vigorously until very smooth. Gradually whisk in the rest of the milk until smooth. Alternatively, combine all ingredients in a blender and puree smooth. The batter will be very loose.
If the batter has separated, whisk to recombine, then pour the batter over the peaches in the hot skillet. Return to the oven and bake until the pancake is puffed, pale golden on top, deeply bronzed around the edges and cooked through, 25-35 minutes. Remove from the oven.
To serve, sprinkle all over with the powdered sugar, if desired. Cut the pancake into wedges with a sharp knife, then use a thin metal spatula to remove slices from the pan and onto plates. Optionally, top with whipped cream and honey if desired. Serve warm.
Leftover pancake keeps well, refrigerated airtight, for up to 3 days. Reheat before serving for best results.
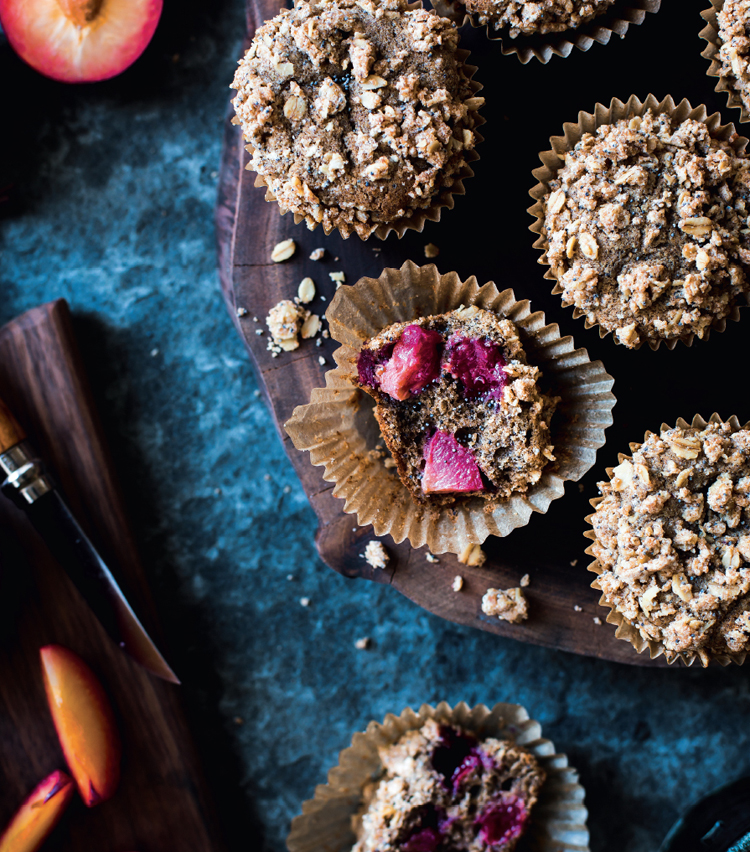
POPPY SEED, PLUOT AND BUCKWHEAT STREUSEL MUFFINS
{SWEET RICE, OAT, BUCKWHEAT}
These muffins are essentially coffee cake in individual form. Earthy buckwheat, oats, brown sugar and cinnamon set off sweet-tart bursts of pluot lodged within a moist and tender crumb crowned with sandy streusel. Pluots are a plum-apricot hybrid that are three-fourths plum and come with all of the plum’s sweet/tart/floral trappings but with a slightly firmer, sweeter flesh. That said, these muffins take well to variations, so try them with any summer berry or stone fruit, fresh figs or ripe chunks of pear in place of the pluots. The poppy seeds add a nice bit of crunch and depth of flavor, but the muffins will still explode with deliciousness should you decide to leave them out. Do be sure to press the streusel gently into the batter prior to baking to help it adhere.
MAKES 14 MUFFINS
STREUSEL
3 tbsp (42 g) cold, unsalted butter, cut into small pieces, plus 1 tsp for greasing the tops of the muffin tins
¼ cup (35 g) sweet white rice flour
2 tbsp (10 g) oat flour
1 tbsp (5 g) tapioca flour
½ cup (50 g) GF old-fashioned rolled oats
¼ cup (50 g) packed organic light or dark brown sugar
1½ tsp (4 g) poppy seeds
½ tsp ground cinnamon
¼ plus ⅛ tsp fine sea salt
MUFFINS
⅓ cup (80 ml) whole milk (or plant milk such as almond milk)
2 tbsp (15 g) poppy seeds
2 tsp (10 ml) vanilla extract
8 tbsp (113 g) unsalted butter, at room temperature
½ cup plus 2 tbsp (130 g) packed organic light brown sugar
2 large eggs, at room temperature
¾ cup (115 g) sweet white rice flour
½ cup (50 g) oat flour
¼ cup plus 2 tbsp (50 g) buckwheat flour
2 tsp (8 g) baking powder
½ tsp fine sea salt
9 oz (252 g) pluots (about 3), ripe but firm (1½ cups [252 g] pluot chunks)
Position a rack in the upper third of the oven and preheat to 350°F (175°C). Rub the tops of 2 standard muffin pans with the 1 teaspoon softened butter (this will prevent any overflow from sticking) and line with 14 paper liners. (Alternatively, skip the liners and grease the pans well with softened butter.)
To make the streusel, in the bowl of a stand mixer fitted with the paddle attachment, combine the sweet rice, oat and tapioca flours with the rolled oats, brown sugar, poppy seeds, cinnamon, salt and remaining 3 tablespoons (42 g) butter. Mix on medium-low speed until the butter is worked in and the streusel comes together in clumps, about 2 minutes. (Alternatively, rub the butter in with your fingertips.) Scrape the streusel into a small bowl and set aside; no need to wash the mixer bowl.
To make the muffins, in a measuring pitcher, stir together the milk, poppy seeds and vanilla and set aside. This will plump up the seeds a bit and draw out their unique flavor.
Meanwhile, in the now-empty bowl of the stand mixer (or in a large bowl with a wooden spoon), combine the butter and brown sugar. Beat on medium speed until light and fluffy, 3 minutes, scraping down the sides of the bowl once or twice. Add the eggs one at a time, beating to combine after each addition; the mixture may look broken at this point and that’s okay.
While the butter does its thing, sift the sweet rice, oat and buckwheat flours with the baking powder and salt into a medium bowl. When the eggs are incorporated into the butter, turn the mixer to low. Add one-third of the flour mixture, mixing to combine, then add half of the milk mixture, mixing to combine. Continue until you’ve used up all the milk and flour mixtures, scraping down the sides and bottom of the bowl as well as the paddle to make sure the batter is homogenous.
To prepare the pluots, use a sharp paring or serrated knife to cut the flesh off of the pits, then into ½- to 1-inch (1.3- to 2.5-cm) chunks; you should have 1½ cups of prepared fruit. Remove the bowl from the mixer and use a flexible spatula to gently fold in the pluot chunks until evenly distributed.
Use a tablespoon or spring-loaded ice cream scoop to divide the batter among the muffin cups, filling them nearly to the top and mounding them in the center, and making sure to include some pluot pieces in the last couple of muffins. Sprinkle the streusel over the muffins and press it in slightly. Bake the muffins until the tops are golden and a tester inserted into the center of one comes out clean or with a few moist crumbs, 22-32 minutes. Remove the muffins from the oven and let cool for 10 minutes, then carefully remove from the pans and let cool to warm or room temperature, at least 10 more minutes. Store airtight at room temperature for up to 2 days.
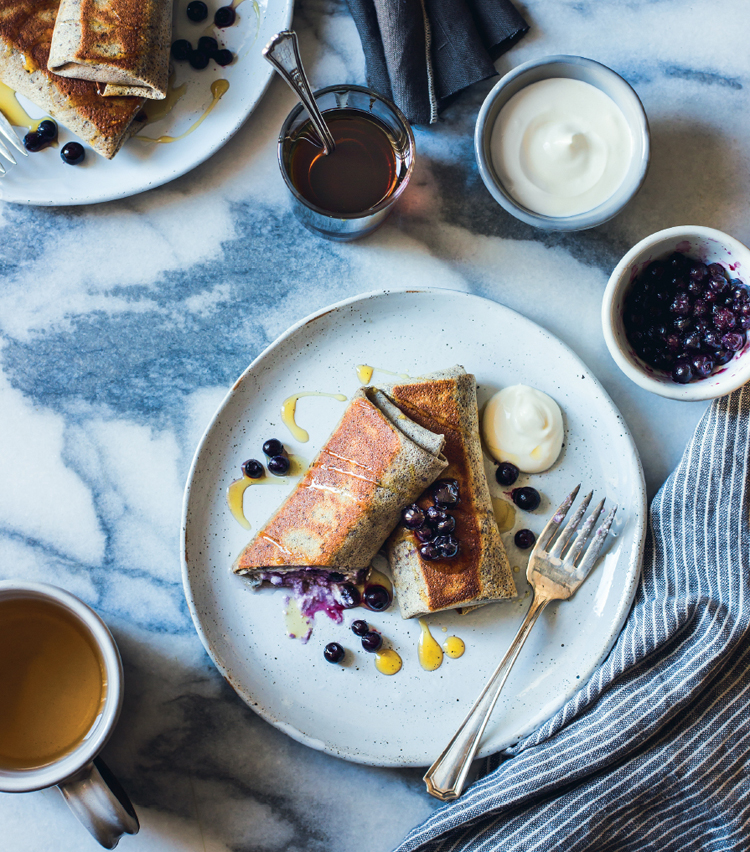
HUCKLEBERRY BUCKWHEAT CHEESE BLINTZES
{BUCKWHEAT, SWEET RICE}
My paternal grandmother, whom we called Bubba, made the best cheese blintzes—little parcels of lightly sweetened farmer cheese wrapped in soft crepes and fried in butter, which we would eat with sour cream and applesauce. Not exactly health food. But adding fresh berries and loads of buckwheat flour, and frying them in the thinnest layer of ghee, helps lighten these up. A drizzle of maple syrup is just the thing to add earthy sweetness, and I confess to liking a dollop of sour cream or Greek yogurt to up the creamy factor. Ghee is your friend for frying, as it has a high smoke point and warm flavor. Huckleberries, with their intense flavor and low water content, make an ideal filling, though wild blueberries work beautifully (and are often available frozen) as do cultivated blueberries. Assembled blintzes freeze brilliantly; to serve, just fry them on both sides over low heat until golden and heated through. Look for farmer cheese that’s like a firmer version of ricotta.
MAKES ABOUT 12 BLINTZES, 4-6 SERVINGS
BUCKWHEAT CREPES
1 cup (235 ml) whole milk
4 large eggs
1 tbsp (10 g) organic granulated cane sugar
¼ tsp fine sea salt
¾ cup (105 g) buckwheat flour
¼ cup (35 g) sweet white rice flour
1 tbsp (14 g) melted butter
FILLING
1 lb (450 g) farmer cheese
1½ tbsp (20 g) organic granulated cane sugar
1 egg yolk
Big pinch of salt (![]() tsp)
tsp)
1 tbsp (14 g) melted butter
¾ cup (100 g) fresh or frozen huckleberries (or wild blueberries)
FOR FRYING AND SERVING
2 tbsp (28 g) ghee or unsalted butter
Extra huckleberries
Maple syrup
Greek yogurt, sour cream or Crème Fraîche
To make the crepes, in a blender, combine the milk, eggs, sugar, salt, buckwheat flour and sweet rice flour. Blend on low to combine, scraping down the sides of the blender once or twice. With the motor running, blend in the melted butter. Pour the batter into a measuring pitcher or bowl and stick a spatula in there; you’ll need to stir the batter occasionally while cooking the crepes in order to incorporate the flecks of buckwheat that tend to sink to the bottom. Have a large plate by the stove on which to stack the cooked crepes.
To make the filling, in a medium bowl, stir together the cheese, sugar, egg yolk and salt. Quickly stir in the melted butter, then gently fold in the huckleberries.
To fry the crepes, heat an 8-inch (20-cm) crepe pan or skillet over medium heat, and use a scrunched-up paper towel to swipe it with a bit of ghee or butter. (Too much butter will cause the batter to slip as you swirl it to coat the pan.)
Pour a scant ¼ cup (59 ml) of batter onto the crepe pan, tilting, swirling and shuffling to coat it evenly with a thin layer of batter. Cook the crepe until just barely set on top, 30-60 seconds. Use a thin, metal spatula to ease the edges of the crepe up off the pan, then slide (or drag) the crepe onto the plate, cooked side down. It should be barely colored on the bottom.
Continue cooking the crepes, swiping the pan with a bit of butter between crepes, and adjusting the heat so that the pan doesn’t burn but the crepes cook in 30-60 seconds each.
To fill the blintzes, place 2½ tablespoons (38 g) of cheese filling on the lower third of a crepe and fold the bottom up over the cheese. Fold the sides in so that they just touch, then roll the blintz up from the filled end up to form a parcel—it should look something like an egg roll. Stack the filled blintzes on a plate.
When the blintzes have all been filled, melt some butter or ghee in your crepe pan over medium heat (or use another large skillet if you like). (Preheat your oven to 200°F [100°C] if you’re making these for a crowd and need to keep them warm while you fry the next batch.) Fry the blintzes until they are golden on the bottom, about 2 minutes, then flip and brown on the second side, another 2 minutes. Have the heat low enough so that the filling heats through without the bottoms burning.
Serve the warm blintzes with the berries, maple syrup and a dollop of yogurt.
Extra blintzes keep brilliantly, fried or unfried, in the refrigerator for up to 3 days or in the freezer for up to 2 months.
APPLE, BUCKWHEAT AND GRUYÈRE PUFF PANCAKE

{SWEET RICE, BUCKWHEAT, OAT}
My sole New Year’s resolution for the past five years has been “eat more dessert,” specifically, dessert made by someone else. I tend to eschew sweets when out and about, knowing there are usually goodies waiting for us back at home. But tasting what other cooks get up to in the kitchen is endlessly inspiring, thus the resolution. One January 1st, my request was answered. A few musician friends came over to welcome the New Year with tunes and comestibles. My friend’s mother, Barbara, who was visiting from the Provençal village in which she lives, brought over a tub of buttery, caramelized apples and a container of batter, which she put together and popped into the oven. We feasted on apple puff pancake laced with cinnamon and lemon, and Barbara kindly shared her recipe with me. Barbara often adds slices of Brie cheese to her pancake, which is pure genius.
Here, I’ve adapted Barbara’s recipe to work with alternative grains—oat flour for starchy sweetness, buckwheat for nutty flavor, and sweet rice for binding power—and added some cave-aged Gruyère (though sharp Cheddar or Brie work beautifully, too). The salty cheese sets off the sweet, caramelized apples brightened with lemon, the batter puffs up, forming a crackly crust that flakes as it cools, and if you’re like us, you’ll be stealing into the kitchen to sneak slices from the pan at all hours of the day—and year.
MAKES 4 SERVINGS
APPLES AND CHEESE
1 lb (450 g) tart, firm baking apples (such as Granny Smith; about 2 large or 4 medium)
4 tbsp (56 g) unsalted butter
¼ cup (25 g) organic granulated cane sugar
2 tbsp (30 ml) lemon juice
1 tsp ground cinnamon
⅛ tsp fine sea salt
3-4 oz (56-84 g) thinly sliced cave-aged Gruyère cheese (or sharp Cheddar or Brie)
BATTER
¼ cup (35 g) sweet white rice flour
¼ cup (30 g) buckwheat flour
¼ cup (25 g) GF oat flour
1 tbsp (12 g) organic granulated cane sugar
½ tsp fine sea salt
4 large eggs
1 cup (235 ml) whole milk
FOR SERVING (OPTIONAL)
Maple syrup or powdered sugar
Position a rack in the upper third of the oven and preheat to 425°F (220°C).
To prepare the apples, peel them, cut their flesh off the core, and slice them about ⅜-inch (1-cm) thick; you should have about 2¾ cups (412 g).
Melt the butter in a 10-inch (25-cm) ovenproof skillet (such as a well-seasoned cast-iron skillet) over medium-high heat. Add the apples and sprinkle with the sugar, lemon juice, cinnamon and salt. Cook, turning the apples occasionally with a metal spatula, until the apples are tender and their juices thicken, 8-10 minutes, decreasing the heat as needed.
Meanwhile, to make the batter, sift the sweet rice, buckwheat and oat flours with the sugar and salt into a large bowl. Whisk in the eggs 2 at a time, whisking until smooth, then gradually whisk in the milk to form a loose batter. If the batter is lumpy, strain it through a medium-mesh sieve. (Alternatively, throw everything in a blender and blend until smooth, about 1 minute.)
When the apples are cooked, give them a final stir, top them with the sliced cheese, and pour the batter over the top. Immediately transfer to the oven and bake until the pancake is puffed, golden and cooked through, 18-28 minutes, decreasing the oven temperature if the sides are browning too quickly and rotating the pancake halfway through for even baking.
Remove from the oven, cut into wedges, and serve hot or warm with maple syrup, if desired. Leftovers keep well, refrigerated airtight, for up to 2 days. Reheat in a 350°F (175°C) oven for best results.
NOTE: For a strictly sweet version, leave off the cheese and serve the pancake sprinkled with powdered sugar or drizzled with maple syrup and topped with a plume of Whipped Cream.
PUMPKIN CRANBERRY NUT AND SEED LOAF
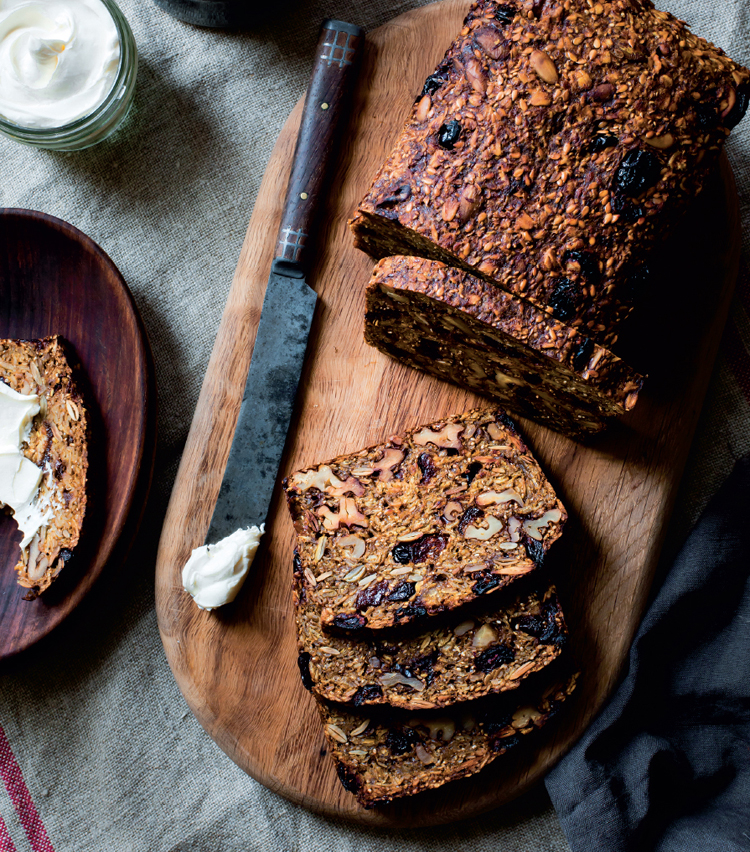
{OATS}
This loaf was inspired by the Adventure Bread made at Josey Baker’s The Mill in San Francisco, home of the infamous four-dollar toast. His adventure bread is packed with nuts, seeds and oats, held together by psyllium husk, chia seeds and flaxseeds, moistened with water, vegetable oil and maple syrup. Once you’ve sourced the ingredients (available in bulk at most health food stores), the bread is incredibly simple to mix up and bake. A loaf keeps, refrigerated, for up to 2 weeks. At first glance, the recipe seems impossible, as though it shouldn’t work; but mix it all up, let it rest for a few hours, and bake it and you’ll soon find yourself as hooked as I am.
I’ve updated Baker’s loaf with the fall flavors of pumpkin, cranberries, walnuts and pepitas, and a hint of warming spices. Slices are heavenly when toasted and spread with whipped cream cheese, but the bread isn’t so sweet that you couldn’t use it to make toasted cheese sandwiches or to wrap around slices of leftover Thanksgiving turkey.
MAKES ONE 9 BY 5-INCH (23 BY 13-CM) LOAF
1½ cups (175 g) raw walnut halves
1 cup (140 g) raw pumpkin seeds (pepitas)
2¾ cups (250 g) GF old-fashioned rolled oats
1 cup (145 g) dried cranberries
½ cup (90 g) flaxseeds
⅓ cup (30 g) psyllium husks
¼ cup (40 g) chia seeds
2 tsp (9 g) fine sea salt
¾ tsp ground cinnamon
½ tsp freshly grated nutmeg
1 (15-oz [425-g]) can unsweetened pumpkin puree
1 cup (235 ml) water
¼ cup (60 ml) maple syrup
¼ cup (60 ml) sunflower oil (or light olive oil)
Position a rack in the center of the oven and preheat to 325°F (165°C). Spread the walnuts and pumpkin seeds on a small, rimmed baking sheet and toast until golden and fragrant, shuffling the pan occasionally, 10-15 minutes. Remove from the oven.
Meanwhile, in a large bowl, stir together the oats, cranberries, flaxseeds, psyllium husks, chia seeds, salt, cinnamon and nutmeg to combine. Stir in the hot walnuts and pumpkin seeds. Add the pumpkin puree, water, maple syrup and sunflower oil and stir well with a sturdy wooden spoon or your hands to make sure the “dough” is moistened through and evenly distributed.
Line a 9 by 5-inch (23 by 13-cm) loaf pan on all sides with parchment paper and scrape the dough into the prepared pan, packing it in and rounding it slightly on top; it won’t rise in the oven. Cover tightly with a piece of plastic wrap and let sit at room temperature for 2-8 hours.
When ready to bake, preheat the oven to 400°F (200°C). Bake the loaf for 1 hour and 15 minutes; it will be deeply bronzed on top and feel firm to the touch. Let cool completely, at least 2 hours. The bread is best sliced fairly thinly and toasted well. It will keep, refrigerated airtight, for up to 2 weeks.
TART CHERRY, CHOCOLATE AND HEMPSEED NO-BAKE OAT BARS {VEGAN}
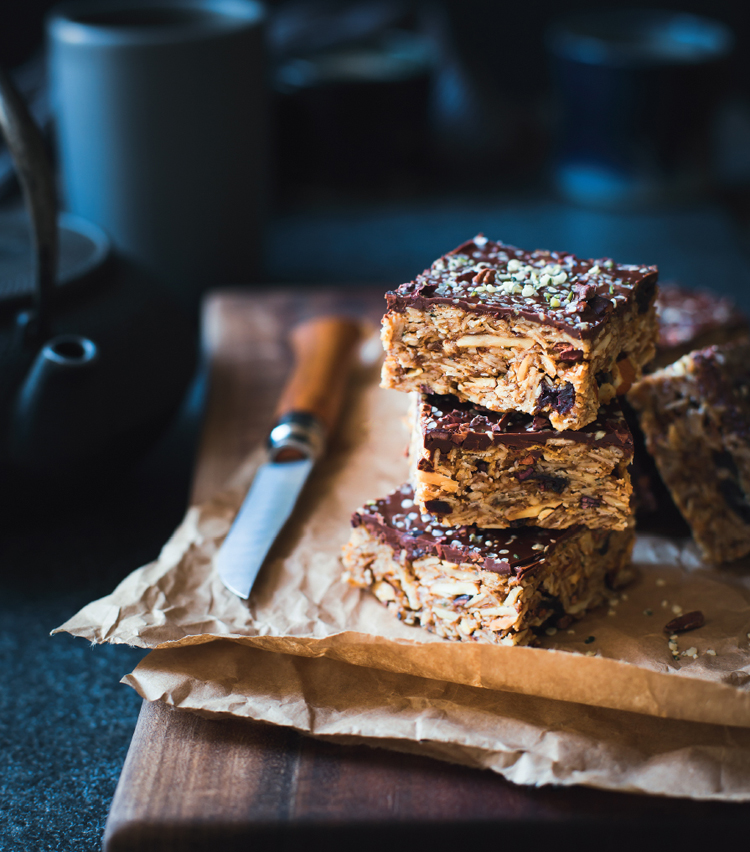
{OATS}
My mom, who’s a bit of a health nut (understatement), used to disparage an ex by saying, “He ate COOKIES for BREAKFAST!” as if there were no worse crime. Call me rebellious, but I’m a fan of cookies for breakfast, particularly if there’s chocolate involved, and that’s essentially what these no-bake granola bars are.
I always assumed no-bake bars were inferior to the baked variety, but Laura of the blog Tutti Dolci changed my mind when she mixed hers up with plenty of almond butter and topped them with a smear of salted chocolate. I like mine with a dose of dried tart cherries, buttery hempseeds and crunchy cacao nibs, though feel free to switch up the nuts, seeds and fruit as you see fit; the recipe is quite forgiving. If you’re anything like me, you’ll find yourself dipping into your stash … any time of day.
MAKES 16 SMALL BUT RICH BARS
BARS
1 cup (235 ml) smooth, unsalted almond butter (preferably at room temperature, stirred if separated)
½ cup (120 ml) maple syrup
2 tsp (10 ml) vanilla extract
¼ tsp fine sea salt
2½ cups (225 g) GF old-fashioned rolled oats
½ cup (55 g) unblanched sliced almonds
½ cup (70 g) dried tart cherries (or cranberries)
¼ cup (30 g) hulled hempseeds
¼ cup (30 g) cacao nibs
TOPPING
1 tbsp (15 ml) extra-virgin coconut oil
¾ cup (130 g) chopped bittersweet chocolate
Flaky salt such as Maldon, cacao nibs and hempseeds, for sprinkling
To make the bars, in a large bowl, whisk together the almond butter, maple syrup, vanilla and salt until smooth. Set aside.
Place the oats in a wide, heavy-bottomed skillet set over low heat and toast until golden and fragrant, 8-12 minutes, stirring frequently. Pour the warm oats into the bowl with the almond butter mixture. Wipe out the skillet and add the almonds, toasting over low heat and stirring frequently until golden and fragrant, 4-6 minutes. Add the almonds to the bowl with the oats, then add the dried cherries, hempseeds and cacao nibs. Use a flexible spatula to fold the mixture until well combined. Let sit until cool enough to handle, 5-10 minutes.
Line an 8-inch (20-cm) square pan with a sling of parchment paper, leaving an overhang on each side to use as handles. Scrape in the oat mixture and use damp hands to pack the mixture firmly into an even layer.
To make the topping, place the coconut oil and chocolate in a small saucepan and set it over the lowest possible heat, stirring constantly with a heatproof silicone spatula until the chocolate is melted and smooth. Pour the melted chocolate over the bars, and tilt the pan gently to coat it in an even layer; there will be just enough. Sprinkle the top with a few small pinches of flaky salt and several large pinches of cacao nibs and hempseeds. Chill the bars until firm, at least 2 hours and up to 1 day.
Loosen the edges of the bar with a small, offset spatula or the tip of a knife, and use the parchment handles to lift it up and out of the pan and onto a cutting board. Use a large, sharp chef’s knife to cut 16 squares.
Store the bars airtight in the refrigerator; they will soften if left at room temperature. They are crispest on the day of making but will keep well for up to 5 days.
NOTE: Natural nut butters often come with a slick of oil at the top of the jar, so be sure to give yours a good stir before you get started measuring.
ROASTED BANANA TEFF SCONES WITH MUSCOVADO SUGAR GLAZE
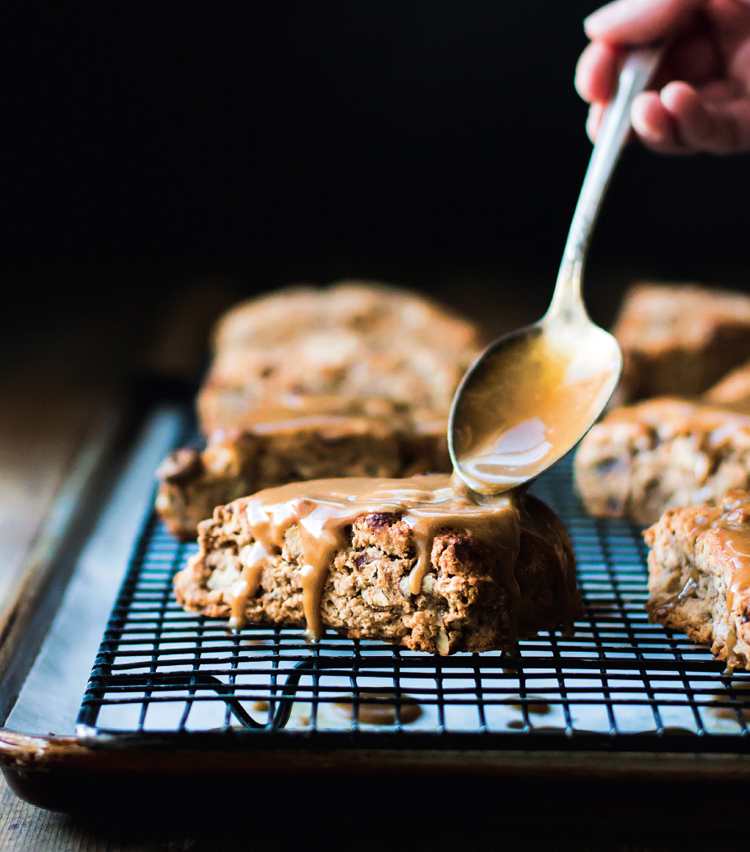
{SWEET RICE, TEFF, OAT}
These decadent scones are filled with the malty flavors of teff flour, molasses and roasted banana, with toothsome heft from whole grains and pecans. The scones themselves are minimally sweet to contrast a butterscotch-y muscovado sugar glaze that was inspired by a recipe from the West Oakland brunch spot Brown Sugar Kitchen.
MAKES 8 SCONES
ROASTED BANANAS AND PECANS
3 large bananas (1¼ lb [570 g] in peel)
2 tbsp (25 g) packed light or dark muscovado sugar (or organic brown sugar)
1 tbsp (14 g) unsalted butter
¾ cup (90 g) raw pecan halves
SCONES
1 cup (155 g) sweet white rice flour
¾ cup (100 g) teff flour, plus more for shaping the scones
¼ cup (25 g) GF oat flour
2 tbsp (25 g) packed light or dark muscovado sugar (or organic brown sugar)
1 tbsp (15 g) baking powder
½ tsp fine sea salt
5 tbsp (70 g) cold, unsalted butter, sliced
½ cup (120 ml) cold, heavy cream, plus another 1-7 tbsp (15-105 ml), as needed
1 large egg
1 tsp vanilla extract
GLAZE
¼ cup (25 g) organic powdered sugar
3 tbsp (45 ml) heavy cream
1 tbsp (14 g) unsalted butter
¼ cup (50 g) packed light or dark muscovado sugar (or organic brown sugar)
½ tsp vanilla extract
⅛ tsp fine sea salt
Position a rack in the upper third of the oven and preheat to 400°F (200°C). To prepare the bananas and pecans, peel the bananas, slice them into ½-inch (1.3-cm) rounds, and place them on a small baking sheet lined with parchment paper for easy cleanup. Sprinkle with the muscovado sugar and dot with the butter. Roast in the oven until the bananas are golden and tender, 20-30 minutes, flipping them once halfway through roasting and being gentle with them so they stay intact. Remove from the oven, immediately scrape into a shallow, heatproof bowl, and refrigerate until completely chilled, at least 20 minutes. Lower the oven temperature to 350°F (175°C). Spread the pecans on a small, rimmed baking sheet and toast in the oven until fragrant and crisp, 8-10 minutes. Let cool completely, then break up into rough quarters.
Meanwhile, to make the scones, in a large bowl, combine the sweet rice, teff and oat flours with 2 tablespoons (25 g) muscovado sugar, baking powder and salt. Add the butter and blend with a pastry cutter or your fingertips until the butter is broken down into the size of small peas. Chill this mixture until cold, 15-30 minutes. In a measuring pitcher, whisk together the ½ cup (120 ml) cream, egg and vanilla and refrigerate until needed. Increase the oven temperature to 425°F (220°C). Stack a rimmed baking sheet atop a second rimmed baking sheet and line with parchment paper (this will keep the bottoms from over-browning).
Add the cooled pecans and bananas to the butter/flour mixture and toss gently to combine. Gradually add the cream mixture, working with a flexible silicone spatula until the dough holds together when you give it a squeeze; you may need to add 1-6 tablespoons (15-90 ml) more cream to properly hydrate the dough. Knead the dough 20 or so times in the bowl to form a ball; unlike wheat scones, these gluten-free scones require more kneading to bring the dough together, so don’t be shy. Cover and refrigerate the dough for 15 minutes or up to several hours.
Place the dough on a board dusted lightly with teff flour. Dust the top of the dough round lightly with more teff flour, and use clean, dry hands to pat it into a 7-inch (18-cm) round, 1¼ inches (3 cm) high. Use a sharp chef’s knife to cut the round into 8 wedges, and use a thin metal spatula or bench scraper to transfer the scones to the lined baking sheet, spacing them 3 inches (7 cm) apart. Brush the tops of the scones with 1 tablespoon (15 ml) cream. Bake the scones until deeply golden and firm to the touch, 18-25 minutes. Remove from the oven and let cool until barely warm; they are still cooking from residual heat.
While the scones bake, make the glaze. Sift the powdered sugar into a small bowl and set aside. In a small saucepan placed over medium-low heat, melt together the cream, butter, muscovado sugar, vanilla and salt to dissolve the sugar, stirring occasionally, 3 minutes. Pour the hot cream mixture into the powdered sugar and whisk smooth. Let cool to a spreadable consistency, 30-60 minutes. Spoon and spread the glaze over the cooled scones and let it set for 20 minutes or so to firm. These are the best the day of baking, but extras keep for 1-2 days.
MAPLE ORANGE AMARANTH GRANOLA
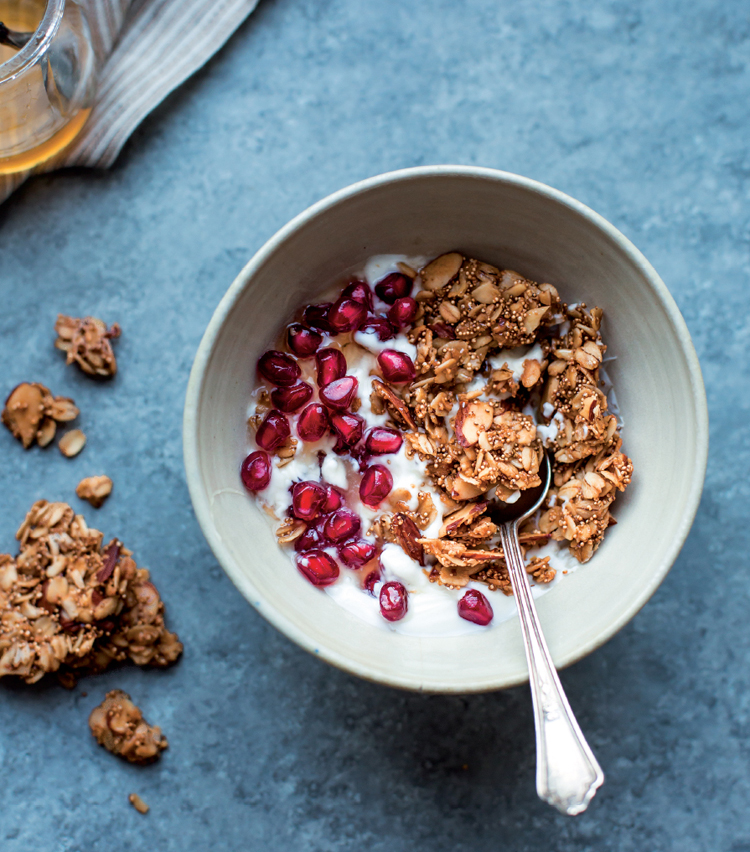
{OATS, AMARANTH}
Homemade granola is worlds away from the store-bought stuff; even expensive brands tend to taste stale and rancid compared to fresh-baked. This granola tastes like a big, crunchy oatmeal cookie studded with bits of crispy popped amaranth that gives the granola a toasty flavor reminiscent of popcorn. A hot skillet and amaranth seeds are all you’ll need to make a bowl of tiny, popped grains; these tend to burn easily, so have extra on hand just in case. The maple, orange and vanilla create a bright, floral flavor not unlike the honey that was traditionally mixed with amaranth by the ancient Aztecs for use in religious rituals. But maple keeps the granola crisper than does honey, which is hygroscopic (which means that it grabs moisture from out of the air), thus maple is a better choice for granola. Either way, a bowl of this crunchy cereal topped with fresh fruit and good yogurt or almond milk is a religious experience.
You’ll need two rimmed baking sheets that stack and a couple of pieces of parchment paper to bake this granola. Spreading the uncooked granola into the pan in a thin layer, then covering it with parchment and a second sheet pan, eliminates the need to stir the granola as it bakes, and it ensures fat clusters that clump, almost like a thin granola bar. The salt level here seems high, but it ensures full-flavored granola. Do be sure to use fine sea salt or kosher salt, not table salt or an unrefined salt with lots of ocean flavor. And do be sure to give the raw granola a good stir to evenly distribute the salt.
MAKES ABOUT 4 CUPS (600 G)
6 tbsp (70 g) whole, raw amaranth seeds
2½ cups (270 g) GF old-fashioned rolled oats
1 cup (110 g) unblanched, sliced almonds
¼ cup (40 g) maple sugar (or packed organic light brown sugar)
¼ cup plus 2 tbsp (90 ml) maple syrup
¼ cup plus 2 tbsp (85 g) melted, unsalted butter
¾ tsp fine sea salt (not table salt)
1 tsp vanilla extract
Finely grated zest from 1 large orange
Position a rack in the center of the oven and preheat to 325°F (165°C).
Heat a medium, heavy-bottomed skillet over medium heat until very hot (I use an 8-inch [20-cm] cast-iron skillet). Add 2 teaspoons (23 g) of the amaranth seeds and shuffle the pan so they’re in a single layer; they should begin popping immediately. Shake the pan frequently, every few seconds, and keep the amaranth in a single layer, until about half of the seeds have popped and the rest are golden in color. Tip these into a large bowl. Repeat until you’ve popped all the amaranth.
To the bowl of popped amaranth, add the oats, almonds, maple sugar, maple syrup, melted butter, salt, vanilla and orange zest. Stir very well to combine, making sure to evenly distribute the salt and amaranth seeds.
Scrape the mixture onto the lined baking sheet, and spread it into a thin sheet. Ideally, the edges will be slightly thicker than the center, as they will bake faster. Lay the second piece of parchment over the granola, and place the second sheet pan on top, right side up, making a little granola sandwich.
Slide the whole thing into the oven and bake for 20 minutes. Rotate and continue baking for 10-20 minutes for a total of 30-40 minutes, peeking under the parchment to make sure the edges aren’t burning, until the granola is a rich golden brown. It will still be soft, but should crisp up as it cools. If the granola is still soft after cooling, break it up and return it, uncovered, to a low oven (around 150°F [65°C]) and let it dry out for 20 minutes or so.
Let the granola cool completely in the sheet pan sandwich, 1-2 hours, then break up into large sheets or clumps and store in an airtight container for up to 1 month.
NOTE: To make this vegan, trade the melted butter for 5 tablespoons (75 ml) sunflower oil, melted coconut oil or light olive oil.