How to Bake Everything: Simple Recipes for the Best Baking - Mark Bittman (2016)
Savory Baking
If warm-from-the-oven chocolate chip cookies or dark, chewy brownies are among the first things that most of us bake, savory baked dishes may well be the recipes you become most passionate about, or at least the ones you turn to most often. Nourishing and open to endless interpretation, things like Baked Eggs, Pasta Frittata, or Scallion Pancakes can be quickly assembled on weeknights. Some, like Cheese Soufflé, Baked Brie, or Flaky Caramelized Fennel and Sausage Tart, can be readily dispatched for easy and impressive entertaining. And every pizza lover should try his or her hand at homemade (pages 544-554) to see how easy it is and have a field day with the toppings; like bread, this is something about which you can become downright obsessive.
The overriding rules here are no different from elsewhere in this book. In fact the key differences are that vegetables, cheeses, herbs, and spices take the place of sugar, fruit, and chocolate. A moderately stocked kitchen will be more than enough to prepare any of the recipes that follow. It should come as no surprise that variations and mix-and-match flavors are welcomed and nearly foolproof; most of these dishes are more like templates than commands, which means that whether you’re an avid baker or a novice, you will never run out of possibilities.
The Cheese Lexicon
Cheese is a reliable and classic staple of savory cooking (it also works spectacularly with many sweet flavors), and a slice of good cheese is such a sublime treat that it can take the place of dessert entirely or be served simply with homemade jam (page 575) and crackers.
Not too long ago, cheese selection was, for most of us, limited to not much more than supermarket versions of cheddar, “Swiss,” and Parmesan, none of which bear much if any resemblance to their original and true forms. Now the variety is staggering, perhaps slightly overwhelming at times; more and more grocery stores have a dedicated section, even a full counter with dozens of types of cheese from all corners of the globe. Almost all are made from cow’s, sheep’s, or goat’s milk (mozzarella di bufala, that divinely creamy mozzarella that you might see occasionally, comes from water buffalo).
As with many other ingredients, a good rule of thumb is to bake with cheeses you’d like to eat plain, because the best (and worst) attributes of any cheese you choose will likely show up in the finished product. There are other factors too—strength of flavor, firmness, graininess, the ability to crumble or melt—that determine which cheese will work best in which baking recipes, and the cheeses I suggest in each recipe and chart take all those characteristics into account.
In general, cheese is best bought in small quantities (with the exception of hard cheeses like Parmesan, which keep for months); soft, fresh cheeses especially don’t keep long, unless they’re mass produced, in which case they probably aren’t worth eating. Treat them as you would produce, buying them whenever inspiration strikes.
I’ve grouped the cheeses that follow by texture, since that’s usually the most important detail in baking. In general, you can swap cheeses from the same category: cheddar for Gouda, pecorino Romano for Parmesan, and so on, although the taste will be at least subtly different.
SOFT, CREAMY CHEESES
Tangy yet mild, these are baking powerhouses: you’re just as likely to see them whipped into a frosting or filling sweet pastries as you are to dollop them over pizza or serve with herbs or meat.
Ricotta The best ricotta has a pure, rich milky flavor and a consistency that borders on fluffy. Ricotta makes a phenomenal cheesecake (page 222) and enriches many other sweet batters, but also pairs naturally with mozzarella and even more assertively flavored cheeses. Some are looser than others; strain it through a fine-mesh sieve if it seems runny. Try to avoid the hyperprocessed tubs at the supermarket.
Fresh Goat Cheese (Chèvre) This usually comes in logs or disks that you can crumble as is, soften and spread, or whip. It goes well with honey and berries for a sweet application or herbs, caramelized onions, or meat for savory.
Cream Cheese Best known in baking as a frosting or the basis of a cheesecake, cream cheese is tremendously versatile: Whip it with fruit or spices to make pastry fillings, or add it to batters and doughs for a rich, creamy texture.
Mascarpone Perhaps my favorite of the creamy cheeses, with a mild, slightly sweet flavor that’s fabulous with fruit. If you can’t find it, you can generally substitute crème fraîche, sour cream, or thick yogurt.
SEMISOFT AND WASHED-RIND CHEESES
Mozzarella Freshly made mozzarella (which often comes packed in water or sometimes oil) can be made from the milk of a cow or water buffalo (that’s mozzarella di bufala) and is quite different from the drier, slightly aged brick kind available at supermarkets and delis. In fact, I rarely use the latter unless I must, and I never get the shredded kind that comes in bags. Fresh mozzarella should taste like milk, only with a little tang, and should never be rubbery or stringy. Snack on it, or combine it, raw or on pizza, with tomatoes and basil.
Fontina This cow’s milk cheese melts superbly and has a nutty, creamy flavor that’s a bit more assertive than mozzarella’s and as good for snacking as it is for baking; younger varieties are milder. (The best, the original, is Fontina Val d’Aosta.) Try swapping it for half of the mozzarella if you’d like a change.
Brie, Camembert, and Toma The first two are of French origin, while the third is Italian, but versions of all are now made in the United States, and some are really good—when in doubt, ask your cheesemonger. They’re all soft-ripened cow’s milk cheeses with a thick, white, slightly fuzzy edible rind. Triple-cream versions have higher fat, with the flavor of Brie and the texture of good butter. You won’t bake with them often, but of course the best ones are the perfect accompaniment to homemade breads, crackers, and fruit.
Taleggio This Italian cheese smells funky, so its mild, fruity flavor is a wonderful surprise. It’s phenomenal on pizza, bold enough to stand up to other toppings like kale, radicchio, or fruit, but excellent at blending in.
SEMIHARD CHEESES
These cheeses are firm but have a creamy texture, and the best of them melt smoothly without leaving behind a rubbery, stringy, or greasy mess. Grate them or thinly slice them for baking; they can be folded into fillings or scattered over flatbreads and pizzas.
Cheddar I prefer sharp cheddar cheeses, with at least a little bit of age on them, because these are more flavorful and melt better. If you can’t get your hands on a true English Cheddar, there are now some good ones made in the States.
Swiss-Style Cheeses (“Swiss,” Gruyère, Emmental, Comté) Although each of these is unique, I’m grouping them together here because they share a velvety texture when melted and a complex, nutty taste that makes them good choices for combining with other ingredients. They are especially good options for a quiche or vegetable tart.
Gouda Like Swiss, you can think of Gouda as an umbrella term for the wide range of varieties made in the style of this Dutch cheese. Typically made with cow’s milk, you can also find goat or sheep varieties; all share a characteristic salty but mild flavor that makes it one of the most popular types of cheese. Some versions are smoked, which adds another dimension of flavor. And the aged varieties are sharper. A good choice for sweet recipes; it’s a savory complement to most fruits.
Provolone The flavor of this smooth cow’s milk cheese varies greatly, from sweet to sharp, depending on how it’s been aged. At its best, it’s somewhat reminiscent of Parmesan. Great on pizza.
HARD CHEESES
These cheeses are, in a sense, easiest to use: because they’re dry, they can be grated very finely and blend seamlessly into batters and doughs, they melt on virtually anything, and they can be sprinkled directly over dishes about to go into the oven. They also have a powerful impact, so you can hardly go wrong. Use a Microplane to get an almost snowlike fineness, use a grater for larger shreds, or shave with a vegetable peeler.
PARMESAN If I could have only one cheese, this would be it. I cannot emphasize how important it is to spring for the real thing—Parmigiano-Reggiano—which is imported (only) from Italy and sold virtually everywhere nowadays. Look for a waxy rind marked with the name in pinhole-punched lettering. With a complex nutty flavor and a slightly grainy but almost buttery texture, you’ll reach for this cheese all the time. A decent substitute is grano padano. But Parmesan is truly unique.
PECORINO ROMANO A sheep’s milk cheese from Italy with a salty, sharp funk; it has a similar texture to Parmesan and can be used for nearly all of the same things; the flavor, however, is much stronger. Preferable in some instances.
MANCHEGO A Spanish sheep’s milk cheese with a black rind. It’s firm but buttery, nutty but sharp, sweet but sour. Excellent on crackers, flatbreads, and for an unusual pizza topping. Pairs well with fruits, especially figs, grapes, and quince paste.
CRUMBLY CHEESES
As wonderful as these cheeses are uncooked, they’re excellent for baking because they retain most of their original texture but soften slightly rather than melt, so each bite is packed with flavor. Crumble them with your fingers or a fork and fold them into fillings and doughs or scatter on top of open-faced pastries, pizzas, and flatbreads.
FETA Although many that you’ll find at the supermarket are packed in airtight plastic, I prefer to buy this Greek cheese stored in brine. Traditionally it’s made with sheep’s milk and sometimes goat’s milk, although cow’s milk varieties are now ubiquitous. The flavor is fresh and milky with salty rather than sharp notes, and the texture is dry and crumbly. If the feta you buy is too salty for you, try another variety (some are quite mild) or rinse the cheese and pat it dry before using it.
RICOTTA SALATA White, milky, buttery, and slightly nutty. Usually made from sheep’s milk, this dense cheese is generally more complex and less salty than most feta.
QUESO FRESCO (QUESO BLANCO) The most common cheese in Mexico, this snow-white fresh cheese crumbles into relatively fine, milky-tasting bits. It’s salty but doesn’t have a lot of flavor on its own; add it for texture and color.
BLUE CHEESES There are so many kinds—Gorgonzola (Italy), Roquefort (France), Cabrales (Spain), Stilton (England), and Maytag (America), just to name a few. For many, blue-veined cheeses (which intentionally cultivate harmless but flavorful molds) and their funky pungency are an acquired taste, but I love them. There’s a ton of variation in texture, creaminess, and sharpness, so ask your cheesemonger or taste around. Blue cheese dominates, so it’s especially important to use it—for breads, crackers, or savory shortbread—where you want it to have the spotlight. As prominent as it can be, it pairs beautifully with fruit, like grapes, and jams or marmalades (pages 574-575).
How to Prep Any Vegetable for Savory Baking
Most vegetables need at least a little bit of preparation before they’re scattered over crusts or folded into custards. Here are my favorite ways to prepare most of them for baked recipes. Use your own judgment and taste as a guide and err on the underdone side since the vegetables will soften a little more as your dish bakes. In all cases, cool them slightly before combining with eggs and follow the guidelines in the specific recipe for how much you can get away with adding.
ARTICHOKE HEARTS
Boil, steam, or sauté until tender.
ASPARAGUS OR GREEN BEANS
Use raw if very young or thin; if not, they can be blanched, steamed, sautéed, or roasted.
BEETS
Peel if you like; cut into wedges, then roast until tender.
BELL PEPPERS OR MILD CHILE PEPPERS
Chop, discard seeds, and use raw, roast, or sauté for a minute or two to soften.
BROCCOLI, CAULIFLOWER, OR BROCCOLI RABE
Chop into small florets; discard tough stems or thinly slice them. Roast until the edges turn brown or steam until tender.
BUTTERNUT, ACORN, DELICATA, PUMPKIN, OR OTHER WINTER SQUASH
Peel, cut in half to scoop out seeds and pulp, and cut into cubes, wedges, or chunks. Steam or roast until tender.
CABBAGE (RED OR GREEN), BRUSSELS SPROUTS, OR RADICCHIO
Remove any tough or damaged exterior leaves and trim the tough core. Cut into manageable chunks and roast or sauté until tender but still crisp.
CARROTS OR PARSNIPS
Peel if you like. Steam or roast just until tender but not soft.
CORN
Scrape the kernels from the cob and use raw or steam, roast, or grill whole cobs and then remove the kernels.
DARK LEAFY GREENS (KALE, SPINACH, WATERCRESS, CHARD, AND THE LIKE)
Tender baby greens can be added raw. Otherwise, remove tough stems and use the leaves whole or chopped. Sauté in a bit of olive oil or blanch them (boil for about 1 minute, until tender, then plunge into a bowl of ice water to stop the cooking). Drain off any excess liquid and coarsely chop.
EGGPLANT
Peel if you like and cut into small cubes or slices. Sauté, roast, or grill until tender with no dry spots.
FENNEL
Trim fronds and stalks. Thinly slice the bulb and use raw or cut into wedges and roast until tender and slightly browned in parts.
LEEKS
Thinly slice the white and light green parts only; these get notoriously full of dirt or sand, so rinse them carefully. Sauté until soft.
MUSHROOMS
Remove tough stems. If you like, cut the caps into slices or smaller pieces. Sauté or roast in a little butter or olive oil.
ONIONS OR SHALLOTS
Chop or slice and sauté until soft. To caramelize—which gives a complex, sweet flavor and jammy consistency—continue to cook over low heat, stirring often, until they’re very soft and lightly browned, at least 20 minutes. The longer you let them cook, the sweeter and more “melted” they’ll be.
PEAS
Use raw, steam, or blanch.
POTATOES AND SWEET POTATOES
Peel if you like. Boil or cube and roast until you can easily pierce with a fork.
SUMMER SQUASH AND ZUCCHINI
Cut into thin slices; use raw, steam, sauté, roast, or grill.
TOMATOES
Use raw, chopped fresh tomatoes, preferably seeded, or drained canned tomatoes. If you like, combine with a bit of butter or oil and cook until they’ve thickened and reduced a bit, or roast until the skin is a bit shriveled.
Eggs
As fundamental as eggs are in so many sweet baked recipes, they become an elegant centerpiece as savory baked custards, soufflés, and quiches—dishes that are every bit as variable, doable, and rewarding as their sweet counterparts.
If you’ve ever made an omelet or a frittata, you know that it’s absurdly easy to customize egg dishes, and these are no different. Once you’ve nailed down the basic techniques, anything goes, and that’s the fun of it. Many of the recipes are so simple that children can make them; for others you may need one or two tries before you nail the presentation, but what you lack in style points you’ll make up in flavor, texture, and satisfaction. There are few joys as basic and gratifying as feeding yourself with the elemental egg and making the many recipes that showcase it.
Recipes
Baked Eggs
Savory Baked Custard
Green Pea and Parmesan Baked Custard
Cheese Soufflé
Spinach Soufflé
Pasta Frittata
Cheese Quiche
Baked Eggs
Makes: 4 servings
Time: 30 minutes
The texture of baked eggs cannot be duplicated by any other method. This is one of the best ways to cook eggs for a crowd since it’s easy to multiply and the eggs finish cooking at the same time; just plan on one ramekin per serving.
Before baking, you can top eggs with bread crumbs, grated cheese, minced fresh herbs, or a sprinkle of your favorite spice blend—alone or in combination. And you can put basically anything into the cup before adding the egg, which makes this an easy way to use up leftovers. Try the simple options from the list below or any of the additions to Savory Baked Custard and Green Pea and Parmesan Baked Custard and their variations. Depending on the addition, you may need to cook the eggs for a couple minutes more.
- Butter or oil for greasing
- 4 tablespoons cream (optional)
- 4 eggs
- Salt and black pepper to taste
1. Heat the oven to 375°F. Smear a bit of butter or oil into 4 custard cups or small ramekins to coat the inside. If you’re using the cream, put 1 tablespoon in the bottom of each cup. Break 1 egg into each cup, then sprinkle each with salt and pepper. Arrange the cups on a baking sheet.
2. Bake the eggs for 10 to 15 minutes or until the eggs are just set and the whites solidified. Because of the heat retained by the cups, these will continue to cook after you remove them from the oven, so it’s best to undercook them slightly (the precise time, in a good oven on a middle rack, is 12 minutes). Serve right away.
BAKED EGGS WITH TOMATO Omit the cream. Before adding the eggs to each cup, put a tablespoon or 2 of chopped fresh tomato (or a slice of tomato if it will fit) in the bottom. Sprinkle the eggs with torn fresh basil leaves, grated Parmesan, and bread crumbs before baking.
BAKED EGGS BENEDICT Omit the cream. Split and toast English muffins (figure about ½ muffin per cup), then cut or tear them to fit at the bottom of each greased cup. Top each with a layer of Canadian bacon or good-quality ham, then the eggs. Bake as directed, then garnish with hollandaise sauce.
12 Easy Baked Eggs
Put a small spoonful of any of these fillings at the bottom of each cup, instead of or in addition to the cream, to make a “bed” for the eggs; the sky’s the limit with these, so think of this as merely a jumping-off point:
- Caramelized onions and crème fraîche (Greek yogurt will also work)
- Tomato sauce (see page 550 for two dead-simple homemade versions) with cooked white beans or chickpeas and dried or minced fresh oregano
- Spinach or kale, sautéed with minced fresh garlic
- Fried rice or cooked rice, quinoa, or farro
- Sautéed mushrooms with chopped cooked bacon or pancetta and thyme
- Toasted or grilled bread or corn bread
- Roasted potatoes, sweet potatoes, or winter squash
- Curried braised lentils
- Refried beans or any beans, mashed, puréed, or not, with cheese; garnish with salsa
- Ricotta cheese mixed with pesto
- Chopped pitted olives and feta
- Cooked white or brown rice and 1 teaspoon soy sauce; garnish with roasted seaweed
Savory Baked Custard
Makes: 4 to 6 servings
Time: 45 minutes
Flavored with nothing more than herbs and salt, this baked custard is as sublime as it is simple. The texture is velvety and homey—this is grown-up nursery food. To add vegetables and cheese, see the variations. You can cook this in one large (1-quart) soufflé dish, but it works much better in several smaller dishes and takes half the time.
- 2 cups cream, half-and-half, or milk
- 1 sprig fresh thyme or rosemary
- 2 eggs, plus 2 yolks
- ½ teaspoon salt
1. Put the cream and thyme or rosemary in a small pot over medium heat. Cook just until it begins to steam.
2. Heat the oven to 300°F and put a kettle of water on to boil. Put the eggs, yolks, and salt in a medium bowl and beat until blended. Remove the herb sprig and add the cream gradually to the eggs while whisking constantly. Pour the mixture into 4 to 6 small ramekins or custard cups.
3. Put the ramekins in a baking pan and pour hot water into the pan to within about 1 inch of the top of the ramekins (see illustration). Bake for 30 to 40 minutes, until the mixture is not quite set; it should jiggle a bit in the middle. Use your judgment; cream sets faster than milk. Serve warm, at room temperature, or cold, ideally the same day. Cover with plastic wrap and store in the fridge for no longer than 2 days.
BAKED CHEESY CUSTARD A cheese that melts easily is best here: Add ½ cup finely grated Parmesan, Emmental, Gruyère, cheddar, or Jack or use goat cheese; stir into the heated cream until melted. If you like, add a pinch of cayenne or a dash of hot sauce to the eggs in Step 2.
BAKED CUSTARD WITH ROASTED GARLIC Subtle and sweet: Add 4 to 8 cloves roasted garlic, peeled and smashed into a paste, to the egg mixture. To roast the garlic: Without breaking them apart, remove as much of the papery coating as you can from 1 or 2 heads of garlic. Cut the top pointy part off the head to expose a bit of each clove. Film a small baking dish with a little olive oil and add the garlic. Drizzle the garlic with olive oil and sprinkle with salt. Cover with aluminum foil and bake at 375°F until the garlic is soft (you’ll be able to pierce it easily with a thin-bladed knife), 40 minutes or longer.
BAKED KALE CUSTARD Any cooked green works well, but kale is particularly nice (be sure to squeeze out the excess water): Add ½ cup chopped cooked kale to the egg mixture, with a sprinkling of nutmeg if you like.
BAKED MUSHROOM CUSTARD Before Step 1, put 1 tablespoon butter in a medium skillet over medium-high heat. When it melts, add 2 tablespoons finely chopped shallot and cook until softened, about a minute. Add 2 cups (about 8 ounces) chopped shiitake, cremini, or button mushrooms and cook until tender, about 5 minutes. Lower the heat a bit, pour in the cream, add the thyme or rosemary, and proceed with the recipe.
Green Pea and Parmesan Baked Custard
Makes: 4 servings
Time: 45 minutes
This savory custard is a celebration of spring. Peas, paired with their trusty sidekicks Parmesan and mint, add a mild sweetness and a beautiful green hue. You can use any vegetable purée you like to make custards, not just pea; see the list below for ideas.
- 2 cups fresh or thawed frozen green peas
- 2 cups cream, half-and-half, or milk
- ½ cup freshly grated Parmesan cheese
- 3 eggs, plus 3 yolks
- 2 tablespoons chopped fresh mint leaves
- ½ teaspoon salt
1. If you are using fresh peas, steam or blanch them for just a couple of minutes, then plunge into an ice bath to stop the cooking. Combine all but ¼ cup of the peas with the cream in a pot and use an immersion blender to purée; or use a blender and then transfer the mixture to the pot. Cook the pea mixture just until it begins to steam. Add the Parmesan and stir until it melts.
2. Heat the oven to 300°F and put a kettle of water on to boil. Put the eggs and yolks, mint, and salt in a medium bowl and whisk or beat until blended. Gradually add the pea mixture to the egg mixture, whisking constantly, then add the reserved whole peas. Pour the mixture into four 8-ounce ramekins or a soufflé dish.
3. Put the ramekins or dish in a baking pan and pour hot water into the pan to within about 1 inch of the top of the dish or ramekins (see illustration). Bake for 30 to 40 minutes for ramekins, 20 to 30 minutes more for a dish, until the mixture is not quite set; it should jiggle a bit in the middle. Use your judgment; cream sets faster than milk. Serve warm, at room temperature, or cold within a few hours of baking.
Shrimp Chawanmushi A classic Japanese custard flavored with dashi (stock made from dried seaweed and bonito flakes). I love the addition of chopped shrimp for texture, but you could just as easily use chicken, tofu, or vegetables: To make the dashi, combine one 2-inch piece of dried kelp (kombu) and 2 cups water in a medium saucepan over medium heat. Just before the mixture comes to a boil, turn off the heat and remove the kelp (you can use it as a vegetable in stir-fries or salads if you like). Immediately add ¼ cup dried bonito flakes and stir; let sit for a couple of minutes, then strain and cool slightly. To make the chawanmushi, put 2 tablespoons roughly chopped raw shrimp in the bottom of four 8-ounce ramekins. Mix together the eggs and yolks, 2 cups dashi, 1 tablespoon soy sauce, 1 teaspoon mirin, and ¼ teaspoon salt, and pour the mixture through a fine-mesh strainer into a liquid measuring cup. Pour the mixture into the ramekins, and bake as directed in Step 3, for about 30 minutes. Garnish with chopped scallions.
12 Puréed Vegetables to Use in Savory Custards
Substitute about 2 cups of any of these cooked and puréed vegetables for the peas in the preceding custard recipe. Add the purée to the cream and reheat the mixture gently.
- Asparagus
- Spinach or other greens
- Tomato
- Zucchini or summer squash
- Mushrooms
- Roasted red peppers
- Eggplant
- Corn
- Leeks
- Onions
- Fennel
- Chestnuts
How to Customize Any Baked Egg Dish
Whether you’re making baked eggs, baked custard, or quiche, think of this as a choose-your-own-adventure guide to making them your own. As long as you don’t bog the eggs down with an absurd proportion of add-ins, you really can’t go wrong.
Mix with (or Place Under) the Eggs
▪ A tablespoon or so sautéed minced garlic, fresh ginger, or fresh chiles
▪ Ricotta, cottage cheese, or mascarpone
▪ Dijon mustard (up to a tablespoon)
▪ Hot sauce (a dash or 2)
▪ Chopped fresh herbs, like oregano, basil, thyme, or sage (up to ¼ cup)
▪ Soy sauce (up to a tablespoon) and/or fish sauce (up to a teaspoon); go easy on the salt
▪ Citrus zest (up to a tablespoon)
▪ Cooked pasta, grains, or beans
▪ Your favorite vegetables (see page 507 for suggestions on how to prepare them all)
▪ Chopped, cooked bacon, pancetta, or crumbled sausage
▪ Cooked meat, like chicken, turkey, or pork
▪ Flaked smoked fish
▪ Ground spices like cumin, cayenne, or chili powder (up to 1 teaspoon each)
▪ Reconstituted dried tomatoes, finely chopped
▪ Cubed or torn bread, preferably stale, like Ciabatta, Sourdough, or English Muffins
▪ Sliced or chopped cured meats like salami, prosciutto, or speck
▪ Chopped olives (kalamata, oil-cured, and Castelvetrano are all nice), capers, or caperberries
▪ A pinch of hot red pepper flakes
Sprinkle on Top Before Baking or Broiling
▪ Any grated or shredded hard or semihard cheese, like Parmesan, cheddar, or Gouda
▪ Any crumbled cheese, like feta, goat cheese, cotija, or blue
▪ Bread crumbs
▪ Chopped nuts
Cheese Soufflé
Makes: 4 to 6 servings
Time: About 1 hour
If you’ve ever had a soufflé, you know how impressive and delicious it is, lofty and both light and rich. What you might not know is how easy it is to bake; the trick is serving it as soon as it’s out of the oven, since it’ll start to “deflate” almost immediately (in which case it will be just as delicious and only a little bit less impressive). This makes one large soufflé or 4 to 6 individual soufflés in 1½- to 2-cup ramekins; the cooking time may be reduced by as much as half with the smaller dishes.
- 4 tablespoons (½ stick) butter, plus more for greasing
- ¼ cup flour
- 1½ cups milk, warmed until hot to the touch (about 1 minute in the microwave)
- 6 eggs, separated
- ½ cup freshly grated Parmesan cheese
- ½ cup grated or crumbled cheddar, Jack, Roquefort, Emmental, and/or other cheese
- Dash of cayenne
- Salt and pepper
1. Use a bit of butter to grease a 2-quart soufflé or other deep baking dish, preferably one with straight sides. (Hold off on this step if you’re going to delay baking the soufflés until later.)
2. Put the butter in a small saucepan over medium-low heat. When the foam subsides, stir in the flour and cook, stirring, until the mixture darkens, about 3 minutes. Reduce the heat to low and add the milk, a bit at a time, whisking until the mixture is thick. Let cool for a few minutes, then beat in the egg yolks, cheeses, cayenne, and some salt and pepper. (You can prepare this base a few hours ahead of cooking; cover tightly and refrigerate; bring back to room temperature before continuing.)
3. When you’re almost ready to cook, heat the oven to 375°F. Use an electric mixer or a whisk to beat the egg whites until fairly stiff. Stir about a third into the base to lighten it, then gently—and not overthoroughly—fold in the remaining whites using a rubber spatula or your hand. Transfer to the prepared dish and bake for about 30 minutes, until the top is brown, the sides are firm, and the center is still moist. Use a thin skewer to check the interior; if it is still soupy, bake for another 5 minutes. If it is just a bit moist, the soufflé is done. Serve immediately.
MUSTARD AND GRUYèRE SOUFFLé with Rosemary Use 1 cup Gruyère for the cheese and omit the cayenne. Stir 1 tablespoon Dijon mustard and 1 teaspoon chopped fresh rosemary into the base mixture along with the salt and pepper.
SALMON SOUFFLé WITH CREAM CHEESE AND DILL Omit the cayenne and use ½ cup cream cheese instead of the grated cheeses. Use a fork to roughly mash about 1 cup cooked salmon; stir it into the base mixture along with salt and pepper. Just before adding the egg whites, stir in a couple tablespoons chopped fresh dill.
BLUE CHEESE SOUFFLé WITH WALNUTS Use ½ cup crumbled blue cheese for the cheese and omit the cayenne. Stir 1 cup roughly chopped (and toasted if you like; see page 57) walnuts into the base mixture along with the salt and pepper.
Spinach Soufflé
Makes: 4 to 6 servings
Time: About 1 hour
Using chopped cooked spinach makes this classic soufflé a bit rough; if you prefer a silkier texture, purée the spinach in a food processor or blender with a splash of the milk to get it going. For an unexpected and wonderful rendition, see the mushroom and ginger variation that follows.
- 4 tablespoons (½ stick) butter, plus more for greasing
- ¼ cup flour
- 1½ cups milk, warmed until hot to the touch (about 1 minute in the microwave)
- 6 eggs, separated
- ½ cup freshly grated Parmesan cheese
- ¼ teaspoon nutmeg
- Salt and pepper
- 1 cup cooked, drained, and chopped spinach
- 2 tablespoons minced onion
1. Use a bit of butter to grease a 2-quart soufflé or other deep baking dish, preferably one with straight sides. (Hold off on this step if you’re going to delay baking the soufflé until later.)
2. Put the butter in a small saucepan over medium-low heat. When the foam subsides, stir in the flour and cook, stirring, until the mixture darkens, about 3 minutes. Turn the heat to low and whisk in the milk, a bit at a time, until the mixture is thick. Let cool for a few minutes, then beat in the egg yolks, Parmesan, nutmeg, and some salt and pepper; stir in the spinach and onion. (You can prepare this base a few hours in advance of cooking; cover tightly and refrigerate; bring back to room temperature before continuing.)
3. When you’re almost ready to cook, heat the oven to 375°F. Use an electric mixer or a whisk to beat the egg whites until fairly stiff. Stir about a third into the base to lighten it, then gently—and not overthoroughly—fold in the remaining whites, using a rubber spatula or your hand. Transfer to the prepared dish and bake for about 30 minutes, until the top is brown, the sides are firm, and the center is still moist. Use a thin skewer to check the interior; if it is still soupy, bake for another 5 minutes. If it is just a bit moist, the soufflé is done. Serve immediately.
Pea Soufflé with Lemon Omit the spinach and onion. Blanch 1¼ cups fresh or thawed frozen peas for 2 to 3 minutes, until bright green and tender. Drain, drop into a bowl of ice water for a minute to stop the cooking, drain again, and purée using a food processor or blender (add a tablespoon or 2 of the milk if necessary). Mix the pea purée into the base mixture in Step 2; substitute 2 teaspoons grated lemon zest for the nutmeg.
Mushroom Soufflé with Ginger and Soy Omit the spinach and onion. Sauté 8 to 12 ounces finely chopped mushrooms along with 1 tablespoon minced fresh ginger and 2 minced garlic cloves in the butter in a medium saucepan until very tender and browned. Add the flour and continue making the base mixture as in Step 2, but add 2 teaspoons soy sauce instead of the nutmeg.
ZUCCHINI AND CHEDDAR SOUFFLé Substitute cheddar for the Parmesan and 1 cup sautéed grated zucchini for the spinach.
9 Vegetables to Use for a Soufflé
Use about a cup of cooked, drained, and chopped or puréed vegetable, alone or in combination.
- Fresh fava or lima beans
- Eggplant
- Cauliflower
- Corn
- Roasted red (or yellow) peppers
- Carrots
- Sweet potato
- Parsnips
- Butternut or other winter squash
Pasta Frittata
Makes: 6 to 8 servings
Time: 40 minutes, including time to cook the pasta
Spaghetti, eggs, and cheese, with a creamy center and burnished brown lid: This is Italian comfort food and your new weeknight hero. Like any frittata, it’s both practical and tremendously versatile, but it’s also substantial and luxurious, equally good at breakfast, lunch, and dinner. Add up to 1 cup chopped cooked vegetables or 2 cups tender greens, like spinach; swap out the cheeses; make the rich, creamy carbonara variation; or try Pasta “Quiche” for something eggier. This is best with slightly undercooked pasta because it continues to cook as the pie bakes, or use leftover pasta instead.
- Salt
- 8 ounces dry spaghetti, linguine, fettuccine, or other long pasta
- 4 tablespoons (½ stick) butter or olive oil
- 6 eggs
- 1 teaspoon black pepper
- 1 cup freshly grated Parmesan cheese
1. Bring a large pot of water to a boil and salt it. Cook the pasta until barely tender, a minute or 2 short of where you would normally eat it. Drain and immediately toss it in a wide bowl with 2 tablespoons of the butter. Set aside to cool for a bit. (You can use leftover pasta too. In that case, melt the butter and toss it with the pasta; the pasta doesn’t have to be warm.)
2. Heat the oven to 400°F. In a large bowl, beat the eggs with 1 teaspoon salt and the pepper, then fold in the pasta until combined (tongs make this easy). Stir in the cheese and toss to coat.
3. Melt the remaining 2 tablespoons butter in a large ovenproof nonstick skillet over medium-high heat. Pour the egg mixture into the pan and immediately decrease the heat to medium-low; use a spoon if necessary to even out the top of the frittata, but don’t worry about getting it too perfect since you want some uneven edges to brown. Cook, undisturbed, until the mixture firms up on the bottom, 10 to 15 minutes, then transfer to the oven. Bake for about 10 minutes, until the top is just cooked. If you like, broil the pie for 2 or 3 minutes, until the top is deeply browned. Remove and serve wedges hot or at room temperature.
Carbonara Pasta Pie Swap the Parmesan for pecorino Romano and fold ½ cup chopped cooked pancetta, bacon, or guanciale into the mixture along with the cheese.
Pasta “Quiche” The focus here is more on the eggs, with the pasta almost serving as a filling; to make it a real quiche, bake it in a Savory Tart Crust, which is wonderfully excessive for any carb lover: Use only 4 ounces dried pasta (2 cups leftover cooked pasta); if you like, combine ½ cup whole milk or cream with the eggs before adding the pasta.
Customizing Vegetable Fillings and Toppings
Experimenting with baking vegetables is easy, fun, and rewarding. Certain flavors—like Parmesan, fresh parsley, or a crisp topper of bread crumbs—are almost always welcome, and vegetables like onions and garlic go with nearly everything, so I’ve left those off this list. Otherwise, feel free to mix and match as you please, erring on the conservative side with unfamiliar ingredients until you know how much you like. Note that vegetables run a wide range in terms of preparation, so glance at How to Prep Any Vegetable for Savory Baking for any necessary precooking before you proceed.
VEGETABLE: Artichoke hearts
CHEESE: Mozzarella, fontina, cheddar
GOOD WITH: Grated lemon zest
Hollandaise sauce
Dried tomatoes
Minced fresh oregano or thyme
Chopped fresh basil or tarragon
VEGETABLE: Asparagus or green beans
CHEESE: Ricotta, fresh goat cheese, mascarpone
GOOD WITH: Grated lemon or orange zest
Grated fresh ginger
Chopped toasted nuts
Minced fresh chives or rosemary
VEGETABLE: Beets
CHEESE: Fresh goat cheese, manchego, blue cheese, Gruyère
GOOD WITH: Grated orange zest
Minced fresh thyme
Chopped toasted nuts
VEGETABLE: Bell peppers or mild chile peppers
CHEESE: Mozzarella, feta, queso fresco
GOOD WITH: Chopped fresh cilantro
Pesto
VEGETABLE: Broccoli or cauliflower
CHEESE: Ricotta, Gouda, cheddar, provolone
GOOD WITH: Grated lemon zest
Anchovies
VEGETABLE: Butternut, acorn, delicata, pumpkin, or other winter squash
CHEESE: Ricotta, Gouda, Gruyère
GOOD WITH: Minced fresh sage, thyme, or rosemary
Chopped toasted nuts
Ground cumin, coriander, cinnamon, za’atar, curry powder, paprika, or a blend
VEGETABLE: Cabbage (red or green), Brussels sprouts, or radicchio
CHEESE: Cheddar, Gruyère, fontina
GOOD WITH: Caraway seeds
VEGETABLE: Carrots or parsnips
CHEESE: Feta, queso fresco, ricotta salata
GOOD WITH: Grated orange zest
Grated fresh ginger
Cumin
Spice blends like za’atar
VEGETABLE: Corn
CHEESE: Ricotta, fresh goat cheese, cheddar, queso fresco, ricotta salata
GOOD WITH: Eggplant, summer squash, and/or tomatoes
Minced fresh thyme or rosemary
Chopped fresh mint or basil
Chili powder
VEGETABLE: Dark leafy greens (kale, spinach, watercress, chard, and the like)
CHEESE: Ricotta, fresh goat cheese, cheddar, Gruyère
GOOD WITH: Grated lemon zest
Chopped toasted nuts
VEGETABLE: Eggplant
CHEESE: Mozzarella, fontina, feta, provolone
GOOD WITH: Corn, summer squash, and/or tomatoes
Roasted garlic
Ground cumin, coriander, cinnamon, za’atar, or a blend
VEGETABLE: Fennel
CHEESE: Parmesan, manchego, Gruyère, goat cheese, feta
GOOD WITH: Grated orange zest
Black or green olives
Chopped fresh mint or dill
Minced fresh thyme or oregano
Tomatoes and/or eggplant
VEGETABLE: Mushrooms
CHEESE: Fresh goat cheese, blue cheese, Gruyère, cheddar
GOOD WITH: Minced fresh thyme or rosemary
Dijon mustard
Caramelized onions or minced fresh garlic
VEGETABLE: Peas
CHEESE: Ricotta, fresh goat cheese, pecorino Romano, feta, ricotta salata
GOOD WITH: Grated lemon zest
Chopped fresh mint or tarragon
Dijon mustard
VEGETABLE: Potatoes
CHEESE: Cheddar, Gouda, cream cheese, Gruyère
GOOD WITH: Dijon mustard
Capers
VEGETABLE: Summer squash and zucchini
CHEESE: Ricotta, fresh goat cheese, cheddar, queso fresco, provolone
GOOD WITH: Grated lemon zest
Sliced scallions
Chopped fresh mint or basil
Corn, eggplant, and/or tomatoes
Pesto
Capers
VEGETABLE: Sweet potatoes
CHEESE: Ricotta, fresh goat cheese, Gruyère, Gouda, manchego
GOOD WITH: Minced fresh sage, thyme, or rosemary
Pesto
Chopped toasted nuts
Ground cumin, coriander, cinnamon, za’atar, or a blend
VEGETABLE: Tomatoes
CHEESE: Nearly any cheese, particularly mozzarella, fontina, feta, Brie, fresh goat cheese, and cheddar
GOOD WITH: Corn, eggplant, and/or summer squash
Roasted garlic
Minced fresh oregano, thyme, or rosemary
Chopped fresh mint, basil, dill, chives, or tarragon
Chopped olives
Pesto
Anchovies
Cheese Quiche
Makes: 4 to 8 servings
Time: About 1 hour
Quiche is a savory custard baked in a pie or tart shell; the rest comes down to additions. You can use any kind of cheese you like; if it’s soft, like goat or cream cheese, ricotta, or cottage cheese, reduce the cream by ½ cup or so. Fresh herbs are a simple way to boost the flavor; add ¼ cup chopped fresh basil, parsley, chives, chervil, cilantro, or dill; 1 teaspoon or so chopped fresh tarragon, thyme, or rosemary; or about 1 tablespoon chopped fresh marjoram or oregano. Dijon mustard is also a wonderful addition: Stir 2 tablespoons (or more or less to taste) into the egg mixture.
- 1 recipe Savory Piecrust or Savory Tart Crust, fitted into a deep-dish pie pan and chilled
- 6 eggs
- 2 cups grated Emmental, Gruyère, Cantal, cheddar, or other flavorful cheese
- 2 cups cream, half-and-half, milk, or a combination, heated gently just until warm
- ½ teaspoon salt
- ¼ teaspoon cayenne or to taste
1. Heat the oven to 425°F and set the rack in the middle. Partially prebake the chilled crust as described on page 258 until the crust begins to brown, 10 to 12 minutes. Let cool on a wire rack while you prepare the filling. Lower the oven temperature to 325°F.
2. Combine the remaining ingredients and beat until well blended. Put the partially baked shell on a baking sheet and pour in the egg mixture. Bake for 30 to 40 minutes or until the filling is almost firm (it should still jiggle just a little in the middle) and lightly browned on top; lower the oven temperature if the edges of the crust are darkening too quickly. Cool on a rack; serve warm or at room temperature. This is good for making ahead—you can reheat in a 350°F oven.
CRUSTLESS QUICHE If you want to skip the extra step of making the crust; the result is something like an extra-custardy frittata (and also a gluten-free option): Omit the crust. Grease the whole pie plate with butter and pour in the filling. Bake until the center is nearly set and browned on the top.
ONION QUICHE Omit the cheese and cayenne. While the crust cools, caramelize 6 cups sliced onions, following the directions on page 507. Add 1 teaspoon fresh or ½ teaspoon dried thyme. Stir the onions into the egg mixture in Step 2.
BACON AND ONION QUICHE Follow the Onion variation above, again omitting the cheese (or not; keep it if you like) and cayenne. While the crust cools, cook 8 to 12 slices of bacon in a large skillet over medium heat until crisp. Remove the bacon with a slotted spoon and cook the onions in the bacon fat, stirring until very tender, 10 to 15 minutes. Lay the cooked bacon strips on the crust (or crumble them in pieces if you prefer); stir the cooked onions into the egg mixture and proceed with the recipe.
HASH BROWN QUICHE The ultimate breakfast: Use Hash Brown Potato Crust; if you like, brown 8 ounces breakfast sausage in a skillet, cool slightly, and add to the egg filling.
Savory Pies, Cakes, and Snacks
A savory baked good can be every bit as much of a treat as a sweet pie or cake, and many of the recipes that follow are so ridiculously easy to make and to customize that you’ll find yourself returning to them again and again. The techniques are, by and large, exactly the same as the ones you use in sweet baking; differences are only in the ingredients lists.
Many of these dishes have two equally important components: the batter or crust and the filling or topping. For most, you can lift the filling from one and drop it into the crust of another, so you wind up with far more ideas than you bargained for; see the chart above for guidance. Also, Savory Piecrust (this page) and Savory Tart Crust are interchangeable, and for any open-faced pie or tart (without a top crust) you can also feel free to sub in Hash Brown Potato Crust. Or follow the method for Spinach-Cheese Pie (page 528) for a phyllo crust instead.
You want a deep pie plate here so you can maximize the amount of the hearty fillings. If you don’t have one, a 10-inch cast-iron skillet, a springform pan, or even a deep 2-quart casserole dish is a good substitute. Or you can assemble the pie in your regular pie dish and plan to have a little extra filling; bake that in ramekins topped with scraps of piecrust.
Recipes
Savory Piecrust
Savory Tart Crust
Hash Brown Potato Crust
Asparagus Tart
Flaky Caramelized Fennel and Sausage Tart
Curried Sweet Potato Galette
Chicken Pot Pie
Chicken Cobbler with Corn and Chiles
Cornish Pasties
Black Bean and Cheese Empanadas
Spinach-Cheese Triangles
Lebanese Meat Pies
Georgian Cheese Bread
Tomato, Olive, and Mozzarella Turnovers
Skillet Tamale Pie
Baked Brie
Olive Palmiers
Savory Bread Pudding (Strata)
Chipotle Spoon Bread
Cabbage Strudel
Baked Vegetable Flatbread
Scallion Pancakes
Korean Vegetable Pancakes
Johnnycakes
Potato Knishes
Potato Samosas
Steamed Chickpea Bread
Savory Piecrust
Makes: Enough for a 9-inch single-crust pie
Time: 20 minutes, plus time to chill
The only difference between this and the classic piecrust on page 259 is the exclusion of sugar. The flaky, buttery crust without the added sweetness is an ideal base for standbys like Chicken Pot Pie, empanadas, or any other savory fillings you want to whip up. See page 255 for how to roll out and handle pie dough.
- 1 cup plus 2 tablespoons flour, plus more for dusting
- ½ teaspoon salt
- 1 stick cold butter, cut into chunks
- ¼ cup ice water
1. Combine the flour and salt in a food processor and pulse once or twice. Add the butter and turn on the machine; process until the butter and flour are blended and the mixture looks like cornmeal, about 10 seconds. If you don’t have a food processor, cut the butter into smaller cubes and use your fingers or 2 knives to mix it with the flour mixture until it’s in very small pieces. Refrigerate for 5 or 10 minutes if the dough ever gets too warm or greasy.
2. With the machine running, slowly add the ice water, stopping as soon as the mixture forms into a ball (you may not need the entire ¼ cup); if you’re making the dough by hand, slowly drizzle the water over the flour and continue to mix as you did with the butter. Turn the dough onto a lightly floured counter and form into a ball. Wrap in plastic and freeze for 10 minutes or refrigerate for at least 30 minutes. (You can refrigerate the dough for up to a couple of days or freeze, tightly wrapped, for up to a couple of weeks.)
WHOLE WHEAT SAVORY PIECRUST Slightly nutty flavor, a deeper, golden brown color; there’s some sacrifice in texture, but it’s a worthwhile trade-off: Substitute ½ cup whole wheat flour or, even better, whole wheat pastry flour for ½ cup of the all-purpose flour. A bit more ice water may be necessary.
OLIVE OIL PASTRY CRUST Replace the butter with 3 tablespoons olive oil.
Mix-and-Match Savory Fillings and Crusts
One of the best things about baking savory pies and pastries is that they’re as versatile and interchangeable as their sweet counterparts; creating an entirely new one is just a matter of a simple switch. You can match any filling (or its variations) to any other crust within the lists below. Or see How to Prep Any Vegetable for Savory Baking on page 507 and Customizing Vegetable Fillings and Toppings on page 516 to inspire new combinations.
Mix and match the crusts and fillings from these filled pies and pastries:
▪ Chicken Pot Pie
▪ Cornish Pasties
▪ Black Bean and Cheese Empanadas
▪ Spinach-Cheese Triangles or Spinach-Cheese Pie
▪ Lebanese Meat Pies
▪ Cabbage Strudel
Mix and match the crusts and fillings from these open-faced tarts:
▪ Asparagus Tart
▪ Curried Sweet Potato Galette
▪ Flaky Caramelized Fennel and Sausage Tart
Savory Tart Crust
Makes: Enough for a 9-inch tart
Time: 20 minutes, plus time to chill
An egg yolk makes this tart crust ultra-rich, almost like shortbread. Just as you can fill dessert tarts with almost any fruit imaginable, savory tarts are blank canvases for all sorts of vegetables (see page 516). Fit the dough into a tart pan as described on page 263.
- 1¼ cups flour
- ½ teaspoon salt
- 1 stick cold butter, cut into chunks
- 1 egg yolk
- 3 tablespoons ice water, plus more if necessary
1. Combine the flour and salt in a food processor and pulse once or twice. Add the butter all at once; process until the mixture is uniform, about 10 seconds (do not overprocess). Add the egg yolk and process for another few seconds. To make the dough by hand, cut the butter into smaller cubes to start, then use your fingertips or 2 knives to blend in the butter, then the yolk until the mixture looks like wet sand. If the butter ever starts to look greasy, stick the bowl in the fridge for 5 or 10 minutes.
2. With the machine running, slowly pour in the ice water, stopping as soon as the dough forms a ball (you may not need all the water); if you’re mixing by hand, drizzle it in and continue to combine as you did with the butter. Form into a ball, wrap in plastic, and freeze for 10 minutes or refrigerate for at least 30 minutes. (You can refrigerate for up to a couple of days or freeze, tightly wrapped, for up to a couple of weeks.)
WHOLE WHEAT SAVORY TART CRUST Not quite as flaky, but with a wonderfully nutty flavor: Substitute ½ cup whole wheat or whole wheat pastry flour for ½ cup of the all-purpose flour. A bit more ice water may be necessary.
SAVORY NUT TART CRUST Substitute ½ cup ground nuts, like almonds, hazelnuts, walnuts, pecans, macadamias, or peanuts, for ½ cup of the flour.
Hash Brown Potato Crust
Makes: Enough for a 9-inch pie
Time: 30 minutes
Who doesn’t love hash browns? Their deep golden exterior, tender centers, and surprisingly neutral flavor make a fabulous crust for any savory pie filling you like. It’s especially good with quiche (page 518). Try the sweet potato variation for something a little bolder.
- 2 tablespoons olive oil, plus more for greasing
- 3 medium russet potatoes (about 1½ pounds), peeled
- 1 teaspoon salt
- ½ teaspoon black pepper
1. Heat the oven to 400°F and lightly grease a deep-dish pie plate or 9-inch cast-iron skillet.
2. Use a food processor or box grater to shred the potatoes. Put the shredded potatoes in a large bowl, cover completely with water, and set aside for a couple of minutes; this helps get rid of excess starch so the crust can crisp up.
3. Drain the potatoes and place in a clean dish towel. Use the towel to thoroughly wring out as much water as you can. Transfer to a large bowl and toss with the olive oil, salt, and pepper, then press the mixture over the bottom and sides of the prepared pie plate, packing it into an even layer.
4. Bake the crust for about 20 minutes, until it’s golden brown and the edges are starting to crisp. Cool on a rack for at least a few minutes before filling. Bake with filling as directed.
SWEET POTATO HASH BROWN PIECRUST Substitute 1¼ pounds sweet potatoes for russets. Finely grate or chop 1 small onion and add it to the potatoes. Instead of soaking the mixture in water, place it in a colander and cover with the salt for 5 minutes or so, then squeeze dry and proceed with the recipe.
Asparagus Tart
Makes: One 9-inch tart, enough for about 8 servings
Time: About 1½ hours
Think of this classic vegetable tart as a template, ready to be filled with whatever produce is currently at its best. Tender vegetables (like the asparagus used here) often need no precooking; others, like eggplant, mushrooms, and sturdier root vegetables, should get a little head start, either by roasting or parboiling until they’re a little shy of tender (see How to Prep Any Vegetable for Savory Baking, page 507). To be fancy, arrange the vegetables in concentric circles around the tart; to be like me, just dump them on. Serve thin slices as appetizers or bigger wedges alongside a salad as a main course.
- 1 recipe Savory Tart Crust, fitted into a tart pan and chilled
- 1 large yellow onion, sliced
- 2 tablespoons olive oil, plus more for drizzling
- Salt and pepper
- 8 ounces fresh goat cheese
- 2 teaspoons fresh thyme leaves
- 1 pound asparagus, trimmed and cut in half crosswise
1. Partially bake the crust as described on page 258, just until it’s golden and set, then turn the oven to 375°F. Set the shell aside on a wire rack.
2. While the crust is baking, cook the onion in the olive oil in a skillet over medium heat for about 10 minutes, until tender and browned, stirring often. Sprinkle with salt and pepper.
3. Spoon the onion into the tart crust. Crumble the goat cheese over the onion and sprinkle with the thyme. Put the asparagus on top, spreading the spears all the way out to the edges and arranging them as neatly or as messily as you like. Drizzle lightly with olive oil.
4. Put the tart pan on a baking sheet and bake for 25 to 30 minutes, until the asparagus is tender and lightly browned. Cool on a rack for about 10 minutes; serve warm or at room temperature.
ARTICHOKE TART Substitute ricotta for the goat cheese (sprinkle a little grated lemon zest on along with the thyme) and 3 cups chopped fresh or thawed frozen artichokes for the asparagus. Scatter on a handful of grated Parmesan before baking.
CHERRY TOMATO AND OLIVE TART Don’t prebake the crust. Fill with the onions and cheese. Substitute 2 cups cherry tomatoes and 1 cup pitted olives (oil-cured or kalamata are great) for the asparagus. Bake until the crust is cooked and the tomatoes are nicely roasted, 40 to 45 minutes.
Flaky Caramelized Fennel and Sausage Tart
Makes: 1 square or rectangular tart, 6 to 8 servings
Time: About 1½ hours, largely unattended
Puff pastry makes for an exceptionally flaky and luxurious tart dough, and the fillings here are no less decadent: crumbled sausage, fennel sautéed till nearly melting, and a generous sprinkling of Gruyère. For a slightly lighter touch, skip the cheese and scatter some arugula leaves over the tart as soon as you remove it from the oven. The heat from the tart will wilt them slightly.
- 4 tablespoons olive oil
- 1 pound Italian, breakfast, or other fresh sausage, casings removed
- 3 fennel bulbs, trimmed and sliced
- Salt and pepper
- 1 pound puff pastry dough, homemade (pages 465-466) or store-bought, chilled
- 1 cup grated Gruyère cheese
- Chopped fresh chives for garnish
1. Heat the oven to 400°F. Put 2 tablespoons of the oil in a large skillet over medium-high heat. When hot, add the sausage and cook, stirring occasionally and breaking the meat into small clumps until it loses its pink color, 5 to 7 minutes. Remove the sausage with a slotted spoon.
2. Add the remaining 2 tablespoons oil and the fennel; sprinkle with salt and pepper. Cook, stirring occasionally and adding a tiny splash of water if the pan dries out until the fennel is very soft and lightly browned, 20 to 25 minutes.
3. Meanwhile, roll the puff pastry into a roughly 14-inch square, about ¼ inch thick, and put it on a large baking sheet. When the fennel is done, scatter it over the puff pastry, leaving a 1-inch border (this will puff up and become the crust). Scatter the sausage and cheese over the top.
4. Bake for 25 to 30 minutes, until the pastry puffs up around the edges and turns golden. Sprinkle with chives before serving.
FIG, BACON, AND BLUE CHEESE TART Instead of the fennel, top the prepared dough with 2 cups quartered fresh figs, some crumbled blue cheese, and a sprinkling of fresh rosemary leaves. Bake as directed. Meanwhile, substitute 8 to 12 slices of bacon for the sausage; crisp them in the skillet, then transfer to paper towels to drain. Chop and sprinkle over the finished tart.
EGGPLANT AND FETA TART WITH MOROCCAN SPICES If you want to add meat, use ground lamb in place of the sausage; otherwise leave it out. Substitute 1 large eggplant, chopped, for the fennel and cook it until tender and browned, about 20 minutes. A few minutes before the eggplant is done, stir in 1 teaspoon cumin, ½ teaspoon each cinnamon and allspice, and a dash of cayenne. Substitute feta for the Gruyère and mint for the chives.
Curried Sweet Potato Galette
Makes: 8 servings
Time: About 1 hour
Few tarts are more laissez-faire than the rustic, free-form galette. The key to success is slicing the sweet potatoes very thin, so that they will cook all the way through before the crust gets too dark. If you have a mandoline, this is the place to use it.
- Flour for dusting
- 1 recipe Savory Tart Crust
- 1 pound sweet potatoes, peeled and sliced as thin as possible
- 3 tablespoons olive oil
- 1 teaspoon curry powder
- ½ teaspoon cumin
- ½ teaspoon garam masala (optional)
- ¼ teaspoon ginger
- Salt and pepper
- Chopped fresh cilantro for garnish
1. Heat the oven to 425°F. On a lightly floured counter, roll the crust out about ⅛ inch thick; it need not be perfectly round. Put it directly on a baking sheet.
2. Toss the sweet potatoes with the olive oil, spices, salt, and pepper in a large bowl. Cover the dough with the sweet potatoes, shingling them so that they overlap to form a single layer and leaving about a 1½-inch border all around. Fold up the uncovered edge of the crust over the sweet potatoes, pinching it together. Brush the top of the dough with any olive oil left in the bowl; bake for 25 to 30 minutes, until the crust is golden brown and the sweet potatoes are tender.
3. Cool on a rack for a few minutes; serve warm, garnished with the cilantro.
POTATO AND ONION GALETTE Use 1 pound russet potatoes and 1 small onion instead of the sweet potatoes. Substitute 1 tablespoon fresh rosemary leaves for the spices.
WINTER SQUASH GALETTE Substitute butternut or acorn squash for the sweet potatoes, smoked paprika for the curry powder and garam masala, and 1 teaspoon grated lime zest for the ginger. If you have some raw pumpkin seeds, sprinkle them on top of the pumpkin slices before baking.
SQUASH AND FIVE-SPICE GALETTE Substitute winter squash for the sweet potatoes, Chinese five-spice for the curry powder and garam masala, and 1 teaspoon soy sauce for the cumin.
Chicken Pot Pie
Makes: 4 to 6 servings
Time: About 1½ hours
My version of the comfort food classic is hearty and rich without relying on too much flour or cream. Use homemade chicken stock if at all possible. Even a quick stock made from chicken parts—backbone, wings, etc.—and a carrot, stalk of celery, and bay leaf boiled for 30 to 60 minutes will be better than anything store-bought. See the Slab Pie variation to easily scale up any pie to feed an army.
- 4 tablespoons (½ stick) butter
- 1 large onion, chopped
- 3 medium carrots, chopped
- Salt and pepper
- 3 tablespoons flour, plus more for dusting
- 2 cups chicken stock, preferably homemade
- 1 teaspoon minced fresh thyme leaves
- 2 pounds boneless, skinless chicken breasts, thighs, or a combination, chopped
- 1 cup fresh or frozen peas
- ¼ cup cream (optional)
- 1 recipe Savory Piecrust
- 1 egg
1. Heat the oven to 375°F. Melt the butter in a large deep skillet or saucepan over medium heat. (If you like, you can make the filling in a 10-inch cast-iron skillet and bake it right in that pan after topping it with the crust.) Add the onion and carrots, sprinkle with salt and pepper, and cook, stirring occasionally, until slightly softened, 5 to 10 minutes. Sprinkle in the flour and cook, stirring constantly with a whisk or a wooden spoon until it’s incorporated into the vegetables, tan in color, and no longer smells raw, just a couple of minutes.
2. Add the chicken stock and thyme and bring the mixture to a simmer; stir in the chicken and simmer until it’s just cooked through, 8 to 10 minutes. Stir in the peas and the cream if you’re using it, season with salt and pepper, and turn off the heat.
3. Transfer the chicken mixture to a deep 2-quart ovenproof casserole or a deep-dish pie plate. Lightly flour a work surface and roll out the dough large enough to cover the casserole (see page 255 for how to roll out pie crust). Cover the casserole with the dough, crimping the edges using any of the methods described on page 257. Beat the egg with 2 tablespoons water and brush it all over the crust. Sprinkle with salt and pepper; use a sharp paring knife to cut two or three 2-inch-long slits in the crust to allow steam to escape.
4. Put the pie on a baking sheet and bake for 45 minutes to 1 hour, until golden brown. Let it sit for a few minutes before serving.
SLAB PIE The best way to make pie for a crowd; the slices are also easy to grab and take on the go, and since it uses the same amount of filling, you can swap in whichever variation you like: Make 1½ recipes Savory Piecrust. Divide it in half and wrap each piece tightly in plastic wrap. To bake, line a rimmed baking sheet with parchment and roll one dough half so it’s a few inches larger than the sheet. Work quickly; if the dough starts to warm up or get greasy, pause and stick it in the fridge for 10 minutes or so. Transfer the dough to the baking sheet, press it up the sides, and spread the filling evenly over it. Roll the other piece of dough so that it’s just barely larger than the baking sheet and place it over the filling. Crimp the edges to seal, brush with the egg wash, and cut a couple slits in the top crust. Bake until the crust is golden brown, about 45 minutes.
CURRIED CHICKEN POT PIE Add 1 tablespoon minced fresh ginger along with the onions and carrots and 2 teaspoons curry powder along with the flour. Omit the rosemary and substitute unsweetened coconut cream or coconut milk for the dairy cream.
SEAFOOD POT PIE Omit the rosemary and chicken. Add up to 2 cups roughly chopped shrimp, scallops, flaky white fish, salmon, or lobster along with the peas. Stir in some chopped fresh parsley and a little lemon zest (if you like) along with the seafood.
MUSHROOM POT PIE Omit the chicken; use vegetable stock to make this vegetarian. After the onions and carrots have softened slightly, add 3 cups chopped mushrooms and cook until their liquid has released and evaporated, 10 to 12 minutes. For extra mushroom flavor, simmer the stock with ¼ cup dried porcini, turn off the heat, and let sit. Chop and add the rehydrated porcini along with the peas. When adding the stock, be careful not to include any porcini sediment from the bottom of the saucepan.
CLAM PIE A Long Island classic, like chowder in pie form: Make a double recipe of the Savory Piecrust, fit the bottom crust into a 9-inch deep-dish pie plate, roll out the top crust and transfer to a rimless baking sheet, then chill both; scrap everything else. Boil 3 peeled medium russet potatoes until soft, drain, and mash roughly with a fork. While they are boiling, crisp 6 slices chopped bacon in a skillet and transfer to a paper towel; add a chopped onion and 1 teaspoon minced garlic to the skillet and cook until golden. Add the bacon and onions to the potatoes along with 3 cups chopped raw clams, ½ cup chopped fresh parsley, 2 tablespoons flour, ¼ cup clam juice (optional; use any liquid that came with the clams, or bottled is fine), salt, and pepper. Spoon the filling into the pie plate, dot it with a few small cubes of butter, and cover with the top crust. Brush and bake as directed.
Chicken Cobbler with Corn and Chiles
Makes: 4 to 6 servings
Time: About 1½ hours
All the trappings of chicken pot pie with half as much work. Instead of making and rolling out a crust, you whip up a simple cobbler batter and scatter it over the top—a shortcut you probably knew in the realm of desserts that’s just as brilliant for dinner. Crunchy on top and tender inside, the biscuitlike topper is a perfect match for the creamy, chile-scented stew underneath. If you have leftover roasted chicken, you get a bit of a head start (although the filling won’t be quite as flavorful): Chop 2 cups’ worth and add it to the filling when you add the corn and cream.
- 3 tablespoons neutral oil (like grapeseed or corn)
- 3 poblano chiles, seeded and chopped
- 1 large onion, chopped
- Salt and pepper
- 1 tablespoon minced garlic
- 1 teaspoon cumin
- ¼ teaspoon cayenne
- 1½ cups chicken stock or water
- 1 pound boneless, skinless chicken thighs or breasts, chopped
- 1½ cups fresh or frozen corn kernels
- ¼ cup cream (optional)
- 2 tablespoons cornstarch
- 1 cup flour
- ¾ teaspoon baking powder
- ⅛ teaspoon baking soda
- 2-3 tablespoons butter, cut into bits
- ½ cup buttermilk or more as needed
- 1 egg, beaten
1. Heat the oven to 400°F. Put the oil in a large skillet over medium heat. When hot, add the poblanos and onion, sprinkle with salt and pepper, and cook, stirring occasionally, until softened, 8 to 12 minutes. Add the garlic, cumin, and cayenne and cook, stirring until fragrant, a minute or 2.
2. Add the stock; bring to a boil, and let bubble for a minute or 2, then add the chicken, reduce the heat, and simmer until the chicken is just cooked through, 8 to 10 minutes. Stir in the corn and the cream if you’re using it.
3. In a small bowl, whisk the cornstarch with a few tablespoons of stock or water to make a slurry; add it to the skillet and stir until the liquid thickens slightly. Season with salt and pepper. Transfer everything to an ovenproof casserole and set aside.
4. Combine the flour, baking powder, baking soda, and ¼ teaspoon salt in a food processor or a mixing bowl and pulse once or twice or stir together. Add the butter and process until the pieces are pea sized, no more than 30 seconds; if you’re combining by hand, use your fingertips or 2 knives to mix in the butter. Transfer the mixture to a bowl. By hand, beat in the buttermilk and egg until the dough just comes together; it should be sticky. Add a few more tablespoons buttermilk if the dough seems too stiff.
5. Drop spoonfuls of batter on top of the chicken mixture and smooth with a knife, covering as much surface area as possible but leaving a few gaps for steam to escape. Bake for 30 minutes or so, until golden on top and bubbly underneath. Serve immediately.
CHICKEN POT PIE COBBLER A shortcut with all the same classic flavors: Prepare the filling for Chicken Pot Pie and start this recipe at Step 4.
CHICKEN AND MUSHROOM COBBLER Substitute 2 cups quartered button mushrooms for the poblanos and fresh or frozen peas for the corn. Omit the cumin and cayenne; add 1 tablespoon chopped fresh thyme along with the stock.
TOMATO COBBLER Simpler and, in summer when tomatoes are at their peak, divine: Scrap the filling. Cut 2½ to 3 pounds ripe tomatoes into wedges; put them in an ovenproof dish greased with olive oil, sprinkle with 1 tablespoon cornstarch and some salt and pepper and toss gently to combine. Some chopped garlic, sliced fresh basil leaves, and a generous layer of shredded sharp cheddar never hurt either—scatter them evenly over the tomatoes before topping with the dough and bake as directed.
Cornish Pasties
Makes: 6 servings
Time: About 1½ hours
These traditional English hand pies (pronounced PASStees) are stuffed with chopped steak and vegetables (most notably rutabaga, which the British call “swede”). The meat and vegetables should be chopped into small dice. For best results, do this by hand. Serve with a grainy mustard.
- 12 ounces beef chuck or skirt steak, chopped
- 2 medium russet or Yukon Gold potatoes, peeled and diced small
- 1 small rutabaga, peeled and chopped
- 1 medium onion, chopped
- 1 tablespoon chopped fresh thyme, rosemary, or sage leaves, or a combination
- 3 tablespoons olive oil
- 2 tablespoons Worcestershire sauce
- 1 teaspoon salt
- 1 teaspoon black pepper
- 2 recipes Savory Piecrust
- Flour for dusting
- 2 eggs
1. Heat the oven to 375°F. In a large bowl, combine the beef, potatoes, rutabaga, onion, herbs, olive oil, Worcestershire, salt, and pepper; stir to combine and set aside.
2. Cut each ball of dough into 3 equal pieces (6 total), form each of those into a ball, and press them into flat disks; put them in the fridge to stay cold, taking them out one at a time as you roll them. Lightly flour a work surface and roll each ball into a circle about 8 inches across, following the method on page 255. Beat the eggs with 3 tablespoons water.
3. Spoon about 1 cup of the filling onto one side of each circle of dough, leaving a ½-inch border. Brush some of the egg mixture around the outer edge of each circle. Fold the empty side of the dough over the filling to create a half-moon; crimp the open edges together with a fork or your fingers. Use a fork to poke several air vents in the top of each pie.
4. Put the pies on one or two rimmed baking sheets and brush the remaining egg wash over the top. Bake for 45 minutes to 1 hour, until golden brown. Serve hot or warm.
BEEF AND STILTON HAND PIES Any blue cheese will work fine, but English Stilton is the classic: Crumble ¾ cup of the cheese into the filling mixture.
LAMB HAND PIES Substitute lamb shoulder or loin for the beef; use rosemary as the herb.
PORK AND GINGER HAND PIES Entirely nontraditional but tasty nonetheless: Substitute pork shoulder for the beef, 1½ cups chopped scallions for the onion, 1 tablespoon minced fresh ginger for the herbs, 2 tablespoons vegetable oil and 1 tablespoon sesame oil for the olive oil, and soy sauce for the Worcestershire.
BUTTERNUT SQUASH HAND PIES Substitute 2 cups grated butternut squash for the beef; use sage or rosemary as the herb; add 1 minced garlic clove instead of the Worcestershire.
Black Bean and Cheese Empanadas
Makes: 8
Time: About 1¼ hours
You can stuff empanadas with pretty much any filling you want, provided it isn’t too wet, but the flavors, unsurprisingly, lean toward Latin America and the Southwest. I have also seen them in Southeast Asia, though, and they’re also a very close cousin of the famous Jamaican beef patty (see the variation).
- 1 tablespoon neutral oil (like grapeseed or corn)
- 1 small onion, finely chopped
- 1 tablespoon minced garlic
- 1 teaspoon cumin
- Pinch of cayenne or dash of hot sauce
- 1 15-ounce can black beans, drained, or 1 cup cooked beans
- 1 cup grated Jack or cheddar cheese
- Salt and pepper
- 2 recipes Savory Piecrust
- Flour for dusting
- 1 egg
1. Put the oil in a medium skillet over medium-high heat. Add the onion and cook, stirring occasionally until soft, about 5 minutes. Add the garlic, cumin, and cayenne and cook, stirring, until fragrant, about a minute. Stir in the beans, cheese, and a sprinkle of salt and pepper; turn off the heat.
2. Heat the oven to 375°F. Divide each ball of dough into 4 equal pieces for a total of 8. On a lightly floured counter, flatten each piece of dough into a disk and roll it out into a 6- or 7-inch circle. Beat the egg with 2 tablespoons water.
3. Spoon about ¼ cup of the bean mixture onto one side of each circle, and brush a little egg wash halfway around the edge of the dough. Fold the dough over the filling to form a half-moon; crimp the edges together with a fork to seal and then use the fork to poke a few holes for steam vents in the top of each empanada.
4. Put the empanadas on an ungreased baking sheet and brush the tops with the remaining egg wash. Bake for 35 to 45 minutes, until golden brown. Serve hot or warm.
CHORIZO AND GREEN OLIVE EMPANADAS Brown 8 ounces fresh (Mexican) chorizo, removed from the casings, along with the onion. Omit the cumin and cayenne (the chorizo has both of those in it already). Use pinto beans instead of black beans; substitute ½ cup chopped green olives for the cheese.
MUSHROOM AND POBLANO EMPANADAS Omit the beans, increase the oil to 3 tablespoons, and reduce the cheese to ½ cup. Cook 2 chopped poblano chiles along with the onion; when soft, add 1 pound chopped mushrooms, sprinkle with salt and pepper, and cook until the mushrooms are lightly browned and their liquid has evaporated. Substitute 1 teaspoon chopped fresh rosemary for the cumin.
JAMAICAN BEEF PATTIES When making the dough, add ½ teaspoon each turmeric and curry powder along with the flour. Omit the beans and cheese. Brown 1 pound ground beef along with the onion (use a large onion). Substitute allspice for the cumin and add 1 teaspoon chopped fresh thyme and 1 tablespoon tomato paste along with the other seasonings.
Spinach-Cheese Triangles
Makes: About 40 pieces, enough for 20 to 40 servings
Time: About 1¼ hours
One of the all-time great (and impressive) appetizers; you can convert this into an equally stunning main course by following the variation below for Spinach-Cheese Pie. Read about handling phyllo on page 487 (and even find a recipe to make your own on page 488). But here are a couple of handy rules: Defrost phyllo dough overnight in the refrigerator. Allow yourself plenty of room to work. Brush the layers lightly and evenly with butter or oil; don’t glob it on.
- Salt
- 1½ pounds fresh spinach, trimmed
- 2 tablespoons olive oil
- 1 cup chopped onion
- ½ cup chopped scallions
- Black pepper
- ⅛ teaspoon nutmeg
- 3 eggs
- 8 ounces feta cheese, crumbled
- 8 ounces ricotta or cottage cheese, drained
- ¼ cup minced fresh dill leaves or 1 tablespoon dried
- ¼ cup chopped fresh parsley leaves
- ½ pound store-bought phyllo dough (15-20 sheets), thawed if frozen, or 1 recipe Homemade Phyllo Dough (page 488)
- 1 stick butter, melted, or olive oil
- 1 cup bread crumbs, preferably fresh (see page 415)
1. Bring a pot of water to a boil and salt it. Add the spinach and cook until bright green and tender, 3 minutes. Drain, squeeze dry, and chop.
2. Put the olive oil in a medium skillet over medium heat. When hot, add the onion and scallions and cook, stirring, until softened, about 5 minutes. Add the spinach, some salt and pepper, and the nutmeg and stir.
3. Beat the eggs with the cheeses in a large bowl. Stir in the spinach mixture, dill, and parsley. Heat the oven to 350°F.
4. Unroll the phyllo sheets and cut them into thirds lengthwise. Keep the phyllo sheets covered with a piece of plastic wrap and a damp towel over the top to prevent them from drying out. Working with one piece at a time, brush lightly with butter, then sprinkle lightly with bread crumbs. Put 1 heaping teaspoon of spinach filling in one corner of the dough and fold the corner over to make a triangle (see illustrations). Continue to fold the phyllo, making triangles—as you learned to do with a flag. As each piece is finished, brush the top with melted butter and put on a baking sheet.
5. Once the sheet is full, bake for about 20 minutes, until the triangles are nicely browned; while they’re in the oven, continue to shape the rest. Let each batch rest for 5 to 10 minutes before serving.
SPINACH-CHEESE PIE This makes for easy assembly; cut into generous slices, it’s both rustic and divine, absolutely dinner worthy: After you’ve prepared the filling, lightly grease a rectangular 13 × 9-inch baking dish with the butter. Place one sheet of phyllo in the bottom of the dish and brush with more butter. Repeat with half of the phyllo, then spread the filling on top. Stack the remaining phyllo over the top, brushing each layer with butter, and use a sharp knife to score the top layers into squares or rectangles (don’t cut all the way through to the bottom). Bake for 40 to 50 minutes, until the top of the dough is golden brown and very crisp. Serve warm or at room temperature.
PHYLLO TRIANGLES WITH LEMONY GREENS This is also good if you cook 1 cup mushrooms with the onion: Use any greens you like—spinach, kale, dandelion, escarole, etc.—and increase the amount to 3 pounds. In Step 2, add ½ cup chopped walnuts to the onion; season the greens and onion with 2 tablespoons fresh lemon juice. Let cool for a few minutes, then stir in 2 beaten eggs; omit the cheese. Proceed as directed.
PHYLLO TRIANGLES WITH CHEESE Omit the spinach and everything in Step 2. In Step 3, add 1 cup grated Parmesan, pecorino Romano, or other hard cheese (hard Greek sheep’s milk cheese would be ideal) to the mix along with nutmeg and black pepper to taste; omit the dill and parsley.
PHYLLO TRIANGLES WITH LAMB Reduce the spinach to 12 ounces. Before adding the onion and scallions to the skillet, cook 12 ounces ground lamb, stirring and breaking up any clumps, until it loses its red color, about 5 minutes. Add the onion and scallions and proceed as directed.
BOUREKAS Variations of these individual pies exist all over the Middle East; my favorite is this Israeli version: After brushing the stuffed triangles with the melted butter, sprinkle generously with sesame seeds and a little za’atar, a Middle Eastern spice blend. It’s not quite traditional, but it’s fantastic here.
Folding Spinach-Cheese Triangles

Step 1
Spoon the filling onto one corner of the dough.
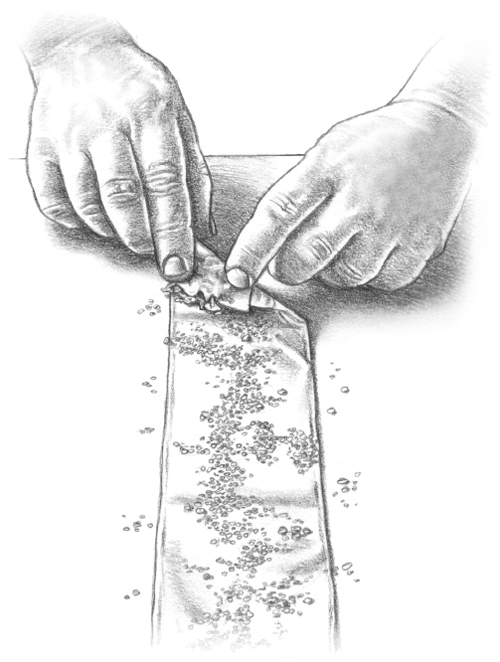
Step 2
Fold over the corner to make a triangle.
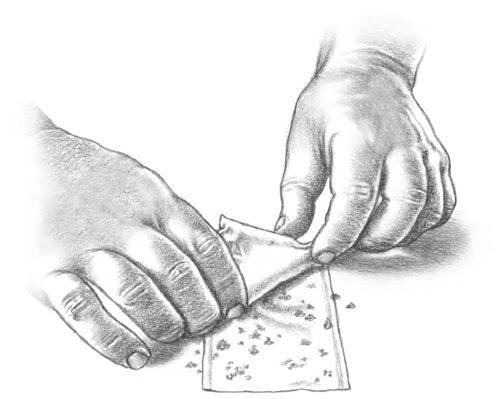
Step 3
Continue folding in triangles as you would a flag.
Lebanese Meat Pies
Makes: About 30 pieces
Time: About 2 hours
These cinnamon-laced pies, called fatayar, are wrapped in a wonderfully tender yeasted dough and pinched into triangles that are incredibly easy to eat and share. If you prefer, you can use this filling with phyllo dough to make triangles as on page 527 or substitute Savory Tart Crust (page 520) for the yeasted dough.
- 3 cups flour, plus more for dusting
- 1 tablespoon instant yeast
- 1 teaspoon salt
- ⅓ cup plus 2 tablespoons olive oil
- 1 yellow onion, finely chopped
- 1 pound ground lamb or beef
- 1 teaspoon salt
- ½ teaspoon cinnamon
- ¼ teaspoon black pepper
- ¼ teaspoon cumin
- ½ cup pine nuts (optional)
- 1 egg
1. Combine the flour, yeast, and salt In a large bowl or a food processor. Slowly drizzle in 1 cup water and ⅓ cup of the oil, stirring with a wooden spoon or pulsing the machine until the dough forms a ball. Transfer to a lightly floured work surface and continue to knead by hand for a minute or 2, dusting with flour if it gets too sticky to handle, until the dough is smooth. Place it in a large bowl, cover lightly with plastic wrap or a towel, and set aside to rise for at least 1 hour, until nearly doubled in size.
2. Put the remaining 2 tablespoons oil in a large skillet over medium heat, then add the onion and cook until it starts to soften, just a few minutes. Add the lamb, stirring occasionally and breaking it up with the spoon, until it’s cooked through. Stir in the salt, cinnamon, pepper, cumin, and the pine nuts if you’re using them; remove from the heat and let cool.
3. Heat the oven to 400°F and line 2 baking sheets with parchment paper. Divide the dough in half and reserve one half. Roll the other out on a lightly floured surface into a rectangle less than ¼ inch thick, then use a sharp paring knife or pizza wheel to cut it into 4-inch squares. Add a heaping tablespoon of the lamb mixture to the center of each. Beat the egg with 1 tablespoon water and brush it lightly along the borders of each pie, then draw opposite corners together to make triangular pies and press gently on the edges to seal. Poke a slit in the top of each with the tip of a paring knife and arrange the pies on the prepared sheets, just an inch or 2 apart. Cover with plastic wrap and set aside while you repeat with the rest of the dough and filling.
4. Bake the pies for about 20 minutes, until golden brown, rotating the sheets halfway through baking. Serve warm or at room temperature with yogurt for dipping. These also freeze well, packed in an airtight zipper bag, for up to 2 weeks; thaw completely in the fridge before baking as directed.
34 Savory Dishes You’ll Find Elsewhere in This Book
- Parsley Parsnip Bread (page 68)
- Whole Wheat Molasses Bread (page 69)
- Southern Corn Bread and variations
- Leftovers Bread and variations
- Savory Muffins
- Parsley Polenta Muffins
- Buttermilk Biscuits and variations
- Sweet Potato Biscuits and variations
- Bacon Cheddar Pinwheel Biscuits
- Goat Cheese and Chive Pinwheel Biscuits
- Orange-Olive Oil Biscuits and variations
- Goat Cheese and Dill Scones
- Popovers and variations
- Irish Soda Bread and variations
- Rieska and variations
- Cornmeal Pancakes and variations
- Buckwheat Pancakes and variations
- Mashed Potato Pancakes and variations
- Corn Waffles and variations
- Savory French Toast
- Monte Cristo French Toast
- Crêpes (page 121) with any savory fillings
- Japanese Egg Crêpes
- Mashed Potato Blintzes
- Fried Dough
- Corn Fritters and variations
- Ricotta Fritters and variations
- Cheese-Stuffed Baked Apples
- All of the recipes in Crackers and Flatbreads
- Most of the recipes in Yeast Breads
- Gougères and variations
- Apple-Cheddar Turnovers
- Ham and Cheese Croissants
- Cheese-and-Herb Phyllo Pastries
Georgian Cheese Bread
Makes: 1 boat, enough to serve 4 as a snack
Time: About 2 hours, largely unattended
This traditional dish from the country of Georgia, known as acharuli khachapuri, is essentially a canoe made out of pizza dough and filled with bubbling cheese and a runny egg. What’s not to like? The most fun way to eat it is to put the boat on a platter while it’s still hot and tear into it with your fingers, dipping the hunks of bread into the molten center. If that sounds too hot or messy (it can be both), you can always cut it crosswise into pieces and serve on individual plates.
- 1½ cups all-purpose or bread flour, plus more as needed
- 1 teaspoon instant yeast
- 1 teaspoon salt
- 1 tablespoon olive oil, plus more for greasing
- 1½ cups shredded Muenster cheese
- ¾ cup crumbled feta cheese
- Black pepper
- 1 egg
- 1 tablespoon butter, cut into small cubes (optional but traditional)
1. Combine the flour, yeast, and salt in a food processor. Turn the machine on and add ½ cup water and the oil through the feed tube. Process for about 30 seconds, adding more water a little at a time until the mixture forms a ball and is slightly sticky to the touch. If it is still dry, add another tablespoon or 2 of water and process for another 10 seconds. In the unlikely event that the mixture is too sticky, add flour a tablespoon at a time.
2. Turn the dough onto a floured work surface and knead by hand to form a smooth, round dough ball. Grease a bowl with oil, add the dough, and turn to coat; cover with plastic wrap and let rise until the dough doubles in size, 1 to 2 hours. Meanwhile, mix the cheeses together in a bowl; season with black pepper.
3. When the dough is ready, heat the oven to 475°F, with a baking stone in it if you have one. On a lightly floured surface, roll the dough out into a circle about ⅛ inch thick. Sprinkle half of the cheese mixture over the dough, leaving a 1-inch border around the edge. Roll one side of the circle toward the center, then repeat with the opposite side so that there is a gap of about 4 inches in between the 2 rolls (see following illustrations). Pinch the open ends of the rolls together on both sides and twist them together (the resulting shape should look something like a boat).
4. Carefully transfer the boat to a lightly floured peel, floured baking sheet, plank of wood, or flexible cutting board or put it on a rimmed baking sheet lined with parchment. Sprinkle the rest of the cheese mixture into the opening in the middle. Slide the boat onto the baking stone if you’re using one or put the baking sheet in the oven. Bake for 15 to 20 minutes, until the crust is golden. Crack the egg into the middle of the boat and bake until the egg is partially set, 3 to 5 minutes, depending on how firm you want the egg. Remove the boat from the oven, put the cubes of butter in the middle if you’re using them, and serve as soon as you’re comfortable tearing into it with your fingers.
ITALIAN CHEESE BREAD Substitute 2 cups shredded fresh mozzarella and ¼ cup grated Parmesan or fontina for the cheeses and add ¼ cup chopped dried tomatoes. Drizzle with olive oil instead of using the butter if you like.
MEXICAN CHEESE BREAD Substitute 2¼ cups shredded cheddar or Jack cheese and a chopped jalapeño for the cheeses.
Shaping Georgian Cheese Bread
STEP 1
Sprinkle the cheese mixture over the dough, then roll one side of the circle toward the center.
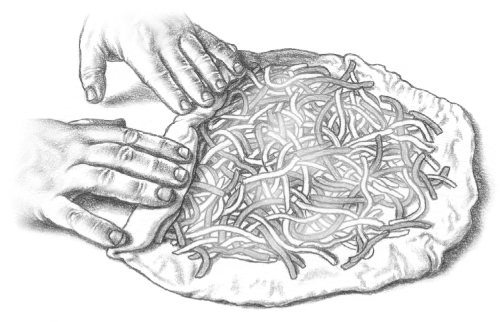
STEP 2
Repeat with the opposite side, leaving about 4 inches in between the two rolls.
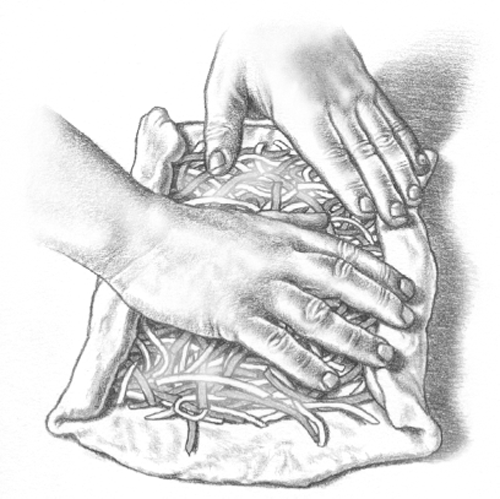
Step 3
Pinch the open ends shut and twist them together.
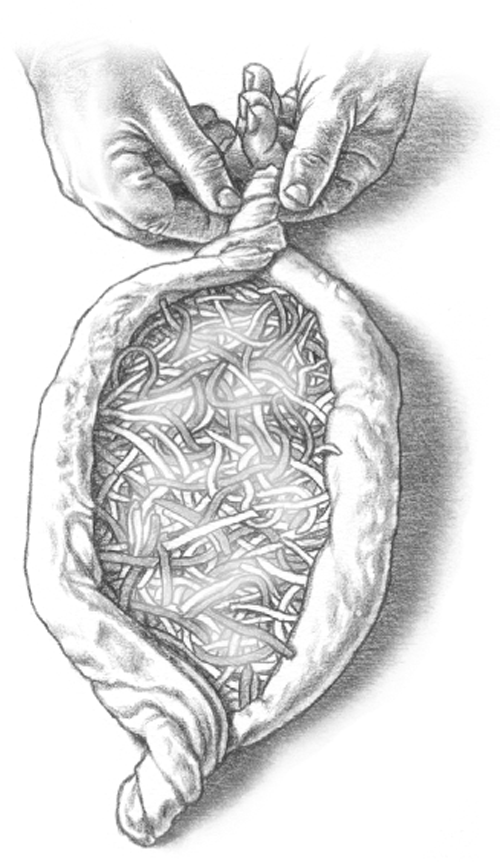
Step 4
Once the bread is baked, crack an egg into the middle of the boat, then return to the oven until the egg is set.

Tomato, Olive, and Mozzarella Turnovers
Makes: About 18 small turnovers
Time: About 1 hour
A savory Mediterranean take on the turnover. Once you’ve got the rolling and forming technique down, the possibilities for fillings are pretty much endless.
- ½ cup dried tomatoes, chopped
- ½ cup pitted olives, chopped
- ½ cup shredded or thinly sliced fresh mozzarella
- ¼ cup chopped fresh parsley
- 1 egg yolk
- 2 tablespoons olive oil
- ½ teaspoon salt
- ¼ teaspoon black pepper
- Flour for dusting
- 1 pound puff pastry dough, homemade (pages 465-466) or store-bought, chilled
1. Put the tomatoes, olives, cheese, parsley, egg yolk, olive oil, salt, and pepper into a large bowl and stir until thoroughly combined.
2. Lightly dust a counter with flour. Cut the pastry in half; wrap one half and place it in the fridge as you roll the other out, sprinkling with more flour as necessary, until the dough is about ¼ inch thick and about 12 inches on each side. Cut the pastry into nine 4-inch squares.
3. Put a heaping tablespoon of the tomato mixture in the center of each square; brush the edges of the pastry very lightly with water, then fold over the corners to form a triangle. Seal by pressing the edges gently with a fork, then use the fork to poke the top of each turnover 3 times so steam can escape. Put the turnovers on ungreased baking sheets, about an inch apart, and chill while you heat the oven (or for up to several hours).
4. Repeat with the second half of the pastry.
5. Heat the oven to 375°F. Brush the tops of the turnovers with a little water and sprinkle lightly with pepper. Bake for about 30 minutes, until the turnovers are golden brown. Serve hot or warm.
PEAR-BLUE CHEESE TURNOVERS For the filling, core 1 large pear (peel if you like) and grate or finely chop it. Toss it with 1 tablespoon fresh lemon juice, then fold in ½ cup crumbled blue cheese and 1 teaspoon chopped fresh thyme. Other good additions here: up to ½ cup chopped walnuts or prosciutto.
MUSHROOM TURNOVERS Fill the pastry with the mixture from the Mushroom Strudel variation.
Skillet Tamale Pie
Makes: 4 servings
Time: 45 minutes
It’s not that I don’t love making actual tamales, but this retro casserole is a much more realistic endeavor for a weeknight dinner. Masa harina gives the topping that authentic tortilla flavor, but regular cornmeal is a fine substitute. For possible additions to the batter, see the Spicy Skillet Tamale Pie variation that follows, as well as the list of corn bread stir-ins.
- 1 cup masa harina or fine- or medium-grind cornmeal
- 1½ cups hot water or more as needed
- Salt
- 2 tablespoons olive oil or more as needed
- 12 ounces ground beef, pork, or lamb
- Black pepper
- 1 onion, chopped
- 1 tablespoon minced garlic
- 2 teaspoons chili powder
- 1 teaspoon cumin
- 8 plum or 4 large ripe tomatoes, chopped, or 2 cups chopped drained canned tomatoes
- 3 cups fresh or frozen corn kernels
- ½ teaspoon baking powder
- ¼ cup chopped fresh cilantro for garnish
1. Heat the oven to 400°F. In a medium bowl, combine the masa, hot water, and a large pinch of salt; stir with a fork until smooth.
2. Put the oil in a deep ovenproof skillet (cast iron is ideal) over medium-high heat. When hot, add the meat, sprinkle with salt and pepper, and cook, stirring and breaking up any clumps until nicely browned, 5 to 10 minutes. Lower the heat a bit, add the onion and garlic, and cook, stirring occasionally and adding more oil if the mixture starts to look dry, until the vegetables soften, about 5 minutes. Stir in the chili powder, cumin, tomatoes, and corn and turn off the heat.
3. Stir the baking powder into the cornmeal mixture until it’s completely incorporated. The mixture should be the consistency of thick pancake batter; if not, add a little more water. Spoon the batter into the skillet on top of the filling and spread it around a bit. Bake for 20 to 25 minutes, until the corn bread has cracked and turned golden and is cooked all the way through (a toothpick inserted into the corn bread should come out clean). Garnish with the cilantro and serve hot or at room temperature.
Cheesy Skillet Tamale Pie Stir 1½ cups grated Jack cheese into the skillet along with the tomatoes and corn.
Spicy Skillet Tamale Pie An addition of heat to both layers. Substitute fresh (Mexican) chorizo (removed from the casing) for the meat. Add 1 minced fresh chile, like jalapeño or serrano, to the masa mixture in Step 1.
ITALIAN TAMALE PIE Substitute Italian sausage (removed from the casing) for the meat. Substitute 1 teaspoon hot red pepper flakes for the chili powder and cumin and basil for the cilantro.
Baked Brie
Makes: 8 to 10 servings
Time: About 1 hour
With puff pastry on hand, this old-school party appetizer is ridiculously easy, yet still impressive and an infallible crowd pleaser. The main recipe is just cheese wrapped in crust—hardly a bad thing—but you can consult the list of possible embellishments below or see How to Bake Anything en Croute to use the same technique with vegetables, meats, fish, and more. Serve with sliced apples, carrot or celery sticks, or whatever is your preferred implement for scooping up melted cheese.
- Flour for dusting
- 1 pound puff pastry dough, homemade (pages 465-466) or store-bought, chilled
- 1 8-ounce wheel Brie
- 1 egg
1. Heat the oven to 400°F. Lightly dust a work surface with flour; roll out the pastry until it’s about 12 inches square and less than ¼ inch thick. Sprinkle with more flour as needed.
2. Place the wheel of cheese in the center of the dough. If you’d like to add any toppings (see the list that follows), place them on the top of the cheese, right in the center. Fold opposite dough corners over the cheese, pinching them together in the center to seal. Transfer the package, seam side down, to a rimmed baking sheet.
3. Beat the egg with 2 tablespoons water and brush it all over the crust. Bake for about 45 minutes, until the crust is puffed and dark golden brown. To serve, put the package on a large wooden board or platter and slice into it while still hot so the cheese oozes out.
8 Additions to Baked Brie
Spread or scatter a couple tablespoons of any of the following on top of the Brie before enclosing in puff pastry:
- Fruit Compote
- Fruit Jam
- Caramelized onions
- Olive tapenade
- Chopped nuts mixed with honey or maple syrup
- Chopped dried fruit
- Apple or pear slices
- The mushroom filling from Mushroom Strudel
Olive Palmiers
Makes: About 50
Time: 1¼ hours
Although they’re usually sweet (see page 467), palmiers are easily and spectacularly made into appetizers by spreading the dough with savory ingredients instead of sugar. Sharp, briny tapenade cuts through the buttery pastry particularly well; the recipe for it here gives you some leftovers, which will keep in the fridge for at least a month, but if you prefer, you can use your favorite store-bought version.
If you’re not cooking these for a crowd (they stay crisp for only a few days), use half as much puff pastry and freeze the rest or shape and then freeze the palmiers for up to 1 month, thaw completely in the fridge, and bake them as you need them.
- 1 pound good black olives, preferably oil cured, pitted
- 3 tablespoons capers, rinsed if salted, drained if brined
- 6 or 8 anchovies with some of their oil
- 1 or 2 cloves garlic, smashed
- About ½ cup olive oil, plus more if desired
- 1 teaspoon fresh thyme leaves (optional)
- Flour for dusting
- 1 pound puff pastry dough, homemade (pages 465-466) or store-bought, chilled
1. Make the tapenade: Combine the olives, capers, anchovies with their oil, and garlic in a food processor, along with a bit of the olive oil. Pulse the machine once or twice, then turn it on and add the remaining olive oil rather quickly; you don’t want this purée too uniform but rather rough, as it would be if you had the energy to use a mortar and pestle (which you can use if you prefer). Stir in the thyme if you’re using it and thin with more olive oil if necessary.
2. Make the palmiers: Lightly dust a work surface with flour. Roll the dough into a rectangle about 14 inches long and less than ¼ inch thick, sprinkling on more flour as necessary, and spread 1 cup of the tapenade over the whole sheet. Fold each of the short ends 2 or 3 times inward to reach the middle, then fold the dough in half along the center and press gently to seal (see the illustrations on page 469). Wrap tightly in plastic wrap and refrigerate for about 30 minutes.
3. Heat the oven to 350°F. Slice the log into ¼-inch-thick slices and put on ungreased baking sheets. Bake until golden brown, about 30 minutes, turning the baking sheets once after about 20 minutes. Store cooled palmiers in an airtight container at room temperature.
OLIVE AND FETA PALMIERS After spreading the tapenade onto the puff pastry, sprinkle with ½ cup crumbled feta.
PESTO AND DRIED TOMATO PALMIERS Substitute pesto for the tapenade. In a food processor or blender, combine 2 loosely packed cups fresh basil leaves, ½ clove garlic, 2 tablespoons pine nuts, ¼ cup olive oil, and a pinch of salt. Purée, stopping to scrape down the sides of the container if necessary and adding another ¼ cup oil as you go. Stir in ½ cup freshly grated Parmesan or pecorino Romano by hand. After spreading the pesto onto the puff pastry, sprinkle with ½ cup chopped dried tomatoes.
THREE-CHEESE AND HERB PALMIERS Substitute the following mixture for the tapenade: ½ cup each ricotta, goat cheese, and freshly grated Parmesan, up to 2 tablespoons chopped fresh herbs (like rosemary, thyme, and oregano), 1 teaspoon minced garlic, and some salt and pepper.
How to Bake Anything en Croute
Wrap anything in a layer of puff pastry and not only will the texture change radically, the presentation will be striking. Furthermore, whatever’s inside will remain moist and tender. Use the wrapping technique from Baked Brie with any of these fillings or try your own, taking care not to overfill—about 2 cups’ worth of filling is perfect.
BEETS EN CROUTE: Wrap 1 large beet (about 8 ounces) in foil and roast at 400°F for about 1 hour, until you can easily pierce it with a knife. Once it’s cooled, you can easily peel the skin and chop it. Spread a softened 4-ounce log of goat cheese over the center of the dough, then top with the beet and 1 teaspoon fresh thyme leaves.
SALMON EN CROUTE: Spread an even layer of Dijon or whole-grain mustard over the rolled dough, leaving a 1-inch border. Remove the skin from a 1-pound salmon fillet and place it in the center of the dough. Shape and bake as directed; garnish with fresh dill.
SAUSAGE EN CROUTE: Cut the dough in half so that each piece is 6 inches wide. Spread evenly with whole-grain mustard, then place a piece of kielbasa, andouille, or other cooked sausage in the center, parallel with the long sides of the dough, leaving about 1 inch on either end; cut the sausage to fit. Wrap the dough around it, gently pressing the sides and ends together to seal.
ROASTED VEGETABLES EN CROUTE: This is fantastic with any combination of vegetables and works perfectly with leftovers, so use whatever you have on hand; zucchini, tomatoes, eggplant, and red pepper are great in summer, and butternut squash, cauliflower, carrots, and Brussels sprouts are excellent in winter: Cube 2 cups’ worth of vegetables and combine with ¼ cup chopped onion or leek. Toss everything with olive oil to coat and season with salt and pepper; if you like, add up to 1 tablespoon minced fresh herbs like rosemary, thyme, or sage, 1 tablespoon minced garlic, or up to 1 teaspoon ground spices like cumin, coriander, or chili powder. Roast at 400°F until tender and let cool. Scatter the center of the dough with ½ cup bread crumbs, top with the vegetables, seal well, and roast face up.
BEEF EN CROUTE: Decadent and savory, perfect with a side of creamed spinach: Pat a 1½-pound beef tenderloin dry and season with salt and pepper. Heat 3 tablespoons olive oil in a large skillet over high heat until it’s smoking, then sear the beef on all sides. Set aside. Sauté 2 finely chopped shallots in 1 tablespoon each olive oil and butter over medium heat for 1 minute; add ½ pound finely chopped mushrooms and 1 teaspoon minced fresh thyme leaves and continue to cook, stirring occasionally, until most of the moisture has cooked out, about 10 minutes. If you like, add ¼ cup Madeira, Marsala, or sherry and continue to cook until the mixture reduces to a syrup. Spread the mushrooms over the center of the dough and top with the beef. Shape and bake as directed.
EASY TOURTE MILANESE: This is traditionally assembled in a deep pie plate so that its immaculate layers are revealed in each slice. My version combines the same flavorful, colorful components with a fraction of the effort: Roast 1 red pepper, remove the skin, and finely chop (or use store-bought). Sauté 2 cups chopped spinach and 2 cloves minced garlic in 1 tablespoon olive oil and ½ teaspoon salt. Use a slotted spoon or strainer to drain off any excess moisture; set aside. In a separate pan, gently scramble 2 eggs over low heat, stirring constantly to make fine curds; set these aside too. Place 1 slice each good-quality ham and Swiss cheese in the center of the dough. Spread the eggs over this, then top with the spinach and the red peppers. Stack one more slice each of the cheese and ham, then fold and bake as directed.
Savory Bread Pudding (Strata)
Makes: 6 to 8 servings
Time: About 1 hour, largely unattended
The ultimate safety net for bread bakers, ensuring that your day-old loaves will never go to waste. It’s good with any hard, semihard, or crumbled cheese, herbs, or cooked meat, and it’s a wonderful repository for leftover cooked vegetables; stir in up to 3 cups along with the cheese. Plus, any bread you like will work, just as long as it’s neither overly crusty nor overly soft. If all you have on hand is fresh bread, dry it out first: cut or tear it into pieces and put it on a baking sheet in a single layer. Bake it in a 250°F oven until dried out but not browned, 5 to 10 minutes, depending on the bread. If it starts to brown, turn your oven to the lowest temperature or turn the heat off entirely but leave the bread inside.
- 3 cups milk
- 4 tablespoons (½ stick) butter, plus more for greasing
- ¼ cup chopped mixed fresh herbs, like parsley, chives, thyme, and sage
- Salt and pepper
- 8 thick slices day-old bread, crusts removed if very thick
- 3 eggs
- 2 cups grated Gruyère, Emmental, cheddar, or Jack cheese
1. Preheat the oven to 350°F and put a kettle of water on to boil. Warm the milk, butter, herbs, and a good sprinkling of salt and pepper in a small saucepan over low heat just until the butter melts. Meanwhile, butter a 1½-quart or 8-inch square baking dish (glass is nice) and cut or tear the bread into bite-sized pieces—not too small.
2. Put the bread in the baking dish and pour the warm milk mixture over it. Let it sit for a few minutes, occasionally submerging any pieces of bread that rise to the top. Beat the eggs briefly and pour them evenly over the bread mixture. Sprinkle the cheese evenly on top. Set the baking dish in a larger baking pan and pour the hot water from the kettle into the pan to within about an inch of the top of the dish (see illustration, page 338).
3. Bake for 45 to 60 minutes or until a thin knife inserted in the center comes out clean or nearly so; the center should be just a little wobbly. Run it under the broiler for about 30 seconds if you want to brown the top a bit. Serve hot or store, covered, in the refrigerator for up to 2 days. To reheat, cover with foil and heat in a 325°F oven for about 15 minutes; remove the foil and heat for another 5 minutes or so for a crisper crust.
BACON BREAD PUDDING Begin by cooking about 8 slices of bacon until crisp. Remove the bacon with tongs or a slotted spoon and roughly chop it. Use the rendered bacon fat in place of half of the butter. Stir in the chopped bacon along with the cheese in Step 2.
JalapeñO CORN BREAD PUDDING Skip the herbs; use day-old corn bread (page 71) as the bread and cheddar or Jack as the cheese. Stir in 1 or 2 chopped jalapeños and ½ cup chopped scallions along with the cheese.
BLUE CHEESE AND WALNUT BREAD PUDDING Especially nice with Multigrain Bread: Use 1 tablespoon chopped fresh rosemary as the herb and blue cheese (no more than 1½ cups) as the cheese. Stir in 1 cup roughly chopped toasted walnuts along with the cheese.
RYE BREAD PUDDING WITH PASTRAMI AND SWISS Like a deconstructed Reuben sandwich: Skip the herbs; use rye bread and Swiss cheese. Stir in 1 cup chopped pastrami along with the cheese, and if you really want to channel the Reuben, stir in some sauerkraut as well.
SAUSAGE AND OLIVE BREAD PUDDING Begin by sautéing 8 ounces hot or sweet Italian sausage (removed from its casing) with a little olive oil, breaking up the meat as you go, just until cooked. Use 3 tablespoons olive oil in place of the butter, parsley as the herb, and Parmesan as the cheese. Stir in the sausage (along with any rendered fat) and ½ cup chopped pitted olives along with the cheese.
WHOLE GRAIN BREAD PUDDING WITH SQUASH AND SAGE Begin by roasting 3 cups cubed winter squash that you’ve drizzled with olive oil and sprinkled with salt and pepper at 350°F until just tender, around 40 minutes, depending on the squash. Increase the milk to 3½ cups, use 3 tablespoons chopped fresh sage as the herb, and stir in the roasted squash and a handful of cooked wheat berries, farro, rye, or other chewy grain along with the cheese. Use Multigrain Bread.
BREAD PUDDING WITH DRIED TOMATOES AND MOZZARELLA Use a good white or semolina bread: In Step 1, add 1 cup chopped dried tomatoes to the milk when heating. Use chopped fresh basil as the herb and substitute slices of fresh mozzarella for the grated cheese.
Chipotle Spoon Bread
Makes: 6 to 8 servings
Time: About 1 hour
A traditional southern side dish, spoon bread is a moister cousin of corn bread—closer in texture to a baked pudding or soufflé. Purists don’t whip the egg whites, but I like the extra lift and lightness that results when you do.
- 4 tablespoons (½ stick) butter
- 3 cups whole milk
- 2 dried whole chipotles or 1 chipotle in adobo, chopped
- 1 teaspoon salt
- 1¼ cups fine cornmeal
- ½ teaspoon baking powder
- 3 eggs, separated
- Chopped scallions for garnish
1. Heat the oven to 350°F. Grease a 2-quart baking dish with some of the butter; combine the rest of it with the milk, chipotles, and a large pinch of salt in a medium saucepan over medium heat. Bring just about to a boil, then reduce to a simmer; if you used whole dried chipotles, fish them out and discard them.
2. Add the cornmeal in a steady stream, whisking all the while to prevent lumps from forming. Continue whisking until the mixture thickens slightly, a minute or 2. Remove from the heat, whisk in the baking powder, and let the mixture cool for a few minutes.
3. Beat the egg yolks in a large bowl, then slowly add the cornmeal mixture, whisking constantly. In a separate bowl, beat the egg whites with an electric mixer until they hold stiff peaks. Stir a couple of spoonfuls of the whites into the cornmeal mixture to lighten it a bit, then fold in the remaining whites thoroughly but gently.
4. Pour the mixture into the prepared baking dish and bake for 35 to 45 minutes, until puffed and golden. Serve immediately, garnished with scallions.
MOROCCAN-SPICED PUMPKIN SPOON BREAD Omit the chipotles. Whisk in 1 cup pumpkin purée and ½ teaspoon each cumin, coriander, cinnamon, and paprika after whisking in the baking powder.
CHEDDAR-CHIVE SPOON BREAD Omit the chipotles (although they would not be out of place here if you want a little heat). Stir in 1 cup grated cheddar and ½ cup chopped chives before folding in the egg whites. Sprinkle another ¼ cup cheddar over the top before baking.
Cabbage Strudel
Makes: 4 to 6 servings
Time: About 2 hours
Strudel is a blank slate, as good a vehicle for savory fillings as it for sweet ones (see page 494). Cabbage is classic, as is mushroom (see the variation), each of them a tender foil for their phyllo shell. To keep the phyllo crisp, make sure the filling isn’t too wet; strain out any juices if necessary.
- 1 pound Savoy or green cabbage (1 small or ½ medium head), cored and shredded
- 1 teaspoon paprika
- Salt and pepper
- 2 sticks butter
- 8 sheets store-bought phyllo dough (about 4 ounces), thawed, or 4 sheets Phyllo Dough
1. Heat the oven to 350°F. Put the cabbage in a 13 × 9-inch baking dish and toss with the paprika and some salt and pepper. Cut 1 stick of the butter into cubes and scatter over the top. Cover the dish with aluminum foil and bake, stirring once or twice and then covering again with the foil, until the cabbage is tender and golden brown, about an hour. Set aside to cool.
2. Line a baking sheet with parchment paper. Melt the second stick of butter. Keep the phyllo sheets covered with a piece of plastic wrap and a damp towel over the top to prevent them from drying out. Remove 1 sheet of phyllo and place it on the baking sheet. Immediately brush it with melted butter. Place another sheet on top of it and quickly brush it with more butter, then repeat with all the sheets to make a stack.
3. Spoon the cabbage mixture in a line along one long edge of the phyllo; roll it into a log and finish with the seam side down; tuck in the ends of the log.
4. Brush the strudel with more butter and score the top a few times with a sharp knife. Bake for about 30 minutes, until golden brown. Let rest for just a couple minutes, then cut into 2- to 3-inch-thick slices.
CARAWAY CABBAGE STRUDEL Toss the cabbage with 1 tablespoon caraway seeds along with the paprika before baking.
MUSHROOM STRUDEL Substitute 1 pound assorted mushrooms (chopped fairly small) for the cabbage and omit the paprika. Put 3 tablespoons butter in a large skillet over medium heat. When hot, add a chopped shallot (and a minced garlic clove if you like) and cook until softened; add the mushrooms, sprinkle with salt and pepper, and cook until tender. Add ¼ cup red wine and cook until it mostly bubbles away; stir in 2 tablespoons cream and a sprinkling of fresh thyme leaves and cook until the mixture thickens a bit, just a minute or 2. Set aside to cool, then proceed as directed.
Baked Vegetable Flatbread
Makes: 4 servings
Time: About 45 minutes
Baked in a very hot oven with copious amounts of olive oil, this mushroom and onion flatbread becomes wonderfully crisp. Serve it on its own as an appetizer (the smell will hook your dinner party guests as soon as they walk in the door), or as an accompaniment for soup or stew. I sometimes grate Parmesan over the top of the bread while it’s still warm. For a nuttier flavor and heartier texture, use half whole wheat flour.
- 6 tablespoons olive oil
- 4 ounces button or cremini mushrooms, thinly sliced
- 1 small onion, thinly sliced
- Salt and pepper
- 1 cup flour
- 1 tablespoon chopped fresh rosemary leaves
1. Heat the oven to 450°F. Put 2 tablespoons of the oil in a large ovenproof skillet over medium heat. When hot, add the mushrooms and onion and sprinkle with salt and pepper. Cook, stirring occasionally until soft, 5 to 10 minutes.
2. Meanwhile, put the flour in a medium bowl; sprinkle with salt and pepper, then slowly add 1½ cups warm water, whisking to eliminate lumps. The batter should be the consistency of thin pancake batter. Stir in the rosemary.
3. When the vegetables are soft, add them to the batter. Put the remaining 4 tablespoons oil in the same skillet and let it heat up. Pour in the batter and swirl it around to make sure the vegetables are spread out evenly. Transfer the skillet to the oven and bake for about 30 minutes, until the flatbread is browned and crisped around the edges (it will release easily from the pan and a toothpick inserted into the middle will come out clean).
4. Let the bread cool for a minute or 2, then cut it into wedges and serve.
MEATY BAKED FLATBREAD Omit the mushrooms. Before adding the onion to the skillet, cook 4 ounces ground lamb or crumbled Italian sausage until lightly browned.
BAKED FLATBREAD WITH HEARTY GREENS Omit the mushrooms and rosemary. Stir up to 1 cup chopped cooked and drained greens, such as kale, collards, broccoli rabe, or spinach, into the batter at the end of Step 2.
CHICKPEA VEGETABLE FLATBREAD A cousin of the Provençal flatbread called Socca: Substitute chickpea flour for all-purpose flour.
Scallion Pancakes
Makes: 4 servings
Time: About 1 hour, largely unattended
These Chinese-restaurant favorites are incredibly easy to make at home, and come out better than (probably) any you’ve had before. The dough comes together in 30 seconds and requires only a short rest (which you could skip if you were in a hurry) before a quick sear in a skillet. You can make an even faster version using a pancakelike batter (see the variation).
A dipping sauce is pretty much nonnegotiable when it comes to scallion pancakes, so I’ve included a recipe. Spike it with sriracha hot sauce for an extra kick.
- 2 cups flour
- ½ cup chopped scallions, or more if you like
- Salt
- ¼ cup soy sauce
- ¼ cup mirin or 1 tablespoon honey mixed with 2 tablespoons water and 1 tablespoon rice or apple cider vinegar
- 1 teaspoon minced fresh ginger
- Flour for dusting
- Neutral oil (like grapeseed or corn) for frying
1. Combine the flour, scallions, and a pinch of salt in a large bowl. Slowly stream in ¾ cup warm water, stirring by hand as you go, until the dough comes together into a ball. Cover the dough and let it rest for 20 to 30 minutes.
2. Meanwhile, make the dipping sauce: Combine the soy sauce, mirin, and ginger in a small dish.
3. Divide the dough in half and roll each piece out into a thin (⅛- to ¼-inch) round pancake. Coat a large skillet (preferably nonstick) with oil and put over medium-high heat. When the oil is hot, add a pancake and cook, turning once, until golden brown on both sides, 2 to 4 minutes per side. Transfer to a paper towel to drain and repeat with the second pancake Cut into wedges, and serve immediately with the dipping sauce.
SESAME PANCAKES Add 1 teaspoon sesame oil to the dough along with the water, and substitute ½ cup toasted sesame seeds for the scallions, or use both.
EASIER SCALLION PANCAKES Faster too: Instead of a dough, make a batter. Combine 1 egg, ¾ cup water, 1 cup flour, and a pinch of salt in a large bowl. Whisk until smooth. The mixture should have the consistency of thin pancake batter; if it doesn’t, add water or flour as necessary. Stir in the chopped scallions. Heat the pan with a little more oil than the main recipe, pour half of the batter into the hot pan, and cook as you would a traditional American pancake, using the remaining batter to make a second pancake and adding more oil if necessary.
Korean Vegetable Pancakes
Makes: 6 to 8 servings
Time: About 45 minutes
These addictive savory cakes are more substantial than scallion pancakes, with the vegetables front and center and just enough batter to bind them together. To make sure they’re crisp on the outside and tender and chewy on the inside, you should use half rice flour. You can get away with only all-purpose flour if necessary, but it won’t give you that marvelous chewiness. Serve the pancakes hot or room temperature with a dipping sauce made of soy sauce and rice vinegar.
Other vegetables are also wonderful here, either in place of or in addition to the carrots and zucchini: Corn kernels, shredded cabbage, and radish (daikon in particular) are especially nice; use up to 2 cups prepared vegetables in total.
- 1 cup all-purpose flour
- 1 cup rice flour
- 2 eggs, lightly beaten
- 1 tablespoon neutral oil (like grapeseed or corn), plus more for the pan
- 5 scallions, green parts only, cut into 3-inch lengths and sliced lengthwise
- 20 chives, preferably Chinese (“garlic”) chives, or ¼ cup chopped fresh parsley or cilantro
- 2 medium carrots, grated
- 1 small yellow squash or zucchini, grated
1. Mix the flours, eggs, and oil with 1½ cups water in a large bowl until a smooth batter forms. Let it rest while you prepare the vegetables. When you’re ready to cook, stir the scallions, chives, carrots, and squash into the batter.
2. Heat a large nonstick skillet over medium heat and coat the bottom with oil. When hot, ladle in a quarter of the batter and spread it out evenly into a circle. Continue to cook until the bottom is browned, about 5 minutes, then flip and cook for another 5 minutes. If the edges seem to be browning and crisping up before the center is fully cooked through, use a metal spatula to press the center flat. Repeat with the remaining batter.
3. As the pancakes finish, remove them and, if necessary, drain on paper towels. Cut into small triangles and serve with a soy sauce dipping sauce, such as the one from Scallion Pancakes.
KIMCHI PANCAKES Spicy and incredible. Add about 1 cup chopped drained kimchi to the batter.
KOREAN SEAFOOD AND VEGETABLE PANCAKES Add about 1 cup chopped raw shrimp, squid, or scallops to the batter.
Johnnycakes
Makes: 4 servings
Time: 30 minutes
These cornmeal pancakes most likely originated with native Americans but have since become a staple of the cuisines of New England and the South (where they’re called “hoecakes”). They are cooked on a griddle or in a skillet and can be loaded up with any number of mix-ins, both sweet and savory. If you like, serve them as you would regular pancakes, with a little maple syrup and a pat of butter. They’re best when eaten fresh, but you can always reheat them if necessary; wrap them in foil and warm in a 300°F oven for about 15 minutes.
- 1½ cups fine or medium-grind cornmeal
- 1 teaspoon salt
- ¼ teaspoon black pepper
- 1½ cups boiling water
- ½ cup buttermilk or whole milk or more as needed
- 2 tablespoons butter, melted
- 1 cup fresh or thawed frozen corn kernels
- Neutral oil (like grapeseed or corn) for frying
1. Heat the oven to 200°F. Combine the cornmeal, salt, pepper, and boiling water in a bowl and let it sit until the cornmeal absorbs the water and softens, 5 to 10 minutes.
2. Stir in the buttermilk a little at a time until the batter is spreadable but still thick. Stir in the melted butter and corn.
3. Put a large skillet or griddle (preferably cast iron) over medium heat. After 2 or 3 minutes, add a thin film of oil and let it get hot. Working in batches, spoon the batter onto the skillet or griddle, making any size pancakes you like. Cook until bubbles appear and burst on the top and the underside is golden brown, 3 to 5 minutes; flip and cook on the other side until golden. Transfer the cooked cakes to the oven to keep warm and continue with the next batch. Serve warm.
CHEDDAR-SCALLION JOHNNYCAKES Substitute ½ cup grated cheddar and ½ cup chopped scallions for the corn.
SPICED JOHNNYCAKES Add 1 tablespoon curry powder or chili powder along with the boiling water. For some extra heat, stir in some minced jalapeño along with the corn.
MAPLE-WALNUT JOHNNYCAKES Substitute ½ cup chopped walnuts (or any nuts) and 2 tablespoons maple syrup for the corn. Some chopped fresh or dried fruit is a good addition here as well.
OLIVE AND DRIED TOMATO JOHNNYCAKES Substitute ⅓ cup each chopped olives and dried tomatoes for the corn. If you like, stir in ¼ cup chopped fresh basil or parsley or 1 tablespoon chopped fresh rosemary or thyme.
SHRIMP AND GRITS CAKES Substitute grits for the cornmeal. Stir in 1 cup chopped raw shrimp and ½ teaspoon (or more) cayenne along with the boiling water. Substitute ½ cup chopped scallions for the corn.
Potato Knishes
Makes: 6
Time: About 2 hours
I ate these as a kid growing up in New York, where you used to be able to find them at delis on practically any block of the Lower East Side. Real Jewish delis are disappearing fast, meaning that to get a great knish you may just have to make it yourself. Knishes are traditionally appetizers, or snacks, but I’m full after eating one of these big boys (there’s nothing light about dough-wrapped mashed potatoes). Don’t cut corners when browning the onions; that’s where most of the flavor comes from. I like to dip these in a bit of brown mustard, but applesauce and sour cream are also worthy accompaniments. See the variations for plenty more unorthodox (no pun intended) ideas.
- 3 cups flour, plus more for dusting
- 1½ teaspoons baking powder
- Salt
- 4 large eggs
- ½ cup plus 1 tablespoon neutral oil (like grapeseed or corn)
- 2 teaspoons white vinegar
- 1½ pounds starchy potatoes, like russets (about 2 large or 3 medium), peeled and cut into chunks
- 2 tablespoons unsalted butter
- 2 medium onions, chopped
- Black pepper
1. Combine the flour, baking powder, and a pinch of salt in a large bowl. In a small bowl, beat together 2 of the eggs, ½ cup of the oil, the vinegar, and ¾ cup water. Slowly pour the wet ingredients into the dry, stirring as you go (your hand is the best tool for this) until the dough comes together into a shaggy ball. Add more flour if the dough is too wet or more water if too dry. Turn the dough onto a lightly floured counter and knead until it’s smooth, a minute or 2; cover with plastic wrap and let it rest on the counter for at least an hour or up to overnight in the fridge.
2. Put the potatoes in a medium saucepan and cover with cold water. Add a large pinch of salt and bring to a boil. Keep at a rolling boil until the potatoes are done, anywhere from 15 to 30 minutes, depending on the size of the pieces. Test a piece occasionally: A skewer or sharp knife should meet almost no resistance. Drain the potatoes well and transfer them to a large bowl.
3. Meanwhile, put the remaining tablespoon oil and the butter in a large skillet over medium heat. When the foam subsides, add the onions and sprinkle with salt and pepper; cook, stirring occasionally until they are deeply browned, 30 to 40 minutes.
4. Mash the potatoes with a potato masher or a fork, leaving them a bit chunky; add the onions, 1 egg, some salt and pepper, and stir until well combined.
5. Heat the oven to 375°F and line a large rimmed baking sheet with parchment paper. Lightly dust a work surface with flour; divide the dough in half and roll out 1 piece into a roughly 10-inch square. Scoop half of the potato filling along one side of the square, forming it into a log with your hands and leaving a 1-inch border of dough around the outside (see illustrations). Pull the sides of the dough up over the filling, then roll it into a log; if necessary, brush a little water on the edge to help the seam stick.
6. Using the side of your hand as if it were a knife, “slice” the log crosswise into 3 pieces (see illustrations; using your hand instead of a knife helps seals the sides to give them the characteristic rounded edges). Pinch together any open ends of dough around the filling, then gently pat the knishes with your palms so they flatten out slightly. Put them on the baking sheet, then repeat the process with the second half of dough.
7. Beat the remaining egg with 2 tablespoons water and brush it all over the knishes. Bake for 30 to 45 minutes, until golden brown. Let them cool for a few minutes before serving.
CAULIFLOWER KNISHES When it’s cooked, cauliflower becomes wonderfully creamy, a dead ringer for potatoes: Cut a 1½-pound head of cauliflower into florets and steam, boil, or roast until tender. Substitute for the potatoes.
SWEET POTATO AND BACON KNISHES Who said knishes had to be kosher? Substitute sweet potatoes for russets. Before adding the onions to the skillet, cook 4 ounces chopped bacon until crisp; no need to add any extra oil or butter.
CREAMY SPINACH KNISHES Use only one onion; when it’s soft, add 2 cups baby or chopped spinach and cook until the spinach is cooked. Separately, mash the potatoes with ½ cup cream cheese, then stir in the spinach mixture.
BROCCOLI-CHEDDAR KNISHES Decrease the potatoes to 12 ounces; steam 12 ounces broccoli florets until tender, then mash them together. Use only 1 onion and add 1 cup grated cheddar cheese to the finished filling.
BUTTERNUT SQUASH KNISHES Instead of the potatoes, cube one 2-pound butternut squash, coat it lightly with olive oil, and roast at 400°F until tender.
BEEF KNISHES Omit the potatoes. To the cooked onions, add 1 pound ground beef; continue to cook the mixture over medium heat, stirring occasionally and breaking up the meat with a fork, until it’s cooked through. Season with salt and pepper; if you like, add ¼ teaspoon each ground cinnamon and cumin.
LEEK, SCALLION, AND CHIVE KNISHES These have the wonderfully mild flavors of spring produce: Swap the onions for 2 leeks, white and pale green parts only. Fold ¼ cup sliced scallions and 2 tablespoons minced chives into the filling just before adding it to the dough.
CURRIED KNISHES Think of these as a midpoint between Samosas (below) and knishes: Once you’ve heated the oil and butter, toast 1 teaspoon mustard seeds in the skillet until fragrant. Add the onions and 3 cloves minced garlic; when the onions are soft, stir in 1 tablespoon curry powder and 1 teaspoon ground cumin. Add this to the mashed potatoes, then stir in ¾ cup peas and 1 minced jalapeño, seeds and stem removed.
Making Knishes
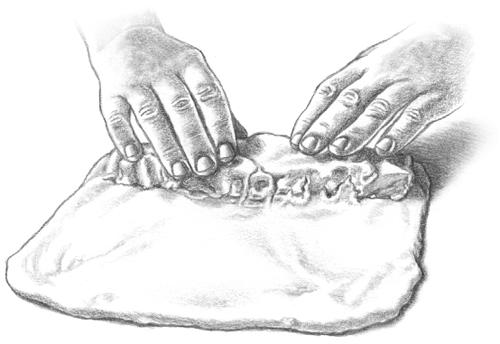
Step 1
Form the filling into a log along one edge of the dough, leaving a 1-inch border.
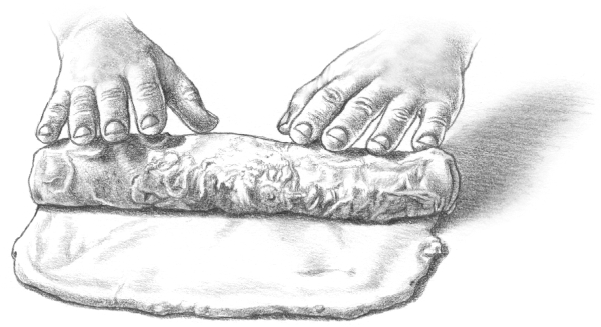
Step 2
Roll the dough into a log.

Step 3
Use the side of your hand like a knife to cut the log into three pieces.
Potato Samosas
Makes: 20 to 30 dumplings, enough for 5 to 10 servings
Time: About 1½ hours
This classic Indian pocket food is an amazing snack with great texture and flavor: tangy dough enriched with butter and yogurt, soft and spicy mashed potato filling speckled with peas. Traditionally, samosas are deep-fried, but baking them is far simpler and less messy, and you still get a satisfyingly crisp crust. If you miss the fried version, see the variation.
- About 1¼ pounds starchy potatoes, like russets (1 large or 2 medium)
- 2 cups all-purpose flour, plus more as needed
- Salt
- 8 tablespoons (1 stick) butter, cold
- 2 tablespoons yogurt, sour cream, or buttermilk
- 1 tablespoon ice water, plus more as necessary
- 1 cup chopped onion
- 1 fresh chile, like jalapeño or serrano, seeded and minced, or cayenne to taste
- 1 tablespoon minced garlic
- 2 teaspoons minced or grated fresh ginger
- 1 tablespoon curry powder
- Black pepper
- ½ cup fresh or frozen green peas (thawed in water to cover while you prepare the other ingredients)
- Neutral oil (like grapeseed or corn) for greasing
1. Peel the potatoes and cut them into ½-inch chunks. Put them in a saucepan and add water to cover. Turn the heat to high and boil them until soft, 5 to 10 minutes. Drain.
2. Meanwhile, make the dough: Put the flour and 1 teaspoon salt in a food processor; pulse for a couple of seconds to blend. Cut 4 tablespoons of the butter into bits, add it to the flour, and turn on the machine; let it run until the butter and flour are combined. Add the yogurt and pulse a few times. Then, with the machine running, add the ice water through the feed tube, adding more 1 tablespoon at a time if needed. The instant the dough forms a ball, stop adding water. Turn the dough onto a lightly floured work surface, knead it for a minute by hand, then cover with plastic wrap or a damp towel and set aside.
3. Put the remaining 4 tablespoons butter in a large skillet, preferably nonstick, over medium heat. Add the onion and the chile and cook, stirring, until the onion softens, about 5 minutes. Add the garlic, ginger, curry powder, and salt and pepper to taste and cook, stirring, for about 2 minutes. Add the cooked potatoes and the peas (drained if they’ve been sitting in water), raise the heat a little, and cook, stirring frequently, until the potatoes begin to brown, about 10 minutes. Taste and adjust the seasoning if necessary; the mixture should be spicy but not fiery. Let cool while you roll out the dough.
4. Heat the oven to 350°F; grease a baking sheet with oil. Knead the dough for a few seconds, sprinkling it with a little flour if it’s too sticky. Break off a small piece of the dough (you’ll want to make 20 to 30 samosas, so judge accordingly) and roll it out on a lightly floured counter until it is a circle at least 3 inches in diameter. Make 5 or 6 circles, then fill them: Put 1 tablespoon or so of filling in the center, moisten the edge with a few drops of water, then fold over and seal. Transfer to the baking sheet about an inch apart and keep covered with a damp towel. Repeat until all the dough and filling are used up (use a second baking sheet if necessary).
5. Bake for 20 to 30 minutes, until golden brown. Serve immediately or at room temperature (but within 1 hour or so).
FRIED SAMOSAS When you’re about halfway through forming the samosas, put enough neutral oil to come to a depth of at least 2 inches in a large deep pan. The broader the pan, the more samosas you can cook at once, but the more oil you will use. Turn the heat to medium-high; you want the temperature to be at about 375°F when you start cooking. Fry the samosas a few at a time, turning if necessary, until golden brown, 8 to 10 minutes. Drain on paper towels or paper bags.
BEEF OR LAMB SAMOSAS Omit the potatoes. To make the filling, heat 2 tablespoons butter or oil in a large skillet over medium heat. Add the onion, chile, garlic, ginger, curry, salt, and pepper as directed in Step 3. Add 12 ounces ground beef or lamb and cook, stirring, until the meat loses its color, about 5 minutes. Remove from the skillet with a slotted spoon, leaving all fat and other liquid in the pan. Stir ¼ cup chopped fresh cilantro and the peas into the mixture and let cool while you roll out the dough.
LENTIL AND POTATO SAMOSAS For the filling, combine ½ cup dried brown lentils, 1¾ cups water or coconut milk, and 2 teaspoons curry powder in a medium saucepan over medium-high heat. Simmer partially covered, stirring occasionally, until the lentils start to absorb the water, 15 minutes. Add 1 medium starchy potato, peeled and cut into chunks. Cover and cook undisturbed for 10 minutes or so, then stir gently and add a little more liquid if the lentils look dry. Add some salt as the lentils become tender. Cover and continue cooking until the lentils are soft and beginning to turn to mush and the potatoes are tender at the center, another 5 to 10 minutes. Stir in lots of black pepper. Drain the mixture well if it’s wet and let cool while you roll out the dough.
Steamed Chickpea Bread
Makes: 6 to 8 servings
Time: 1 hour, plus time for the batter to rest
This steamed cakelike bread from the Gujarat state of India, called dhokla, is straight magic; fluffy, aromatic, and with a delicious topping of toasted whole spices, cilantro, and coconut. There are multiple approaches to preparing the batter, some of which include soaking, grinding, and fermenting rice or dried legumes. I use chickpea flour, which adds a wonderfully nutty flavor but doesn’t require all that effort. Serve this as a side dish, snack, or even breakfast.
- ½ inch fresh ginger, peeled
- 1 fresh chile, like jalapeño or serrano
- 1 small garlic clove, peeled
- 1 teaspoon salt
- 1½ cups chickpea flour
- 1 teaspoon baking soda
- ½ teaspoon turmeric
- ¾ cup yogurt
- 1 tablespoon fresh lemon juice
- 4 tablespoons neutral oil (like grapeseed or corn), plus more for greasing
- 1 teaspoon cumin seeds
- 1 teaspoon black or yellow mustard seeds
- ½ cup grated fresh coconut (optional)
- Chopped fresh cilantro for garnish
1. Finely chop the ginger, chile, and garlic all together in one pile; sprinkle with the salt and continue chopping and mashing the mixture with the flat side of your knife until it turns into as fine a paste as you can make it (a mortar and pestle does the job faster).
2. Put the paste in a large bowl; add the chickpea flour, baking soda, turmeric, yogurt, lemon juice, and 2 tablespoons of the oil. Slowly add ¾ cup warm water, whisking to eliminate lumps. The batter should be the consistency of thick pancake batter; if it isn’t, whisk in more water or chickpea flour as necessary. Let the batter rest at room temperature for anywhere from 1 to 3 hours.
3. When you’re ready to cook the bread, grease an 8- or 9-inch square baking pan with a little oil and set it in a Dutch oven or pot large enough to hold the pan (at least 13 inches in diameter for a 9-inch pan; nestle the pan inside before greasing it to be sure). Whisk the batter one more time, then pour it into the prepared pan and cover tightly with foil. Add enough boiling water to the pot to come about three-quarters of the way up the sides of the pan, put the lid on the pot, and bring the water to a simmer. Steam the bread until a skewer inserted into the middle of the bread comes out clean, about 15 minutes.
4. Let the bread cool for a few minutes, then run a paring knife around the edges to loosen it and carefully invert the bread onto a large plate. Cut it into squares or whatever shape you like.
5. Put the remaining 2 tablespoons oil in a small or medium skillet over medium-high heat. When hot, add the cumin and mustard seeds and cook until they begin to crackle, a minute or 2. Spoon the seeds and oil over each piece of bread, garnish with the coconut, if using, and cilantro, and serve.
The Basics of Pizza
Everybody loves pizza. Even if you’re used to the wood-fired pies that are increasingly popular at more and more restaurants, home-baked pizza will amaze you with how easy, fun, and versatile it is. And if you’re used to only delivery pizza, it’s a game-changer.
When you make your own pizza, of course, you have complete control over ingredients in terms of both quality and quantity. The toppings range from elemental—tomatoes, mozzarella, mushrooms, meat, vegetables—to more original or special: new kinds of cheese, eggs, salsa verde, and more. At home you have the option of using better ingredients than the ones they use at most pizzerias, and that makes a huge difference. Plus, you can combine them in any which way, and every pizza night is a new chance to experiment.
Pizza takes a bit of planning since the dough is yeasted, but the rise time isn’t too long and is mostly hands-off, so you can make it work around your schedule. Plus, you can freeze the dough, allowing for more flexible timing. Once you get the hang of the timing and shaping, you’ll be in love with the results—and eating a lot more pizza.
PREPARING PIZZA DOUGH
Pizza dough is a simple bread dough made with flour, yeast, salt, and water, usually with olive oil for extra texture and flavor. A food processor makes quick work of mixing it together—I’m talking one minute of activity. You can also use a standing mixer, and of course you can knead the dough by hand (first in a big bowl, then transferred to a floured board), which is no big deal since it doesn’t require much hands-on work to begin with. In any case, start to finish, you can have pizza dough ready in about an hour, but to develop more flavor—and make this a true do-ahead dish—let it rise and ferment for 6 to 8 hours, even overnight.
SHAPING THE DOUGH
You don’t have to toss and spin your dough into a perfect circle like you see at the old-school pizzerias. In terms of texture, you’ll get equally good results laying the dough on a countertop and using your fingertips to gently press and stretch it into shape. (This is how professionals make focaccia, which is just another form of pizza.) Equally easy is to flatten the dough a bit, then roll it out with a rolling pin.
In either case, patience is key; your goal is to coax the dough into shape, and this is easiest if you allow the dough to rest between steps as you shape it. If you’re short on time, you can plow right through from start to finish, but whenever you handle the dough, it becomes more elastic and difficult to stretch out (that’s the gluten doing its thing). The rest periods let it relax, which in turn makes it easier for you to shape.
With one recipe of pizza dough and the same basic techniques, you can make any size or thickness of pizza. The larger and thinner you stretch the dough, the harder it can be to handle, so I like to divide the dough into at least two pies; three or four if they’re going on the grill. Make more for “personal pizzas” or press the dough into a pan for Chicago-style deep-dish (page 548).
It’s important to let it rise—another thing that you really can fit to your own timeline. Just don’t let it puff up too much or your pizza will have big bubbles and sunken valleys. No matter how thinly you stretch or roll the crust, it will just about double in thickness as it bakes (the temperature of your kitchen and the amount of toppings will affect this), so don’t be conservative with the rolling before you add toppings.
THE TOPPINGS
Of all the things you can bake at home, pizza is one of the easiest and most fun things to customize. You can stick to classic combinations: tomatoes, basil, and Parmesan; tomato sauce and mozzarella; or a little mozzarella with some crumbled sausage or sliced pepperoni. But I have the most fun branching out—to different meats, vegetables, cheeses, nuts, sauces, and various combinations—since pizza is prime for experimentation. See The Cheese Lexicon and even more topping options (page 550) for inspiration.
Do be careful not to pile on too many ingredients. This does no favors to your crust, which really deserves equal billing with whatever you put on it. If you smother the dough with toppings, it will steam as it bakes, turning a potentially crisp and light crust into a soggy mess.
BAKING
Professional pizza ovens reach around 700°F, but don’t worry if you don’t happen to have a wood-fired oven in your backyard. The highest temperature your oven can go—525 or 550°F for most home ovens—does the job wonderfully. Your best bet is to bake the pizza directly on a pizza stone, which crisps up the bottom of the crust and dries it out perfectly; if you don’t have one of those, you’ll do just fine baking the pie on a flat baking sheet or one with a small lip. (And of course there’s always pizza on the grill;.)
The ideal pizza stone is a large rectangle; it should be unglazed, relatively thick, and made of a porous stone or clay that absorbs heat and transfers it evenly to your pizza. You can buy a pizza stone or use an unglazed quarry tile from the hardware store. And use it for more than just pizza: it makes excellent yeast breads, flatbreads, and crackers, and there’s no harm in leaving it on the lowest rack of the oven all the time. To use it, let it sit in the oven while it heats for at least a half hour—you want them both thoroughly heated. Once you’ve got the stone, you should also consider getting a peel—the board with a handle that looks like a large Ping-Pong paddle—to get the pizza onto the stone. You can sprinkle flour or cornmeal on it and shape and top the dough directly on the peel, then slide it right onto the preheated stone.
If you use a baking sheet to bake the pizza, wipe it with just a little olive oil to keep the dough from sticking, rather than dusting the surface with flour or cornmeal as you would with a peel. Once you do that, just press the dough right onto the pan to shape it.
CUTTING AND SERVING
Pizzas with little or no cheese are also good served at room temperature, as you would bread. You can cut pizza into wedges like pie or into smaller squares, which are good if you’re feeding a crowd or just prefer smaller pieces.
Shaping Dough for Pizza and Calzones

Step 1
Stretch the dough with your hands. If at any point the dough becomes very resistant, cover and let it rest for a few minutes.
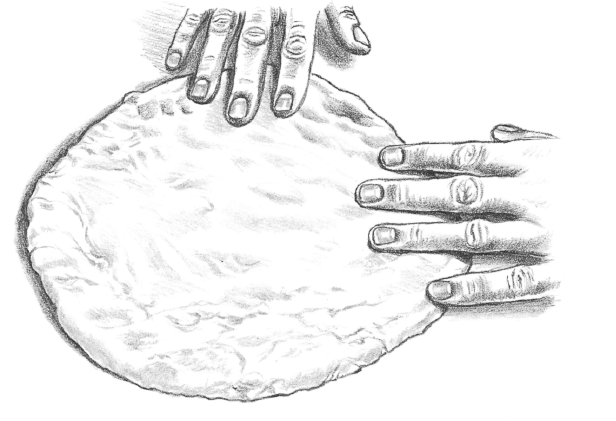
Step 2
Press the dough out with your hands. Use a little flour or olive oil to keep it from sticking.

Step 3
Alternatively, roll it out with a pin; either method is effective.

Step 4
To make a calzone, add your filling, fold the dough over onto itself, and pinch the seams closed.
Recipes
Pizza Dough
Focaccia
White Pizza
Cheese Pizza
Tarte Flambée
Calzones
Pizza Dough
Makes: Enough for 1 large or 2 or more small pies
Time: 1 hour or more
Pizza dough is not only incredibly easy to make but freezes well too. I keep a few balls of it tucked away at all times so that a homemade pie is always at my fingertips. See the freezing and defrosting directions in Step 3.
I make pizza dough in the food processor. To do it by hand, stir in a bowl with a heavy wooden spoon until the dough becomes too heavy to stir, then switch to your hands. To make the dough in a stand mixer, start with the paddle attachment and, when the dough becomes heavy, replace the paddle with the dough hook. All of these methods involve minimal kneading, but you can look to the variations for an absolutely no-knead dough.
- 3 cups all-purpose or bread flour, plus more as needed
- 2 teaspoons instant yeast
- 2 teaspoons coarse kosher or sea salt, plus extra for sprinkling
- 2 tablespoons olive oil
1. In a food processor or a large bowl, combine the flour, yeast, and salt. Gradually add 1 cup water and the oil, pouring it through the feed tube with the machine running or stirring with a wooden spoon until combined.
2. Continue to mix, slowly adding ½ cup more water, until the dough forms a ball and is slightly sticky to the touch; this will take about 30 seconds in the food processor or a couple minutes of stirring, then kneading by hand. If it is still dry, add another tablespoon or 2 of water and process for another 10 seconds, but be careful not to overwet the dough. (In the unlikely event that the mixture is too sticky to handle, add flour a tablespoon at a time.)
3. Once the dough comes together in a ball, turn it onto a floured work surface and knead by hand for a few seconds to form a smooth, round ball. Put the dough in a floured bowl and cover with plastic wrap; let rise until doubled in size, 1 to 2 hours. (You can cut this rising time short if you’re in a hurry, or you can let the dough rise more slowly in the refrigerator for up to 8 hours.) Proceed with any of the pizza recipes that follow or wrap the dough tightly in plastic wrap or a zipper bag and freeze for up to a month. (Defrost in the bag or a covered bowl in the refrigerator or at room temperature; bring to room temperature before shaping.)
CRUNCHIER PIZZA DOUGH This dough may be a little more difficult to handle, but it has superior flavor and crunch: Substitute ½ cup cornmeal for ½ cup of the flour.
NO-KNEAD PIZZA DOUGH Way less yeast and a much longer rise time give this dough a more complex flavor and chewier texture—highly recommended if you have the time: Use ¼ teaspoon yeast; once all the ingredients are combined, mix by hand briefly, just until the dough forms a sticky ball. In Step 3, let the dough rise at room temperature for about 18 hours or until it has more than doubled in size. Proceed as directed.
WHOLE WHEAT PIZZA DOUGH For a dough with a nuttier flavor and darker color, use 1½ cups each whole wheat flour and all-purpose flour (you’ll probably need to add a few more tablespoons of water). For a 100 percent whole wheat crust, use only whole wheat flour, add 2 teaspoons sugar in Step 1, and increase the water to 1¾ to 2 cups, as needed.
Pizza on the Grill
Grilled pizza is fun to make, delivering the high heat that gives you that perfect crust (and impressing everyone at your cookouts). It’s also easier than you’d think, especially if your grill has a cover. Wood fires are the trickiest fuel to control but impart a great flavor to the crust; gas grills are naturally the easiest, and charcoal lies somewhere in between.
You want a fire that is hot enough to brown the dough, but not so hot that it scorches it before the interior cooks; you should be able to hold your hand a few inches above the fire for 3 or 4 seconds. An ideal setup is one where part of the grill is hot and part of it cool. On a gas grill, this means setting one side to “high” and the other to “low” or some similar arrangement. With a charcoal grill, just build your fire on one side; use the hot side for the initial browning of the dough, the cool side to heat it with the toppings.
The process is straightforward: Grill the dough on one side, just enough to firm it up and brown it a bit, then flip it (a pizza peel is ideal for this; if you don’t have one use tongs or a spatula aided by your fingers), add all your toppings, and move the pie to a part of the grill with lower heat. If you want the toppings to become very hot, cover the grill. If you don’t care whether they actually cook, but just want them to warm up a bit, you can leave the grill open.
It’s especially important when grilling to keep pizza toppings to a minimum. Fully loaded grilled pizzas won’t cook properly and will be impossible to handle. One way around this is to grill pizzas with one or two ingredients, then add more when you remove them from the fire.
Focaccia
Makes: 1
Time: About 1½ hours, largely unattended
Think of focaccia as bread—it’s fabulous to eat on its own or use for sandwiches—but also as pizza, because it uses the same dough. It needs nothing more than olive oil, but you can top it minimally (see the variations) or repurpose it for deep-dish pizza.
- 1 recipe Pizza Dough, made with 1 tablespoon more olive oil
- Flour for dusting
- 3 tablespoons olive oil
- Coarse kosher or sea salt
1. When the dough is ready, knead it lightly, form it into a ball, and place it on a lightly floured work surface. Sprinkle with a little more flour and cover with plastic wrap or a towel; let it rest for 20 minutes.
2. Use 1 tablespoon of the oil to grease a rimmed baking sheet or large jelly roll pan (roughly 11 by 17 inches). Press the dough to the edges of the pan; if it resists, let it rest for 5 minutes before proceeding. Sometimes this takes a while, because the dough is so elastic. Don’t fight it; just stretch, let it rest for a few minutes, then stretch again. Try not to tear the dough.
3. Cover the dough with plastic wrap or a towel and let it rise for at least 30 minutes, or until somewhat puffy. Meanwhile, heat the oven to 425°F. Uncover the dough and dimple the surface all over with your fingertips. Drizzle with the remaining olive oil and sprinkle with plenty of salt.
4. Put the focaccia in the oven, lower the temperature to 375°F, and bake for about 30 minutes or until the focaccia is golden. Remove and cool on a rack before serving. Cut the focaccia into squares and serve with meals or as a snack. Or slice squares in half horizontally and use to make sandwiches. Focaccia, well wrapped (first in plastic, then in foil), freezes fairly well for 2 weeks or so. Reheat, straight from the freezer (unwrap, remove the plastic, and then rewrap in foil), in a 350°F oven for 10 to 15 minutes.
ROSEMARY FOCACCIA Sprinkle the focaccia with 1 tablespoon chopped fresh rosemary leaves with the salt before baking. Sage, thyme, or oregano is also good.
OLIVE AND CARAMELIZED ONION FOCACCIA Scatter about 1 cup total chopped olives (oil-cured are best) and caramelized onions (see page 507) over the focaccia along with the salt before baking. (Go easy on the salt since you’re adding olives.)
TOMATO AND ROASTED GARLIC FOCACCIA Gently smear a clove or 2 of roasted garlic over the focaccia before sprinkling with salt. Lay very thin slices of tomato over the top before baking.
PEAR AND PARMESAN FOCACCIA Top the focaccia with thinly sliced pears (or apples), then sprinkle with some freshly grated Parmesan before baking.
DEEP-DISH PIZZA, CHICAGO STYLE Like focaccia, this is pressed right into the pan. Bake the dough partially, for about 10 minutes. Grate 2 cups mozzarella cheese and ½ cup Parmesan; heat about 1½ cups tomato sauce (see page 550 for 2 easy ways to make it yourself). Smear the pizza with a thin layer of sauce, sprinkle with the cheeses (and any other ingredients you like), and bake for 20 to 25 minutes more, until hot and bubbly and browned on the bottom. For more toppings, see Cheese Pizza and 24 Ideas for Pizza Toppings (page 550).
White Pizza
Makes: 1 large or 2 or more small pies
Time: About 45 minutes
Pizza bianca—white pizza, pizza without sauce—is a blank slate. Without toppings, it’s a great appetizer that lets you appreciate the homemade dough, but it’s also the perfect base for you to experiment with some of the possible additions and tweaks that follow. However you do it, it’s likely to be among the best pizzas you’ll ever eat.
- 1 recipe Pizza Dough
- Flour for dusting
- Olive oil as needed
- Coarse kosher or sea salt
- 1 tablespoon or more roughly chopped fresh rosemary or thyme leaves
1. Heat the oven to 500°F or higher with a pizza stone on a lower rack if you have one. Form the dough into a ball for one big pizza or divide it into as many pieces as you like for smaller pizzas; cover lightly with plastic wrap or a towel and let rest until they puff slightly, about 20 minutes.
2. Roll or lightly press each dough ball into a flat round, lightly flouring your work surface and the dough as necessary (do not use more flour than you need to). Let the rounds sit for a few minutes; this will relax the dough and make it easier to roll out. If you are using the pizza stone, roll or pat out the dough on a peel, as thin as you like it, turning occasionally and sprinkling it with flour as necessary. If you’re using 1 or 2 baking sheets, oil them, then press each dough ball into a flat round directly on the oiled sheets.
3. Sprinkle the top with some salt and the chopped rosemary and drizzle with a little olive oil. Slide the pizza onto the stone or slide a baking sheet into the oven on a rack set in the middle. (Bake multiple pizzas one at a time.) Bake for 6 to 12 minutes, depending on the oven heat and size of the pies, until nicely browned. Serve immediately or at room temperature (these will keep for a few hours).
White Pizza with Cheese Add 1 cup fresh mozzarella and ¾ cup ricotta, dropped in dollops, along with the herbs and salt, then drizzle the top with 2 tablespoons olive oil. If you like, you can use any of the following variations with this as a base.
Cacio e Pepe Pizza Cheese and pepper, nothing more; it’s classic for a reason: Top the pizza with 1½ cups grated pecorino Romano cheese and 1 full tablespoon freshly ground black pepper (start with 2 teaspoons if you’re nervous).
White Pizza with Prosciutto and Parmesan Scatter some chopped prosciutto on top after adding the rosemary (or, for fuller coverage, lay large slices of prosciutto across the pizza). Grate some Parmesan over the top.
White Pizza with Lemon and Oregano Substitute fresh oregano for the rosemary. Remove the zest from 2 lemons in strands as large as possible; or cut away big pieces of zest, then slice them into super-thin julienne. When you add the salt and the oregano in Step 3, spread the lemon zest around on top and gently press it into the dough. A sprinkling of pitted olives (especially the black oil-cured kind) is wonderful here as well. Proceed with the recipe and, when the pizza comes out of the oven, top it with some shaved Parmesan cheese if you like and lots of black pepper.
White Pizza with Mint Unexpected and refreshing: Instead of the rosemary, scatter about ¼ cup chopped fresh mint leaves on top along with the salt and press them down into the dough a bit.
White Pizza with Balsamic Caramelized Onions This takes some advance work: Omit the rosemary. Caramelize some onions (see page 507) cooked fairly dark. Season to taste with salt and pepper, then stir in 1 tablespoon balsamic vinegar or to taste. About halfway through baking, scatter the onions over the pie(s) along with some minced fresh basil, thyme, or sage leaves.
White Pizza with Clams Briny and wonderful (so ease up on the salt a bit); also good with diced peeled lightly cooked shrimp or shelled lightly steamed mussels: Omit the rosemary. Top the pie(s) with a few freshly shucked littleneck clams (and some of their juice if you have it), a few very thin slivers of garlic, a little coarse salt, and some minced fresh parsley leaves.
White Pizza with Anchovies Omit the rosemary. Make a rough paste out of chopped anchovies, garlic, parsley, salt, hot red pepper flakes, and olive oil. It should be thin enough so you can spoon it over the crust and spread it around easily. No need for any extra salt.
White Pizza with Figs and Blue Cheese Omit the salt. Put some slices or wedges of fresh figs on the top, then scatter with some blue cheese (goat cheese is good too). If you like, you can add a few slices chopped prosciutto. When the pizza comes out of the oven, sprinkle with some arugula leaves.
Carbonara Pizza Spread ¼ cup mascarpone cheese or crème fraîche in an even layer over the pizza(s). When the pizzas are about 5 minutes away from done, crack 2 eggs into the center, side by side, then scatter with 1 cup chopped cooked bacon, guanciale, or pancetta, plenty of cracked black pepper, and grated Parmesan. Bake until the egg white is just set and the yolk still runny.
Quattro Formaggi Meaning “Four Cheeses,” this can have any cheese on it, but most common and beloved are fresh mozzarella (¾ cup), ricotta (½ cup), Gorgonzola (½ cup), and Parmesan (¼ cup), all scattered over the pie.
White Pizza with Potatoes and Rosemary Slice 8 to 12 ounces new potatoes into very thin rounds; sauté them in a skillet with some olive oil and a sprinkle of salt and pepper, tossing occasionally, until they are just tender, about 10 minutes. Lay the potatoes on the dough and sprinkle with plenty of rosemary.
Springtime Pizza The perfect way to highlight new produce and delicate flavors: Top the pizza(s) with ¾ cup fresh mozzarella, ¾ cup ricotta, dropped in dollops, 8 ounces chopped blanched asparagus, and ½ cup peas. About 5 minutes before the pizzas are completely done, make a slight well in the center of the pie, then crack an egg into the well and continue baking until the white is set. If you like, scatter a few slices of prosciutto over the top. Garnish with minced fresh chives.
Dessert Pizza Brush the dough with a little olive oil and skip everything else. Bake the dough by itself until browned. Take it out of the oven and spread all over with Chocolate-Hazelnut Spread. Scatter some sliced bananas and strawberries over the top, dust with some powdered sugar if you want to be fancy about it, and (if you’re a fan of the sweet-salty combo) sprinkle with a little coarse salt.
How to Make Restaurant-Quality Pizza, Any Which Way
Think of pizza as composed of two equal and equally important components: crust and toppings. Once you’ve got a killer crust, you can let it speak for itself with little more than tomato sauce and olive oil, or channel a gourmet pizzeria with artisanal toppings (one of the easiest and most accessible ways to use “fancy” ingredients).
Homemade Tomato Sauce
Here are two methods, one raw and one cooked; the raw one takes literally one minute, and the cooked takes only 20 or so. Both are too easy not to make yourself, and both can be made up to a week in advance if they’re covered and refrigerated.
Raw Tomato Sauce This is the essence of tomatoes—lively, sweet, and tangy: Drain one 28-ounce can of best-quality San Marzano tomatoes and chop or use your hands to roughly mash them; you can also use a 28-ounce can of purée, as long as tomatoes are the only ingredient. Combine with 3 tablespoons olive oil, 1 teaspoon salt, and ½ teaspoon freshly ground black pepper.
Cooked Tomato Sauce This has a slightly rounder, milder flavor: Heat 3 tablespoons olive oil or butter in a saucepan over medium-high heat. Add 1 medium onion, chopped, and cook for a couple minutes, until it’s soft. Add a 28-ounce can of best-quality San Marzano tomatoes (chopped whole or puréed) along with 1 teaspoon salt and ½ teaspoon freshly ground black pepper and cook, stirring occasionally until the tomatoes break down and the mixture comes together and thickens, 10 to 15 minutes. Let cool before using.
24 Ideas for Pizza Toppings
Use the following ingredients, alone or in combination, on any of the pizzas in this section, depending on what sauce you’d like as the base. For quantities, err on the conservative side, particularly if you’re using multiple toppings. It’s easy to add more later, but an overtopped pizza will be soggy and flimsy.
▪ Cooked sausage, bacon, pancetta, chicken, meatballs, or other meat
▪ Sliced salami, prosciutto, speck, mortadella, dried (Spanish) chorizo, guanciale, or other cured meat
▪ An egg, cracked directly over the pizza, added about 5 minutes before baking is done
▪ Grated hard and semihard cheeses like Parmesan, cheddar, Gouda, provolone, or Gruyère
▪ Sliced semisoft cheeses like fontina, Taleggio, or Brie
▪ Scattered pieces of soft goat cheese or ricotta
▪ Canned anchovy fillets
▪ Minced raw or mashed roasted garlic
▪ Fresh herbs like basil, oregano, rosemary, sage, or thyme
▪ Minced fresh chile (like jalapeño or Thai) or hot red pepper flakes
▪ Pitted black olives, especially the oil-cured kind, or green olives
▪ Caramelized onions (see page 507)
▪ Reconstituted dried tomatoes
▪ Sliced tomato or whole cherry tomatoes
▪ Chopped red onion, raw or roasted
▪ Cooked or marinated artichoke hearts
▪ Arugula (washed well and dried); add to finished pizzas and let the heat wilt it, which will take about a minute
▪ Sautéed or blanched greens (drained if necessary) like spinach, kale, chard, or radicchio
▪ Sautéed mushrooms
▪ Roasted red peppers
▪ Grilled or broiled eggplant
▪ Roasted cauliflower, broccoli, Brussels sprouts, asparagus, beets, fennel, or other firm vegetables
▪ Sautéed or roasted thinly sliced potato or sweet potato
▪ Pesto, chimichurri, or salsa verde
Cheese Pizza
Makes: 1 large or 2 or more small pies
Time: About 45 minutes
The classic American-style pizza, with variations to keep things interesting for a long time to come (see 24 Ideas for Pizza Toppings, page 550). You can use store-bought tomato sauce, but my two recipes on page 550—really, they’re so simple you can think of them as methods—are, guaranteed, easier than a run to the grocery. As always, good-quality mozzarella is preferable; if it comes packed in water, drain it well and slice it thinly if it’s too soft to grate. And if you’re looking to broaden your cheese horizons past mozzarella, see pages 506-509.
- 1 recipe Pizza Dough
- Flour for dusting
- 2 tablespoons olive oil or more as needed
- 2 cups tomato sauce
- 2 cups grated or thinly sliced fresh mozzarella cheese (about 8 ounces)
- Salt and pepper
1. Heat the oven to 500°F or higher with a pizza stone on a lower rack if you have one. Shape the dough into a ball for one big pizza or, for smaller pies, divide it into as many pieces as you like. Cover the dough with plastic wrap or a towel and let rest until they puff slightly, 20 minutes or so.
2. Roll or lightly press each dough ball into a flat round, lightly flouring your work surface and the dough as necessary (use only as much flour as you need to). Let the rounds sit for a few minutes; this will relax the dough and make it easier to roll out. If you are using the pizza stone, roll or pat out the dough on a peel, as thin as you like it, turning occasionally and sprinkling it with flour as necessary. If you’re using 1 or 2 baking sheets, oil them, then press each dough ball into a flat round directly on the oiled sheets.
3. Drizzle the rounds with the olive oil, then top them with the sauce and cheese; sprinkle with salt and pepper. Slide the pizza onto the stone or slide a baking sheet into the oven on a rack set in the middle. (Bake multiple pizzas one at a time.) Bake until the crust is crisp and the cheese melted, usually 8 to 12 minutes. Let stand for several minutes before slicing to set up the cheese.
Marinara Pizza All tomatoes, no cheese: Spread the sauce over the pie and top with a couple cloves’ worth of thinly sliced garlic, olive oil, a pinch of dried or chopped fresh oregano, and, if you like, a few chopped black olives or whole capers.
Margherita Pizza The classic Neapolitan pizza: Slice the mozzarella and use about half as much as in the main recipe, so that there are just a few slices scattered over the pizza. Top with torn fresh basil leaves, olive oil, salt, Parmesan, and, if you like, sliced fresh tomato.
Sausage, Pepperoni, or Prosciutto Pizza Scatter 4 ounces or so crumbled and lightly cooked sausage, thinly sliced pepperoni, or roughly chopped (or torn) prosciutto over the cheese.
Meat Lovers’ Pizza A home run for casual entertaining: Add 3 or 4 kinds of cooked meat, no more than about ⅓ cup each; my favorites include crumbled sausage, cooked bacon, cooked chicken, sliced ham, and pepperoni.
Summer Pizza Throw this one on the grill at the peak of the season: Decrease the cheese to 1 cup. Cut the kernels off 2 ears fresh corn and scatter them over the pies along with ½ sliced red onion and 4 ounces crumbled goat cheese. Garnish with torn basil.
Mushroom Pizza Instead of mozzarella, use 1½ cups Taleggio. Add 1 cup sautéed mushrooms and a couple sprigs fresh thyme. When the pizza’s done, remove the sprigs or strip them of their leaves and discard the stems.
Pizza with Broccoli Rabe Sauté about ½ pound broccoli rabe spears with some garlic and hot red pepper flakes if you like, making sure you stop cooking them as soon as they’re just tender. In Step 3, after you put the cheese on the pizza, distribute the broccoli rabe around the top and press gently into the cheese. Proceed with the recipe.
RED AND GREEN PIZZA Half tomato sauce, half pesto: Substitute ½ cup pesto for 1 cup of the tomato sauce. Spread the tomato sauce in a thin layer over the whole pizza and scatter about 1 cup grated fresh mozzarella over it, then dollop the pesto over everything.
PIZZA PUTTANESCA Plenty of bold flavors here: Top with 1 cup grated fresh mozzarella, ¼ cup chopped olives, 2 tablespoons capers, 4 chopped anchovy fillets, 4 thinly sliced garlic cloves, and 1 tablespoon minced fresh oregano.
GREEK-STYLE PIZZA Substitute 1 cup crumbled feta for 1 cup of the mozzarella. Scatter some thinly sliced red onion, chopped kalamata olives, and chopped fresh oregano leaves over the cheese. If you like, grate a little lemon zest on top after the pizza comes out of the oven.
MEXICAN-STYLE PIZZA Spicy and smoky: Substitute 1 cup each Jack cheese and cotija cheese (or other hard Mexican farmer’s cheese) for the mozzarella. Stir 1 minced chipotle in adobo and 2 teaspoons cumin into the tomato sauce before spreading it over the dough. Scatter 4 ounces or so crumbled and lightly cooked fresh (Mexican) chorizo over the cheese. Garnish with cilantro leaves and salsa verde before serving.
SPANISH-STYLE PIZZA Substitute 1 cup grated manchego cheese for 1 cup of the mozzarella and 1 cup chopped roasted red peppers for 1 cup of the tomato sauce (stir them together). Lay a few slices of Serrano ham over the cheese before baking, or if you can’t find Serrano, scatter on some chopped dried (Spanish) chorizo.
Tarte Flambée
Makes: 1 thick-crust pizza, enough for 4 main-dish or 8 appetizer servings
Time: About 1 hour
This Alsatian “pizza” is an absolute showstopper, covered with creamy fromage blanc (or crème fraîche) and a salty-sweet mixture of finely chopped bacon and onions. The variations (both classics in their own right) are slightly less decadent but equally extraordinary.
- ½ recipe Pizza Dough
- Flour for dusting
- 3 tablespoons olive oil
- 1 large yellow onion, finely chopped
- 8 slices bacon, finely chopped
- Black pepper
- 1 teaspoon fresh thyme leaves or ½ teaspoon dried
- 1 cup fromage blanc or crème fraîche or ¾ cup sour cream thinned with ⅓ cup milk
1. Heat the oven to 450°F with a pizza stone on a lower rack if you have one. Knead the dough lightly on a lightly floured work surface, sprinkle it with a little flour, and cover it with plastic wrap or a towel. Let it rest while you cook the onions.
2. Heat the olive oil in a large skillet over medium-high heat. When hot, add the onions and bacon, sprinkle with pepper, and cook, stirring frequently, until the onions are soft, about 5 minutes. Turn off the heat and stir in the thyme.
3. Pat or roll out the dough to a diameter of 12 inches, using more flour as necessary. The process will be easier if you allow the dough to rest occasionally. If you are using the pizza stone, roll or pat out the dough on a peel, as thin as you like it, turning occasionally and sprinkling it with flour as necessary. Otherwise, press the dough into a flat round on a baking sheet. Let the dough rest for 15 to 30 minutes or until it begins to puff ever so slightly.
4. Spread the dough with the fromage blanc, then the onion mixture. Bake until nicely crisp, 15 minutes or more; if the pizza is browning unevenly, rotate it back to front about halfway through the cooking time. Serve hot or at room temperature.
PISSALADIèRE The classic Niçoise pizza, loaded with sweet, soft-cooked onions; salty olives and anchovies add contrast. Be sure to cook the onions very, very slowly: Omit the bacon and fromage blanc. Use 1 large onion and slice it thin. In Step 2, cook the onion slices over medium-low heat with salt and pepper, stirring frequently, until they give up their liquid and become quite soft, at least 15 minutes; don’t let them brown. In Step 4, spread the dough with the onions, then decorate with 6 to 10 anchovies, about 12 black olives (pitted and halved), and 6 to 8 thin tomato slices. Bake as directed.
SICILIAN ONION PIZZA Omit the bacon and fromage blanc. Use 1 large onion and slice it thin; cook the slices as in the previous variation until they are very soft. Stir in 6 to 10 anchovies and cook for 5 minutes more. Stir a 6-ounce can of tomato paste into the onions and cook for a few more minutes over low heat. Sprinkle with salt and pepper. Drizzle the rolled-out dough with 2 tablespoons olive oil and bake for 10 to 12 minutes or until the bottom begins to turn pale golden. Spread the partially baked dough with 1 cup bread crumbs, preferably fresh, then spread with the onion mixture. Return to the oven and bake for 15 to 20 minutes more, until the bottom is dark golden but not burned and the top is a richly colored caramel. Remove and cool for a few minutes before cutting; best served hot or warm.
Calzones
Makes: 2 calzones, enough for 4 main-dish servings
Time: About 1¼ hours
Essentially a pizza folded over itself, calzone is like one big hand pie: filling neatly enclosed with dough, so you get browned crust in every bite. You can fill it with any pizza toppings (see 24 Ideas for Pizza Toppings, page 550) or the combinations from any of the previous pizza variations, it should be substantial and fairly dry so the dough doesn’t leak or get soggy. Drained ricotta is an ideal base. Serve with tomato sauce on the side or don’t bother.
- 2 cups ricotta cheese
- 1 recipe Pizza Dough
- 1 cup finely chopped cooked spinach or other greens, such as chard or broccoli rabe
- 1 cup chopped or grated fresh mozzarella cheese
- 1 cup freshly grated Parmesan cheese
- Salt and pepper
- Flour for dusting
1. If the ricotta is very moist, drain it in a fine strainer for 10 minutes or so to remove excess moisture. Divide the dough in half and shape each piece into a ball; cover lightly with plastic wrap or a towel and set aside to rise until slightly puffed, about 20 minutes.
2. Combine the spinach, ricotta, mozzarella, and Parmesan in a bowl. Taste and add salt, if necessary, and pepper. Heat the oven to 350°F with a pizza stone on a lower rack if you have one.
3. Roll or lightly press each dough ball into a flat round, lightly flouring your work surface and the dough as necessary (do not use more flour than you need to). Let the rounds sit for a few minutes; this will relax the dough and make it easier to roll out. Roll or pat out each dough round into an 8- to 10-inch disk, not too thin, on a floured pizza peel or lightly oiled baking sheet.
4. Put half the filling into the middle of each dough round. Moisten the edges with a little water. Fold one edge over onto the other and press tightly closed with your fingertips. Use a fork to poke several air vents in the top.
5. Bake the calzones directly on a pizza stone or on a baking sheet for 30 to 40 minutes or until nicely browned. Serve hot or warm.
MEAT CALZONE Substitute 1 cup crumbled cooked Italian sausage, chopped prosciutto, or salami for the greens.
PESTO-CHICKEN CALZONE Substitute ½ cup pesto for ½ cup of the ricotta and 1 cup chopped cooked chicken for the greens.
HAM AND CHEDDAR CALZONE Substitute 1 cup chopped ham for the greens and grated cheddar for the mozzarella.
SPINACH-ARTICHOKE CALZONE Substitute ½ cup room-temperature cream cheese for 1 cup of the ricotta. Use ¾ cup chopped cooked spinach and add ¾ cup chopped cooked artichoke hearts and 1 minced garlic clove to the filling mixture in Step 2.