The Complete Guide to Wiring, Updated 6th Edition: Current with 2014-2017 Electrical Codes - Black & Decker, Cool Springs Press (2014)
Chapter 9. Repair Projects

“Repair" and "wiring" are two words you don't see together too much anymore. In most cases of an electrical failure, the repair is to replace the failed device. But it may also be reconnected to a bad splice or a loose connection.
The electrical items that most frequently require actual repairs are light fixtures. If you include lamps and cords in this category, you've pretty much covered it. Most electrical failures result from poorly made connections in the original installation. Exceptions are switches, which tend to wear out over time and require replacement, and ceiling fans. Ceiling fans are unique in that, like switches, they contain moving parts—and rapidly moving parts at that. Catching a switch pull chain on a moving blade is the cause of many ceiling fan problems, along with blades that have fallen out of balance and have begun to wobble.
When replacing part of an electrical fixture, the rule of thumb for finding the replacement part is to remove the broken part and bring it with you to a lighting or electrical supply store. Failing that, take down the make and serial number of the fixture so the clerk can look up part information for you.
In this chapter:
![]() Repairing Light Fixtures
Repairing Light Fixtures
![]() Repairing Chandeliers
Repairing Chandeliers
![]() Repairing Ceiling Fans
Repairing Ceiling Fans
![]() Repairing Fluorescent Lights
Repairing Fluorescent Lights
![]() Replacing Plugs & Cords
Replacing Plugs & Cords
![]() Replacing a Lamp Socket
Replacing a Lamp Socket
![]() Repairing Light Fixtures
Repairing Light Fixtures
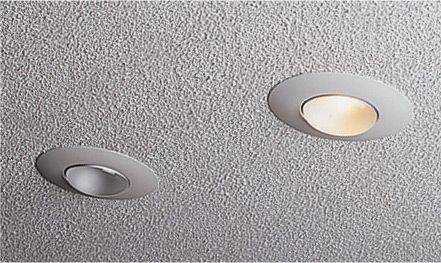
Light fixtures are attached permanently to ceilings or walls. They include wall-hung sconces, ceiling-hung globe fixtures, recessed light fixtures, and chandeliers. Most light fixtures are easy to repair using basic tools and inexpensive parts.
If a light fixture fails, always make sure the light bulb is screwed in tightly and is not burned out. A faulty light bulb is the most common cause of light fixture failure. If the light fixture is controlled by a wall switch, also check the switch as a possible source of problems.
Light fixtures can fail because the sockets or built-in switches wear out. Some fixtures have sockets and switches that can be removed for minor repairs. These parts are held to the base of the fixture with mounting screws or clips. Other fixtures have sockets and switches that are joined permanently to the base. If this type of fixture fails, purchase and install a new light fixture.
Damage to light fixtures often occurs because homeowners install light bulbs with wattage ratings that are too high. Prevent overheating and light fixture failures by using only light bulbs that match the wattage ratings printed on the fixtures.
Techniques for repairing fluorescent lights are different from those for incandescent lights. Refer to pages 304 to 309 to repair or replace a fluorescent light fixture.
Tools & Materials ![]()
Circuit tester
Screwdriver
Continuity tester
Combination tool
Replacement parts, as needed
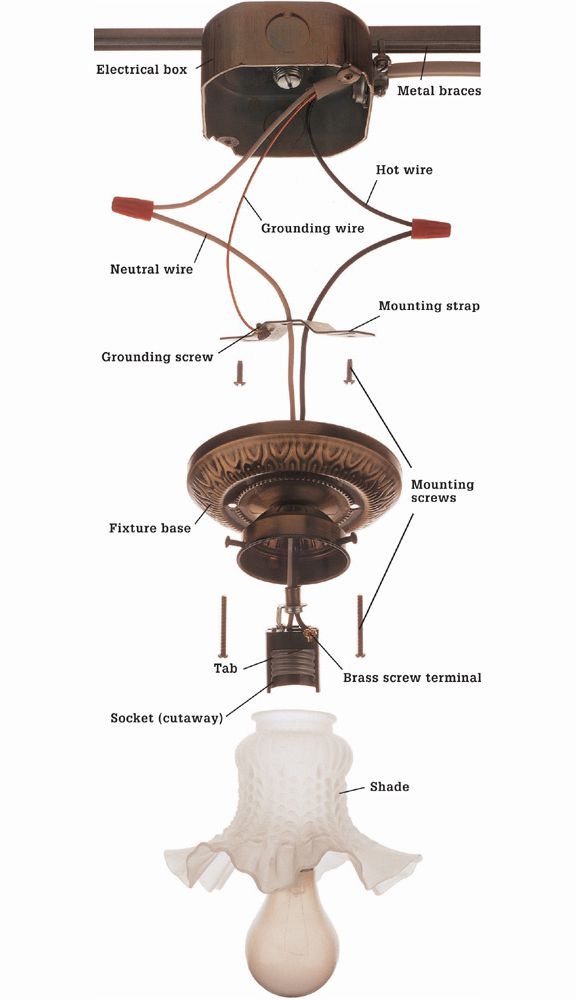
In a typical incandescent light fixture, a black hot wire is connected to a brass screw terminal on the socket. Power flows to a small tab at the bottom of the metal socket and through a metal filament inside the bulb. The power heats the filament and causes it to glow. The current then flows through the threaded portion of the socket and through the white neutral wire back to the main service panel.
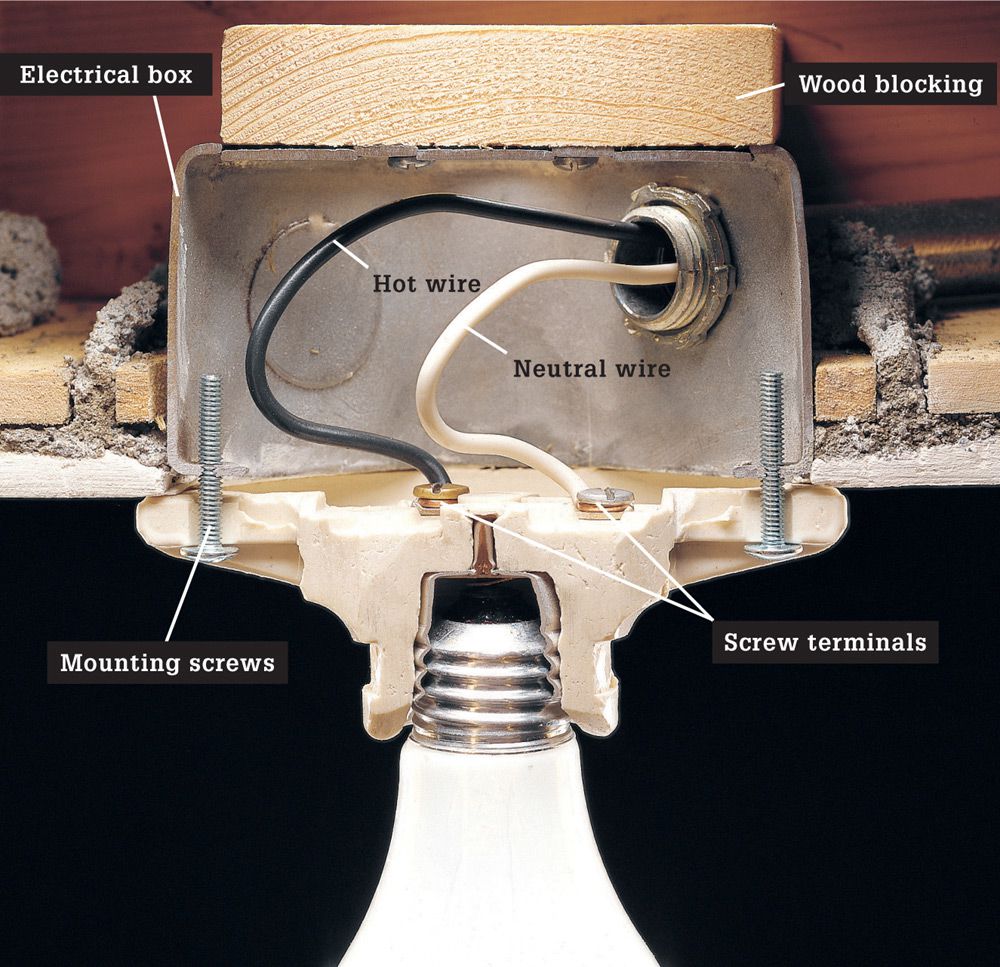
Before 1959, incandescent light fixtures (shown cutaway) often were mounted directly to an electrical box or to plaster lath. Electrical codes now require that fixtures be attached to mounting straps that are anchored to the electrical boxes. If you have a light fixture attached to plaster lath, install an approved electrical box with a mounting strap to support the fixture.
|
PROBLEM |
REPAIR |
|
Wall- or ceiling-mounted fixture flickers or does not light. |
1. Check for faulty light bulb. 2. Check wall switch and replace, if needed. 3. Check for loose wire connections in electrical box. 4. Test socket and replace, if needed (pages 314 to 315), 5. Replace light fixture. |
|
Built-in switch on fixture does not work. |
1. Check for faulty light bulb. 2. Check for loose wire connections on switch. 3. Replace switch. 4. Replace light fixture. |
|
Chandelier flickers or does not light. |
1. Check for faulty light bulb. 2. Check wall switch and replace, if needed. 3. Check for loose wire connections in electrical box. 4. Test sockets and fixture wires, and replace, if needed. |
|
Recessed fixture flickers or does not light. |
1. Check for faulty light bulb. 2. Check wall switch, and replace, if needed. 3. Check for loose wire connections in electrical box. 4. Test fixture, and replace, if needed. |
|
|
|
![]() How to Remove a Light Fixture & Test a Socket
How to Remove a Light Fixture & Test a Socket
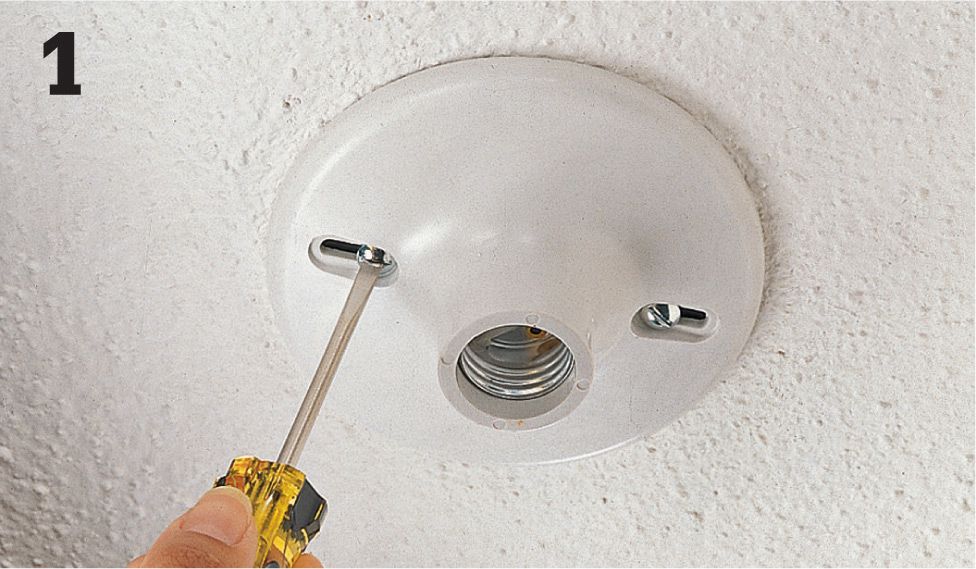
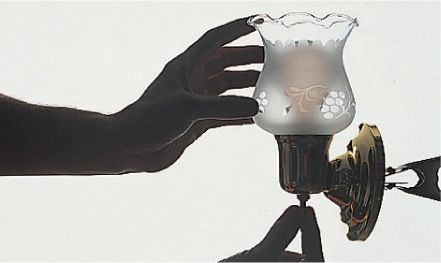
Turn off the power to the light fixture at the main panel. Remove the light bulb and any shade or globe, then remove the mounting screws holding the fixture base and the electrical box or mounting strap. Carefully pull the fixture base away from the box.
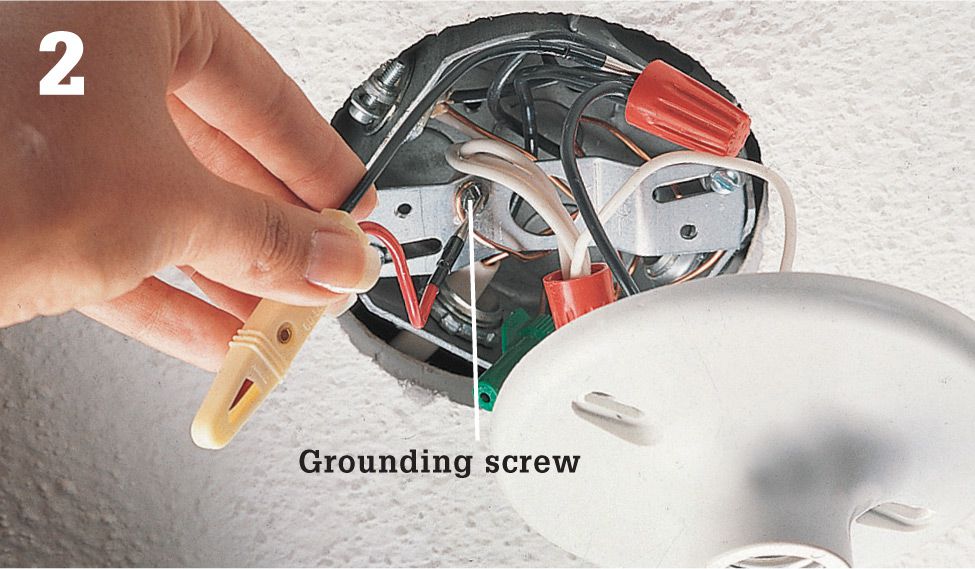
Test for power with a circuit tester. The tester should not glow. If it does, there is still power entering the box. Return to the panel and turn off power to the correct circuit.
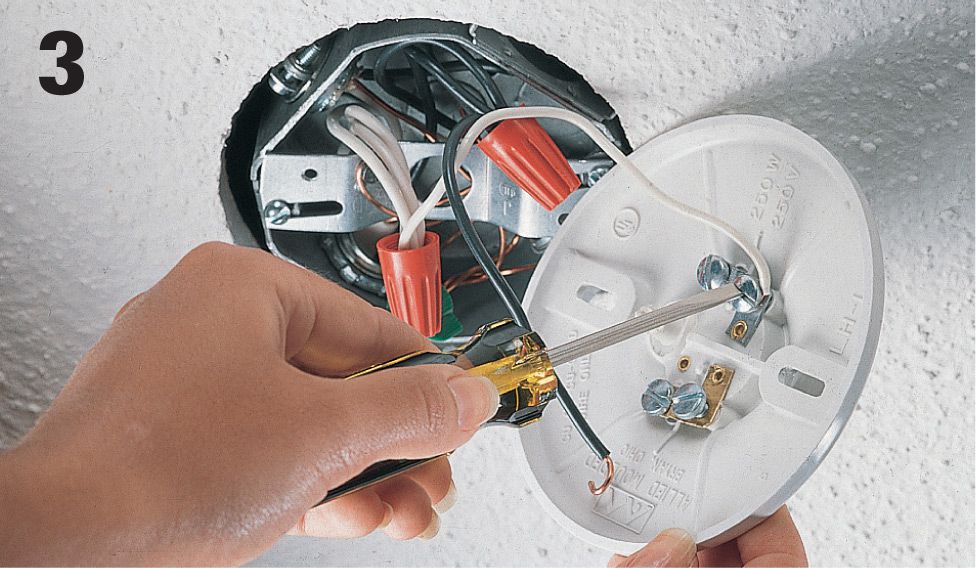
Disconnect the light fixture base by loosening the screw terminals. If the fixture has wire leads instead of screw terminals, remove the light fixture base by unscrewing the wire connectors.
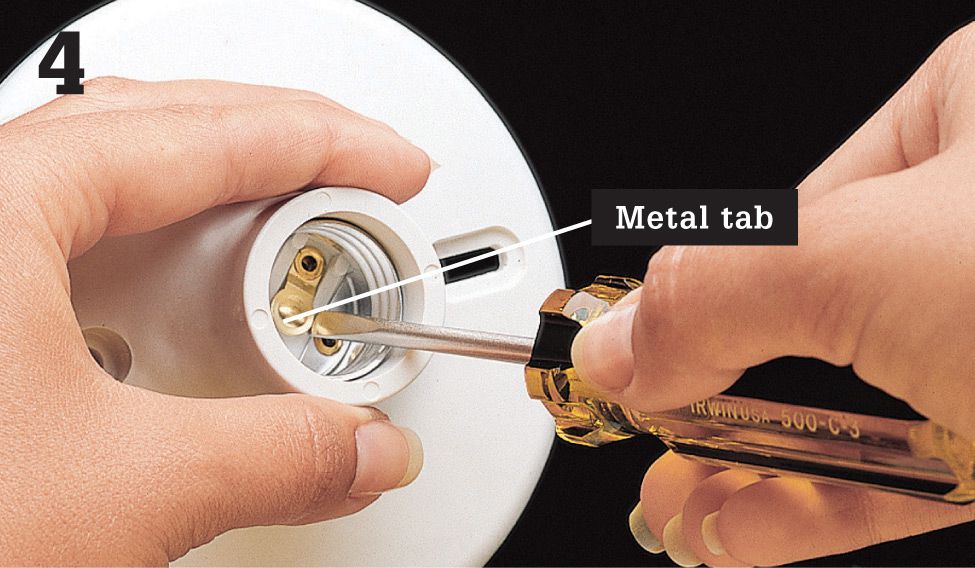
Adjust the metal tab at the bottom of the fixture socket by prying it up slightly with a small screwdriver. This adjustment will improve the contact between the socket and the light bulb.
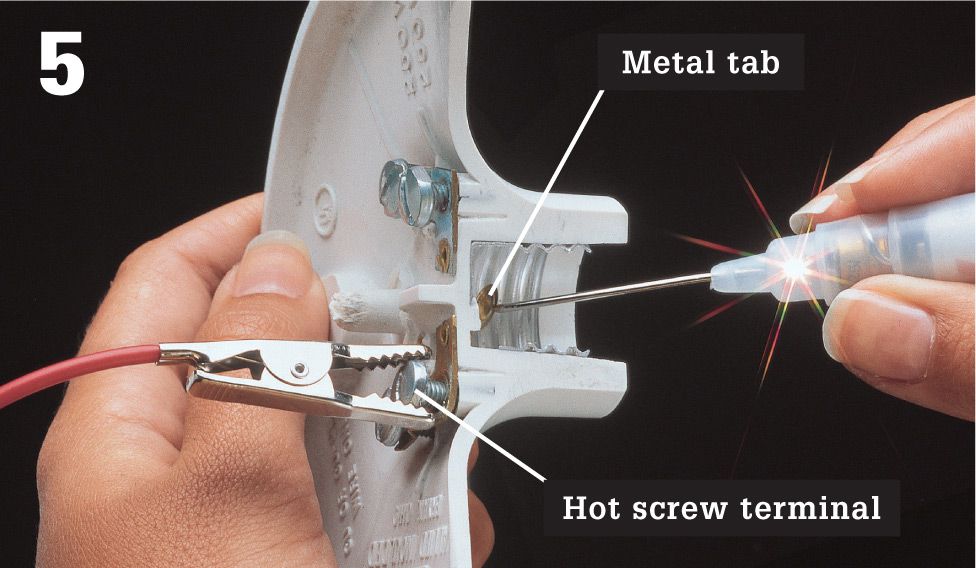
Test the socket (shown cutaway) by attaching the clip of a continuity tester to the hot screw terminal (or black wire lead) and touching probe of the tester to the metal tab in the bottom of the socket. The tester should glow. If not, the socket is faulty and must be replaced.
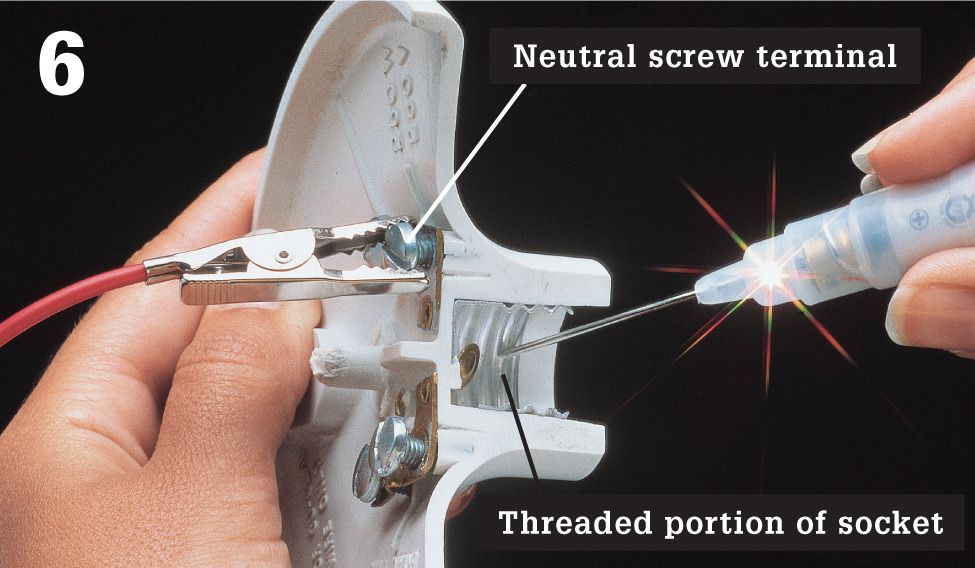
Attach the tester clip to the neutral screw terminal (or white wire lead), and touch the probe to the threaded portion of the socket. The tester should glow. If not, the socket is faulty and must be replaced. If the socket is permanently attached, replace the fixture.
![]() How to Replace a Socket
How to Replace a Socket
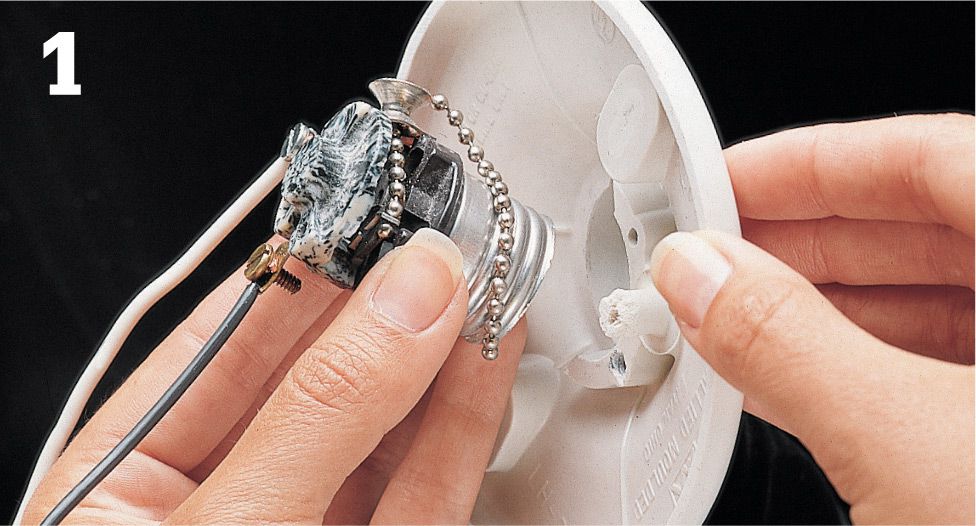
Remove the old light fixture. Remove the socket from the fixture. The socket may be held by a screw, clip, or retaining ring. Disconnect wires attached to the socket.
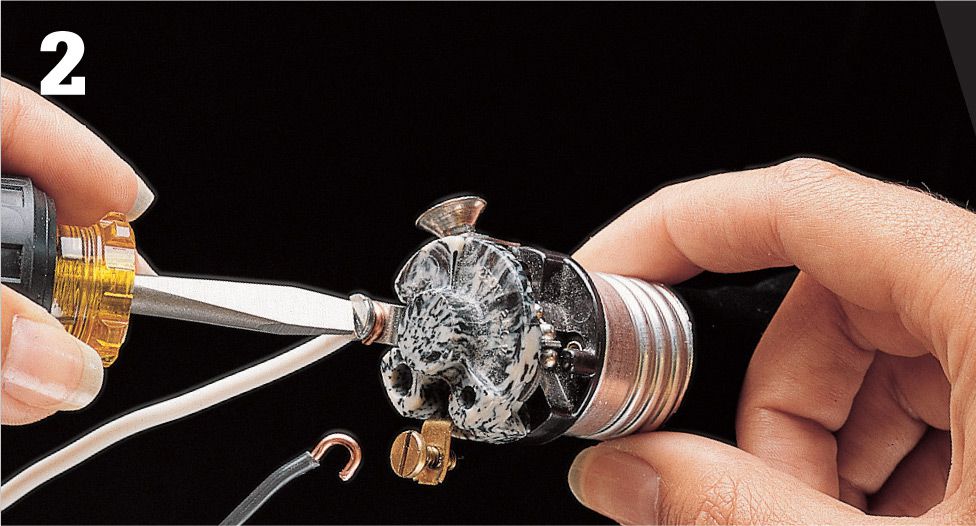
Purchase an identical replacement socket. Connect the white wire to the silver screw terminal on the socket, and connect the black wire to the brass screw terminal. Attach the socket to the fixture base, and reinstall the fixture.
![]() How to Test & Replace a Built-in Light Switch
How to Test & Replace a Built-in Light Switch
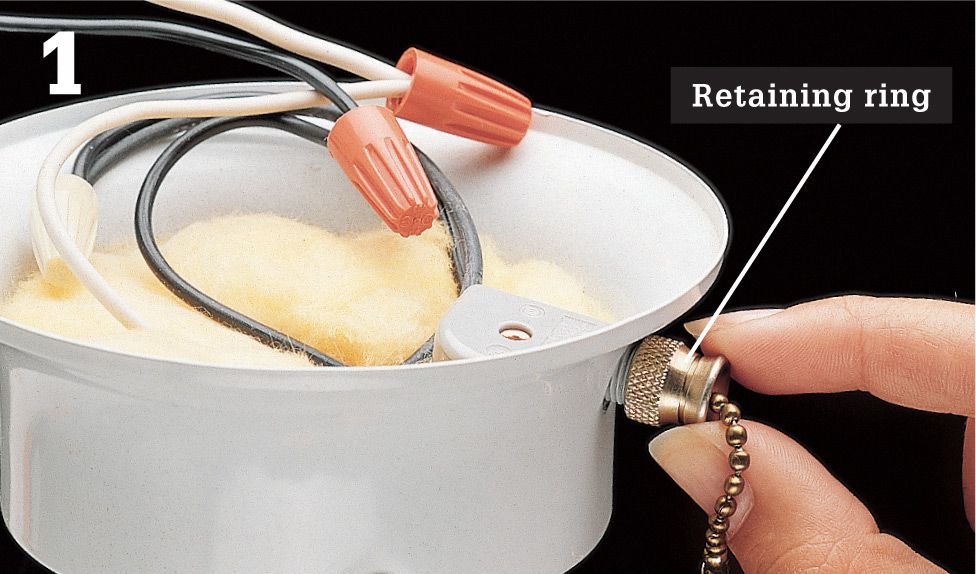
Remove the light fixture. Unscrew the retaining ring holding the switch.
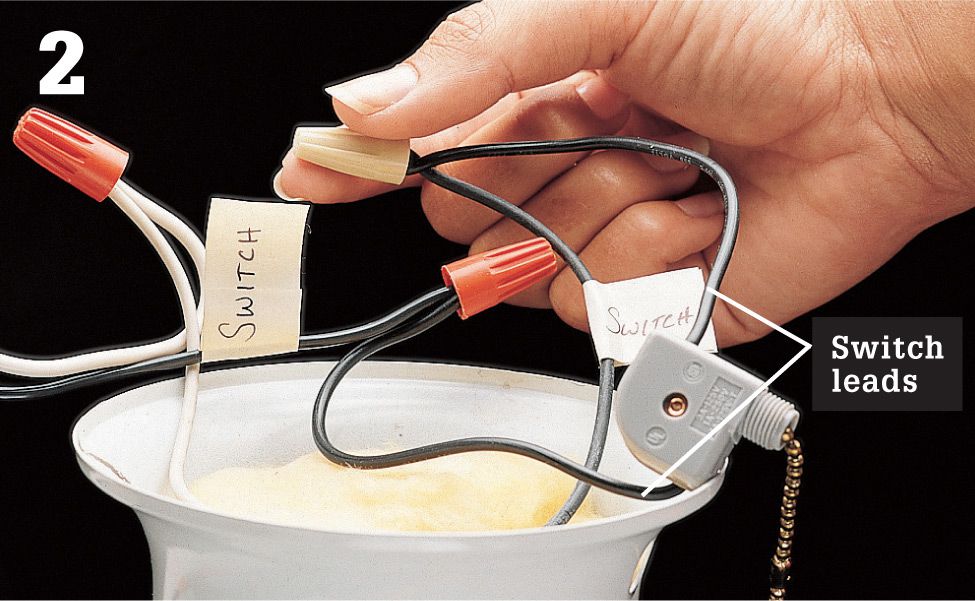
Label the wires connected to the switch leads. Disconnect the switch leads, and remove the switch.
Test the switch by attaching the clip of the continuity tester to one of the switch leads and holding the tester probe to the other lead. Operate the switch control. If the switch is good, the tester will glow when the switch is in one position but not both.
If the switch is faulty, purchase and install a duplicate switch. Remount the light fixture, and turn on the power at the main service panel.
![]() Repairing Chandeliers
Repairing Chandeliers
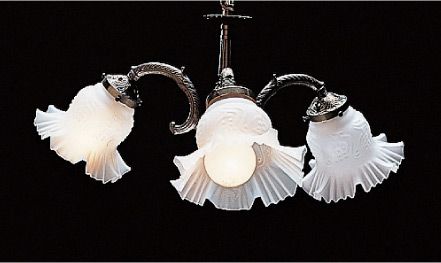
Repairing a chandelier requires special care. Because chandeliers are heavy, it is a good idea to work with a helper when removing a chandelier. Support the fixture to prevent its weight from pulling against the wires.
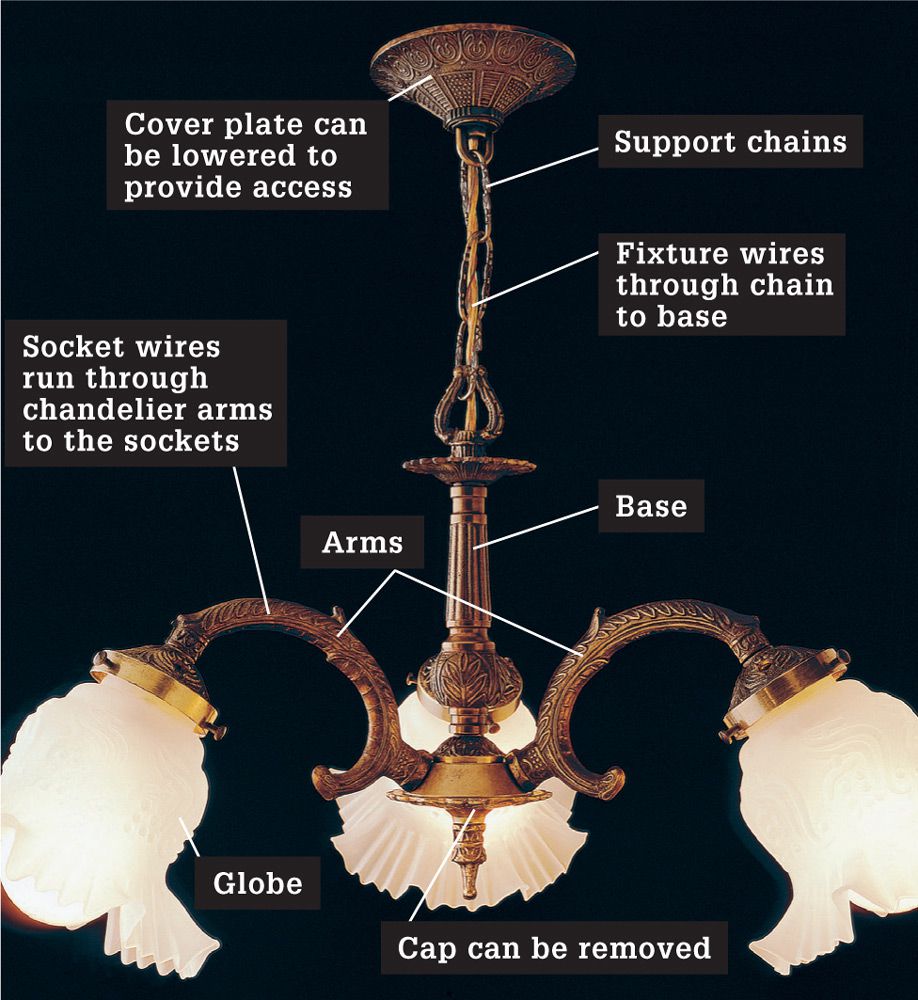
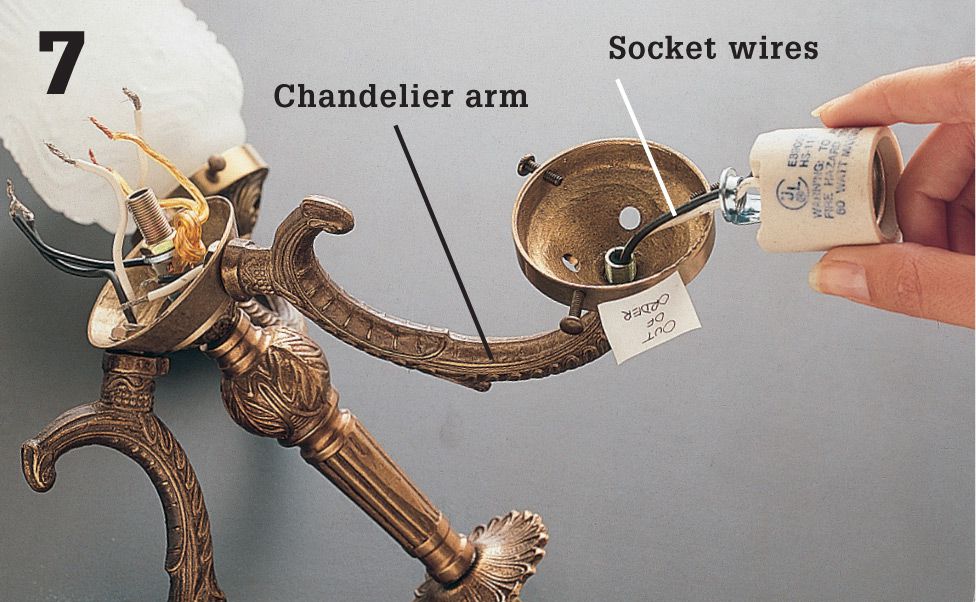
Chandeliers have two fixture wires that are threaded through the support chain from the electrical box to the hollow base of the chandelier. The socket wires connect to the fixture wires inside this base.
Fixture wires are identified as hot and neutral. Look closely for a raised stripe on one of the wires. This is the neutral wire that is connected to the white circuit wire and white socket wire. The other smooth fixture wire is hot and is connected to the black wires.
If you have a new chandelier, it may have a grounding wire that runs through the support chain to the electrical box. If this wire is present, make sure it is connected to the grounding wires in the electrical box.
![]() How to Repair a Chandelier
How to Repair a Chandelier
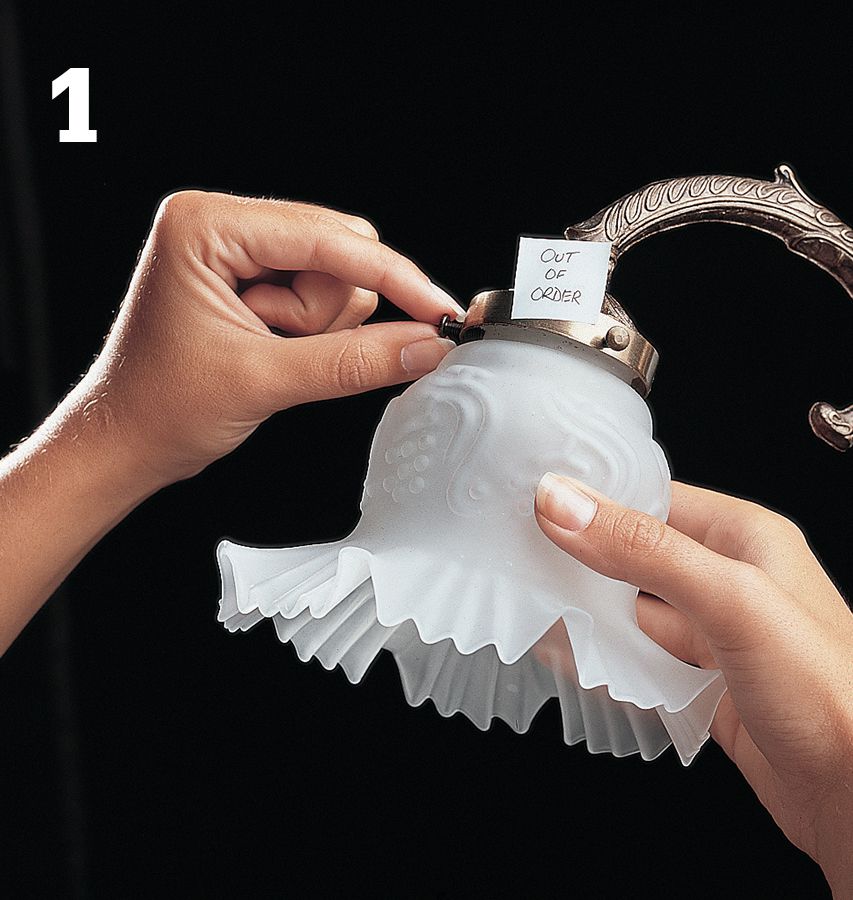
Label any lights that are not working using masking tape. Turn off power to the fixture at the main service panel. Remove light bulbs and all shades or globes.
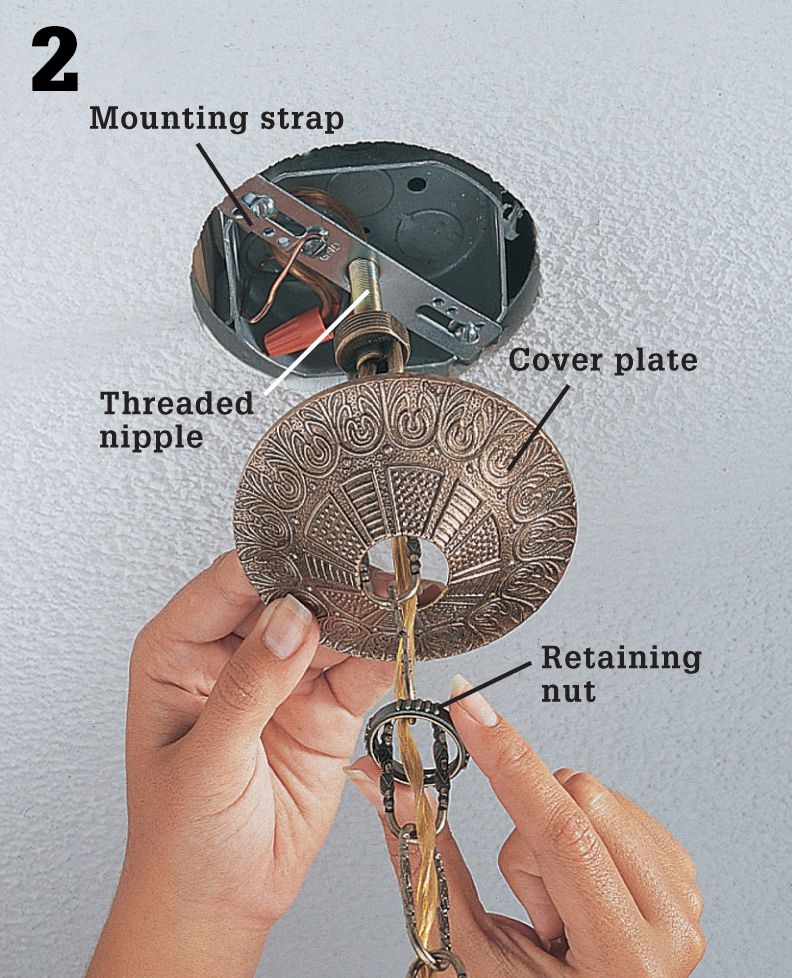
Unscrew the retaining nut, and lower the decorative coverplate away from the electrical box. Most chandeliers are supported by a threaded nipple attached to a mounting strap.
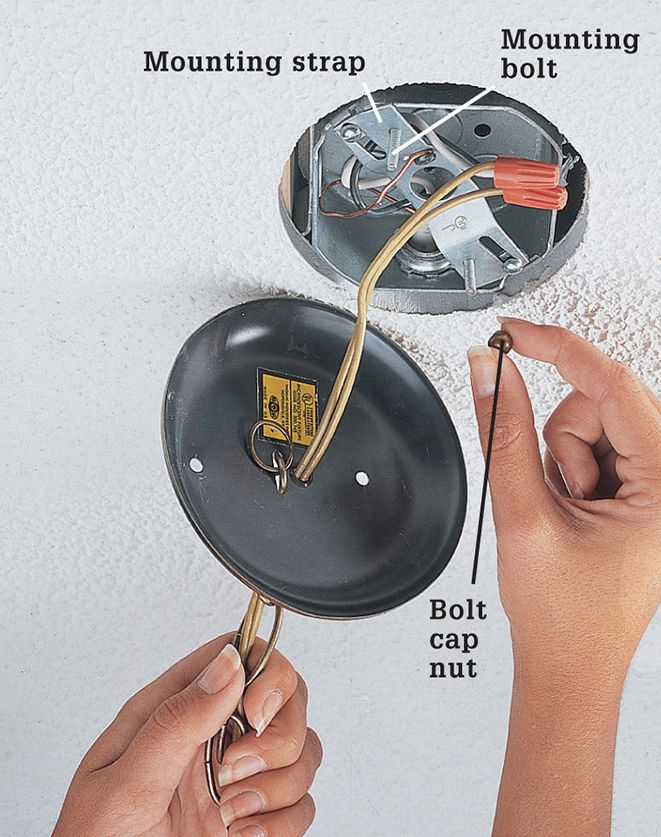
Mounting variation: Some chandeliers are supported only by the cover plate that is bolted to the electrical box mounting strap. These types do not have a threaded nipple.

Test for power with a circuit tester. The tester should not glow. If it does, turn off power to the correct circuit at the panel.
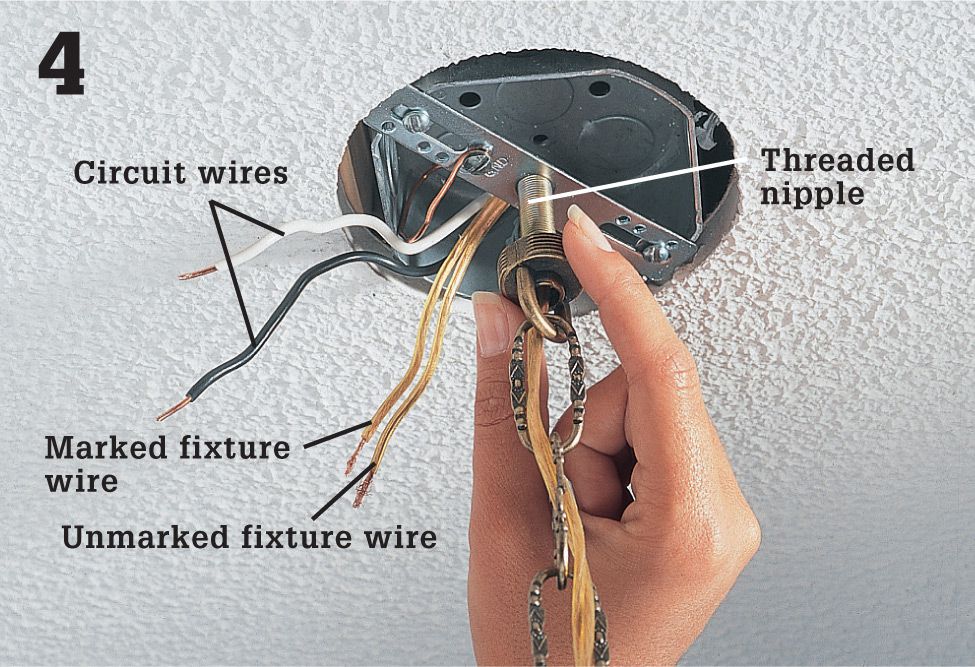
Disconnect fixture wires by removing the wire connectors. Unscrew the threaded nipple and carefully place the chandelier on a flat surface.
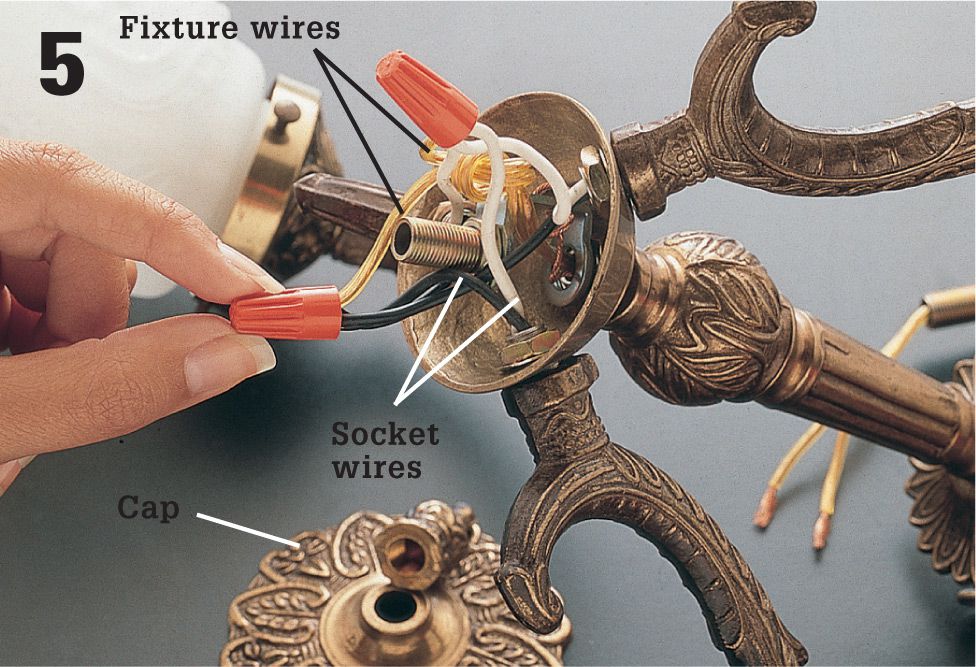
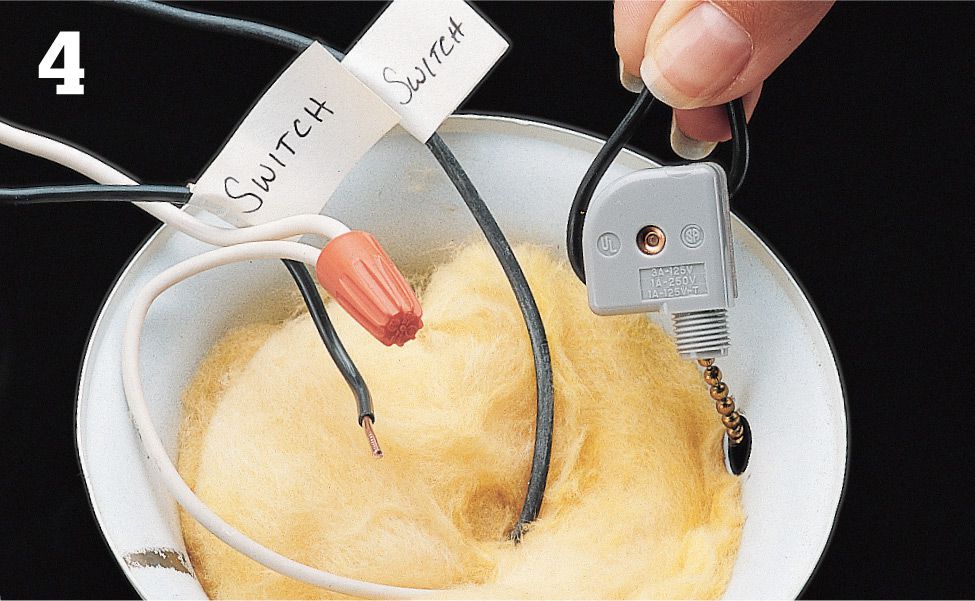
Remove the cap from the bottom of the chandelier, exposing the wire connections inside the hollow base. Disconnect the socket wires and fixture wires.

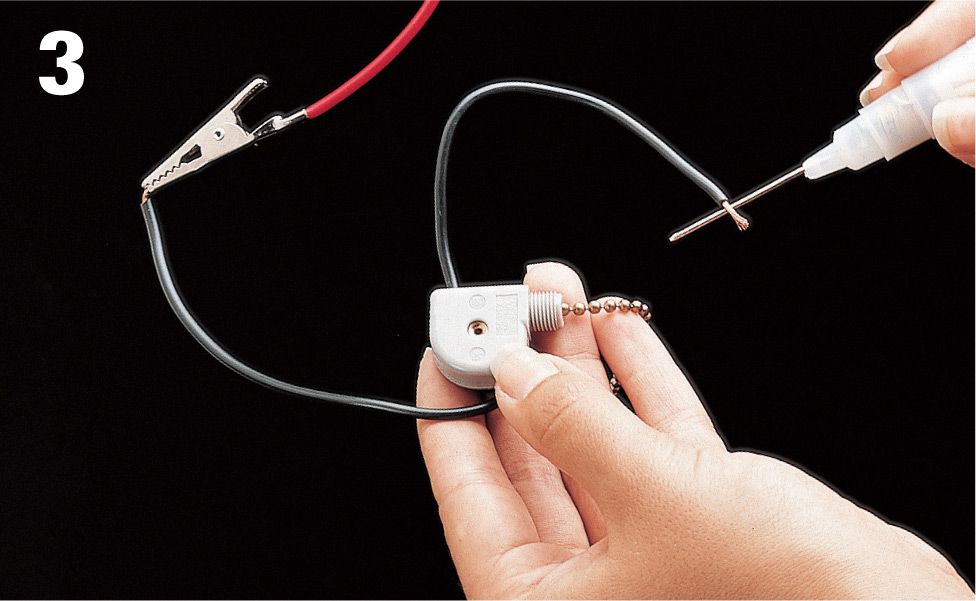
Test the socket by attaching the clip of the continuity tester to the black socket wire and touching the probe to the tab in the socket. Repeat with the socket threads and the white socket wire. If the tester does not glow, the socket must be replaced.
Remove a faulty socket by loosening any mounting screws or clips and pulling the socket and socket wires out of the fixture arm. Purchase and install a new chandelier socket, threading the socket wires through the fixture arm.
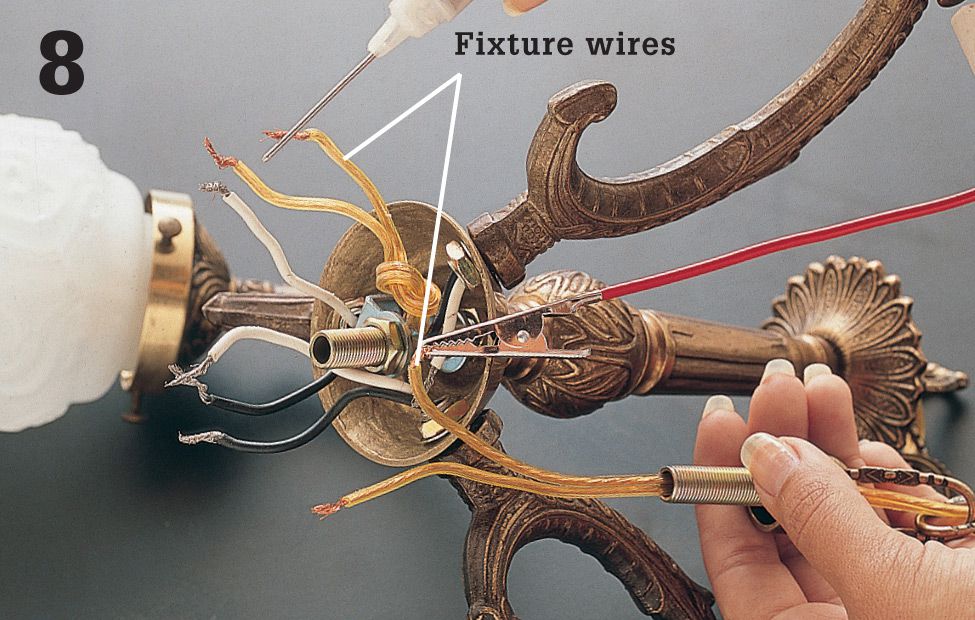
Test each fixture wire by attaching the clip of the continuity tester to one end of the wire and touching the probe to other end. If the tester does not glow, the wire must be replaced. Install new wires, if needed, then reassemble and rehang the chandelier.
![]() Repairing Ceiling Fans
Repairing Ceiling Fans
Ceiling fans contain rapidly moving parts, making them more susceptible to trouble than many other electrical fixtures. Installation is a relatively simple matter, but repairing a ceiling fan can be very frustrating. The most common problems you’ll encounter are balance and noise issues and switch failure, usually precipitated by the pull chain breaking. In most cases, both problems can be corrected without removing the fan from the ceiling. But if you have difficulty on ladders or simply don’t care to work overhead, consider removing the fan when replacing the switch.
Tools & Materials ![]()
Screwdriver
Combination tool
Replacement switch
Voltage sensor
Ceiling fans are subject to a great deal of vibration and stress, so it’s not uncommon for switches and motors to fail. Minimize wear and tear by making sure blades are in balance so the fan doesn’t wobble.
![]() How to Troubleshoot Blade Wobble
How to Troubleshoot Blade Wobble

Start by checking and tightening all hardware used to attach the blades to the mounting arms and the mounting arms to the motor. Hardware tends to loosen over time, and this is frequently the cause of wobble.
If wobble persists, try switching around two of the blades. Often this is all it takes to get the fan back into balance. If a blade is damaged or warped, replace it.
If the blades are tight and you still have wobble, turn the power off at the panel, remove the fan canopy, and inspect the mounting brace and the connection between the mounting pole and the fan motor. If any connections are loose, tighten them, and then replace the canopy.
![]() How to Fix a Loose Wire Connection
How to Fix a Loose Wire Connection
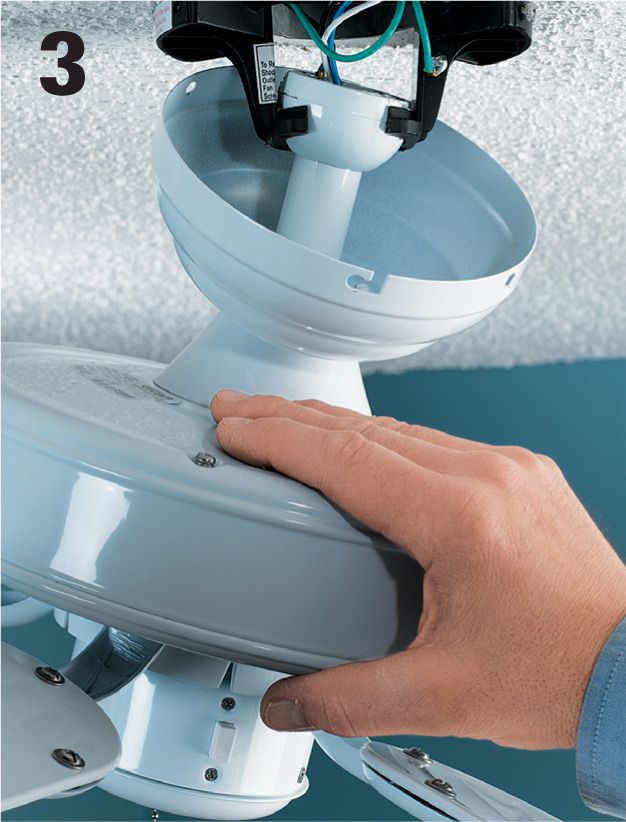
A leading cause of fan failure is loose wire connections. To inspect these connections, first shut off the power to the fan. Remove the fan blades to gain access, and then remove the canopy that covers the ceiling box and fan mounting bracket. Most canopies are secured with screws on the outside shell. Have a helper hold the fan body while you remove the screws so it won’t fall.

Once the canopy is lowered, you’ll see black, white, green, copper, and possibly blue wires. Hold a voltage sensor within 1/2" of these wires with the wall switch that controls the fan in the ON position. The black and blue wires should cause the sensor to beep if power is present.
Shut off power, and test the wires by placing a voltage sensor within 1/2" of the wires. If the sensor beeps or lights up, then the circuit is still live and is not safe to work on. When the sensor does not beep or light up, the circuit is dead and may be worked upon.
When you have confirmed that there is no power, check all the wire connections to make certain each is tight and making good contact. You may be able to see that a connection has come apart and needs to be remade. But even if you see one bad connection, check them all by gently tugging on the wire connectors. If the wires pull out of the wire connector or the connection feels loose, unscrew the wire connector from the wires. Turn the power back on and see if the problem has been solved.
![]() How to Replace a Ceiling Fan Pull-Chain Switch
How to Replace a Ceiling Fan Pull-Chain Switch
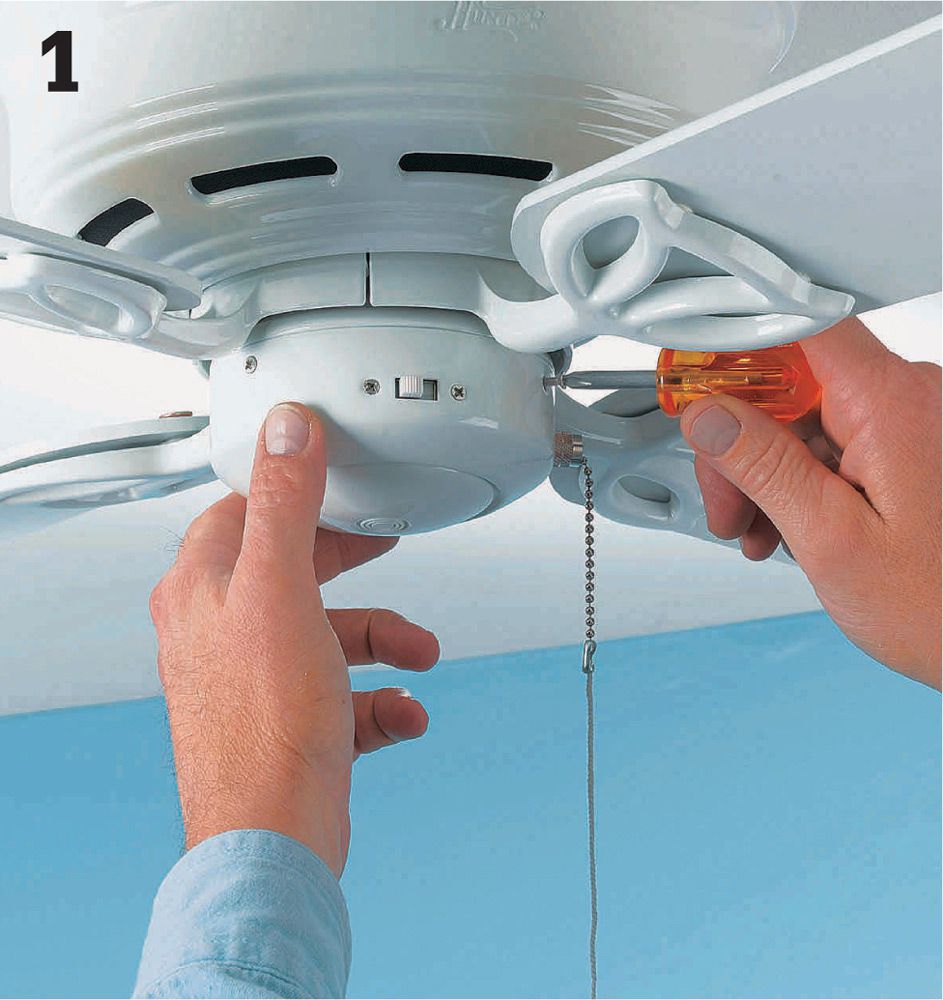
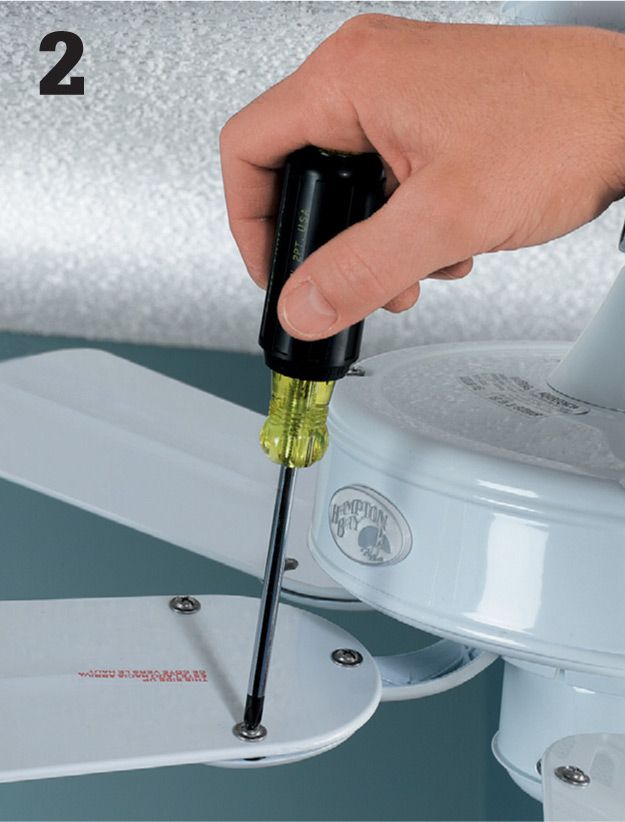
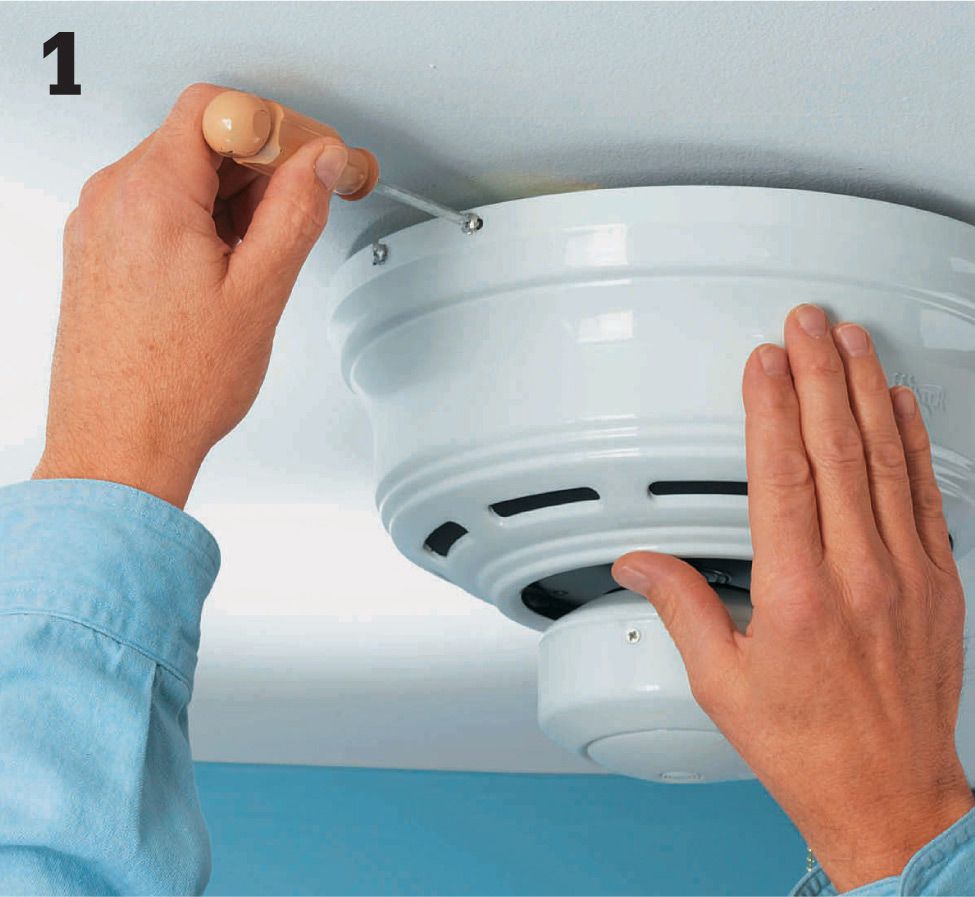
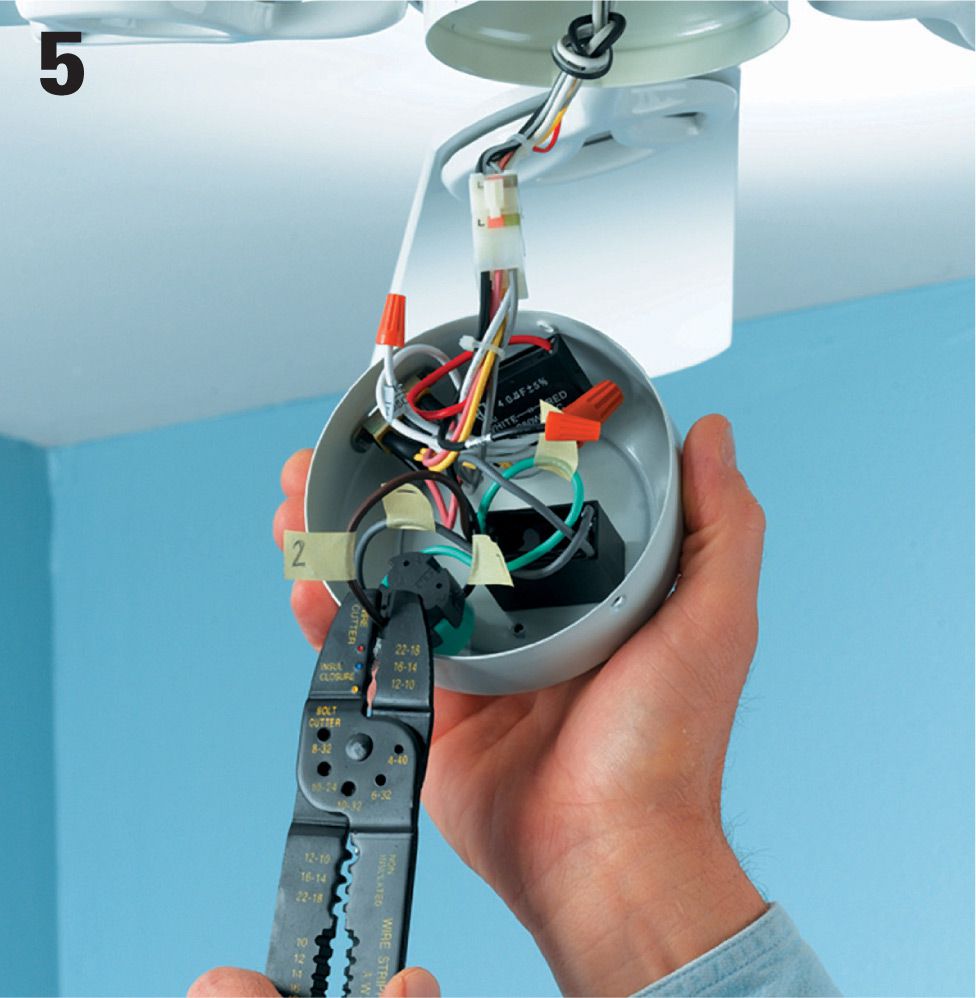
Turn off the power at the panel. Use a screwdriver to remove the three to four screws that secure the bottom cap on the fan switch housing. Lower the cap to expose the wires that supply power to the pull-chain switch.
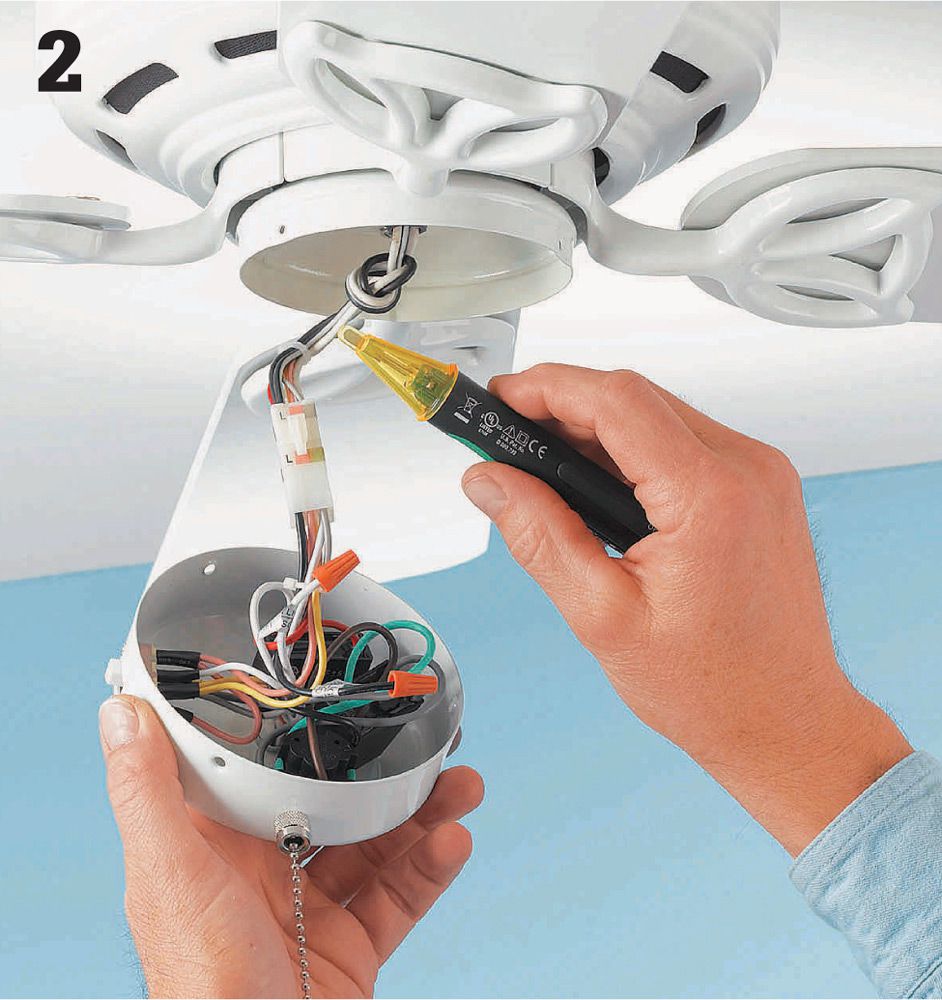
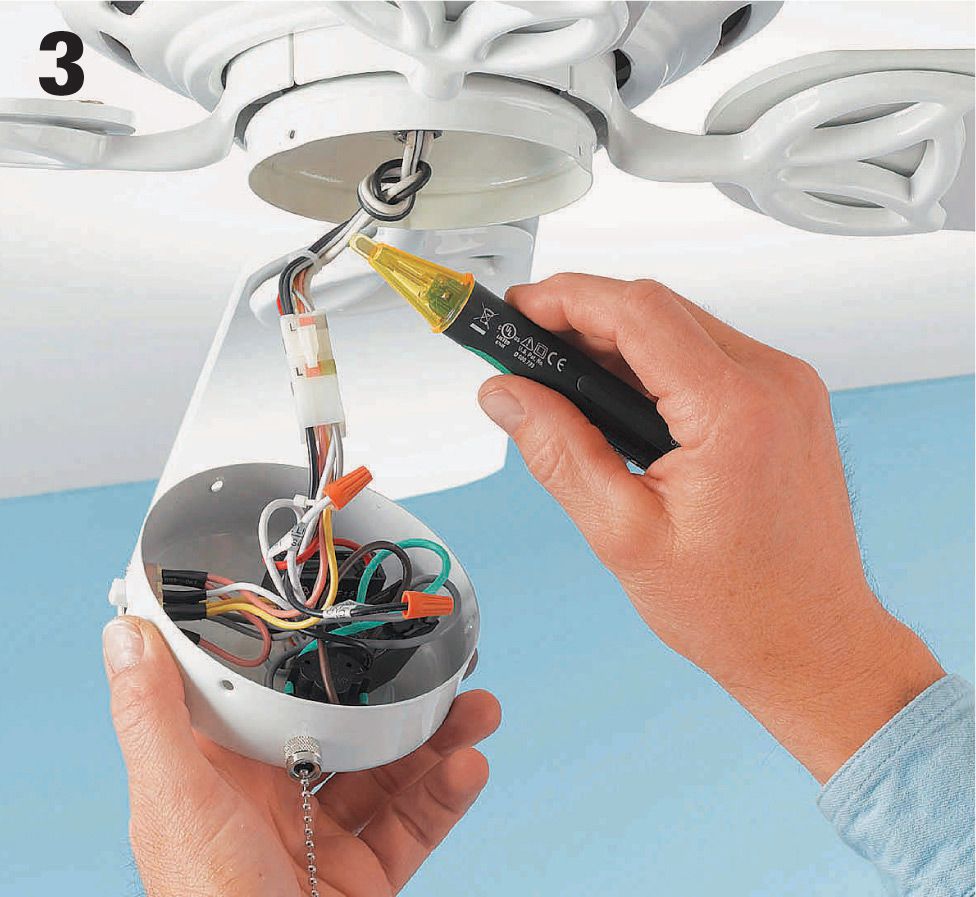
Test the wires by placing a voltage sensor within 1/2" of the wires. If the sensor beeps or lights up, then the circuit is still live and is not safe to work on. When the sensor does not beep or light up, the circuit is dead and may be worked upon.
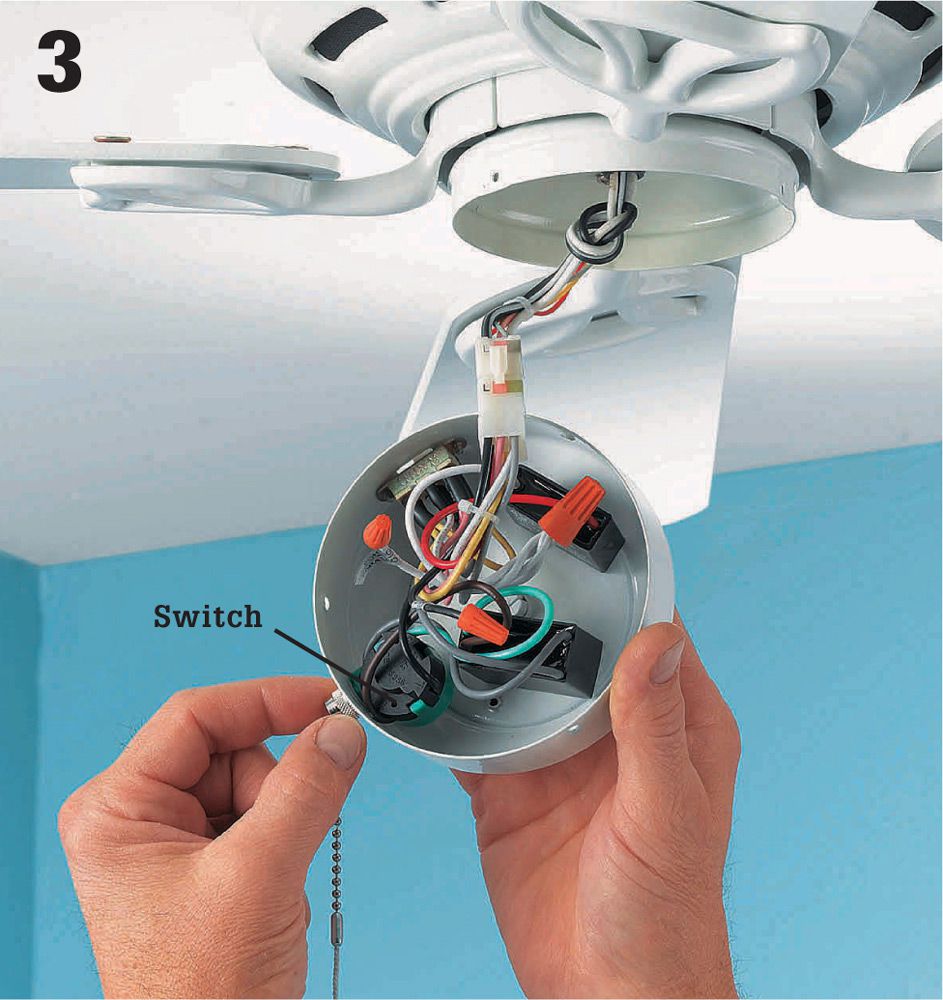
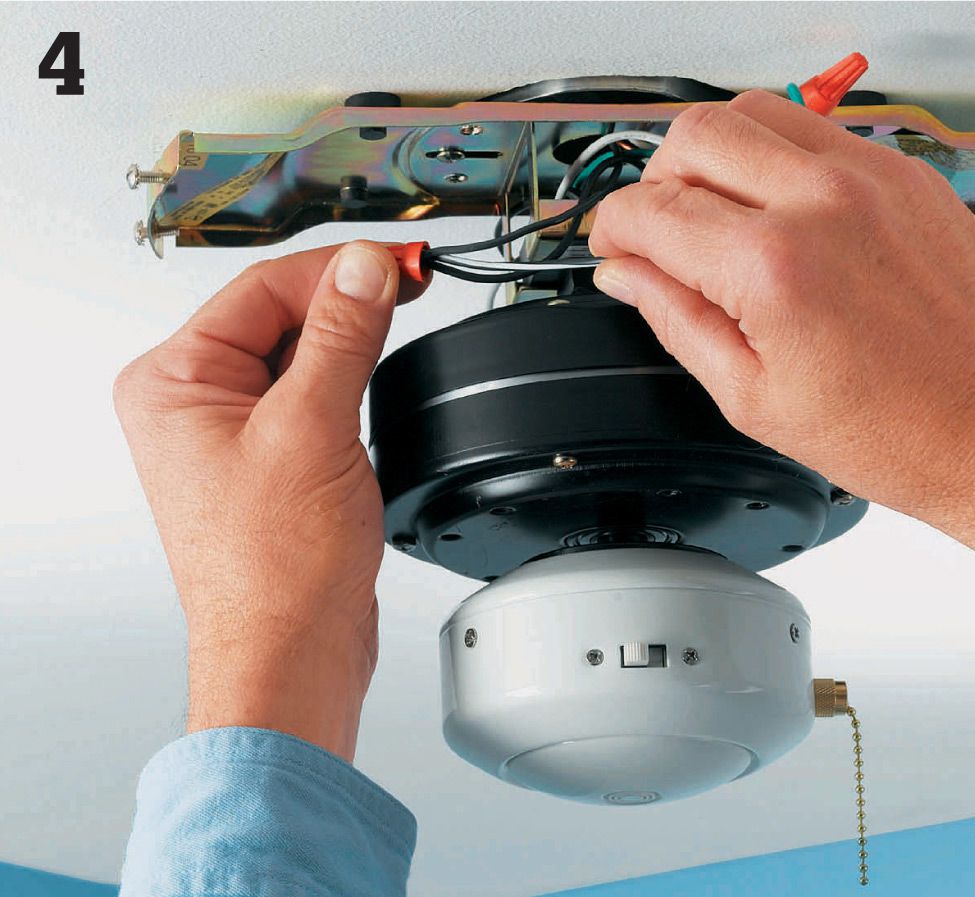
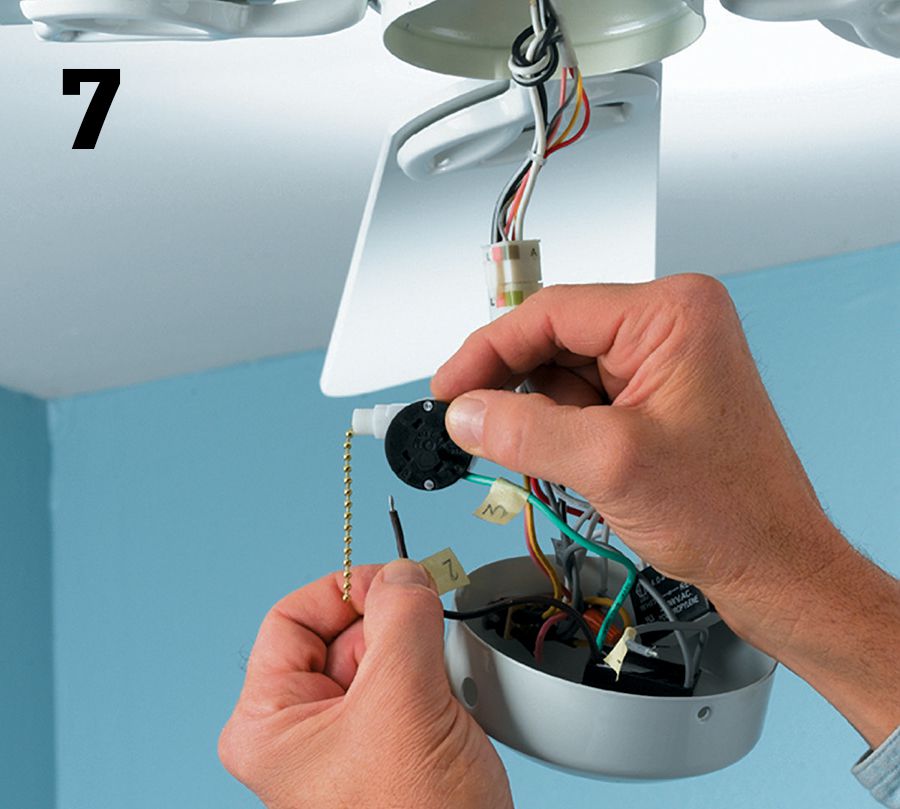
Locate the switch unit (the part that the pull chain used to be attached to if it broke off); it’s probably made of plastic. You’ll need to replace the whole switch. Fan switches are connected with three to eight wires, depending on the number of speed settings.
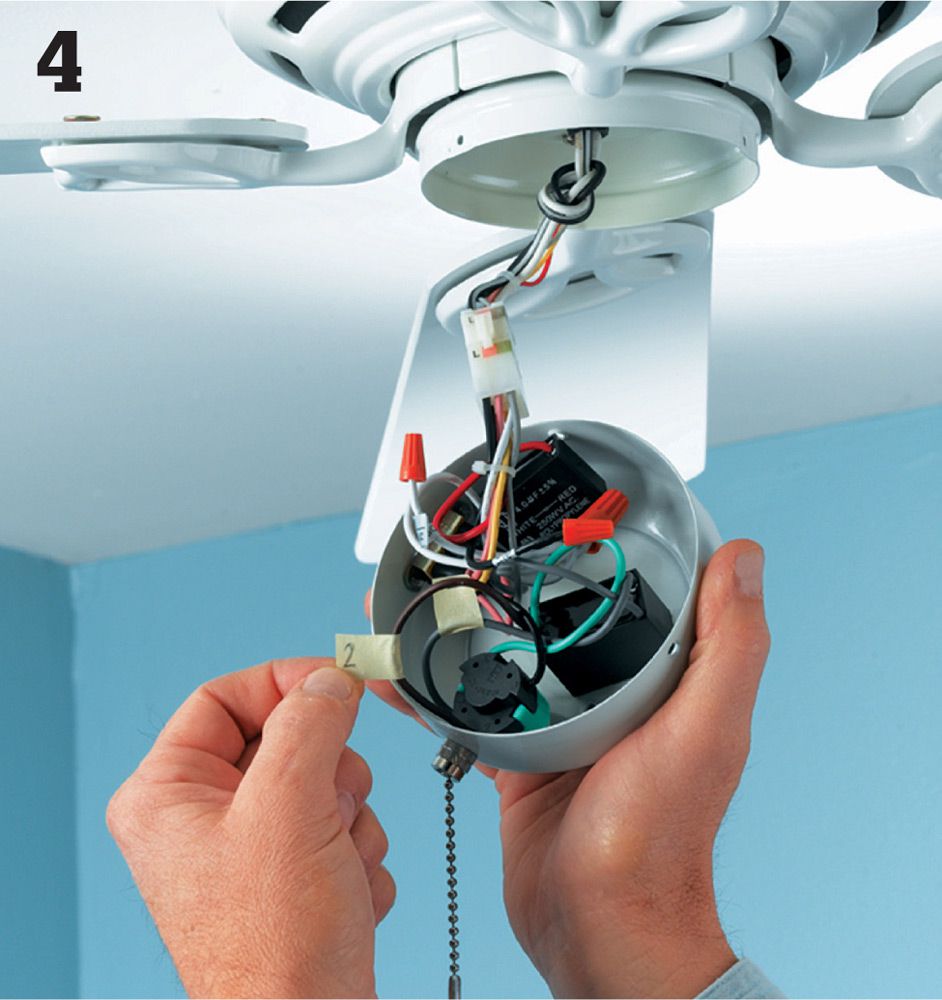
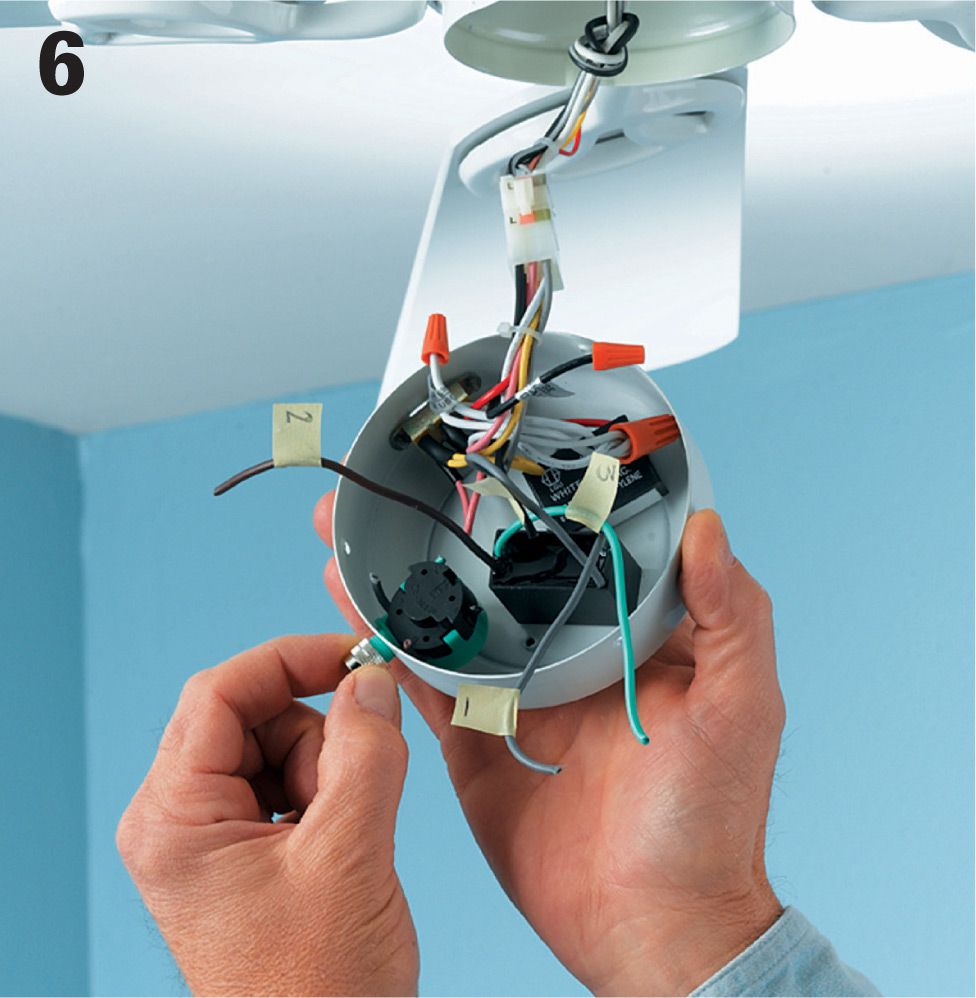
Attach a small piece of tape to each wire that enters the switch, and write an identifying number on the tape. Start at one side of the switch, and label the wires in the order they’re attached.
Disconnect the old switch wires, in most cases by cutting the wires off as close to the old switch as possible. Unscrew the retaining nut that secures the switch to the switch housing.
Buyer’s Tip ![]()
Here’s how to buy a new switch. Bring the old switch to the hardware store or home center, and find an identical new switch—one with the same number and color of wires. It should also attach to the fan motor wires in the same way (slots or screw terminals or with integral wires and wire connectors) and attach to the fan in the same way. If you are unable to locate an identical switch, find the owners manual for your ceiling fan and contact the manufacturer. Or, find the brand and model number of the fan and order a switch from a ceiling fan dealer or electronics supply store.
Remove the switch. There may be one or two screws that hold it in place or it may be secured to the outside of the fan with a small knurled nut, which you can loosen with needlenose pliers. Purchase an identical new switch.
Connect the new switch using the same wiring configuration as on the old model. To make connections, first use a wire stripper to strip 3/4" of insulation from the ends of each of the wires coming from the fan motor (the ones you cut in step 5). Attach the wires to the new switch in the same order and configuraion as they were attached to the old switch. Secure the new switch in the housing, and make sure all wires are tucked neatly inside. Reattach the bottom cap. Restore power to the fan. Test all the fan’s speeds to make sure all the connections are good.
![]() Repairing Fluorescent Lights
Repairing Fluorescent Lights
Fluorescent lights are relatively trouble free and use less energy than incandescent lights. A typical fluorescent tube lasts about three years and produces two to four times as much light per watt as a standard incandescent light bulb.
The most frequent problem with a fluorescent light fixture is a worn-out tube. If a fluorescent light fixture begins to flicker or does not light fully, remove and examine the tube. If the tube has bent or broken pins or black discoloration near the ends, replace it. Light gray discoloration is normal in working fluorescent tubes. When replacing an old tube, read the wattage rating and the color temperature rating printed on the tube, and buy a new tube with matching ratings. The color temperature rating is a measure of the color of the light produced by the tube. Most people prefer a “warm” light in the 2,700K range. Never dispose of old tubes by breaking them. Fluorescent tubes contain a small amount of hazardous mercury. Check with your local environmental control agency or health department for disposal guidelines.
Fluorescent light fixtures also can malfunction if the sockets are cracked or worn. Inexpensive replacement sockets are available at any hardware store and can be installed in a few minutes.
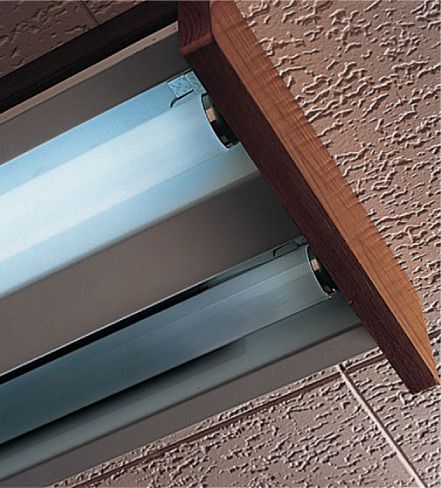
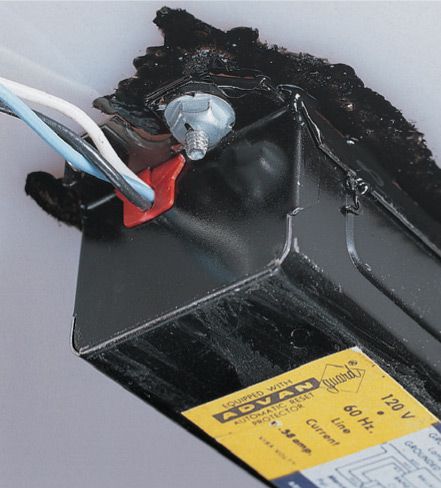
If a fixture does not work even after the tube and sockets have been serviced, the ballast probably is defective. Faulty ballasts may leak a black, oily substance and can cause a fluorescent light fixture to make a loud humming sound. Although ballasts can be replaced, always check prices before buying a new ballast. It may be cheaper to purchase and install a new fluorescent fixture rather than to replace the ballast in an old fluorescent light fixture.
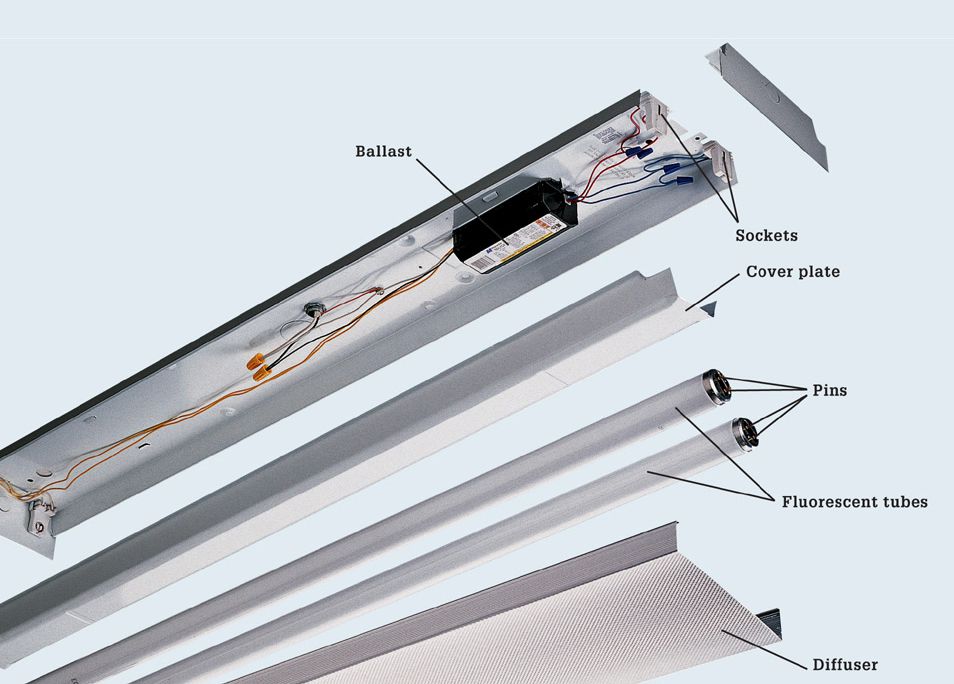
A fluorescent light works by directing electrical current through a special gas-filled tube that glows when energized. A white translucent diffuser protects the fluorescent tube and softens the light. A cover plate protects a special transformer, called a ballast. The ballast regulates the flow of 120-volt household current to the sockets. The sockets transfer power to metal pins that extend into the tube.
|
Problem |
|
|
Tube flickers, or lights partially. |
|
|
Repair |
|
|
1. Rotate tube to make sure it is seated properly in the sockets. 2. Replace tube and the starter (where present) if tube is discolored or if pins are bent or broken. 3. Replace the ballast if replacement cost is reasonable. Otherwise, replace the entire fixture. |
|
|
Problem |
|
|
Tube does not light. |
|
|
Repair |
|
|
1. Check wall switch and repair or replace, if needed. 2. Rotate the tube to make sure it is seated properly in sockets. 3. Replace tube and the starter (where present) if tube is discolored or if pins are bent or broken. 4. Replace sockets if they are chipped or if tube does not seat properly. 5. Replace the ballast or the entire fixture. |
|

|
Problem |
|
|
Noticeable black substance around ballast. |
|
|
Repair |
|
|
Replace ballast if replacement cost is reasonable. Otherwise, replace the entire fixture. |
|
|
Problem |
|
|
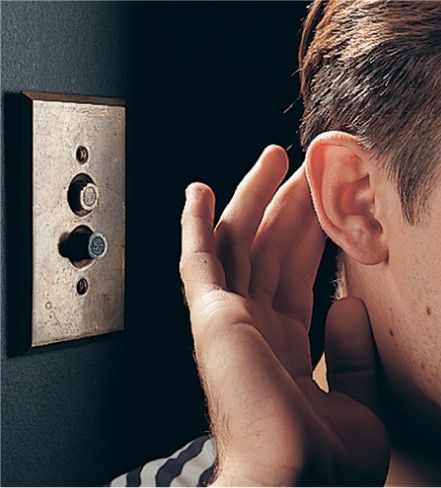
Fixture hums. |
|
|
Repair |
|
|
Replace ballast if replacement cost is reasonable. Otherwise, replace the entire fixture. |
|
Tools & Materials ![]()
Screwdriver
Ratchet wrench
Combination tool
Circuit tester
Replacement tubes
Starters, or ballast (if needed)
Replacement fluorescent light fixture (if needed)
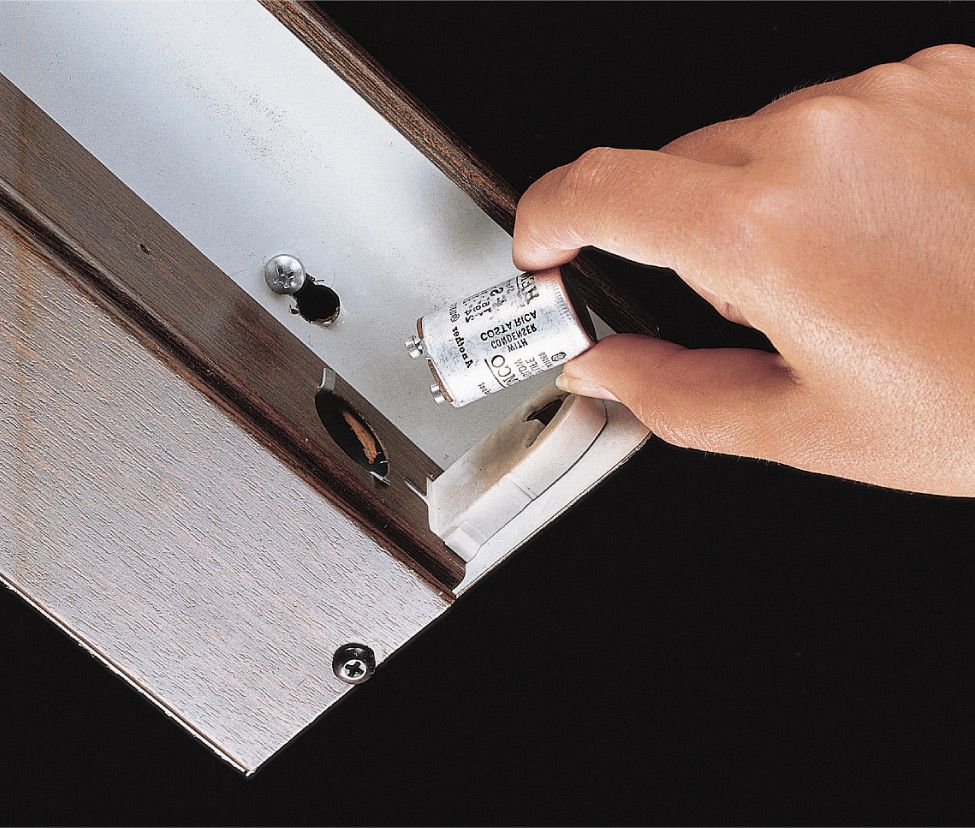
Older fluorescent lights may have a small cylindrical device, called a starter, located near one of the sockets. When a tube begins to flicker, replace both the tube and the starter. Turn off the power, and then remove the starter by pushing it slightly and turning it counterclockwise. Install a replacement that matches the old starter.
![]() How to Replace a Fluorescent Tube
How to Replace a Fluorescent Tube
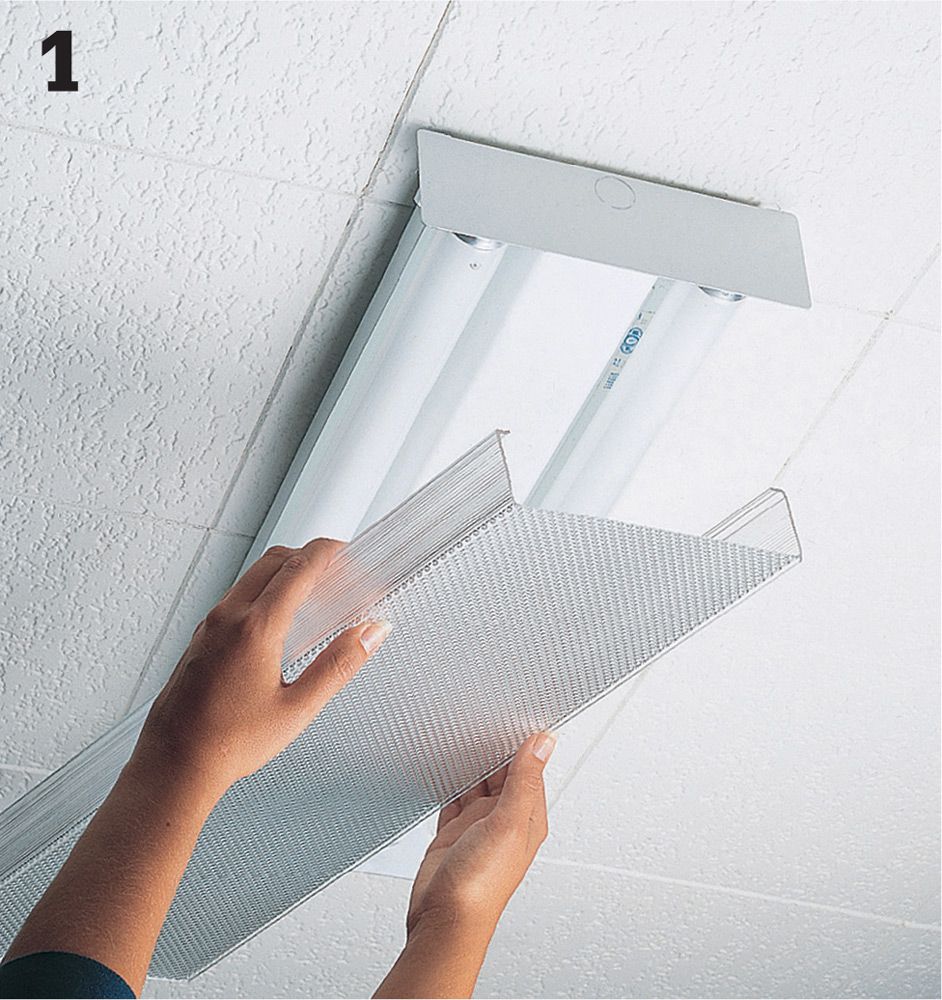
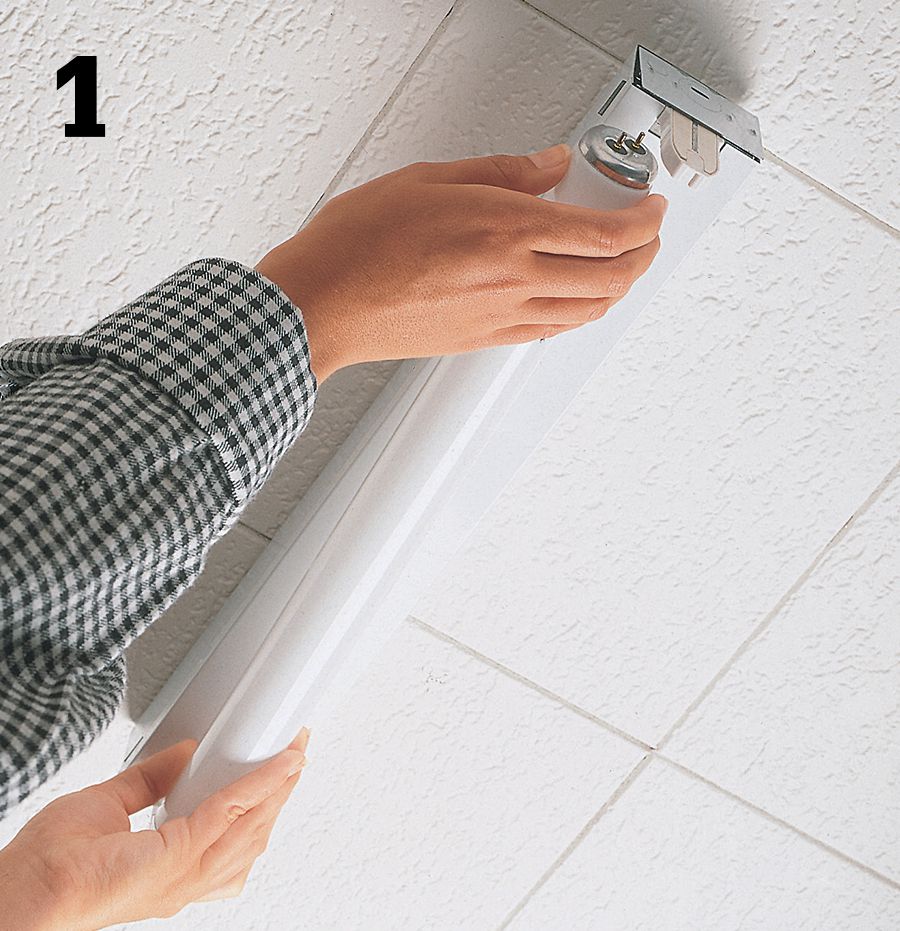
Turn off power to the light fixture at the switch. Remove the diffuser to expose the fluorescent tube.
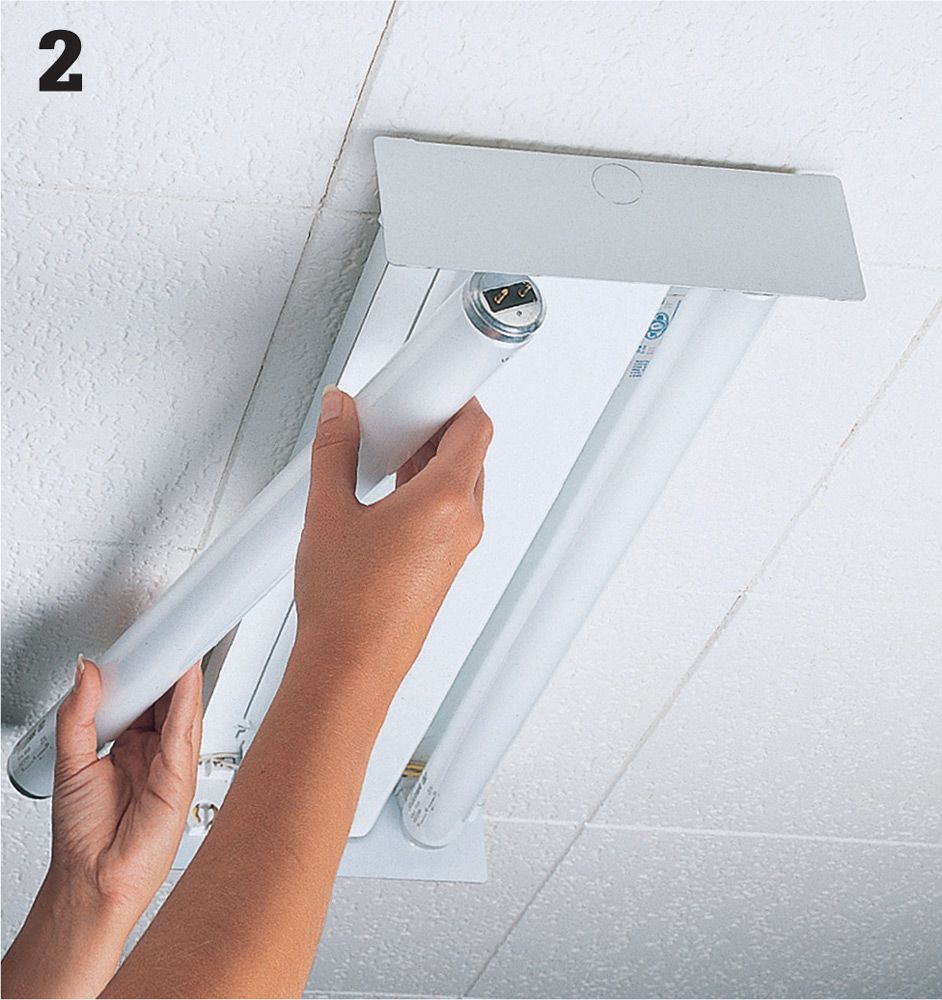
Remove the fluorescent tube by rotating it 1/4 turn in either direction and sliding the tube out of the sockets. Inspect the pins at the end of the tube. Tubes with bent or broken pins should be replaced.
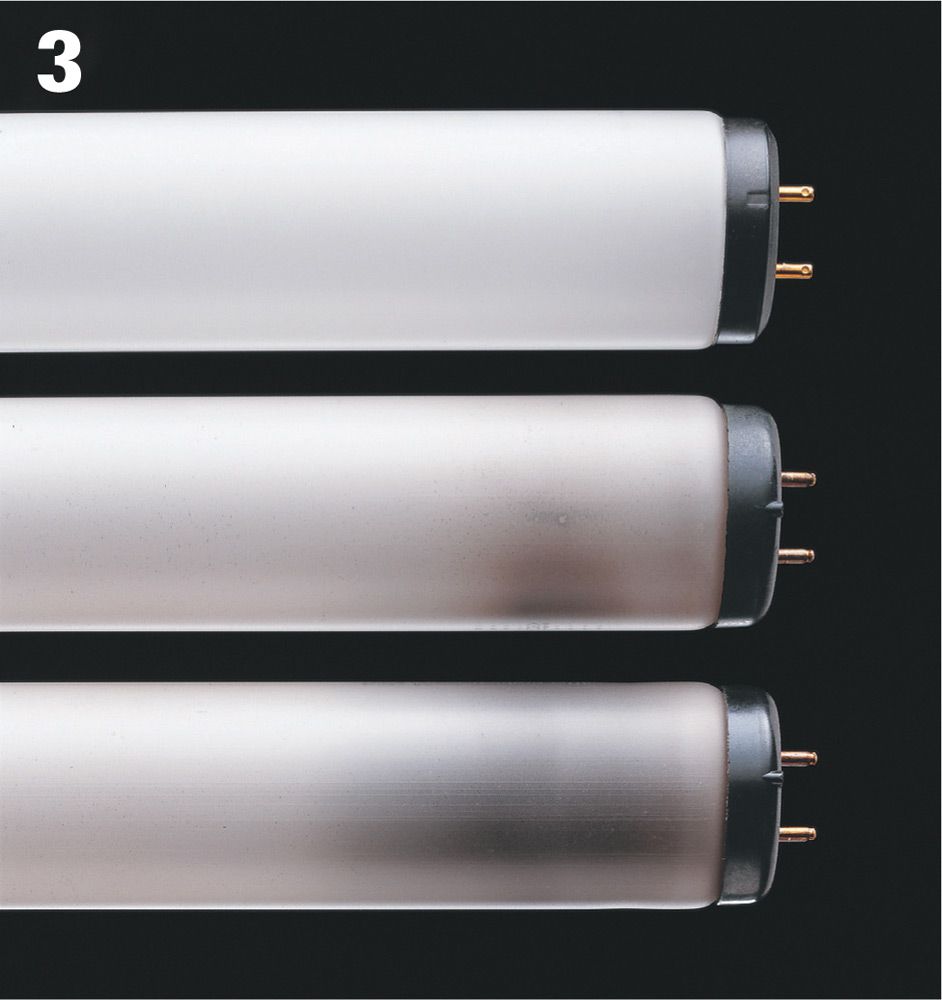
Inspect the ends of the fluorescent tube for discoloration. The new tube in good working order (top) shows no discoloration. The normal, working tube (middle) may have gray color. A worn-out tube (bottom) shows black discoloration.
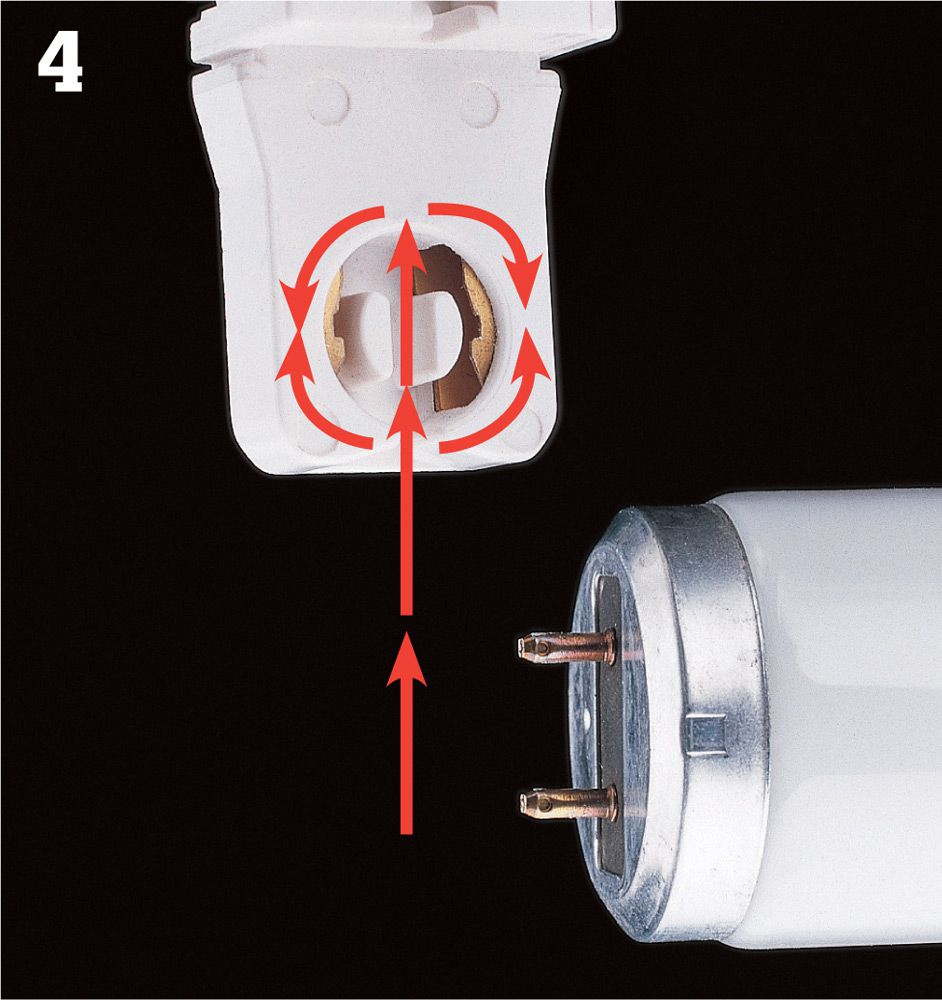
Install a new tube with the same wattage rating as the old tube. Insert the tube so that pins slide fully into sockets, and then twist tube 1/4 turn in either direction until it is locked securely. Reattach the diffuser, and turn on the power at the switch.
![]() How to Replace a Socket
How to Replace a Socket
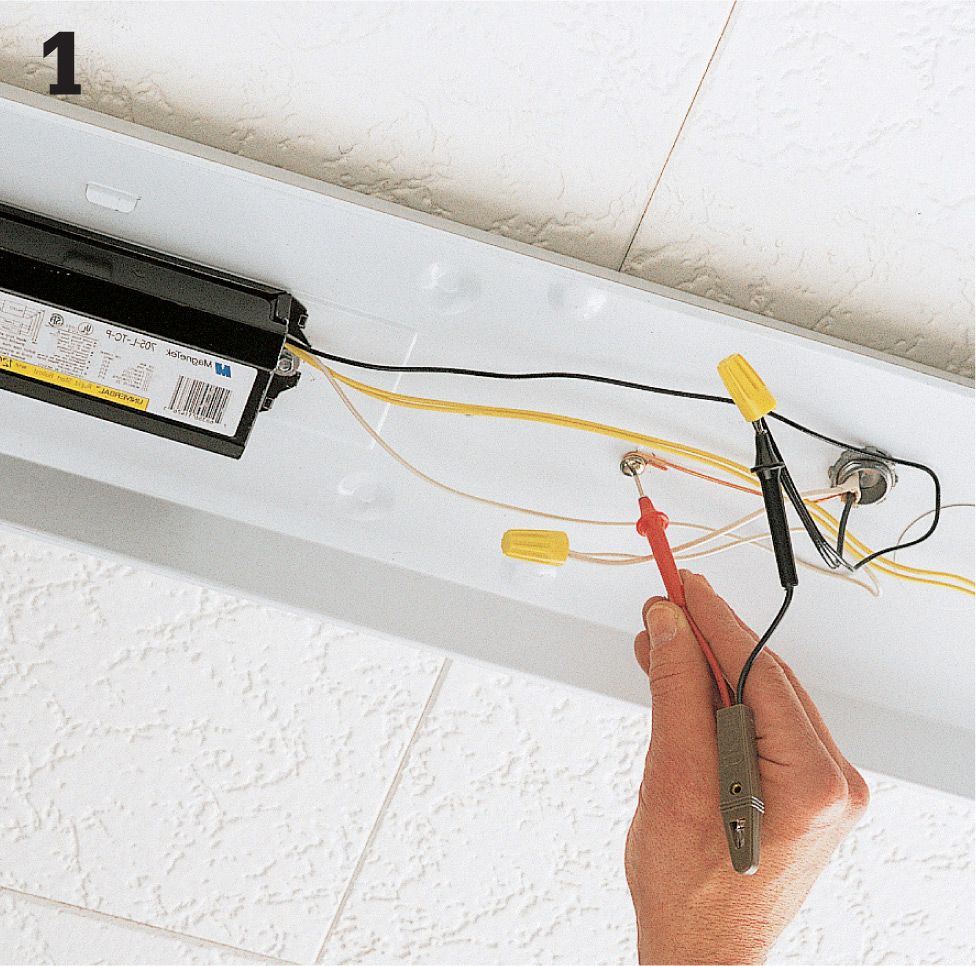
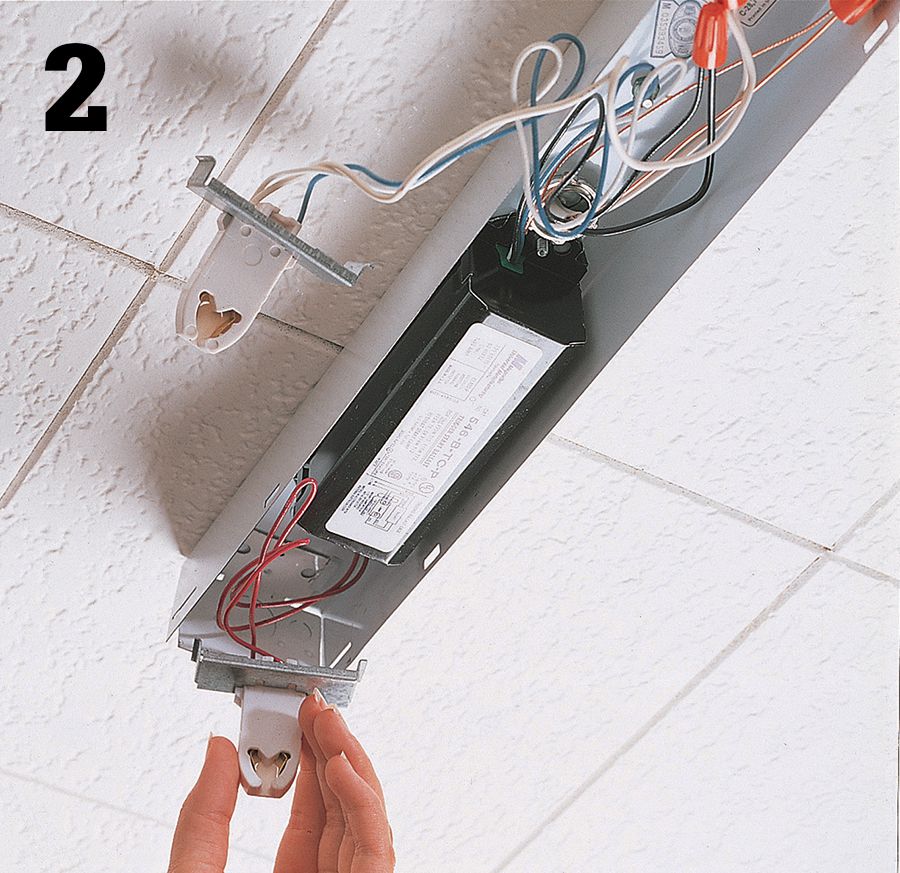
Turn off the power at the switch. Remove the diffuser, fluorescent tube, and the cover plate. Test for power by touching one probe of a neon circuit tester to the grounding screw and inserting the other probe into the hot wire connector. If the tester glows, return to the panel and turn off the correct circuit.
Remove the faulty socket from the fixture housing. Some sockets slide out, while others must be unscrewed.
Disconnect wires attached to the socket. For push-in fittings (above) remove the wires by inserting a small screwdriver into the release openings. Some sockets have screw terminal connections, while others have preattached wires that must be cut before the socket can be removed.
Purchase and install a new socket. If the socket has preattached wire leads, connect the leads to the ballast wires using wire connectors. Replace the cover plate and then the fluorescent tube, making sure that it seats properly. Replace the diffuser. Restore power to the fixture at the panel, and test.
![]() How to Replace a Ballast
How to Replace a Ballast
Turn off the power at the panel, and then remove the diffuser, fluorescent tube, and cover plate. Test for power using a circuit tester (page 302, step 3).
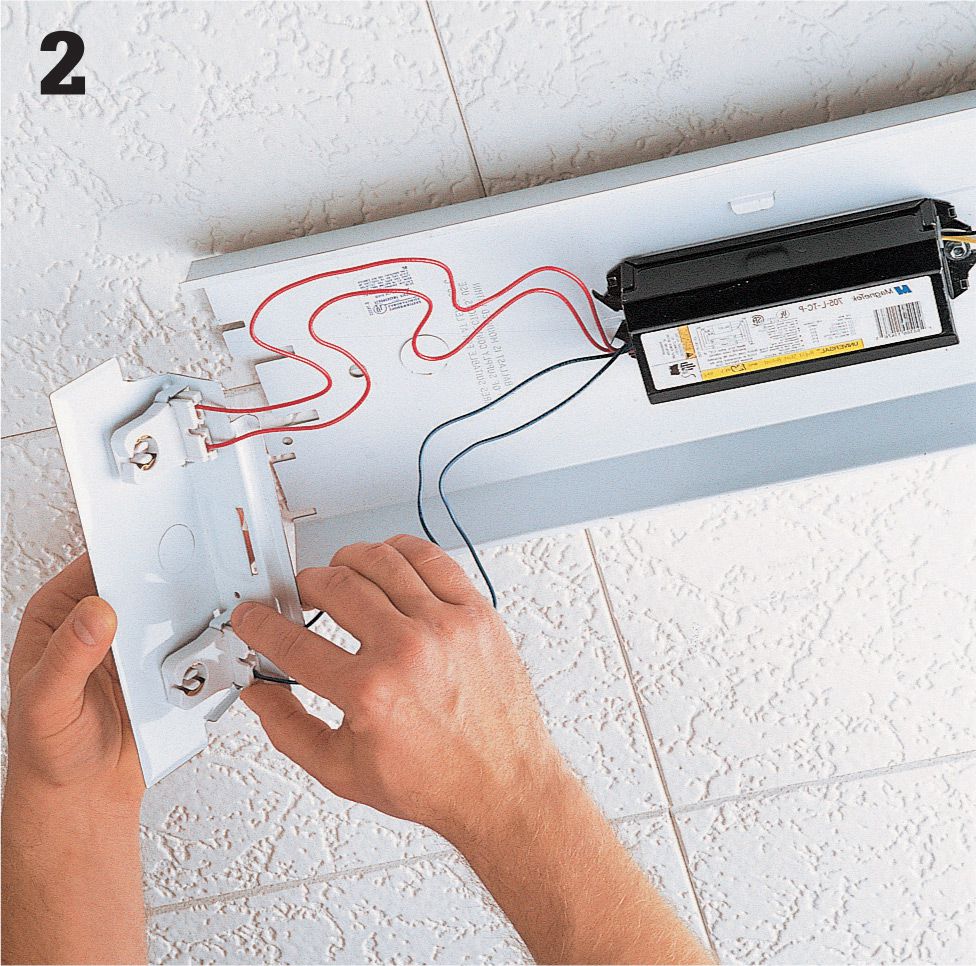
Remove the sockets from the fixture housing by sliding them out or by removing the mounting screws and lifting the sockets out.
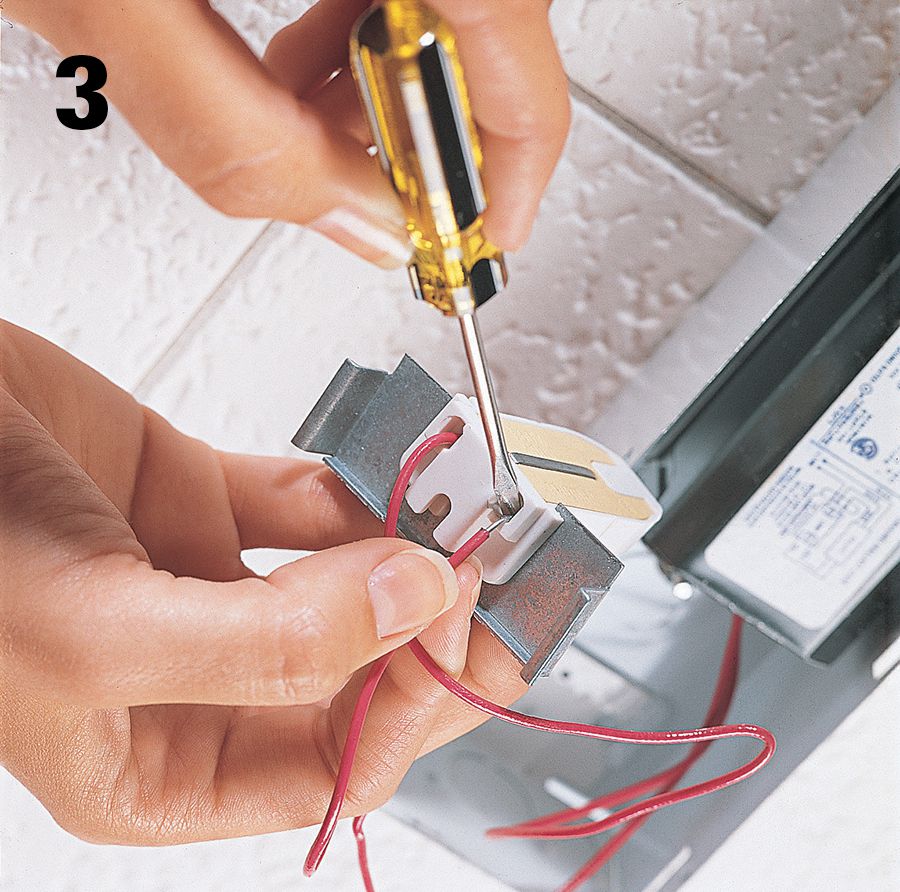
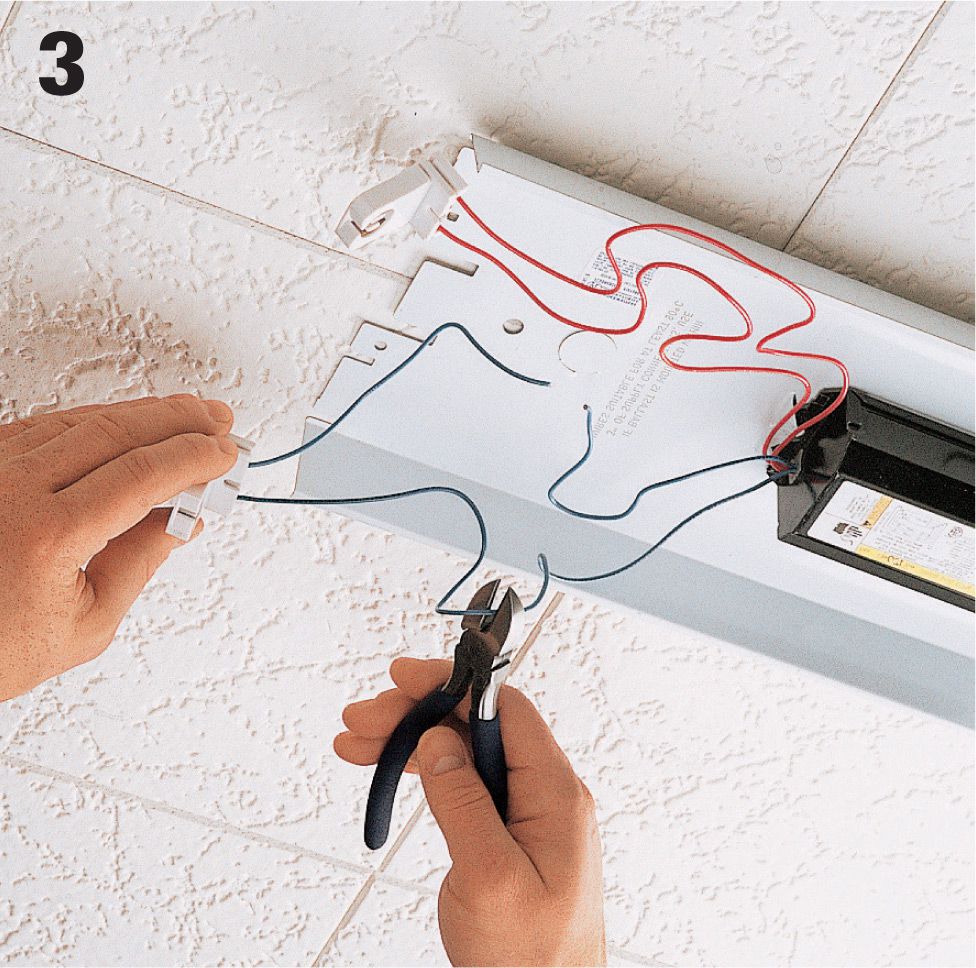
Disconnect the wires attached to the sockets by pushing a small screwdriver into the release openings (above), by loosening the screw terminals, or by cutting wires to within 2" of sockets.
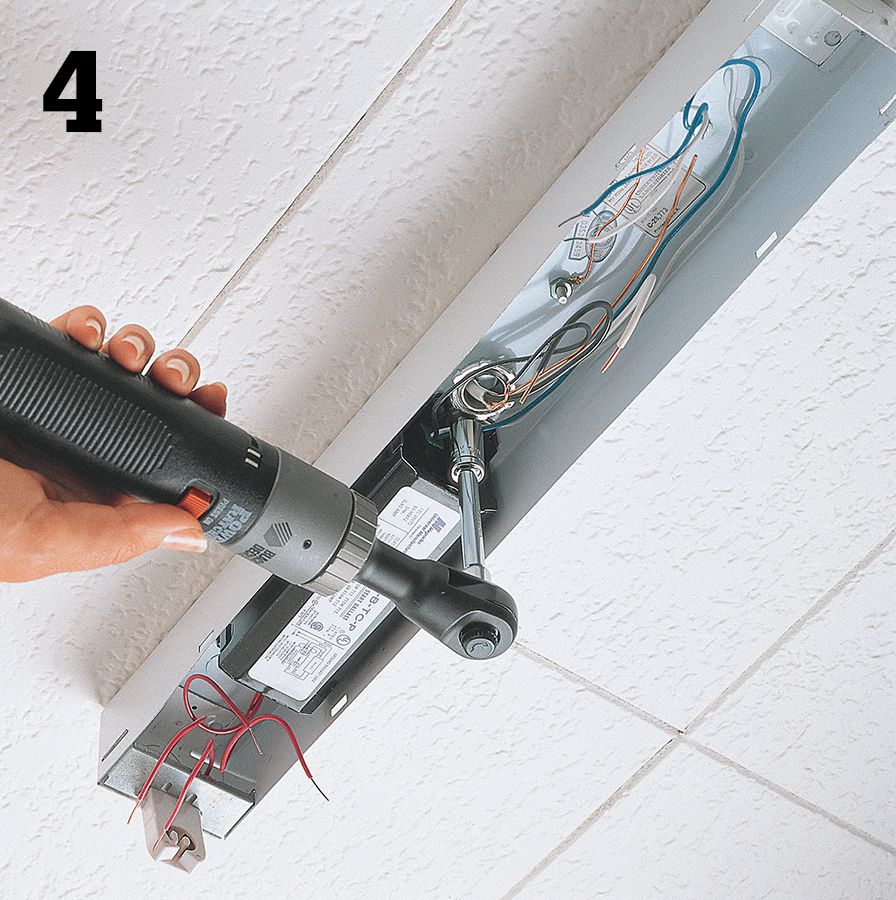
Remove the old ballast using a ratchet wrench or screwdriver. Make sure to support the ballast so it does not fall.
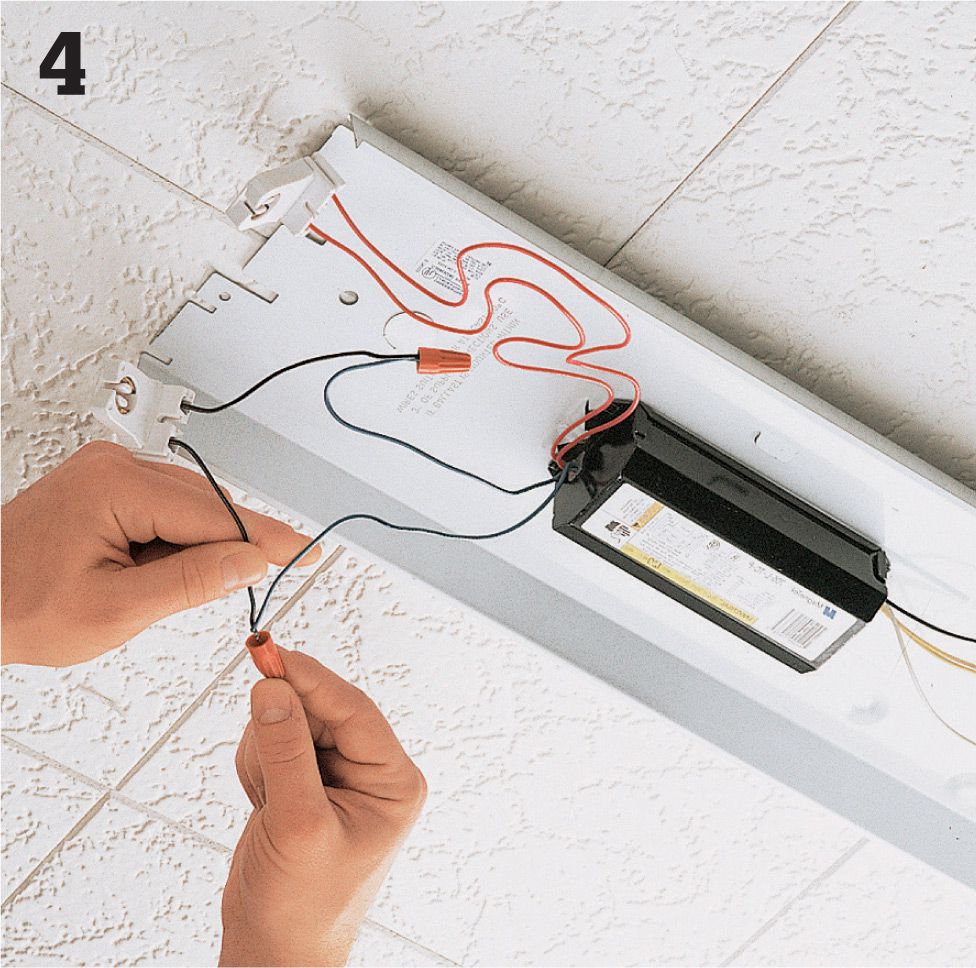
Install a new ballast that has the same ratings as the old ballast.
Attach the ballast wires to the socket wires using wire connectors, screw terminal connections, or push-in fittings. Reinstall the cover plate, fluorescent tube, and diffuser. Turn on power to the light fixture at the panel.
![]() How to Replace a Fluorescent Light Fixture
How to Replace a Fluorescent Light Fixture
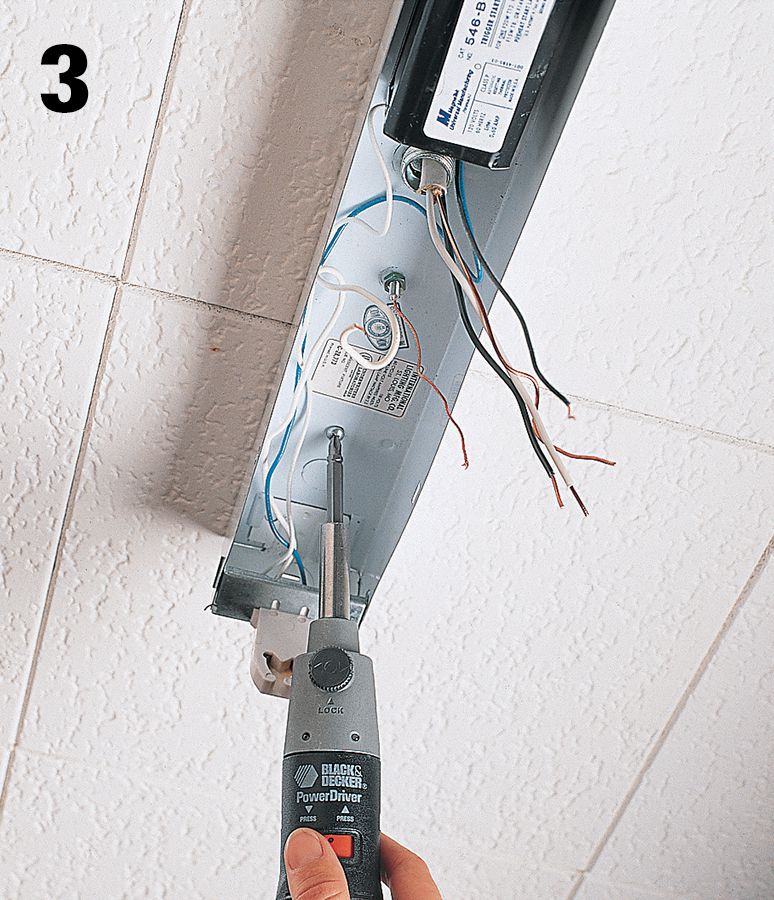
Turn off power to the light fixture at the panel. Remove the diffuser, tube, and cover plate. Test for power using a circuit tester.
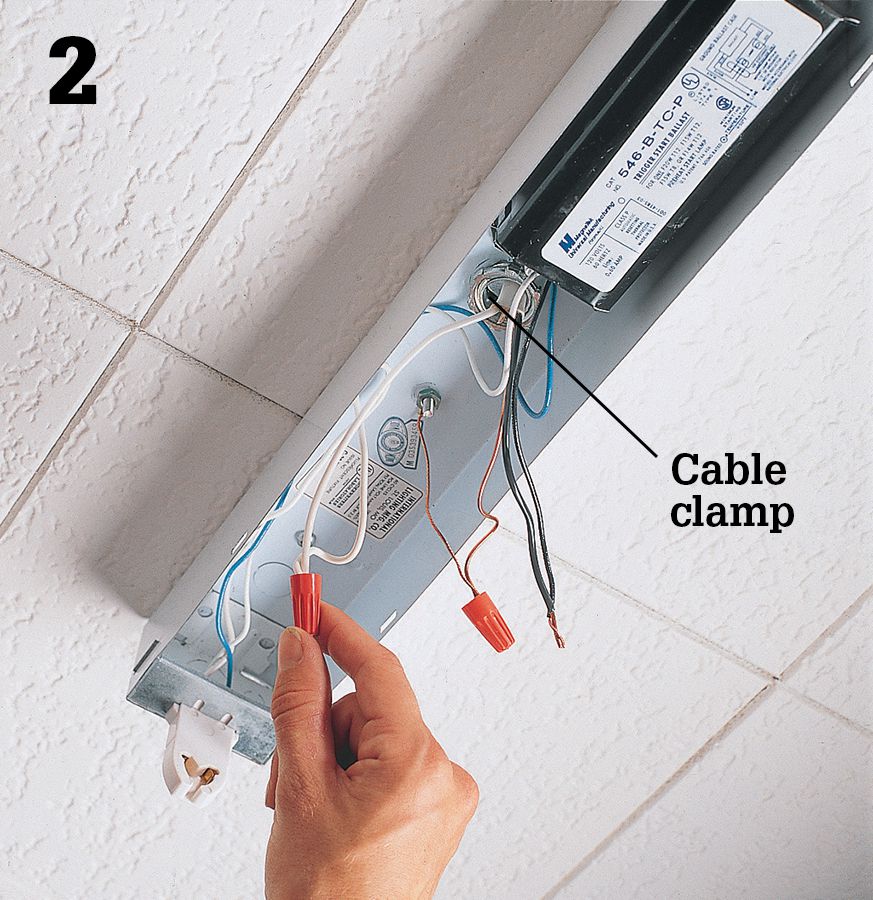
Disconnect the insulated circuit wires and the bare copper grounding wire from the light fixture. Loosen the cable clamp holding the circuit wires.
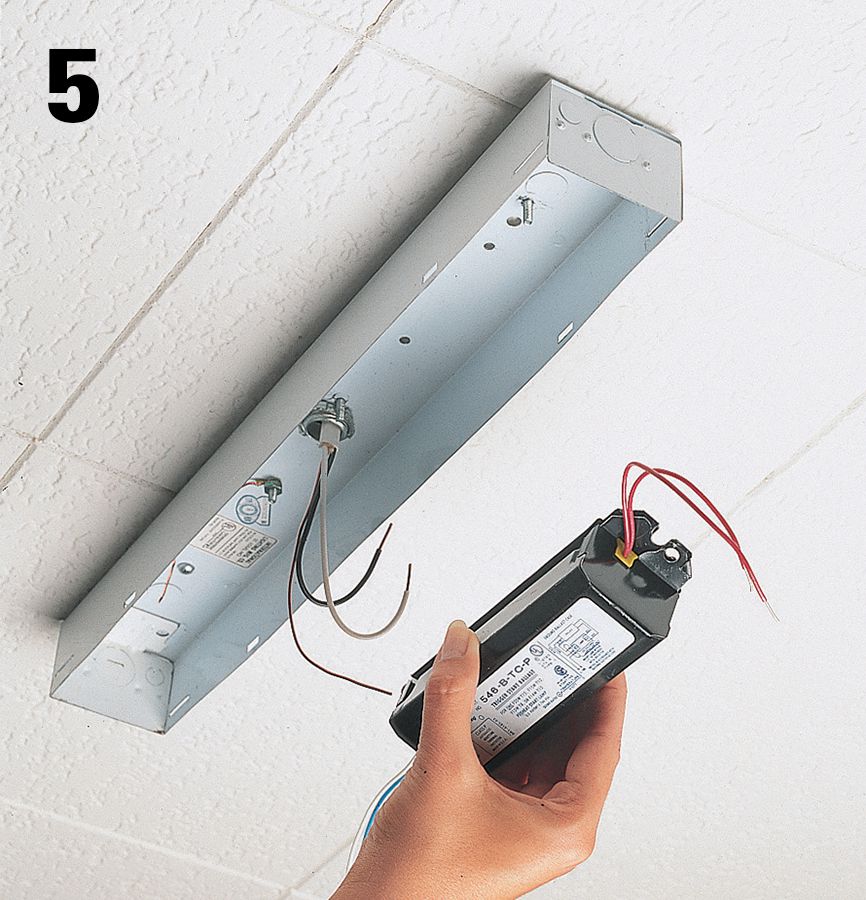
Unscrew the fixture from the wall or ceiling and carefully remove it. Make sure to support the fixture so it does not fall.
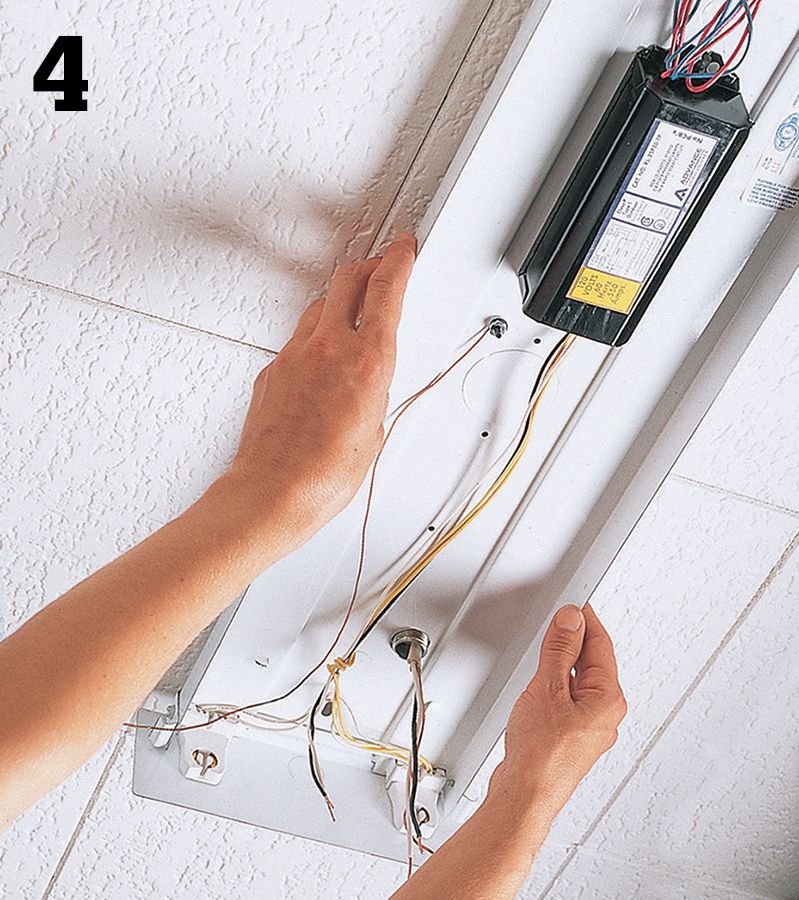
Position the new fixture, threading the circuit wires through the knockout opening in the back of the fixture. Screw the fixture in place so it is firmly anchored to framing members.
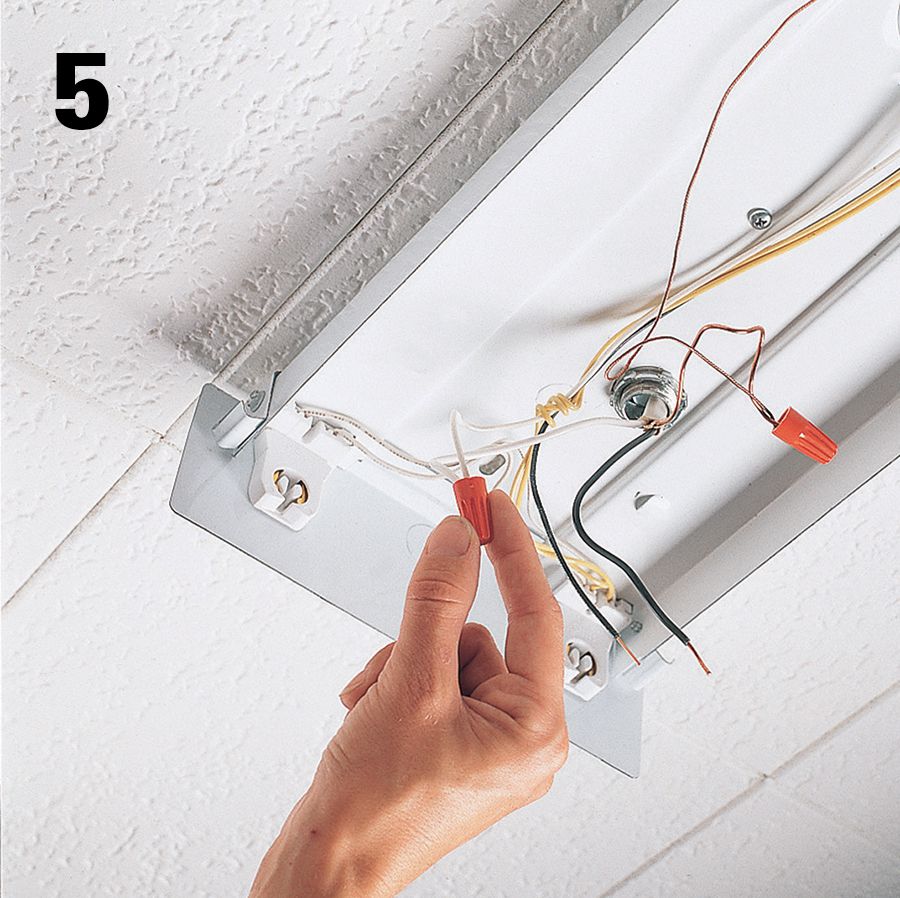
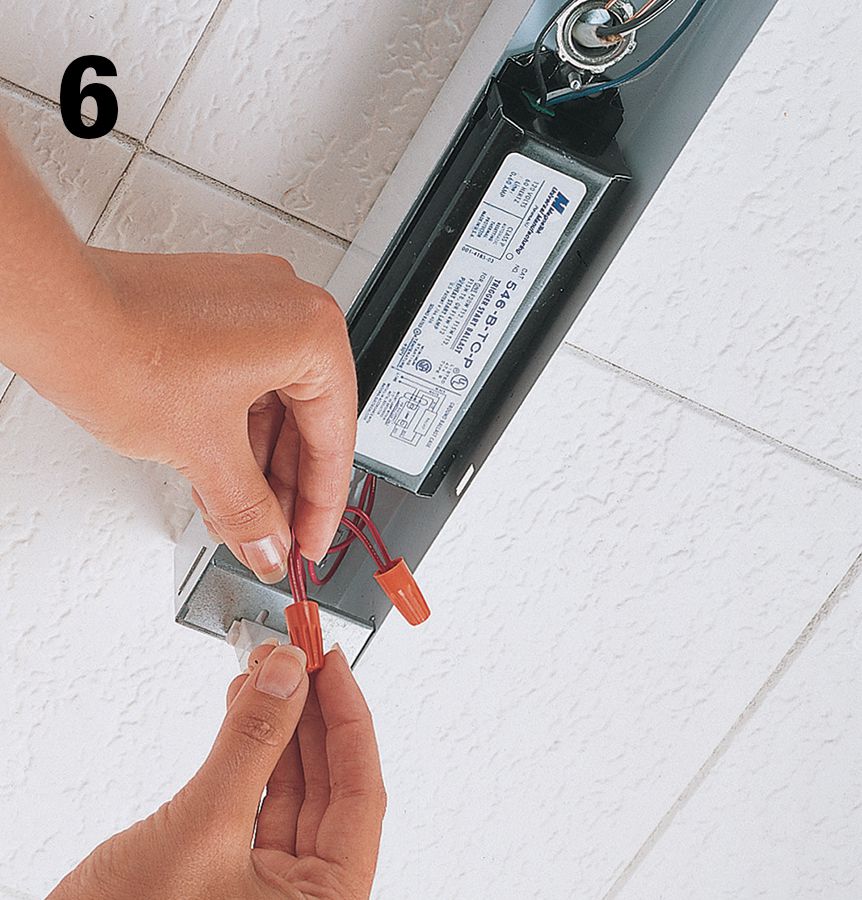
Connect the circuit wires to the fixture wires using wire connectors. Follow the wiring diagram included with the new fixture. Tighten the cable clamp holding the circuit wires.
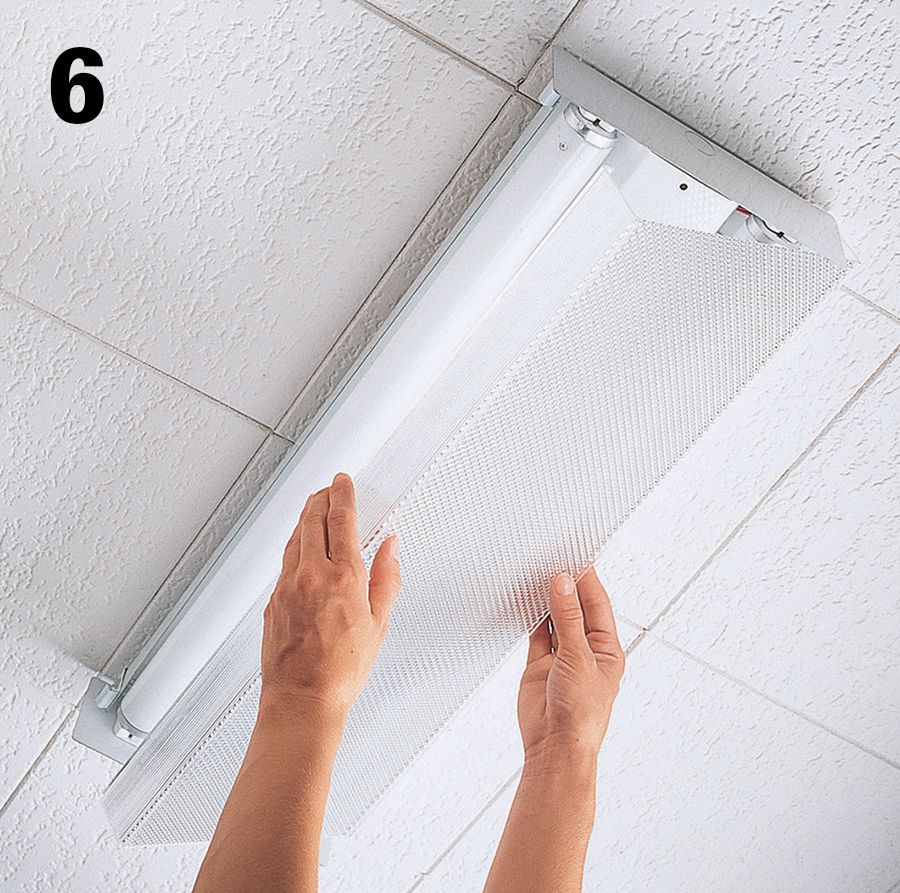
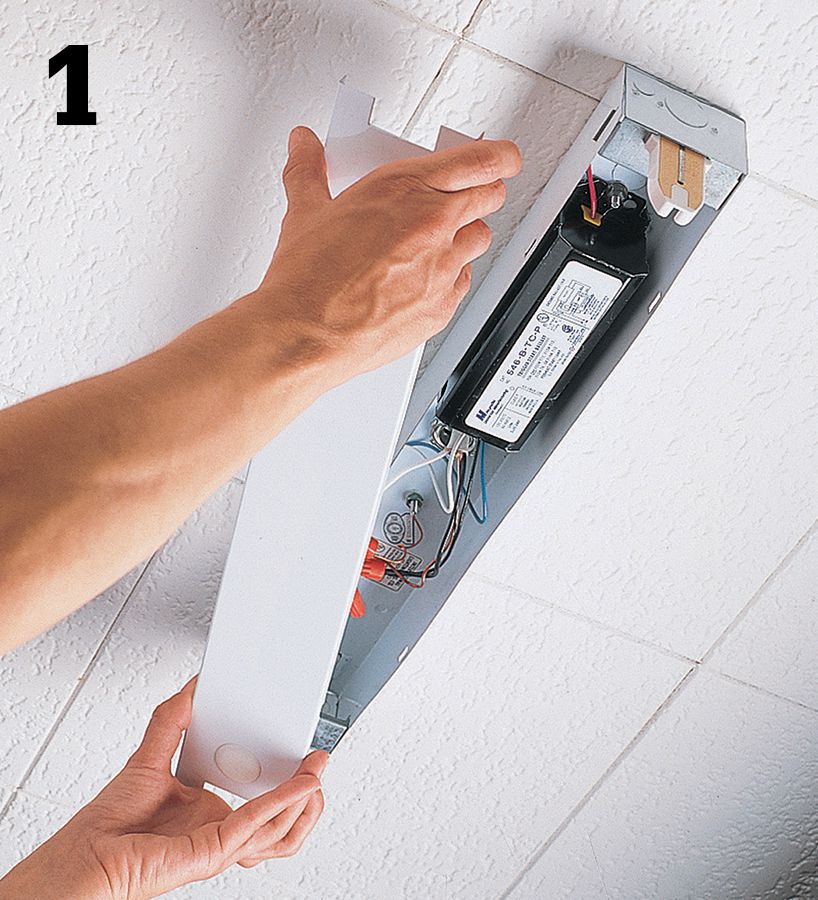
Attach the fixture cover plate, and then install the fluorescent tubes and attach the diffuser. Turn on power to the fixture at the panel, and test.
![]() Replacing Plugs & Cords
Replacing Plugs & Cords
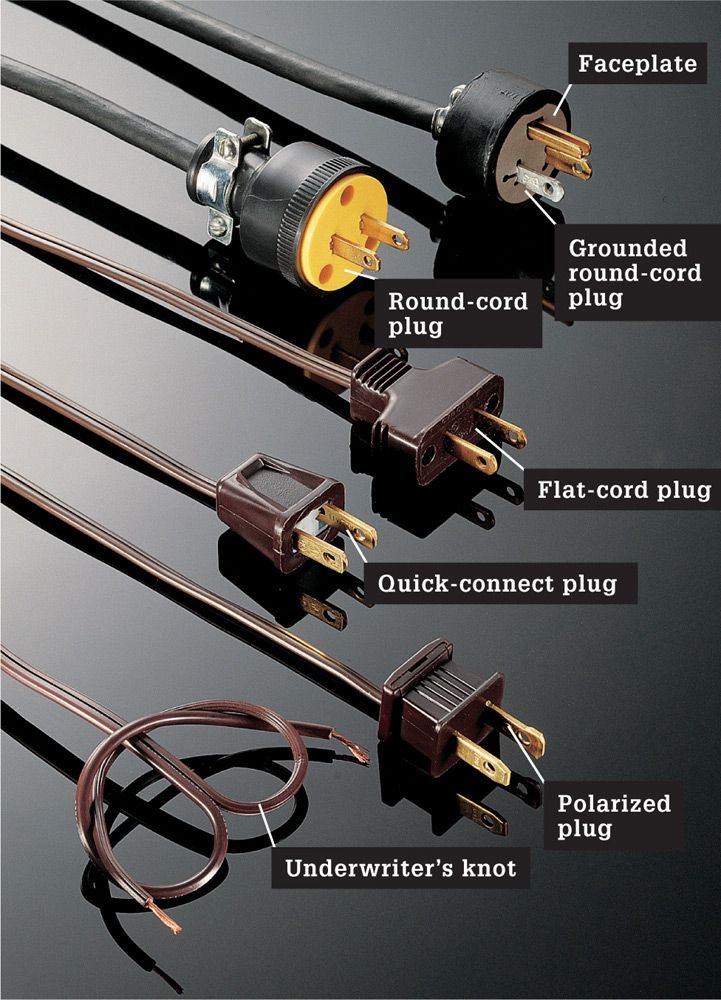
Replace an electrical plug whenever you notice bent or loose prongs, a cracked or damaged casing, or a missing insulating faceplate. A damaged plug poses a shock and fire hazard.
Replacement plugs are available in different styles to match common appliance cords. Always choose a replacement that is similar to the original plug. Flat-cord and quick-connect plugs are used with light-duty appliances, such as lamps and radios. Round-cord plugs are used with larger appliances, including those that have three-prong grounding plugs.
Some tools and appliances use polarized plugs. A polarized plug has one wide prong and one narrow prong, corresponding to the hot and neutral slots found in a standard receptacle.
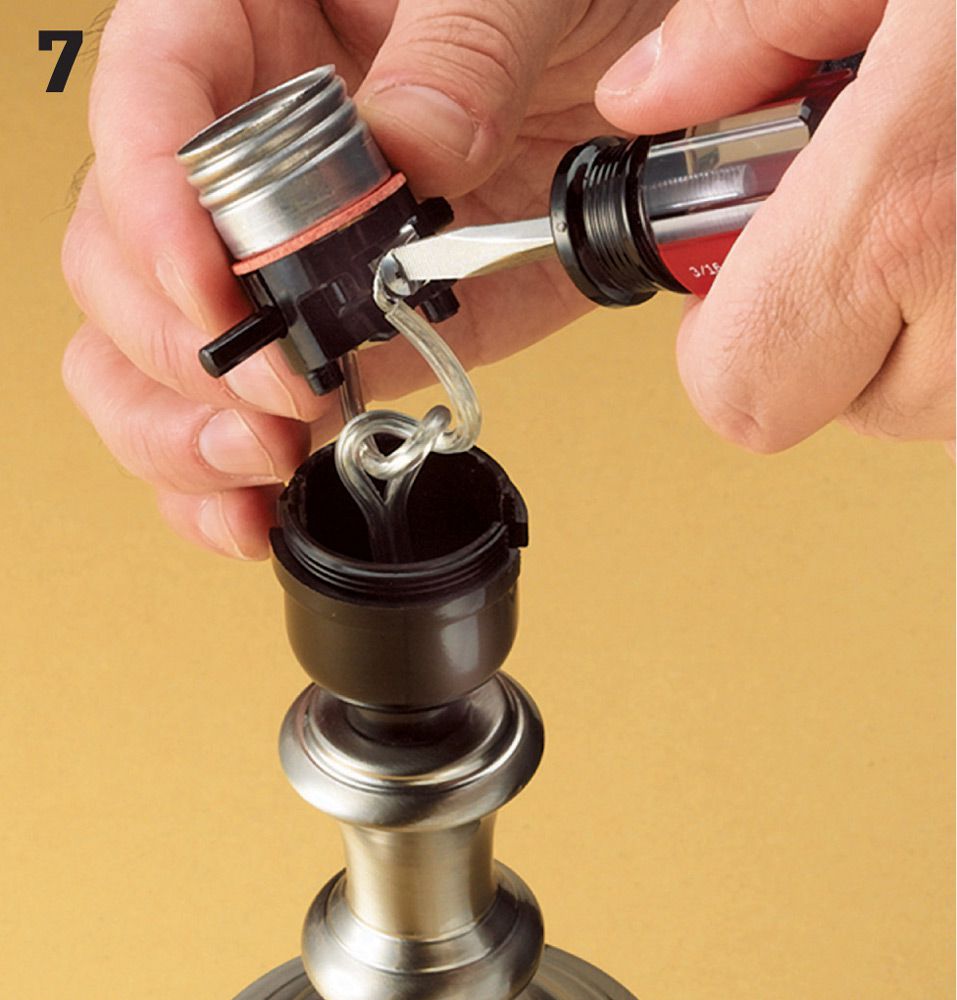
If there is room in the plug body, tie the individual wires in an underwriter’s knot to secure the plug to the cord (see photo, right).
Tools & Materials ![]()
Combination tool
Needlenose pliers
Screwdriver
Replacement plug
![]() How to Install a Quick-Connect Plug
How to Install a Quick-Connect Plug
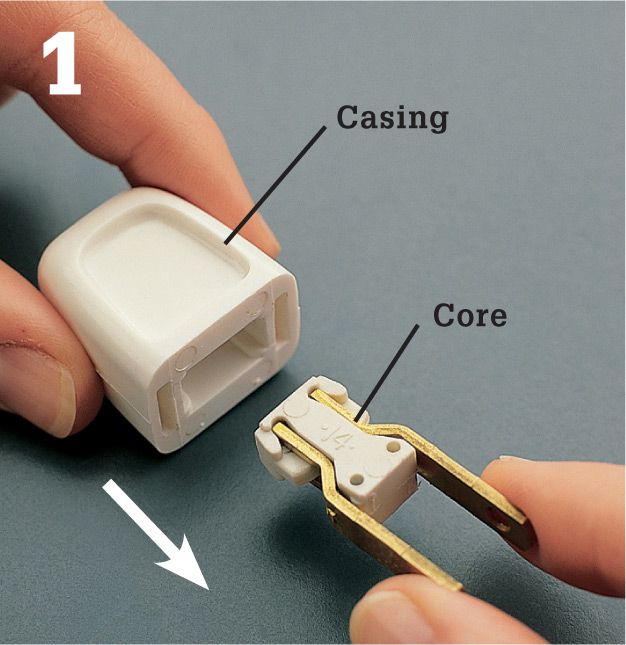
Squeeze the prongs of the new quick-connect plug together slightly, and pull the plug core from the casing. Cut the old plug from the flat-cord wire with a combination tool, leaving a clean cut end.
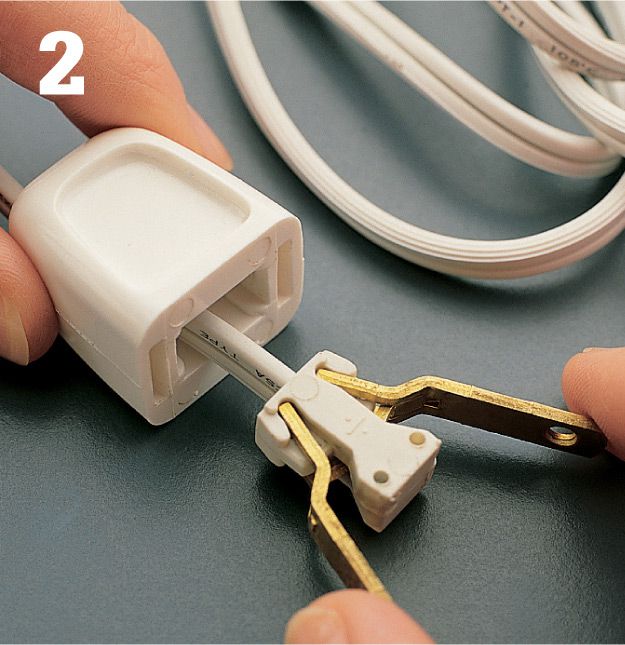
Feed unstripped wire through the rear of the plug casing. Spread the prongs, and then insert the wire into the opening in the rear of the core. Squeeze the prongs together; spikes inside the core penetrate the cord. Slide the casing over the core until it snaps into place.
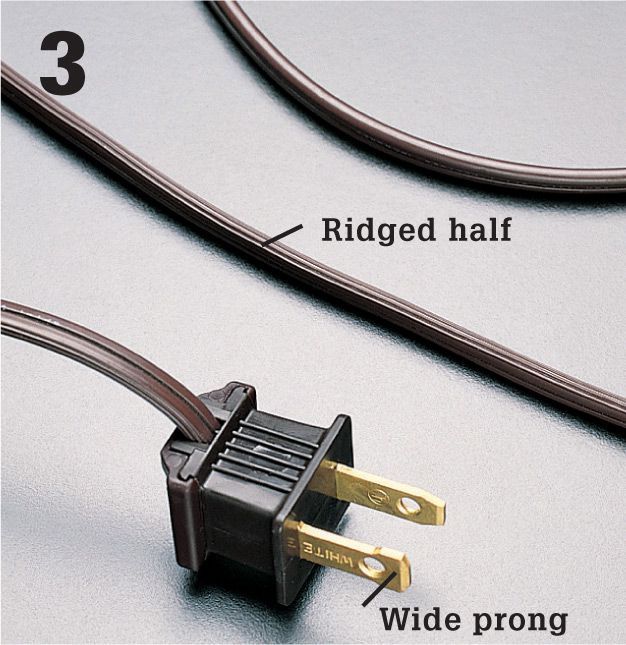
When replacing a polarized plug, make sure that the ridged half of the cord lines up with the wider (neutral) prong of the plug.
![]() How to Replace a Round-Cord Plug
How to Replace a Round-Cord Plug
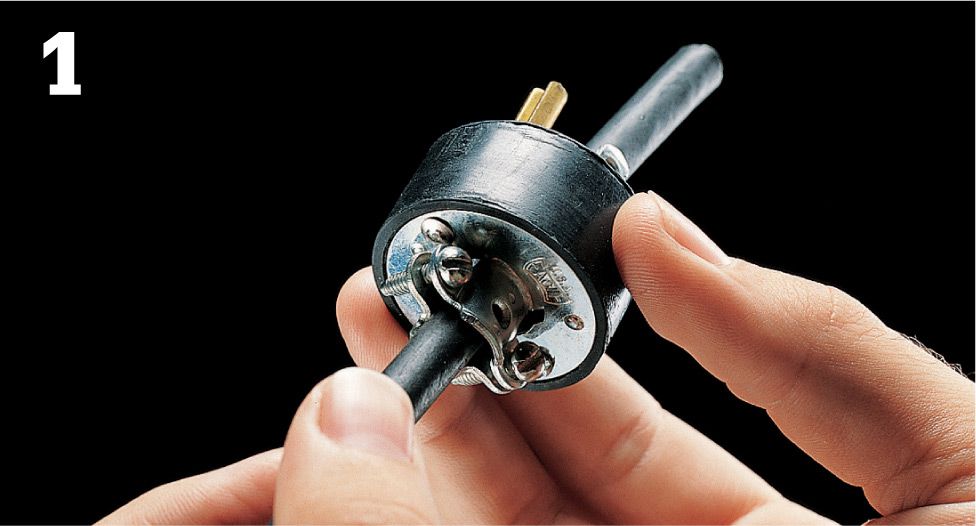
Cut off the round cord near the old plug using a combination tool. Remove the insulating faceplate on the new plug and feed the cord through the rear of the plug. Strip about 3" of outer insulation from the round cord. Strip 3/4" insulation from the individual wires.
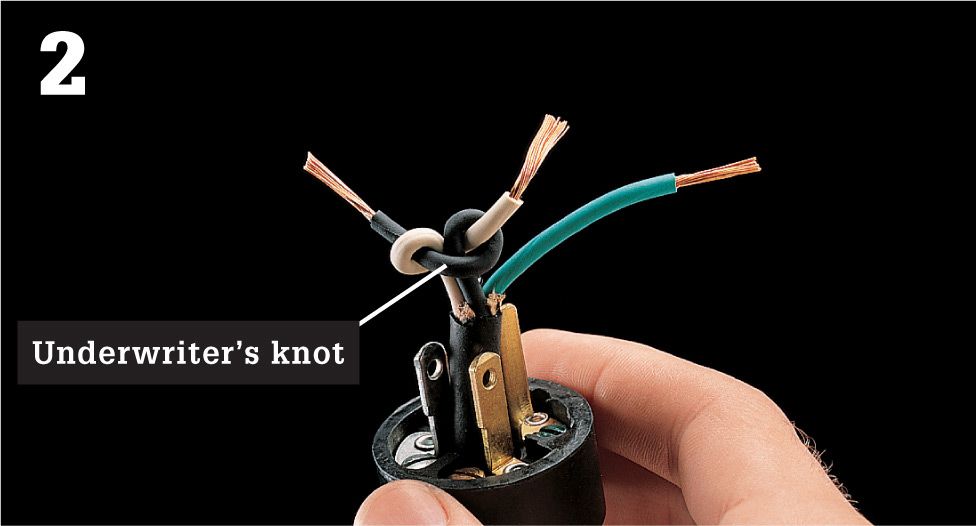
Tie an underwriter’s knot with the black and the white wires. Make sure the knot is located close to the edge of the stripped outer insulation. Pull the cord so that the knot slides into the plug body.
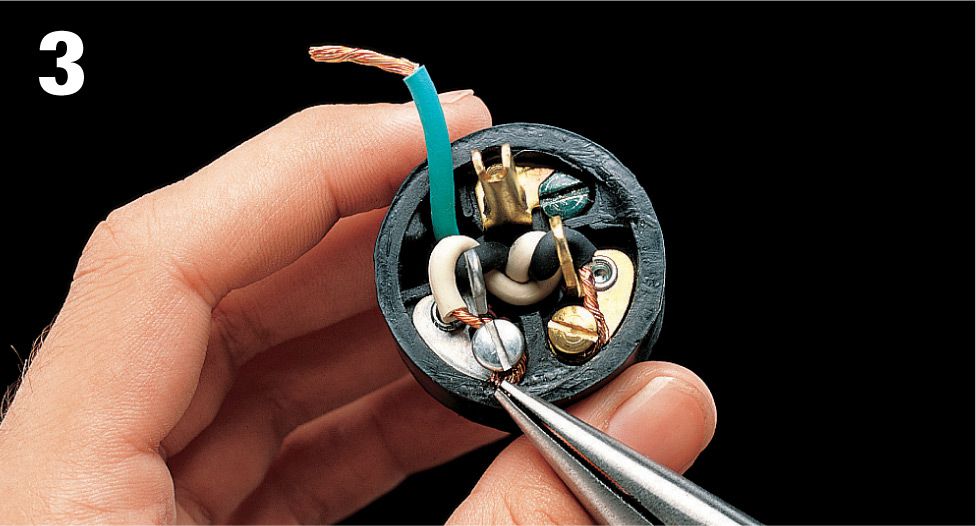
Hook the end of the black wire clockwise around the brass screw and the white wire around the silver screw. On a three-prong plug, attach the third wire to the grounding screw. If necessary, excess grounding wire can be cut away.
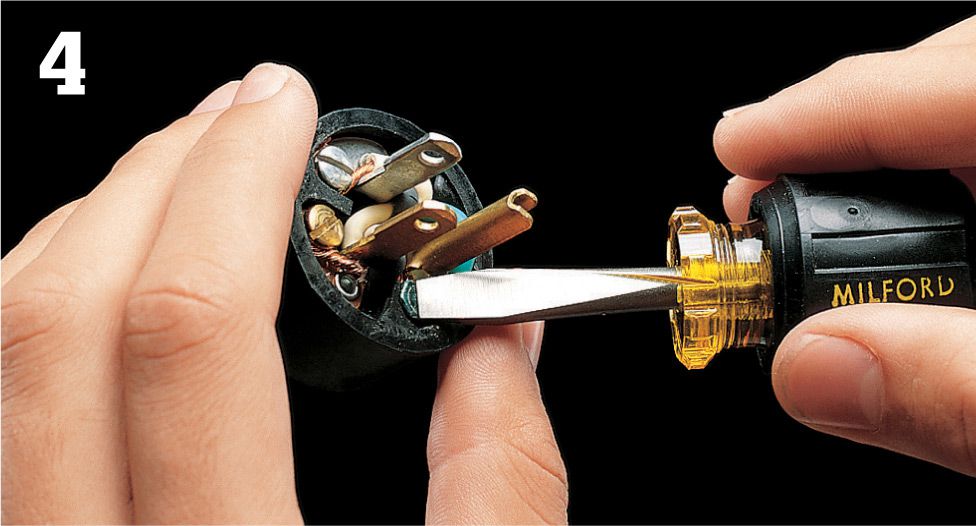
Tighten the screws securely, making sure the copper wires do not touch each other. Replace the insulating faceplate.
![]() How to Replace a Flat-Cord Plug
How to Replace a Flat-Cord Plug
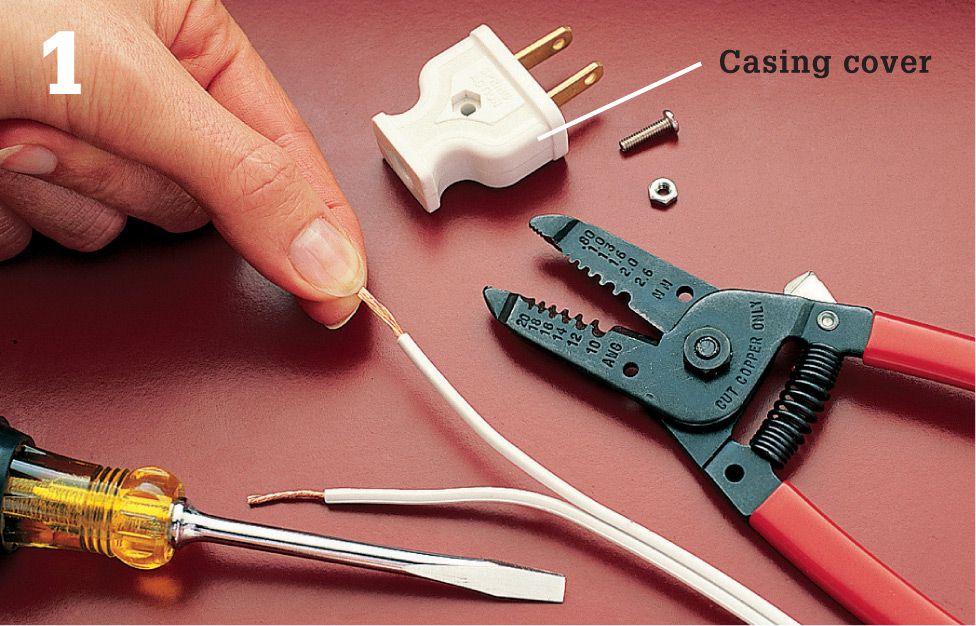
Cut the old plug from cord using a combination tool. Pull apart the two halves of the flat cord so that about 2" of wire are separated. Strip 3/4" insulation from each half. Remove the casing cover on the new plug.
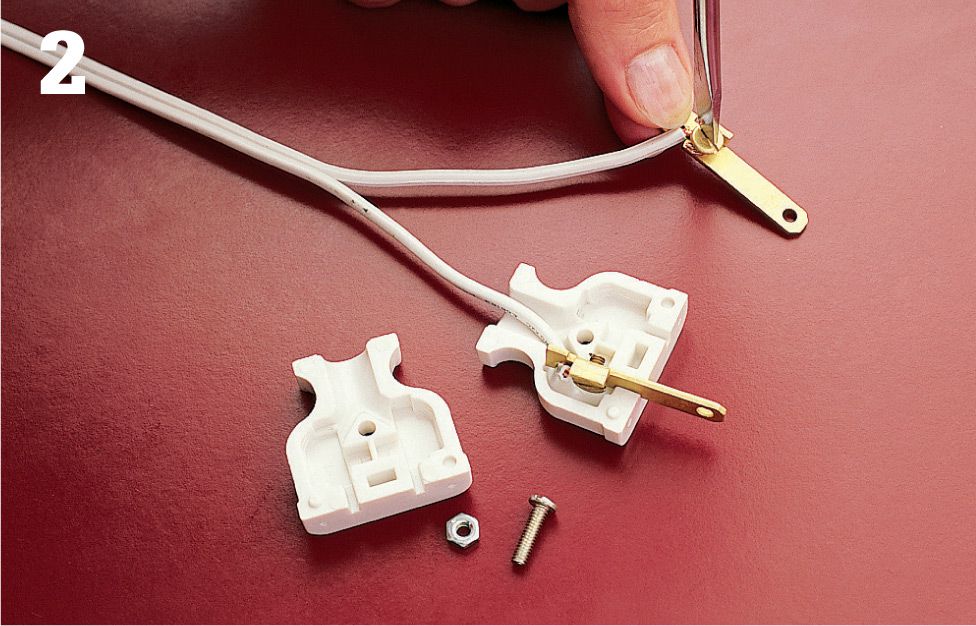
Hook the ends of the wires clockwise around the screw terminals, and tighten the screw terminals securely. Reassemble the plug casing. Some plugs may have an insulating faceplate that must be installed.
![]() How to Replace a Lamp Cord
How to Replace a Lamp Cord
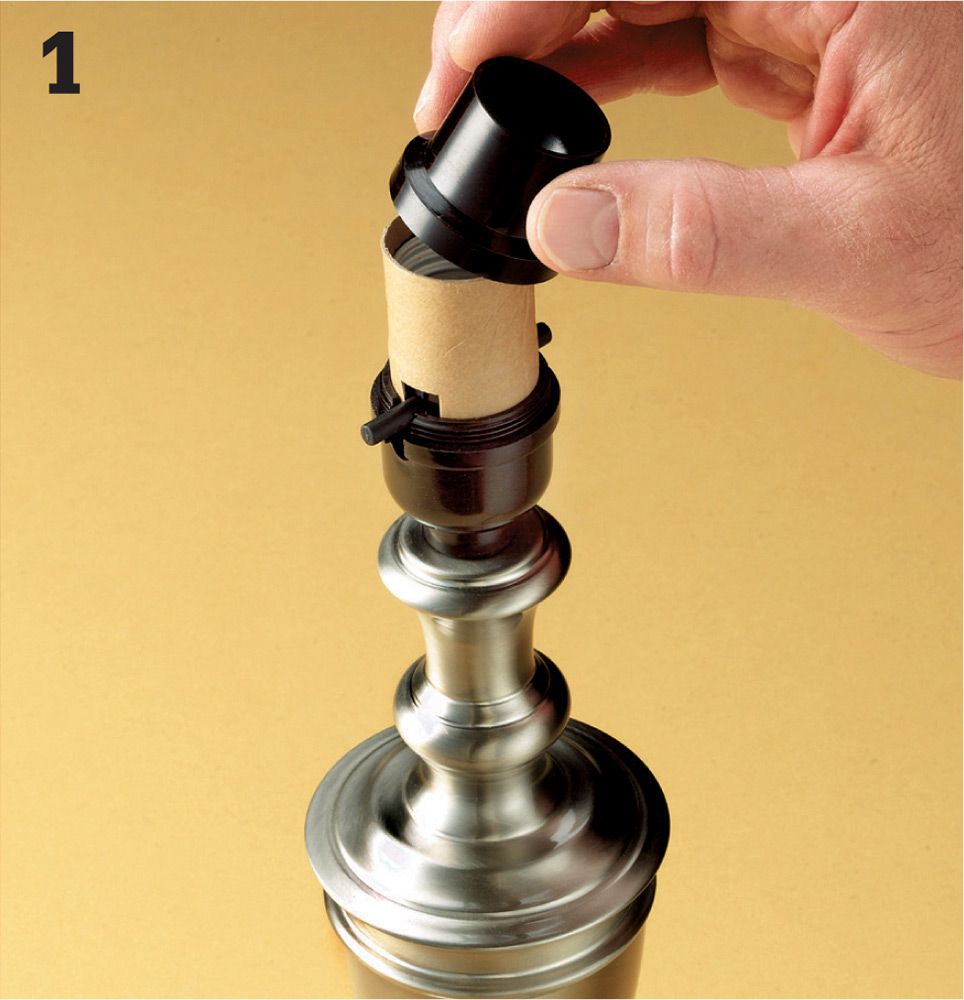
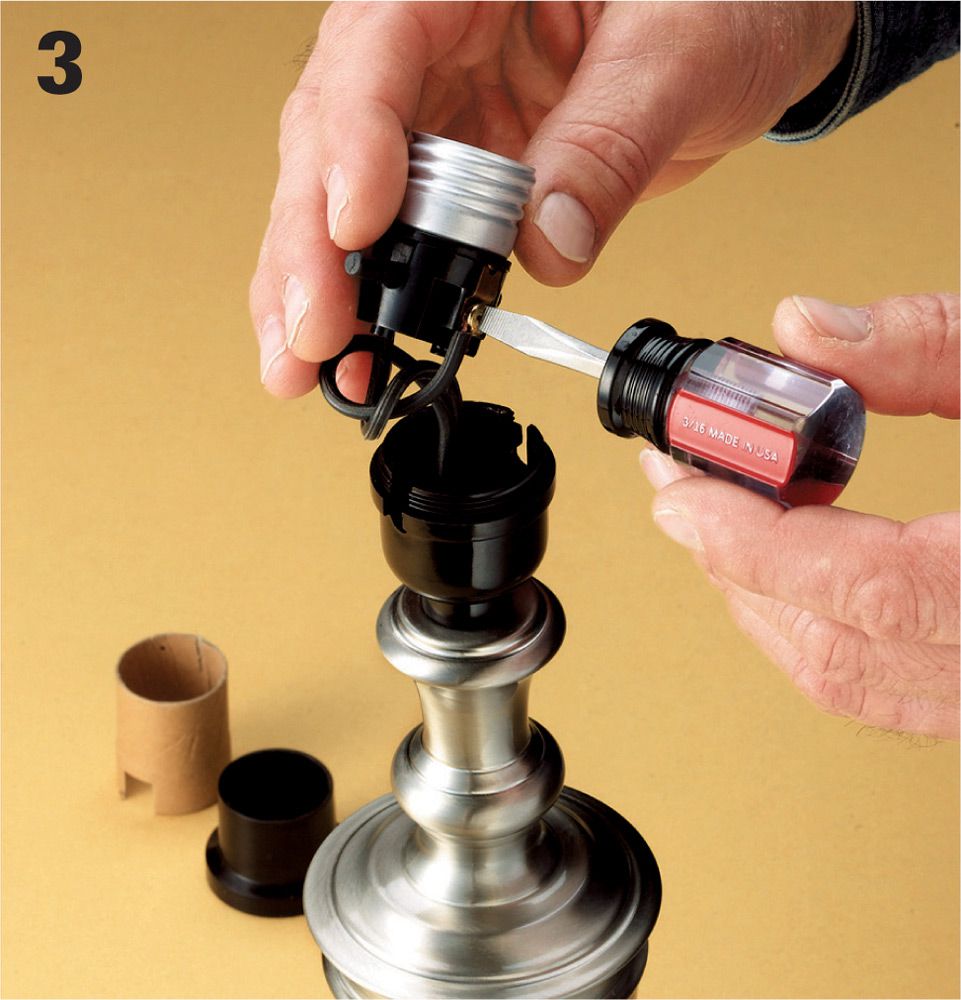
With the lamp unplugged, the shade off, and the bulb out, you can remove the socket. Squeeze the outer shell of the socket just above the base, and pull the shell out of the base. The shell is often marked “Press” at some point along its perimeter. Press there, and then pull.
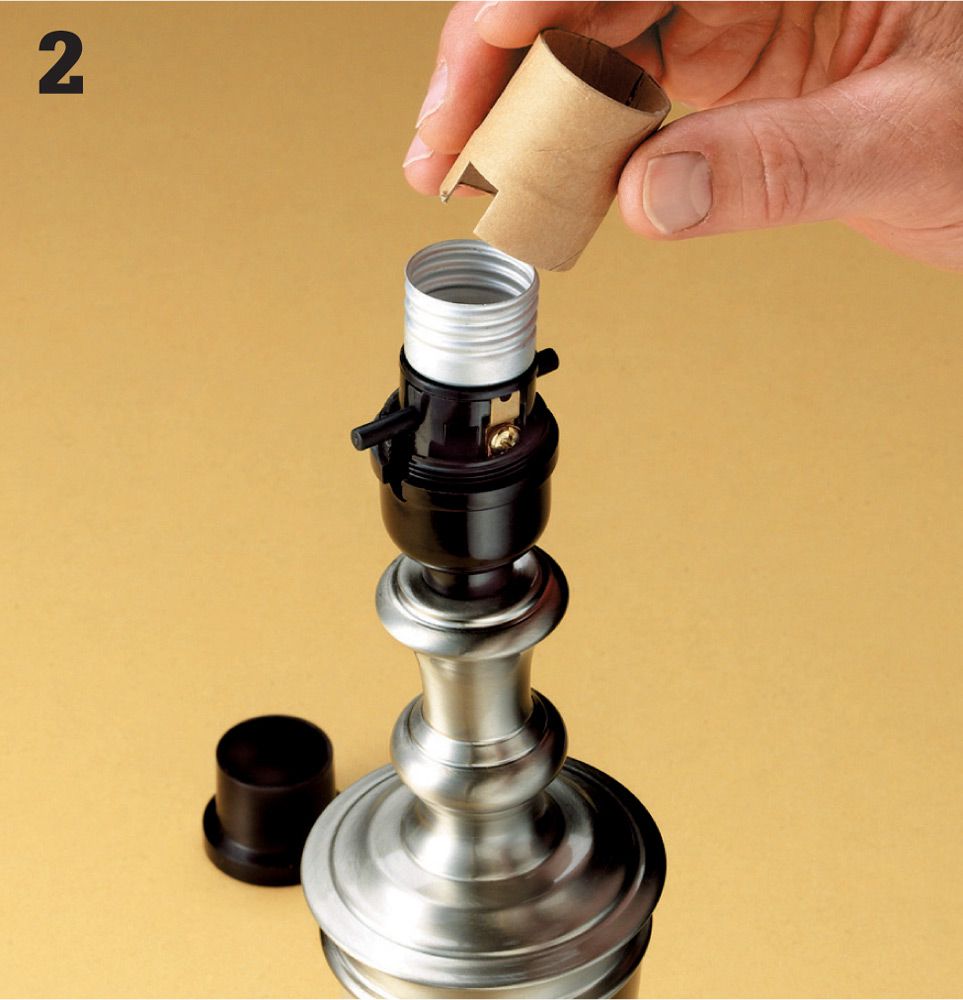
Under the outer shell there is a cardboard insulating sleeve. Pull this off and you’ll reveal the socket attached to the end of the cord.
With the shell and insulation set aside, pull the socket away from the lamp (it will still be connected to the cord). Unscrew the two screws to completely disconnect the socket from the cord. Set the socket aside with its shell (you’ll need them to reassemble the lamp).
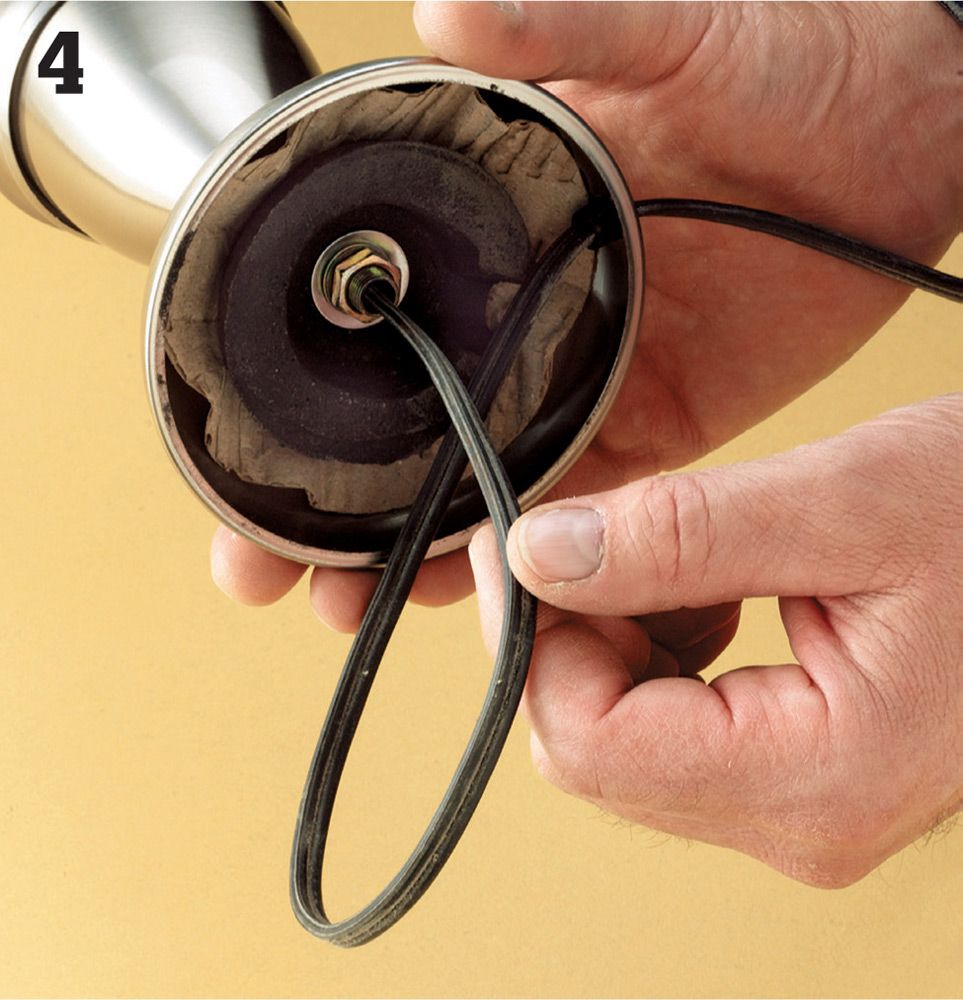
Remove the old cord from the lamp by grasping the cord near the base and pulling the cord through the lamp.
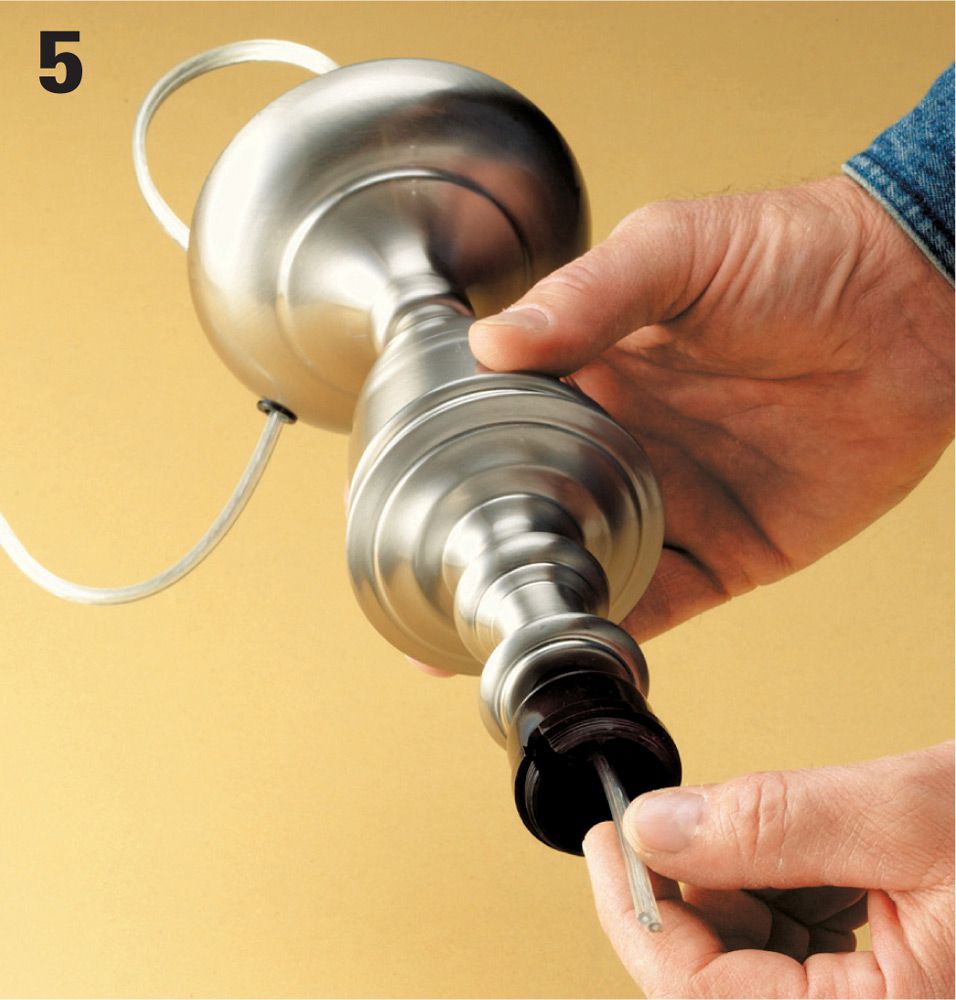
Bring your damaged cord to a hardware store or home center and purchase a similar cord set. (A cord set is simply a replacement cord with a plug already attached.) Snake the end of the cord up from the base of the lamp through the top so that about 3" of cord is visible above the top.
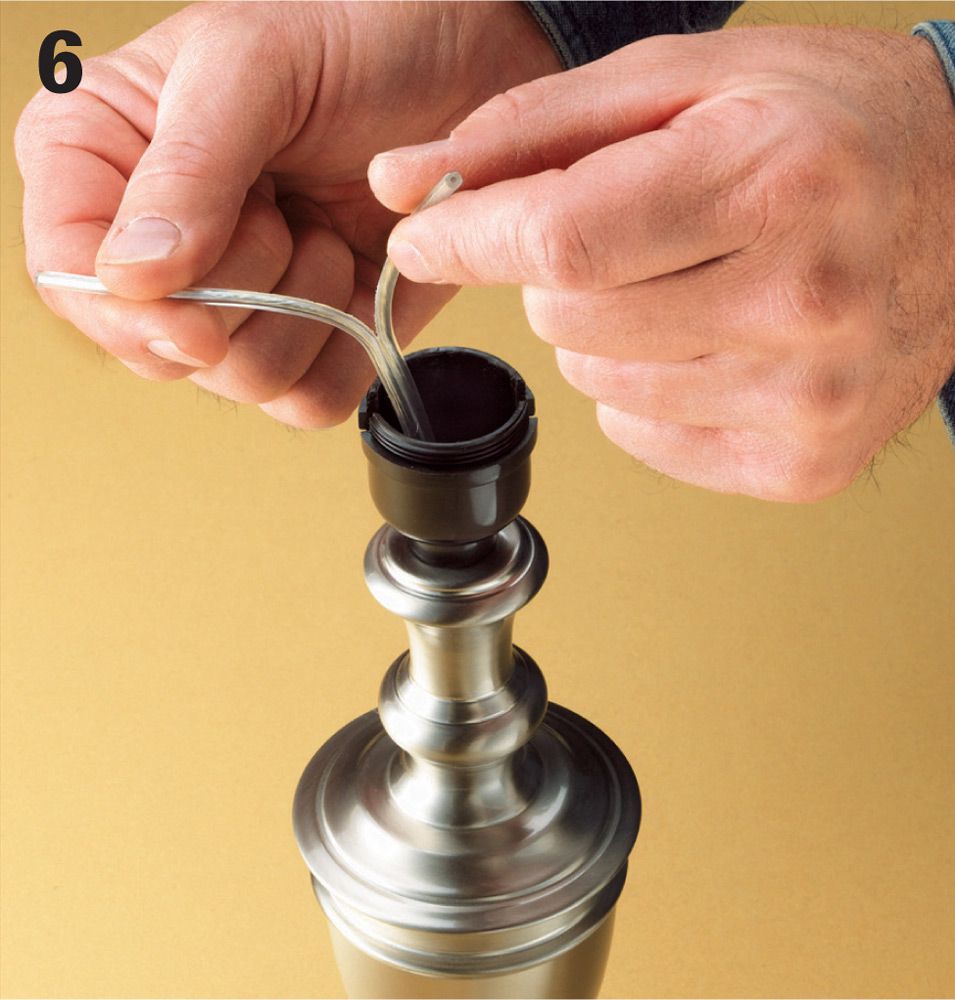
Carefully separate the two halves of the cord. If the halves won’t pull apart, you can carefully make a cut in the middle with a knife. Strip away about 3/4" of insulation from the end of each wire.
Connect the ends of the new cord to the two screws on the side of the socket (one of which will be silver in color, the other brass-colored). One half of the cord will have ribbing or markings along its length; wrap that wire clockwise around the silver screw, and tighten the screw. The other half of the cord will be smooth; wrap it around the copper screw, and tighten the screw.

Set the socket on the base. Make sure the switch isn’t blocked by the harp—the part that holds the shade on some lamps. Slide the cardboard insulating sleeve over the socket so the sleeve’s notch aligns with the switch. Now slide the outer sleeve over the socket, aligning the notch with the switch. It should snap into the base securely. Screw in a light bulb, plug the lamp in, and test it.
![]() Replacing a Lamp Socket
Replacing a Lamp Socket
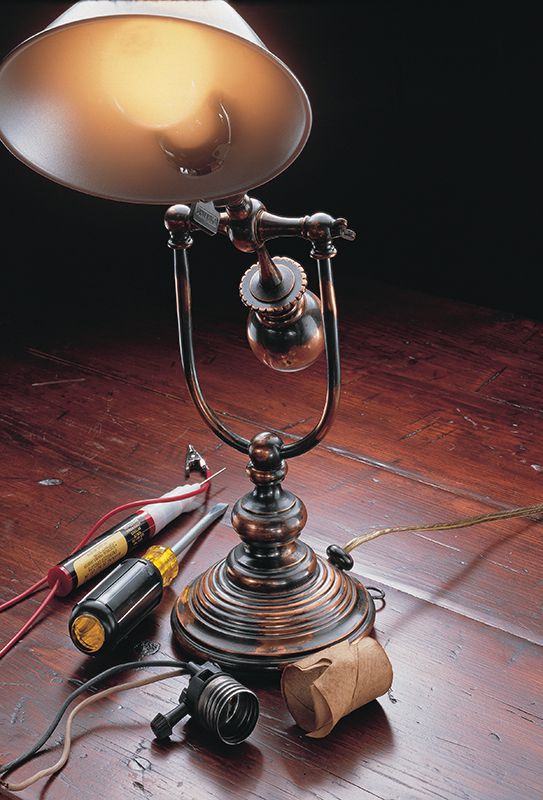
Next to the cord plug, the most common source of trouble in a lamp is a worn lightbulb socket. When a lamp socket assembly fails, the problem is usually with the socket-switch unit, although replacement sockets may include other parts you do not need.
Lamp failure is not always caused by a bad socket. You can avoid unnecessary repairs by checking the lamp cord, plug, and light bulb before replacing the socket.
Tools & Materials ![]()
Replacement socket
Continuity tester
Screwdriver
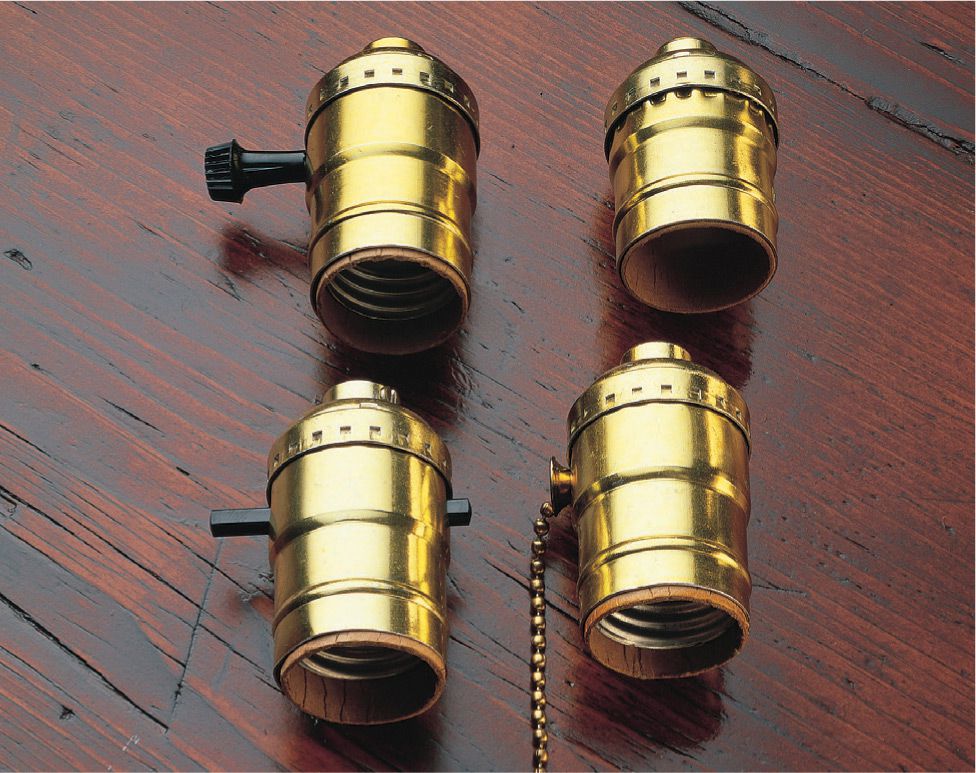
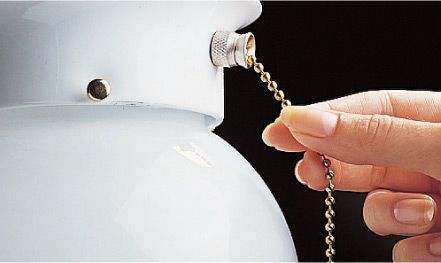
Socket-mounted switch types are usually interchangeable: choose a replacement you prefer. Clockwise from top left: twist knob, remote switch, pull chain, push lever.
Tip ![]()
When replacing a lamp socket, you can improve a standard ON-OFF lamp by installing a three-way socket.
![]() How to Repair or Replace a Lamp Socket
How to Repair or Replace a Lamp Socket
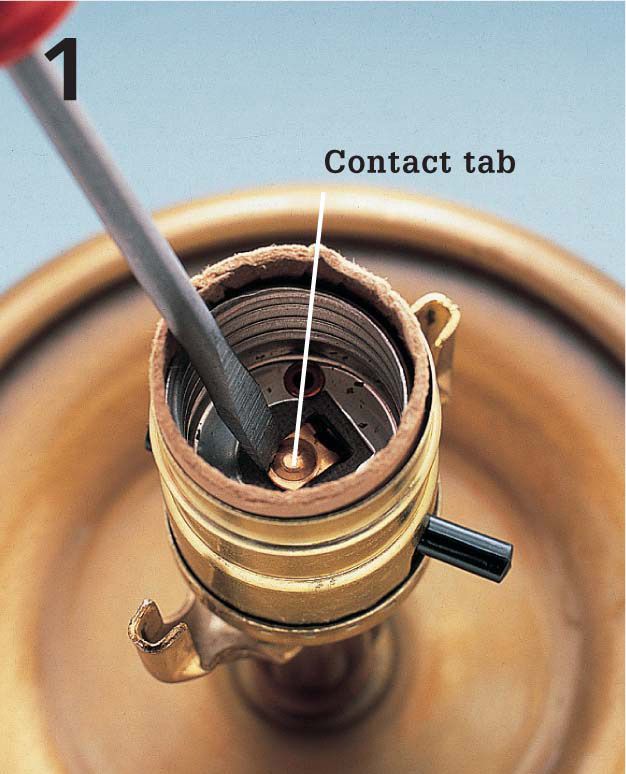
Unplug the lamp. Remove the shade, light bulb, and harp (shade bracket). Scrape the contact tab clean with a small screwdriver. Pry the contact tab up slightly if flattened inside the socket. Replace the bulb, plug in the lamp, and test. If the lamp does not work, unplug, remove the bulb, and continue with the next step.
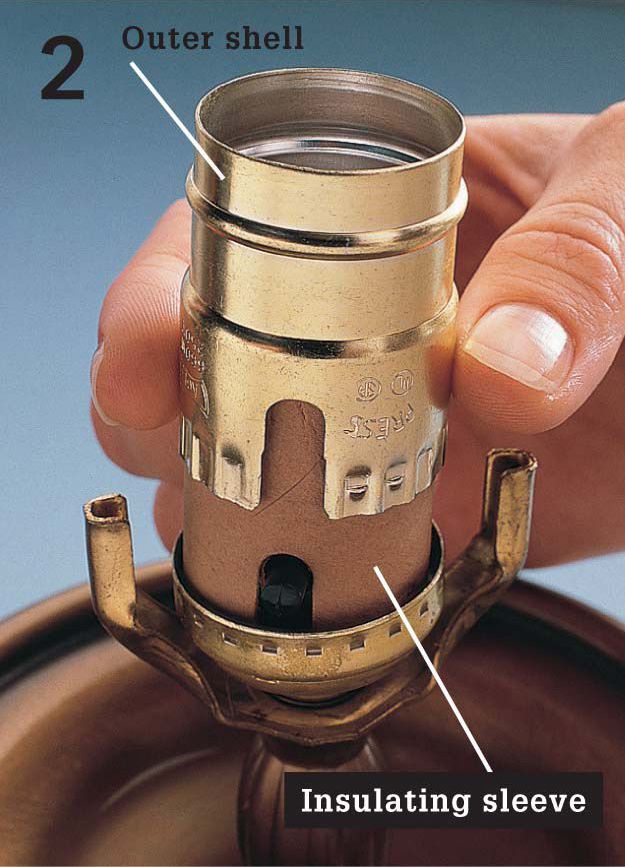
Squeeze the outer shell of the socket near the “Press” marking, and lift it off. On older lamps, the socket may be held by screws found at the base of the screw socket. Slip off the cardboard insulating sleeve. If the sleeve is damaged, replace the entire socket.
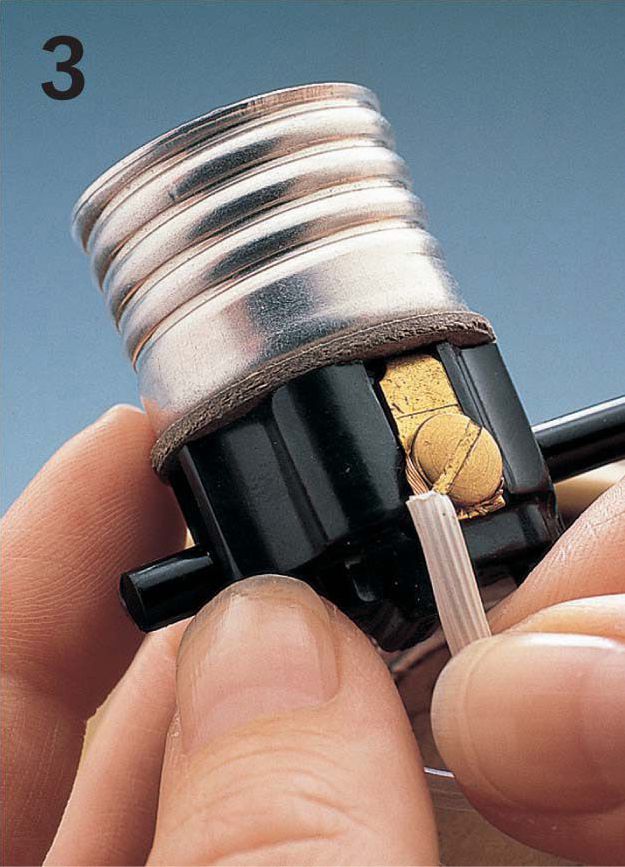
Check for loose wire connections on the screw terminals. Refasten any loose connections, and then reassemble the lamp, and test. If connections are not loose, remove the wires, lift out the socket, and continue with the next step.
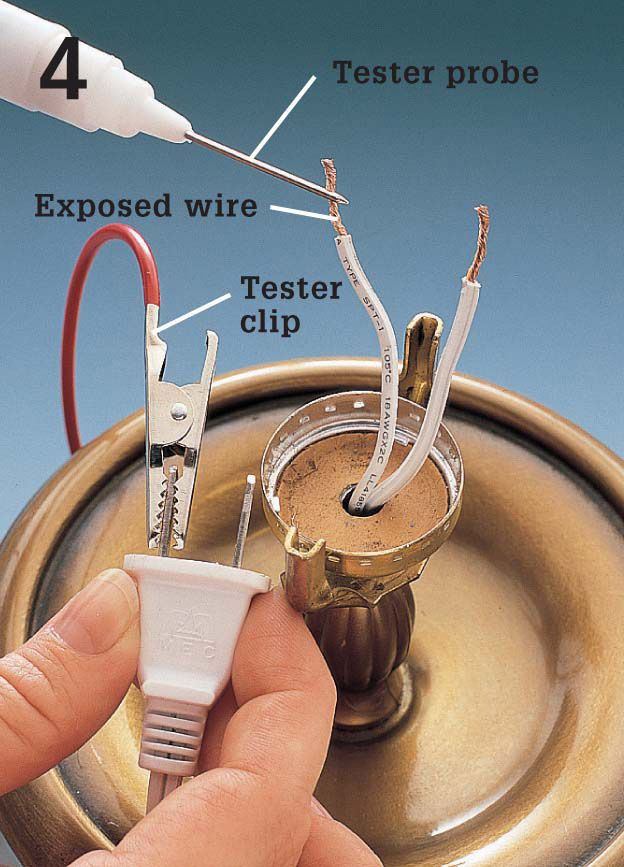
Test for lamp cord problems with a continuity tester. Place the clip of the tester on one prong of the plug. Touch the probe to one exposed wire, and then to the other wire. Repeat the test with the other prong of the plug. If the tester fails to light for either prong, then replace the cord and plug. Retest the lamp.
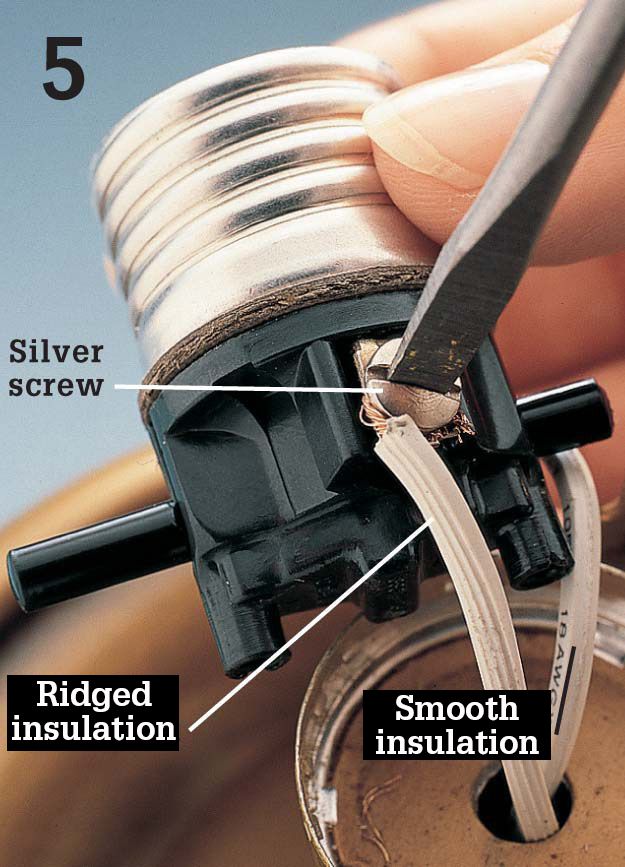
If cord and plug are functional, then choose a replacement socket marked with the same amp and volt ratings as the old socket. One half of flat-cord lamp wire is covered by insulation that is ridged or marked: attach this wire to the silver screw terminal. Connect the other wire to the brass screw.

Slide the insulating sleeve and outer shell over the socket so that the socket and screw terminals are fully covered and the switch fits into the sleeve slot. Press the socket assembly down into the cap until the socket locks into place. Replace the harp, light bulb, and shade.