Solar Power: The Ultimate Guide to Solar Power Energy and Lower Bills: (Off Grid Solar Power Systems, Home Solar Power System) - Mark Prentice, James Bickel (2016)
Book 1. 20 Hacks to Build Your Own Affordable Solar Power System
Chapter 5. Installing Your Solar System
Now we get to the meat of the project. Installing a solar power system can be done quickly and easily if you have purchased the right equipment and have the right tools on hand. For the most part, the installation phase is pretty straightforward.
However, you will need to be very organized so that the process runs smoothly. Each area has very specific guidelines and codes on the type of fasteners and rails you’ll need. If you don’t have the right ones you can easily derail your project until you can get the right ones.
The good news is that solar panels come with the manufacturer’s exact instructions on proper installation but below is a basic step-by-step guideline to follow.

Pre-Installation
When you receive your materials, make sure that you inspect them for any defects or incorrect orders. They should come complete with any wiring and conduit required for installation.
You want to measure the voltage for each of the panels in full sunlight to make sure that you’re getting the amount of power you’re expecting. If not, return it for the right panels. Once they are installed, you’ll have a lot more trouble removing them and making an exchange.
Make sure that all the required hardware is on hand. Most solar panels will come with the needed hardware but all suppliers are different. Everything should be in place before you start.
Store the panels in its original packaging until ready for installation.
Create a safety plan to protect yourself from accidents while on the roof. You will be in dangerous situations where anything can go wrong; even if you’re working at home, OSHA has very specific safety guidelines that must be followed.
Gather your tools. These are some of the things you might need:
Tape measure
Extension ladder
Chalk line
Ink marker
Hammer
Roofing bar
Shingle ripper
Utility knife
Cordless drill
Impact driver
Ratchet set
Caulk gun
Level
Lineman pliers
Crimping tool
Wire stripper
Screwdrivers
Hacksaw
Conduit bender
Multi-meter
A tool for pulling wire
Roofing sealant
Cap wire splices
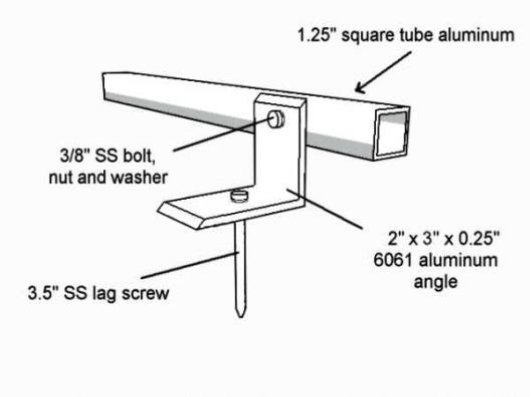
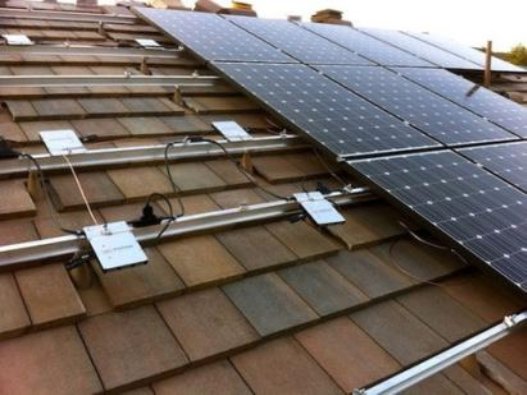
Install the Mounts and Rails
Begin by measuring and marking the exact area where you need to drill holes for the mounts. This will require a littlecalculating to make sure that your panels will fit in the space you’ve designated. You will need to mark the areas for the mid-clamps as well as the ends of each of the rails. If calculated correctly, you’ll know precisely where each rail will begin and end and the exact length of each row.
You may need to adjust your layout to get maximum efficiency. Solar panels are very sensitive and even the smallest amount of shade can affect its performance. Once the mounts are marked off, install them according to the manufacturers directions.
After the mounts are marked off, do the same for the rails. These sit on top of the mounts. Typically they will sit between 6 to 8 inches inward from one end of the module. You’ll have to refer to the product guidelines to know their exact placement.
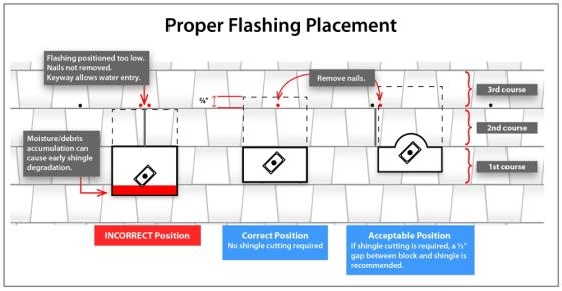
Flashings
Flashings are used to redirect water away from the screw holes made to mount the railings. Because you will have to cut away some of the shingles to install the rafter, flashings are needed to protect your roof from water seepage and possible damage later on.
Make sure that you caulk the back side of the flashing and around any holes you drilled.

Install the Racking and Grounding Wire
Next, splice the rails together to get your desired length. If the rails are too long, you can cut them down to size with a hacksaw. There will be very specific manufacturer’s instructions on how to ensure that you get the exact measurements you need.
The grounding wire can then be connected from one rail to the next until you reach the junction box.
Micro Inverters
Start by inserting the mid-clamps to hold the panels in place on the rails. Once these are secured then you can install the wire clips. Make sure you use the right clamps and clips so that there is no risk of the panels slipping out of place.
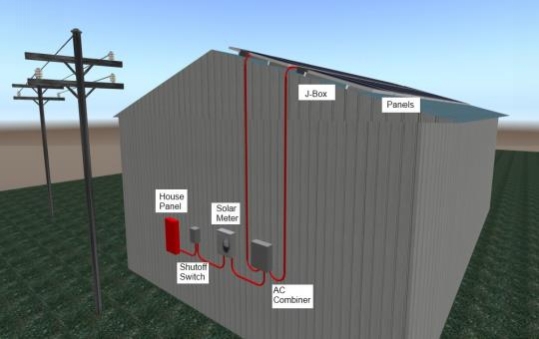
Inverter and Junction Box
Your inverter and junction box should be located somewhere between the solar panels and the electrical panel for your home. Ideally, the junction box will be situated very close to the panels and the inverter will be somewhere near the main power box. This is the time when you will install any other electrical components that may come with your system.
Conduit
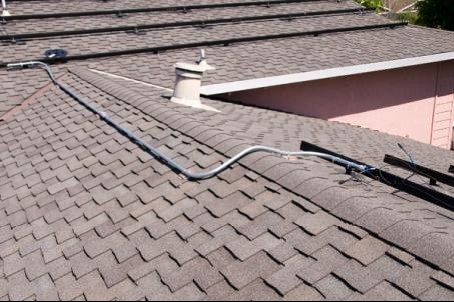
In solar power systems, all the wiring runs from the panels to the junction box. Once they leave the junction box on the way to the main service panel and the inverter, they need to be inside a conduit. Conduit that runs along the rooftop needs to run several inches above the roof so you will have to install lifts and mounts to carry it.

Wiring
At this point, all the equipment and materials are installed and you now need to run the wiring and make all the electrical connections. Start from the furthest point from the junction box. The best approach to this is to use fish tape and a wire pulling device. Pass through all the panels and connect at either the central inverter (for larger systems) and ending at the main service panel.
While you may be perfectly capable of connecting the wiring yourself, it is strongly recommended that you use a qualified electrician to make sure everything is connected as it should be.
Monitoring Gear
This step is needed when using micro-inverters or a monitoring system. It will allow you to program it so you can monitor your solar system and its performance on a regular basis.
Testing
Your final step is to test your system to make sure there are no problems. You want to open your power flow one area at a time. Powering your system up all at once could lead to major problems if there is a mistake in wiring somewhere. It’s worth paying the extra money to have a professional electrician check each connection thoroughly before you put your system into full force.