Solar Power: The Ultimate Guide to Solar Power Energy and Lower Bills: (Off Grid Solar Power Systems, Home Solar Power System) - Mark Prentice, James Bickel (2016)
Book 2. Proven Methods To Build Your Own Solar Power System That You Can Afford
Chapter 2. How to Construct your Own Solar Power System
Solar Power System Ideas
Ok folks! This is the point in this book in which we get to the really fun part! We are going to learn how to construct our own solar powered electric system! I’m not going to pretend that this isn’t a major DIY but there are also a lot of options out there.
From using refurbished cells to using our own homemade solar power cells fashioned out of other—let’s just say—less than orthodox materials, nowadays there are a lot of DIY solar designs and ideas.
It used to be that those old $1000 dollar double sided solar panels slapped on your roof was the holy grail of environmental and energy efficient achievement.
But now we’ve found ways to leapfrog completely over this standard model with our own DIY engineering, and it is fully attainable for you to create your own solar power system for next to nothing at all. The first thing that we are going to look into in this, are rejected and so-called blemished solar cells.
Buying Slightly Damaged and Second Hand Solar Cells
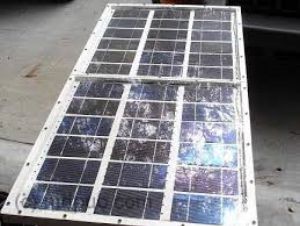
While new untouched cells may cost you a lot of money, these supposed damaged solar cells can often enough be bought extremely cheap. And when we say damaged, please note, that is just a disclaimer.
Because unless someone took a sledge hammer to these cells and then purposefully tried to scrape all of the silicon off of its surface, even with chips and cracks these cells still serve their fundamental purpose and absorb heat.
It’s just that commercial sales demands the companies that make them to only deliver pristine, absolutely perfect products without blemish, so even the most minor of flaws will cause them to dump their product at a steep discount. At this point then, you must be wondering, how do you buy solar cells?
The most likely place to look for solar cells, especially blemished or slightly damaged cells, is always going to be online.
Evergreen Solar is a good company to look into, and so is wholesale dealer www.wholesalesolar.com. You can also get a hold of these discount solar cells at online retail giants such as EBay and Amazon.
But to be honest guys, all you really have to do is search Google and you are bound to find someone wanting to sell slightly damaged solar cells. Just make sure you buy what’s right for you and what it is that you want to do.
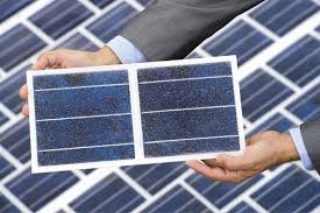
Personally, for most of my DIY solar power projects I resort to using the classic mono-crystalline square cells and to make sure I have enough for a finished product I usually make sure I get a hold of at least 30 solar cells. Because running at half a volt per solar cell, even with just 30 of them, with this setup you will be averaging about 15 volts of power to your DCB (Deep Cycle Battery).
Creating Your Solar Panel Housing
After obtaining your solar cells the next thing you should do is work on constructing your solar panel itself. You see, this is the big distinction; between solar cells and solar panels. Before I ever started building my own DIY solar power systems I didn’t understand the difference. I thought solar panels and cells were all the same thing; all the same shiny little squares that collect sunshine right? And I am assuming that many of you out there are under the same exact impression.
But as it turns out, the solar panel itself is not the solar cells; the solar panel is simply the construct that houses them. At its most basic level a solar panel is just a large box shaped platform on which you can affix your solar cells.
It is then these solar cells that absorb the solar radiation that is converted to energy. Solar panels can be made out of metal, wood, and even plastic. The easiest (and most stress free) kind of material to use for your solar panels however is always going to be a nice solid piece of wood.
So get a hold of some plywood that’s at least 1/8 of an inch thick with a raised border, inside a 3/3 wooden base. Next, find yourself a good piece of pegboard to put down inside this base.
Remember pegboard? It’s the stuff that people used to actually peg stuff on? You know—with thumbtacks and sticky notes—and all that? Basically the old fashioned version of a message board! Not so much in vogue nowadays but the material works well for an intermediate surface on which to place your panels.
So just get a big old fashioned piece of pegboard and cut out just enough of the material so that it fits in nice and snug into your 3/3 base. Now just seal the deal with some wood working glue and let your pegboard dry to the rest of the solar panel structure.
Once this is established you can then move on to your actual solar cells for the unit. Carefully take out one of your solar sells and affix a good (heat resistant) glue to the back of it.
Installing Solar Cells and Wiring
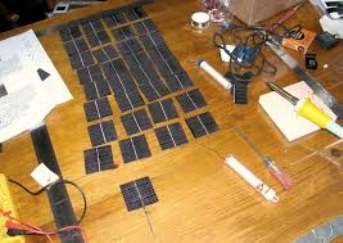
Now simply place this solar cell in the far left, bottom corner of your pegboard, inside your solar panel. All you have to do is simply repeat this pattern until that row is finished and then move on to the row directly above, and continue the process until the solar panel is completely covered with your 30 solar cells.
Just let your glue dry and the main task of solar cell installation is complete.
With your solar cells firmly attached you will have to move on to the next major stage of your DIY Solar Power System construction; the wiring. If any mention of having to wire something electronically makes you run for the hills, don’t worry.
I can assure you that wiring up your solar panel will not be that difficult for you to achieve. I’m by no means an electrician myself, yet certain basic, fundamental principles are easily understood.
You can begin by drilling a hole in your panel’s side. Take your woodworking glue and drop a small amount down into the bottom of the hole. Now you are going to take out your first wire and guide it through this hole until it presses to the bottom and allow the other end of your wiring to run up our panel’s base.
After you have done this, you can then take the other end of the wire and attach what is called a “two pin” plug. This is the piece of the puzzle that will connect directly to your DCB. Your solar panel is now ready to be put into the sunlight and begin charging. Congratulations on constructing your very own DIY Solar Power System!