The Car Hacker's Handbook: A Guide for the Penetration Tester - Craig Smith (2016)
Chapter 3. VEHICLE COMMUNICATION WITH SOCKETCAN
When you begin using a CAN for vehicle communications, you may well find it to be a hodgepodge of different drivers and software utilities. The ideal would be to unify the CAN tools and their different interfaces into a common interface so we could easily share information between tools.
Luckily, there’s a set of tools with a common interface, and it’s free! If you have Linux or install Linux on a virtual machine (VM), you already have this interface. The interface, called SocketCAN, was created on the Open Source development site BerliOS in 2006. Today, the term SocketCAN is used to refer to the implementation of CAN drivers as network devices, like Ethernet cards, and to describe application access to the CAN bus via the network socket-programming interface. In this chapter we’ll set up SocketCAN so that we’re more easily able to communicate with the vehicle.
Volkswagen Group Research contributed the original SocketCAN implementation, which supports built-in CAN chips and card drivers, external USB and serial CAN devices, and virtual CAN devices. The can-utils package provides several applications and tools to interact with the CAN network devices, CAN-specific protocols, and the ability to set up a virtual CAN environment. In order to test many of the examples in this book, install a recent version in a Linux VM on your system. The newest versions of Ubuntu have can-utils in their standard repositories.
SocketCAN ties into the Linux networking stack, which makes it very easy to create tools to support CAN. SocketCAN applications can use standard C socket calls with a custom network protocol family, PF_CAN. This functionality allows the kernel to handle CAN device drivers and to interface with existing networking hardware to provide a common interface and user-space utilities.
Figure 3-1 compares the implementation of traditional CAN software with that of a unified SocketCAN.
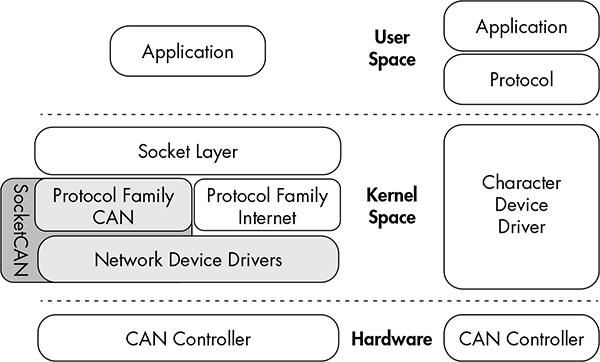
Figure 3-1: SocketCAN layout (left) and traditional CAN software (right)
With traditional CAN software, the application has its own protocol that typically talks to a character device, like a serial driver, and then the actual hardware driver. On the left of the figure, SocketCAN is implemented in the Linux kernel. By creating its own CAN protocol family, SocketCAN can integrate with the existing network device drivers, thus enabling applications to treat a CAN bus interface as if it’s a generic network interface.
Setting Up can-utils to Connect to CAN Devices
In order to install can-utils, you must be running a Linux distribution from 2008 or later or one running the 2.6.25 Linux kernel or higher. First we’ll install can-utils, then cover how to configure it for your particular setup.
Installing can-utils
You should be able to use your package manager to install can-utils. Here’s a Debian/Ubuntu example:
$ sudo apt-get install can-utils
If you don’t have can-utils in your package manager, install it from source with the git command:
$ git clone https://github.com/linux-can/can-utils
As of this writing, can-utils has configure, make, and make install files, but in older versions, you’d just enter make to install from source.
Configuring Built-In Chipsets
The next step depends on your hardware. If you’re looking for a CAN sniffer, you should check the list of supported Linux drivers to ensure your device is compatible. As of this writing, the Linux built-in CAN drivers support the following chipsets:
✵ Atmel AT91SAM SoCs
✵ Bosch CC770
✵ ESD CAN-PCI/331 cards
✵ Freescale FlexCAN
✵ Freescale MPC52xx SoCs (MSCAN)
✵ Intel AN82527
✵ Microchip MCP251x
✵ NXP (Philips) SJA1000
✵ TI’s SoCs
CAN controllers, like the SJA1000, are usually built into ISA, PCI, and PCMCIA cards or other embedded hardware. For example, the EMS PCMCIA card driver implements access to its SJA1000 chip. When you insert the EMS PCMCIA card into a laptop, the ems_pcmcia module loads into the kernel, which then requires the sja1000 module and the can_dev module to be loaded. The can_dev module provides standard configuration interfaces—for example, for setting bit rates for the CAN controllers.
The Linux kernel’s modular concept also applies to CAN hardware drivers that attach CAN controllers via bus hardware, such as the kvaser_pci, peak_pci, and so on. When you plug in a supported device, these modules should automatically load, and you should see them when you enter the lsmod command. USB drivers, like usb8dev, usually implement a proprietary USB communication protocol and, therefore, do not load a CAN controller driver.
For example, when you plug in a PEAK-System PCAN-USB adapter, the can_dev module loads and the peak_usb module finalizes its initialization. Using the display message command dmesg, you should see output similar to this:
$ dmesg
--snip --
[ 8603.743057] CAN device driver interface
[ 8603.748745] peak_usb 3-2:1.0: PEAK-System PCAN-USB adapter hwrev 28 serial
FFFFFFFF (1 channel)
[ 8603.749554] peak_usb 3-2:1.0 can0: attached to PCAN-USB channel 0 (device
255)
[ 8603.749664] usbcore: registered new interface driver peak_usb
You can verify the interface loaded properly with ifconfig and ensure a can0 interface is now present:
$ ifconfig can0
can0 Link encap:UNSPEC HWaddr 00-00-00-00-00-00-00-00-00-00-00-00-00-00-00-00
UP RUNNING NOARP MTU:16 Metric:1
RX packets:0 errors:0 dropped:0 overruns:0 frame:0
TX packets:0 errors:0 dropped:0 overruns:0 carrier:0
collisions:0 txqueuelen:10
RX bytes:0 (0.0 B) TX bytes:0 (0.0 B)
Now set the CAN bus speed. (You’ll find more information on bus speeds in Chapter 5.) The key component you need to set is the bit rate. This is the speed of the bus. A typical value for high-speed CAN (HS-CAN) is 500Kbps. Values of 250Kbps or 125Kbps are typical for lower-speed CAN buses.
$ sudo ip link set can0 type can bitrate 500000
$ sudo ip link set up can0
Once you bring up the can0 device, you should be able to use the tools from can-utils on this interface. Linux uses netlink to communicate between the kernel and user-space tools. You can access netlink with the ip link command. To see all the netlink options, enter the following:
$ ip link set can0 type can help
If you begin to see odd behavior, such as a lack of packet captures and packet errors, the interface may have stopped. If you’re working with an external device, just unplug or reset. If the device is internal, run these commands to reset it:
$ sudo ip link set canX type can restart-ms 100
$ sudo ip link set canX type can restart
Configuring Serial CAN Devices
External CAN devices usually communicate via serial. In fact, even USB devices on a vehicle often communicate through a serial interface—typically an FTDI chip from Future Technology Devices International, Ltd.
The following devices are known to work with SocketCAN:
✵ Any device that supports the LAWICEL protocol
✵ CAN232/CANUSB serial adapters (http://www.can232.com/)
✵ VSCOM USB-to-serial adapter (http://www.vscom.de/usb-to-can.htm)
✵ CANtact (http://cantact.io)
NOTE
If you’re using an Arduino or building your own sniffer, you must implement the LAWICEL protocol—also known as the SLCAN protocol—in your firmware in order for your device to work. For details, seehttp://www.can232.com/docs/canusb_manual.pdf and https://github.com/linux-can/can-misc/blob/master/docs/SLCAN-API.pdf.
In order to use one of the USB-to-serial adapters, you must first initialize both the serial hardware and the baud rate on the CAN bus:
$ slcand -o -s6 -t hw -S 3000000 /dev/ttyUSB0
$ ip link set up slcan0
The slcand daemon provides the interface needed to translate serial communication to the network driver, slcan0. The following options can be passed to slcand:
-o Opens the device
-s6 Sets the CAN bus baud rate and speed (see Table 3-1)
-t hw Specifies the serial flow control, either HW (hardware) or SW (software)
-S 3000000 Sets the serial baud, or bit rate, speed
/dev/ttyUSB0 Your USB FTDI device
Table 3-1 lists the numbers passed to -s and the corresponding baud rates.
Table 3-1: Numbers and Corresponding Baud Rates
|
Number |
Baud |
|
0 |
10Kbps |
|
1 |
20Kbps |
|
2 |
50Kbps |
|
3 |
100Kbps |
|
4 |
125Kbps |
|
5 |
250Kbps |
|
6 |
500Kbps |
|
7 |
800Kbps |
|
8 |
1Mbps |
As you can see, entering -s6 prepares the device to communicate with a 500Kbps CAN bus network.
With these options set, you should now have an slcan0 device. To confirm, enter the following:
$ ifconfig slcan0
slcan0 Link encap:UNSPEC HWaddr 00-00-00-00-00-00-00-00-00-00-00-00-00-00-00-00
NOARP MTU:16 Metric:1
RX packets:0 errors:0 dropped:0 overruns:0 frame:0
TX packets:0 errors:0 dropped:0 overruns:0 carrier:0
collisions:0 txqueuelen:10
RX bytes:0 (0.0 B) TX bytes:0 (0.0 B)
Most of the information returned by ifconfig is set to generic default values, which may be all 0s. This is normal. We’re simply making sure that we can see the device with ifconfig. If we see an slcan0 device, we know that we should be able to use our tools to communicate over serial with the CAN controller.
NOTE
At this point, it may be good to see whether your physical sniffer device has additional lights. Often a CAN sniffer will have green and red lights to signify that it can communicate correctly with the CAN bus. Your CAN device must be plugged in to your computer and the vehicle in order for these lights to function properly. Not all devices have these lights. (Check your device’s manual.)
Setting Up a Virtual CAN Network
If you don’t have CAN hardware to play with, fear not. You can set up a virtual CAN network for testing. To do so, simply load the vcan module.
$ modprobe vcan
If you check dmesg, you shouldn’t see much more than a message like this:
$ dmesg
[604882.283392] vcan: Virtual CAN interface driver
Now you just set up the interface as discussed in “Configuring Built-In Chipsets” on page 37 but without specifying a baud rate for the virtual interface.
$ ip link add dev vcan0 type vcan
$ ip link set up vcan0
To verify your setup, enter the following:
$ ifconfig vcan0
vcan0 Link encap:UNSPEC HWaddr 00-00-00-00-00-00-00-00-00-00-00-00-00-00-00-00
UP RUNNING NOARP MTU:16 Metric:1
RX packets:0 errors:0 dropped:0 overruns:0 frame:0
TX packets:0 errors:0 dropped:0 overruns:0 carrier:0
collisions:0 txqueuelen:0
RX bytes:0 (0.0 B) TX bytes:0 (0.0 B)
As long as you see a vcan0 in the output, you’re ready to go.
The CAN Utilities Suite
With our CAN device up and running, let’s take a high-level look at the can-utils. They’re listed and described briefly here; we’ll use them throughout the book, and we’ll explore them in greater detail as we use them.
asc2log This tool parses ASCII CAN dumps in the following form into a standard SocketCAN logfile format:
0.002367 1 390x Rx d 8 17 00 14 00 C0 00 08 00
bcmserver Jan-Niklas Meier’s proof-of-concept (PoC) broadcast manager server takes commands like the following:
vcan1 A 1 0 123 8 11 22 33 44 55 66 77 88
By default, it listens on port 28600. It can be used to handle some busy work when dealing with repetitive CAN messages.
canbusload This tool determines which ID is most responsible for putting the most traffic on the bus and takes the following arguments:
interface@bitrate
You can specify as many interfaces as you like and have canbusload display a bar graph of the worst bandwidth offenders.
can-calc-bit-timing This command calculates the bit rate and the appropriate register values for each CAN chipset supported by the kernel.
candump This utility dumps CAN packets. It can also take filters and log packets.
canfdtest This tool performs send and receive tests over two CAN buses.
cangen This command generates CAN packets and can transmit them at set intervals. It can also generate random packets.
cangw This tool manages gateways between different CAN buses and can also filter and modify packets before forwarding them on to the next bus.
canlogserver This utility listens on port 28700 (by default) for CAN packets and logs them in standard format to stdout.
canplayer This command replays packets saved in the standard SocketCAN “compact” format.
cansend This tool sends a single CAN frame to the network.
cansniffer This interactive sniffer groups packets by ID and highlights changed bytes.
isotpdump This tool dumps ISO-TP CAN packets, which are explained in “Sending Data with ISO-TP and CAN” on page 55.
isotprecv This utility receives ISO-TP CAN packets and outputs to stdout.
isotpsend This command sends ISO-TP CAN packets that are piped in from stdin.
isotpserver This tool implements TCP/IP bridging to ISO-TP and accepts data packets in the format 1122334455667788.
isotpsniffer This interactive sniffer is like cansniffer but designed for ISO-TP packets.
isotptun This utility creates a network tunnel over the CAN network.
log2asc This tool converts from standard compact format to the following ASCII format:
0.002367 1 390x Rx d 8 17 00 14 00 C0 00 08 00
log2long This command converts from standard compact format to a user readable format.
slcan_attach This is a command line tool for serial-line CAN devices.
slcand This daemon handles serial-line CAN devices.
slcanpty This tool creates a Linux psuedoterminal interface (PTY) to communicate with a serial-based CAN interface.
Installing Additional Kernel Modules
Some of the more advanced and experimental commands, such as the ISO-TP-based ones, require you to install additional kernel modules, such as can-isotp, before they can be used. As of this writing, these additional modules haven’t been included with the standard Linux kernels, and you’ll likely have to compile them separately. You can grab the additional CAN kernel modules like this:
$ git clone https://gitorious.org/linux-can/can-modules.git
$ cd can-modules/net/can
$ sudo ./make_isotp.sh
Once make finishes, it should create a can-isotp.ko file.
If you run make in the root folder of the repository, it’ll try to compile some out-of-sync modules, so it’s best to compile only the module that you need in the current directory. To load the newly compiled can-isotp.ko module, run insmod:
# sudo insmod ./can-isotp.ko
dmesg should show that it loaded properly:
$ dmesg
[830053.381705] can: isotp protocol (rev 20141116 alpha)
NOTE
Once the ISO-TP driver has proven to be stable, it should be moved into the stable kernel branch in Linux. Depending on when you’re reading this, it may already have been moved, so be sure to check whether it’s already installed before compiling your own.
The can-isotp.ko Module
The can-isotp.ko module is a CAN protocol implementation inside the Linux network layer that requires the system to load the can.ko core module. The can.ko module provides the network layer infrastructure for all in-kernel CAN protocol implementations, like can_raw.ko, can_bcm.ko, and can-gw.ko. If it’s working correctly, you should see this output in response to the following command:
# sudo insmod ./can-isotp.ko
[830053.374734] can: controller area network core (rev 20120528 abi 9)
[830053.374746] NET: Registered protocol family 29
[830053.376897] can: netlink gateway (rev 20130117) max_hops=1
When can.ko is not loaded, you get the following:
# sudo insmod ./can-isotp.ko
insmod: ERROR: could not insert module ./can-isotp.ko: Unknown symbol in
module
If you’ve forgotten to attach your CAN device or load the CAN kernel module, this is the strange error message you’ll see. If you were to enter dmesg for more information, you’d see a series of missing symbols referenced in the error messages.
$ dmesg
[830760.460054] can_isotp: Unknown symbol can_rx_unregister (err 0)
[830760.460134] can_isotp: Unknown symbol can_proto_register (err 0)
[830760.460186] can_isotp: Unknown symbol can_send (err 0)
[830760.460220] can_isotp: Unknown symbol can_ioctl (err 0)
[830760.460311] can_isotp: Unknown symbol can_proto_unregister (err 0)
[830760.460345] can_isotp: Unknown symbol can_rx_register (err 0)
The dmesg output shows a lot of Unknown symbol messages, especially around can_x methods. (Ignore the (err 0) messages.) These messages tell us that the _isotop module can’t find methods related to standard CAN functions. These messages indicate that you need to load the can.ko module. Once loaded, everything should work fine.
Coding SocketCAN Applications
While can-utils is very robust, you’ll find that you want to write custom tools to perform specific actions. (If you’re not a developer, you may want to skip this section.)
Connecting to the CAN Socket
In order to write your own utilities, you first need to connect to the CAN socket. Connecting to a CAN socket on Linux is the same as connecting to any networking socket that you might know from TCP/IP network programming. The following shows C code that’s specific to CAN as well as the minimum required code to connect to a CAN socket. This code snippet will bind to can0 as a raw CAN socket.
int s;
struct sockaddr_can addr;
struct ifreq ifr;
s = socket(PF_CAN, SOCK_RAW, CAN_RAW);
strcpy(ifr.ifr_name, "can0");
ioctl(s, SIOCGIFINDEX, &ifr);
addr.can_family = AF_CAN;
addr.can_ifindex = ifr.ifr_ifindex;
bind(s, (struct sockaddr *)&addr, sizeof(addr));
Let’s dissect the sections that are specific to CAN:
s = socket(PF_CAN, SOCK_RAW, CAN_RAW);
This line specifies the protocol family, PF_CAN, and defines the socket as CAN_RAW. You can also use CAN_BCM if you plan on making a broadcast manager (BCM) service. A BCM service is a more complex structure that can monitor for byte changes and the queue of cyclic CAN packet transmissions.
These two lines name the interface:
strcpy(ifr.ifr_name, "can0");
ioctl(s, SIOCGIFINDEX, &ifr);
These lines set up the CAN family for sockaddr and then bind to the socket, allowing you to read packets off the network:
addr.can_family = AF_CAN;
addr.can_ifindex = ifr.ifr_ifindex;
Setting Up the CAN Frame
Next we want to setup the CAN frame and read the bytes off the CAN network into our newly defined structure:
struct can_frame frame;
nbytes = read(s, &frame, sizeof(struct can_frame));
The can_frame is defined in linux/can.h as:
struct can_frame {
canid_t can_id; /* 32 bit CAN_ID + EFF/RTR/ERR flags */
__u8 can_dlc; /* frame payload length in byte (0 .. 8) */
__u8 data[8] __attribute__((aligned(8)));
};
Writing to the CAN network is just like the read command but in reverse. Simple, eh?
The Procfs Interface
The SocketCAN network-layer modules implement a procfs interface as well. Having access to information in proc can make bash scripting easier and also provide a quick way to see what the kernel is doing. You’ll find the provided network-layer information in /proc/net/can/ and /proc/net/can-bcm/. You can see a list of hooks into the CAN receiver by searching the rcvlist_all file with cat:
$ cat /proc/net/can/rcvlist_all
receive list 'rx_all':
(vcan3: no entry)
(vcan2: no entry)
(vcan1: no entry)
device can_id can_mask function userdata matches ident
vcan0 000 00000000 f88e6370 f6c6f400 0 raw
(any: no entry)
Some other useful procfs files include the following:
stats CAN network-layer stats
reset_stats Resets the stats (for example, for measurements)
version SocketCAN version
You can limit the maximum length of transmitted packets in proc:
$ echo 1000 > /sys/class/net/can0/tx_queue_len
Set this value to whatever you feel will be the maximum packet length for your application. You typically won’t need to change this value, but if you find that you’re having throttling issues, you may want to fiddle with it.
The Socketcand Daemon
Socketcand (https://github.com/dschanoeh/socketcand) provides a network interface into a CAN network. Although it doesn’t include can-utils, it can still be very useful, especially when developing an application in a programming language like Go that can’t set the CAN low-level socket options described in this chapter.
Socketcand includes a full protocol to control its interaction with the CAN bus. For example, you can send the following line to socketcand to open a loopback interface:
< can0 C listen_only loopback three_samples >
The protocol for socketcand is essentially the same as that of Jan-Niklas Meier’s BCM server mentioned earlier; it’s actually a fork of the BCM server. (Socketcand, however, is a bit more robust than the BCM server.)
Kayak
Kayak (http://kayak.2codeornot2code.org/), a Java-based GUI for CAN diagnostics and monitoring (see Figure 3-2), is one of the best tools for use with socketcand. Kayak links with OpenStreetMaps for mapping and can handle CAN definitions. As a Java-based application, it’s platform independent, so it leans on socketcand to handle communication to the CAN transceivers.
You can download a binary package for Kayak or compile from source. In order to compile Kayak, install the latest version of Apache Maven, and clone the Kayak git repository (git://github.com/dschanoeh/Kayak). Once the clone is complete, run the following:
$ mvn clean package
You should find your binary in the Kayak/application/target/kayak/bin folder.
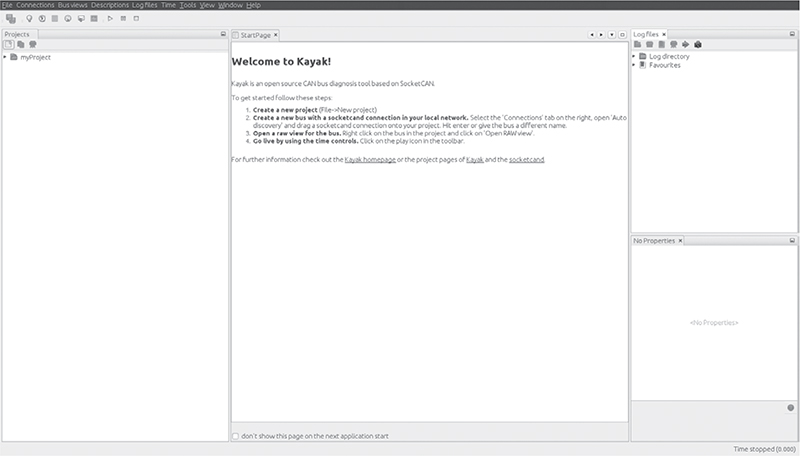
Figure 3-2: The Kayak GUI
Before you launch Kayak, start socketcand:
$ socketcand -i can0
NOTE
You can attach as many CAN devices as you want to socketcand, separated by commas.
Next, start Kayak and take the following steps:
1. Create a new project with CTRL-N and give it a name.
2. Right-click the project and choose Newbus; then, give your bus a name (see Figure 3-3).
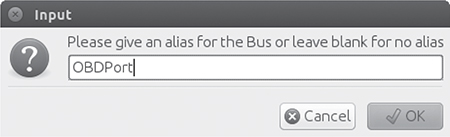
Figure 3-3: Creating a name for the CAN bus
3. Click the Connections tab at the right; your socketcand should show up under Auto Discovery (see Figure 3-4).
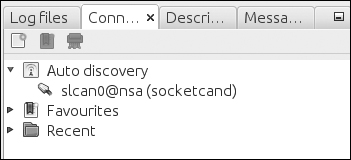
Figure 3-4: Finding Auto Discovery under the Connections tab
4. Drag the socketcand connection to the bus connection. (The bus connection should say Connection: None before it’s set up.) To see the bus, you may have to expand it by clicking the drop-down arrow next to the bus name, as shown in Figure 3-5.
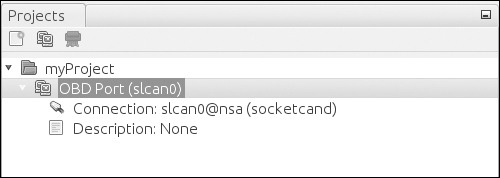
Figure 3-5: Setting up the bus connection
5. Right-click the bus and choose Open RAW view.
6. Press the play button (circled in Figure 3-6); you should start to see packets from the CAN bus.

Figure 3-6: Open RAW view and press the play button to see packets from the CAN bus.
7. Choose Colorize from the toolbar to make it easier to see and read the changing packets.
Kayak can easily record and play back packet capture sessions, and it supports CAN definitions (stored in an open KDC format). As of this writing, the GUI doesn’t support creating definitions, but I’ll show how to create definitions later.
Kayak is a great open source tool that can work on any platform. In addition, it has a friendly GUI with advanced features that allow you to define the CAN packets you see and view them graphically.
Summary
In this chapter, you learned how to use SocketCAN as a unified interface for CAN devices and how to set up your device and apply the appropriate bit rate for your CAN bus. I reviewed all of the default CAN utilities in the can-utils package that come with SocketCAN support, and I showed you how to write low-level C code to directly interface with the CAN sockets. Finally, you learned how to use socketcand to allow remote interaction with your CAN devices and set up Kayak to work with socketcand. Now that you’ve set up communication with your vehicle, you’re just about ready to try out some attacks.